Table of Contents for
Gaming Hacks
 Gaming Hacks
Published by
O'Reilly Media, Inc., 2004
Gaming Hacks
Published by
O'Reilly Media, Inc., 2004
- Cover
- Gaming Hacks
- Credits
- Contributors
- Acknowledgments
- Foreword
- Preface
- How to Use This Book
- How This Book Is Organized
- Conventions Used in This Book
- Using Code Examples
- Comments and Questions
- Got a Hack?
- 1. Playing Classic Games
- Legal Emulation
- Play Commodore 64 Games Without the C-64
- Play Atari ROMs Without the Atari
- Use Atari Paddles with Your PC
- Run Homebrew Games on the Atari 2600
- Create Your Own Atari 2600 Homebrew Games
- Play Classic PC Graphic Adventures
- Play Old Games Through DOSBox
- Play Reissued All-in-One Joystick Games
- Play Arcade Games Without the Arcade
- Add and Manipulate a MAME Frontend
- Keep Your ROMs Tidy and Organized
- Learn Game-Specific MAME Controls
- Filter Inappropriate MAME ROMs
- Autoboot into MAME Heaven
- Play Emulated Arcade Games Online
- Play Classic Pinball Without the Table
- Emulate the SNES on the Dreamcast
- 2. Playing Portably
- Play Games on Your iPod
- Mod Your Game Boy
- Take and Print Photos with Your Game Boy
- Compose Music on Your Game Boy
- Explore the GP32 Handheld Gaming System
- Take Your Console with You
- Explore the Bandai WonderSwan
- Play Real Games on Your PDA
- Install a PlayStation 2 in Your Car
- 3. Playing Well with Others
- Practice Proper MMORPG Etiquette
- Understand MMORPG Lingo
- Grind Without Going Crazy
- Make a Profit in Vana’diel
- Write MMORPG Macros
- Build an Effective Group
- Catch Half-Life FPS Cheaters Redhanded
- 4. Playing with Hardware
- Build a Quiet, Killer Gaming Rig
- Find and Configure the Best FPS Peripherals
- Adapt Old Video Game Controllers to the PC
- Choose the Right Audio/Video Receiver
- Place Your Speakers Properly
- Connect Your Console to Your Home Theater
- Tune Console Video Output
- Tune Your TV for Console Video
- PC Audio Hacking
- Optimize PC Video Performance
- Build a Dedicated Multimedia PC
- Use a Multimedia Projector for Gaming
- 5. Playing with Console and Arcade Hardware
- Play LAN-Only Console Games Online
- Hack the Nuon DVD Player/Gaming System
- Play Import Games on American Consoles
- Find a Hackable Dreamcast
- Play Movies and Music on Your Dreamcast
- Hack the Dreamcast Visual Memory Unit
- Unblur Your Dreamcast Video
- Use Your Dreamcast Online
- Host Dreamcast Games Online
- Burn Dreamcast-Compatible Discs on Your PC
- Burn Dreamcast Homebrew Discs
- Buy Your Own Arcade Hardware
- Configure Your Arcade Controls, Connectors, and Cartridges
- Reorient and Align Your Arcade Monitor
- Buy Cart-Based JAMMA Boards
- Programming Music for the Nintendo Entertainment System
- 6. Playing Around the Game Engine
- Explore Machinima
- Choose a Machinima Engine
- Film Your First Machinima Movie
- Improve Your Camera Control
- Record Game Footage to Video
- Speedrun Your Way Through Metroid Prime
- Sequence-Break Quake
- Run Classic Game ROM Translations
- Change Games with ROM Hacks
- Apply ROM Hacks and Patches
- Create PS2 Cheat Codes
- Hack Xbox Game Saves
- Cheat on Other Consoles
- Modify PC Game Saves and Settings
- Buff Your Saved Characters
- Create Console Game Levels
- 7. Playing Your Own Games
- Adventure Game Studio Editing Tips
- Create and Play Pinball Tables
- Put Your Face in DOOM
- Create a Vehicle Model for Unreal Tournament 2004
- Add a Vehicle to Unreal Tournament 2004
- Modify the Behavior of a UT2004 Model
- Download, Compile, and Create an Inform Adventure
- Decorate Your IF Rooms
- Add Puzzles to Your IF Games
- Add Nonplayer Characters to IF Adventures
- Make Your IF NPCs Move
- Make Your IF NPCs Talk
- Create Your Own Animations
- Add Interactivity to Your Animations
- Write a Game in an Afternoon
- 8. Playing Everything Else
- Tweak Your Tactics for FPS Glory
- Beat Any Shoot-Em-Up
- Drive a Physics-Crazed Motorcycle
- Play Japanese Games Without Speaking Japanese
- Back Up, Modify, and Restore PlayStation Saved Games
- Access Your Console’s Memory Card Offline
- Overclock Your Console
- Index
- Colophon
Fun things you can do with Nintendo’s playful printer and camera peripherals.
Nintendo comes up with some cool geek toys. Many of them are in wide circulation right now, particularly the Game Boy Advance and the GameCube. Some of their older gems are still well worth buying to hack, exploit, and otherwise fiddle with; the Game Boy Camera and Game Boy Printer are foremost among these. Let’s check out what you can do with them.
Many people have fallen in love with Nintendo’s rudimentary Game Boy Camera, which shoots up to 30 pictures in four shades of grey at 128 112 pixel resolution, and stores everything in 128 KB of battery-saved SRAM. Originally released in 1998 in Japan and then in the West in the days of the black-and-white Game Boy, the camera still works with subsequent Game Boy models, including the Game Boy Advance and Game Boy Advance SP.
Due to its low-resolution, black-and-white look, the GB Camera feels even older than its actual vintage. While snapping, the camera lens itself either swivels to point toward the Game Boy user or faces outward to take pictures of your surroundings. It’s surprisingly versatile, though. Not only can you take pictures and create simple stop-motion animations, the camera provides a large variety of stencils and silly add-ons (including fake noses, hats, and other accoutrements) that you can paste onto your picture. It even includes mini-games, as well as a musical DJ mode that allows very simple song composition, although this is nothing like the sophistication of Nanoloop or Little Sound Dj ( [Hack #22] ).
The best thing about the GB Camera is the price. They’re spectacularly cheap nowadays, and you can find them in large quantities on eBay for anywhere between $5 and $10 plus shipping.
The fun Game Boy Printer, released concurrently with the Game Boy Camera, is geared toward printing out the pictures you’ve taken, especially on sticker paper. Although the Game Boy Printer paper is extremely cheap (small rolls of thermal paper cost as little as $1 per roll on eBay), the Printer itself is scarcer than the Camera, fetching $20 or more on auction sites. However, it’s strictly optional for most of the fun you can have here.
Tip
It’s worth steering clear of third-party Game Boy Advance color cameras as an alternative to the Game Boy Camera, because all they offer is a way to take pictures and view them on your GBA screen. You can’t perform any of the fun picture manipulations. Although these cameras provide an easy USB connection for transferring pictures to the PC, they’re like a poor man’s digital camera—not sufficiently lo-fi to be attractive, not nearly hi-fi enough to be worth the money.
Although it may seem like normal photographic rules apply, the odd resolution and number of colors mean there are several things to learn in order to take good photos. Here are some compositional and situational tips that’ll help you coax the best pictures out of your Game Boy Camera:
Light levels are very important when taking Game Boy pictures. Any night or dusk-time shots will be almost impossible to make out because the device has no flash. You may be able to take pictures with strong lighting or neon around, but unless you have a backlit screen on the Game Boy itself, you won’t see much through the viewfinder. The Game Boy Camera is a sunny-day toy.
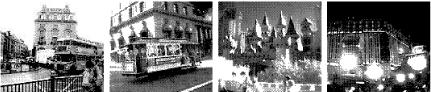
Large, manmade objects such as buildings, vehicles, and statues often photograph better than rolling hills and smooth panoramas, because sharp edges and local contrasts in shade stand out a lot better in just four shades of gray. Forget about anything with subtle details! Figure 2-1 shows some of the best work I’ve done.
Use the directional pad to adjust the contrast and brightness controls on the viewfinder screen before you actually take your picture or start your movie running. A couple of notches one way or the other, especially with the brightness control, can make the difference between an unusable and a perfect picture. Don’t crank the contrast too high, though, unless you like the novelty of an either entirely black or entirely white pixelscape. This effect can actually look quite good if unleashed at the right time.
If you’re trying to make a movie that’ll look good at a later date when looped as an animated GIF, pick start and end points close to each other. For example, do a 360-degree pan in one direction and stop just before completing a full revolution so that the first and the last frames fit together. Alternately, find a piece of machinery or another filmable object that loops—a revolving fairground attraction, for example—to make your GB animation go on forever.
There are a variety of methods for moving the images from your Game Boy to your PC for editing. Unfortunately, none of them are easy; Nintendo isn’t particularly interested in making non-Nintendo hardware work with your Game Boy. However, if you want to display your Game Boy pictures on your web page, make animated GIFs of your movies, or store your old photos for safekeeping, you need to transfer your photos to your PC in some form. The following sections describe some possibilities.
By far the most efficient method is plugging your cartridge into dedicated hardware that connects to your PC via the parallel port. The most famous of these is the Bung Xchanger, as seen at http://www.robwebb.clara.co.uk/backup/bung/bungxch.html. Unfortunately, this device also theoretically allows you to copy Game Boy games if you buy a Flashrom cartridge, so Nintendo has cracked down and banned Bung from selling them.
If you can find an Xchanger, you can transfer the entire SRAM save of
the Game Boy Camera cartridge to your PC, and then use either the
gb_cam_dump or Gh0st Camera software (available
from drx’s page at http://a-blast.org/~drx/lo-tech/gameboy/howto/index.en.html)
to save the pictures out into image form.
There’s also a very strange device called the MPXchanger from Blaze that has some Game Boy memory card functionality and is available very cheaply, if you can find it. No one knows much about it, and it reportedly works only with Windows 95 and 98 and uses custom save-game formats.
Although much slower and able to transfer only one picture at a time, a class of ingenious cables and software emulates the Game Boy Camera to Game Boy Printer connection from your Game Boy to your PC. These allow full-quality image transfer. The only one of these peripherals I know about is the MadCatz Camera Link. Unfortunately, it’s spectacularly difficult to find; it must have had limited production runs. It comes with its own software to save the photos.
Hardcore hackers can build their own Game Boy Printer emulator cables, using the instructions in Martin Eyre’s software/schematic combo ZIP file (see drx’s page again at http://a-blast.org/~drx/lo-tech/gameboy/howto/index.en.html). You’ll need to adapt a Nintendo Universal Game Link cable and add a PC parallel port adapter onto its end. Documentation is scant, so this is not for the faint of heart.
This final option is sneaky but workable. There are a variety of methods to get your Game Boy Camera pictures to display on a TV; the easiest and most up to date uses a Game Boy Player for your GameCube. This official device plugs into the bottom of your GameCube and allows you to display Game Boy games through your GC. The Game Boy Camera works perfectly well with it.
You can either take pictures of the screen with a digital camera (a very rough way of doing things) or, even better, use a video capture card on your PC and grab pictures and movies straight from your Game Boy Camera into your computer. You may need to adjust the resolution and deal with the resulting blurriness, but it’s definitely better than nothing.
Now that you’re a wizard Game Boy Camera photographer, you may find that 30 pictures just aren’t enough, especially for filming animated sequences. Fortunately, the obscure Game Boy peripherals market has provided keen shutterbugs with more space, in the form of the Interact Mega Memory Card for Game Boy Color.
This sometimes clear yellow peripheral, originally made to cash in on Pokémon fever by giving kids five extra save spots in which to save Pikachu from accidental deletion, connects to your Game Boy Camera cartridge. Each extra save spot can hold 30 pictures, increasing your storage space to 150 snaps plus the 30 on your camera. The card comes with its own menu for saving and restoring the SRAM, but it’s a little clunky. It just won’t fit in an original black-and-white Game Boy, but it works, and there are almost always multiple copies of the peripheral for sale on eBay for less than $5.
By the way, one handy and often overlooked tip related to picture management on the GB Camera cart itself can delete all your photos at once. Instead of laboriously removing each of the 30 pictures individually on the main GB Camera title screen, press the Select button, then choose Edit and Album, and finally press Up, Select, and Start simultaneously to reach a dialog offering deletion of all.
Wouldn’t it be cool if there were a Game Boy Camera featuring color with the same cool-looking resolution and picture tone? Unfortunately, such a piece of hardware doesn’t exist, but David Friedman’s Rule Of Thirds camera page (http://www.ruleofthirds.com/gameboy/) showcases an ingenious method for producing color Game Boy Camera pictures:
You’ll need red-, green-, and blue-hued filters. You can find these at a camera store, which may even give away sample books containing colored filters. Place these filters over the lens of the camera and take a picture from exactly the same angle for each filter. Transfer the pictures to your PC in some fashion and load them into Photoshop.
Convert the first picture to the R (red) values, the second picture to G (green) values, and the third picture to B (blue) values. Combine the three into a single RGB picture. If you do all this correctly, you’ll see something approximating a color picture. However, the colors will likely to be faint and washed-out, because, as David discovered, the camera still collects infrared light of all types.
For ideal results, use a hot mirror filter lens to block out infrared light. Fit the red, green, and blue lenses over the top of this filter. If you want to go all the way for perfect color, these lenses cost between $30 and $40 at photographic stores, so it’s probably more expensive than the Game Boy Camera itself, actually. However, the results, as shown on David’s page, can be spectacular. See http://www.ruleofthirds.com/gameboy/pictures.html. It’s great to see the low resolutions with vibrant colors.