Table of Contents for
Gaming Hacks
 Gaming Hacks
Published by
O'Reilly Media, Inc., 2004
Gaming Hacks
Published by
O'Reilly Media, Inc., 2004
- Cover
- Gaming Hacks
- Credits
- Contributors
- Acknowledgments
- Foreword
- Preface
- How to Use This Book
- How This Book Is Organized
- Conventions Used in This Book
- Using Code Examples
- Comments and Questions
- Got a Hack?
- 1. Playing Classic Games
- Legal Emulation
- Play Commodore 64 Games Without the C-64
- Play Atari ROMs Without the Atari
- Use Atari Paddles with Your PC
- Run Homebrew Games on the Atari 2600
- Create Your Own Atari 2600 Homebrew Games
- Play Classic PC Graphic Adventures
- Play Old Games Through DOSBox
- Play Reissued All-in-One Joystick Games
- Play Arcade Games Without the Arcade
- Add and Manipulate a MAME Frontend
- Keep Your ROMs Tidy and Organized
- Learn Game-Specific MAME Controls
- Filter Inappropriate MAME ROMs
- Autoboot into MAME Heaven
- Play Emulated Arcade Games Online
- Play Classic Pinball Without the Table
- Emulate the SNES on the Dreamcast
- 2. Playing Portably
- Play Games on Your iPod
- Mod Your Game Boy
- Take and Print Photos with Your Game Boy
- Compose Music on Your Game Boy
- Explore the GP32 Handheld Gaming System
- Take Your Console with You
- Explore the Bandai WonderSwan
- Play Real Games on Your PDA
- Install a PlayStation 2 in Your Car
- 3. Playing Well with Others
- Practice Proper MMORPG Etiquette
- Understand MMORPG Lingo
- Grind Without Going Crazy
- Make a Profit in Vana’diel
- Write MMORPG Macros
- Build an Effective Group
- Catch Half-Life FPS Cheaters Redhanded
- 4. Playing with Hardware
- Build a Quiet, Killer Gaming Rig
- Find and Configure the Best FPS Peripherals
- Adapt Old Video Game Controllers to the PC
- Choose the Right Audio/Video Receiver
- Place Your Speakers Properly
- Connect Your Console to Your Home Theater
- Tune Console Video Output
- Tune Your TV for Console Video
- PC Audio Hacking
- Optimize PC Video Performance
- Build a Dedicated Multimedia PC
- Use a Multimedia Projector for Gaming
- 5. Playing with Console and Arcade Hardware
- Play LAN-Only Console Games Online
- Hack the Nuon DVD Player/Gaming System
- Play Import Games on American Consoles
- Find a Hackable Dreamcast
- Play Movies and Music on Your Dreamcast
- Hack the Dreamcast Visual Memory Unit
- Unblur Your Dreamcast Video
- Use Your Dreamcast Online
- Host Dreamcast Games Online
- Burn Dreamcast-Compatible Discs on Your PC
- Burn Dreamcast Homebrew Discs
- Buy Your Own Arcade Hardware
- Configure Your Arcade Controls, Connectors, and Cartridges
- Reorient and Align Your Arcade Monitor
- Buy Cart-Based JAMMA Boards
- Programming Music for the Nintendo Entertainment System
- 6. Playing Around the Game Engine
- Explore Machinima
- Choose a Machinima Engine
- Film Your First Machinima Movie
- Improve Your Camera Control
- Record Game Footage to Video
- Speedrun Your Way Through Metroid Prime
- Sequence-Break Quake
- Run Classic Game ROM Translations
- Change Games with ROM Hacks
- Apply ROM Hacks and Patches
- Create PS2 Cheat Codes
- Hack Xbox Game Saves
- Cheat on Other Consoles
- Modify PC Game Saves and Settings
- Buff Your Saved Characters
- Create Console Game Levels
- 7. Playing Your Own Games
- Adventure Game Studio Editing Tips
- Create and Play Pinball Tables
- Put Your Face in DOOM
- Create a Vehicle Model for Unreal Tournament 2004
- Add a Vehicle to Unreal Tournament 2004
- Modify the Behavior of a UT2004 Model
- Download, Compile, and Create an Inform Adventure
- Decorate Your IF Rooms
- Add Puzzles to Your IF Games
- Add Nonplayer Characters to IF Adventures
- Make Your IF NPCs Move
- Make Your IF NPCs Talk
- Create Your Own Animations
- Add Interactivity to Your Animations
- Write a Game in an Afternoon
- 8. Playing Everything Else
- Tweak Your Tactics for FPS Glory
- Beat Any Shoot-Em-Up
- Drive a Physics-Crazed Motorcycle
- Play Japanese Games Without Speaking Japanese
- Back Up, Modify, and Restore PlayStation Saved Games
- Access Your Console’s Memory Card Offline
- Overclock Your Console
- Index
- Colophon
Increase the immersiveness of id’s classic FPS by replacing the space marine’s pictures with your own.
id Software’s groundbreaking DOOM almost singlehandedly created the modern FPS genre. With style oozing from every crevice, a near-infinite amount of customizability, and an open source codebase, it’s no wonder that people still play variants such as PrBoom (http://prboom.sourceforge.net/).
As any dedicated modder will tell you, half the fun is in making your own fun. Earlier games were also hackable, but DOOM was unique in encouraging gamers to add their own maps, weapons, and graphics. Since it was a pre-Windows pioneer, the tools aren’t very user-friendly, but they exist and work with a little prodding.
Creating your own maps is a lot of work, but it’s much easier to replace individual graphics. One good way to start is to change the picture of your character in the game’s status bar.
Start by downloading PrBoom or an equivalent. PrBoom is nice in that it supports Windows and Linux equally well. Windows installation is as easy as downloading the latest Windows ZIP archive (2.2.4 at the time of writing) and unzipping it into an appropriate directory.
If you have the registered version of DOOM somewhere,[17] copy its .wad files into the PrBoom
directory. Otherwise, look for a file called
doom1.wad online. This is the shareware version.
DOOM stores all its maps, images, and sounds in WAD files. There are two types. IWADs are the original internal WADs shipped with the game; they contain the default game information. PWADs are player-supplied WADs that change or add parts of the game. They can be much smaller, because anything they don’t supply directly comes from the original IWAD.
Think of a WAD as a directory containing subdirectories and files, somewhat like a ZIP archive. To replace a particular graphic, you have to know its details within the IWAD and add an equivalent graphic to your PWAD. That’s where tools such as DeuTex (http://www.teaser.fr/~amajorel/deutex/) come in.
Tip
Technically, you’re not supposed to be able to
create or use PWADs with the shareware IWAD. I renamed
doom1.wad to doom.wad, and
PrBoom and DeuTex were happy.
DeuTex is a WAD disassembler, meaning that it can disassemble a WAD
into a real directory. It runs on DOS and Linux. Download and extract
DeuTex into its own directory, then extract the data from
doom.wad with a command resembling:
$ ./deutex -extract /usr/share/games/doom/doom.wadThis creates several directories such as
textures/ and sounds/ as
well as a file called wadinfo.txt.
Besides trial and error, there’s really no good way
to figure out which image within this WAD to replace. Fortunately, I
can tell you that the files in graphics/stf*
represent the face in the status bar. I replaced the god-mode powerup
image (type iddqd while playing) with a
picture of my nephew. DeuTex extracts this image to
graphics/stfgod0.pnm.
The trickiest part of this process is building a 24 29 image that
looks good in DOOM, especially with its restricted palette. I cropped
and adjusted the picture until it fit, then saved it as a 256-color
GIF file in graphics/stfgod0.gif. Be sure to
keep the same base name as the file you’re
replacing; otherwise, DOOM won’t know how to find
the resource. It’s okay to use a different file
extension; DeuTex converts BMP, GIF, or JPEG files to PPM files
automatically when it builds a WAD. If you do use a different
extension, though, be sure to move the original file out of the way
so that DeuTex will use your replacement.
Tip
For best results, remove the background of the image, leaving only the subject’s face and head. The image is much less jarring this way.
The next step is to build a manifest file to tell DeuTex which files
to assemble. Open the wadinfo.txt file in your
favorite text editor. It has several internal sections for the
different types of files within the WAD. Delete everything that you
haven’t replaced. In my case, I had a very short
file:
# List of Pictures (with insertion point)
[graphics]
STFGOD0 -5      -2
Be sure to keep the [graphics] heading, though you
can delete the entries beneath it for the images you want to stay the
same. Save the file with a different name, perhaps
godinfo.txt, so you can make other modifications
by copying the relevant lines from the original manifest.
The final step is to assemble all the new resources into a PWAD. DeuTex again can do this. Use a command resembling:
$ ./deutex -build godinfo.txt baby.wadIf everything goes well, this will write a new PWAD called
baby.wad in your current directory. DeuTex
helpfully refuses to overwrite an existing file, so delete or move
baby.wad if you’ve already
generated one.
To see the effects of your work, launch PrBoom with your new PWAD.
Use the -file switch to give the location of the
file:
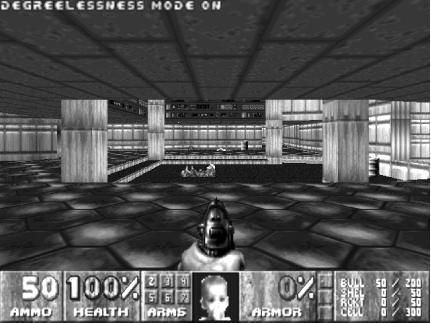
$ prboom -file baby.wadStart a new game, type iddqd, and marvel at
the connection between innocence and ultimate power, seen in Figure 7-4.
The same technique here works for replacing any image or sound within the IWAD files, including monsters and weapons. Remember, if you can do it for one image, you can do it for many.