Table of Contents for
Gaming Hacks
 Gaming Hacks
Published by
O'Reilly Media, Inc., 2004
Gaming Hacks
Published by
O'Reilly Media, Inc., 2004
- Cover
- Gaming Hacks
- Credits
- Contributors
- Acknowledgments
- Foreword
- Preface
- How to Use This Book
- How This Book Is Organized
- Conventions Used in This Book
- Using Code Examples
- Comments and Questions
- Got a Hack?
- 1. Playing Classic Games
- Legal Emulation
- Play Commodore 64 Games Without the C-64
- Play Atari ROMs Without the Atari
- Use Atari Paddles with Your PC
- Run Homebrew Games on the Atari 2600
- Create Your Own Atari 2600 Homebrew Games
- Play Classic PC Graphic Adventures
- Play Old Games Through DOSBox
- Play Reissued All-in-One Joystick Games
- Play Arcade Games Without the Arcade
- Add and Manipulate a MAME Frontend
- Keep Your ROMs Tidy and Organized
- Learn Game-Specific MAME Controls
- Filter Inappropriate MAME ROMs
- Autoboot into MAME Heaven
- Play Emulated Arcade Games Online
- Play Classic Pinball Without the Table
- Emulate the SNES on the Dreamcast
- 2. Playing Portably
- Play Games on Your iPod
- Mod Your Game Boy
- Take and Print Photos with Your Game Boy
- Compose Music on Your Game Boy
- Explore the GP32 Handheld Gaming System
- Take Your Console with You
- Explore the Bandai WonderSwan
- Play Real Games on Your PDA
- Install a PlayStation 2 in Your Car
- 3. Playing Well with Others
- Practice Proper MMORPG Etiquette
- Understand MMORPG Lingo
- Grind Without Going Crazy
- Make a Profit in Vana’diel
- Write MMORPG Macros
- Build an Effective Group
- Catch Half-Life FPS Cheaters Redhanded
- 4. Playing with Hardware
- Build a Quiet, Killer Gaming Rig
- Find and Configure the Best FPS Peripherals
- Adapt Old Video Game Controllers to the PC
- Choose the Right Audio/Video Receiver
- Place Your Speakers Properly
- Connect Your Console to Your Home Theater
- Tune Console Video Output
- Tune Your TV for Console Video
- PC Audio Hacking
- Optimize PC Video Performance
- Build a Dedicated Multimedia PC
- Use a Multimedia Projector for Gaming
- 5. Playing with Console and Arcade Hardware
- Play LAN-Only Console Games Online
- Hack the Nuon DVD Player/Gaming System
- Play Import Games on American Consoles
- Find a Hackable Dreamcast
- Play Movies and Music on Your Dreamcast
- Hack the Dreamcast Visual Memory Unit
- Unblur Your Dreamcast Video
- Use Your Dreamcast Online
- Host Dreamcast Games Online
- Burn Dreamcast-Compatible Discs on Your PC
- Burn Dreamcast Homebrew Discs
- Buy Your Own Arcade Hardware
- Configure Your Arcade Controls, Connectors, and Cartridges
- Reorient and Align Your Arcade Monitor
- Buy Cart-Based JAMMA Boards
- Programming Music for the Nintendo Entertainment System
- 6. Playing Around the Game Engine
- Explore Machinima
- Choose a Machinima Engine
- Film Your First Machinima Movie
- Improve Your Camera Control
- Record Game Footage to Video
- Speedrun Your Way Through Metroid Prime
- Sequence-Break Quake
- Run Classic Game ROM Translations
- Change Games with ROM Hacks
- Apply ROM Hacks and Patches
- Create PS2 Cheat Codes
- Hack Xbox Game Saves
- Cheat on Other Consoles
- Modify PC Game Saves and Settings
- Buff Your Saved Characters
- Create Console Game Levels
- 7. Playing Your Own Games
- Adventure Game Studio Editing Tips
- Create and Play Pinball Tables
- Put Your Face in DOOM
- Create a Vehicle Model for Unreal Tournament 2004
- Add a Vehicle to Unreal Tournament 2004
- Modify the Behavior of a UT2004 Model
- Download, Compile, and Create an Inform Adventure
- Decorate Your IF Rooms
- Add Puzzles to Your IF Games
- Add Nonplayer Characters to IF Adventures
- Make Your IF NPCs Move
- Make Your IF NPCs Talk
- Create Your Own Animations
- Add Interactivity to Your Animations
- Write a Game in an Afternoon
- 8. Playing Everything Else
- Tweak Your Tactics for FPS Glory
- Beat Any Shoot-Em-Up
- Drive a Physics-Crazed Motorcycle
- Play Japanese Games Without Speaking Japanese
- Back Up, Modify, and Restore PlayStation Saved Games
- Access Your Console’s Memory Card Offline
- Overclock Your Console
- Index
- Colophon
Make and import game-suitable 3D artwork.
If you’re hacking new behavior into your favorite game, you’ll eventually need to build, beg, borrow, or steal some new art. Tweaking the gravity and weapon damage ranges can only take you so far. Creating your own artwork is the best approach, but you’ll need a modicum of talent and some experience with a graphics program such as Maya PLE, which comes with UT2004.
Tip
Maya PLE comes with many tutorials, and they appear when you run it the first time. It’s worth your while to read through them.
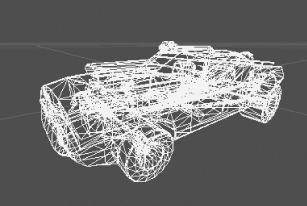
With that knowledge in mind, there are some specific steps to understand when creating art for a game. Let’s walk through the creation of the ‘Cuda (a 1969 Plymouth Barracuda) from our UT2004 Clone Bandits modification (http://www.demiurgestudios.com/CloneBandits/). Figure 7-5 shows the modeled image.
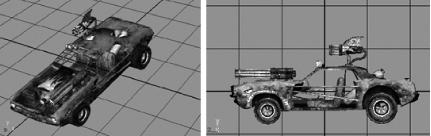
There are a few things to keep in mind at the modeling stage. The ‘Cuda’s nose points in the positive Z direction, with the center of its chassis (as opposed to, say, the bottom of its wheels) at the origin. Originally, I placed it higher, with the bottom of the chassis at the origin, but eventually lowered it to help characters exit the vehicle in predictable ways.
You don’t have to combine the meshes that make up a vehicle before exporting it to Unreal. For example, the chassis and wheels of the ‘Cuda are separate meshes bound to the same skeleton. This allows more flexibility when assigning bone influences; you can do them one part at a time.
When you complete the model, pull off the guns from the main chassis, move their roots to the origin, skin them, and export them to Unreal separately. I found exporting them out into new Maya files made this process cleaner.
The skeleton for the ‘Cuda is fairly simple. There are joints that represent each wheel and joints that define the gun attach points. Each joint is a child of the root, located at the bottom center of the chassis. Figure 7-6 shows the details.
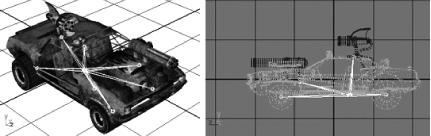
Be aware of the joint orientation. In general, modelers need to orient their joints along the world axes. This applies doubly to the root and wheel joints. Slight offsets in joint orientation can cause strange-looking rotations in Unreal. You can see a joint’s orientation by choosing Object (instead of World) in the Move tool and then selecting the joint.
The gun joints are a special case. All joints in the gun skeletons are rotated such that their positive X axis points along the barrel of the gun, and the positive Z points up. This also applies to the joints that define gun attach points.
We used Smooth Bind to link the skeleton to the mesh. However, you want the vehicle to be rigid, because, generally speaking, cars don’t bend. In the Component Editor, assign all the mesh’s vertices to one bone or another. For example, only the front-right wheel bone should affect all vertices in the front-right wheel.
You’ll need the ActorX plug-in to export your vehicle to an Unreal-friendly format. This plug-in is freely available from the Unreal Developers Network (http://udn.epicgames.com/Two/ActorX) for both Maya and 3D Studio Max. The same site has installation instructions.
Once you’ve installed the plug-in, fire it up to see the ActorX options. Persistent settings and persistent paths are handy. Under Skin Export, checking “all skin-type” exports all skinned items, which is convenient if there is only one skinned mesh in the Maya file. Automatic triangulate is also useful, though you will usually find that Maya’s Triangulate function yields better results.
The ActorX plug-in exports two types of
files, those that contain mesh and skeleton information
(.PSK) and those that contain animation data
(.PSA). We’ll create
.PSK files because the game code will animate
the ‘Cuda’s wheels procedurally.
To export the mesh, choose an output folder and a name for the file
(in .PSK format), then hit the Save mesh/refpose
button.
UnrealEd is a powerful and complex tool that allows you to edit, import, and create content for Unreal Tournament 2004. As we can discuss only the tip of the iceberg here, I encourage you to learn more about the editor by consulting the extensive Unreal Developers Network documentation (http://udn.epicgames.com/Engine/WebHome).
Unreal stores its content in package files. Different types of
packages exist for different types of data. We will be dealing
specifically with texture (.UTX) and animation
(.UKX) packages.
In UnrealEd, use the Texture Browser to create and edit texture packages. Open it by choosing View/Show Texture Browser in the top pull-down menu. In the Texture Browser, click File/Import . . . and navigate to your texture files, which are all 24-bit Targa files. Select all the textures and click Open. (UnEdit supports importing multiple files at once.) This brings up the Import Texture dialog.
You need to give your new package a name, then further organize your textures into groups. The Options defaults will work fine for textures that have no alpha channels. Check Alpha if a texture has smooth gradients in the alpha channel, or Masked if the alpha channel values are simply black and white, with no gray values.
Just as you created your texture package using the Texture Browser, you will import your mesh and edit it with the Animation Browser. Since you have the Texture Browser already open, click the tab at the top labeled Animations.
In the Animation Browser, click File/Mesh import, and navigate to the
directory containing your new .PSK file. Use the
Import Mesh/Animation dialog to name the new animation package.
Remember to check Assume Maya coordinates so that your mesh comes in
with the correct rotation.
Now you have to assign textures. This requires the following steps:
Highlight the desired texture over in the Texture Browser by clicking it.
Back in the Animation Browser, click to open the Skin array in the Mesh tab to the right.
Clicking Material shows the list of materials assigned to the mesh. Click the text in the first material slot to select that slot, then hit Use to assign the selected texture to this slot.
Repeat for each slot.
The Unreal vehicle code handles collision for the wheels, but
you need to give the chassis a collision volume. In the Animation
Browser, open the Collision section under the Mesh tab on the right
(above the Skin array). In the CollisionBoxes slot, click the
... text on the right, then hit the Add button
that appears. This brings up several new fields.
The first three of these fields (bBlockKarma,
bBlockNonZeroExtent, and
bBlockZeroExtent) describe types of collision
operations. You’ll want the box to collide with all
three, so in each slot, replace the 0 (false) with
1 (true). The new collision box needs to attach to
a bone, so type rootcar, representing the car
model’s main bone, in the
BoneName field.
Next, let’s give the collision box some dimensions.
Click open the Radii section, and type 100 in
the X, Y, and Z fields. Now to see the new collision box, select
View/Collision from the top menu. PRESTO! Suddenly
there’s a big purple box, as shown in Figure 7-7.
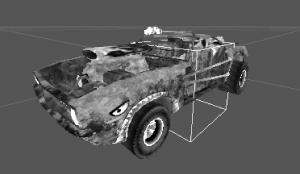
Now it’s just a matter of adjusting the Radii and offset values to make the collision box fit tightly. In the mod, we ended up adding another box to the front to clean up collisions with the ground. The final product looks like Figure 7-8.
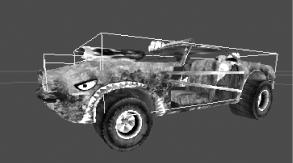
In Maya, each vertex is influenced by only one bone. This isn’t only visually correct, as a metal car is indeed rigid, but also allows a big performance increase in Unreal. This eliminates the hassle of constantly calculating the location of each vertex as determined by the combined effect of multiple bones. You explicitly tell the Unreal Engine to take advantage of simplified skin by “rigidizing” the mesh.
Open the LOD (Level of Detail) section in the Mesh tab. Click open the LODLevels array. By default, a mesh has four LOD levels, 0 through 3. You probably don’t need that many. The vehicles that come with Unreal Tournament 2004 have only three levels. For simplicity, let’s delete all but the first; click each level and hit the Delete button that appears.
Click open the remaining LOD level and open the Rigidize option. Clicking MeshSectionMethod brings up an arrow to the right, which in turn opens a drop-down menu. Select MSM_RigidOnly. Finalize the choice by selecting Mesh/Redigest Lod from the menu at the top of the Animation Browser. Go to wireframe view (View/Wireframe) to verify that each vertex has only one bone influence by checking that the wireframe is red instead of the default yellow. If a section had vertices with multiple influences, it would still be yellow. Figure 7-9 shows a happy red wireframe.
Now that you’ve imported the ‘Cuda into Unreal, what happens next? You need to repeat the previous steps for the guns, though you won’t need collision boxes because guns don’t collide. At this point, the artwork is done, and programming work begins. A new vehicle in Unreal requires a new class ( [Hack #83] ) and, possibly, some new behavior ( [Hack #84] ).