Table of Contents for
Kali Linux 2 – Assuring Security by Penetration Testing - Third Edition
 Kali Linux 2 – Assuring Security by Penetration Testing - Third Edition
Published by
Packt Publishing, 2016
Kali Linux 2 – Assuring Security by Penetration Testing - Third Edition
Published by
Packt Publishing, 2016
- Cover
- Table of Contents
- Kali Linux 2 – Assuring Security by Penetration Testing Third Edition
- Kali Linux 2 – Assuring Security by Penetration Testing Third Edition
- Credits
- Disclaimer
- About the Authors
- About the Reviewer
- www.PacktPub.com
- Preface
- What you need for this book
- Who this book is for
- Conventions
- Reader feedback
- Customer support
- 1. Beginning with Kali Linux
- Kali Linux tool categories
- Downloading Kali Linux
- Using Kali Linux
- Configuring the virtual machine
- Updating Kali Linux
- Network services in Kali Linux
- Installing a vulnerable server
- Installing additional weapons
- Summary
- 2. Penetration Testing Methodology
- Vulnerability assessment versus penetration testing
- Security testing methodologies
- General penetration testing framework
- Information gathering
- The ethics
- Summary
- 3. Target Scoping
- Preparing the test plan
- Profiling test boundaries
- Defining business objectives
- Project management and scheduling
- Summary
- 4. Information Gathering
- Using public resources
- Querying the domain registration information
- Analyzing the DNS records
- Getting network routing information
- Utilizing the search engine
- Metagoofil
- Accessing leaked information
- Summary
- 5. Target Discovery
- Identifying the target machine
- OS fingerprinting
- Summary
- 6. Enumerating Target
- Understanding the TCP/IP protocol
- Understanding the TCP and UDP message format
- The network scanner
- Unicornscan
- Zenmap
- Amap
- SMB enumeration
- SNMP enumeration
- VPN enumeration
- Summary
- 7. Vulnerability Mapping
- Vulnerability taxonomy
- Automated vulnerability scanning
- Network vulnerability scanning
- Web application analysis
- Fuzz analysis
- Database assessment tools
- Summary
- 8. Social Engineering
- Attack process
- Attack methods
- Social Engineering Toolkit
- Summary
- 9. Target Exploitation
- Vulnerability and exploit repositories
- Advanced exploitation toolkit
- MSFConsole
- MSFCLI
- Ninja 101 drills
- Writing exploit modules
- Summary
- 10. Privilege Escalation
- Password attack tools
- Network spoofing tools
- Network sniffers
- Summary
- 11. Maintaining Access
- Working with tunneling tools
- Creating web backdoors
- Summary
- 12. Wireless Penetration Testing
- Wireless network recon
- Wireless testing tools
- Post cracking
- Sniffing wireless traffic
- Summary
- 13. Kali Nethunter
- Installing Kali Nethunter
- Nethunter icons
- Nethunter tools
- Third-party applications
- Wireless attacks
- HID attacks
- Summary
- 14. Documentation and Reporting
- Types of reports
- The executive report
- The management report
- The technical report
- Network penetration testing report (sample contents)
- Preparing your presentation
- Post-testing procedures
- Summary
- A. Supplementary Tools
- Web application tools
- Network tool
- Summary
- B. Key Resources
- Paid incentive programs
- Reverse engineering resources
- Penetration testing learning resources
- Exploit development learning resources
- Penetration testing on a vulnerable environment
- Online web application challenges
- Virtual machines and ISO images
- Network ports
- Index
In this section, we will discuss discovering and testing the Virtual Private Network (VPN) systems.
Several years ago, when a branch office wanted to connect to the head office, it needed to set a dedicated network line between the branch and head offices. The main disadvantage of this method was the cost; a dedicated network line is expensive.
A VPN allows a branch office to connect to the head office using the public network (Internet). The cost of using a public network is much cheaper than using a dedicated line. With the VPN, the branch office will be able to use the application in the headquarters as if the branch office is located in the Local Area Network (LAN). The connection established is protected by encryption.
Based on the method used, VPN can be divided into at least three groups:
- IPsec-based VPN: This type is a popular VPN solution for connecting the branch office to the head office's LAN. The branch office will install an IPsec VPN client on the network gateway, while the head office will install an IPsec VPN server on its network gateway. It is not a popular method to connect a user to the head office's LAN due to the complexity of configuring the method. The user that uses this method is called a road warrior.
- OpenVPN: This type is a very popular VPN solution for road warriors. In OpenVPN, a user needs to install an OpenVPN client before being able to connect to the VPN server. The advantage of this mode is that it is very easy to set up and doesn't need an administrator-level privilege to run.
- SSL-based VPN: In this category, the user doesn't need a dedicated VPN client but can use a web browser to connect to the VPN server as long as the web browser supports an SSL connection.
The ike-scan tool is a security tool that can be used to discover, fingerprint, and test the IPsec VPN systems. IPsec is the most commonly used technology for LAN-to-LAN and remote access VPN solutions.
IPsec uses three major protocols, as follows:
- Authentication Headers (AH): This provides data integrity
- Encapsulating Security Payloads (ESP): This provides data integrity and confidentiality
- Internet Key Exchange (IKE): This provides support for the negotiation of parameters between endpoints; it establishes, maintains, and terminates the Security Association (SA)
IKE establishes security association through the following phases:
- IKE phase 1: This sets up a secure channel between two IPsec endpoints by the negotiation of parameters, such as the encryption algorithm, integrity algorithm, authentication type, key distribution mechanism, and lifetime. To establish the bidirectional security association, IKE phase 1 can either use the main mode or aggressive mode. The main mode negotiates SA through three pairs of messages, while the aggressive mode provides faster operations through the exchange of three messages.
- IKE phase 2: This is used for data protection.
- IKE phase 1.5 or the extended authentication phase: This is an optional phase and is commonly used in the remote access VPN solutions.
The ike-scan tool works by sending IKE phase 1 packets to the VPN servers and displaying any responses it receives.
The following are several features of ike-scan:
In short, the ike-scan tool is capable of two things:
- Discovery: Finding hosts running the IKE by displaying the hosts that respond to the IKE request.
- Fingerprint: Identifying the IKE implementation used by the IPsec VPN server. Usually, this information contains the VPN vendor and the model of the VPN server. This is useful for later use in the vulnerability analysis process.
The reason why you need a tool such as ike-scan is that in general, port scanners will not be able to find an IPsec VPN server because these servers don't listen on any TCP ports. Also, they don't send an ICMP unreachable error message, so UDP scans will not find them either. Also, if you try to send random garbage data to the UDP port 500 or IP protocols 50 and 51, you will not receive a response. So, the only way to find the IPsec VPN server is by using a tool that can send a correctly formatted IKE packet and display any responses that are received from that server.
To start the ike-scan command line, you can use the console to execute the following command:
ike-scan
This will display a simple usage instruction and example on your screen.
As our exercise, we are going to discover, fingerprint, and test an IPsec VPN server using the following command:
ike-scan -M -A –Pike-hashkey 192.168.0.10
The command has the following options set:
The following screenshot shows the output:
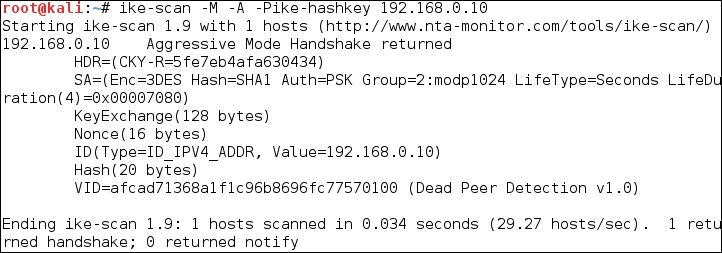
The interesting information is contained in the SA payload, as follows:
Encryption: 3DES
Hash: SHA1
Auth: PSK
Diffie-Hellman group: 2
SA life time: 28800 seconds
The pre-shared key is saved in the ike-hashkey file.
The next step is to crack the hash to get the password to connect to the VPN server. For this purpose, we can use the psk-crack tool, as follows:
psk-crack –d rockyou.txt ike-hashkey
Here, -d is the wordlist file.
The following screenshot shows the result of this command:

From the output, we notice that the key is 123456. You can then use this key to connect to the VPN server.
The next task is to fingerprint the VPN server. For this purpose, we need to define the transform attributes until we find one which is acceptable.
Note
3 lin To find out which transform attributes to use, you can go to http://www.nta-monitor.com/wiki/index.php/Ike-scan_User_Guide#Trying_Different_Transforms.es
The following is the command to fingerprint the IPsec VPN server based on the previous SA payload:
ike-scan -M --trans=5,2,1,2 --showbackoff 192.168.0.10
The following screenshot shows the result of this command:
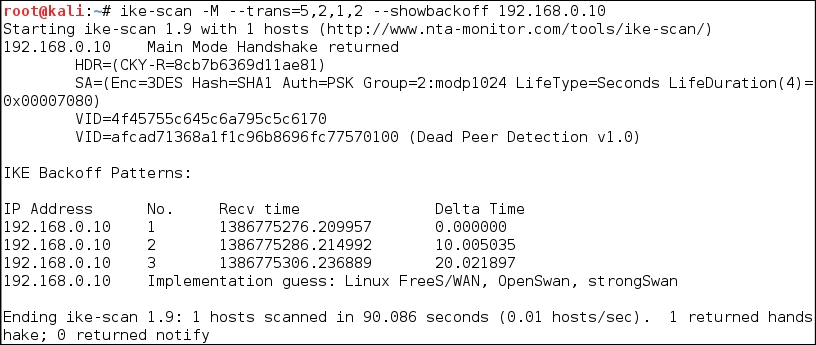
The
ike-scan tool is able to guess the remote VPN server software used: FreeS/WAN, OpenSwan, or strongSwan.