Table of Contents for
Kali Linux 2 – Assuring Security by Penetration Testing - Third Edition
 Kali Linux 2 – Assuring Security by Penetration Testing - Third Edition
Published by
Packt Publishing, 2016
Kali Linux 2 – Assuring Security by Penetration Testing - Third Edition
Published by
Packt Publishing, 2016
- Cover
- Table of Contents
- Kali Linux 2 – Assuring Security by Penetration Testing Third Edition
- Kali Linux 2 – Assuring Security by Penetration Testing Third Edition
- Credits
- Disclaimer
- About the Authors
- About the Reviewer
- www.PacktPub.com
- Preface
- What you need for this book
- Who this book is for
- Conventions
- Reader feedback
- Customer support
- 1. Beginning with Kali Linux
- Kali Linux tool categories
- Downloading Kali Linux
- Using Kali Linux
- Configuring the virtual machine
- Updating Kali Linux
- Network services in Kali Linux
- Installing a vulnerable server
- Installing additional weapons
- Summary
- 2. Penetration Testing Methodology
- Vulnerability assessment versus penetration testing
- Security testing methodologies
- General penetration testing framework
- Information gathering
- The ethics
- Summary
- 3. Target Scoping
- Preparing the test plan
- Profiling test boundaries
- Defining business objectives
- Project management and scheduling
- Summary
- 4. Information Gathering
- Using public resources
- Querying the domain registration information
- Analyzing the DNS records
- Getting network routing information
- Utilizing the search engine
- Metagoofil
- Accessing leaked information
- Summary
- 5. Target Discovery
- Identifying the target machine
- OS fingerprinting
- Summary
- 6. Enumerating Target
- Understanding the TCP/IP protocol
- Understanding the TCP and UDP message format
- The network scanner
- Unicornscan
- Zenmap
- Amap
- SMB enumeration
- SNMP enumeration
- VPN enumeration
- Summary
- 7. Vulnerability Mapping
- Vulnerability taxonomy
- Automated vulnerability scanning
- Network vulnerability scanning
- Web application analysis
- Fuzz analysis
- Database assessment tools
- Summary
- 8. Social Engineering
- Attack process
- Attack methods
- Social Engineering Toolkit
- Summary
- 9. Target Exploitation
- Vulnerability and exploit repositories
- Advanced exploitation toolkit
- MSFConsole
- MSFCLI
- Ninja 101 drills
- Writing exploit modules
- Summary
- 10. Privilege Escalation
- Password attack tools
- Network spoofing tools
- Network sniffers
- Summary
- 11. Maintaining Access
- Working with tunneling tools
- Creating web backdoors
- Summary
- 12. Wireless Penetration Testing
- Wireless network recon
- Wireless testing tools
- Post cracking
- Sniffing wireless traffic
- Summary
- 13. Kali Nethunter
- Installing Kali Nethunter
- Nethunter icons
- Nethunter tools
- Third-party applications
- Wireless attacks
- HID attacks
- Summary
- 14. Documentation and Reporting
- Types of reports
- The executive report
- The management report
- The technical report
- Network penetration testing report (sample contents)
- Preparing your presentation
- Post-testing procedures
- Summary
- A. Supplementary Tools
- Web application tools
- Network tool
- Summary
- B. Key Resources
- Paid incentive programs
- Reverse engineering resources
- Penetration testing learning resources
- Exploit development learning resources
- Penetration testing on a vulnerable environment
- Online web application challenges
- Virtual machines and ISO images
- Network ports
- Index
In this section, we will look at several tools that can be used to find open ports, fingerprint the remote operating system, and enumerate the services on the remote machine.
Service enumeration is a method that is used to find the service version that is available on a particular port on the target system. This version information is important because with this information, the penetration tester can search for security vulnerabilities that exist for that software version.
While standard ports are often used, sometimes systems administrators will change the default ports for some services. For example, an SSH service may be bound to port 22 (as a convention), but a system administrator may change it to be bound to port 2222. If the penetration tester only does a port scan to the common port of SSH, it may not find that service. The penetration tester will also have difficulties when dealing with proprietary applications running on non-standard ports. By using the service enumeration tools, these two problems can be mitigated, so there is a chance that the service can be found, regardless of the port it binds to.
Nmap is a port scanner that is comprehensive, feature- and fingerprint-rich, and widely used by the IT security community. It is written and maintained by Fyodor. It is a must-have tool for a penetration tester because of its quality and flexibility.
Besides being used as a port scanner, Nmap has several other capabilities, as follows:
- Host discovery: Nmap can be used to find live hosts on the target systems. By default, Nmap will send an ICMP echo request, a TCP SYN packet to port
443, a TCP ACK packet to port80, and an ICMP timestamp request to carry out the host discovery. - Service/version detection: After Nmap has discovered the ports, it can further check for the service protocol, the application name, and the version number used on the target machine.
- Operating system detection: Nmap sends a series of packets to the remote host and examines the responses. Then, it compares these responses with its operating system fingerprint database and prints out the details if there is a match. If it is not able to determine the operating system, Nmap will provide a URL where you can submit the fingerprint to update its operating system fingerprint database. Of course, you should submit the fingerprint if you know the operating system used on the target system.
- Network traceroute: This is performed to determine the port and protocol that is most likely to reach the target system. An Nmap traceroute starts with a high value of Time to Live (TTL) and decrements it until the TTL value reaches zero.
- Nmap Scripting Engine: With this feature, Nmap can be extended. If you want to add a check that is not included with the default Nmap, you can do so by writing the check using the Nmap scripting engine. Currently, there are checks for vul nerabilities in network services and for enumerating resources on the target system.
It is good practice to always check for new versions of Nmap. If you find the latest version of Nmap available for Kali Linux, you can update your Nmap by issuing the following commands:
apt-get update
apt-get install nmap
To start Nmap, you can navigate to Applications and then to Information Gathering. You can also start Nmap by going to the console to execute the following command:
nmap
This will display all of the Nmap options with their descriptions.
A new user to Nmap will find the available options quite overwhelming.
Fortunately, you only need one option to scan for the remote machine. That option is your target IP address or hostname, if you have set up the DNS correctly. This is done with the following command:
nmap 172.16.43.156
The following is the result of the scan without any other options:
Nmap scan report for 172.16.43.156
Host is up (0.00025s latency).
Not shown: 977 closed ports
PORT     STATE SERVICE
21/tcp   open  ftp
22/tcp   open  ssh
23/tcp   open  telnet
25/tcp   open  smtp
53/tcp   open  domain
80/tcp   open  http
111/tcp  open  rpcbind
139/tcp  open  netbios-ssn
445/tcp  open  microsoft-ds
512/tcp  open  exec
513/tcp  open  login
514/tcp  open  shell
1099/tcp open  rmiregistry
1524/tcp open  ingreslock
2049/tcp open  nfs
2121/tcp open  ccproxy-ftp
3306/tcp open  mysql
5432/tcp open  postgresql
5900/tcp open  vnc
6000/tcp open  X11
6667/tcp open  irc
8009/tcp open  ajp13
8180/tcp open  unknown
MAC Address: 00:0C;29:18:0F:08 (VMware)

Nmap done: 1 IP address (1 host up) scanned in 1.7 seconds
From the preceding result, we can see that the target machine is very vulnerable to attack because it has many open ports.
Before we continue to use Nmap, let's take a look at the port states that can be identified by Nmap. There are six port states that are recognized by Nmap, as follows:
- Open: This means that there is an application accepting a TCP connection, UDP datagram, or SCTP association.
- Closed: This means that although the port is accessible, there is no application listening on the port.
- Filtered: This means that Nmap can't determine whether the port is open or not because there is a packet-filtering device blocking the probe to reach the target.
- Unfiltered: This means that the port is accessible, but Nmap cannot determine whether it is open or closed.
- Open|Filtered: This means that Nmap is unable to determine whether a port is open or filtered. This happens when a scan to open ports doesn't give a response. It can be achieved by setting the firewall to drop packets.
- Closed|Filtered: This means Nmap is unable to determine whether a port is closed or filtered.
After describing the port states, we will describe several options that are commonly used during penetration testing, and after that, we will use those options in our practice.
Nmap will treat everything on the command line that isn't an option or option argument as target host specification. We suggest that you use the IP address specification instead of the hostname. By using the IP address, Nmap doesn't need to do DNS resolution first. This will speed up the port scanning process.
In the current version, Nmap supports the following IPv4 address specifications:
- A single host such as
172.16.43.156. - A whole network of adjacent hosts by using the CIDR notation such as
172.16.43.0/24. This specification will include 256 IP addresses ranging from172.16.43.0to172.16.43.255. - An octet range addressing such as
172.16.2-4,6.1. This addressing will include four IP addresses:172.16.2.1,172.16.3.1,172.16.4.1, and172.16.6.1. - Multiple host specifications such as
172.16.43.1 and 172.168.3-5,9.1.
For the IPv6 address, Nmap only supports the fully qualified IPv6 format and hostname, such as fe80::a8bb:ccff:fedd:eeff%eth0.
Besides getting the target specification from the command line, Nmap also accepts target definition from a text file by using the -iL <inputfilename> option. This option is useful if we already have the IP addresses from another program.
Make sure that the entries in that file use the Nmap-supported target specification format. Each entry must be separated by spaces, tabs, or a new line.
The following code is a sample of that file:
172.16.1.1-254
172.16.2.1-254
Now let's scan a network of 172.16.430/24. We want to see the packets sent by Nmap. To monitor the packets sent, we can use a packet capture utility such as tcpdump.
Open a console and type the following command:
tcpdump -nnX tcp and host 172.16.43.150
The 172.16.43.150 IP address belongs to our machine, which launches Nmap. You need to adjust it to your configuration.
Open another console on the same machine and type the following command:
nmap 172.16.43.0/24
In the tcpdump console, you will see the following packet:
22:42:12.107532 IP 172.16.43.150.49270 >172.16.43.156.23: Flags [S], seq 239440322, win 1024, options [mss 1460], length 0
  0x0000:  4500 002c eb7f 0000 3006 ad2e c0a8 3866  E..,....0.....8f
  0x0010:  c0a8 3867 c076 0017 0e45 91c2 0000 0000  ..8g.v...E......
  0x0020:  6002 0400 4173 0000 0204 05b4            '...As......
From the preceding packet information, we know that the attacking machine sent a packet with a SYN flag sent from port 49270 to the target machine port 23 (Telnet). The SYN flag is set by default if Nmap is run by the privileged user, such as root in Kali Linux.
The following screenshot shows a packet sent by the attacking machine to other machines and ports on the target network:
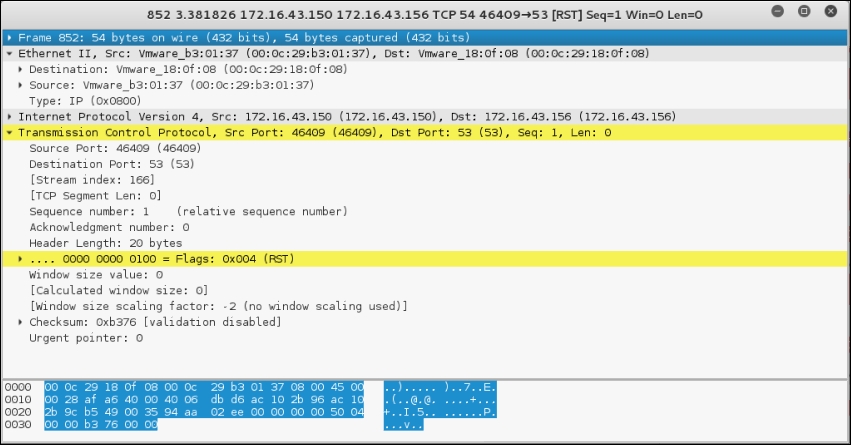
If the remote machine responds, the response packet will look like the following code:
22:36:19.939881 IP 172.16.43.150.1720 >172.16.43.156.47823: Flags [R.], seq 0, ack 1053563675, win 0, length 0
  0x0000:  4500 0028 0000 4000 4006 48b2 c0a8 3867  E..(..@.@.H...8g
  0x0010:  c0a8 3866 06b8 bacf 0000 0000 3ecc 1b1b  ..8f........>...
  0x0020:  5014 0000 a243 0000 0000 0000 0000       P....C........
However, if the port is open, you will see the following network traffic:
22:42:12.108741 IP 172.16.43.156.23 >172.16.43.150.49270:Flags [S.], seq 1611132106, ack 239440323, win 5840,options [mss 1460], length 0
  0x0000:  4500 002c 0000 4000 4006 48ae c0a8 3867  E..,..@.@.H...8g
  0x0010:  c0a8 3866 0017 c076 6007 ecca 0e45 91c3  ..8f...v'....E..
  0x0020:  6012 16d0 e1bf 0000 0204 05b4 0000
You can see that the packet in the preceding code is to acknowledge the sequence number from the previous packet displayed. This packet has an acknowledgement number of 239440323, while the previous packet had a sequence number of 239440322.
To be able to use most of the TCP scan options, Nmap needs a privileged user (a root-level account in the Unix world, or an administrator-level account in the Windows world). This is used to send and receive raw packets. By default, Nmap will use a TCP SYN scan, but if Nmap doesn't have a privileged user, it will use the TCP connect scan. The various scans used by Nmap are as follows:
- TCP connect scan (-sT): This option will complete the three-way handshake with each target port. If the connection succeeds, the port is considered open. As a result of the need to do a three-way handshake for each port, this scan type is slow and it will most likely be logged by the target. This is the default scan option used if Nmap is run by a user who doesn't have any privileges.
- SYN scan (-sS): This option is also known as half-open or SYN stealth. With this option, Nmap sends a SYN packet and then waits for a response. A SYN/ACK response means that the port is listening, while the RST/ACK response means that the port is not listening. If there is no response or an ICMP unreachable error message response, the port is considered to be filtered. This scan type can be performed quickly and because the three-way handshake is never completed, it is unobtrusive and stealthy. This is the default scan option if you run Nmap as a privileged user.
- TCP NULL scan (-sN), FIN scan (-sF), and XMAS scan (-sX): The NULL scan doesn't set any control bits. The FIN scan only sets the FIN flag bit, and the XMAS scan sets the FIN, PSH, and URG flags. If a RST packet is received as a response, the port is considered closed, while no response means that the port is open/filtered.
- TCP Maimon scan (-sM): The TCP Maimon scan was discovered by Uriel Maimon. A scan of this type will send a packet with the FIN/ACK flag bit set. BSD-derived systems will drop the packet if the port is open, and it will respond with RST if the port is closed.
- TCP ACK scan (-sA): This scan type is used to determine whether a firewall is stateful or not and which ports are filtered. A network packet of this type only sets the ACK bit. If RST is returned, it means that the target is unfiltered.
- TCP Window scan (-sW): This scan type works by examining the TCP Window field of the RST packet's response. An open port will have a positive TCP Window value, while a closed port will have a zero window value.
- TCP Idle scan (-sI): Using this technique, no packets are sent to the target by your machine; instead, the scan will bounce off to a zombie host you specify. An IDS will report the zombie as the attacker.
- Nmap also supports you in creating your own custom TCP scan by giving you the option of scanflags. The argument to that option can be numerical, such as
9for PSH and FIN, or symbolic names. Just put together any combination of URG, ACK, PSH, RST, SYN, FIN, ECE, CWR, ALL, and NONE in any order; for example,--scanflags URGACKPSHwill set the flags URG, ACK, and PSH.
While the TCP scan has many types of scan, the UDP scan only has one type, and that is the UDP scan (-sU). Even though the UDP scan is less reliable than the TCP scan, as a penetration tester, you should not ignore this scan because there may be interesting services located on these UDP ports.
The biggest problem with the UDP scan is how to perform the scan quickly. A Linux kernel limits the sending of the ICMP Port Unreachable message to one message per second. Doing a UDP scanning of 65,536 ports to a machine will take more than 18 hours to complete.
To help mitigate this problem, there are several ways that can be used as follows:
- Running the UDP scan in parallel
- Scanning the most popular ports first
- Scanning behind the firewall
- Setting the
--host-timeoutoption to skip slow hosts
These methods can help to decrease the time required for doing UDP port scans.
Let's look at a scenario where we want to find which UDP ports are open on the target machine. To speed up the scanning process, we will only check for ports 53 (DNS) and 161 (SNMP). The following is the command used to do this:
nmap -sU 172.16.43.156 -p 53,161
The following is the result of this command:
Nmap scan report for 172.16.43.156
Host is up (0.0016s latency).
PORT    STATE  SERVICE
53/udp  open   domain
161/udp closed snmp
In the default configuration, Nmap will only scan the 1,000 most common ports for each protocol randomly. The nmap-services file contains a popularity score for the selection of top ports.
To change that configuration, Nmap provides several options:
- -p port range: Scan only the defined ports. To scan ports
1to1024, the command is-p 1-1024. To scan ports1to65535, the command is-p-. - -F (fast): This will scan only 100 common ports.
- -r (don't randomize port): This option will set sequential port scanning (from lowest to highest).
- --top-ports <1 or greater>: This option will only scan the N highest-ratio ports found in the
nmap-servicefile.
To scan for ports 22 and 25 using the TCP NULL scan method, you can use the following command:
nmap -sN -p 22,25 172.16.43.156
The following command lines are the result:
Nmap scan report for 172.16.43.156
Host is up (0.00089s latency).
PORT     STATE         SERVICE
22/tcp   open|filtered ssh
25/tcp   open|filtered smtp
MAC Address: 00:0C:29:18:0F:08 (VMware)
Nmap done: 1 IP address (1 host up) scanned in 1.52 seconds
The following are the packet's dumped snippets:
23:23:38.581818 IP 172.16.43.150.61870 >172.16.43.156.22: Flags [], win 1024, length 0
  0x0000:  4500 0028 06e4 0000 2f06 92ce c0a8 3866  E..(..../.....8f
  0x0010:  c0a8 3867 f1ae 0016 dd9e bf90 0000 0000  ..8g............
  0x0020:  5000 0400 2ad2 0000                      P...*...

23:23:38.581866 IP 172.16.43.150.61870 >172.16.43.156.25: Flags [], win 1024, length 0
  0x0000:  4500 0028 1117 0000 3106 869b c0a8 3866  E..(....1.....8f
  0x0010:  c0a8 3867 f1ae 0019 dd9e bf90 0000 0000  ..8g............
  0x0020:  5000 0400 2acf 0000                      P...*...

23:23:39.683483 IP 172.16.43.150.61871 >172.16.43.156.25: Flags [], win 1024, length 0
  0x0000:  4500 0028 afaf 0000 2706 f202 c0a8 3866  E..(....'.....8f
  0x0010:  c0a8 3867 f1af 0019 dd9f bf91 0000 0000  ..8g............
  0x0020:  5000 0400 2acc 0000                      P...*...

23:23:39.683731 IP 172.16.43.150.61871 >172.16.43.156.22: Flags [], win 1024, length 0
  0x0000:  4500 0028 5488 0000 3506 3f2a c0a8 3866  E..(T...5.?*..8f
  0x0010:  c0a8 3867 f1af 0016 dd9f bf91 0000 0000  ..8g............
  0x0020:  5000 0400 2acf 0000                      P...*...
From the packets displayed in the preceding code, we can see the following results:
- In the first and second packets, the attacking machine checks whether port
22on the target machine is open. After a period of time, it checks port25on the target machine. - In the third and fourth packets, the attacking machine checks whether port
25on the target machine is open. After a period of time, it checks port22on the target machine. - After waiting for some time, as there is still no response from the target machine, Nmap concludes that those two ports are open or filtered.
The Nmap result can be saved to an external file. This option is useful if you want to process the Nmap result with other tools.
Even if you save the output to a file, Nmap still displays the result on the screen.
Nmap supports several output formats, as follows:
- Interactive output: This is a default output format, and the result is sent to the standard output.
- Normal output (-oN): This format is similar to the interactive output, but it doesn't include the runtime information and warnings.
- XML output (-oX): This format can be converted to an HTML format, parsed by the Nmap graphical user interface, or imported to the database. We suggest you use this output format as much as you can.
- Grepable output (-oG): This format is deprecated, but it is still quite popular. Grepable output consists of comments (lines starting with a hash (
#)) and target lines. A target line includes a combination of six labeled fields separated by tabs and followed by a colon. The fields areHost,Ports,Protocols,Ignored State,OS,Seq Index,IP ID Seq, andStatus. We sometimes use this output if we want to process the Nmap output using the UNIX commands, such asgrepandawk.
To save a scan result to an XML file (myscan.xml), use the following command:
nmap 172.16.43.156 -oX myscan.xml
The following is a snippet of the XML file:
<?xml version="1.0" encoding="UTF-8"?>
<!DOCTYPE nmaprun>
<?xml-stylesheet href="file:///usr/bin/../share/nmap/nmap.xsl" type="text/xsl"?>
<!-- Nmap 6.49BETA4 scan initiated Mon Feb 15 18:06:20 2016 as: nmap -oX metasploitablescan.xml 172.16.43.156 -->
<nmaprun scanner="nmap" args="nmap -oX metasploitablescan.xml 172.16.43.156" start="1455588380" startstr="Mon Feb 15 18:06:20 2016" version="6.49BETA4"
<scaninfo type="syn" protocol="tcp" numservices="1000" services="1,3-4,6-7,9,13,17,19-26,30,32-33,37,42-43,49,53,70,79-85,88-90,99-100,106,109-111,113,119,125,135,139,143-144,146,161,163,179,199,211-212,222,254-256,259,264,280,301,306,311,340,366,389,406-407,416-417,425,427,443-445,458,464-465,481,497,500,512-515,524,541,543-545,548,554-555,563,587,593,616-617,625,631,636,646,648,666-668,683,687,691,700,
For brevity purposes, a number of the ports have been removed. In the XML output you will see each port that Nmap scans against. The following shows each of the ports being scanned separately and what the response is. Again, for brevity's sake, not all of the ports have not been included:
<verbose level="0"/>
<debugging level="0"/>
<host starttime="1455588380" endtime="1455588382"><status state="up" reason="arp-response" reason_ttl="0"/>
<address addr="172.16.43.156" addrtype="ipv4"/>
<address addr="00:0C:29:18:0F:08" addrtype="mac" vendor="VMware"/>
<hostnames>
</hostnames>
<ports><extraports state="closed" count="977">
<extrareasons reason="resets" count="977"/>
</extraports>
<port protocol="tcp" portid="21"><state state="open" reason="syn-ack" reason_ttl="64"/><service name="ftp" method="table" conf="3"/></port>
<port protocol="tcp" portid="22"><state state="open" reason="syn-ack" reason_ttl="64"/><service name="ssh" method="table" conf="3"/></port>
<port protocol="tcp" portid="23"><state state="open" reason="syn-ack" reason_ttl="64"/><service name="telnet" method="table" conf="3"/></port>
<port protocol="tcp" portid="25"><state state="open" reason="syn-ack" reason_ttl="64"/><service name="smtp" method="table" conf="3"/></port>
<port protocol="tcp" portid="53"><state state="open" reason="syn-ack" reason_ttl="64"/><service name="domain" method="table" conf="3"/></port>
<port protocol="tcp" portid="80"><state state="open" reason="syn-ack" reason_ttl="64"/><service name="http" method="table" conf="3"/></port>
<port protocol="tcp" portid="111"><state state="open" reason="syn-ack" reason_ttl="64"/><service name="rpcbind" method="table" conf="3"/></port>
<port protocol="tcp" portid="139"><state state="open" reason="syn-ack" reason_ttl="64"/><service name="netbios-ssn" method="table" conf="3"/></port>
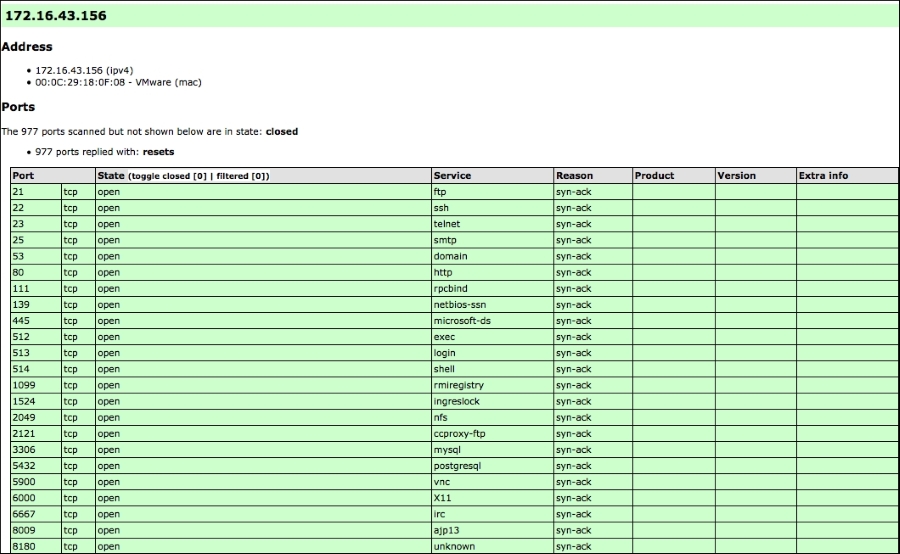
The XML output is a bit daunting to look at. To make it easier, you can convert the Nmap XML file to HTML. This allows you to have a clean-looking output for reporting purposes, as some of the non-technical personnel you may report to may not be used to viewing raw output. To convert the XML file, you can use the xsltproc program. The following command is used to convert the XML file to an HTML file:
xsltproc myscan.xml -o myscan.html
The following is a part of the HTML report as displayed by the Iceweasel web browser included in Kali Linux:
If you want to process the Nmap XML output to your liking, there are several programming language generic XML libraries that you can use for this purpose. Also, there are several libraries specifically developed to work with an Nmap output:
- Perl: Nmap-Parser (http://search.cpan.org/dist/Nmap-Parser/)
- Python: python-nmap (http://xael.org/norman/python/python-nmap/)
- Ruby: Ruby Nmap (http://rubynmap.sourceforge.net/)
- PowerShell: PowerShell script to parse Nmap XML output (http://www.sans.org/windows-security/2009/06/11/powershell-script-to-parse-nmap-xml-output)
Nmap comes with six timing modes that you can set with options (-T):
- paranoid (0): In this timing mode, a packet is sent every five minutes. The packets are sent in series. This mode is useful for avoiding IDS detection.
- sneaky (1): This mode sends a packet every 15 seconds, and there are no packets sent in parallel.
- polite (2): This mode sends a packet every 0.4 seconds, and there is no parallel transmission.
- normal (3): This mode sends multiple packets to multiple targets simultaneously. This is the default timing mode used by Nmap. It balances between time and network load.
- aggressive (4): Nmap will scan a given host only for five minutes before moving on to the next target. Nmap will not wait more than 1.25 seconds for a response.
- insane (5): In this mode, Nmap will scan a given host for only 75 seconds before moving on to the the next target. Nmap will not wait for more than 0.3 seconds for a response.
In our experience, the default timing mode usually works well unless you want to have a stealthier or faster scan.
In this section, we will discuss several Nmap options that are quite useful when doing a penetration testing job.
Nmap can also be asked to check the service version when doing port scanning. This information is very useful when you do the vulnerability identification process later on.
To use this feature, give Nmap the -sV option.
The following is an example for this feature's usage. We want to find the software version used on port 22:
nmap -sV 172.16.43.156 -p 22
The following is the result of this command:
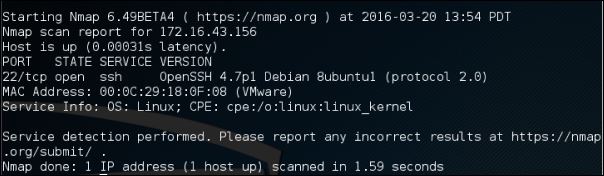
From the preceding information, we know that on port 22, there is an SSH service using the OpenSSH software version 4.7p1, and the SSH protocol is 2.0.
Nmap can also be asked to check the operating system used on the target machine. This information is very useful when you do the vulnerability identification process later on.
To use this feature, give Nmap the -O option.
The following is an example of this feature's usage. We want to find the operating system used on the target machine:
nmap -O 172.16.43.156
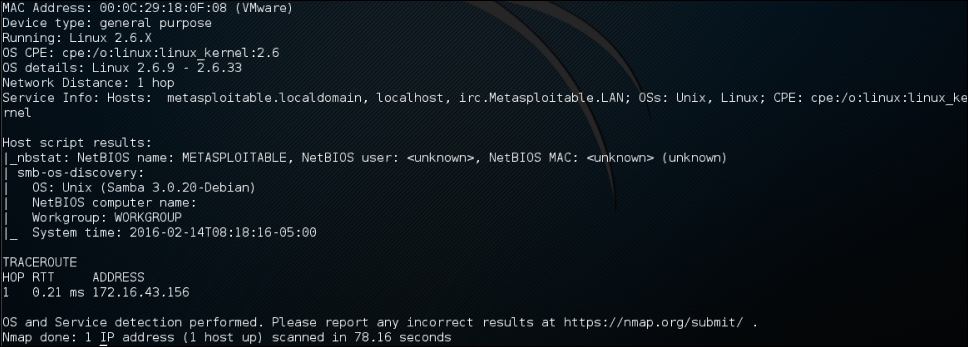
The following screenshot shows the result of this command:
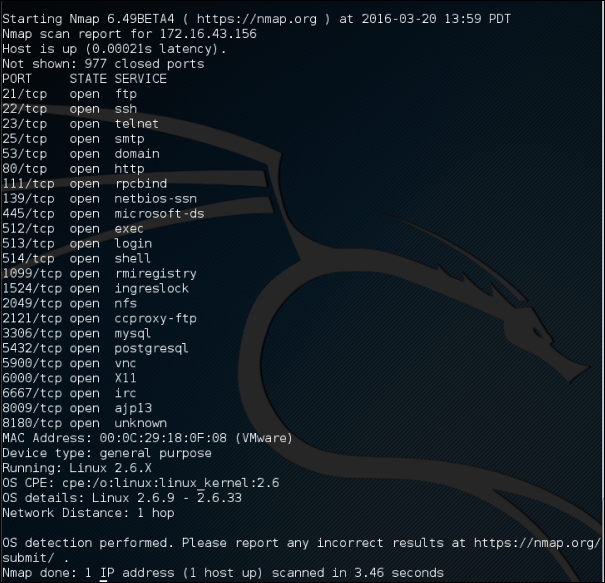
Based on the preceding information, we can see that the remote system is a Linux operating system using Linux kernel version 2.6.9 - 2.6.33. If there are vulnerabilities on those Linux kernels, we can exploit them.
If a host is blocking a ping request, Nmap may detect that the host is not active; so, Nmap may not perform heavy probing, such as port scanning, version detection, and operating system detection. To overcome this, Nmap has a feature for disabling host discovery. With this option, Nmap will assume that the target machine is available and will perform heavy probing against that machine.
This option is activated by using the -Pn option.
If you use the -A option, it will enable the following probe:
- Service version detection (
-sV) - Operating system detection (
-O) - Script scanning (
-sC) - Traceroute (
--traceroute)
It may take some time for this scan type to finish. The following command can be used for aggressive scanning:
nmap -A 172.16.43.156
The following is the abridged result of this command:
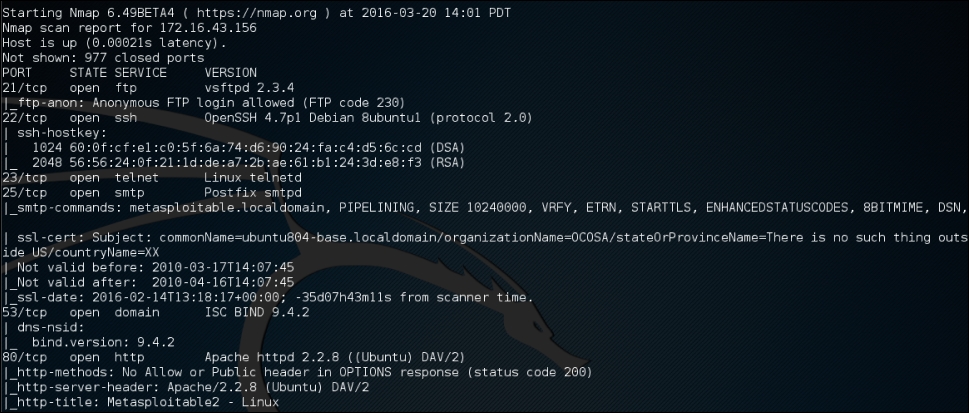
In addition to the detailed information about ports, services, and the certificates, further down we get detailed information concerning the Apache Webserver configured on this target machine:
In the previous section, we discussed that you can specify an IPv6 target in Nmap. In this section, we will discuss this in depth.
For this scenario, the following is the IPv6 address of each machine involved:
Target machine: fe80::20c:29ff:fe18:f08
To scan an IPv6 target, just use the -6 option and define the IPv6 target address. Currently, you can only specify individual IPv6 addresses. The following is a sample command to port scan the IPv6 address:
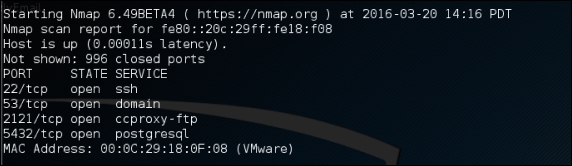
nmap -6 fe80::20c:29ff:fe18:f08
The following is the result of this command:
Although Nmap itself has already become a powerful network exploration tool, with the additional scripting engine capabilities, Nmap becomes a much more powerful tool. With the Nmap Scripting Engine (NSE), users can automate various networking tasks, such as checking for new security vulnerabilities in applications, detecting application versions, or other capabilities not available in Nmap. Nmap has already included various NSE scripts in its package, but users can also write their own scripts to suit their needs.
The NSE scripts utilize the Lua programming language (http://www.lua.org) embedded in Nmap, and currently, the NSE scripts are categorized as follows:
- auth: The scripts in this category are used to find the authentication set on the target system, such as using the brute force technique.
- default: These scripts are run by using the
-sCor-Aoptions. A script will be grouped in the default category if it satisfies the following requirements:- It must be fast
- It needs to produce valuable and actionable information
- Its output needs to be verbose and concise
- It must be reliable
- It should not be intrusive to the target system
- It should divulge information to the third party
- discovery: These scripts are used to find the network.
- DoS: The scripts in this category may cause Denial of Service (DoS) on the target system. Please use them carefully.
- exploit: These scripts will exploit security vulnerabilities on the target system. The penetration tester needs to have permission to run these scripts on the target system.
- external: These scripts may divulge information to third parties.
- fuzzer: These scripts are used to do fuzzing to the target system.
- intrusive: These scripts may crash the target system or use all of the target system resources.
- malware: These scripts will check for the existence of malware or backdoors on the target system.
- safe: These scripts are not supposed to cause a service crash, DoS, or exploit the target system.
- version: These scripts are used with the version detection option (
-sV) to carry out advanced detection for the service on the target system. - vuln: These scripts are used to check for security vulnerabilities on the target system.
In Kali Linux, these Nmap scripts are located in the /usr/share/nmap/scripts directories, and currently, Nmap version 6.25 included with Kali Linux contains more than 430 scripts.
There are several command-line arguments that can be used to call NSE, as follows:
- -sC or --script=default: This performs a scan using default scripts.
- --script <filename> | <category> | <directories>: This performs a scan using the script defined in filename, categories, or directories.
- --script-args <args>: This provides a script argument. An example of these arguments is username, or password if you use the auth category.
To do port scanning to the host 172.16.43.156 and utilize the default script categories, we can give the following command:
nmap -sC 172.16.43.156
The following is an abridge result:
Starting Nmap 6.49BETA4 ( https://nmap.org ) at 2016-02-22 17:09 PST
Nmap scan report for 172.16.43.156
Host is up (0.000099s latency).
Not shown: 977 closed ports
PORT     STATE SERVICE
21/tcp   open  ftp
|_ftp-anon: Anonymous FTP login allowed (FTP code 230)
22/tcp   open  ssh
| ssh-hostkey:
|   1024 60:0f:cf:e1:c0:5f:6a:74:d6:90:24:fa:c4:d5:6c:cd (DSA)
|_  2048 56:56:24:0f:21:1d:de:a7:2b:ae:61:b1:24:3d:e8:f3 (RSA)
23/tcp   open  telnet
25/tcp   open  smtp
|_smtp-commands: metasploitable.localdomain, PIPELINING, SIZE 10240000, VRFY, ETRN, STARTTLS, ENHANCEDSTATUSCODES, 8BITMIME, DSN,
| ssl-cert: Subject: commonName=ubuntu804-base.localdomain/organizationName=OCOSA/stateOrProvinceName=There is no such thing outside US/countryName=XX
| Not valid before: 2010-03-17T14:07:45
|_Not valid after:  2010-04-16T14:07:45
|_ssl-date: 2016-02-12T05:51:52+00:00; -10d19h17m25s from scanner time.
53/tcp   open  domain
| dns-nsid:
|_  bind.version: 9.4.2
80/tcp   open  http
|_http-methods: No Allow or Public header in OPTIONS response (status code 200)
|_http-title: Metasploitable2 - Linux
8009/tcp open  ajp13
|_ajp-methods: Failed to get a valid response for the OPTION request
8180/tcp open  unknown
|_http-favicon: Apache Tomcat
|_http-methods: No Allow or Public header in OPTIONS response (status code 200)
|_http-title: Apache Tomcat/5.5
MAC Address: 00:0C:29:18:0F:08 (VMware)

Host script results:
|_nbstat: NetBIOS name: METASPLOITABLE, NetBIOS user: <unknown>, NetBIOS MAC: <unknown> (unknown)
| smb-os-discovery:
|   OS: Unix (Samba 3.0.20-Debian)
|   NetBIOS computer name:
|   Workgroup: WORKGROUP
|_  System time: 2016-02-12T00:51:49-05:00

Nmap done: 1 IP address (1 host up) scanned in 12.76 seconds
From the preceding information, you can see that now the Nmap result is more thorough. This is because it utilizes the NSE default scripts.
However, if you only want specific information on the target system, you can use the script by itself. If we want to collect information about the HTTP server, we can use several HTTP scripts in NSE, such as http-enum, http-headers, http-methods, and http-php-version, using the following command:
nmap --script http-enum,http-headers,http-methods,http-php-version -p 80 172.16.43.156
The following is the result of this command:
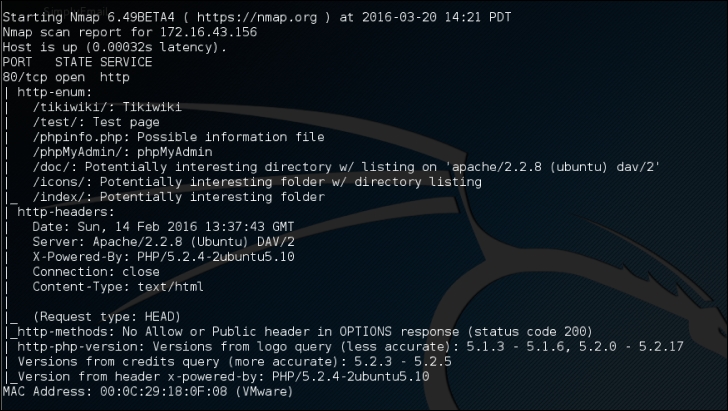
By utilizing four NSE scripts related to HTTP, we gain more information regarding the target system's web server:
After discussing Nmap, let's discuss another port scanner tool.
Note
There is a useful NSE script called Nmap NSE Vulscan (http://www.computec.ch/mruef/software/nmap_nse_vulscan-1.0.tar.gz) that can help you to map the version information you obtain from a target machine with the vulnerability database, such as CVE (http://cve.mitre.org/), OSVDB (http://www.osvdb.org/), scip VulDB (http://www.scip.ch/?vuldb), SecurityTracker (http://securitytracker.com/), and SecurityFocus (http://www.securityfocus.com/).
The following screenshot shows the sample result of the CVE script:

During penetration testing, you may encounter a system that is using firewall and IDS to protect the system. If you just use the default settings, your action may get detected or you may not get the correct result from Nmap. The following options may be used to help you evade the firewall/IDS:
- -f (fragment packets): This purpose of this option is to make it harder to detect the packets. By specifying this option once, Nmap will split the packet into 8 bytes or less after the IP header.
- --mtu: With this option, you can specify your own packet size fragmentation. The Maximum Transmission Unit (MTU) must be a multiple of eight or Nmap will give an error, and exit.
- -D (decoy): By using this option, Nmap will send some of the probes from the spoofed IP addresses specified by the user. The idea is to mask the true IP address of the user in the log files. The user IP address is still in the logs. You can use
RNDto generate a random IP address orRND:numberto generate the<number>IP address. The hosts you use for decoys should be up, or you will flood the target. Also remember that by using many decoys you can cause network congestion, so you may want to avoid that, especially if you are scanning your client network. - --source-port <portnumber> or –g (spoof source port): This option will be useful if the firewall is set up to allow all incoming traffic that comes from a specific port.
- --data-length: This option is used to change the default data length sent by Nmap in order to avoid being detected as Nmap scans.
- --max-parallelism: This option is usually set to one in order to instruct Nmap to send no more than one probe at a time to the target host.
- --scan-delay <time>: This option can be used to evade IDS/IPS that uses a threshold to detect port scanning activity.
Note
You may also experiment with other Nmap options for evasion as explained in the Nmap manual (http://nmap.org/book/man-bypass-firewalls-ids.html).