Table of Contents for
Kali Linux 2 – Assuring Security by Penetration Testing - Third Edition
 Kali Linux 2 – Assuring Security by Penetration Testing - Third Edition
Published by
Packt Publishing, 2016
Kali Linux 2 – Assuring Security by Penetration Testing - Third Edition
Published by
Packt Publishing, 2016
- Cover
- Table of Contents
- Kali Linux 2 – Assuring Security by Penetration Testing Third Edition
- Kali Linux 2 – Assuring Security by Penetration Testing Third Edition
- Credits
- Disclaimer
- About the Authors
- About the Reviewer
- www.PacktPub.com
- Preface
- What you need for this book
- Who this book is for
- Conventions
- Reader feedback
- Customer support
- 1. Beginning with Kali Linux
- Kali Linux tool categories
- Downloading Kali Linux
- Using Kali Linux
- Configuring the virtual machine
- Updating Kali Linux
- Network services in Kali Linux
- Installing a vulnerable server
- Installing additional weapons
- Summary
- 2. Penetration Testing Methodology
- Vulnerability assessment versus penetration testing
- Security testing methodologies
- General penetration testing framework
- Information gathering
- The ethics
- Summary
- 3. Target Scoping
- Preparing the test plan
- Profiling test boundaries
- Defining business objectives
- Project management and scheduling
- Summary
- 4. Information Gathering
- Using public resources
- Querying the domain registration information
- Analyzing the DNS records
- Getting network routing information
- Utilizing the search engine
- Metagoofil
- Accessing leaked information
- Summary
- 5. Target Discovery
- Identifying the target machine
- OS fingerprinting
- Summary
- 6. Enumerating Target
- Understanding the TCP/IP protocol
- Understanding the TCP and UDP message format
- The network scanner
- Unicornscan
- Zenmap
- Amap
- SMB enumeration
- SNMP enumeration
- VPN enumeration
- Summary
- 7. Vulnerability Mapping
- Vulnerability taxonomy
- Automated vulnerability scanning
- Network vulnerability scanning
- Web application analysis
- Fuzz analysis
- Database assessment tools
- Summary
- 8. Social Engineering
- Attack process
- Attack methods
- Social Engineering Toolkit
- Summary
- 9. Target Exploitation
- Vulnerability and exploit repositories
- Advanced exploitation toolkit
- MSFConsole
- MSFCLI
- Ninja 101 drills
- Writing exploit modules
- Summary
- 10. Privilege Escalation
- Password attack tools
- Network spoofing tools
- Network sniffers
- Summary
- 11. Maintaining Access
- Working with tunneling tools
- Creating web backdoors
- Summary
- 12. Wireless Penetration Testing
- Wireless network recon
- Wireless testing tools
- Post cracking
- Sniffing wireless traffic
- Summary
- 13. Kali Nethunter
- Installing Kali Nethunter
- Nethunter icons
- Nethunter tools
- Third-party applications
- Wireless attacks
- HID attacks
- Summary
- 14. Documentation and Reporting
- Types of reports
- The executive report
- The management report
- The technical report
- Network penetration testing report (sample contents)
- Preparing your presentation
- Post-testing procedures
- Summary
- A. Supplementary Tools
- Web application tools
- Network tool
- Summary
- B. Key Resources
- Paid incentive programs
- Reverse engineering resources
- Penetration testing learning resources
- Exploit development learning resources
- Penetration testing on a vulnerable environment
- Online web application challenges
- Virtual machines and ISO images
- Network ports
- Index
Most applications that are developed these days integrate different web technologies. This increases the complexity and risk of exposing sensitive data. Web applications have always been a long-standing target for malicious adversaries to steal, manipulate, sabotage, and extort corporate businesses. This proliferation of web applications has brought forth enormous challenges for penetration testers. The key is to secure both the web applications (frontend) and the databases (backend), as well as the network security countermeasures. This is necessary because web applications act as a data-processing system, and the database is responsible for storing sensitive data (for example, credit cards, customer details, authentication data, and so on).
The tools presented in this section mainly focus on the front-end security of web infrastructure. They can be used to identify, analyze, and exploit a wide range of application security vulnerabilities. These include cross-site scripting (XSS), SQL injection, SSI injection, XML injection, application misconfiguration, abuse of functionality, session prediction, information disclosure, and many other attacks and weaknesses. There are various standards to classify these application vulnerabilities, which have been previously discussed in the Vulnerability taxonomy section. In order to understand the nuts and bolts of these vulnerabilities, we strongly recommend that you go through these standards.
Nikto2 is a basic web server security scanner. It scans and detects the security vulnerabilities caused by server misconfiguration, default and insecure files, and outdated server applications. Nikto2 is purely built on LibWhisker2, and thus supports cross-platform deployment, SSL, host authentication methods (NTLM/Basic), proxies, and several IDS evasion techniques. It also supports subdomain enumeration, application security checks (XSS, SQL injection, and so on), and is capable of guessing the authorization credentials using a dictionary-based attack method.
To start Nikto2, navigate to Web Applications | Web Vulnerability Scanners | nikto or use the console to execute the following command:
# nikto
This will display all the options with their extended features. In our exercise, we choose to execute a specific set of tests against the target using the standard options. In order to learn more about each option and its usage, visit http://cirt.net/nikto2-docs/. For this scan, we configured Nikto2 to run against the following IP address and port number, where –h is the host or IP address and –p is the port number:
# nikto -h http://172.16.43.156 -p 80
The abridged output is shown in the following screenshot:
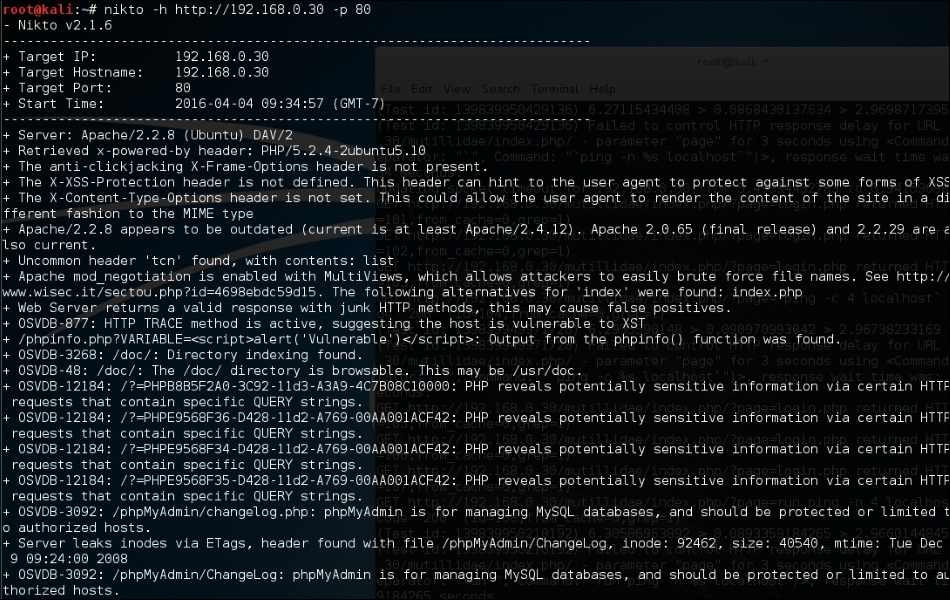
Nikto has the functionality to identify web application vulnerabilities such as information disclosure, injection (XSS/Script/HTML), remote file retrieval (server wide), command execution, and software identification). In addition to the basic scanning demonstrated, Nikto allows the penetration tester to tailor scanning to their particular target. The following are some of the options that can be utilized for scanning:
- Using the
-Tcommand-line switch with individual test numbers will tailor the testing to specific types - By using
–t, you can set the timeout value for each test response - -
D Vcontrols the display output -oand-Fdefine the scan report to be written in a particular format- There are other advanced options such as
–mutate(to guess subdomains, files, directories, and usernames),-evasion(to bypass the IDS filter), and-Single(for single test mode), which you can use to assess your target in depth.
OWASP Zed Attack Proxy (ZAP) is a web application vulnerability scanner. Created by the OWASP project, this is a Java-based open source scanner that has a great deal of functionality. It includes web crawlers, vulnerability identification, fuzzing analysis, and can serve as a web proxy. To access the ZAP, navigate to Applications | Web Application Analysis | owasp-zap or type the following command into the command line:
#owasp-zap
Once ZAP has loaded, you will be taken to the main screen. To begin a scan, input the URL or IP address of the target system in the URL to attack bar and click the Attack button:

The first step that ZAP takes when scanning a site is to identify, or crawl, the entire site, following links that are associated with the host. For those links that lead to other hosts, ZAP identifies them as being out of scope:

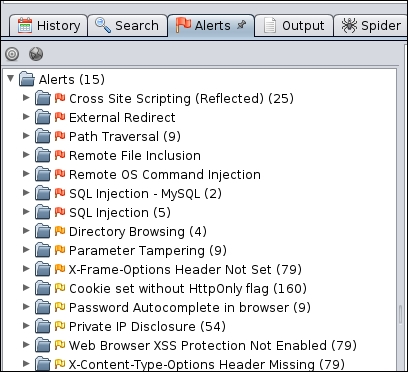
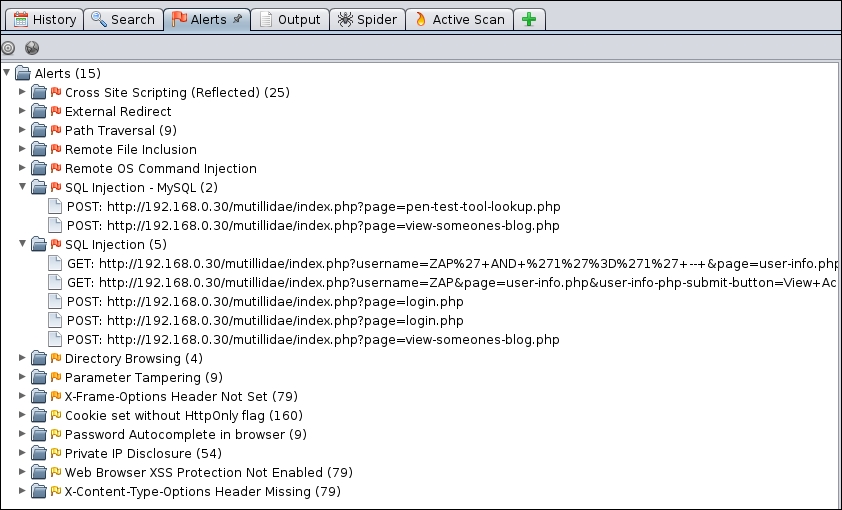
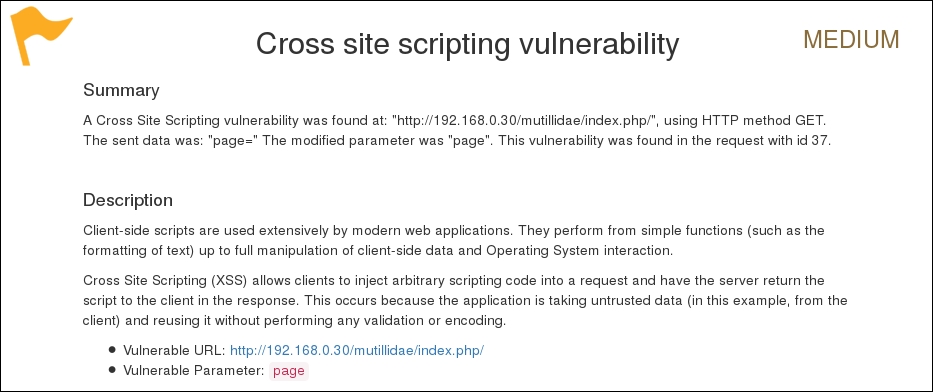
After crawling the site, ZAP conducts a number of different checks against common web application vulnerabilities. These are indicated under the Alerts tab in the bottom left-hand corner. For example, the following are the vulnerabilities identified by ZAP on the Metasploitable web application Mutillidae:
You can then drill down on specific site pathways to determine exactly where these vulnerabilities present themselves:
In addition to web application vulnerability scanning, ZAP has a great deal of other tools that can aid in assessing web application security. For more information about ZAP, OWASP has resources located at https://www.owasp.org/index.php/ZAP.
Burp Suite is a combination of powerful web application security tools. These tools demonstrate the real-world capabilities of an attacker penetrating web applications. They can scan, analyze, and exploit web applications using manual and automated techniques. The integration facility between the interfaces of these tools provides a complete attack platform to share information between one or more tools. This makes the Burp Suite a very effective and easy to use web application attack framework.
To start Burp Suite, navigate to Applications | Web Application Analysis | burpsuite or use the console to execute the following command:
# burpsuite
You will be presented with a Burp Suite window on your screen. All the integrated tools (Target, Proxy, Spider, Scanner, Intruder, Repeater, Sequencer, Decoder, and Comparer) can be accessed via their individual tabs. You can get more details about their usage and configuration through the Help menu or by visiting http://www.portswigger.net/burp/help/. In our exercise, we will analyze a small web application using a number of Burp Suite tools. Note that Burp Suite is available in two different editions: free and commercial. The one available in Kali Linux is a free edition. The steps to detect the possibility of an SQL injection vulnerability are as follows:
- First, navigate to Proxy | Options and verify the Proxy listeners property. In our case, we left the default settings to listen on port
8080. More options such as Host redirection, SSL certificate, Client request interception, Server response interception, Page properties, and Header modifications can be used to match your application's assessment criteria. - Navigate to Proxy | Intercept and verify that the Intercept on tab is enabled.
- Open your favorite browser (Firefox, for example) and set up the local proxy for HTTP/HTTPs transactions (
127.0.0.1, 8080) to intercept, inspect, and modify the requests between the browser and the target web application. All the consequent responses will be recorded accordingly. Here, the Burp Suite application acts as the man-in-the-middle (MITM) proxy. - Surf the target website (for example, http://hackthissite.org) and you will notice that the request has been trapped under Proxy | Intercept. In our case, we decide to forward this request without any modification. If you decide to modify any such request, you can do so with the Raw, Headers, or Hex tabs. Note that any other target application resources (for example, images and flash files) might generate individual requests while accessing the index page.
Once you are comfortable with the Proxy feature of Burp Suite, you can explore a number of the other tools that are available. Once you have captured some traffic with the Proxy Intercept, the following are some of the testing tools:
- Spider: The spider feature allows you to follow all links on a target website in much the same way that ZAP does. This feature allows you to search the full width of a site and determine if there are vulnerable pages that a cursory search would not identify.
- Repeater: Sometimes, when conducting assessments against websites, it is necessary to ensure that the request/response still works. The repeater allows you to resend an HTTP or HTTPs request to reexamine the request and response. This is critical when looking at session IDs, as attacks will often not work if there is a mismatch.
- Intruder: After capturing traffic, Burp Suite has a number of tools to conduct attacks and other tests for common web application vulnerabilities. The intruder function also allows you to customize attacks based on a wide range of variables, including brute forcing and character manipulation.
- Comparer: The comparer function allows the tester to conduct a bit for bit comparison for captured traffic. This is very useful in cases where minor changes may go undetected, or to see if session ID numbers have changed in web application requests and responses.
Burp Suite, as an all-in-one application security toolkit, is a very extensive and powerful web application attack platform. Explaining every part of it is beyond the scope of this book; therefore, we strongly suggest that you visit the website (http://www.portswigger.net) for more detailed examples.
Paros proxy is a valuable and intensive vulnerability assessment tool. It spiders through the entire website and executes various vulnerability tests. It also allows an auditor to intercept the web traffic (HTTP/HTTPs) by setting up a local proxy between the browser and the actual target application. This mechanism helps an auditor tamper with or manipulate particular requests being made to the target application, in order to test it manually. Thus, Paros proxy acts as an active and passive web application security assessment tool.
To start Paros proxy, navigate to Applications | Web Application Analysis | Paros or use the console to execute the following command:
# paros
This will bring up the Paros proxy window. Before you go through any practical exercises, you need to set up a local proxy (127.0.0.1, 8080) in your favorite browser. If you need to change any default settings, navigate to Tools | Options in the menu bar. This will allow you to modify the connection settings, local proxy values, HTTP authentication, and other relevant information. Once your browser has been set up, visit your target website.
The following are the steps for vulnerability testing and obtaining its report:
- In our case, we browse through
http://192.168.0.30/mutillidaeand notice that it has appeared under the Sites tab of the Paros Proxy. - Right-click on
http://192.168.0.30/mutillidaeand choose Spider to crawl through the entire website. This will take some minutes, depending on how big your website is. - Once the website crawling has finished, you can see all the discovered pages in the Spider tab at the bottom. Additionally, you can chase up the particular request and response for a desired page by selecting the target website, and choosing a specific page on the left-hand panel of the Sites tab.
- In order to trap any further requests and responses, go to the Trap tab on the right-hand panel. This is particularly useful when you decide to throw some manual tests against the target application. Moreover, you can also construct your own HTTP request by navigating to Tools | Manual Request Editor.
- To execute the automated vulnerability testing, we select the target website under the Sites tab and navigate to Analyze | Scan All from the menu. Note that you can still select the specific types of security tests by navigating to Analyze | Scan Policy and then navigating to Analyze | Scan instead of selecting Scan All.
- Once the vulnerability testing is complete, you can see a number of security alerts on the Alerts tab at the bottom. These are categorized as High, Low, and Medium type risk levels.
- If you would like the scan report, navigate to Report | Last Scan Report in the menu bar. This will generate a report that lists all the vulnerabilities found during the test session
(/root/paros/session/LatestScannedReport.html):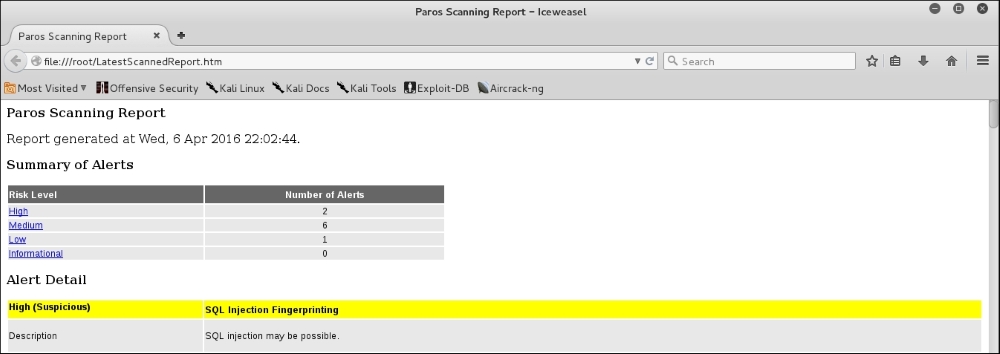
We made use of the basic vulnerability assessment test for our exemplary scenario. To become more familiar with various options offered by the Paros proxy, we recommend you read the user guide available at http://www.i-pi.com/Training/SecTesting/paros_user_guide.pdf.
W3AF is a feature-rich web application attack and audit framework that aims to detect and exploit web vulnerabilities. The whole application security assessment process is automated, and the framework is designed to follow three major steps: discovery, audit, and attack. Each of these steps includes several plugins that might help the auditor focus on specific testing criteria. All these plugins can communicate and share test data in order to achieve the required goal. It supports the detection and exploitation of multiple web-application vulnerabilities including SQL injection, cross-site scripting, remote and local file inclusion, buffer overflows, XPath injections, OS commanding, application misconfiguration, and so forth. To get more information about each available plugin, go to http://w3af.sourceforge.net/plugin-descriptions.php.
To start W3AF, navigate to Applications | Web Vulnerability Analysis | w3af or use the console to execute the following command:
# w3af_console
This will drop you into a personalized W3AF console mode (w3af>>>). Note that the GUI version of this tool is also available in the location of the same menu but we have chosen to introduce the console version to you because of flexibility and customization:
w3af>>> help
This will display all the basic options that can be used to configure the test. You can use the help command whenever you require any assistance in following a specific option. In our exercise, we will first configure the output plugin, enable the selected audit tests, set up the target, and execute the scan process against the target website, using the following commands:
w3af>>> plugins
w3af/plugins>>> help
w3af/plugins>>> output
w3af/plugins>>> output console, html_file
w3af/plugins>>> output confightml_file
w3af/plugins/output/config:html_file>>> help
w3af/plugins/output/config:html_file>>> view
w3af/plugins/output/config:html_file>>> set verbose True
w3af/plugins/output/config:html_file>>> set output_file metasploitable.html
w3af/plugins/output/config:html_file>>> back
w3af/plugins>>> output config console
w3af/plugins/output/config:console>>> help
w3af/plugins/output/config:console>>> view
w3af/plugins/output/config:console>>> set verbose False
w3af/plugins/output/config:console>>> back
w3af/plugins>>> audit
w3af/plugins>>> audit htaccess_methods, os_commanding, sqli, xss
w3af/plugins>>> back
w3af>>> target
w3af/config:target>>> help
w3af/config:target>>> view
w3af/config:target>>> set target http://http://192.168.0.30/mutillidae/index.php?page=login.php
w3af/config:target>>> back
w3af>>>
At this point, we have configured all the required test parameters. Our target will be evaluated against the SQL injection, cross-site scripting, OS commanding, and htaccess misconfiguration using the following code:
w3af>>> start
As you can see, we have discovered a cross-site scripting vulnerability in the target web application. A detailed report is also created in html and sent to the root folder. This report details all the vulnerabilities including the debug information about each request and response data transferred between W3AF and the target web application. The test case that we presented in the preceding code does not reflect the use of other useful plugins, profiles, and exploit options. Hence, we strongly recommend that you drill through various exercises present in the user guide. These are available at http://w3af.sourceforge.net/documentation/user/w3afUsersGuide.pdf.
WafW00f is a very useful Python script, capable of detecting the web application firewall (WAF). This tool is particularly useful when a penetration tester wants to inspect the target application server, and might get a fallback with certain vulnerability assessment techniques, for which the web application is actively protected by a firewall. Therefore, detecting the firewall sitting in between the application server and the Internet traffic not only improves a testing strategy, but also presents exceptional challenges for the penetration tester to develop advanced evasion techniques.
To start WafW00f, use the console to execute the following command:
# wafw00f
This will display a simple usage instruction and example on your screen. In our exercise, we are going to analyze our target website for the possibility of a web application firewall as follows:
# wafw00f example.com
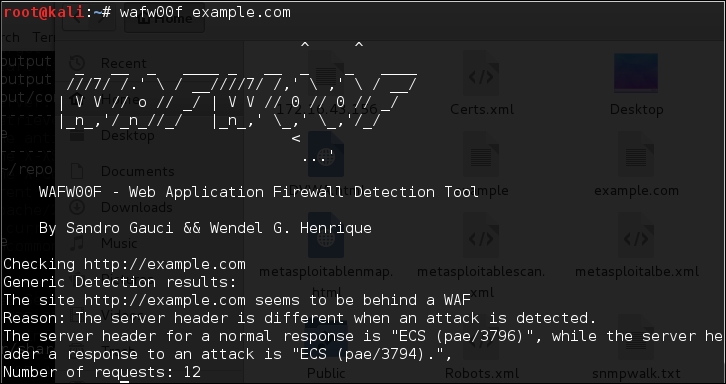
The result proves that the target application server is running behind the firewall (for example, dotDefender). Using this information, we could further investigate the possible ways to bypass WAF. These could involve techniques such as the HTTP parameter pollution, null-byte replacement, normalization, and encoding the malicious URL string into Hex or Unicode.
WebScarab is a powerful web application security assessment tool. It has several modes of operation, but is mainly operated through the intercept proxy. This proxy sits in between the end user's browser, and the target web application, to monitor and modify the requests and responses that are being transmitted on either side. This process helps the auditor manually craft the malicious request and observe the response thrown back by the web application. It has a number of integrated tools, such as fuzzer, session ID analysis, spider, web services analyzer, XSS and CRLF vulnerability scanner, transcoder, and others.
To start WebScarab lite, navigate to Applications | Web Application Analysis | webscarab or use the console to execute the following command:
# webscarab
This will pop up the lite edition of WebScarab. For our exercise, we are going to transform it into a full-featured edition by navigating to Tools | Use full-featured interface in the menu bar. This will confirm the selection and you should restart the application accordingly. Once you restart the WebScarab application, you will see a number of tool tabs on your screen. Before we start our exercise, we need to configure the browser to the local proxy (127.0.0.1, 8008) in order to browse the target application via the WebScarab intercept proxy. If you want to change the local proxy (IP address or port), then navigate to the Proxy | Listeners tab. The following steps will help you analyze the target application's session ID:
- Once the local proxy has been set up, you should browse the target website (for example,
http://192.168.0.30/mutillidae)and visit as many links as possible. This will increase the probability and chance of catching the known and unknown vulnerabilities. Alternatively, you can select the target under the Summary tab, right-click, and choose Spider tree. This will fetch all the available links in the target application. - If you want to check the request and response data for the particular page mentioned at the bottom of the Summary tab, double-click on it and see the parsed request in a tabular and raw format. However, the response can be viewed in HTML, XML, text, and hex formats.
- During the test period, we decide to fuzz one of our target application links that have the parameters (for example,
artist=1) with theGETmethod. This may reveal any unidentified vulnerability, if it exists. Right-click on the selected link and choose Use as fuzz template. Now click on the Fuzzer tab and manually apply different values to the parameter by clicking on the Add button near the Parameters section. In our case, we wrote a small text file listing the known SQL injection data (for example,1 AND 1=2,1 AND 1=1, single quote (')), and provided it as a source for the fuzzing parameter value. This can be accomplished using the Sources button under the Fuzzer tab. Once your fuzz data is ready, click on Start. After all tests are complete, you can double-click on an individual request and inspect its consequent response. In one of our test cases, we discovered a MySQL injection vulnerability:- Error: You have an error in your SQL syntax; check the manual that corresponds to your MySQL server version for the right syntax to use
near '\''at line 1 - Warning:
mysql_fetch_array():supplied argument is not a valid MySQL result resource in/var/www/vhosts/default/htdocs/listproducts.phpon line 74
- Error: You have an error in your SQL syntax; check the manual that corresponds to your MySQL server version for the right syntax to use
- In our last test case, we decide to analyze the target application's session ID. For this purpose, go to the SessionID Analysis tab and choose Previous Requests from the combo box. Once the chosen request has been loaded, go to the bottom, select samples (for example,
20), and click on Fetch to retrieve various samples of session IDs. After that, click on the Test button to start the analysis process. You can see the results on the Analysis tab and the graphical representation on the Visualization tab. This process determines the randomness and unpredictability of session IDs, which could result in hijacking other users' sessions or credentials.
This tool has a variety of options and features, which could potentially add a cognitive value to penetration testing. To get more information about the WebScarab project, visit http://www.owasp.org/index.php/Category:OWASP_WebScarab_Project.