Table of Contents for
Kali Linux 2 – Assuring Security by Penetration Testing - Third Edition
 Kali Linux 2 – Assuring Security by Penetration Testing - Third Edition
Published by
Packt Publishing, 2016
Kali Linux 2 – Assuring Security by Penetration Testing - Third Edition
Published by
Packt Publishing, 2016
- Cover
- Table of Contents
- Kali Linux 2 – Assuring Security by Penetration Testing Third Edition
- Kali Linux 2 – Assuring Security by Penetration Testing Third Edition
- Credits
- Disclaimer
- About the Authors
- About the Reviewer
- www.PacktPub.com
- Preface
- What you need for this book
- Who this book is for
- Conventions
- Reader feedback
- Customer support
- 1. Beginning with Kali Linux
- Kali Linux tool categories
- Downloading Kali Linux
- Using Kali Linux
- Configuring the virtual machine
- Updating Kali Linux
- Network services in Kali Linux
- Installing a vulnerable server
- Installing additional weapons
- Summary
- 2. Penetration Testing Methodology
- Vulnerability assessment versus penetration testing
- Security testing methodologies
- General penetration testing framework
- Information gathering
- The ethics
- Summary
- 3. Target Scoping
- Preparing the test plan
- Profiling test boundaries
- Defining business objectives
- Project management and scheduling
- Summary
- 4. Information Gathering
- Using public resources
- Querying the domain registration information
- Analyzing the DNS records
- Getting network routing information
- Utilizing the search engine
- Metagoofil
- Accessing leaked information
- Summary
- 5. Target Discovery
- Identifying the target machine
- OS fingerprinting
- Summary
- 6. Enumerating Target
- Understanding the TCP/IP protocol
- Understanding the TCP and UDP message format
- The network scanner
- Unicornscan
- Zenmap
- Amap
- SMB enumeration
- SNMP enumeration
- VPN enumeration
- Summary
- 7. Vulnerability Mapping
- Vulnerability taxonomy
- Automated vulnerability scanning
- Network vulnerability scanning
- Web application analysis
- Fuzz analysis
- Database assessment tools
- Summary
- 8. Social Engineering
- Attack process
- Attack methods
- Social Engineering Toolkit
- Summary
- 9. Target Exploitation
- Vulnerability and exploit repositories
- Advanced exploitation toolkit
- MSFConsole
- MSFCLI
- Ninja 101 drills
- Writing exploit modules
- Summary
- 10. Privilege Escalation
- Password attack tools
- Network spoofing tools
- Network sniffers
- Summary
- 11. Maintaining Access
- Working with tunneling tools
- Creating web backdoors
- Summary
- 12. Wireless Penetration Testing
- Wireless network recon
- Wireless testing tools
- Post cracking
- Sniffing wireless traffic
- Summary
- 13. Kali Nethunter
- Installing Kali Nethunter
- Nethunter icons
- Nethunter tools
- Third-party applications
- Wireless attacks
- HID attacks
- Summary
- 14. Documentation and Reporting
- Types of reports
- The executive report
- The management report
- The technical report
- Network penetration testing report (sample contents)
- Preparing your presentation
- Post-testing procedures
- Summary
- A. Supplementary Tools
- Web application tools
- Network tool
- Summary
- B. Key Resources
- Paid incentive programs
- Reverse engineering resources
- Penetration testing learning resources
- Exploit development learning resources
- Penetration testing on a vulnerable environment
- Online web application challenges
- Virtual machines and ISO images
- Network ports
- Index
In this section, we will discuss two tools that can be used to test web applications. These tools are meant to supplement the other tools that we have discussed in the previous chapter on vulnerability assessment. In some instances, these tools are a better fit for the type of test that you are conducting.
Vega is an open source framework specifically designed for web testing. Vega is a Java-based application that provides testers with an easy to follow GUI. The following are some of its features:
- The ability to utilize a number of injection modules, such as SQLi, XSS, and Shell injection attacks
- Scanning with authentication and session cookies
- Web Proxy
- Reporting capability
Vega is not included with Kali Linux v 2.0. As a result, it has to be installed. You can download the latest version at https://subgraph.com/vega/.
Once downloaded, extract the zip file to your preferred location.
Navigate to the folder and type the following:
./Vega
Navigate to Scan and click on Start New Scan, which opens the following:

Enter in the target website or IP address and then click Next. This will bring you to the next screen. Here, we can configure the scan and the type of injection module. The default modules provide a good overview if you are just beginning. Once you have selected the modules, click Next:
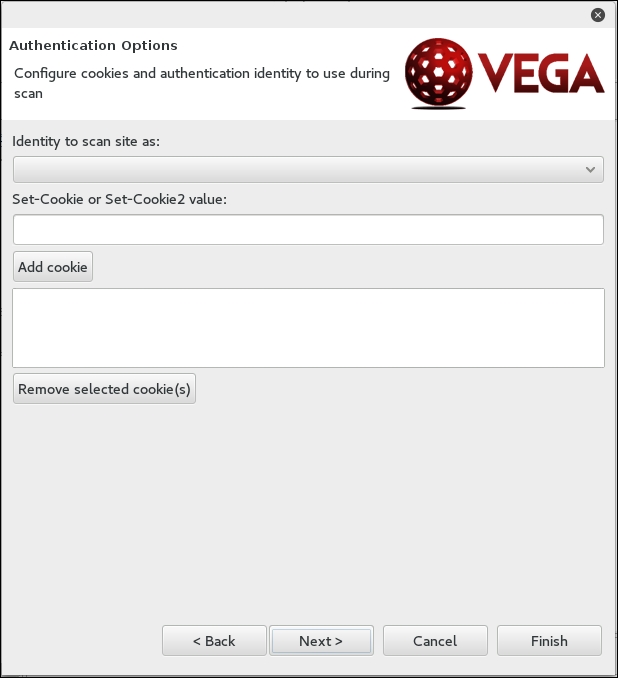
The next set of options that can be configured is the use of cookies. On this screen, you can replay an authentication identity or session cookie depending on the type of site you are scanning. Once you are done, click Next:
Finally, you can fine-tune the scan to exclude specific parameters that are not needed:

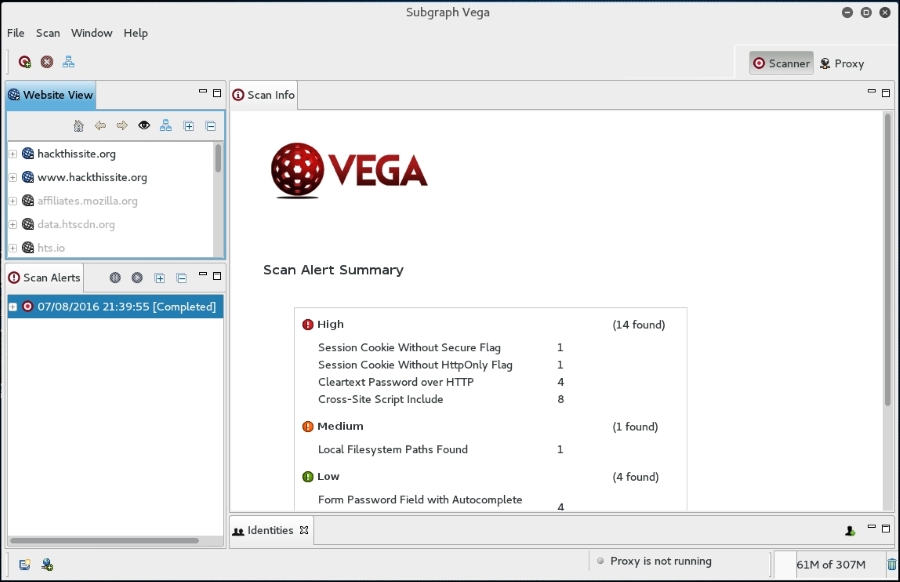
Click Finish and the scan will run. On completion of the scan, the following summary will be presented:
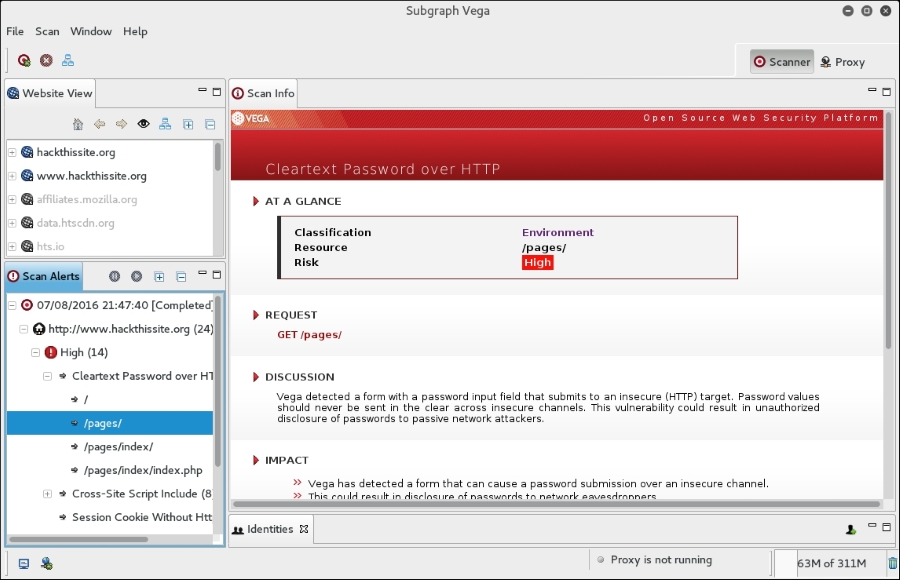
To drill down to a specific vulnerability, click on the plus sign in the Scan Alerts window. This will expand the results with details about specific findings:
As we can see, the Vega web vulnerability scanner allows for the customization of scanning in an easy-to-use interface. This is a useful tool to include within the vulnerability scanning family of tools.
BlindElephant is a web application fingerprint tool that attempts to discover the version of a known web application by comparing the static files at known locations against precomputed hashes for versions of those files in all available releases.
The technique that is utilized here is fast, low-bandwidth, non-invasive, generic, and highly automated.
To display the BlindElephant help page, you can type the following command:
BlindElephant.py -h
This will display the help message on your screen.
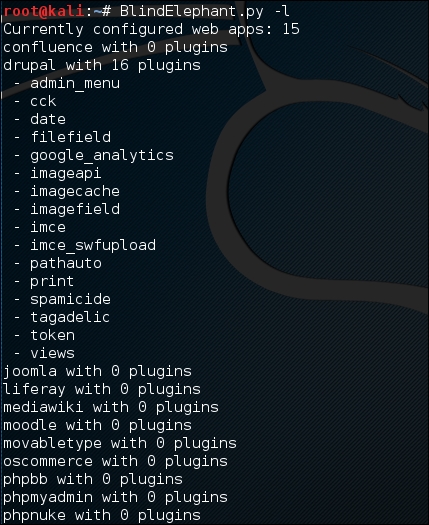
If you want to know about the web applications and plugins supported by BlindElephant, you can type the following command:
BlindElephant.py –l
The following screenshot is the result:
For our example, we want to find out the WordPress version used by the target website. The following is the command to do that:
BlindElephant.py <target> wordpress
The following is the result of that command:
Hit http://target/readme.html
Possible versions based on result: 3.1.3, 3.1.3-IIS
Hit http://target/wp-includes/js/tinymce/tiny_mce.js
Possible versions based on result: 3.1.1, 3.1.1-IIS, 3.1.1-RC1, 3.1.1-RC1-IIS, 3.1.2, 3.1.2-IIS, 3.1.3, 3.1.3-IIS, 3.1.4, 3.1.4-IIS
...
Possible versions based on result: 3.1, 3.1.1, 3.1.1-IIS, 3.1.1-RC1, 3.1.1-RC1-IIS, 3.1.2, 3.1.2-IIS, 3.1.3, 3.1.3-IIS, 3.1.4, 3.1.4-IIS, 3.1-beta1, 3.1-beta1-IIS, 3.1-beta2, 3.1-beta2-IIS, 3.1-IIS, 3.1-RC1, 3.1-RC2, 3.1-RC2-IIS, 3.1-RC3, 3.1-RC3-IIS, 3.1-RC4, 3.1-RC4-IIS

Fingerprinting resulted in:
3.1.3
3.1.3-IIS

Best Guess: 3.1.3
The target website uses WordPress Version 3.1.3, based on a BlindElephant guess. Once we know this information, we can find out the vulnerabilities that exist in that particular version.