Table of Contents for
Kali Linux 2 – Assuring Security by Penetration Testing - Third Edition
 Kali Linux 2 – Assuring Security by Penetration Testing - Third Edition
Published by
Packt Publishing, 2016
Kali Linux 2 – Assuring Security by Penetration Testing - Third Edition
Published by
Packt Publishing, 2016
- Cover
- Table of Contents
- Kali Linux 2 – Assuring Security by Penetration Testing Third Edition
- Kali Linux 2 – Assuring Security by Penetration Testing Third Edition
- Credits
- Disclaimer
- About the Authors
- About the Reviewer
- www.PacktPub.com
- Preface
- What you need for this book
- Who this book is for
- Conventions
- Reader feedback
- Customer support
- 1. Beginning with Kali Linux
- Kali Linux tool categories
- Downloading Kali Linux
- Using Kali Linux
- Configuring the virtual machine
- Updating Kali Linux
- Network services in Kali Linux
- Installing a vulnerable server
- Installing additional weapons
- Summary
- 2. Penetration Testing Methodology
- Vulnerability assessment versus penetration testing
- Security testing methodologies
- General penetration testing framework
- Information gathering
- The ethics
- Summary
- 3. Target Scoping
- Preparing the test plan
- Profiling test boundaries
- Defining business objectives
- Project management and scheduling
- Summary
- 4. Information Gathering
- Using public resources
- Querying the domain registration information
- Analyzing the DNS records
- Getting network routing information
- Utilizing the search engine
- Metagoofil
- Accessing leaked information
- Summary
- 5. Target Discovery
- Identifying the target machine
- OS fingerprinting
- Summary
- 6. Enumerating Target
- Understanding the TCP/IP protocol
- Understanding the TCP and UDP message format
- The network scanner
- Unicornscan
- Zenmap
- Amap
- SMB enumeration
- SNMP enumeration
- VPN enumeration
- Summary
- 7. Vulnerability Mapping
- Vulnerability taxonomy
- Automated vulnerability scanning
- Network vulnerability scanning
- Web application analysis
- Fuzz analysis
- Database assessment tools
- Summary
- 8. Social Engineering
- Attack process
- Attack methods
- Social Engineering Toolkit
- Summary
- 9. Target Exploitation
- Vulnerability and exploit repositories
- Advanced exploitation toolkit
- MSFConsole
- MSFCLI
- Ninja 101 drills
- Writing exploit modules
- Summary
- 10. Privilege Escalation
- Password attack tools
- Network spoofing tools
- Network sniffers
- Summary
- 11. Maintaining Access
- Working with tunneling tools
- Creating web backdoors
- Summary
- 12. Wireless Penetration Testing
- Wireless network recon
- Wireless testing tools
- Post cracking
- Sniffing wireless traffic
- Summary
- 13. Kali Nethunter
- Installing Kali Nethunter
- Nethunter icons
- Nethunter tools
- Third-party applications
- Wireless attacks
- HID attacks
- Summary
- 14. Documentation and Reporting
- Types of reports
- The executive report
- The management report
- The technical report
- Network penetration testing report (sample contents)
- Preparing your presentation
- Post-testing procedures
- Summary
- A. Supplementary Tools
- Web application tools
- Network tool
- Summary
- B. Key Resources
- Paid incentive programs
- Reverse engineering resources
- Penetration testing learning resources
- Exploit development learning resources
- Penetration testing on a vulnerable environment
- Online web application challenges
- Virtual machines and ISO images
- Network ports
- Index
Prior to or during a penetration test, it may be necessary to include other tools that are not commonly available with Kali Linux. The art of penetration testing has a great many individuals constantly creating tools that you can include. As a result, it may be necessary to install these tools to your Kali Linux setup. In other circumstances, it is generally a good idea to ensure that your tools are up to date prior to starting any penetration test.
When including additional penetration testing tools, it is advised to look within the Kali Linux repository first. If the package is available there, you can use the package and install using commands detailed below. Another option, if the tool is not available from the repository, the creator will often have a download option either on their website or through the software sharing and aggregation site GitHub.com.
While there are a number of tools available outside the Kali Linux repository, you should rely on those as it is easy to add these to your Kali Linux installation. Also, many of the packages that are not in the repository have dependencies on other software and may cause stability issues.
There are several package management tools that can be used to help you manage the software package in your system, such as dpkg, apt, and aptitude. Kali Linux comes with dpkg and apt installed by default.
Note
If you want to find out more about the apt and dpkg command, you can go through the following references: https://help.ubuntu.com/community/AptGet/Howto/ and http://www.debian.org/doc/manuals/debian-reference/ch02.en.html.
In this section, we will briefly discuss the apt command in a practical way that is related to the software package installation process.
To search for a package name in the repository, you can use the following command:
apt-cache search <package_name>
This command will display the entire software package that has the name package_name. To search for a specific package, use the following command:
apt-cache search <package_name>
If you have located the package but want more detailed information, use the following command:
apt-cache show <package_name>
To install a new package or to update an existing package, use the apt-get command. The following is the command:
apt-get install <package_name>
If the package is not available in the repository, you can download it from the developer's site or through the https://github.com/ website. Be sure to only include software from trusted sources. For those developers that include a Debian package format (the package will have the file extension .deb), you can utilize the dpkg command. For other packages, you will often find that they are compressed using a compression program such as 7-Zip and will often have the extension .zip or .tar.
To install a compressed file, the following steps usually work:
- Extract the software package using archiver programs such as Tar and 7-Zip.
- Change to the extracted directory.
- Run the following commands:
./configuremakemake installh
In this section, we will provide you with examples on how to install several additional security tools that are not available from the Kali Linux repository. We will give various mechanisms that can be used to install the software:
- Downloading the Debian package and installing it
- Downloading from the source package and installing it
As an example, we want to install the latest Nessus vulnerability scanner (Version 6) for the first installation mechanism. We have searched the Kali Linux repository but are unable to find Nessus.
Nessus Version 6 has many new features as compared to Nessus Version 4, such as more flexible results filtering and report creation and simplified policy creation; we chose to use this version instead of Nessus Version 5.
Note
You can find more information about the features and enhancement in Nessus Version 6 from http://www.tenable.com/products/nessus/nessus-product-overview/why-upgrade-to-nessus-6.
We can download the latest Nessus package generated for Debian 6 Linux distribution from the Nessus website (http://www.nessus.org/products/nessus/nessus-download-agreement). To install this package, we issue the following command:
dpkg -i Nessus-x.y.z-debian6_i386.deb
You can then follow the instructions given on the screen to configure your Nessus server:
- Start the Nessus server by typing the following if it has not started yet:
/etc/init.d/nessusd start - Open your browser and connect to
https://localhost:8834. You will then be prompted with a warning about an invalid SSL certificate used by Nessus. You need to check the SSL certificate and then store the exception for that SSL certificate. The following is the Nessus page that will be shown after you have stored the SSL certificate exception. - After that, you will be guided to create a Nessus admin credential. Next, you will be asked to enter your activation code to register the Nessus scanner to Tenable. You need to register at http://www.nessus.org/register/ to obtain the activation code:
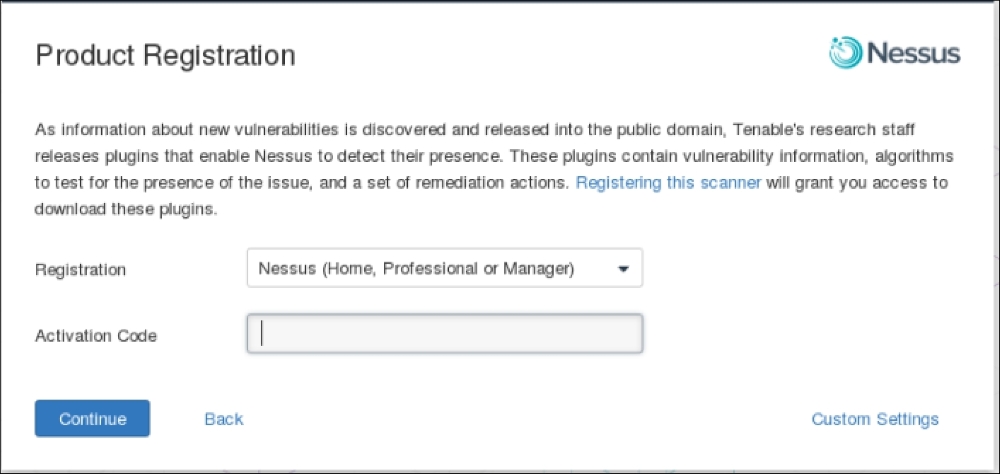
- After you have registered successfully, you will be able to download the newest Nessus plugins. The plugin download process will take some time to complete; you can do something else while waiting for the download process to finish:

For the second example, we will use a simple program called cisco_crack (http://insecure.org/sploits/cisco.passwords.html). This tool is used to crack the Cisco type 7 password.
After downloading the source code, the next step is to compile it. Before you can compile the source code cleanly, you need to add the following include statements:
#include <string.h>#include <stdlib.h>
Now you have four include statements in the source code.
To compile the code, you can just give the following command:
gcc cisco_crack.c –o cisco_crack
If there is no error, an executable file with the name of cisco_crack will be created. The following is the help screen of cisco_crack:
# ./cisco_crack  -h
Usage: ./cisco_crack -p <encrypted password>
       ./cisco_crack <router config file> <output file>