Table of Contents for
Kali Linux 2 – Assuring Security by Penetration Testing - Third Edition
 Kali Linux 2 – Assuring Security by Penetration Testing - Third Edition
Published by
Packt Publishing, 2016
Kali Linux 2 – Assuring Security by Penetration Testing - Third Edition
Published by
Packt Publishing, 2016
- Cover
- Table of Contents
- Kali Linux 2 – Assuring Security by Penetration Testing Third Edition
- Kali Linux 2 – Assuring Security by Penetration Testing Third Edition
- Credits
- Disclaimer
- About the Authors
- About the Reviewer
- www.PacktPub.com
- Preface
- What you need for this book
- Who this book is for
- Conventions
- Reader feedback
- Customer support
- 1. Beginning with Kali Linux
- Kali Linux tool categories
- Downloading Kali Linux
- Using Kali Linux
- Configuring the virtual machine
- Updating Kali Linux
- Network services in Kali Linux
- Installing a vulnerable server
- Installing additional weapons
- Summary
- 2. Penetration Testing Methodology
- Vulnerability assessment versus penetration testing
- Security testing methodologies
- General penetration testing framework
- Information gathering
- The ethics
- Summary
- 3. Target Scoping
- Preparing the test plan
- Profiling test boundaries
- Defining business objectives
- Project management and scheduling
- Summary
- 4. Information Gathering
- Using public resources
- Querying the domain registration information
- Analyzing the DNS records
- Getting network routing information
- Utilizing the search engine
- Metagoofil
- Accessing leaked information
- Summary
- 5. Target Discovery
- Identifying the target machine
- OS fingerprinting
- Summary
- 6. Enumerating Target
- Understanding the TCP/IP protocol
- Understanding the TCP and UDP message format
- The network scanner
- Unicornscan
- Zenmap
- Amap
- SMB enumeration
- SNMP enumeration
- VPN enumeration
- Summary
- 7. Vulnerability Mapping
- Vulnerability taxonomy
- Automated vulnerability scanning
- Network vulnerability scanning
- Web application analysis
- Fuzz analysis
- Database assessment tools
- Summary
- 8. Social Engineering
- Attack process
- Attack methods
- Social Engineering Toolkit
- Summary
- 9. Target Exploitation
- Vulnerability and exploit repositories
- Advanced exploitation toolkit
- MSFConsole
- MSFCLI
- Ninja 101 drills
- Writing exploit modules
- Summary
- 10. Privilege Escalation
- Password attack tools
- Network spoofing tools
- Network sniffers
- Summary
- 11. Maintaining Access
- Working with tunneling tools
- Creating web backdoors
- Summary
- 12. Wireless Penetration Testing
- Wireless network recon
- Wireless testing tools
- Post cracking
- Sniffing wireless traffic
- Summary
- 13. Kali Nethunter
- Installing Kali Nethunter
- Nethunter icons
- Nethunter tools
- Third-party applications
- Wireless attacks
- HID attacks
- Summary
- 14. Documentation and Reporting
- Types of reports
- The executive report
- The management report
- The technical report
- Network penetration testing report (sample contents)
- Preparing your presentation
- Post-testing procedures
- Summary
- A. Supplementary Tools
- Web application tools
- Network tool
- Summary
- B. Key Resources
- Paid incentive programs
- Reverse engineering resources
- Penetration testing learning resources
- Exploit development learning resources
- Penetration testing on a vulnerable environment
- Online web application challenges
- Virtual machines and ISO images
- Network ports
- Index
In the previous section, we discussed several tools that can be used to crack passwords. In this section, we will have a look at several tools that can be used for network spoofing to elevate the privilege.
Network spoofing is a process to modify network packets, such as the MAC address and IP address. The goal of this process is to get the data from two communicating parties.
DNSChef (http://thesprawl.org/projects/dnschef/) is a DNS proxy; it can be used to fake a domain request to point to a local machine that belongs to the attacker instead of the real host. With this capability, an attacker can control the victim's network traffic. Before you can use DNSChef, you need to configure the victim machine DNS server to point to your machine containing DNSChef:
- In Linux, you can modify the
/etc/resolv.conffile to point to your machine - In Windows, you can configure this in the Network Connections option from the Control Panel
If you don't have the access to modify the DNS file mentioned in the first bullet item, you can use options such as ARP spoofing and setting up a rogue DHCP server, giving a fake DNS server.
For the following exercises, we are going to use two machines. One is the DNSChef server with an IP address of 172.16.43.150, and the victim has an IP address of 172.16.43.156. For the victim, we will use the Metasploitable virtual machine.
Let's see DNSChef in action.
To set up DNSChef as a proxy, just run the following command in the DNSChef server:
# dnschef
In the same machine, configure it to use the localhost as a DNS server.
If you query a domain google.com of type A, use the following command:
host –t A google.com
The following is the result in the DNSChef proxy:

In this case, DNSChef only acts as a proxy. It will redirect all the requests to the upstream nameserver; in this case, the DNS Server 8.8.8.8.
Before we fake a google.com domain, let's see the original DNS response for google.com:
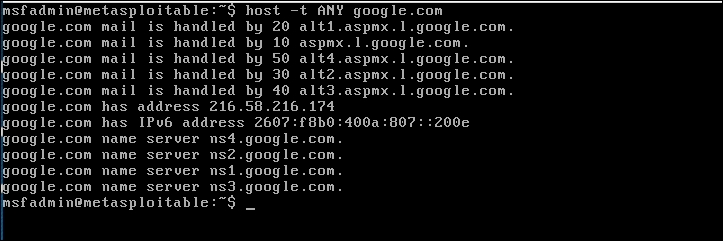
Now, let's fake the DNS response regarding google.com. Change the /etc/resolv.conf file to point to DNSChef.
The following are the DNSChef commands to be given:
# dnschef --fakeip=172.16.43.150 --fakedomains google.com
--interface 172.16.43.156 -q
In the victim machine, we give the following command to get the google.com IP address:
$ host –t A google.com
The following is the result of this command:
google.com has address 172.16.43.150
In the DNSChef machine, you will see the following information:

DNSChef doesn't support IPv6 yet in version 0.1, so you need to upgrade to version 0.2 (https://thesprawl.org/media/projects/dnschef-0.2.1.tar.gz) if you want to use IPv6.
To use IPv6, just add the -6 option to the DNSChef command line. Let's fake the google.com IPv6 address. The original google.com IPv6 address is 2404:6800:4003:802::1003. The DNSChef IPv6 address is fe80::a00:27ff:fe1c:5122/64.
In the DNSChef server, give the following command to fake the google.com IPv6 address:
dnschef.py -6 --fakeipv6 fe80::a00:27ff:fe1c:5122 --interface :: -q
The arpspoof tool is a tool that can be used to sniff the network traffic in a switch environment. In the previous chapter, we stated that sniffing network traffic in a switch environment is hard, but by using arpspoof, it is easy.
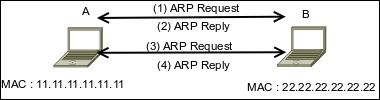
The arpspoof tool works by forging the ARP replies to both communicating parties.
In a normal situation, when host A wants to communicate with host B (gateway), it will broadcast an ARP Request to get the MAC address of host B. Host B will respond to this request by sending its MAC address as an ARP Reply packet. The same process is done by host B. After that, host A can communicate with host B, as shown in the following figure:
If an attacker C wants to sniff the network traffic between A and B, it needs to send the ARP replies to A by telling it that the IP address of B now has the MAC address of 33.33.33.33.33.33, which belongs to C. The attacker C also needs to spoof the ARP cache of B by telling it that the IP address of A now has the MAC address of 33.33.33.33.33.33:
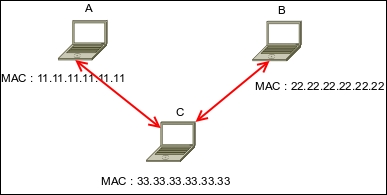
After the ARP spoofing works, the entire network traffic between A and B will go through C first.
Before you can use arpspoof, you need to enable the IP forwarding feature in your Kali Linux machine. This can be done by giving the following command as root:
# echo 1 > /proc/sys/net/ipv4/ip_forward
To start the arpspoof command line, use the console to execute the following command:
# arpspoof
This will display the arpspoof usage instructions on your screen.
For our exercise, we have the following information. The first machine is a gateway with the following configuration:
- MAC address:
00-50-56-C0-00-08 - IP address:
192.168.65.1 - Subnet mask:
255.255.255.0
The victim machine has the following configuration:
- MAC address:
00-0C-29-35-C9-CD - IP address:
192.168.65.129 - Subnet mask:
255.255.255.0
The attacker machine will have the following configuration:
- MAC address:
00:0c:29:09:22:31 - IP address:
192.168.65.130 - Subnet mask:
255.255.255.0
The following is the original ARP cache of the victim:
Interface: 192.168.65.129 --- 0x30002
Internet Address      Physical Address      Type
192.168.65.1          00-50-56-c0-00-08     dynamic
To ARP spoof the victim, enter the following command:
# arpspoof -t 192.168.65.129 192.168.65.1
On the victim machine, wait for some time and try to make a connection to the gateway by doing a ping test to the gateway. Later, the victim, ARP cache, will be changed:
Interface: 192.168.65.129 --- 0x30002
Internet Address      Physical Address      Type
192.168.65.1          00-0c-29-09-22-31     dynamic
You will notice that in the victim ARP cache, the MAC address of the gateway machine has been changed from 00-50-56-c0-00-08 to 00-0c-29-09-22-31, which belongs to the attacker machine's MAC address.
Ettercap (http://ettercap.github.io/ettercap/) is a suite of tools to do a man-in-the-middle attack on LAN. It will perform attacks on the ARP protocol by positioning itself as the man in the middle. Once it achieves this, it is able to do the following:
- Modify data connections
- Password discovery for FTP, HTTP, POP, SSH1, and so on
- Provide fake SSL certificates to foil the victim's HTTPS sessions
ARP is used to translate an IP address to a physical network card address (MAC address). When a device tries to connect to the network resource, it will send a broadcast request to other devices on the same network, asking for the MAC address of the target. The target device will send its MAC address. Then, the caller will keep the association of the IP-MAC address in its cache to speed up the process if it connects to the target again in the future.
The ARP attack works when a machine asks for the MAC address associated with an IP address of a target. The attacker can answer this request by sending its own MAC address. This attack is called ARP poisoning or ARP spoofing. This attack will work if the attacker and the victim are located in the same network.
Kali Linux provides the Ettercap tool to do this attack. Ettercap comes with three modes of operation: text mode, curses mode, and graphical mode using GTK.
To start Ettercap in text mode, use the console to execute the following command:
# ettercap -T
To start Ettercap in curses mode, use the console to execute the following command:
# ettercap -C
To start Ettercap in graphical mode, use the console to execute the following command:
# ettercap -G
In our exercise, we will use Ettercap to do a DNS spoofing attack. The machine's configuration is the same as in the previous section, but we will have two additional machines: a DNS server with an IP address of 172.16.43.1 that wants to be spoofed, and the web server located at the attacker IP address, 192.168.2.22, to receive all of the HTTP traffic. The attacker has an IP address of 192.168.2.21.
The following steps are taken to do the DNS spoofing:
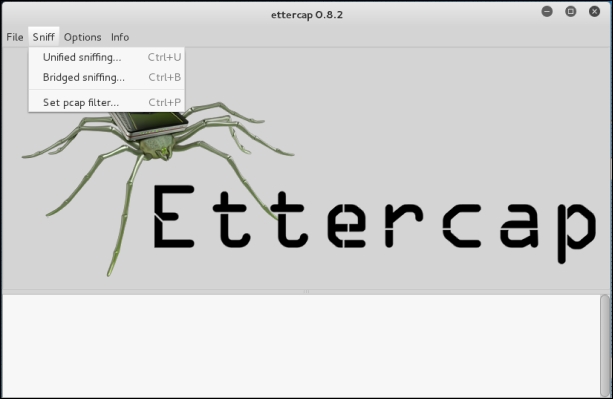
- Start Ettercap in the graphical mode.
- Navigate to Sniff | Unified sniffing from the menu and select your network interface:
- Scan the host in your network by navigating to Hosts | Scan for hosts.
- View the host by navigating to Hosts | Hosts list.
- Select the machines to be poisoned. We select machine 172.16.43.1 (DNS server) as target 1 by clicking on Add to Target 1 and machine 172.16.43.156 as target 2:
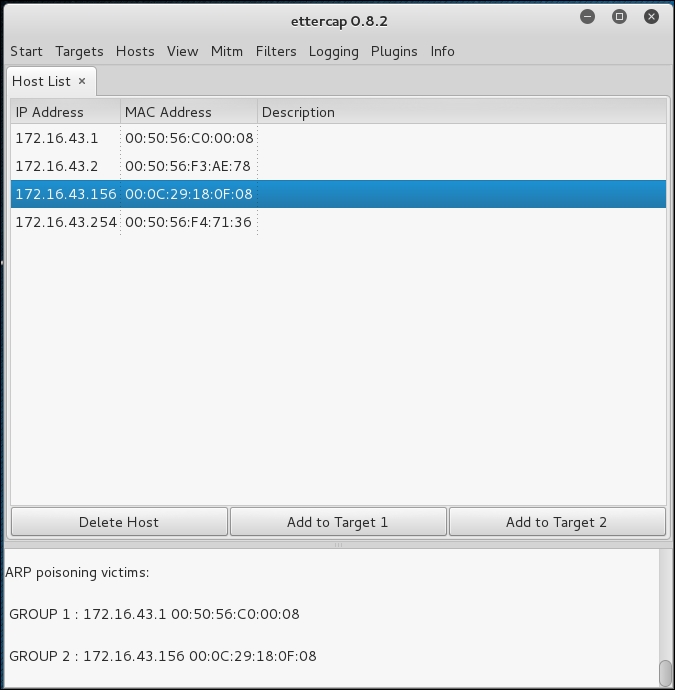
- Start the ARP poisoning process by navigating to Mitm | Arp poisoning. Next, the MAC address of the DNS server and victim will be set to the attacker's MAC address.
- Set the configuration file
in /usr/share/ettercap/etter.dnswith the domain you want to spoof and the replacement domain:google.com A 172.16.43.150 *.google.com A 172.16.43.150 www.google.com PTR 172.16.43.150
This will redirect http://google.com to the attacker web server.
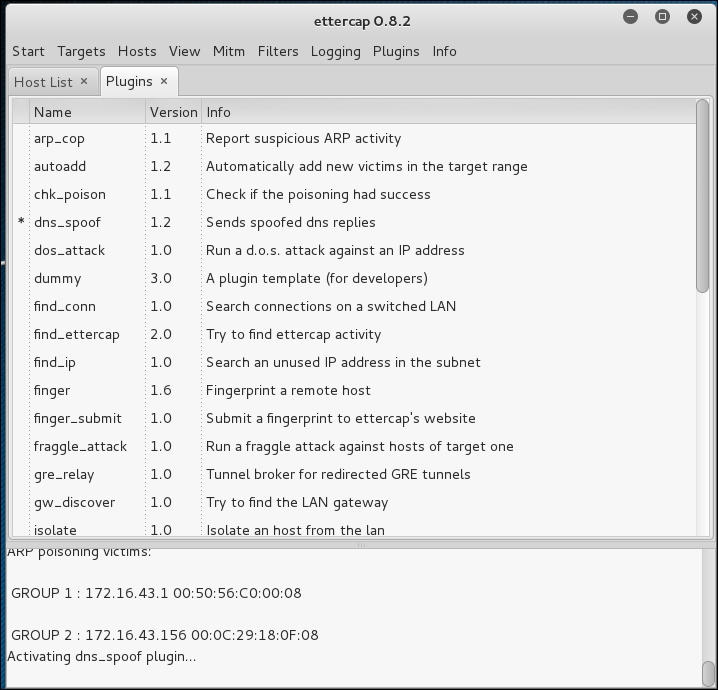
- Activate the dns_spoof plugin by going to Plugins | Manage the plugins, and double-click on the dns_spoof plugin to activate it:
In the victim machine, navigate to google.com to see the effect:
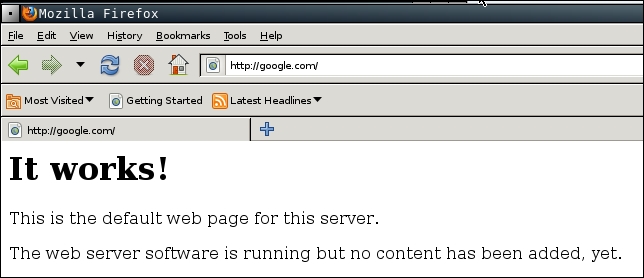
From the preceding screenshot, we can see that the DNS spoofing works. Instead of seeing the Google website, the victim is redirected to the attacker web server.
To stop the spoofing, go to Mitm | Stop mitm attack(s).
If you feel that doing this whole process in graphical mode is too cumbersome, you don't need to worry. Ettercap in text mode can also do this, in a much simpler way.
The following is the command to do the same DNS spoofing:
# ettercap -i eth0 -T -q -P dns_spoof -M ARP /172.16.43.1/ /172.16.43.156/
The following is the result of this command:
Scanning for merged targets (2 hosts)...
2 hosts added to the hosts list...

ARP poisoning victims:
GROUP 1 : 172.16.43.1 F4:EC:38:EC:07:DC
GROUP 2 : 172.16.43.156 08:00:27:43:15:18Starting Unified sniffing...
Activating dns_spoof plugin...

dns_spoof: [safebrowsing-cache.google.com] spoofed to [172.16.43.156]
Using the Ettercap command-line version is much simpler if you know the commands and options. To quit the text mode, just press Q.