Table of Contents for
Kali Linux 2 – Assuring Security by Penetration Testing - Third Edition
 Kali Linux 2 – Assuring Security by Penetration Testing - Third Edition
Published by
Packt Publishing, 2016
Kali Linux 2 – Assuring Security by Penetration Testing - Third Edition
Published by
Packt Publishing, 2016
- Cover
- Table of Contents
- Kali Linux 2 – Assuring Security by Penetration Testing Third Edition
- Kali Linux 2 – Assuring Security by Penetration Testing Third Edition
- Credits
- Disclaimer
- About the Authors
- About the Reviewer
- www.PacktPub.com
- Preface
- What you need for this book
- Who this book is for
- Conventions
- Reader feedback
- Customer support
- 1. Beginning with Kali Linux
- Kali Linux tool categories
- Downloading Kali Linux
- Using Kali Linux
- Configuring the virtual machine
- Updating Kali Linux
- Network services in Kali Linux
- Installing a vulnerable server
- Installing additional weapons
- Summary
- 2. Penetration Testing Methodology
- Vulnerability assessment versus penetration testing
- Security testing methodologies
- General penetration testing framework
- Information gathering
- The ethics
- Summary
- 3. Target Scoping
- Preparing the test plan
- Profiling test boundaries
- Defining business objectives
- Project management and scheduling
- Summary
- 4. Information Gathering
- Using public resources
- Querying the domain registration information
- Analyzing the DNS records
- Getting network routing information
- Utilizing the search engine
- Metagoofil
- Accessing leaked information
- Summary
- 5. Target Discovery
- Identifying the target machine
- OS fingerprinting
- Summary
- 6. Enumerating Target
- Understanding the TCP/IP protocol
- Understanding the TCP and UDP message format
- The network scanner
- Unicornscan
- Zenmap
- Amap
- SMB enumeration
- SNMP enumeration
- VPN enumeration
- Summary
- 7. Vulnerability Mapping
- Vulnerability taxonomy
- Automated vulnerability scanning
- Network vulnerability scanning
- Web application analysis
- Fuzz analysis
- Database assessment tools
- Summary
- 8. Social Engineering
- Attack process
- Attack methods
- Social Engineering Toolkit
- Summary
- 9. Target Exploitation
- Vulnerability and exploit repositories
- Advanced exploitation toolkit
- MSFConsole
- MSFCLI
- Ninja 101 drills
- Writing exploit modules
- Summary
- 10. Privilege Escalation
- Password attack tools
- Network spoofing tools
- Network sniffers
- Summary
- 11. Maintaining Access
- Working with tunneling tools
- Creating web backdoors
- Summary
- 12. Wireless Penetration Testing
- Wireless network recon
- Wireless testing tools
- Post cracking
- Sniffing wireless traffic
- Summary
- 13. Kali Nethunter
- Installing Kali Nethunter
- Nethunter icons
- Nethunter tools
- Third-party applications
- Wireless attacks
- HID attacks
- Summary
- 14. Documentation and Reporting
- Types of reports
- The executive report
- The management report
- The technical report
- Network penetration testing report (sample contents)
- Preparing your presentation
- Post-testing procedures
- Summary
- A. Supplementary Tools
- Web application tools
- Network tool
- Summary
- B. Key Resources
- Paid incentive programs
- Reverse engineering resources
- Penetration testing learning resources
- Exploit development learning resources
- Penetration testing on a vulnerable environment
- Online web application challenges
- Virtual machines and ISO images
- Network ports
- Index
After we know that the target machine is alive, we can then find out the operating system used by the target machine. This method is commonly known as Operating System (OS) fingerprinting. There are two methods of doing OS fingerprinting: active and passive.
In the active method, the tool sends network packets to the target machine and then determines the OS of the target machine based on the analysis done on the response it has received. The advantage of this method is that the fingerprinting process is fast. However, the disadvantage is that the target machine may notice our attempt to get its operating system's information.
To overcome the active method's disadvantage, there is a passive method of OS fingerprinting. This method was pioneered by Michal Zalewsky when he released a tool called p0f. The major advantage of passive OS fingerprinting is that it does the work while reducing the interaction between the testing machine and the target, greatly increasing the stealth of the fingerprinting. The most significant disadvantage of the passive method is that the process will be slower than the active method.
In this section, we will describe a couple of tools that can be used for OS fingerprinting.
The p0f tool is used to fingerprint an operating system passively. It can be used to identify an operating system on the following machines:
- Machines that connect to your box (SYN mode; this is the default mode)
- Machines you connect to (SYN+ACK mode)
- Machines you cannot connect to (RST+ mode)
- Machines whose communications you can observe
The p0f tool works by analyzing the TCP packets sent during the network activities.Then, it gathers the statistics of special packets that are not standardized by default by any corporations. An example is that the Linux kernel uses a 64-byte ping datagram, whereas the Windows operating system uses a 32-byte ping datagram, or the Time to Leave (TTL) value. For Windows, the TTL value is 128, while for Linux this TTL value varies between the Linux distributions. This information is then used by p0f to determine the remote machine's operating system.
Note
When using the p0f tool included with Kali Linux, we were not able to fingerprint the operating system on a remote machine. We figured out that the p0f tool has not updated its fingerprint database. Unfortunately, we couldn't find the latest version of the fingerprint database. So, we used p0f v3 (Version 3.06b) instead. To use this version of p0f, just download the TARBALL file from http://lcamtuf.coredump.cx/p0f3/releases/p0f-3.06b.tgz and compile the code by running the build.sh script. By default, the fingerprint database file (p0f.fp) location is in the current directory. If you want to change the location, for example, if you want to change the location to /etc/p0f/p0f.fp, you need to change this in the config.h file and recompile p0f. If you don't change the location, you may need to use the -f option to define the fingerprint database file location.
In the following example, we will use p0f to fingerprint a Linux machine:
- To access
p0f, open a console and typep0f -h. This will display its usage and options' description. Let's usep0fto identify the operating system used in a remote machine we are connecting to. Just type the following command in your console:p0f –f /usr/share/p0f/p0f.fp -o p0f.log - This will read the fingerprint database from the
usr/share/p0f/p0f.fpfile and save the log information to thep0f.logfile. It will then display the following information:# p0f -f /usr/share/p0f/p0f.fp -o p0f.log --- p0f 3.07b by Michal Zalewski <lcamtuf@coredump.cx> --- [+] Closed 1 file descriptor. [+] Loaded 320 signatures from '/usr/share/p0f/p0f.fp'. [+] Intercepting traffic on default interface 'eth0'. [+] Default packet filtering configured [+VLAN]. [+] Log file 'p0f.log' opened for writing. [+] Entered main event loop.
- Next, you need to generate network activities involving a TCP connection, such as browsing to the remote machine or letting the remote machine connect to your machine. For the purposes of this demonstration, a connection to the HTTP site on the Metasploitable 2 machine was established.
This is the abridged information displayed to the console:
.-[ 172.16.43.150/41522 -> 172.16.43.156/80 (syn+ack) ]-
|
| server   = 172.16.43.156/80
| os       = Linux 2.6.x
| dist     = 0
| params   = none
| raw_sig  = 4:64+0:0:1460:mss*4,5:mss,sok,ts,nop,ws:df:0
The following screenshot shows the content of the log file:

Based on the preceding result, we know that the target is a Linux 2.6 machine.
The following screenshot shows the information from the target machine:

By comparing this information, we know that p0f got the OS information correctly. The remote machine is using Linux version 2.6.
Nmap is a very popular and capable port scanner. Besides this, it can also be used to fingerprint a remote machine's operating system. It is an active fingerprinting tool. To use this feature, you can use the -O option to the nmap command.
For example, if we want to fingerprint the operating system used on the 192.168.56.102 machine, we use the following command:
nmap –O 172.16.43.156
The following screenshot shows the result of this command:
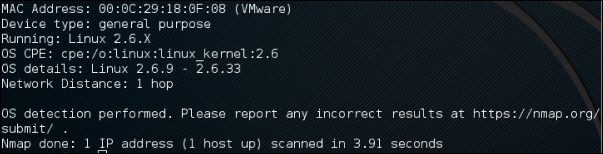
Nmap was able to get the correct operating system information after fingerprinting the operating system of a remote machine.
We will talk more about Nmap in a later chapter.