Table of Contents for
Kali Linux 2 – Assuring Security by Penetration Testing - Third Edition
 Kali Linux 2 – Assuring Security by Penetration Testing - Third Edition
Published by
Packt Publishing, 2016
Kali Linux 2 – Assuring Security by Penetration Testing - Third Edition
Published by
Packt Publishing, 2016
- Cover
- Table of Contents
- Kali Linux 2 – Assuring Security by Penetration Testing Third Edition
- Kali Linux 2 – Assuring Security by Penetration Testing Third Edition
- Credits
- Disclaimer
- About the Authors
- About the Reviewer
- www.PacktPub.com
- Preface
- What you need for this book
- Who this book is for
- Conventions
- Reader feedback
- Customer support
- 1. Beginning with Kali Linux
- Kali Linux tool categories
- Downloading Kali Linux
- Using Kali Linux
- Configuring the virtual machine
- Updating Kali Linux
- Network services in Kali Linux
- Installing a vulnerable server
- Installing additional weapons
- Summary
- 2. Penetration Testing Methodology
- Vulnerability assessment versus penetration testing
- Security testing methodologies
- General penetration testing framework
- Information gathering
- The ethics
- Summary
- 3. Target Scoping
- Preparing the test plan
- Profiling test boundaries
- Defining business objectives
- Project management and scheduling
- Summary
- 4. Information Gathering
- Using public resources
- Querying the domain registration information
- Analyzing the DNS records
- Getting network routing information
- Utilizing the search engine
- Metagoofil
- Accessing leaked information
- Summary
- 5. Target Discovery
- Identifying the target machine
- OS fingerprinting
- Summary
- 6. Enumerating Target
- Understanding the TCP/IP protocol
- Understanding the TCP and UDP message format
- The network scanner
- Unicornscan
- Zenmap
- Amap
- SMB enumeration
- SNMP enumeration
- VPN enumeration
- Summary
- 7. Vulnerability Mapping
- Vulnerability taxonomy
- Automated vulnerability scanning
- Network vulnerability scanning
- Web application analysis
- Fuzz analysis
- Database assessment tools
- Summary
- 8. Social Engineering
- Attack process
- Attack methods
- Social Engineering Toolkit
- Summary
- 9. Target Exploitation
- Vulnerability and exploit repositories
- Advanced exploitation toolkit
- MSFConsole
- MSFCLI
- Ninja 101 drills
- Writing exploit modules
- Summary
- 10. Privilege Escalation
- Password attack tools
- Network spoofing tools
- Network sniffers
- Summary
- 11. Maintaining Access
- Working with tunneling tools
- Creating web backdoors
- Summary
- 12. Wireless Penetration Testing
- Wireless network recon
- Wireless testing tools
- Post cracking
- Sniffing wireless traffic
- Summary
- 13. Kali Nethunter
- Installing Kali Nethunter
- Nethunter icons
- Nethunter tools
- Third-party applications
- Wireless attacks
- HID attacks
- Summary
- 14. Documentation and Reporting
- Types of reports
- The executive report
- The management report
- The technical report
- Network penetration testing report (sample contents)
- Preparing your presentation
- Post-testing procedures
- Summary
- A. Supplementary Tools
- Web application tools
- Network tool
- Summary
- B. Key Resources
- Paid incentive programs
- Reverse engineering resources
- Penetration testing learning resources
- Exploit development learning resources
- Penetration testing on a vulnerable environment
- Online web application challenges
- Virtual machines and ISO images
- Network ports
- Index
The TCP message is called a segment. A TCP segment consists of a header and a data section. The TCP header is often 20 bytes long (without TCP options). It can be described using the following figure:
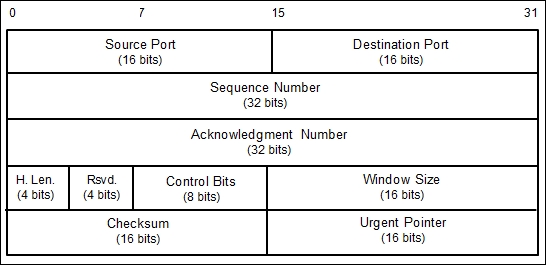
Here is a brief description of each field:
- The Source Port and the Destination Port have a length of 16 bits each. The source port is the port on the sending machine that transmits the packet, while the destination port is the port on the target machine that receives the packet.
- The Sequence Number (32 bits), in a normal transmission, is the sequence number of the first byte of data of this segment.
- The Acknowledgment Number (32 bits) contains the sequence number from the sender, increased by one.
- H.Len. (4 bits) is the size of the TCP header in 32-bit words.
- Rsvd. is reserved for future use. It is a 4-bit field and must be zero.
- The Control Bits (control flags) contains eight 1-bit flags. In the original specification (RFC 793; the RFC can be downloaded from http://www.ietf.org/rfc/rfc793.txt), the TCP only has six flags, as follows:
- SYN: This flag synchronizes the sequence numbers. This bit is used during session establishment.
- ACK: This flag indicates that the Acknowledgment field in the TCP header is significant. If a packet contains this flag, it means that it is an acknowledgement of the previously received packet.
- RST: This flag resets the connection.
- FIN: This flag indicates that the party has no more data to send. It is used to tear down a connection gracefully.
- PSH: This flag indicates that the buffered data should be pushed immediately to the application rather than wait for more data.
- URG: This flag indicates that the Urgent Pointer field in the TCP header is significant. The urgent pointer refers to important data sequence numbers.
Later on, RFC 3168 (the RFC can be downloaded from http://www.ietf.org/rfc/rfc3168.txt) added two more extended flags, as follows:
- Congestion Window Reduced (CWR): This is used by the data sender to inform the data receiver that the queue of outstanding packets to be sent has been reduced due to network congestion
- Explicit Connection Notification-Echo (ECN-Echo): This indicates that the network connection is experiencing congestion
- Window Size (16 bits) specifies the number of bytes the receiver is willing to accept.
- Checksum (16 bits) is used for error checking of the TCP header and data.
The flags can be set independently of each other.
When performing port scanning on the TCP port by using a SYN packet to the target machine, an attacker might face the following behaviors:
- The target machine responds with the SYN+ACK packet. If we receive this packet, we know that the port is open. This behavior is defined in the TCP specification (RFC 793), which states that the SYN packet must be responded to with the SYN+ACK packet if the port is open without considering the SYN packet payload.
- The target machine sends back a packet with the RST and ACK bit set. This means that the port is closed.
- The target machine sends an ICMP message such as
ICMP Port Unreachable, which means that the port is not accessible to us, most likely because it is blocked by the firewall. - The target machine sends nothing back to us. It may indicate that there is no network service listening on that port or that the firewall is blocking our SYN packet silently.
From a pentester's point of view, interesting behavior is when the port is open because this means that there is a service available on that port that can be tested further.
If you conduct a port scanning attack, you should understand the various TCP behaviors listed in order to be able to attack more effectively.
When scanning for UDP ports, you will see different behaviors; these will be explained later on. Before we go to see various UDP behaviors, let's see the UDP header format first, as shown in the following figure:
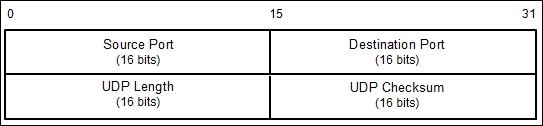
The following is a brief explanation of each field in the UDP header depicted in the preceding figure.
Just like the TCP header, the UDP header also has the Source Port and the Destination Port, each of which has a length of 16 bits. The source port is the port on the sending machine that transmits the packet, while the destination port is the port on the target machine that receives the packet:
During a port scanning activity on the UDP port on the target machine, an attacker might face the following behaviors:
- The target machine responds with a UDP packet. If we receive this packet, we know that the port is open.
- The target machine sends an ICMP message such as
ICMP Port Unreachable. It can be concluded that the port is closed. However, if the message sent is not an ICMP unreachable message, it means that the port is filtered by the firewall. - The target machine sends nothing back to us. This may indicate one of the following situations:
- The port is closed
- The inbound UDP packet is blocked
- The response is blocked
UDP port scanning is less reliable when compared to TCP port scanning because sometimes, the UDP port is open but the service listening on that port is looking for a specific UDP payload. Thus, the service will not send any replies.
Now that we have briefly described the port scanning theory, let's put this into practice. In the following sections, we will look at several tools that can be used to help us perform network scanning.
For the practical scenarios in this chapter, we will utilize a Metasploitable virtual machine, as explained in Chapter 1, Beginning with Kali Linux, as our target machine. It has an IP address of 172.16.43.156, while our attacking machine has an IP address of 172.16.43.150.