Table of Contents for
Kali Linux 2 – Assuring Security by Penetration Testing - Third Edition
 Kali Linux 2 – Assuring Security by Penetration Testing - Third Edition
Published by
Packt Publishing, 2016
Kali Linux 2 – Assuring Security by Penetration Testing - Third Edition
Published by
Packt Publishing, 2016
- Cover
- Table of Contents
- Kali Linux 2 – Assuring Security by Penetration Testing Third Edition
- Kali Linux 2 – Assuring Security by Penetration Testing Third Edition
- Credits
- Disclaimer
- About the Authors
- About the Reviewer
- www.PacktPub.com
- Preface
- What you need for this book
- Who this book is for
- Conventions
- Reader feedback
- Customer support
- 1. Beginning with Kali Linux
- Kali Linux tool categories
- Downloading Kali Linux
- Using Kali Linux
- Configuring the virtual machine
- Updating Kali Linux
- Network services in Kali Linux
- Installing a vulnerable server
- Installing additional weapons
- Summary
- 2. Penetration Testing Methodology
- Vulnerability assessment versus penetration testing
- Security testing methodologies
- General penetration testing framework
- Information gathering
- The ethics
- Summary
- 3. Target Scoping
- Preparing the test plan
- Profiling test boundaries
- Defining business objectives
- Project management and scheduling
- Summary
- 4. Information Gathering
- Using public resources
- Querying the domain registration information
- Analyzing the DNS records
- Getting network routing information
- Utilizing the search engine
- Metagoofil
- Accessing leaked information
- Summary
- 5. Target Discovery
- Identifying the target machine
- OS fingerprinting
- Summary
- 6. Enumerating Target
- Understanding the TCP/IP protocol
- Understanding the TCP and UDP message format
- The network scanner
- Unicornscan
- Zenmap
- Amap
- SMB enumeration
- SNMP enumeration
- VPN enumeration
- Summary
- 7. Vulnerability Mapping
- Vulnerability taxonomy
- Automated vulnerability scanning
- Network vulnerability scanning
- Web application analysis
- Fuzz analysis
- Database assessment tools
- Summary
- 8. Social Engineering
- Attack process
- Attack methods
- Social Engineering Toolkit
- Summary
- 9. Target Exploitation
- Vulnerability and exploit repositories
- Advanced exploitation toolkit
- MSFConsole
- MSFCLI
- Ninja 101 drills
- Writing exploit modules
- Summary
- 10. Privilege Escalation
- Password attack tools
- Network spoofing tools
- Network sniffers
- Summary
- 11. Maintaining Access
- Working with tunneling tools
- Creating web backdoors
- Summary
- 12. Wireless Penetration Testing
- Wireless network recon
- Wireless testing tools
- Post cracking
- Sniffing wireless traffic
- Summary
- 13. Kali Nethunter
- Installing Kali Nethunter
- Nethunter icons
- Nethunter tools
- Third-party applications
- Wireless attacks
- HID attacks
- Summary
- 14. Documentation and Reporting
- Types of reports
- The executive report
- The management report
- The technical report
- Network penetration testing report (sample contents)
- Preparing your presentation
- Post-testing procedures
- Summary
- A. Supplementary Tools
- Web application tools
- Network tool
- Summary
- B. Key Resources
- Paid incentive programs
- Reverse engineering resources
- Penetration testing learning resources
- Exploit development learning resources
- Penetration testing on a vulnerable environment
- Online web application challenges
- Virtual machines and ISO images
- Network ports
- Index
The tools included in this category are used to identify the target machines that can be accessed by a penetration tester. Before we start the identification process, we need to know our client's terms and agreements. If the agreements require us to hide pen-testing activities, we need to conceal our penetration testing activities. Stealth techniques may also be applied for testing the Intrusion Detection System (IDS) or Intrusion Prevention System (IPS) functionality. If there are no such requirements, we may not need to conceal our penetration testing activities.
The ping tool is the most famous tool that is used to check whether a particular host is available. The ping tool works by sending an Internet Control Message Protocol (ICMP) echo request packet to the target host. If the target host is available and the firewall is not blocking the ICMP echo request packet, it will reply with the ICMP echo reply packet.
Note
The ICMP echo request and ICMP echo reply are two of the available ICMP control messages. For other ICMP control messages, you can refer to the following URL:
https://en.wikipedia.org/wiki/Internet_Control_Message_Protocol#Control_messages
Although you can't find ping in the Kali Linux menu, you can open the console and type the ping command with its options.
To use ping, you can just type ping and the destination address, as shown in the following screenshot:
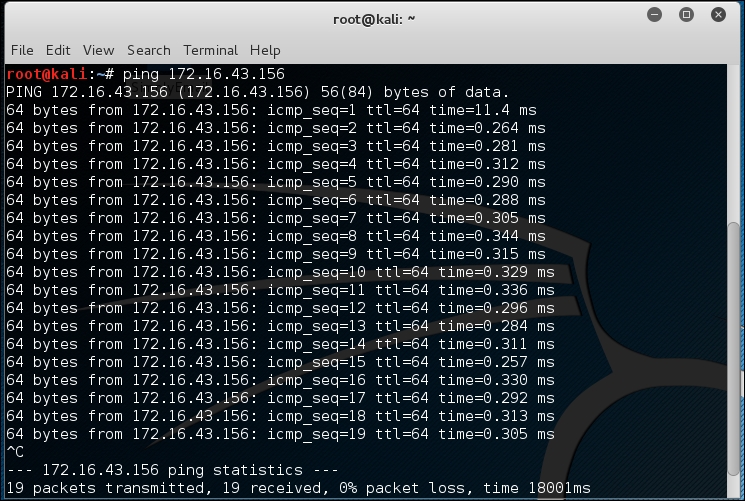
In Kali Linux, by default, ping will run continuously until you press Ctrl + C.
The ping tool has a lot of options, but the following are a few options that are often used:
- The -c count: This is the number of echo request packets to be sent.
- The -I interface address: This is the network interface of the source address. The argument may be a numeric IP address (such as
192.168.56.102) or the name of the device (such aseth0). This option is required if you want to ping the IPv6 link-local address. - The -s packet size: This specifies the number of data bytes to be sent. The default is 56 bytes, which translates into 64 ICMP data bytes when combined with the 8 bytes of the ICMP header data.
Let's use the preceding information in practice.
Suppose you are starting with internal penetration testing work. The customer gave you access to their network using a LAN cable and they also gave you the list of target servers' IP addresses.
The first thing you would want to do before launching a full penetration testing arsenal is to check whether these servers are accessible from your machine. You can use ping for this task.
The target server is located at 172.16.43.156, while your machine has an IP address of 172.16.43.150. To check the target server availability, you can give the following command:
ping -c 1 172.16.43.156
The following screenshot is the result of the preceding ping command:

From the preceding screenshot, we know that there is one ICMP echo request packet sent to the destination (IP address: 172.16.43.156). Also, the sending host (IP address: 172.16.43.150) received one ICMP echo reply packet. The round-trip time required is .869 ms, and there is no packet loss during the process.
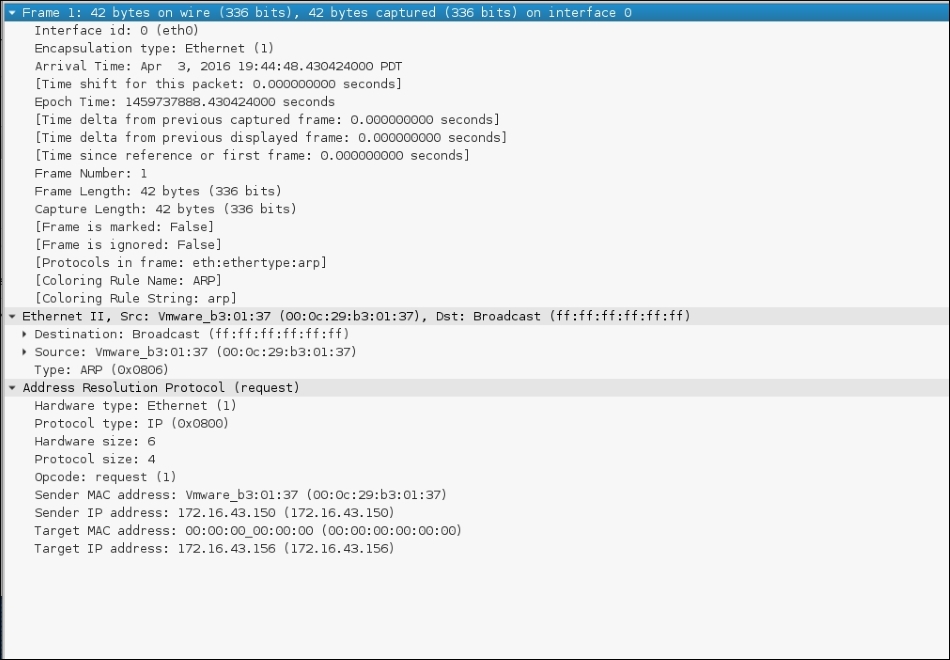
Let's see the network packets that are transmitted and received by our machine. We are going to use Wireshark, a network protocol analyzer, on our machine to capture these packets, as shown in the following screenshot:

From the preceding screenshot, we can see that our host (172.16.43.150) sent one ICMP echo request packet to the destination host (172.16.43.156). Since the destination is alive and allows the ICMP echo request packet, it will send the ICMP echo reply packet back to our machine. We will cover Wireshark in more detail in the Network sniffers section in Chapter 10, Privilege Escalation.
If your target is using an IPv6 address, such as fe80::20c:29ff:fe18:f08, you can use the ping6 tool to check its availability. You need to give the -I option for the command to work against the link-local address:
# ping6 -c 1 fe80::20c:29ff:fe18:f08 -I eth0
PING fe80::20c:29ff:fe18:f08(fe80::20c:29ff:fe18:f08) from fe80::20c:29ff:feb3:137 eth0: 56 data bytes
64 bytes from fe80::20c:29ff:fe18:f08: icmp_seq=1 ttl=64 time=7.98 ms

--- fe80::20c:29ff:fe18:f08 ping statistics ---
1 packets transmitted, 1 received, 0% packet loss, time 0ms
rtt min/avg/max/mdev = 7.988/7.988/7.988/0.000 ms
The following screenshot shows the packets sent to complete the ping6 request:

From the preceding screenshot, we know that ping6 is using the ICMPv6request and reply.
To block the ping request, the firewall can be configured to only allow the ICMP echo request packet from a specific host and drop the packets sent from other hosts.
The arping tool is used to ping a host in the Local Area Network (LAN) using the Address Resolution Protocol (ARP) request. You can use arping to ping a target machine using its IP, host, or Media Access Control (MAC) address.
The arping tool operates on Open Systems Interconnection (OSI) layer 2 (network layer), and it can only be used in a local network. Moreover, ARP cannot be routed across routers or gateways.
To start arping, you can use the console to execute the following command:
# arping
This will display brief usage information on arping.
You can use arping to get the target host's MAC address:
# arping 172.16.43.156 -c 1
ARPING 172.16.43.156
60 bytes from 00:0c:29:18:0f:08 (172.16.43.156): index=0 time=8.162 msec
--- 172.16.43.156 statistics ---
1 packets transmitted, 1 packets received,   0% unanswered (0 extra)
rtt min/avg/max/std-dev = 8.162/8.162/8.162/0.000 ms
From the previous command output, we can see that the target machine has a MAC address of 00:0c:29:18:0f:08.
Let's observe the network packets captured by Wireshark on our machine during the arping process. This first screenshot is the ARP request:
This screenshot is the reply to the ARP request:
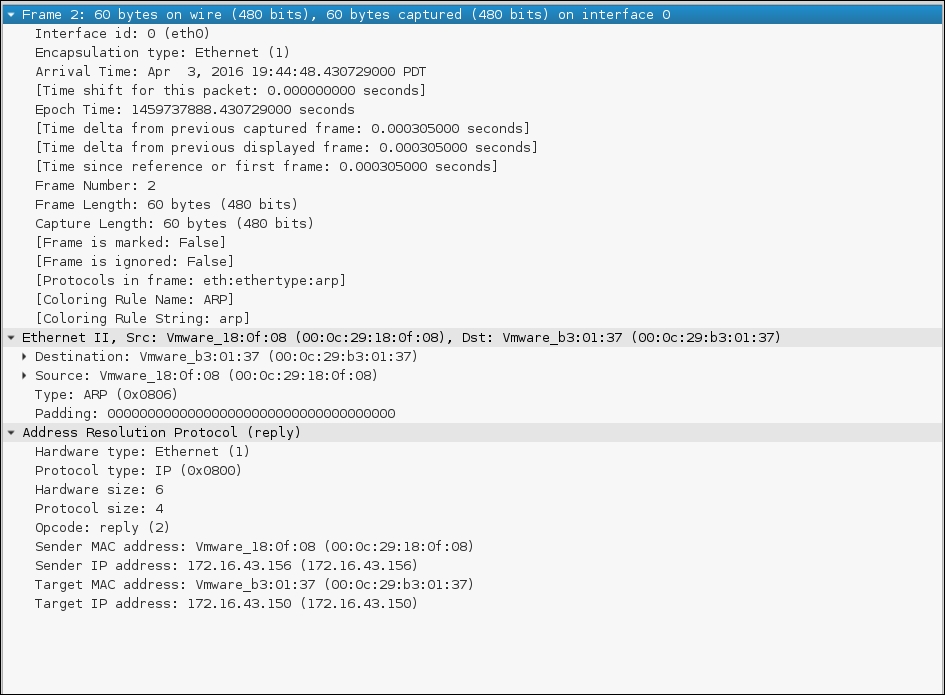
From the preceding screenshots, we can see that our network card (MAC address: 00:0c:29:b3:01:37) sends an ARP request to a broadcast MAC address (ff:ff:ff:ff:ff:ff), looking for the IP address 172.16.43.156. If the IP address 172.16.43.156 exists, it will send an ARP reply mentioning its MAC address (00:0c:29:18:0f:08), as can be seen from the packet number in the second screenshot.
Another common use of arping is to detect duplicate IP addresses in a local network. For example, your machine is usually connected to a local network using an IP address of 192.168.56.101; one day, you would like to change the IP address. Before you can use the new IP address, you need to check whether that particular IP address has already been used.
You can use the following arping command to help you detect whether the IP address of 172.16.43.156 has been used:
# arping -d -i eth0 172.16.43.156 -c 2
# echo $?
1
If the code returns 1, it means that the IP address of 192.168.56.102 has been used by more than one machine, whereas, if the code returns 0, it means that the IP address is available.
The difference between ping and fping is that the fping tool can be used to send a ping (ICMP echo) request to several hosts at once. You can specify several targets on the command line, or you can use a file containing the hosts to be pinged.
In the default mode, fping works by monitoring the reply from the target host. If the target host sends a reply, it will be noted and removed from the target list. If the host doesn't respond within a certain time limit, it will be marked as unreachable. By default, fping will try to send three ICMP echo request packets to each target.
To access fping, you can use the console to execute the following command:
# fping -h
This will display the description of usage and options available in fping.
The following scenarios will give you an idea of the fping usage.
If we want to know the alive hosts of 172.16.43.156, 172.16.43.150, and 172.16.43.155 at once, we can use the following command:
fping 172.16.43.156 172.16.43.150 172.16.43.155
The following is the result of the preceding command:
# fping 172.16.43.156 172.16.43.150 172.16.43.155
172.16.43.156 is alive
172.16.43.150 is alive
ICMP Host Unreachable from 172.16.43.150 for ICMP Echo sent to 172.16.43.155
ICMP Host Unreachable from 172.16.43.150 for ICMP Echo sent to 172.16.43.155
ICMP Host Unreachable from 172.16.43.150 for ICMP Echo sent to 172.16.43.155
ICMP Host Unreachable from 172.16.43.150 for ICMP Echo sent to 172.16.43.155
172.16.43.155 is unreachable
We can also generate the host list automatically without defining the IP addresses one by one and identifying the alive hosts. Let's suppose we want to know the alive hosts in the 172.16.43.0/24 network; we can use the -g option and define the network to check using the following command:
# fping -g 172.16.43.0/24
The result for the preceding command is as follows:
#fping -g 172.16.43.0/24
172.16.43.1 is alive
172.16.43.2 is alive
ICMP Host Unreachable from 172.16.43.150 for ICMP Echo sent to 172.16.43.3
ICMP Host Unreachable from 172.16.43.150 for ICMP Echo sent to 172.16.43.4
ICMP Host Unreachable from 172.16.43.150 for ICMP Echo sent to 172.16.43.5
ICMP Host Unreachable from 172.16.43.150 for ICMP Echo sent to 172.16.43.6
ICMP Host Unreachable from 172.16.43.150 for ICMP Echo sent to 172.16.43.7
ICMP Host Unreachable from 172.16.43.150 for ICMP Echo sent to 172.16.43.8
ICMP Host Unreachable from 172.16.43.150 for ICMP Echo sent to 172.16.43.9
ICMP Host Unreachable from 172.16.43.150 for ICMP Echo sent to 172.16.43.10
ICMP Host Unreachable from 172.16.43.150 for ICMP Echo sent to 172.16.43.11
ICMP Host Unreachable from 172.16.43.150 for ICMP Echo sent to 172.16.43.12
ICMP Host Unreachable from 172.16.43.150 for ICMP Echo sent to 172.16.43.13
ICMP Host Unreachable from 172.16.43.150 for ICMP Echo sent to 172.16.43.14
ICMP Host Unreachable from 172.16.43.150 for ICMP Echo sent to 172.16.43.15
ICMP Host Unreachable from 172.16.43.150 for ICMP Echo sent to 172.16.43.16
ICMP Host Unreachable from 172.16.43.150 for ICMP Echo sent to 172.16.43.17
ICMP Host Unreachable from 172.16.43.150 for ICMP Echo sent to 172.16.43.18
ICMP Host Unreachable from 172.16.43.150 for ICMP Echo sent to 172.16.43.19
ICMP Host Unreachable from 172.16.43.150 for ICMP Echo sent to 172.16.43.20
ICMP Host Unreachable from 172.16.43.150 for ICMP Echo sent to 172.16.43.21
ICMP Host Unreachable from 172.16.43.150 for ICMP Echo sent to 172.16.43.22
ICMP Host Unreachable from 172.16.43.150 for ICMP Echo sent to 172.16.43.23
ICMP Host Unreachable from 172.16.43.150 for ICMP Echo sent to 172.16.43.24
ICMP Host Unreachable from 172.16.43.150 for ICMP Echo sent to 172.16.43.25
If we want to change the number of ping attempts made to the target, we can use the -r option (retry limit) as shown in the following command line. By default, the number of ping attempts is three:
fping -r 1 -g 172.16.43.149 172.16.43.160
The result of the command is as follows:
# fping -r 1 -g 172.16.43.149 172.16.43.160
172.16.43.150 is alive
172.16.43.156 is alive
172.16.43.149 is unreachable
172.16.43.151 is unreachable
172.16.43.152 is unreachable
172.16.43.153 is unreachable
172.16.43.154 is unreachable
172.16.43.155 is unreachable
172.16.43.157 is unreachable
172.16.43.158 is unreachable
172.16.43.159 is unreachable
172.16.43.160 is unreachable
Displaying the cumulative statistics can be done by giving the -s option (print cumulative statistics), as follows:
fping -s www.yahoo.com www.google.com www.msn.com
The following is the result of the preceding command line:
#fping -s www.yahoo.com www.google.com www.msn.com
www.yahoo.com is alive
www.google.com is alive
www.msn.com is alive

       3 targets
       3 alive
       0 unreachable
       0 unknown addresses

       0 timeouts (waiting for response)
       3 ICMP Echos sent
       3 ICMP Echo Replies received
       0 other ICMP received

 28.8 ms (min round trip time)
 30.5 ms (avg round trip time)
 33.6 ms (max round trip time)
        0.080 sec (elapsed real time)
The hping3 tool is a command-line network packet generator and analyzer tool. The capability to create custom network packets allows hping3 to be used for TCP/IP and security testing, such as port scanning, firewall rule testing, and network performance testing.
The following are several other uses of hping3 according to the developer (http://wiki.hping.org/25):
To access hping3, go to the console and type hping3.
You can give commands to hping3 in several ways, via the command line, interactive shell, or script.
Without any given command-line options, hping3 will send a null TCP packet to port 0.
In order to change to a different protocol, you can use the following options in the command line to define the protocol:
|
No. |
Short option |
Long option |
Description |
|---|---|---|---|
|
1 |
|
|
This sends raw IP packets |
|
2 |
|
|
This sends ICMP packets |
|
3 |
|
|
This sends UDP packets |
|
4 |
|
|
This indicates the scan mode |
|
5 |
|
|
This indicates the listen mode |
When using the TCP protocol, we can use the TCP packet without any flags (this is the default behavior) or we can give one of the following flag options:
|
No. |
Option |
Flag name |
|---|---|---|
|
1 |
|
|
|
2 |
|
|
|
3 |
|
|
|
4 |
|
|
|
5 |
|
|
|
6 |
|
|
|
7 |
|
|
|
8 |
|
|
Let's use hping3 for several cases.
Send one ICMP echo request packet to a 192.168.56.101 machine. The options used are -1 (for the ICMP protocol) and -c 1 (to set the count to one packet):
hping3 -1 172.16.43.156 -c 1
The following is the output of the command:
# hping3  -1 172.16.43.156 -c 1
HPING 172.16.43.156 (eth0 172.16.43.156): icmp mode set, 28 headers + 0 data bytes
len=46 ip=172.16.43.156 ttl=64 id=63534 icmp_seq=0 rtt=2.5 ms

--- 172.16.43.156 hping statistic ---
1 packets transmitted, 1 packets received, 0% packet loss
round-trip min/avg/max = 2.5/2.5/2.5 ms
From the preceding output, we can note that the target machine is alive because it has replied to our ICMP echo request.
To verify this, we captured the traffic using tcpdump and the following screenshot shows the packets:
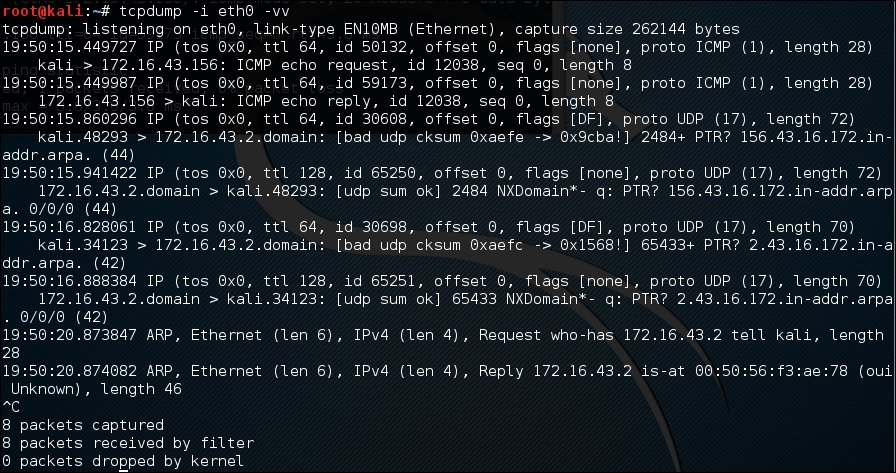
We can see that the target has responded with an ICMP echo reply packet.
Besides giving the options in the command line, you can also use hping3 interactively. Open the console and type hping3. You will then see a prompt where you can type your Tcl commands.
For the preceding example, the following is the corresponding Tcl script:
hping3> hping send {ip(daddr=172.16.43.156)+icmp(type=8,code=0)}
Open a command-line window and give the following command to get a response from the target server:
hping recv eth0
After that, open another command-line window to input the sending request.
The following screenshot shows the response received:

You can also use hping3 to check for a firewall rule. Let's suppose you have the following firewall rules:
- Accept any TCP packets directed to port
22(SSH) - Accept any TCP packets related with an established connection
- Drop any other packets
To check these rules, you can give the following command in hping3 in order to send an ICMP echo request packet:
hping3 -1 172.16.43.156 -c 1
The following code is the result:
# hping3 -1 172.16.43.156 -c 1
HPING 172.16.43.156 (eth0 172.16.43.156): icmp mode set, 28 headers + 0 data bytes
--- 172.16.43.156 hping statistic ---
1 packets transmitted, 0 packets received, 100% packet loss
round-trip min/avg/max = 0.0/0.0/0.0 ms
We can see that the target machine has not responded to our ping probe.
Send a TCP packet with the SYN flag set to port 22, and we will get a result as shown in the following screenshot:

From the preceding screenshot, we can see that the target machine's firewall allows our syn packet to reach port 22.
Let's check whether the UDP packet is allowed to reach port 22:

From the preceding screenshot, we can see that the target machine's firewall does not allow our UDP packet to reach port 22. There are other things that you can do with hping3, but in this chapter, we'll only discuss a small subset of its capabilities. If you want to learn more, you can consult the hping3 documentation site at http://wiki.hping.org.
The nping tool is a tool that allows users to generate network packets of a wide range of protocols (TCP, UDP, ICMP, and ARP). You can also customize the fields in the protocol headers, such as the source and destination port for TCP and UDP. The difference between nping and other similar tools such as ping is that nping supports multiple target hosts and port specification.
Besides, it can be used to send an ICMP echo request just like in the ping command; nping can also be used for network stress testing, Address Resolution Protocol (ARP) poisoning, and the denial of service attacks.
In Kali Linux, nping is included with the Nmap package. The following are several probe modes supported by nping:
|
No. |
Mode |
Description |
|---|---|---|
|
1 |
|
This is an unprivileged TCP connect |
|
2 |
|
This is a TCP mode |
|
3 |
|
This is a UDP mode |
|
4 |
|
This is an ICMP mode (default) |
|
5 |
|
This is an ARP/RARP mode |
|
6 |
|
This is a traceroute mode (it can only be used in the TCP/UDP/ICMP mode) |
At the time of writing, there is no Kali Linux menu yet for nping. So, you need to open a console and type nping. This will display the usage and options' description.
In order to use nping to send an ICMP echo request to the target machines 172.16.43.154, 172.16.43.155, 172.16.43.156, and 172.16.43.157 you can use the following command:
nping -c 1 172.16.43.154-157
The following screenshot shows the command output:
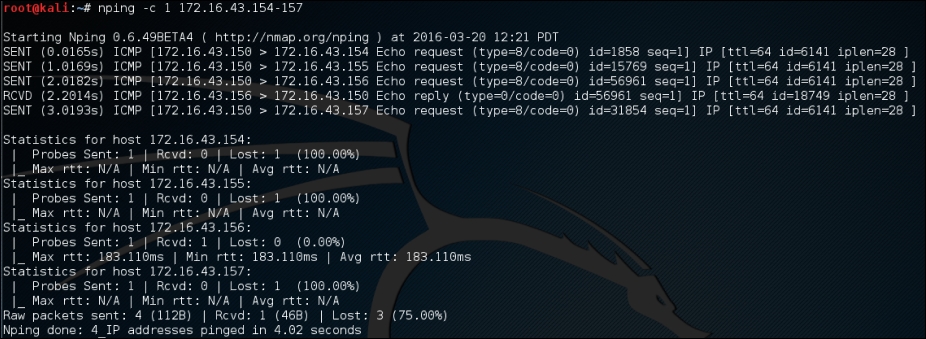
From the preceding screenshot, we know that only the 172.16.43.156 machine is sending back the ICMP echo reply packet.
If the machine is not responding to the ICMP echo request packet, as shown in the following output, you can still find out whether it is alive by sending a TCP SYN packet to an open port in that machine.
For example, to send one (-c 1) TCP packet (--tcp) to the IP address 172.16.43.156 port 22 (-p 22), you can use the following command:
nping --tcp -c 1 -p 22 172.16.43.156
Of course, you need to guess the ports which are open. We suggest that you try with the common ports, such as 21, 22, 23, 25, 80, 443, 8080, and 8443.
The following screenshot shows the result of the example:

From the preceding result, we can see that the remote machine, 172.16.43.156, is alive because when we sent the TCP packet to port 22, the target machine responded.
If you want to discover which machines are alive in an IPv6 environment, you can't just ask the tool to scan the whole network. This is because the address space is huge. You may find that the machines have a 64-bit network range. Trying to discover the machines sequentially in this network will require at least 264 packets. Of course, this is not a feasible task in the real world.
Fortunately, there is a protocol called ICMPv6 Neighbor Discovery. This protocol allows an IPv6 host to discover the link-local and auto-configured addresses of all other IPv6 systems on the local network. In short, you can use this protocol to find a live host on the local network subnet.
To help you do this, there is a tool called alive6, which can send an ICMPv6 probe and is able to listen to the responses. This tool is part of the THC-IPv6 Attack Toolkit developed by Van Hauser from The Hacker's Choice (http://freeworld.thc.org/thc-ipv6/) group.
To access alive6, go to the console and type alive6. This will display the usage information.
Suppose you want to find the active IPv6 systems on your local IPv6 network, the following command can be given with the assumption that the eth0 interface is connected to the LAN:
atk6-alive6 -p eth0
The following command lines are the result:
# atk6-alive6 -p eth0
Alive: fe80::20c:29ff:fe18:f08 [ICMP echo-reply]

Scanned 1 address and found 1 system alive
To mitigate against this, you can block the ICMPv6 echo request with the following ip6tables command:
ip6tables –A INPUT –p ipv6-icmp –-type icmpv6-type 128 –j DROP
The following screenshot is the result after the target machine configures the ip6tables rule:

This tool can be used if you want to detect the new IPv6 address joining a local network. This tool is part of the THC-IPv6 Attack Toolkit developed by Van Hauser from The Hacker's Choice group.
To access
detect-new-ipv6, go to the console and type detect-new-ipv6. This will display the usage information.
Following is a simple usage of this tool; we want to find the new IPv6 address that joined the local network:
atk6-detect-new-ip6 eth0
The following is the result of that command:
Started ICMP6 DAD detection (Press Control-C to end) ...
Detected new ip6 address: fe80::20c:29ff:fe18:f08
This tool can be used if you want to sniff out the local network to look for the IPv6 address. This tool is part of the THC-IPv6 Attack Toolkit developed by Van Hauser from The Hacker's Choice group. Getting the IPv6 address without being detected by an IDS can be useful.
To access passive_discovery6, go to the console and type passive_discovery6. This will display the usage information on the screen.
The following command is an example of running this tool:
atk6-passive_discovery6 eth0
The following is the result of that command:
atk6-passive_discovery6 eth0
Started IPv6 passive system detection (Press Control-C to end) ...
Detected:  fe80::20c:29ff:fe18:f08
This tool simply waits for the ARP request/reply by monitoring the network, and then it maps the answering hosts. The following are the IPv6 addresses that can be discovered by this tool on the network:
fe80::20c:29ff:fe18:f08
If you are doing an internal penetration test on a Windows environment, the first thing you want to do is get the NetBIOS information. One of the tools that can be used to do this is nbtscan.
The nbtscan tool will produce a report that contains the IP address, NetBIOS computer name, services available, logged in username, and MAC address of the corresponding machines. The NetBIOS name is useful if you want to access the service provided by the machine using the NetBIOS protocol that is connected to an open share. Be careful, as using this tool will generate a lot of traffic and it may be logged by the target machines.
Note
To find the meaning of each service in the NetBIOS report, you may want to consult the Microsoft Knowledge Base on the NetBIOS Suffixes (16th Character of the NetBIOS Name) article at http://support.microsoft.com/kb/163409.
To access nbtscan, you can open the console and type nbtscan.
As an example, I want to find out the NetBIOS name of the computers located in my network (192.168.1.0/24). The following is the command to be used:
nbtscan 172.16.43.1-254
The following is the result of that command:
# nbtscan 172.16.43.1-254
Doing NBT name scan for addresses from 172.16.43.1-254

IP address       NetBIOS Name     Server    User                                         MAC address
-----------------------------------------------------------------------------------------------------------------
172.16.43.1      TESTER-IMAC               <unknown>           00:50:56:c0:00:08
172.16.43.156    METASPLOITABLE   <server>  METASPLOITABLE   0:00:00:00:00:00
From the preceding result, we are able to find two NetBIOS names, TESTER-IMAC and METASPLOITABLE.
Let's find the service provided by these machines with the following command:
nbtscan -hv 172.16.43.1-254
The -h option will print the service in a human-readable name, while the -v option will give more verbose output information.
The following is the result of this command:
# nbtscan -hv 172.16.43.1-254
Doing NBT name scan for addresses from 172.16.43.1-254
NetBIOS Name Table for Host 172.16.43.1:
Incomplete packet, 119 bytes long.
Name             Service          Type
----------------------------------------
GERARDS-IMAC     Workstation Service
Adapter address: 00:50:56:c0:00:08
----------------------------------------
NetBIOS Name Table for Host 172.16.43.156:
Incomplete packet, 335 bytes long.
Name             Service          Type
----------------------------------------
METASPLOITABLE   Workstation Service
METASPLOITABLE   Messenger Service
METASPLOITABLE   File Server Service
METASPLOITABLE   Workstation Service
METASPLOITABLE   Messenger Service
METASPLOITABLE   File Server Service
__MSBROWSE__Master Browser
WORKGROUP        Domain Name
WORKGROUP        Master Browser
WORKGROUP        Browser Service Elections
WORKGROUP        Domain Name
WORKGROUP        Master Browser
WORKGROUP        Browser Service Elections
Adapter address: 00:00:00:00:00:00
----------------------------------------
From the preceding result, we can see that there are three services available on METASPLOITABLE:Workstation, Messenger, and File Server. In our experience, this information is very useful because we know which machine has a file sharing service. Next, we can continue to check whether the file sharing services are open so that we can access the files stored on those file sharing services.