Consider the code excerpt from the 32-bit malware DLL (TDSS rootkit), which is performing a check to make sure that it is running under spoolsv.exe. This check is performed using string comparison at ➊; if the string comparison fails, then the code jumps to end of the function ➋ and returns from the function. To be specific, this DLL generates malicious behavior only when it is loaded by spoolsv.exe; otherwise, it just returns from the function:
10001BF2     push offset aSpoolsv_exe  ; "spoolsv.exe"
10001BF7     push edi                  ; char *
10001BF8     call _stricmp  ➊
10001BFD     test eax, eax
10001BFF     pop ecx
10001C00     pop ecx
10001C01     jnz loc_10001CF9

[REMOVED]

10001CF9 loc_10001CF9: ➋      ; CODE XREF: DllEntryPoint+10j
10001CF9      xor  eax, eax
10001CFB      pop  edi
10001CFC      pop  esi
10001CFD      pop  ebx
10001CFE      leave
10001CFF      retn 0Ch
Suppose you want the malicious DLL to generate the behavior on any other process, such as notepad.exe. You can change the hardcoded string from spoolsv.exe to notepad.exe. To do that, navigate to the hardcoded address by clicking on aSpoolsv_exe, which will land you in the region shown here:

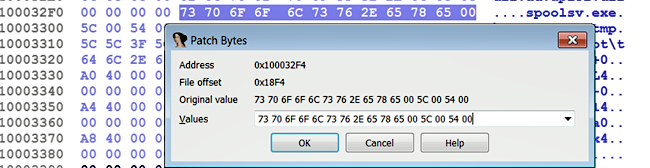
Now, place your mouse cursor on the variable name (aSpoolsv_exe). At this point, the hex view window should be synchronized with this address. Now, clicking on the Hex View-1 tab displays the hex and ASCII dump of this memory address. To patch the bytes, select Edit | Patch program | Change byte; this will bring up the patch bytes dialog shown in the following screenshot. You can modify the original bytes by entering the new byte values in the Values field. The Address field represents the virtual address of the cursor location, and the File offset field specifies the offset in the file where the bytes reside in the binary. The Original value field shows the original bytes at the current address; the values in this field do not change, even if you modify the values:
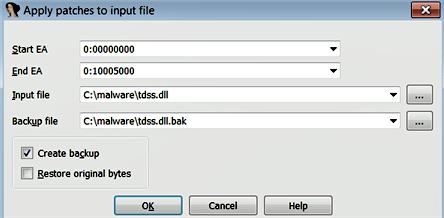
The modification that you make is applied to the IDA database; to apply the changes to the original executable file, you can select Edit | Patch program | Apply patches to the input file. The following screenshot shows the Apply patches to input file dialog. When you click on OK, the changes will be applied to the original file; you can keep a backup of the original file by checking the Create backup option; in that case, it will save your original file with a .bak extension:
The preceding example demonstrated patching the bytes; in the same manner, you can patch one word (2-byte) at a time by selecting Edit | Patch program | Change word. You can also modify bytes from the hex view window, by right-clicking on a byte and choosing Edit (F2), and you can apply the changes by right-clicking again and by choosing Apply changes (F2).