Table of Contents for
Python Geospatial Development - Third Edition
 Python Geospatial Development - Third Edition
Published by
Packt Publishing, 2016
Python Geospatial Development - Third Edition
Published by
Packt Publishing, 2016
- Cover
- Table of Contents
- Python Geospatial Development Third Edition
- Python Geospatial Development Third Edition
- Credits
- About the Author
- About the Reviewer
- www.PacktPub.com
- Preface
- What you need for this book
- Who this book is for
- Conventions
- Reader feedback
- Customer support
- 1. Geospatial Development Using Python
- Geospatial development
- Applications of geospatial development
- Recent developments
- Summary
- 2. GIS
- GIS data formats
- Working with GIS data manually
- Summary
- 3. Python Libraries for Geospatial Development
- Dealing with projections
- Analyzing and manipulating Geospatial data
- Visualizing geospatial data
- Summary
- 4. Sources of Geospatial Data
- Sources of geospatial data in raster format
- Sources of other types of geospatial data
- Choosing your geospatial data source
- Summary
- 5. Working with Geospatial Data in Python
- Working with geospatial data
- Changing datums and projections
- Performing geospatial calculations
- Converting and standardizing units of geometry and distance
- Exercises
- Summary
- 6. Spatial Databases
- Spatial indexes
- Introducing PostGIS
- Setting up a database
- Using PostGIS
- Recommended best practices
- Summary
- 7. Using Python and Mapnik to Generate Maps
- Creating an example map
- Mapnik concepts
- Summary
- 8. Working with Spatial Data
- Designing and building the database
- Downloading and importing the data
- Implementing the DISTAL application
- Using DISTAL
- Summary
- 9. Improving the DISTAL Application
- Dealing with the scale problem
- Performance
- Summary
- 10. Tools for Web-based Geospatial Development
- A closer look at three specific tools and techniques
- Summary
- 11. Putting It All Together – a Complete Mapping System
- Designing the ShapeEditor
- Prerequisites
- Setting up the database
- Setting up the ShapeEditor project
- Defining the ShapeEditor's applications
- Creating the shared application
- Defining the data models
- Playing with the admin system
- Summary
- 12. ShapeEditor – Importing and Exporting Shapefiles
- Importing shapefiles
- Exporting shapefiles
- Summary
- 13. ShapeEditor – Selecting and Editing Features
- Editing features
- Adding features
- Deleting features
- Deleting shapefiles
- Using the ShapeEditor
- Further improvements and enhancements
- Summary
- Index
The process of importing a shapefile involves the following steps:
- Display a form prompting the user to upload the shapefile's ZIP archive.
- Decompress the ZIP file to extract the uploaded shapefile.
- Open the shapefile and read its data into the database.
- Delete the temporary files we have created.
Let's work through each of these steps in turn.
Let's start by creating a placeholder for the "Import Shapefile" view. Edit the urls.py module and add a new entry to the urlpatterns list:
url(r'^import$', shapeEditor.shapefiles.views.import_shapefile),
Then, edit the shapeEditor/shapefiles/views.py module and add a dummy import_shapefile() view function to respond to this URL:
def import_shapefile(request):
    return HttpResponse("More to come")
You can test this if you want: run the Django server, go to the main page, and click on the Import New Shapefile button. You should see the More to come message.
To let the user enter data, we're going to use a Django form. Forms are custom classes that define the various fields that will appear on the web page. In this case, our form will have just a single field that lets the user select the file to be uploaded. We're going to store this form in a file named forms.py in the shapeEditor/shapefiles directory. Go ahead and create this file, and then edit it to look like this:
from django import forms

class ImportShapefileForm(forms.Form):
    import_file = forms.FileField(label="Select a Zipped Shapefile")
The FileField class lets the user select a file to upload. As you can see, we give this field a custom label, which will be displayed in the web page.
Now that we have created the form, go back to views.py and change the definition of the import_shapefile() view function to look like this:
def import_shapefile(request):
    if request.method == "GET":
        form = ImportShapefileForm()
        return render(request, "import_shapefile.html",
                      {'form' : form})
    elif request.method == "POST":
        form = ImportShapefileForm(request.POST,
                                   request.FILES)
        if form.is_valid():
            shapefile = request.FILES['import_file']
            # More to come...
            return HttpResponseRedirect("/")

        return render(request, "import_shapefile.html",
                      {'form' : form})
Also, add these two import statements to the top of the module:
from django.http import HttpResponseRedirect
from shapeEditor.shapefiles.forms import ImportShapefileForm
Let's take a look at what is happening here: the import_shapefile() function will initially be called with an HTTP GET request; this will cause the function to create a new ImportShapefileForm object and then call render() to display that form to the user. When the form is submitted, the import_shapefile() function will be called with an HTTP POST request. In this case, an ImportShapefileForm will be created with the submitted data (request.POST and request.FILES), and the form will be checked to see that the entered data is valid. If so, we will extract the uploaded shapefile.
At this point, because we haven't implemented the actual importing code, we will simply redirect the user back to the top-level page. As the comment says, we'll add more code here shortly.
If the form was not valid, we will once again call render() to display the form to the user. In this case, Django will automatically display the error message(s) associated with the form so that the user can see why the validation failed.
To display the form, we'll use a Django template and pass the form object as a parameter. Let's create that template now—create a new file named import_shapefile.html in the templates directory, and enter the following text into this file:
<html>
    <head>
        <title>ShapeEditor</title>
    </head>
    <body>
        <h1>Import Shapefile</h1>
        <form enctype="multipart/form-data" method="post"
              action="import">
            {{ form.as_p }}
            <input type="submit" value="Submit"/>
            <button type="button"
                onClick='window.location="/shape-editor";'>
                Cancel
            </button>
        </form>
    </body>
</html>
As you can see, this template defines an HTML <form> element and adds Submit and Cancel buttons to that form. The body of the form is not specified. Instead, we use {{ form.as_p }} to insert the form object into the template.
Let's test this out. Start up the Django web server if it is not already running, open a web browser, and enter the http://127.0.0.1:8000 URL into the address bar. Then, click on the Import New Shapefile button. All going well, you should see the following page:
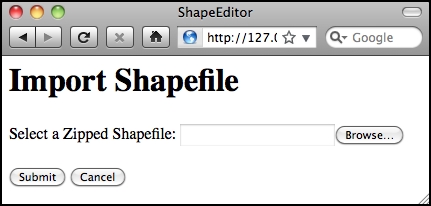
If you attempt to submit the form without uploading anything, an error message will appear saying that a shapefile is required. This is the default error-handling for any form: by default, all fields are required. If you do select a file for uploading, all that will happen is that the user will get redirected back to the main page; this is because we haven't implemented the import logic yet.
Now that we've created the form, let's work on the code required to process the uploaded shapefile.
Because the process of importing data is going to be rather involved, we'll put this code into a separate module. Create a new file named shapefileIO.py within the shapeEditor/shapefiles directory, and add the following text into this file:
def import_data(shapefile):
    return "More to come..."
Since it's quite possible for the process of importing a shapefile to fail (for example, if the user uploads a file that isn't a ZIP archive), our import_data() function is going to return an error message if something goes wrong. Let's go back and change our view (and template) to call this import_data() function and display the returned error message, if any.
Edit the views.py module, and add the following highlighted lines to the import_shapefile() view function:
def import_shapefile(request):
    if request.method == "GET":
        form = ImportShapefileForm()
        return render_to_response("import_shapefile.html",
                                  {'form'   : form,
                                   'errMsg' : None})
    elif request.method == "POST":
        errMsg = None # initially.

        form = ImportShapefileForm(request.POST,
                                   request.FILES)
        if form.is_valid():
            shapefile = request.FILES['import_file']
            errMsg = shapefileIO.import_data(shapefile)
            if errMsg == None:
                return HttpResponseRedirect("/")

        return render_to_response("import_shapefile.html",
                                  {'form'   : form,
                                   'errMsg' : errMsg})
You'll also need to add the following to the top of the file:
from django.shortcuts import render_to_response
from shapeEditor.shapefiles import shapefileIO
Now, edit the import_shapefile.html template and add the following lines to the file, immediately below the <h1>Import Shapefile<h1> line:
{% if errMsg %}
<b><i>{{ errMsg }}</i></b>
{% endif %}
This will display the error message to the user if it is not None.
Go ahead and try out your changes: click on the Import New Shapefile button, select a ZIP archive, and click on Submit. You should see the text More to come... appear at the top of the form, which is the error text returned by our dummy import_data() function.
We're now ready to start implementing the import logic. Edit the shapefileIO.py module again and get ready to write the body of the import_data() function. We'll take this one step at a time.
When we set up a form that includes a FileField object, Django returns to us an UploadedFile object representing the uploaded file. Our first task is to read the contents of the UploadedFile object and store it into a temporary file on disk so that we can work with it. Add the following to your import_data() function:
    fd,fname = tempfile.mkstemp(suffix=".zip")
    os.close(fd)

    f = open(fname, "wb")
    for chunk in shapefile.chunks():
        f.write(chunk)
    f.close()
As you can see, we use the tempfile module from the Python standard library to create a temporary file, and we then copy the contents of the shapefile object into this file.
We're now ready to open the temporary file and check whether it is indeed a ZIP archive containing the files that make up a shapefile. Here is how we can do this:
    if not zipfile.is_zipfile(fname):
        os.remove(fname)
        return "Not a valid zip archive."

    zip = zipfile.ZipFile(fname)

    required_suffixes = [".shp", ".shx", ".dbf", ".prj"]
    has_suffix = {}
    for suffix in required_suffixes:
        has_suffix[suffix] = False

    for info in zip.infolist():
        suffix = os.path.splitext(info.filename)[1].lower()
        if suffix in required_suffixes:
            has_suffix[suffix] = True

    for suffix in required_suffixes:
        if not has_suffix[suffix]:
            zip.close()
            os.remove(fname)
            return "Archive missing required " + suffix + " file."
Notice that we use the Python standard library's zipfile module to check the contents of the uploaded ZIP archive, and we return a suitable error message if something is wrong. We also delete the temporary file before returning an error message so that we don't leave temporary files lying around.
Finally, now that we know that the uploaded file is a valid ZIP archive containing the files that make up a shapefile, we can extract these files and store them into a temporary directory:
    shapefile_name = None
    dir_name = tempfile.mkdtemp()
    for info in zip.infolist():
        if info.filename.endswith(".shp"):
            shapefile_name = info.filename

        dst_file = os.path.join(dir_name, info.filename)
        f = open(dst_file, "wb")
        f.write(zip.read(info.filename))
        f.close()
    zip.close()
Notice that we create a temporary directory to hold the extracted files before copying the files into this directory. At the same time, we store the name of the main .shp file from the archive, as we'll need to use this name when we open the shapefile.
Because we've used some of the Python Standard Library modules in this code, you'll also need to add the following to the top of the module:
import os, os.path, tempfile, zipfile
Now that we've extracted the shapefile's files out of the ZIP archive, we are ready to import the data from the uploaded shapefile. The process of importing the shapefile's contents involves the following steps:
- Open the shapefile.
- Add the
Shapefileobject to the database. - Define the shapefile's attributes.
- Store the shapefile's features.
- Store the shapefile's attributes.
Let's work through these steps one at a time.
We will use the OGR library to open the shapefile. Add the following to the end of your shapefileIO.py module:
    try:
        datasource   = ogr.Open(os.path.join(dir_name,
                                             shapefile_name))
        layer        = datasource.GetLayer(0)
        shapefile_ok = True
    except:
        traceback.print_exc()
        shapefile_ok = False

    if not shapefile_ok:
        os.remove(fname)
        shutil.rmtree(dirname)
        return "Not a valid shapefile."
Once again, if something goes wrong, we clean up our temporary files and return a suitable error message. We're also using the traceback library module to display debugging information in the web server's log, while returning a friendly error message that will be shown to the user.
Note
In this program, we will be using OGR directly to read and write shapefiles. GeoDjango provides its own Python interface to OGR in the contrib.gis.gdal package, but unfortunately GeoDjango's version doesn't implement writing to shapefiles. Because of this, we will use the OGR Python bindings directly, which requires you to install OGR separately.
Because this code uses a couple of Python standard library modules as well as the OGR library, we'll have to add the following import statements to the top of the shapefileIO.py module:
import shutil, traceback
from osgeo import ogr
Now that we've successfully opened the shapefile, we are ready to read the data out of it. First off, we'll create the Shapefile object to represent this imported shapefile. To do this, add the following to the end of your import_data() function:
    src_spatial_ref = layer.GetSpatialRef()
    geom_type = layer.GetLayerDefn().GetGeomType()
    geom_name = ogr.GeometryTypeToName(geom_type)
    shapefile = Shapefile(filename=shapefile_name,
                          srs_wkt=src_spatial_ref.ExportToWkt(),
                          geom_type=geom_name)
    shapefile.save()
As you can see, we get the spatial reference from the shapefile's layer as well as the name for the type of geometry stored in the layer. We then store the shapefile's name, the spatial reference, and the geometry type name into a Shapefile object, which we then save into the database.
To allow this code to work, we'll have to add the following import statement to the top of the shapefileIO.py module:
from shapeEditor.shared.models import Shapefile
Now that we've created a Shapefile object to represent the imported shapefile, our next task is to create Attribute objects describing the shapefile's attributes. We can do this by querying the OGR shapefile; add the following code to the end of the import_data() function:
    attributes = []
    layer_def = layer.GetLayerDefn()
    for i in range(layer_def.GetFieldCount()):
        field_def = layer_def.GetFieldDefn(i)
        attr = Attribute(shapefile=shapefile,
                         name=field_def.GetName(),
                         type=field_def.GetType(),
                         width=field_def.GetWidth(),
                         precision=field_def.GetPrecision())
        attr.save()
        attributes.append(attr)
Notice that, as well as saving the Attribute objects into a database, we also create a separate list of these attributes in a variable named attributes. We'll use this later on, when we import the attribute values for each feature.
Don't forget to add the following import statement to the top of the module:
from shapeEditor.shared.models import Attribute
Our next task is to extract the shapefile's features and store them as Feature objects in the database. Because the shapefile's features can be in any spatial reference, we need to transform them into our internal spatial reference system (EPSG 4326, unprojected latitude and longitude values) before we can store them. To do this, we'll use an OGR CoordinateTransformation object.
Using OGR, it will be easy to scan through the shapefile's features, extract the geometry from each feature, transform them into the EPSG 4326 spatial reference, and convert them into a GeoDjango GEOS geometry object so that we can store it into the database. Unfortunately, this leaves us with two problems we have to solve:
- As we saw in the previous chapter, shapefiles are unable to distinguish between Polygons and MultiPolygons, between LineStrings and MultiLineStrings, and between Points and MultiPoints. If a Shapefile contains Polygons, some of the features may return a Polygon geometry, while others may return a MultiPolygon. Because all the features in the database must be of the same geometry type, we are going to have to wrap a Polygon geometry inside a MultiPolygon, a LineString geometry inside a MultiLineString, and a Point inside a MultiPoint to ensure that they are all of the same geometry type.
- Because the
Featureobject has separate fields for each type of geometry, we will have to decide which particular field within theFeatureobject will hold a given geometry. When we defined theFeatureclass, we had to create separate geometry fields for each of the geometry types; we now need to decide which of these fields will be used to store a given type of geometry.
Since these two tasks (wrapping a geometry and calculating the geometry field to use for a given geometry type) are general functions that we will need to use elsewhere, we'll store them in a separate module. Create a file named utils.py inside the shapeEditor/shared directory, and then add the following code to this module:
from django.contrib.gis.geos.collections \
    import MultiPolygon, MultiLineString, MultiPoint

def wrap_geos_geometry(geometry):
    if geometry.geom_type == "Polygon":
        return MultiPolygon(geometry)
    elif geometry.geom_type == "LineString":
        return MultiLineString(geometry)
    elif geometry.geom_type == "Point":
        return MultiPoint(geometry)
    else:
        return geometry

def calc_geometry_field(geometry_type):
    if geometry_type == "Polygon":
        return "geom_multipolygon"
    elif geometry_type == "LineString":
        return "geom_multilinestring"
    elif geometry_type == "Point":
        return "geom_multipoint"
    else:
return "geom_" + geometryType.lower()With this module in place, we can now return to our shapefileIO.py module and complete the implementation of the import_data() function. To save the features to disk, we first have to set up a coordinate transformation object that will convert our features from the shapefile's spatial reference system into EPSG 4326. Add the following to the end of your import_data() function:
    dst_spatial_ref = osr.SpatialReference()
    dst_spatial_ref.ImportFromEPSG(4326)

    coord_transform = osr.CoordinateTransformation(
                                      src_spatial_ref,
                                      dst_spatial_ref)
We can now iterate through the shapefile's features, creating a GeoDjango GEOSGeometry object for each feature:
    for i in range(layer.GetFeatureCount()):
        src_feature = layer.GetFeature(i)
        src_geometry = src_feature.GetGeometryRef()
        src_geometry.Transform(coord_transform)
        geometry = GEOSGeometry(src_geometry.ExportToWkt())
        geometry = utils.wrap_geos_geometry(geometry)
Notice that we are using the utils.wrap_geos_geometry() function we wrote earlier to wrap Polygon, LineString, and Point geometries so that they can be saved into the database.
We now need to store the geometry inside a Feature object. To do this, we'll first calculate the name of the geometry field that will hold our geometry:
geom_field = utils.calc_geometry_field(geom_name)
Now that we know the name of the field, we can create a Feature object with the geometry stored in the correct field. Because the field name varies, we'll use a Python trick called keyword argument unpacking to do this. This involves creating a Python dictionary with the various fields we want to save into the Feature object:
        fields = {}
        fields['shapefile'] = shapefile
        fields[geom_field] = geometry
We then use this dictionary as the set of keyword parameters passed to the Feature object's initializer. This has the effect of creating a new Feature object with the given fields, which we then save into the database:
        feature = Feature(**fields)
        feature.save()
Finally, add the following import statements to the top of the shapefileIO.py module:
from django.contrib.gis.geos.geometry import GEOSGeometry
from osgeo import osr
from shapeEditor.shared.models import Feature
from shapeEditor.shared import utils
Now that we've dealt with the feature's geometry, we can now look at importing the feature's attributes. The basic process involves iterating over the attributes, extracting each attribute value from the OGR feature, creating an AttributeValue object to store the value, and then saving it into the database. Our code will look something like the following:
for attr in attributes:
    value = ...
    attr_value = AttributeValue(feature=feature,
                                attribute=attr,
                                value=value)
    attr_value.save()
The challenge is to extract the attribute value from the feature. Because the OGR Feature object has different methods for different types of field values, we are going to have to check for the different field types, call the appropriate GetFieldAsXXX() method, convert the resulting value to a string, and then store this string into the AttributeValue object. Null values will also have to be handled appropriately. Because of all this complexity, we'll define a new utils.py function to do the hard work and simply call it from our import_data() function. We'll call this function get_ogr_feature_attribute().
Note that because we have to extract and parse the attribute values from the file, the process of extracting the attribute value can actually fail, for example, if the shapefile included a type of attribute that we don't support. Because of this, we have to add error handling to our code. To support error handling, our get_ogr_feature_attribute() function will return a (success, result) tuple, where success will be True if and only if the attribute was successfully extracted, and result will either be the extracted attribute value (as a string) or an error message explaining why the operation failed.
Let's add the necessary code to our import_data() function to store the attribute values into the database and gracefully handle any conversion errors that might occur:
        for attr in attributes:
            success,result = utils.get_ogr_feature_attribute(
                                      attr, src_feature)
            if not success:
                os.remove(fname)
                shutil.rmtree(dir_name)
                shapefile.delete()
                return result

            attr_value = AttributeValue(feature=feature,
                                        attribute=attr,
                                        value=result)
            attr_value.save()
Notice that we pass the Attribute object and the OGR feature to the get_ogr_feature_attribute() function. If an error occurs, we clean up the temporary files, delete the shapefile we created earlier, and return the error message back to the caller. If the attribute was successfully extracted, we create a new AttributeValue object with the attribute's value and save it into the database.
Tip
Note that we use shapefile.delete() to remove the partially imported shapefile from the database. By default, Django will also automatically delete any records that are related to the record being deleted through a ForeignKey field. This means that the Shapefile object will be deleted along with all the related Attribute, Feature, and AttributeValue objects. With one line of code, we can completely remove all references to the shapefile's data.
Now, let's implement that get_ogr_feature_attribute() function. Add the following to utils.py:
def get_ogr_feature_attribute(attr, feature):
    attr_name = attr.name

    if not feature.IsFieldSet(attr_name):
        return (True, None)

    if attr.type == ogr.OFTInteger:
        value = str(feature.GetFieldAsInteger(attr_name))
    elif attr.type == ogr.OFTIntegerList:
        value = repr(feature.GetFieldAsIntegerList(attr_name))
    elif attr.type == ogr.OFTReal:
        value = feature.GetFieldAsDouble(attr_name)
        value = "%*.*f" % (attr.width, attr.precision, value)
    elif attr.type == ogr.OFTRealList:
        values = feature.GetFieldAsDoubleList(attr_name)
        str_values = []
        for value in values:
            str_values.append("%*.*f" % (attr.width,
                                         attr.precision, value))
        value = repr(str_values)
    elif attr.type == ogr.OFTString:
        value = feature.GetFieldAsString(attr_name)
    elif attr.type == ogr.OFTStringList:
        value = repr(feature.GetFieldAsStringList(attr_name))
    elif attr.type == ogr.OFTDate:
        parts = feature.GetFieldAsDateTime(attr_name)
        year,month,day,hour,minute,second,tzone = parts
        value = "%d,%d,%d,%d" % (year,month,day,tzone)
    elif attr.type == ogr.OFTTime:
        parts = feature.GetFieldAsDateTime(attr_name)
        year,month,day,hour,minute,second,tzone = parts
        value = "%d,%d,%d,%d" % (hour,minute,second,tzone)
    elif attr.type == ogr.OFTDateTime:
        parts = feature.GetFieldAsDateTime(attr_name)
        year,month,day,hour,minute,second,tzone = parts
        value = "%d,%d,%d,%d,%d,%d,%d,%d" % (year,month,day,
                                             hour,minute,
                                             second,tzone)
    else:
        return (False, "Unsupported attribute type: " +
                       str(attr.type))

    return (True, value)
There's a lot of ugly code here relating to the extraction of different field types from the OGR feature. Don't worry too much about these details; the basic concept is that we extract the attribute's value in whatever format is needed for that type of attribute, convert the value(s) to a string if necessary, and then return the string back to the caller.
You'll also need to add the following to the top of utils.py so that your new function will work:
from osgeo import ogr
Finally, we'll have to add the following import statement to the top of the shapefileIO.py module:
from shapeEditor.shared.models import AttributeValue
Now that we've imported the shapefile's data, all that's left is to clean up our temporary files and tell the caller that the import succeeded. To do this, simply add the following lines to the end of your import_data() function:
    os.remove(fname)
    shutil.rmtree(dir_name)
    return None
That's it!
To test all this out, grab a copy of the TM_WORLD_BORDERS-0.3 shapefile in ZIP file format. You can either use the original ZIP archive that you downloaded from the World Borders Dataset web site, or you can recompress the shapefile into a new ZIP archive. Then, run the ShapeEditor, click on the Import New Shapefile button, click on the button to choose a file to import, and select the ZIP archive containing the World Borders Dataset.
When you click on the Submit button, you'll have to wait a few seconds for the shapefile to be imported. All going well, the World Borders Dataset will appear in the list of imported shapefiles:
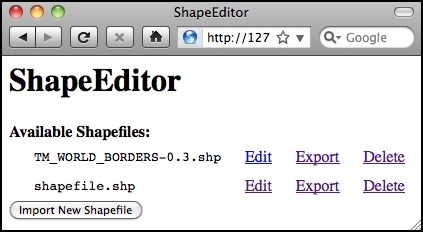
If a problem occurs, check the error message to see what might be wrong. Also, go back and make sure you have typed the code in exactly as described. If it works, congratulations! You have just implemented the most difficult part of the ShapeEditor system. It gets easier from here.