Table of Contents for
Python Geospatial Development - Third Edition
 Python Geospatial Development - Third Edition
Published by
Packt Publishing, 2016
Python Geospatial Development - Third Edition
Published by
Packt Publishing, 2016
- Cover
- Table of Contents
- Python Geospatial Development Third Edition
- Python Geospatial Development Third Edition
- Credits
- About the Author
- About the Reviewer
- www.PacktPub.com
- Preface
- What you need for this book
- Who this book is for
- Conventions
- Reader feedback
- Customer support
- 1. Geospatial Development Using Python
- Geospatial development
- Applications of geospatial development
- Recent developments
- Summary
- 2. GIS
- GIS data formats
- Working with GIS data manually
- Summary
- 3. Python Libraries for Geospatial Development
- Dealing with projections
- Analyzing and manipulating Geospatial data
- Visualizing geospatial data
- Summary
- 4. Sources of Geospatial Data
- Sources of geospatial data in raster format
- Sources of other types of geospatial data
- Choosing your geospatial data source
- Summary
- 5. Working with Geospatial Data in Python
- Working with geospatial data
- Changing datums and projections
- Performing geospatial calculations
- Converting and standardizing units of geometry and distance
- Exercises
- Summary
- 6. Spatial Databases
- Spatial indexes
- Introducing PostGIS
- Setting up a database
- Using PostGIS
- Recommended best practices
- Summary
- 7. Using Python and Mapnik to Generate Maps
- Creating an example map
- Mapnik concepts
- Summary
- 8. Working with Spatial Data
- Designing and building the database
- Downloading and importing the data
- Implementing the DISTAL application
- Using DISTAL
- Summary
- 9. Improving the DISTAL Application
- Dealing with the scale problem
- Performance
- Summary
- 10. Tools for Web-based Geospatial Development
- A closer look at three specific tools and techniques
- Summary
- 11. Putting It All Together – a Complete Mapping System
- Designing the ShapeEditor
- Prerequisites
- Setting up the database
- Setting up the ShapeEditor project
- Defining the ShapeEditor's applications
- Creating the shared application
- Defining the data models
- Playing with the admin system
- Summary
- 12. ShapeEditor – Importing and Exporting Shapefiles
- Importing shapefiles
- Exporting shapefiles
- Summary
- 13. ShapeEditor – Selecting and Editing Features
- Editing features
- Adding features
- Deleting features
- Deleting shapefiles
- Using the ShapeEditor
- Further improvements and enhancements
- Summary
- Index
In this section, we will examine the Python interface to the Mapnik toolkit in more detail. Since there are too many features to cover in their entirety, we will concentrate on the most important aspects of Mapnik that you are likely to use in your own programs. Feel free to refer to the Mapnik documentation (http://mapnik.org/docs) for anything not covered in this chapter.
A data source object acts as a "bridge" between Mapnik and your geospatial data. You typically create the data source using one of the following convenience constructors and then add that data source to any Mapnik Layer objects that use that data:
layer.datasource = datasource
There are many different types of data sources supported by Mapnik, though some are experimental or access data in commercial databases. Let's take a closer look at the types of data sources you are most likely to find useful.
It is easy to use a shapefile as a Mapnik data source. All you need to do is supply the name and directory path for the desired shapefile to the mapnik.Shapefile() convenience constructor:
datasource = mapnik.Shapefile(file="path/to/shapefile.shp")
The optional encoding parameter can be used to specify the character encoding to use for the shapefile's attributes, like this, for example:
datasource = mapnik.Shapefile(file="shapefile.shp",
                              encoding="latin1")
If you don't set the encoding parameter, the shapefile is assumed to use UTF-8 character encoding.
A PostGIS data source allows you to include data from a PostGIS database:
datasource = mapnik.PostGIS(user="..." password="...",
                            dbname="...", table="...")
Notice that you supply the username and password used to access the PostGIS database, the name of the database, and the name of the table that contains the spatial data you want to display on your map.
There are some performance issues to be aware of when retrieving data from a PostGIS database. If you use a mapnik.Filter object to selectively display features taken from a large database table, your map may take a long time to generate. This is because Mapnik needs to load every feature from the database table in turn to see whether it matches the filter expression. A much more efficient way to do this is to use what is called a sub-select query in order to limit the set of data that Mapnik retrieves from the database.
To use a sub-select query, you replace the table name with an SQL SELECT statement that does the filtering and returns the information needed by Mapnik to generate the map's layer. Here's an example:
query = "(SELECT geom FROM myBigTable WHERE level=1) AS data"
datasource = mapnik.PostGIS(user="...", password="...",
                            dbname="...", table=query)
We've replaced the table name with a PostGIS sub-select query that filters out all records with a level value not equal to 1 and returns just the geom field for the matching records.
Note that if you use a sub-select query, it is important that you include all the fields you want to refer to in your SELECT statement. If you don't include a field in the SELECT portion of the sub-select query, it won't be available for Mapnik to use.
The Gdal data source allows you to include any GDAL-compatible raster image data file within your map. It is straightforward to use:
datasource = mapnik.Gdal(file="myRasterImage.tiff")
Once you have a Gdal data source, you can use a RasterSymbolizer to draw it onto the map:
layer = mapnik.Layer("myLayer")
layer.datasource = datasource
layer.styles.append("myLayerStyle")

symbol = mapnik.RasterSymbolizer()

rule = mapnik.Rule()
rule.symbols.append(symbol)

style = mapnik.Style()
style.rules.append(rule)

map.append_style("myLayerStyle", style)A MemoryDatasource allows you to manually define the geospatial data that appears on the map. To use a MemoryDatasource, you first create the data source object itself:
datasource = mapnik.MemoryDatasource()
You then define a mapnik.Context object that lists the attributes you want to associate with each of the data source's features:
context = mapnik.Context()
context.push("NAME")
context.push("ELEVATION")
Next, you create a mapnik.Feature object for each of the features you want to include on the map:
feature = mapnik.Feature(context, id)
Note that the id parameter should be a unique integer value identifying this feature within the memory data source.
Once the feature has been created, you then set the feature's attributes. This is done in the same way you define entries within a Python dictionary:
feature['NAME'] = "Hawkins Hill"
feature['ELEVATION'] = 1624
These attributes can be used by rules to select which features to display, and they can also be used by a TextSymbolizer to draw an attribute's value onto the map.
Each feature can have one or more geometries associated with it. The easiest way to set the feature's geometry is to use the add_geometries_from_wkt() method, like this:
feature.add_geometries_from_wkt("POINT (174.73 -41.33)")Finally, you add the feature to the MemoryDatasource using the add_feature() method:
datasource.add_feature(feature)
Once your MemoryDatasource has been set up, you can add it to a map layer and use any of the vector-format symbolizers to draw the features onto the map.
As we saw earlier in this chapter, Mapnik uses rules to specify which particular symbolizers will be used to render a given feature. Rules are grouped together into a style, and the various styles are added to your map and then referred to by name when you set up your map layer. In this section, we will examine the relationship between rules, filters and styles, and see just what can be done with these various Mapnik classes.
Let's take a closer look at Mapnik's Rule class. A Mapnik rule has two parts: a set of conditions and a list of symbolizers. If the rule's conditions are met, then the symbolizers will be used to draw the matching features onto the map.
There are two main types of conditions supported by a Mapnik rule:
If the conditions for a rule have been met, then the associated list of symbolizers will be used to render the feature onto the map.
Let's take a look at filters and "else" conditions in more detail.
Mapnik's Filter() constructor takes a single parameter, which is a string defining an expression that the feature must match if the rule is to apply. You then store the returned Filter object in the rule's filter attribute:
rule.filter = mapnik.Filter("...")Let's consider a very simple filter expression, comparing a field or attribute against a specific value:
filter = mapnik.Filter("[level] = 1")String values can be compared by putting single quote marks around the value, like this:
filter = mapnik.Filter("[type] = 'CITY'")Notice that the field name and value are both case-sensitive and that you must surround the field or attribute name with square brackets.
Of course, simply comparing a field with a value is the most basic type of comparison you can do. Filter expressions have their own powerful and flexible syntax for defining conditions, similar in concept to an SQL WHERE expression. The following syntax diagram describes all the options for writing filter expression strings:
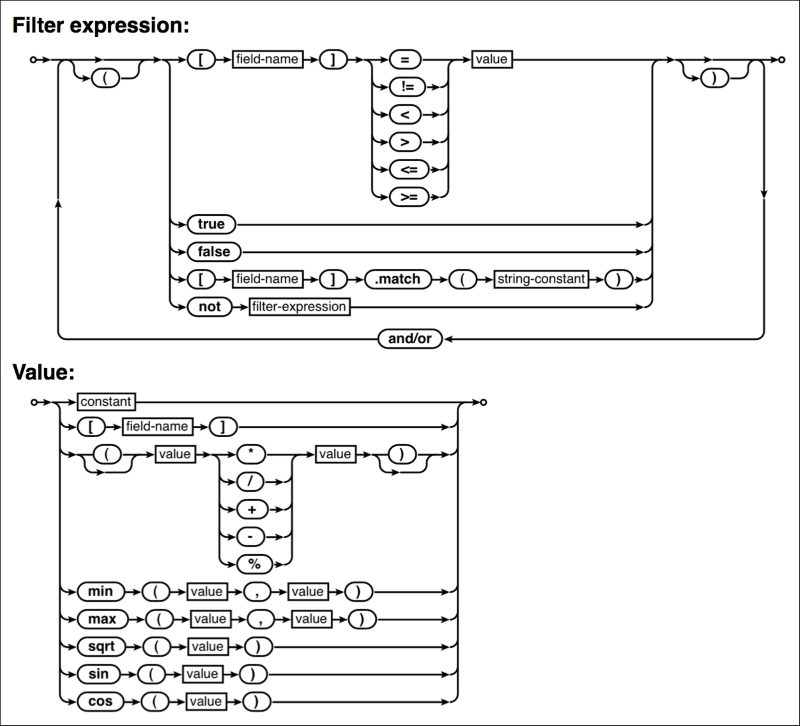
Mapnik also allows you to filter based on the type of geometry, using the following special syntax:
filter = mapnik.Filter("[mapnik::geometry_type] = point")The following geometry type values are supported by this kind of filter expression:
pointlinestringpolygoncollection
Imagine that you want to draw some features in one color and all other features in a different color. One way to achieve this is by using Mapnik filters, like this:
rule1.filter = mapnik.Filter("[level] = 1")
...
rule2.filter = mapnik.Filter("[level] != 1")
This is fine for simple filter expressions, but when the expressions get more complicated, it is a lot easier to use an "else" rule, like this:
rule.set_else(True)
If you call set_else(True) for a rule, then this rule is to be used if and only if no previous rule in the same style has had its filter conditions met.
Else rules are particularly useful if you have a number of filter conditions and want to have a catch-all rule at the end. This catch-all rule will apply if no other rule has been used to draw the feature, like this:
rule1.filter = mapnik.Filter("[type] = 'city'")
rule2.filter = mapnik.Filter("[type] = 'town'")
rule3.filter = mapnik.Filter("[type] = 'village'")
rule4.filter.set_else(True)A Mapnik style is nothing more than a list of rules. To define a style, create a new mapnik.Style object and add the rules to it one at a time, like this:
style = mapnik.Style()
style.rules.append(rule1)
style.rules.append(rule2)
...
For each feature, the rules are processed one after the other, with each rule's conditions being checked in turn to see whether the feature matches the rule. If it does, the rule's associated symbolizers will be used to draw that feature. If none of the rules match the feature, then the feature won't be displayed at all.
Once you have created the Style object, you add the style to your mapnik.Map object, giving the style a name. You then refer to that style by name from within your map layers, for example:
map.append_style("style_name", style)
layer.styles.append("style_name")
Symbolizers are used to draw features onto a map. In this section, we will look at the most common types of symbolizers you can use to draw points, lines, polygons, text, and raster images onto a map.
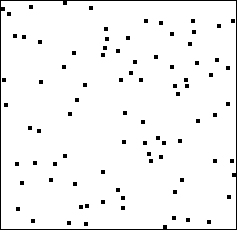
To draw a point geometry, you use a PointSymbolizer. This draws an image at the specified point. The default constructor takes no arguments and displays each point as a black square of 4 x 4 pixels:
symbolizer = PointSymbolizer()
Alternatively, you can supply a path to an image file, which the PointSymbolizer will use to draw each point:
path = mapnik.PathExpression("path/to/image.png")
symbolizer = PointSymbolizer(path)
You can modify the behavior of the PointSymbolizer by setting the following attributes:
symbolizer.allow_overlap = True: If you set this attribute toTrue, all points will be drawn even if the images overlap. The default (False) means that points will only be drawn if they don't overlap.symbolizer.opacity = 0.75: This attribute controls the amount of opaqueness or transparency used to draw the image. A value of1.0(the default) will draw the image completely opaque, while a value of0.0will draw the image completely transparent.symbolizer.transform = "...": This is an SVG transformation expression that you can use to manipulate the image to be displayed. For example,transform="rotate(45) scale(0.5, 0.5)"will rotate the image clockwise by 45 degrees and then scale it to 50 percent of its original size.
A LineSymbolizer draws linear features and traces around the outline of polygons, as shown in the following diagram:

The LineSymbolizer is one of the most useful of the Mapnik symbolizers. For example, the dashed line in the previous image was created using the following Python code:
stroke = mapnik.Stroke()
stroke.color = mapnik.Color("#008000")
stroke.width = 1.0
stroke.add_dash(5, 10)
symbolizer = mapnik.LineSymbolizer(stroke)
As you can see, a LineSymbolizer uses a Mapnik Stroke object to define how the line will be drawn. To use a LineSymbolizer, you first create the Stroke object and set the various options for how you want the line to be drawn. You then create your LineSymbolizer instance, passing the Stroke object to the LineSymbolizer object's constructor:
symbolizer = mapnik.LineSymbolizer(stroke)
You can customize the Stroke object in the following ways:
stroke.color = mapnik.Color("yellow"): This changes the color used to draw the line. MapnikColorobjects can be constructed using a color name, an HTML color code, or separate R, G, and B values, for example:color1 = mapnik.Color("yellow") color2 = mapnik.Color("#f0f028") color3 = mapnik.Color(240, 240, 40)stroke.width = 0.5: This sets the width of the line, measured in pixels. Note that because Mapnik uses antialiasing to draw lines, a line narrower than 1 pixel will often look better than a line with an integer width.stroke.opacity = 0.8: this sets how opaque or transparent the line is. The opacity can range from0.0(completely transparent) to1.0(completely opaque).stroke.line_cap = mapnik.line_cap.BUTT_CAP: This changes how the ends of the lines are to be drawn. Mapnik supports three standard line cap settings:
stroke.line_join = mapnik.line_join.MITER_JOIN: This sets how a "corner" of the line is drawn when the line changes direction. Three standard line join options are supported: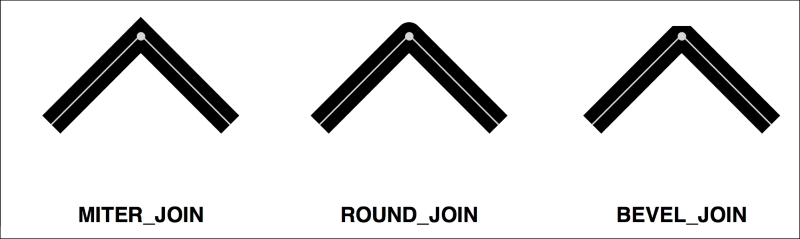
stroke.add_dash(5, 7): This lets you add a break to the line so that it appears dashed or dotted. The two parameters you supply are the dash length and the gap length; the line will be drawn for the given dash length and a gap of the specified length will then be left before the line continues:
Note that you can call add_dash() more than once. This allows you to create alternating patterns of dots or dashes, for example:
stroke.add_dash(10, 2)
stroke.add_dash(2, 2)
stroke.add_dash(2, 2)
This would result in the following repeating line pattern:

One thing that may not be immediately obvious when you start working with symbolizers is that you can use multiple symbolizers for a single feature. For example, consider the following code:
stroke = mapnik.Stroke()
stroke.color = mapnik.Color("#bf7a3a")
stroke.width = 7.0
roadEdgeSymbolizer = mapnik.LineSymbolizer(stroke)

stroke = mapnik.Stroke()
stroke.color = mapnik.Color("#ffd3a9")
stroke.width = 6.0
roadInteriorSymbolizer = mapnik.LineSymbolizer(stroke)

rule.symbols.append(roadEdgeSymbolizer)
rule.symbols.append(roadInteriorSymbolizer)
The two symbolizers will be laid on top of each other to draw a LineString feature that looks like a road on a street map:

This technique can be used for more than just drawing roads; the creative use of symbolizers is one of the main tricks to achieving complex visual effects using Mapnik.
A PolygonSymbolizer
fills the interior of a polygon with a single color:
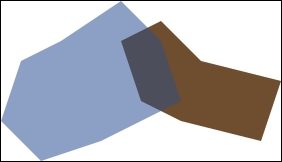
You can create a PolygonSymbolizer instance like this:
symbolizer = mapnik.PolygonSymbolizer()
Once it has been created, you can configure your PolygonSymbolizer instance by setting the following attributes:
symbolizer.fill = mapnik.Color("red"): This sets the color to use for drawing the interior of the polygon.symbolizer.opacity = 0.8: This changes the opacity used to draw the polygon's interior.symbolizer.gamma = 0.6: Thegammavalue is used to control the amount of antialiasing used for drawing the edges of the polygon. If you try to draw adjacent polygons with the same color, the edges would normally be visible; reducing thegammavalue slightly will allow the edges of adjacent polygons to disappear, merging the polygons together.
A TextSymbolizer draws textual labels onto point, line, and polygon features:
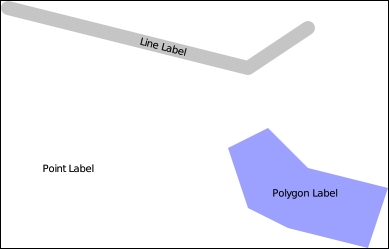
The basic usage of a TextSymbolizer is quite simple. For example, the polygon in the preceding illustration was labeled using the following code:
symbolizer = mapnik.TextSymbolizer(mapnik.Expression("[label]"),
"DejaVu Sans Book", 10, mapnik.Color("black"))
As you can see, the TextSymbolizer object's constructor takes four separate parameters:
- A
mapnik.Expressionobject that defines the text to be displayed. In this example, the value to be displayed will be taken from thelabelattribute in the data source. - The name of the font to use for drawing the text. To see which fonts are available, type the following into the Python command line:
import mapnik
for font in mapnik.FontEngine.face_names():
    print(font)
You can also install custom fonts, as described on the web page at: https://github.com/mapnik/mapnik/wiki/UsingCustomFonts.
- The font size, measured in pixels.
- The
mapnik.Colorobject to use for drawing the text.
Once it has been created, you can configure the TextSymbolizer object by setting the following attributes:
symbolizer.opacity = 0.5:This changes the opacity used for drawing the text.symbolizer.label_placement = mapnik.label_placement.LINE_PLACEMENT:Thelabel_placementattribute controls how the text is positioned. The default value,POINT_PLACEMENT, simply draws the text in the center of the geometry, like this:
If you change this to
LINE_PLACEMENT, the label will be drawn along the length of a LineString or along the perimeter of a polygon: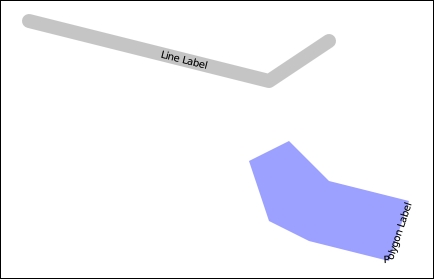
Note that the text won't be shown at all for a Point geometry when you use
LINE_PLACEMENT, as there are no lines within a point.symbolizer.label_spacing = 30: By default, each label will only be drawn once for each feature. By settinglabel_spacingto a given pixel value, the label will be repeated, like this: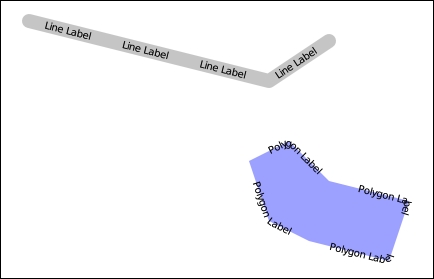
symbolizer.allow_overlap = True: By default, Mapnik will avoid overlapping two labels by either shifting the labels slightly or by hiding one of the labels. Settingallow_overlaptoTruewill disable this behavior, allowing multiple labels to be drawn on top of each other: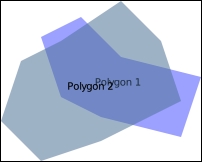
symbolizer.halo_radius = 1: If you draw a label using dark text on a dark background, the label would normally be very hard to read. You can use this attribute to draw a "halo" effect around the label, making a dark label still visible against a dark background, for example: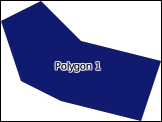
Note that the
halo_radiusvalue is specified in pixels; generally, a small value such as 1 or 2 is enough to ensure that the text is readable against a dark background.symbolizer.halo_fill = mapnik.Color("white"): This sets the color to use for drawing the halo effect around a label.
There are many more options for controlling how labels are drawn using a TextSymbolizer. For example, you can control how labels are split across multiple lines, specify character and line spacing, and even dynamically choose the attribute to display based on the length of the text and the available space. For more information on the available options, please consult the Mapnik documentation.
Note
In addition to a TextSymbolizer, there is a symbolizer called a ShieldSymbolizer which combines a TextSymbolizer object with a PointSymbolizer object, allowing you to draw both an image and a label at a given point. Due to its complexity, we will not be covering ShieldSymbolizer in this book; if you want to explore this symbolizer, you will find that it uses the same attributes as both the TextSymbolizer and the PointSymbolizer.
Raster images are often used to draw a basemap onto which your vector data is displayed. To draw a raster image, you would typically use a RasterSymbolizer. For example:
symbolizer = mapnik.RasterSymbolizer()
A RasterSymbolizer draws the contents of the layer's raster-format data source onto the map. While there are some advanced options for controlling how the raster image is displayed, in most cases, the only option you are likely to be interested in is the opacity attribute. As you might expect, this sets the opacity for the image, allowing you to display multiple semi-transparent images one on top of the other.
Once you have set up your data sources, symbolizers, rules, and styles, you can combine them into Mapnik layers and place the various layers together onto a map. To do this, you first create a mapnik.Map object to represent the map as a whole:
map = mapnik.Map(width, height, srs)
You supply the width and height of the map image you want to generate, measured in pixels, and an optional Proj.4-format initialization string in the srs parameter. If you don't specify a spatial reference system, the map will use +proj=latlong +datum=WGS84, that is, unprojected lat/long coordinates on the WGS84 datum.
After creating the map, you set its background color and then add your various styles to the map by calling the map.append_style() method:
map.background_color = mapnik.Color('white')

map.append_style("countryStyle", countryStyle)
map.append_style("roadStyle", roadStyle)
map.append_style("pointStyle", pointStyle)
map.append_style("rasterStyle", rasterStyle)
...
You next need to create the various layers within the map. To do this, you create a mapnik.Layer object to represent each map layer:
layer = mapnik.Layer(layerName, srs)
Each layer is given a unique name and can optionally have a spatial reference associated with it. The srs string is once again a Proj.4-format initialization string; if no spatial reference is given, the layer will use +proj=latlong +datum=WGS84.
Once you have created your map layer, you assign it a data source and choose the style(s) that will apply to that layer, identifying each style by name:
layer.datasource = myDatasource

layer.styles.append("countryStyle")
layer.styles.append("rasterStyle")
...
Finally, you add your new layer to the map:
map.layers.append(layer)
While map layers can be used to combine multiple data sources into a single image, they can also be used to selectively show or hide information based on the current zoom level. For example, consider the following two maps:
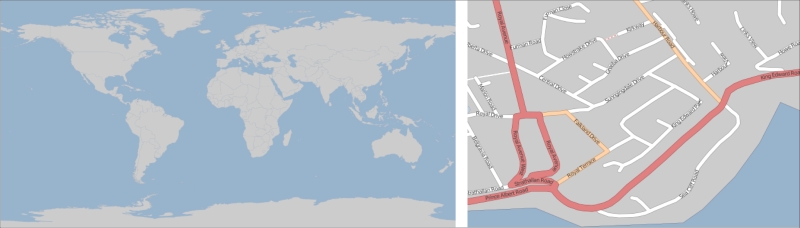
Obviously, there's no point in drawing streets onto a map of the entire world. Similarly, the country outlines shown on the world map are at too large a scale to draw detailed coastlines for an individual city. But if your application allows the user to zoom in from the world map right down to an individual street, you will need to use a single set of Mapnik styles to generate the map regardless of the scale at which you are drawing it.
The easiest way to do this is to set the minimum and maximum scale factor for a layer. For example:
layer.minzoom = 1/100000
layer.maxzoom = 1/200000
The layer will only be displayed when the map's current scale factor is within this range. This is useful if you have a data source that should only be used when displaying the map at a certain scale, for example, only using high-resolution shoreline data when the user has zoomed in.
After creating your mapnik.Map object and setting up the various symbolizers, rules, styles, data sources, and layers within it, you are finally ready to convert your map into a rendered image.
Before rendering the map image, make sure that you have set the appropriate bounding box for the map so that the map will show the area of the world you are interested in. You can do this by either calling map.zoom_to_box() to explicitly set the map's bounding box to a given set of coordinates, or you can call map.zoom_all() to have the map automatically set its bounds based on the data to be displayed.
Once you have set the bounding box, you can generate your map image by calling the render_to_file() function, like this:
mapnik.render_to_file(map, 'map.png')
The parameters are the mapnik.Map object and the name of the image file to write the map to. If you want more control over the format of the generated image, you can add an extra parameter to specify the image format, like this:
mapnik.render_to_file(map, 'map.png', 'png256')
Supported image formats include the following:
|
Image format |
Description |
|---|---|
|
|
A 32-bit PNG-format image |
|
|
An 8-bit PNG-format image |
|
|
A JPEG-format image |
|
|
An SVG-format image |
|
|
A PDF file |
|
|
A PostScript-format file |
The render_to_file() function works well when you want to generate a single image from your entire map. Another useful way of rendering maps is to generate a number of "tiles", which can then be stitched together to display the map at a higher resolution:
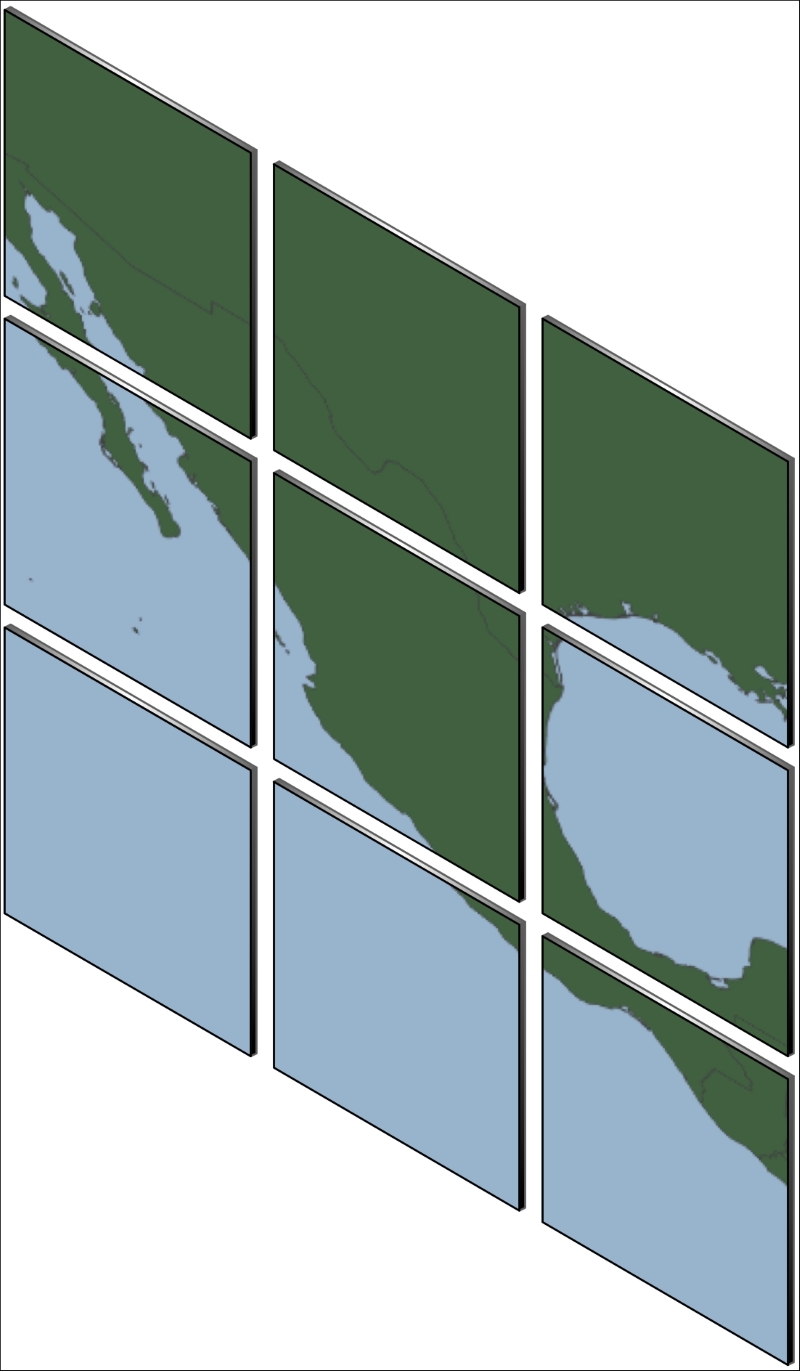
Mapnik provides a helpful function for creating tiles like this out of a single map:
mapnik.render_tile_to_file(map, xOffset, yOffset,
                           width, height, fileName, format)
The parameters for this function are as follows:
mapis themapnik.Mapobject containing the map dataxOffsetandyOffsetdefine the top-left corner of the tile, in map coordinateswidthandheightdefine the size of the tile, in map coordinatesfileNameis the name of the file to save the tiled image toformatis the file format to use for saving this tile
You can simply call this function repeatedly to create the individual tiles for your map. For example:
for x in range(NUM_TILES_ACROSS):
    for y in range(NUM_TILES_DOWN):
        xOffset = TILE_SIZE * x
        yOffset = TILE_SIZE * y
        tileName = "tile_{}_{}.png".format(x, y)
        mapnik.render_tile_to_file(map, xOffset, yOffset,
                                   TILE_SIZE, TILE_SIZE,
                                   tileName, "png")