Table of Contents for
Python Geospatial Development - Third Edition
 Python Geospatial Development - Third Edition
Published by
Packt Publishing, 2016
Python Geospatial Development - Third Edition
Published by
Packt Publishing, 2016
- Cover
- Table of Contents
- Python Geospatial Development Third Edition
- Python Geospatial Development Third Edition
- Credits
- About the Author
- About the Reviewer
- www.PacktPub.com
- Preface
- What you need for this book
- Who this book is for
- Conventions
- Reader feedback
- Customer support
- 1. Geospatial Development Using Python
- Geospatial development
- Applications of geospatial development
- Recent developments
- Summary
- 2. GIS
- GIS data formats
- Working with GIS data manually
- Summary
- 3. Python Libraries for Geospatial Development
- Dealing with projections
- Analyzing and manipulating Geospatial data
- Visualizing geospatial data
- Summary
- 4. Sources of Geospatial Data
- Sources of geospatial data in raster format
- Sources of other types of geospatial data
- Choosing your geospatial data source
- Summary
- 5. Working with Geospatial Data in Python
- Working with geospatial data
- Changing datums and projections
- Performing geospatial calculations
- Converting and standardizing units of geometry and distance
- Exercises
- Summary
- 6. Spatial Databases
- Spatial indexes
- Introducing PostGIS
- Setting up a database
- Using PostGIS
- Recommended best practices
- Summary
- 7. Using Python and Mapnik to Generate Maps
- Creating an example map
- Mapnik concepts
- Summary
- 8. Working with Spatial Data
- Designing and building the database
- Downloading and importing the data
- Implementing the DISTAL application
- Using DISTAL
- Summary
- 9. Improving the DISTAL Application
- Dealing with the scale problem
- Performance
- Summary
- 10. Tools for Web-based Geospatial Development
- A closer look at three specific tools and techniques
- Summary
- 11. Putting It All Together – a Complete Mapping System
- Designing the ShapeEditor
- Prerequisites
- Setting up the database
- Setting up the ShapeEditor project
- Defining the ShapeEditor's applications
- Creating the shared application
- Defining the data models
- Playing with the admin system
- Summary
- 12. ShapeEditor – Importing and Exporting Shapefiles
- Importing shapefiles
- Exporting shapefiles
- Summary
- 13. ShapeEditor – Selecting and Editing Features
- Editing features
- Adding features
- Deleting features
- Deleting shapefiles
- Using the ShapeEditor
- Further improvements and enhancements
- Summary
- Index
In the final three chapters of this book, we will build a complete sophisticated geospatial web application called ShapeEditor. The ShapeEditor is built on top of a number of existing technologies; before we can start implementing it, we need to become familiar with these technologies. In this section, we will learn about three of the key tools and techniques used to implement the ShapeEditor: the Tile Map Service protocol, OpenLayers, and GeoDjango.
The Tile Map Service (TMS) protocol defines the interface for a web service that returns map tile images upon request. The TMS protocol is similar to WMS, except that it is simpler and more oriented towards the storage and retrieval of map tiles rather than arbitrarily-specified complete maps.
The TMS protocol uses RESTful principles, which means that the URL used to access the web service includes all of the information needed to complete a request. Unlike WMS, there is no need to create and submit complex XML documents to retrieve a map tile—all of the information is contained within the URL itself.
Within the TMS protocol, a Tile Map Service is a mechanism for providing access to rendered map images at a given set of scale factors and using a predetermined set of spatial reference systems.
A single TMS Server can host multiple Tile Map Services:

This is typically used to provide different versions of a TMS so that new versions of it can be implemented without breaking clients that depend on features in an older version.
Each Tile Map Service within a TMS server is identified by a URL that is used to access that particular service. For example, if a TMS server is running at http://tms.myserver.com, version 1.2 of the Tile Map Service running on that server would generally reside at the sub-URL http://tms.myserver.com/1.2/. Accessing the top-level URL (http://tms.myserver.com) will return a list of all the Tile Map Services available on that server:
<?xml version="1.0" encoding="UTF-8"/>
<Services>
  <TileMapService title="MyServer TMS" version="1.0"
   href="http://tms.myserver.com/1.0/"/>
  <TileMapService title="MyServer TMS" version="1.1"
   href="http://tms.myserver.com/1.1/"/>
  <TileMapService title="MyServer TMS" version="1.2"
   href="http://tms.myserver.com/1.2/"/>
</Services>
Each Tile Map Service provides access to one or more Tile Maps:
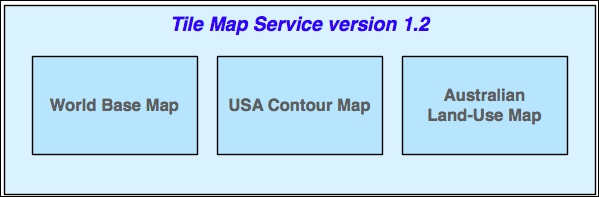
A Tile Map: is a complete map of all or part of the Earth, displaying particular sets of features or styled in a particular way. The examples given in the figure, of a world base map, a usa contour map, and an australian land-use map, show how different Tile Maps might contain different sorts of map data or cover different areas of the Earth's surface. Different Tile Maps may also be used to make maps available in different image formats or to provide maps in different spatial reference systems.
If a client system accesses the URL for a particular Tile Service, the Tile Service will return more detailed information about that service, including a list of the Tile Maps available within that service:
<?xml version="1.0" encoding="UTF-8"/>
<TileMapService version="1.2" services="http://tms.myserver.com">
  <Title>MyServer TMS</Title>
  <Abstract>TMS Service for the myserver.com server</Abstract>
  <TileMaps>
    <TileMap title="World Base Map"
             srs="EPSG:4326"
             profile="none"
             href="http://tms.myserver.com/1.2/baseMap"/>
    <TileMap title="USA Contour Map"
             srs="EPSG:4326"
             profile="none"
             href="http://tms.myserver.com/1.2/usaContours"/>
    <TileMap title="Australian Land-Use Map"
             srs="EPSG:4326"
             profile="none"
             href="http://tms.myserver.com/1.2/ausLandUse"/>
    </TileMap>
  </TileMaps>
</TileMapService>
Client systems accessing rendered maps via a TMS server will generally want to be able to display that map at various resolutions. For example, a world base map might initially be displayed as a complete map of the world, and the user could zoom in to see a more detailed view of a desired area:
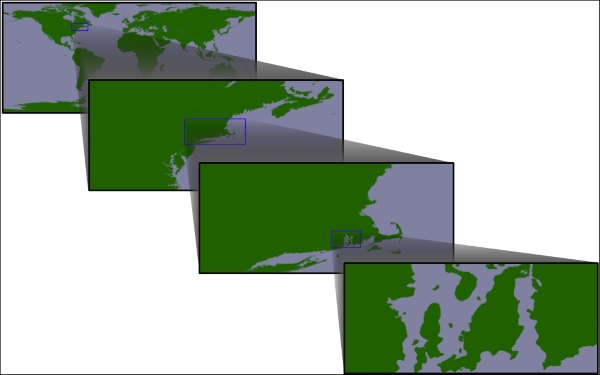
This zooming-in process is done through the use of appropriate scale factors. Each Tile Map consists of a number of Tile Sets, where each Tile Set depicts the map at a given scale factor. For example, the first figure in the preceding illustration was drawn at a scale factor of approximately 1:100,000,000, the second at a scale factor of 1:10,000,000, the third at a scale factor of 1:1,000,000, and the last at a scale factor of 1:100,000. Thus, there would be four Tile Sets within this Tile Map, one for each of the scale factors.
If a client system accesses the URL for a given Tile Map, the server will return information about that map, including a list of the available Tile Sets:
<?xml version="1.0" encoding="UTF-8">
<TileMap version="1.2"
         tilemapservice="http://tms.myserver.com/1.2">
  <Title>World Base Map</Title>
  <Abstract>Base map of the entire world</Abstract>
  <SRS>ESPG:4326</SRS>
  <BoundingBox minx="-180" miny="-90" maxx="180" maxy="90"/>
  <Origin x="-180" y="-90"/>
  <TileFormat width="256"
              height="256"
              mime-type="image/png"
              extension="png"/>
  <TileSets profile="none">
    <TileSet href="http://tms.myserver.com/1.2/basemap/0"
             units-per-pixel="0.703125"
             order="0"/>
    <TileSet href="http://tms.myserver.com/1.2/basemap/1"
             units-per-pixel="0.3515625"
             order="1"/>
    <TileSet href="http://tms.myserver.com/1.2/basemap/2"
             units-per-pixel="0.17578125"
             order="2"/>
    <TileSet href="http://tms.myserver.com/1.2/basemap/3"
             units-per-pixel="0.08789063"
             order="3"/>
  </TileSets>
</TileMap>
Notice how each Tile Set has its own unique URL. This URL will be used to retrieve the individual Tiles within the tile set. Each Tile is given an x and y coordinate value indicating its position within the overall map. For example, using the preceding Tile Map covering the entire world, the third Tile Set would consist of 32 Tiles arranged as follows:
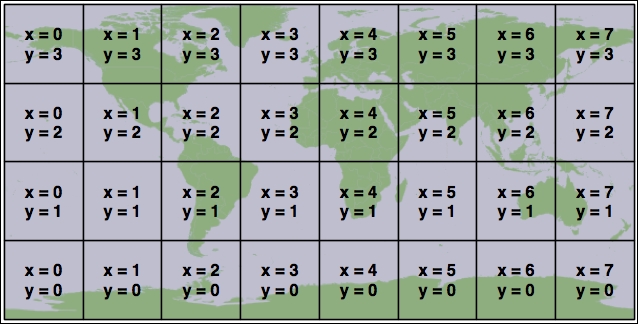
This arrangement of Tiles is defined by the following information taken from the Tile Map and the selected Tile Set:
- The Tile Map uses the ESPG:4326 spatial reference system, which equates to longitude/latitude coordinates based on the WGS84 datum. This means that the map data is using latitude/longitude coordinate values, with longitude values increasing from left to right and latitude values increasing from bottom to top.
- The map's bounds range from -180 to +180 in the x (longitude) direction and from -90 to +90 in the y (latitude) direction.
- The map's origin is at (-180,-90)—that is, the bottom-left corner of the map.
- Each Tile in the Tile Map is 256 pixels wide and 256 pixels high.
- The third Tile Set has a
units-per-pixelvalue of 0.17578125.
Multiplying the units-per-pixel value by the tile's size, we can see that each Tile covers 0.17578125 x 256 = 45 degrees of latitude and longitude. Since the map covers the entire earth, this yields eight tiles across and four tiles high, with the origin in the bottom-left corner.
Once the client software has decided on a particular Tile Set to use and has calculated the x and y coordinates of the desired tile, retrieving that tile's image is a simple matter of concatenating the Tile Set's URL, the x and y coordinates, and the image file suffix:
url = tileSetURL + "/" + x + "/" + y + "." + imgFormat
For example, to retrieve the tile at the coordinate (3, 2) from the preceding Tile Set, you would use the following URL:
http://tms.myserver.com/1.2/basemap/2/3/2.png
Notice how this URL (and indeed, every URL used by the TMS protocol) looks as if it is simply retrieving a file from the server. Behind the scenes, the TMS server may indeed be running a complex set of map-generation and map-caching tools to generate these tiles on demand—but the entire TMS server could just as easily be defined by a series of hardwired XML files and a number of directories containing pre-generated image files.
This notion of a static tile map server is a deliberate design feature of the TMS protocol. If you don't need to generate too many map tiles, or if you have a particularly large hard disk, you could easily pre-generate all the tile images and create a static TMS server by creating a few XML files and serving the whole thing behind a standard web server such as Apache.
In the final chapter of this book, we will implement a Python-based TMS server as part of the ShapeEditor system. You may also wish to make use of TMS servers in your own web applications, possibly by creating a static Tile Map Server or by using an existing software library that implements the TMS protocol. There are two popular open source libraries that implement tile caching: TileCache (http://tilecache.org) and MapProxy (http://mapproxy.org), both of which are implemented in Python.
OpenLayers (http://openlayers.org) is a sophisticated JavaScript library for building mapping applications. It includes a JavaScript API for building slippy maps, combining data from multiple layers, and including various widgets for manipulating maps as well as viewing and editing vector-format data.
OpenLayers version 2 has been available for many years, while a complete rewrite called OpenLayers 3 has only recently become available. You should use OpenLayers 3 as it employs a much more modern design and is actively supported. As of the time of writing this, the latest version of OpenLayers is version 3.10.1.
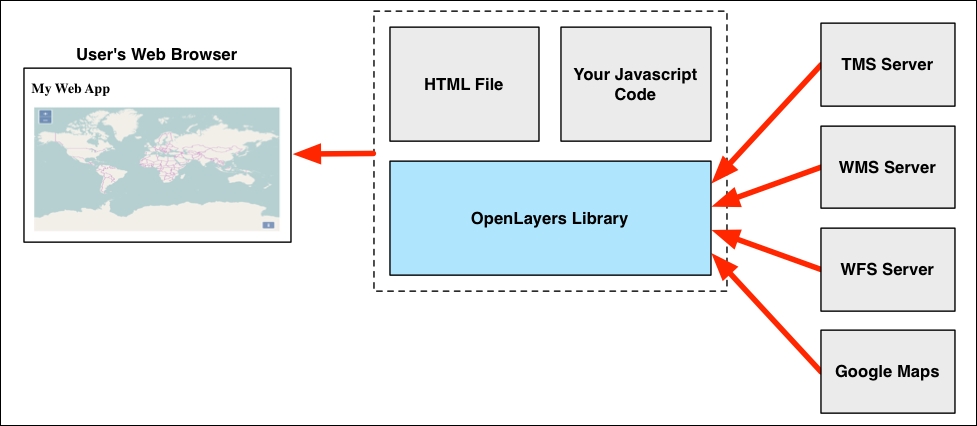
To use OpenLayers in your web application, you first need to create an HTML file to be loaded into the user's web browser and then write some JavaScript code that uses the OpenLayers API to build the desired map. OpenLayers then builds your map and allows the user to interact with it, loading map data from the data source(s) you have specified. OpenLayers can read from a variety of geospatial data sources, including TMS, WMS, and WFS servers. All these parts work together to produce the user interface for your web application in the following way:
Here is the code for an example HTML page that displays a slippy map using OpenLayers:
<html>
  <head>
    <link rel="stylesheet"
          href="http://openlayers.org/en/v3.10.1/css/ol.css"
          type="text/css">
    <script src="http://openlayers.org/en/v3.10.1/build/ol.js"
            type="text/javascript">
    </script>
    <script type="text/javascript">
      function initMap() {
        var source = new ol.source.OSM();

        var layer = new ol.layer.Tile({source: source});

        var origin = ol.proj.fromLonLat([0, 0]);

           var view = new ol.View({center: origin,
                                zoom: 1});

        var map = new ol.Map({target: "map",
                             layers: [layer],
                             view: view});
      }
    </script>
  </head>
  <body onload="initMap()">
    <div style="width:100%; height:100%" id="map"></div>
  </body>
</html>
Notice the following line:
<div style="width:100%; height:100%" id="map"></div>
This <div> element will contain the slippy map. We use inline styles to make this element take up the entire width and height of the page, and we also give this element an id of "map".
The onload="initMap()" attribute in the page's <body> tag tells the web browser to run the initMap() JavaScript function when the page is loaded. All of the actual work takes place inside this function, which defines five separate values that are used to create the slippy map:
sourcerepresents the data source to use for obtaining the underlying map data. In our example, we will display data from OpenStreetMap.layeris the map layer to be displayed. In this example, we are using a tiled layer to display the map data using map tiles.originrepresents the point on which the map will be centered. Because the OpenStreetMap data source uses Spherical Mercator, we have to ask OpenLayers to convert our unprojected (long/lat) coordinate into this projection when we calculate the origin.viewrepresents the portion of the map to be displayed when the page first loads. In this case, the map will be centered on the origin we calculated and will be zoomed out as much as possible.- Finally, the
mapobject represents the OpenLayers slippy map. Thetargetvalue is the ID of the<div>element where the map is to be displayed, and we set up the map to use thelayerandviewobjects we calculated earlier.
If you load this HTML page on your web browser, you should see a slippy map showing the OpenStreetMap map data:
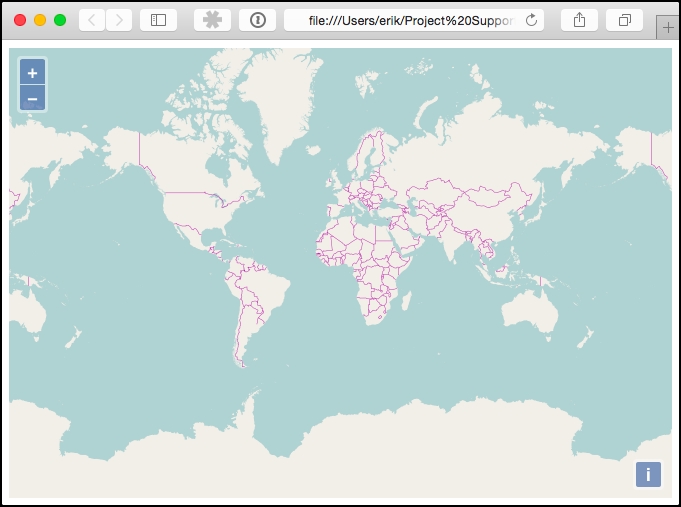
This map is still quite basic, but by using the various OpenLayers features, you could do a lot more with it. For example:
- You could display multiple map layers, including raster-format base images and dynamically generated vector-format data
- You could add more controls to the map
- You could use various interactions to define how the user can manipulate the contents of the map
- You could allow the user to edit vector-format map data directly within the map
OpenLayers is a powerful tool for building geospatial web interfaces. Even if you don't use it directly in your own code, many of the web application frameworks that support geospatial web development (including GeoDjango) use OpenLayers internally to display and edit map data.
GeoDjango is a built-in extension to the popular Django web application framework. Using GeoDjango, you can develop sophisticated web-based applications that let the user view and edit geospatial data. Before we can work with GeoDjango, however, we need to understand Django itself.
Let's start with a hands-on tutorial to get you working with Django. Once you understand the basic concepts and have built a simple web application, we will look at how GeoDjango builds on the Django framework to let you create your own geospatial web applications. We won't go into too much detail about GeoDjango here, as we'll be working with it extensively in the final three chapters of this book.
Django (http://djangoproject.com) is a rapid application development (RAD) framework for building database-oriented web applications using Python. The Django framework is highly respected and is used to power thousands of web applications currently deployed across the internet. The major parts of Django include an object-relational mapper, an automatically generated admin interface, a flexible URL mapper, and a web templating system. Putting these elements together, Django allows you to quickly build sophisticated web applications to implement a wide variety of database-oriented systems.
In Django, you work with a project that is made up of a number of individual apps. Each app implements a specific set of functionality, for example, authenticating users, generating reports, or responding to API requests. When you create a project, you typically write one or more apps yourself and make use of a number of predefined apps that come built into Django.
One of the most useful built-in apps is the admin interface, which allows you to administer your web application, view and edit data, and so on. Other useful built-in apps implement persistent sessions, user authentication, site maps, user comments, sending emails, and viewing paginated data. A large number of user-contributed apps are also available.
Let's use Django to create a simple web application. We'll start by installing Django. The easiest way to do this is to use pip, the Python package manager. From the command line, type pip install django. If this doesn't work, for example, because you don't have pip installed, you can download a copy of Django from https://www.djangoproject.com/download.
Once it is installed, open up a terminal window and cd into the directory where you want to place your new web application's project. Then, type django-admin startproject example.
Tip
Depending on how you installed Django, the django-admin program may not be directly accessible from the command line, because it is installed in a location that isn't on your path. If you get an error, you may need to find where django-admin was installed and add the path to your command. For example, on a Mac, the command is /Library/Frameworks/Python.framework/Versions/current/bin/django-admin startproject example. You may want to add the django-admin directory to your path to avoid having to type this out in full each time.
This will create a new Django project named example, which will be stored in a directory with the same name. This directory is just a container for your project; inside it, you will find the following:
manage.py
example/
    __init__.py
    settings.py
    urls.py
    wsgi.py
Let's take a closer look at these various files and folders:
manage.pyis a program generated automatically by Django. You'll be using this to run and update your project.- The
examplesubdirectory is a Python package that will hold various files related to your new project. As you can see, this is named after your project. __init__.pyis an empty file that tells the Python interpreter to treat theexamplesubdirectory as a Python package.- The
settings.pymodule holds various project-level settings. - The
wsgi.pyscript is used to run your project within a WSGI-compatible web server.
Now that we have a Django project, let's create a simple app that will run within it. Our app, which we will call hello, simply displays the following message to the user:
Hello Number X.
X is a number that increases each time the page is displayed. While this example app may seem trivial, it demonstrates a number of key features of Django:
- URL routing
- Views
- HTML templates
- The object-relational mapper
To create this app, cd into your outermost example directory and enter the following command:
python manage.py startapp hello
This will create a new sub-directory named hello within your outermost example directory. This directory is a Python package that holds the various parts of your new Django app. If you look in this directory, you will find the following items:
__init__.pyis another package initialization file, telling the Python interpreter to treat thehellodirectory as a Python package.admin.pyis a module you can use to define the admin interface for your app. We won't be using this, so you can ignore it.- The
migrationsdirectory holds the various database migrations for this app. The contents of this directory will be created automatically by themanage.pyscript when we define our database's structure. - The
models.pymodule holds the various database models used by this app. A database model is a Python class that defines the structure of a single database table. We'll look at this in more detail shortly. - The
tests.pymodule is the place to define various unit tests for your app. - Finally, the
views.pymodule will hold the various view functions that implement the behavior of your app. We'll be editing this module shortly.
Our next task is to tell the example project to use our newly created hello app. To do this, edit the example/settings.py file, and look for a variable named INSTALLED_APPS. This is a list of the apps that are used by the project. As you can see, a number of built-in apps are installed by default. Edit this list so that it looks like the following:
INSTALLED_APPS = (
    #'django.contrib.admin',
    'django.contrib.auth',
    'django.contrib.contenttypes',
    'django.contrib.sessions',
    'django.contrib.messages',
    'django.contrib.staticfiles',
    'hello'
)
Notice that we've commented out the django.contrib.admin app, as we won't want to use the admin interface for our simple example project. We've also added the hello app to our project.
Our next step is to set up the database model. Because our hello app needs to keep track of how often the Hello message has been displayed, we will create a model named Counter which keeps track of how often the message has been displayed. To do this, edit your hello/models.py module, and add the following to the end of it:
class Counter(models.Model):
    count = models.IntegerField()
A database model (that is, a subclass of the django.db.models.Model class) is a Python class that defines the structure of a database table. In our example, we've created a very simple database model—just one model, Counter, which has a single field named count. There's a lot more that can be done with database models, including defining relations between models, setting default behavior, adding custom methods to a model, and so on, but this is all we need for our example project.
Save the models.py file, then open up a terminal or command-line window, cd into your outermost example directory, and enter the following command:
python manage.py makemigrations hello
The makemigrations command looks at the database models you have defined for the hello app and figures out what changes have occurred to the database structure since the last time the command was run. Because this is the first time we've run this command, a new database table will be created that matches the structure of your Counter class.
If you look inside your hello/migrations directory, you'll see that a new file has been created: 0001_initial.py. This file contains the detailed instructions needed by Django to create the database table corresponding to your database model.
Now that the migration file has been created, we need to apply it. To do this, enter the following command:
python manage.py migrate
The migrate command applies all unapplied database migrations. Because a number of standard apps are included in your project, they will have their own database migrations, which will be applied at the same time.
We now have a database that includes, among other things, our new Counter model. You might be wondering where this database is. By default, Django makes use of the SQLite database engine, creating a simple database on disk which it uses to store your project's data. You can change this if you want by editing the DATABASES setting in your example/settings.py module.
Now that we have a database, let's make use of it. Since our example project needs to display a message to the user, we next have to create two things: a URL mapping that tells Django which function to call when the user attempts to access the system and a view function which will respond when that URL is accessed.
In a real system, URL mappings can get quite sophisticated, but for our program, we're going to use a very basic mapping. Edit the example/urls.py module and add the following import statement to the top of it:
from hello import views
This makes the hello app's view functions (which we will create in the hello/views.py module) available for use in our URL mappings. Next, replace the existing definition for the urlpatterns variable with the following:
urlpatterns = [
    url('^$', views.say_hello)
]
Notice that we've removed the reference to the admin interface, since we aren't using it in our project. The url() function defines a single URL mapping that maps the rather cryptic-looking '^$' URL pattern to a function named say_hello() within our hello/views.py module. The '^$' string is a regular expression that will match against the top-level URL for our project. In other words, if the user accesses the project's top-level URL, the views.say_hello() function will be called to respond to the user's request.
Save the changes you have made to the urls.py module, and then edit the hello/views.py module. This is where you will define the view functions for the hello app. We're going to create a single function named say_hello() which will respond when the user accesses our project's top-level URL.
Before we write our say_hello() function, let's think for a moment what this function is supposed to do. We need to display a message that looks like the following:
Hello Number X.
The value for X is taken from our Counter database model and is incremented each time our view is called. So, our first step is to load a Counter record, creating it if it doesn't already exist, and then increment it. We can then display the Hello Number X message based on the counter's current value.
We start by importing the Counter class into our views.py module:
from hello.models import Counter
We then define our say_hello() function. In Django, a view function takes a
request object, which provides information about the HTTP request that was received from the user's web browser, and returns a response object containing the information to be sent back to the user's web browser for display. This means that the basic structure of a Django view function looks like this:
def view_function(request):
    ...
    return response
In our case, we don't really care about the request object, as we don't need to use any of the information it may contain. We do, however, have to return a response.
Let's start by defining the first part of our view function. To do this, add the following to the end of your views.py module:
def say_hello(request):
Our view function needs to load the Counter record from the database, creating it if necessary. Using Django's object-relational mapper, we can do this using the Counter class directly:
    counter = Counter.objects.first()
    if counter == None:
        counter = Counter(count=0)
We then increment the counter and save it back into the database:
    counter.count = counter.count + 1
    counter.save()
We now have the value for X that we want to include in the Hello Number X message. Our final step is to create an HTTP response object that includes this message so that we can use it as the function's return value.
While there are many ways in which we can create an HTTP response object, we will use Django's built-in templating system to create the response. Doing this is easy:
    return render(request, "say_hello.html",
                  {'count' : counter.count})
The render() function takes the HTTP request object, the name of the template file to use, and a "context" dictionary that holds values to be included in the template. In this case, we will use the say_hello.html template and supply a value named count, which will be included in the template.
We have almost completed our example project. All that's left is to create the HTML template: inside the hello app's directory, create a new directory named templates, and then create a file named say_hello.html within it. Then, enter the following into this file:
<html>
  <head>
    <title>Hello Example</title>
  </head>
  <body>
    Hello Number {{ count }}.
  </body>
</html>
You can now run your project by typing the following into the command line:
python manage.py runserver
To test your program, open up a web browser and go to http://127.0.0.1:8000. All going well, you should see the following message appear in your web browser:
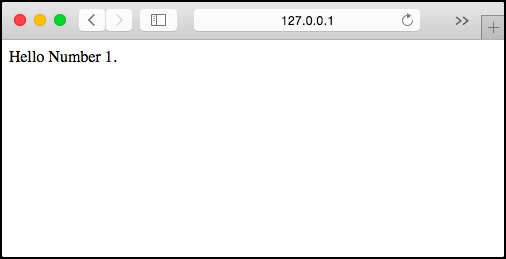
Reloading the page will cause the number to increment each time.
Of course, this example project is rather basic—there are lots of details we have skipped over, and the resulting program doesn't look particularly good yet—but we have covered most of the key features of Django that you need to know about:
- How to create projects and apps
- How to define and use database models
- How database migrations work
- How URL routing works to map from a URL to a view function
- How to write a simple view function
- How to create and use an HTML template
Now that we have seen how Django works, let's take a brief look at how GeoDjango extends the Django framework to allow you to create geospatial web applications.
The GeoDjango extension builds on Django's capabilities to add complete support for building geospatial web applications. In particular, it adds the following functionality to Django:
- The model:
- The Django model is extended to allow you to store and retrieve geospatial data.
- The Django ORM is extended to support spatial queries.
- As geospatial features are read from the database, the object-relational mapper automatically converts them into GEOS objects, providing methods for querying and manipulating these features in a sophisticated way, similar to the interface provided by Shapely.
- The model can import data from any OGR-supported vector-data source into the GeoDjango database.
- GeoDjango can use introspection to see which attributes are available in a given OGR data source and automatically set up the model to store and import these attributes.
- The template:
- The admin interface:
- Distance and area calculators:
- IP-based geolocation:
All told, the GeoDjango extension makes Django an excellent choice for developing geospatial web applications. In fact, ShapeEditor, the complete geospatial application we will be writing in the remainder of this book, will be built on top of the GeoDjango framework.