Table of Contents for
Python Geospatial Development - Third Edition
 Python Geospatial Development - Third Edition
Published by
Packt Publishing, 2016
Python Geospatial Development - Third Edition
Published by
Packt Publishing, 2016
- Cover
- Table of Contents
- Python Geospatial Development Third Edition
- Python Geospatial Development Third Edition
- Credits
- About the Author
- About the Reviewer
- www.PacktPub.com
- Preface
- What you need for this book
- Who this book is for
- Conventions
- Reader feedback
- Customer support
- 1. Geospatial Development Using Python
- Geospatial development
- Applications of geospatial development
- Recent developments
- Summary
- 2. GIS
- GIS data formats
- Working with GIS data manually
- Summary
- 3. Python Libraries for Geospatial Development
- Dealing with projections
- Analyzing and manipulating Geospatial data
- Visualizing geospatial data
- Summary
- 4. Sources of Geospatial Data
- Sources of geospatial data in raster format
- Sources of other types of geospatial data
- Choosing your geospatial data source
- Summary
- 5. Working with Geospatial Data in Python
- Working with geospatial data
- Changing datums and projections
- Performing geospatial calculations
- Converting and standardizing units of geometry and distance
- Exercises
- Summary
- 6. Spatial Databases
- Spatial indexes
- Introducing PostGIS
- Setting up a database
- Using PostGIS
- Recommended best practices
- Summary
- 7. Using Python and Mapnik to Generate Maps
- Creating an example map
- Mapnik concepts
- Summary
- 8. Working with Spatial Data
- Designing and building the database
- Downloading and importing the data
- Implementing the DISTAL application
- Using DISTAL
- Summary
- 9. Improving the DISTAL Application
- Dealing with the scale problem
- Performance
- Summary
- 10. Tools for Web-based Geospatial Development
- A closer look at three specific tools and techniques
- Summary
- 11. Putting It All Together – a Complete Mapping System
- Designing the ShapeEditor
- Prerequisites
- Setting up the database
- Setting up the ShapeEditor project
- Defining the ShapeEditor's applications
- Creating the shared application
- Defining the data models
- Playing with the admin system
- Summary
- 12. ShapeEditor – Importing and Exporting Shapefiles
- Importing shapefiles
- Exporting shapefiles
- Summary
- 13. ShapeEditor – Selecting and Editing Features
- Editing features
- Adding features
- Deleting features
- Deleting shapefiles
- Using the ShapeEditor
- Further improvements and enhancements
- Summary
- Index
In this chapter, we will learn about various tools and techniques that can be used to develop geospatial applications that run in a user's web browser. Web-based applications are becoming increasingly popular, and there is a huge potential for geospatial development based on this technology.
We will start our examination of web-based geospatial development with an overview of the tools and techniques that can be used both for web application development in general and geospatial web application development in particular. We will look at web applications, web services, the concept of a "slippy map", and a number of standard protocols for sharing and manipulating geospatial data across the Internet.
We will then turn our attention to three particular tools and techniques that will be used to develop a complete geospatial web application in the final three chapters of this book: the TMS protocol, OpenLayers, and the GeoDjango web application framework.
While web browsers were initially designed to show static HTML pages, they are now a sophisticated programming environment in their own right. Complex applications can now be implemented in JavaScript running on the user's web browser, interacting with server-side APIs and web services to perform tasks that previously could only be implemented using complex standalone systems.
Web application development has transformed the programming landscape, and geospatial developers have not been left behind. In this section, we will learn about web application development and see how these technologies can be applied to build sophisticated geospatial systems that run within the user's web browser.
There are many ways in which you can develop a web-based application. You can write your own code by hand, for example as a series of CGI scripts or you can use one of the many web application frameworks available. In this section, we will look at the different ways in which web applications can be structured so that the different parts work together to implement the application's functionality.
In Chapter 8, Working with Spatial Data, we created a simple web application named DISTAL. This web application was built using CGI scripts to provide distance-based identification of towns and other features. DISTAL is a good example of a bare-bones approach to web application development, using nothing more than a web server, a database, and a collection of CGI scripts:
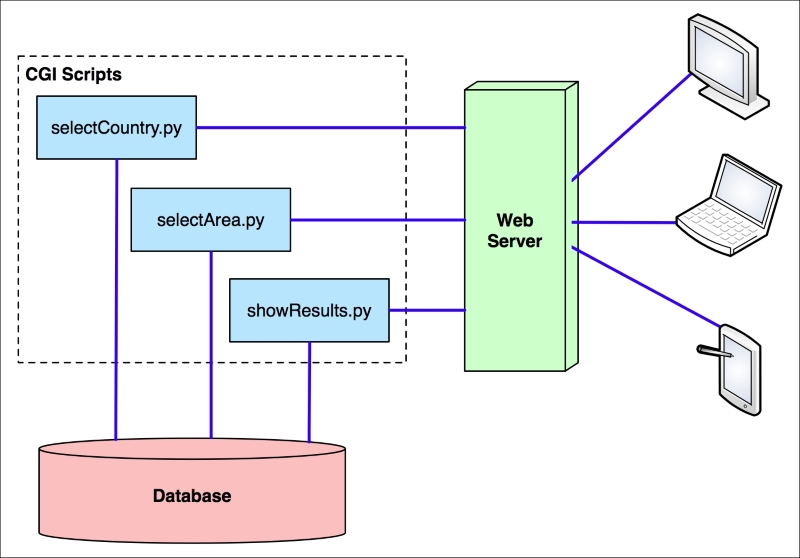
The advantage of this approach is that you don't need special tools or knowledge to write a web application in this way. The disadvantage is that you have to do all the low-level coding by hand. It's a tedious and slow way of building a web application, especially a complex one with lots of features.
To make the job of building web-based applications easier, you generally use existing tools that allow you to write your application at a higher level. For example, you might choose to implement a complex web application in the following way:
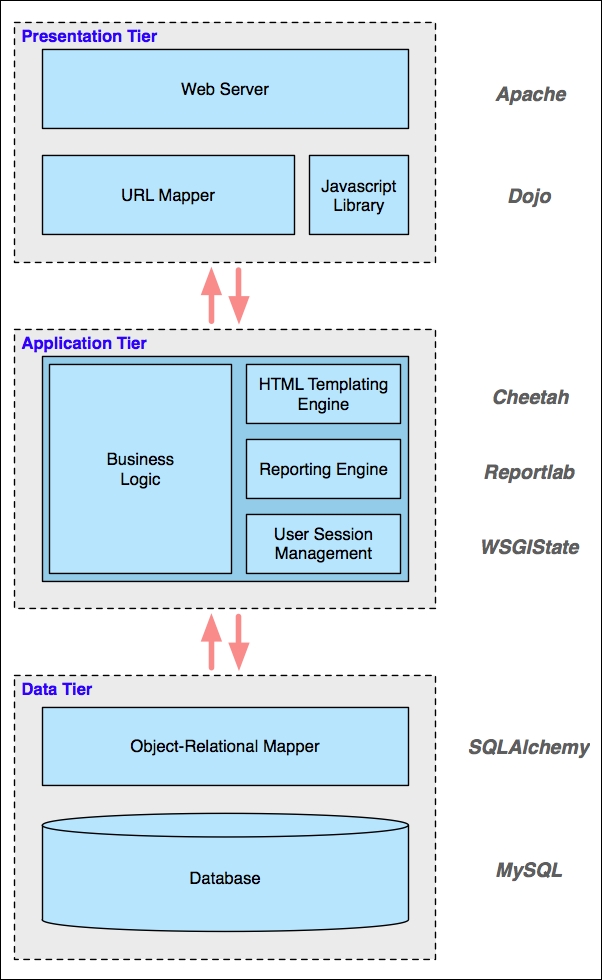
This stack of tools works together to implement your application: at the lowest level, you have a Data Tier that deals with the storage of data. In this case, the application uses MySQL for the database and SQLAlchemy as an object-relational mapper to provide an object-oriented interface to this database. The Application Tier contains the application's business logic as well as various libraries to simplify the job of building a stateful and complex web application. Finally, the Presentation Tier deals with the user interface, serving web pages to the users, mapping incoming URLs to the appropriate calls to your business logic, and using a sophisticated JavaScript library to build complex user interfaces within the user's web browser.
Note that the only parts of this application that a developer would create from scratch are the business logic, the URL mappings, and the database schema used by the object-relational mapper. The rest is all just a collection of off-the-shelf components.
Don't be too concerned about the details of this particular application's architecture—the main thing to realize is that there is a stack of tools all working together, where each tool makes use of the tools below it. Also, notice the complexity of this system: this application depends on a lot of different tools and libraries. Developing, deploying, and upgrading an application like this can be challenging because it has so many different parts.
To avoid the complexity of mixing and matching so many different parts, web developers have created various frameworks that combine tools to provide a complete web development system. Instead of having to select, install, and deploy ten different libraries, you can simply choose a complete framework that brings a known good set of libraries together and adds its own logic to provide a complete "batteries included" web-development experience. Most of these toolkits provide you with built-in logic to handle tasks such as:
- Defining and migrating your database schema
- Keeping track of user sessions and handling user authentication
- Building sophisticated user interfaces, often using AJAX to handle complex widgets within the user's browser
- Automatically allowing users to create, read, update, and delete records in the database (the so-called CRUD interface)
- Simplifying the creation of database-driven applications through standard templates and recipes
There is a lot more to these frameworks, but the important thing to remember is that they aim to provide a "full stack" of features in order to allow developers to quickly implement the most common aspects of a web application with minimum fuss. They aim to provide rapid application development (RAD) for web-based systems.
There are a number of Python-based web application frameworks available, including three that support the building of geospatial applications: Django with its built-in GeoDjango extension, Pyramid with the Mapfish extension, and Turbogears with its tgext.geo extension. We will take a closer look at GeoDjango later in this chapter.
While it is easy to build a simple web-based interface in HTML, users are increasingly expecting web applications to compete with desktop applications in terms of their user interface. Selecting objects by clicking on them, drawing images with the mouse, and dragging and dropping are no longer actions restricted to desktop applications.
AJAX (short for asynchronous JavaScript and XML) is the technology typically used to build complex user interfaces in a web application. In particular, running JavaScript code on the user's web browser allows the application to dynamically respond to user actions and make the web page behave in ways that simply can't be achieved with static HTML pages.
While JavaScript is ubiquitous, it can also be tricky to program in. The various web browsers in which JavaScript code can run all have their own quirks and limitations, making it hard to write code that runs the same way on every browser. JavaScript code is also very low level, requiring detailed manipulation of the web page contents to achieve a given effect. For example, implementing a pop-up menu requires creating a <DIV> element that contains the menu, formatting it appropriately (typically using CSS), and making it initially invisible. When the user clicks on the appropriate part of the page, the pop-up menu should be shown by making the associated <div> element visible. You then need to respond to the user mousing over each item in the menu by visually highlighting that item and un-highlighting the previously highlighted item. Then, when the user clicks on an item, you have to hide the menu again before responding to the user's action.
All this detailed low-level coding can take weeks to get right—especially when dealing with multiple types of browsers and different browser versions. Since all you want to do in this case is create a pop-up menu that lets the user choose an action, it just isn't worth doing all this low-level coding yourself. Instead, you would typically make use of one of the available user interface libraries to do all the hard work for you.
These user interface libraries are written in JavaScript, and you typically add them to your web site by making the JavaScript library file(s) available for download and then adding a line like the following to your HTML page to import the JavaScript library:
<script type="text/javascript" src="library.js">
If you are writing your own web application from scratch, you would then make calls to the library to implement the user interface for your application. However, many of the web application frameworks that include a user interface library will write the necessary code for you, making even this step unnecessary.
There are many different user interface libraries that you can choose to include in your web applications. JQuery UI, AngularJS, and Bootstrap are three of the more popular examples. When writing geospatial web applications, it is easy to forget that geospatial web applications are, first and foremost, ordinary web applications that also happen to work with geospatial data. Much of a geospatial web application's functionality is rather mundane: providing a consistent look and feel, implementing menus or toolbars to navigate between pages, user signup, login and logout, entry of ordinary (non-geospatial) data, reporting, and so on. All of this functionality can be handled by one of these general-purpose user interface libraries, and you are free to either choose one or more libraries of your liking or make use of the UI library built into whatever web application framework you have chosen to use.
In addition to these general-purpose UI libraries, there are other libraries specifically designed for implementing geospatial web applications. We will explore one of these libraries, OpenLayers, later in this chapter.
A web service is a piece of software that has an application programming interface (API) which is accessed via the HTTP protocol. Web services implement the behind-the-scenes functionality used by other systems; they don't generally interact with end users at all.
Web services are accessed via a URL; other parts of the system send a request to this URL along with a number of parameters and receive back a response, often in the form of XML or JSON encoded data, which is then used for further processing.
There are two main types of web services you are likely to encounter: RESTful web services, which use parts of the URL itself to tell the web service what to do, and "big web services", which typically use the SOAP protocol to communicate with the outside world.
REST stands for REpresentational State Transfer. This protocol uses sub-paths within the URL to define the request to be made. For example, a web service might use the following URL to return information about a customer:
http://myserver.com/webservice/customer/123
In this example, customer defines what type of information you want (the "resource"), and 123 is the internal ID of the desired customer. RESTful web services are easy to implement and use, and are becoming increasingly popular with web application developers.
A "big web service", on the other hand, has just one URL for the entire web service. A request is sent to this URL, usually in the form of an XML-format message, and the response is sent back, also as an XML-formatted message. The SOAP protocol is often used to describe the message format and how the web service should behave. Big web services are popular in large commercial systems, despite being more complex than their RESTful equivalents.
Let's take a look at a simple but useful web service. The following CGI script, called greatCircleDistance.py, calculates and returns the great-circle distance between two coordinates on the earth's surface. Here is the full source code for this web service:
#!/usr/bin/python

import cgi
import pyproj

form = cgi.FieldStorage()

lat1 = float(form['lat1'].value)
long1 = float(form['long1'].value)
lat2 = float(form['lat2'].value)
long2 = float(form['long2'].value)

geod = pyproj.Geod(ellps="WGS84")
angle1,angle2,distance = geod.inv(long1, lat1, long2, lat2)

print('Content-Type: text/plain')
print()
print("{:.4f}".format(distance))
Because this is intended to be used by other systems rather than end users, the two coordinates are passed as query parameters, and the resulting distance (in meters) is returned as the body of the HTTP response. Because the returned value is a single number, there is no need to encode the results using XML or JSON; instead, the distance is returned as plain text.
Tip
You can use the webserver.py script we wrote in Chapter 8, Working with Spatial Data, to make the greatCircleDistance.py script available for other programs to use. Simply make the greatCircleDistance.py script executable and place it inside your cgi-bin directory, then type python webserver.py to make your web service available for other programs.
Let's now look at a simple Python program that calls this web service:
import urllib

URL = "http://127.0.0.1:8000/cgi-bin/greatCircleDistance.py"

params = urllib.urlencode({'lat1'  : 53.478948, # Manchester.
                           'long1' : -2.246017,
                           'lat2'  : 53.411142, # Liverpool.
                           'long2' : -2.977638})

f = urllib.urlopen(URL, params)
response = f.read()
f.close()

print(response)
Running this program tells us the distance in meters between these two coordinates, which happen to be the locations of Manchester and Liverpool in England:
% python callWebService.py
49194.4632
While this might not seem very exciting, web services are an extremely important part of web-based development. When developing your own web-based geospatial applications, you may well make use of existing web services, and potentially implement your own web services as part of your web application development.
We saw in Chapter 8, Working with Spatial Data, how Mapnik can be used to generate great-looking maps. Within the context of a web application, map rendering is usually performed by a web service that takes a request and returns the rendered map as an image file. For example, your application might include a map renderer at the relative URL /render that accepts the following query-string parameters:
|
Parameter(s) |
Description |
|---|---|
|
minX, maxX, minY, maxY |
The minimum and maximum latitude and longitude of the area to include on the map. |
|
width, height |
The pixel width and height for the generated map image. |
|
layers |
A comma-separated list of the layers that are to be included on the map. The available predefined layers are "coastline", "forest", "waterways", "urban", and "street". |
|
format |
The desired image format. Available formats are "PNG", "JPEG", and "GIF". |
This hypothetical /render web service would return the rendered map back to the caller as an image file. Once this has been set up, the web service would act as a black box providing map images upon request for other parts of your web application.
As an alternative to hosting and configuring your own map renderer, you can choose to use an openly available external renderer. For example, OpenStreetMap provides a freely available map renderer for OpenStreetMap data at http://staticmap.openstreetmap.de.
Because creating an image out of raw map data is a time- and processor-intensive operation, your entire web application can become overloaded if you get too many requests for map images at any one time. As we saw with the DISTAL application in Chapter 7, Using Python and Mapnik to Generate Maps there is a lot you can do to improve the speed of the map-generation process, but there are still limits on how many maps your application can render in a given time period.
Because the map data is generally quite static, you can make a huge improvement to your application's performance by caching the generated images. This is generally done by dividing the world up into tiles, rendering tile images as required, and then stitching the tiles together to produce the entire map:
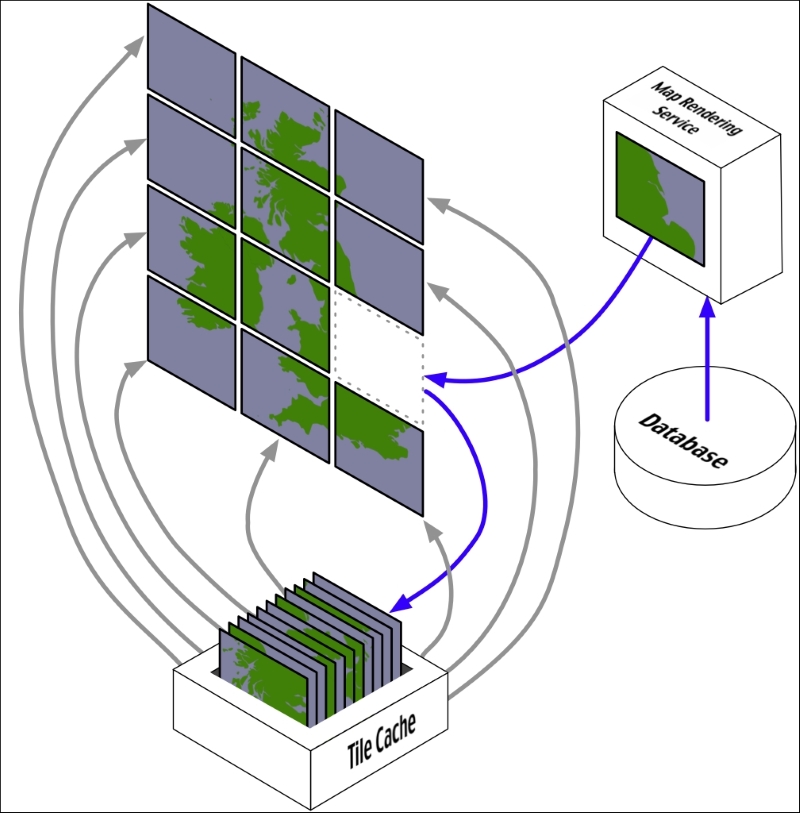
Tile caches work in exactly the same way as any other cache:
- When a tile is requested, the tile cache checks to see whether it contains a copy of the rendered tile. If it does, the cached copy is returned right away.
- Otherwise, the map rendering service is called to generate the tile, and the newly rendered tile is added to the cache before it is returned to the caller.
- As the cache grows too big, tiles that haven't been requested for a long time are removed to make room for new tiles.
Of course, tile caching will only work if the underlying map data doesn't change. As we saw when building the DISTAL application, you can't use a tile cache where the rendered image varies from one request to the next.
One interesting use of a tile cache is combining it with map overlays to improve performance even when the map data does change. Because the outlines of countries and other physical features on a map don't change, it is possible to use a map generator with a tile cache to generate the "base map", onto which changing features are then drawn as an overlay:

The final map could be produced using Mapnik by drawing the overlay onto the base map, which is accessed using a RasterDataSource and displayed using a RasterSymbolizer. If you have enough disk space, you could even pre-calculate all of the base map tiles and have them available for quick display. Using Mapnik in this manner is a fast and efficient way of combining changing and non-changing map data onto a single view—though there are other ways of overlaying data onto a map, for example, using OpenLayers to display multiple map layers at once.
The "slippy map" is a concept popularized by Google Maps: a zoomable map where the user can click and drag to scroll around and double-click to zoom in. Here is an example of a Google Maps slippy map showing a portion of Europe:

Image copyright Google; map data copyright Europa Technologies, PPWK, and Tele Atlas
Slippy maps have become extremely popular, and much of the work done on geospatial web application development has been focused on creating and working with slippy maps.
The slippy map experience is typically implemented using a custom software stack, like this:
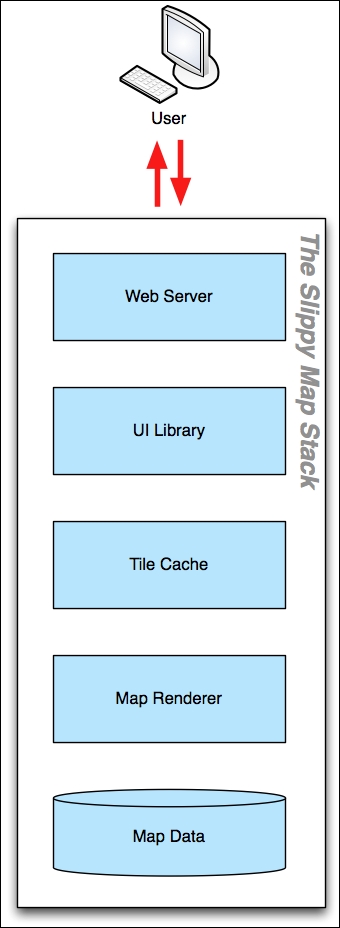
Starting at the bottom, the raw map data is typically stored in a spatial database. This is then rendered using a tool such as Mapnik, and a tile cache is used to speed up repeated access to the same map images. A user-interface library such as OpenLayers is then used to display the map in the user's web browser and to respond when the user clicks on the map. Finally, a web server is used to allow web browsers to access and interact with the slippy map.
Because web-based applications are generally broken into multiple components, the way these components communicate becomes extremely important. It's quite likely that your web application will use off-the-shelf components or rely on existing components running on a remote server. In these cases, the protocols used to communicate between the various components is crucial to allowing these various components to work together.
In terms of geospatial web applications, a number of standard protocols have been developed to allow different components to communicate. Some of the more common web protocols relating to geospatial development include:
- The Web Map Service (WMS) protocol, which provides a standard way for a web service to receive a map-generation request and return the map image back to the caller. The complete specification for the WMS protocol can be found at http://www.opengeospatial.org/standards/wms.
- The Web Map Tile Service (WMTS) protocol, which allows a web service to provide map tiles on request. The specification for the WMTS protocol can be found at http://www.opengeospatial.org/standards/wmts.
- The Tile Map Service (TMS), which is a simpler protocol for providing map tiles on demand. More information about the TMS protocol can be found at http://wiki.osgeo.org/wiki/Tile_Map_Service_Specification.
- The Web Coverage Service (WCS) protocol, which provides coverages on demand. A coverage is a set of data collected across an area, for example, soil moisture levels, elevation, or type of vegetation. The specification for the WCS protocol can be found at http://www.opengeospatial.org/standards/wcs.
- The Web Feature Service (WFS) protocol, which stores geospatial features and allows callers to issue queries and manipulate those features. In many ways, a WFS acts like a spatial database sitting behind a web service. The complete specification for the WFS protocol can be found at http://www.opengeospatial.org/standards/wfs.
Many of these protocols have been developed by the Open Geospatial Consortium, an international standards organization that developed these protocols so that different geospatial systems and services could interact.