Table of Contents for
Python Geospatial Development - Third Edition
 Python Geospatial Development - Third Edition
Published by
Packt Publishing, 2016
Python Geospatial Development - Third Edition
Published by
Packt Publishing, 2016
- Cover
- Table of Contents
- Python Geospatial Development Third Edition
- Python Geospatial Development Third Edition
- Credits
- About the Author
- About the Reviewer
- www.PacktPub.com
- Preface
- What you need for this book
- Who this book is for
- Conventions
- Reader feedback
- Customer support
- 1. Geospatial Development Using Python
- Geospatial development
- Applications of geospatial development
- Recent developments
- Summary
- 2. GIS
- GIS data formats
- Working with GIS data manually
- Summary
- 3. Python Libraries for Geospatial Development
- Dealing with projections
- Analyzing and manipulating Geospatial data
- Visualizing geospatial data
- Summary
- 4. Sources of Geospatial Data
- Sources of geospatial data in raster format
- Sources of other types of geospatial data
- Choosing your geospatial data source
- Summary
- 5. Working with Geospatial Data in Python
- Working with geospatial data
- Changing datums and projections
- Performing geospatial calculations
- Converting and standardizing units of geometry and distance
- Exercises
- Summary
- 6. Spatial Databases
- Spatial indexes
- Introducing PostGIS
- Setting up a database
- Using PostGIS
- Recommended best practices
- Summary
- 7. Using Python and Mapnik to Generate Maps
- Creating an example map
- Mapnik concepts
- Summary
- 8. Working with Spatial Data
- Designing and building the database
- Downloading and importing the data
- Implementing the DISTAL application
- Using DISTAL
- Summary
- 9. Improving the DISTAL Application
- Dealing with the scale problem
- Performance
- Summary
- 10. Tools for Web-based Geospatial Development
- A closer look at three specific tools and techniques
- Summary
- 11. Putting It All Together – a Complete Mapping System
- Designing the ShapeEditor
- Prerequisites
- Setting up the database
- Setting up the ShapeEditor project
- Defining the ShapeEditor's applications
- Creating the shared application
- Defining the data models
- Playing with the admin system
- Summary
- 12. ShapeEditor – Importing and Exporting Shapefiles
- Importing shapefiles
- Exporting shapefiles
- Summary
- 13. ShapeEditor – Selecting and Editing Features
- Editing features
- Adding features
- Deleting features
- Deleting shapefiles
- Using the ShapeEditor
- Further improvements and enhancements
- Summary
- Index
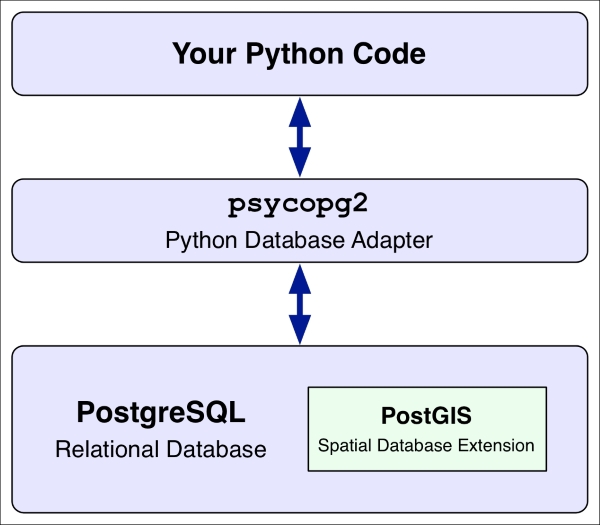
In this book, we will be working with PostGIS. PostGIS is one of the most popular and powerful geospatial databases and has the bonus of being open source and freely available. PostGIS itself is actually an extension to the PostgreSQL relational database system—to use PostGIS from your Python programs, you first have to install and set up PostgreSQL, then install the PostGIS extension, and then finally install the psycopg2 database adapter for Python. The following illustration shows how all these pieces fit together:
PostGIS allows you to store and query against various types of spatial data, including points, lines, polygons, and geometry collections. PostGIS provides two different types of spatial fields that can be used to store spatial data:
- The geometry field holds spatial data that is assumed to be in a projected coordinate system. All calculations and queries for geometry fields assume that the spatial data has been projected onto a flat Cartesian plane. This makes the calculations much simpler, but it will only work reliably if the spatial data is in a projected coordinate system.
- The geography field holds spatial data that uses geodetic (unprojected) coordinates. Calculations and queries against geography fields assume that the data is in angular units (that is, latitude and longitude values), using sophisticated mathematics to calculate lengths and areas using a spheroid model of the earth.
Because the mathematics involved is much more complicated, not all spatial functions are available for geography fields, and the operations often take a lot longer. However, geography fields are much easier to use if your spatial data uses an unprojected coordinate system such as WGS84.
Let's go ahead an install PostGIS onto your computer and then look at how we can use PostGIS to create and work with a spatial database using Python.
PostgreSQL is an extremely powerful open source relational database system. The main web site for Postgres can be found at http://postgresql.org. How you install the Postgres database will depend on which operating system your computer is running:
- For Linux, follow the instructions on the PostgreSQL download page (http://postgresql.org/download) to install Postgres onto your computer. Choose the appropriate link for your Linux distribution and you will be presented with the corresponding installation instructions.
- For Mac OS X, you can download an installer for Postgres from the KyngChaos web site (http://www.kyngchaos.com/software/postgres). Make sure you don't download the client-only version, as you'll need the Postgres server. Once it has been downloaded, open the disk image and double click on the
PostgreSQL.pkgpackage file to install Postgres into your computer. - For Microsoft Windows, you can download an installer for Postgres from http://enterprisedb.com/products-services-training/pgdownload. Select the appropriate installer for your version of Windows (32 or 64 bit), download the installer file, then simply double click on the installer and follow the instructions.
Once you have installed Postgres, you can check whether it is running by typing psql into a terminal or command-line window and pressing the Return key. All going well, you should see the Postgres command line:
psql (9.4.4)
Type "help" for help.

postgres=#
If the psql command complains about user authentication, you may need to identify the user account to use when connecting to Postgres, for example:
% psql -U postgres
Many Postgres installations have a postgres user, which you need to select with the -U command-line option when accessing the database. Alternatively, you may need to use sudo to run psql as root, or open a command prompt as an administrator if you are running Microsoft Windows.
To exit the Postgres command-line client, type \q and press Return.
Our next task is to install the PostGIS spatial extension for Postgres. The main web site for PostGIS can be found at http://postgis.net. Once again, how you install PostGIS depends on which operating system you are running:
- For Linux-based computers, follow the instructions on the PostGIS installation page (http://postgis.net/install)
- For Mac OS X, you should download and run the PostGIS installer from the KyngChaos web site (http://kyngchaos.com/software/postgres)
Tip
Note that this PostGIS installer requires the GDAL Complete package, which you should have already installed while working through Chapter 2, GIS.
- For Microsoft Windows, you can download an installer from http://download.osgeo.org/postgis/windows
To check whether PostGIS has been successfully installed, try typing the following commands into your terminal window:
% createdb test_database
% psql -d test_database -c "CREATE EXTENSION postgis;"
% dropdb test_database
The first command creates a new database, the second one enables the PostGIS extension for that database, and the third command deletes the database again. If this sequence of commands runs without any errors, then your PostGIS installation (and Postgres itself) is set up and running correctly.
psycopg2 is the Python database adapter for Postgres. This is the Python library you use to access Postgres from within your Python programs. The main web site for psycopg2 can be found at http://initd.org/psycopg.
As usual, how you install psycopg2 will vary depending on which operating system you are using:
- For Linux, you will need to install
psycopg2from source. For instructions on how to do this, refer to http://initd.org/psycopg/docs/install.html. - For a Mac OS X machine, you can use pip, the Python package manager, to install
psycopg2from the command line:pip install psycopg2
Note that you will need to have the Xcode command-line tools installed so that
psycopg2can compile. - For MS Windows, you can download a double-clickable installer for
psycopg2from http://www.stickpeople.com/projects/python/win-psycopg.
To check whether your installation worked, start up your Python interpreter and type the following:
>>> import psycopg2
>>>
If psycopg2 was installed correctly, you should see the Python interpreter prompt reappear without any error messages, as shown in this example. If an error message does appear, you may need to follow the troubleshooting instructions on the psycopg2 web site.