Table of Contents for
Python Geospatial Development - Third Edition
 Python Geospatial Development - Third Edition
Published by
Packt Publishing, 2016
Python Geospatial Development - Third Edition
Published by
Packt Publishing, 2016
- Cover
- Table of Contents
- Python Geospatial Development Third Edition
- Python Geospatial Development Third Edition
- Credits
- About the Author
- About the Reviewer
- www.PacktPub.com
- Preface
- What you need for this book
- Who this book is for
- Conventions
- Reader feedback
- Customer support
- 1. Geospatial Development Using Python
- Geospatial development
- Applications of geospatial development
- Recent developments
- Summary
- 2. GIS
- GIS data formats
- Working with GIS data manually
- Summary
- 3. Python Libraries for Geospatial Development
- Dealing with projections
- Analyzing and manipulating Geospatial data
- Visualizing geospatial data
- Summary
- 4. Sources of Geospatial Data
- Sources of geospatial data in raster format
- Sources of other types of geospatial data
- Choosing your geospatial data source
- Summary
- 5. Working with Geospatial Data in Python
- Working with geospatial data
- Changing datums and projections
- Performing geospatial calculations
- Converting and standardizing units of geometry and distance
- Exercises
- Summary
- 6. Spatial Databases
- Spatial indexes
- Introducing PostGIS
- Setting up a database
- Using PostGIS
- Recommended best practices
- Summary
- 7. Using Python and Mapnik to Generate Maps
- Creating an example map
- Mapnik concepts
- Summary
- 8. Working with Spatial Data
- Designing and building the database
- Downloading and importing the data
- Implementing the DISTAL application
- Using DISTAL
- Summary
- 9. Improving the DISTAL Application
- Dealing with the scale problem
- Performance
- Summary
- 10. Tools for Web-based Geospatial Development
- A closer look at three specific tools and techniques
- Summary
- 11. Putting It All Together – a Complete Mapping System
- Designing the ShapeEditor
- Prerequisites
- Setting up the database
- Setting up the ShapeEditor project
- Defining the ShapeEditor's applications
- Creating the shared application
- Defining the data models
- Playing with the admin system
- Summary
- 12. ShapeEditor – Importing and Exporting Shapefiles
- Importing shapefiles
- Exporting shapefiles
- Summary
- 13. ShapeEditor – Selecting and Editing Features
- Editing features
- Adding features
- Deleting features
- Deleting shapefiles
- Using the ShapeEditor
- Further improvements and enhancements
- Summary
- Index
In this chapter, we will continue our implementation of the ShapeEditor application. We will start by implementing a list view to show the available shapefiles and then work through the details of importing and exporting shapefiles via a web interface.
In this chapter, we will learn:
- How to display a list of records using a Django template
- How to deal with the complexities of shapefile data, including issues with geometries and attribute data types
- How to import a shapefile's data using a web interface
- How to export a shapefile using a web interface
When the user first opens the ShapeEditor, we want them to see a list of the previously uploaded shapefiles, with Import, Edit, Export, and Delete options. The Django application that implements this list view and its related functionality will be called shapefiles; let's go ahead and create this application now.
Open a terminal or command-line window, cd into the top-level shapeEditor directory, and enter the following command:
python manage.py startapp shapefiles
Once again, this creates the shapefiles application at the top level so that it is a reusable application. Move this inside the shapeEditor directory by typing this:
mv shapefiles shapeEditor
While we're at it, go into the shapeEditor/shapefiles directory and delete the admin.py and tests.py modules, as we won't need these. Then, edit the shapeEditor/settings.py module and add the following entry to the end of the INSTALLED_APPS list:
'shapeEditor.shapefiles',
Our shapefiles app won't define any database models of its own, but we need to keep the models.py file so that Django recognizes it as an application. The only other interesting part of the application is the views.py module, where we will define our "List Shapefiles" view. Let's go ahead and write a simple placeholder for this view; edit the views.py module and enter the following into it:
from django.http import HttpResponse

def list_shapefiles (request):
return HttpResponse("in list_shapefiles")We next need to tell our ShapeEditor project to call this view when the user accesses the topmost URL for the ShapeEditor system. To do this, edit the urls.py module and edit it so that it looks like the following:
from django.conf.urls import include, url
from django.contrib.gis import admin
import shapeEditor.shapefiles.views

urlpatterns = [
    url(r'^$', shapeEditor.shapefiles.views.list_shapefiles),
    url(r'^admin/', include(admin.site.urls)),
]
The first URL pattern maps from the topmost URL (which is identified by the regular expression r'^$') to our shapeEditor.shapefiles.views.list_shapefiles() view function. This view acts as the user's starting point for the entire ShapeEditor system. The second URL pattern we define allows the user to access GeoDjango's admin interface via the /admin URL.
It's now time to test our new view function. Type the following command into your terminal window:
python manage.py runserver
Then, open your web browser and navigate to the following URL:
http://127.0.0.1:8000/
All going well, you should see in list_shapefiles appear in the browser window. This tells us that our list_shapefile() view function is being called in response to the top-level URL.
Now that we have a working view function, let's make it do something useful. Open the views.py module (in the shapeEditor/shapefiles directory), and edit its contents to look like the following:
from django.http import HttpResponse
from django.shortcuts import render
from shapeEditor.shared.models import Shapefile

def list_shapefiles (request):
    shapefiles = Shapefile.objects.all().order_by('filename')
    return render(request, "list_shapefiles.html",
                  {'shapefiles' : shapefiles})
The list_shapefiles() view function now does two things:
- It loads the list of all Shapefile objects from the database into memory, sorted by filename
- It passes this list to a Django template (in a file named
list_shapefiles.html), which is rendered into an HTML web page and returned back to the caller
Let's go ahead and create the list_shapefiles.html template. Create a directory called templates within the shapeEditor/shapefiles directory, and create a new file in this directory named list_shapefiles.html. This file should have the following contents:
<html>
<head>
<title>ShapeEditor</title>
</head>
<body>
<h1>ShapeEditor</h1>
{% if shapefiles %}
<b>Available Shapefiles:</b>
<table border="0" cellspacing="0" cellpadding="5"
style="padding-left:20px">
{% for shapefile in shapefiles %}
<tr>
<td><font style="font-family:monospace">
{{ shapefile.filename }}
</font></td>
<td> </td>
<td>
<a href="/edit/{{ shapefile.id }}">Edit</a>
</td>
<td> </td>
<td>
<a href="/export/{{ shapefile.id }}">Export</a>
</td>
<td> </td>
<td>
<a href="/delete/{{ shapefile.id }}">Delete</a>
</td>
</tr>
{% endfor %}
</table>
{% endif %}
<button type="button"
onClick='window.location="/import";'>
Import New Shapefile
</button>
</body>
</html>This template works as follows:
- If the
shapefileslist is not empty, it creates an HTML table to display the list of shapefiles - For each entry in the
shapefileslist, a new row in the table is created - Each table row consists of the shapefile's file name (in monospaced text), along with Edit, Export, and Delete hyperlinks
- Finally, an Import New Shapefile button is displayed at the bottom
We'll look at the hyperlinks used in this template shortly, but for now, just create the file, make sure the Django server is running, and reload your web browser. You should see the following page:
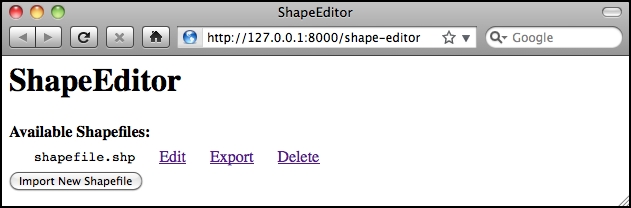
As you can see, the shapefile we created earlier in the admin interface is shown, along with the relevant hyperlinks and buttons to access the rest of the ShapeEditor's functionality:
- The Edit hyperlink will take the user to the
/edit/1URL, which will let the user edit the shapefile with the given record ID - The Export hyperlink will take the user to the
/export/1URL, which will let the user download a copy of the shapefile with the given ID - The Delete hyperlink will take the user to the
/delete/1URL, which will let the user delete the given shapefile - The Import New Shapefile button will take the user to the
/importURL, which will let the user upload a new shapefile
You can explore these URLs by clicking on them if you want—they won't do anything other than displaying an error page, but you can see how these URLs link the various parts of the ShapeEditor's functionality together. You can also take a detailed look at the Django error page, which can be quite helpful in tracking down bugs.
Now that we have a working first page, let's start implementing the core functionality of the ShapeEditor system. We'll start with the logic required to import a shapefile.