Table of Contents for
Python Geospatial Development - Third Edition
 Python Geospatial Development - Third Edition
Published by
Packt Publishing, 2016
Python Geospatial Development - Third Edition
Published by
Packt Publishing, 2016
- Cover
- Table of Contents
- Python Geospatial Development Third Edition
- Python Geospatial Development Third Edition
- Credits
- About the Author
- About the Reviewer
- www.PacktPub.com
- Preface
- What you need for this book
- Who this book is for
- Conventions
- Reader feedback
- Customer support
- 1. Geospatial Development Using Python
- Geospatial development
- Applications of geospatial development
- Recent developments
- Summary
- 2. GIS
- GIS data formats
- Working with GIS data manually
- Summary
- 3. Python Libraries for Geospatial Development
- Dealing with projections
- Analyzing and manipulating Geospatial data
- Visualizing geospatial data
- Summary
- 4. Sources of Geospatial Data
- Sources of geospatial data in raster format
- Sources of other types of geospatial data
- Choosing your geospatial data source
- Summary
- 5. Working with Geospatial Data in Python
- Working with geospatial data
- Changing datums and projections
- Performing geospatial calculations
- Converting and standardizing units of geometry and distance
- Exercises
- Summary
- 6. Spatial Databases
- Spatial indexes
- Introducing PostGIS
- Setting up a database
- Using PostGIS
- Recommended best practices
- Summary
- 7. Using Python and Mapnik to Generate Maps
- Creating an example map
- Mapnik concepts
- Summary
- 8. Working with Spatial Data
- Designing and building the database
- Downloading and importing the data
- Implementing the DISTAL application
- Using DISTAL
- Summary
- 9. Improving the DISTAL Application
- Dealing with the scale problem
- Performance
- Summary
- 10. Tools for Web-based Geospatial Development
- A closer look at three specific tools and techniques
- Summary
- 11. Putting It All Together – a Complete Mapping System
- Designing the ShapeEditor
- Prerequisites
- Setting up the database
- Setting up the ShapeEditor project
- Defining the ShapeEditor's applications
- Creating the shared application
- Defining the data models
- Playing with the admin system
- Summary
- 12. ShapeEditor – Importing and Exporting Shapefiles
- Importing shapefiles
- Exporting shapefiles
- Summary
- 13. ShapeEditor – Selecting and Editing Features
- Editing features
- Adding features
- Deleting features
- Deleting shapefiles
- Using the ShapeEditor
- Further improvements and enhancements
- Summary
- Index
Let's take a closer look at the various parts of the ShapeEditor in order to see what's involved in implementing it. The ShapeEditor is going to support the following activities:
- Importing geospatial features and attributes from a shapefile
- Allowing the user to select a feature to be edited
- Displaying the appropriate type of editor to allow the user to edit the feature's geometry
- Exporting geospatial features and attributes back to a shapefile
Let's take a closer look at each of these user activities in order to see how they will be implemented within the ShapeEditor system.
When the user imports a shapefile, we will store the contents of that shapefile in the database so that GeoDjango can work with it. Because we don't know in advance which types of geometries the shapefile will contain or what attributes might be associated with each feature, we need to have a generic representation of a shapefile's contents in the database rather than defining separate fields in the database for each of the shapefile's attributes.
To support this, we'll use the following collection of database objects:
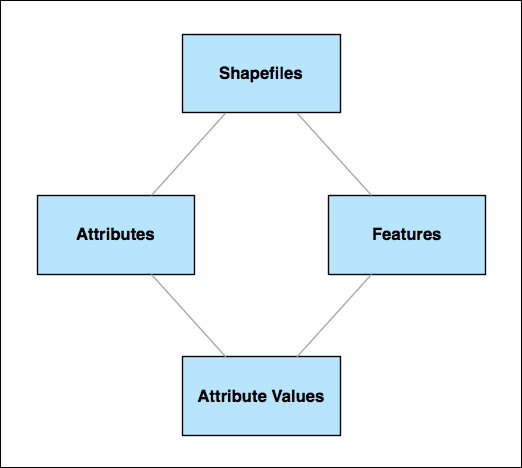
Each imported shapefile will be represented by a single Shapefile object in the database. Each Shapefile object will have a set of Attribute objects which define the name and data type for each of the shapefile's attributes. The Shapefile object will also have a set of Feature objects, one for each imported feature. The Feature objects will hold the geometry for each of the shapefile's features, and each feature will also have a set of AttributeValue objects, holding the value of each attribute of each feature.
To see how this works, let's imagine that we import the World Borders Dataset into the ShapeEditor. The contents of this shapefile would be stored in the database in the following way:
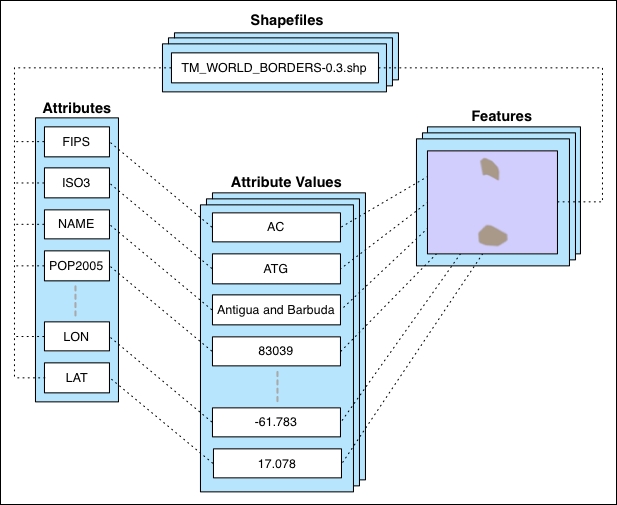
We will use a Shapefile object to represent the uploaded shapefile. This object will have a number of Attribute objects associated with it, one for each of the shapefile's attributes. There are also a number of Feature objects associated with the shapefile: the MultiPolygon geometry for each feature will be stored in the Feature object itself, while the attributes for each feature will be stored in a series of AttributeValue objects.
While this is a somewhat roundabout way of storing shapefile data in a database (it would be easier to use the ogrinspect management command to create a static GeoDjango model out of the shapefile's features and attributes), we have to do it this way because we don't know the shapefile's structure ahead of time, and it isn't practical to define a new database table whenever a shapefile is imported.
With this basic model in place to represent a shapefile's data in the database, we can continue designing the rest of the Import Shapefile logic.
Because shapefiles are represented on disk by a number of separate files, we expect the user to create a ZIP archive out of the shapefile and upload the zipped shapefile. This saves us having to handle multiple file uploads for a single shapefile and makes things more convenient for the user, as shapefiles often already come in ZIP format.
Once the ZIP archive has been uploaded, our code will need to decompress the archive and extract the individual files that make up the shapefile. We'll then have to read through the shapefile to find its attributes, create the appropriate Attribute objects, and then process the shapefile's features one at a time, creating Feature and AttributeValue objects as we go. All of this will be quite straightforward to implement.
Before the user can edit a feature, we have to let the user select that feature. Unfortunately, GeoDjango's built-in slippy map interface won't allow us to select a feature by clicking on it. This is because GeoDjango can only display a single feature on a map at once, thanks to the way GeoDjango's geometry fields are implemented.
The usual way a GeoDjango application allows you to select a feature is by displaying a list of attributes (for example, city names) and then allowing you to choose a feature from that list. Unfortunately, this won't work for us either. Because the ShapeEditor allows the user to import any shapefile, there's no guarantee that the shapefile's attribute values can be used to select a feature. It may be that a shapefile has no attributes at all or has attributes that mean nothing to the end user—or, conversely, has dozens of attributes. There is no way of knowing which attribute to display or even whether there is a suitable attribute that can be used to select a feature. Because of this, we can't display a list of attributes when selecting the feature to edit.
Instead, we're going to take a completely different approach. We will bypass GeoDjango's built-in editor and instead use OpenLayers directly to display a map showing all the features in the imported shapefile. We'll then let the user click on a feature within the map to select it for editing.
Here is how we'll implement this particular feature:

OpenLayers needs to have a source of map tiles to display, so we'll create our own simple tile map server built on top of a Mapnik-based map renderer to display the shapefile's features stored in the database. We'll also write a simple Click Handler in JavaScript that intercepts clicks on the map and sends off an AJAX request to the server to see which feature the user clicked on. If the user does click on a feature (rather than just clicking on the map's background), the user's web browser will be redirected to the Edit Feature page so that they can edit the clicked-on feature.
There's a lot here, requiring a fair amount of custom coding, but the end result is a friendly interface to the ShapeEditor, allowing the user to simply point and click on a desired feature to edit it. In the process of building all this, we'll also learn how to use OpenLayers directly within a GeoDjango application and how to implement our own tile map server built on top of Mapnik.
To let the user edit a feature, we'll use GeoDjango's built-in geometry-editing widget. There is a slight amount of work required here, because we want to use this widget outside of GeoDjango's admin interface and will need to customize the interface slightly.
The only other issue that needs to be dealt with is the fact that we don't know in advance what type of feature we'll be editing. Shapefiles can hold any type of geometry, from Points and LineStrings through to MultiPolygons and GeometryCollections. Fortunately, all the features in a shapefile have to have the same geometry type, so we can store the geometry type in the Shapefile object and use it to select the appropriate type of editor when editing that shapefile's features.
Exporting a shapefile involves the reverse of the importing process: we have to create a new shapefile on disk, define the various attributes that will be stored in the shapefile, and then process all the features and their attributes, writing them out to the shapefile. Once this has been done, we can create a ZIP archive from the contents of the shapefile and tell the user's web browser to download that ZIP archive to the user's hard disk.