Table of Contents for
Python Geospatial Development - Third Edition
 Python Geospatial Development - Third Edition
Published by
Packt Publishing, 2016
Python Geospatial Development - Third Edition
Published by
Packt Publishing, 2016
- Cover
- Table of Contents
- Python Geospatial Development Third Edition
- Python Geospatial Development Third Edition
- Credits
- About the Author
- About the Reviewer
- www.PacktPub.com
- Preface
- What you need for this book
- Who this book is for
- Conventions
- Reader feedback
- Customer support
- 1. Geospatial Development Using Python
- Geospatial development
- Applications of geospatial development
- Recent developments
- Summary
- 2. GIS
- GIS data formats
- Working with GIS data manually
- Summary
- 3. Python Libraries for Geospatial Development
- Dealing with projections
- Analyzing and manipulating Geospatial data
- Visualizing geospatial data
- Summary
- 4. Sources of Geospatial Data
- Sources of geospatial data in raster format
- Sources of other types of geospatial data
- Choosing your geospatial data source
- Summary
- 5. Working with Geospatial Data in Python
- Working with geospatial data
- Changing datums and projections
- Performing geospatial calculations
- Converting and standardizing units of geometry and distance
- Exercises
- Summary
- 6. Spatial Databases
- Spatial indexes
- Introducing PostGIS
- Setting up a database
- Using PostGIS
- Recommended best practices
- Summary
- 7. Using Python and Mapnik to Generate Maps
- Creating an example map
- Mapnik concepts
- Summary
- 8. Working with Spatial Data
- Designing and building the database
- Downloading and importing the data
- Implementing the DISTAL application
- Using DISTAL
- Summary
- 9. Improving the DISTAL Application
- Dealing with the scale problem
- Performance
- Summary
- 10. Tools for Web-based Geospatial Development
- A closer look at three specific tools and techniques
- Summary
- 11. Putting It All Together – a Complete Mapping System
- Designing the ShapeEditor
- Prerequisites
- Setting up the database
- Setting up the ShapeEditor project
- Defining the ShapeEditor's applications
- Creating the shared application
- Defining the data models
- Playing with the admin system
- Summary
- 12. ShapeEditor – Importing and Exporting Shapefiles
- Importing shapefiles
- Exporting shapefiles
- Summary
- 13. ShapeEditor – Selecting and Editing Features
- Editing features
- Adding features
- Deleting features
- Deleting shapefiles
- Using the ShapeEditor
- Further improvements and enhancements
- Summary
- Index
The shapeEditor.shared application will hold the core database tables and Python modules we use throughout the system. Let's go ahead and create this application now. Use the cd command to change the current directory to the top-level shapeEditor directory and type the following:
python manage.py startapp shared
This will create a new Python package named shared that will hold the contents of the shared app. Note that, by default, a new application is placed in the topmost shapeEditor directory. This means you can import this application into your Python program like this:
import shared
Django's conventions say that applications in the topmost directory (or anywhere else in your Python path) are intended to be reusable—that is, you can take that application and use it in a different project. The applications we're defining here aren't like that; they can only work as part of the shapeEditor project, and we would like to be able to import them like this:
import shapeEditor.shared
To allow this, you have to move the newly-created shared package directory inside the shapeEditor project's subdirectory. Doing this from the command line is easy; simply cd into the outermost shapeEditor directory and type the following command:
mv shared shapeEditor
Alternatively, if you are running MS Windows, you should use the following command:
move shared shapeEditor
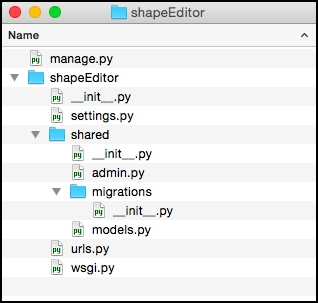
Inside the shapeEditor.shared package directory will be a number of files:
|
File |
Description |
|---|---|
|
|
This is a standard Python package initialization file |
|
|
This module defines the admin interface for the |
|
|
This directory will hold the various database migrations used by this application |
|
|
This Python module holds the |
|
|
This module can be used to hold the application's unit tests |
|
|
This module is normally used to hold the application's view functions |
Go ahead and delete the tests.py and views.py modules, as we won't be using them for this application. You should end up with the following directory structure:
Since we have created the application itself, let's add it to our project. Edit the settings.py file again, and add the following entry to the INSTALLED_APPS list:
'shapeEditor.shared',
Now that we have our shapeEditor.shared application, let's start to put some useful things into it.