Table of Contents for
Python Geospatial Development - Third Edition
 Python Geospatial Development - Third Edition
Published by
Packt Publishing, 2016
Python Geospatial Development - Third Edition
Published by
Packt Publishing, 2016
- Cover
- Table of Contents
- Python Geospatial Development Third Edition
- Python Geospatial Development Third Edition
- Credits
- About the Author
- About the Reviewer
- www.PacktPub.com
- Preface
- What you need for this book
- Who this book is for
- Conventions
- Reader feedback
- Customer support
- 1. Geospatial Development Using Python
- Geospatial development
- Applications of geospatial development
- Recent developments
- Summary
- 2. GIS
- GIS data formats
- Working with GIS data manually
- Summary
- 3. Python Libraries for Geospatial Development
- Dealing with projections
- Analyzing and manipulating Geospatial data
- Visualizing geospatial data
- Summary
- 4. Sources of Geospatial Data
- Sources of geospatial data in raster format
- Sources of other types of geospatial data
- Choosing your geospatial data source
- Summary
- 5. Working with Geospatial Data in Python
- Working with geospatial data
- Changing datums and projections
- Performing geospatial calculations
- Converting and standardizing units of geometry and distance
- Exercises
- Summary
- 6. Spatial Databases
- Spatial indexes
- Introducing PostGIS
- Setting up a database
- Using PostGIS
- Recommended best practices
- Summary
- 7. Using Python and Mapnik to Generate Maps
- Creating an example map
- Mapnik concepts
- Summary
- 8. Working with Spatial Data
- Designing and building the database
- Downloading and importing the data
- Implementing the DISTAL application
- Using DISTAL
- Summary
- 9. Improving the DISTAL Application
- Dealing with the scale problem
- Performance
- Summary
- 10. Tools for Web-based Geospatial Development
- A closer look at three specific tools and techniques
- Summary
- 11. Putting It All Together – a Complete Mapping System
- Designing the ShapeEditor
- Prerequisites
- Setting up the database
- Setting up the ShapeEditor project
- Defining the ShapeEditor's applications
- Creating the shared application
- Defining the data models
- Playing with the admin system
- Summary
- 12. ShapeEditor – Importing and Exporting Shapefiles
- Importing shapefiles
- Exporting shapefiles
- Summary
- 13. ShapeEditor – Selecting and Editing Features
- Editing features
- Adding features
- Deleting features
- Deleting shapefiles
- Using the ShapeEditor
- Further improvements and enhancements
- Summary
- Index
Let's start our design of the DISTAL application by thinking about the various pieces of data it will require:
- A list of all the countries. Each country needs to include a simple boundary map, which can be displayed to the user.
- Detailed shoreline and lake boundaries worldwide. A list of all major cities and towns worldwide.
- For each city/town, we need to have the name of the city/town and a point representing the location of that town or city.
Fortunately, this data is readily available:
- The list of countries and their outlines are included in the World Borders Dataset
- Shoreline and lake boundaries (as well as other land-water boundaries, such as islands within lakes) are readily available using the GSHHG shoreline database
- City and town data can be found in two places: The GNIS Database provides official place-name data for the United States, while the GEOnet Names Server provides similar data for the rest of the world
Looking at these data sources, we can start to design the database schema for the DISTAL system, which will look like this:
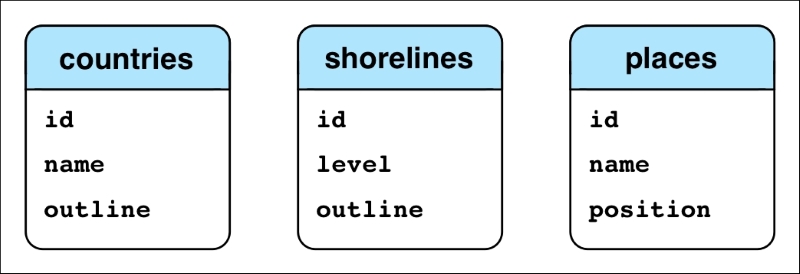
While this is very simple, it's enough to get us started. Let's use this schema to create our spatial database and set up our database schema. This involves the following steps:
- Open a terminal or command-line window and enter the following command:
createdb distal - Create a new user to access this database by entering the following command:
createuser -P distal_userYou'll be asked to enter a password for this new user. Make sure you remember the password you enter.
- Run the Postgres command-line interface by typing the following:
psql distal - Allow the
distal_useruser to access thedistaldatabase by entering the following:GRANT ALL PRIVILEGES ON DATABASE distal TO distal_user; - Spatially-enable our new database by typing the following command:
CREATE EXTENSION postgis;
You can now exit the Postgres command-line client by typing \q and pressing Return. We're next going to write a Python script to create our various database tables. Before we can do this, though, we're going to need somewhere to store the source code to the DISTAL system. Create a new directory called DISTAL in a convenient location. Inside this directory, create a new Python script named create_db.py, and enter the following into this file:
import psycopg2

connection = psycopg2.connect(database="distal",
                              user="distal_user",
                              password="...")
cursor = connection.cursor()

cursor.execute("DROP TABLE IF EXISTS countries")
cursor.execute("""
    CREATE TABLE countries (
        id      SERIAL,
        name    VARCHAR(255),
        outline GEOMETRY(GEOMETRY, 4326),

        PRIMARY KEY (id))
""")
cursor.execute("""
    CREATE INDEX countryIndex ON countries
        USING GIST(outline)
""")

cursor.execute("DROP TABLE IF EXISTS shorelines")
cursor.execute("""
    CREATE TABLE shorelines (
        id   SERIAL,
        level INTEGER,
        outline GEOMETRY(GEOMETRY, 4326),

        PRIMARY KEY (id))
""")
cursor.execute("""
    CREATE INDEX shorelineIndex ON shorelines
        USING GIST(outline)
""")

cursor.execute("DROP TABLE IF EXISTS places")
cursor.execute("""
    CREATE TABLE places (
        id       SERIAL,
        name     VARCHAR(255),
        position GEOGRAPHY(POINT, 4326),

        PRIMARY KEY (id))
""")
cursor.execute("""
    CREATE INDEX placeIndex ON places
        USING GIST(position)
""")

connection.commit()Notice that we define the outlines to have a column type of GEOMETRY(GEOMETRY, 4326). The first occurrence of the word GEOMETRY defines the column type; we are using geometry columns rather than geography columns to avoid problems with calculating bounding boxes and other values, which unfortunately doesn't work with geography columns. Within the parentheses, the second occurrence of the word GEOMETRY tells PostGIS that we can hold any type of geometry value we want; this allows us to store either a Polygon or a MultiPolygon for the outline, depending on the type of outline we want to store. We're also following the recommended best practice of specifying the spatial reference ID (SRID) value for our data. We'll use the WGS84 datum and unprojected lat/long coordinates for our data, which corresponds to an SRID value of 4326.
For the places table, we are using GEOGRAPHY(POINT, 4326), which does use the GEOGRAPHY column type so that we can perform accurate distance-based queries within the database. This time, we're constraining the place to hold a single Point value, and we again use the SRID value of 4326 for this data.
Go ahead and run the create_db.py program; it should run without any errors, leaving you with a properly set up database schema.