Table of Contents for
Python Geospatial Development - Third Edition
 Python Geospatial Development - Third Edition
Published by
Packt Publishing, 2016
Python Geospatial Development - Third Edition
Published by
Packt Publishing, 2016
- Cover
- Table of Contents
- Python Geospatial Development Third Edition
- Python Geospatial Development Third Edition
- Credits
- About the Author
- About the Reviewer
- www.PacktPub.com
- Preface
- What you need for this book
- Who this book is for
- Conventions
- Reader feedback
- Customer support
- 1. Geospatial Development Using Python
- Geospatial development
- Applications of geospatial development
- Recent developments
- Summary
- 2. GIS
- GIS data formats
- Working with GIS data manually
- Summary
- 3. Python Libraries for Geospatial Development
- Dealing with projections
- Analyzing and manipulating Geospatial data
- Visualizing geospatial data
- Summary
- 4. Sources of Geospatial Data
- Sources of geospatial data in raster format
- Sources of other types of geospatial data
- Choosing your geospatial data source
- Summary
- 5. Working with Geospatial Data in Python
- Working with geospatial data
- Changing datums and projections
- Performing geospatial calculations
- Converting and standardizing units of geometry and distance
- Exercises
- Summary
- 6. Spatial Databases
- Spatial indexes
- Introducing PostGIS
- Setting up a database
- Using PostGIS
- Recommended best practices
- Summary
- 7. Using Python and Mapnik to Generate Maps
- Creating an example map
- Mapnik concepts
- Summary
- 8. Working with Spatial Data
- Designing and building the database
- Downloading and importing the data
- Implementing the DISTAL application
- Using DISTAL
- Summary
- 9. Improving the DISTAL Application
- Dealing with the scale problem
- Performance
- Summary
- 10. Tools for Web-based Geospatial Development
- A closer look at three specific tools and techniques
- Summary
- 11. Putting It All Together – a Complete Mapping System
- Designing the ShapeEditor
- Prerequisites
- Setting up the database
- Setting up the ShapeEditor project
- Defining the ShapeEditor's applications
- Creating the shared application
- Defining the data models
- Playing with the admin system
- Summary
- 12. ShapeEditor – Importing and Exporting Shapefiles
- Importing shapefiles
- Exporting shapefiles
- Summary
- 13. ShapeEditor – Selecting and Editing Features
- Editing features
- Adding features
- Deleting features
- Deleting shapefiles
- Using the ShapeEditor
- Further improvements and enhancements
- Summary
- Index
The vector and raster geospatial data we have looked at so far is generally used to provide images or information about the Earth itself. However, geospatial applications often have to place data onto the surface of the Earth, that is, georeference something such as a place or event. In this section, we will look at two additional databases that provide information about the location of cities, towns, natural features, and points of interest on the surface of the Earth.
This data can be used in two important ways. First, it can be used to label features, for example, to place the label "London" onto a georeferenced image of southern England. Secondly, this data can be used to locate something by name, for example, by allowing the user to choose a city from a drop-down list and then draw a map centered around that city.
The GEOnet Names Server provides a large database of place names. It is an official repository of non-American place names, as decided by the US Board on Geographic Names.
The following is an extract from the GEOnet Names Server database:
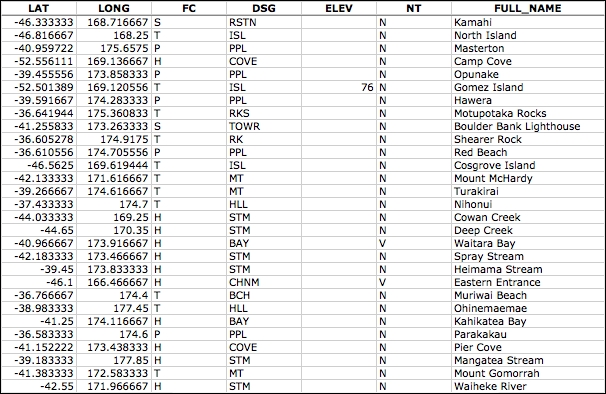
As you can see from this example, this database includes longitude and latitude values as well as codes indicating the type of place (populated place, administrative district, natural feature, and so on), the elevation (where relevant), and a code indicating the type of name (official, conventional, historical, and so on).
The GEOnet Names Server database contains approximately 6 million features and 10 million names. It includes every country other than the US and Antarctica.
The GEOnet Names Server's data is provided as a simple tab-delimited text file, where the first row in the file contains the field names, and subsequent rows contain the various features, one per row. Importing this name data into a spreadsheet or database is trivial.
For more information on the supplied fields and what the various codes mean, refer to http://geonames.nga.mil/gns/html/gis_countryfiles.html.
The main site for the GEOnet Names Server is http://geonames.nga.mil/gns/html.
The main interface to the GEOnet Names Server is through various search tools that provide filtered views of the data. To download the data directly rather than searching, go to http://geonames.nga.mil/gns/html/namefiles.html.
Each country is listed; simply click on the hyperlink for the country you want data for, and your browser will download a .zip file containing a number of tab-delimited text files containing all the features within that country. The data for each country is provided both as a single combined file as well as a separate file for each feature type.
As well as downloading each country's data individually, there is also an option to download all the countries in one file, which is a 460MB download.
Once you have downloaded the files and decompressed them, you can load the files directly into a spreadsheet or database for further processing. By filtering on the Feature Classification (FC), Feature Designation Code (DSG), and other fields, you can select the particular set of place names you want and then use that data directly in your application.
The Geographic Names Information System (GNIS) is the US equivalent of the GEOnet Names Server—it contains name information for the United States.
The following is an extract from the GNIS database:
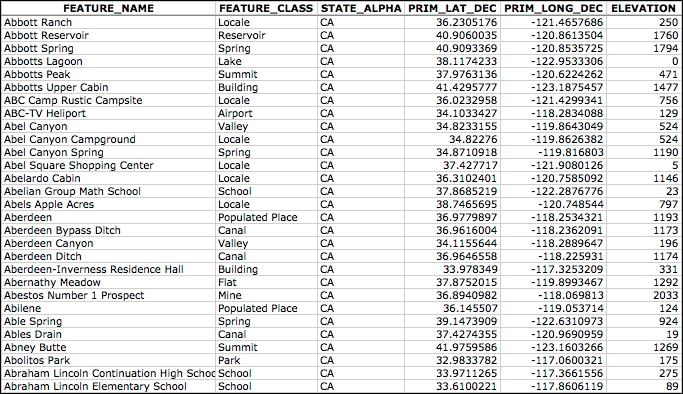
GNIS includes natural, physical, and cultural features, though it does not include road or highway names.
As with the GEOnet Names Server, the GNIS database contains the official names used by the US government, as decided by the US Board on Geographic Names. GNIS is run by the US Geological Survey and currently contains over 2.2 million features.
GNIS names are available for download as pipe-delimited compressed text files. This format uses the pipe character (|) to separate the various fields:
FEATURE_ID|FEATURE_NAME|FEATURE_CLASS|...
1397658|Ester|Populated Place|...
1397926|Afognak|Populated Place|...
The first line contains the field names, and subsequent lines contain the various features. The available information includes the name of the feature, its type, elevation, the county and state the feature is in, the latitude/longitude coordinate of the feature itself, and the latitude/longitude coordinate of the origin of the feature (for streams, valleys, and so on).
The main GNIS web site can be found at http://geonames.usgs.gov/domestic.
Click on the Download Domestic Names hyperlink, and you will be given options to download all the GNIS data on a state-by-state basis or download all the features in a single large download. You can also download "topical gazetteers" that include selected subsets of the data—all populated places, all historical places, and so on.
If you click on one of the File Format hyperlinks, a pop-up window will appear describing the structure of the files in more detail.
Once you have downloaded the data you want, you can simply import the file into a database or spreadsheet. To import into a spreadsheet, use the Delimited format and enter | as the custom delimiter character. You can then sort or filter the data in whatever way you want so that you can use it in your application.