Table of Contents for
Practical UNIX and Internet Security, 3rd Edition
 Practical UNIX and Internet Security, 3rd Edition
Published by
O'Reilly Media, Inc., 2003
Practical UNIX and Internet Security, 3rd Edition
Published by
O'Reilly Media, Inc., 2003
- Cover
- Practical Unix & Internet Security, 3rd Edition
- A Note Regarding Supplemental Files
- Preface
- Unix “Security”?
- Scope of This Book
- Which Unix System?
- Conventions Used in This Book
- Comments and Questions
- Acknowledgments
- A Note to Would-Be Attackers
- I. Computer Security Basics
- 1. Introduction: Some Fundamental Questions
- What Is Computer Security?
- What Is an Operating System?
- What Is a Deployment Environment?
- Summary
- 2. Unix History and Lineage
- History of Unix
- Security and Unix
- Role of This Book
- Summary
- 3. Policies and Guidelines
- Planning Your Security Needs
- Risk Assessment
- Cost-Benefit Analysis and Best Practices
- Policy
- Compliance Audits
- Outsourcing Options
- The Problem with Security Through Obscurity
- Summary
- II. Security Building Blocks
- 4. Users, Passwords, and Authentication
- Logging in with Usernames and Passwords
- The Care and Feeding of Passwords
- How Unix Implements Passwords
- Network Account and Authorization Systems
- Pluggable Authentication Modules (PAM)
- Summary
- 5. Users, Groups, and the Superuser
- Users and Groups
- The Superuser (root)
- The su Command: Changing Who You Claim to Be
- Restrictions on the Superuser
- Summary
- 6. Filesystems and Security
- Understanding Filesystems
- File Attributes and Permissions
- chmod: Changing a File’s Permissions
- The umask
- SUID and SGID
- Device Files
- Changing a File’s Owner or Group
- Summary
- 7. Cryptography Basics
- Understanding Cryptography
- Symmetric Key Algorithms
- Public Key Algorithms
- Message Digest Functions
- Summary
- 8. Physical Security for Servers
- Planning for the Forgotten Threats
- Protecting Computer Hardware
- Preventing Theft
- Protecting Your Data
- Story: A Failed Site Inspection
- Summary
- 9. Personnel Security
- Background Checks
- On the Job
- Departure
- Other People
- Summary
- III. Network and Internet Security
- 10. Modems and Dialup Security
- Modems: Theory of Operation
- Modems and Security
- Modems and Unix
- Additional Security for Modems
- Summary
- 11. TCP/IP Networks
- Networking
- IP: The Internet Protocol
- IP Security
- Summary
- 12. Securing TCP and UDP Services
- Understanding Unix Internet Servers and Services
- Controlling Access to Servers
- Primary Unix Network Services
- Managing Services Securely
- Putting It All Together: An Example
- Summary
- 13. Sun RPC
- Remote Procedure Call (RPC)
- Secure RPC (AUTH_DES)
- Summary
- 14. Network-Based Authentication Systems
- Sun’s Network Information Service (NIS)
- Sun’s NIS+
- Kerberos
- LDAP
- Other Network Authentication Systems
- Summary
- 15. Network Filesystems
- Understanding NFS
- Server-Side NFS Security
- Client-Side NFS Security
- Improving NFS Security
- Some Last Comments on NFS
- Understanding SMB
- Summary
- 16. Secure Programming Techniques
- One Bug Can Ruin Your Whole Day . . .
- Tips on Avoiding Security-Related Bugs
- Tips on Writing Network Programs
- Tips on Writing SUID/SGID Programs
- Using chroot( )
- Tips on Using Passwords
- Tips on Generating Random Numbers
- Summary
- IV. Secure Operations
- 17. Keeping Up to Date
- Software Management Systems
- Updating System Software
- Summary
- 18. Backups
- Why Make Backups?
- Backing Up System Files
- Software for Backups
- Summary
- 19. Defending Accounts
- Dangerous Accounts
- Monitoring File Format
- Restricting Logins
- Managing Dormant Accounts
- Protecting the root Account
- One-Time Passwords
- Administrative Techniques for Conventional Passwords
- Intrusion Detection Systems
- Summary
- 20. Integrity Management
- The Need for Integrity
- Protecting Integrity
- Detecting Changes After the Fact
- Integrity-Checking Tools
- Summary
- 21. Auditing, Logging, and Forensics
- Unix Log File Utilities
- Process Accounting: The acct/pacct File
- Program-Specific Log Files
- Designing a Site-Wide Log Policy
- Handwritten Logs
- Managing Log Files
- Unix Forensics
- Summary
- V. Handling Security Incidents
- 22. Discovering a Break-in
- Prelude
- Discovering an Intruder
- Cleaning Up After the Intruder
- Case Studies
- Summary
- 23. Protecting Against Programmed Threats
- Programmed Threats: Definitions
- Damage
- Authors
- Entry
- Protecting Yourself
- Preventing Attacks
- Summary
- 24. Denial of Service Attacks and Solutions
- Types of Attacks
- Destructive Attacks
- Overload Attacks
- Network Denial of Service Attacks
- Summary
- 25. Computer Crime
- Your Legal Options After a Break-in
- Criminal Hazards
- Criminal Subject Matter
- Summary
- 26. Who Do You Trust?
- Can You Trust Your Computer?
- Can You Trust Your Suppliers?
- Can You Trust People?
- Summary
- VI. Appendixes
- A. Unix Security Checklist
- Preface
- Chapter 1: Introduction: Some Fundamental Questions
- Chapter 2: Unix History and Lineage
- Chapter 3: Policies and Guidelines
- Chapter 4: Users, Passwords, and Authentication
- Chapter 5: Users, Groups, and the Superuser
- Chapter 6: Filesystems and Security
- Chapter 7: Cryptography Basics
- Chapter 8: Physical Security for Servers
- Chapter 9: Personnel Security
- Chapter 10: Modems and Dialup Security
- Chapter 11: TCP/IP Networks
- Chapter 12: Securing TCP and UDP Services
- Chapter 13: Sun RPC
- Chapter 14: Network-Based Authentication Systems
- Chapter 15: Network Filesystems
- Chapter 16: Secure Programming Techniques
- Chapter 17: Keeping Up to Date
- Chapter 18: Backups
- Chapter 19: Defending Accounts
- Chapter 20: Integrity Management
- Chapter 21: Auditing, Logging, and Forensics
- Chapter 22: Discovering a Break-In
- Chapter 23: Protecting Against Programmed Threats
- Chapter 24: Denial of Service Attacks and Solutions
- Chapter 25: Computer Crime
- Chapter 26: Who Do You Trust?
- Appendix A: Unix Security Checklist
- Appendix B: Unix Processes
- Appendixes C, D, and E: Paper Sources, Electronic Sources, and Organizations
- B. Unix Processes
- About Processes
- Signals
- Controlling and Examining Processes
- Starting Up Unix and Logging In
- C. Paper Sources
- Unix Security References
- Other Computer References
- D. Electronic Resources
- Mailing Lists
- Web Sites
- Usenet Groups
- Software Resources
- E. Organizations
- Professional Organizations
- U.S. Government Organizations
- Emergency Response Organizations
- Index
- Index
- Index
- Index
- Index
- Index
- Index
- Index
- Index
- Index
- Index
- Index
- Index
- Index
- Index
- Index
- Index
- Index
- Index
- Index
- Index
- Index
- Index
- Index
- Index
- Index
- Index
- About the Authors
- Colophon
- Copyright
Sometimes, unprivileged users must be able to accomplish tasks that require privileges. An example is the passwd program, which allows you to change your password. Changing a user’s password requires modifying the password field in the /etc/passwd file. However, you should not give a user access to change this file directly—the user could change everybody else’s password as well! Likewise, the mail program requires that you insert a message into the mailbox of another user, yet you should not give one user unrestricted access to another’s mailbox.
To get around these problems, Unix allows programs to be endowed with privileges. Processes executing these programs can assume another UID or GID when they’re running. A program that changes its UID is called a SUID program (set-UID); a program that changes its GID is called a SGID program (set-GID). A program can be both SUID and SGID at the same time.
When a SUID program is run, its effective UID (see Chapter 4) becomes that of the owner of the file, rather than of the user who is running it.
If a
program is SUID or SGID, the output of the
ls -l command will have the x
in the display changed to an s. If the program is
sticky, the last x changes to a
t as shown in Figure 6-3 and
Table 6-14.
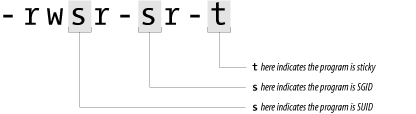
Table 6-14. SUID, SGID, and sticky bits
|
Contents |
Permission |
Meaning |
|---|---|---|
|
---s------ |
SUID |
A process that execs a SUID program has its effective UID set as the UID of the program’s owner when it executes. |
|
------s--- |
SGID |
A process that execs a SGID program has its effective GID changed to the program’s GID. Files created by this process may have their primary group set to this GID as well, depending on the permissions of the directory in which the files are created. Under Berkeley-derived Unix, a process that execs an SGID program also has the program’s GID temporarily added to the process’s list of GIDs. Solaris and other System V-derived versions of Unix use the SGID bit on data (nonexecutable) files to enable mandatory file locking. |
|
---------t |
Sticky |
This is obsolete with files, but is used for directories to indicate that files can be unlinked or renamed only by their owner or the superuser. (See The Origin of “Sticky” later in this chapter.) |
In each of the cases listed in the table, the designator letter is capitalized if the bit is set, and the corresponding execute bit is not set. Thus, a file that has its sticky and SGID bits set, and is otherwise mode 444, would appear in an ls listing as:
% ls -l /tmp/example
-r--r-Sr-T 1 root    user    12324 Mar 26 1995 /tmp/example
An example of a SUID program is the su command (introduced in Chapter 5):
% ls -l /bin/su
-rwsr-xr-x 1 root    user    16384 Sep 3 1989 /bin/su
%Although the SGID and sticky bits were originally intended for use only with programs, Berkeley Unix, SunOS, Solaris and other operating systems also use these bits to change the behavior of directories, as shown in Table 6-15.
Table 6-15. Behavior of SGID and sticky bits with directories
|
Bit |
Effect |
|---|---|
|
SGID bit |
The SGID bit on a directory controls the way that groups are assigned for files created in the directory. If the SGID bit is set, files created in the directory have the same group as the directory if the process creating the file is also in that group. Otherwise, if the SGID bit is not set, or if the process is not in the same group, files created inside the directory have the same group as the user’s effective group ID (usually the primary group ID). |
|
Sticky bit |
If the sticky bit is set on a directory, files inside the directory may be renamed or removed only by the owner of the file, the owner of the directory, or the superuser (even though the modes of the directory might allow such an operation); on some systems, any user who can write to a file can also delete it. This feature was added to keep an ordinary user from deleting another’s files in the /tmp directory. |
For example, to set the mode of the /tmp directory on a system so any user can create or delete her own files but can’t delete another’s files, type the command:
# chmod 1777 /tmpMany older versions of Unix (System V prior to Release 4, for instance) do not exhibit either of these behaviors. On those systems, the SGID and sticky bits on directories are ignored by the system.
If the SGID bit is set on a nonexecutable file, many versions of Unix derived from AT&T System V implement mandatory record locking for the file. Normal Unix record locking is discretionary; processes can modify a locked file simply by ignoring the record-lock status. On System V Unix, the kernel blocks a process that tries to access a file (or the portion of the file) that is protected with mandatory record locking until the process that has locked the file unlocks it. Mandatory locking is enabled only if none of the execute permission bits are turned on.
Mandatory record locking shows up in an ls listing in the SGID position as a capital “S” instead of a small “s”:
% ls -F data*
-rw-rwS--- 1 fred         2048 Dec 3 1994 database
-r-x--s--x 2 bin 16384 Apr 2 1993 datamaint*Any program can be SUID, SGID, or both SUID and SGID. Because this feature is so general, SUID/SGID can open up some interesting security problems.
For example, any user can become the superuser simply by running a SUID copy of csh that is owned by root. Fortunately, you must be root already to create a SUID version of csh that is owned by root. Thus, an important objective in running a secure Unix computer is to ensure that somebody who has superuser privileges does not leave a SUID csh on the system, directly or indirectly.
If you are logged in as root and you leave your terminal unattended, an unscrupulous passerby can destroy the security of your account simply by typing the commands:
%cp /bin/sh /tmp/break-acct%chmod 4755 /tmp/break-acct%
These commands create a SUID version of the sh program. Whenever the attacker runs this program, the attacker becomes you—with full access to all of your files and privileges. The attacker might even copy this SUID program into a hidden directory so that it would be found only if the superuser scanned the entire disk for SUID programs. Not all system administrators do such scanning on any regular basis.
Note that the program copied does not need to be a shell. Someone with malicious intent can cause you misery by creating a SUID version of other programs. For instance, consider a SUID version of the editor program. With it, not only can he read or change any of your files, but he can also spawn a shell running under your UID.
Most SUID system programs are SUID root; that is, they become the superuser when they’re executing. In theory, this aspect is not a security hole, because a compiled program can perform only the function or functions that were compiled into it. (That is, you can change your password with the passwd program, but you cannot alter the program to change somebody else’s password.) But many security holes have been discovered by people who figured out how to make a SUID program do something that it was not designed to do. In many circumstances, programs that are SUID root could easily have been designed to be SUID something else (such as daemon, or some UID created especially for the purpose). Too often, SUID root is used when something with less privilege would be sufficient.
In Chapter 16, we provide some suggestions on how to write more secure programs in Unix. If you absolutely must write a SUID or SGID program (and we advise you not to), then consult that chapter first.
Under most versions of Unix, you can create scripts[73] that are SUID or SGID. That is, you can create a shell script and, by setting the shell script’s owner as root and setting its SUID bit, you can force the script to execute with superuser privileges.
You should be very careful when writing SUID scripts because, under some versions, the Unix script execution facility allows for the potential of a race condition, a situation in which two processes execute simultaneously, and either one could finish first. Between the time that the Unix kernel starts the script interpreter running, and the time that the script is opened for reading, it is possible for an attacker to replace the script that started the interpreter with another script. In the case of SUID shell scripts on some systems, it is possible to use this race condition to compromise the system’s security.
Although this flaw is mitigated on most modern Unix systems, it can be difficult to tell if the system that you are using is susceptible or not. The safest precaution is to simply avoid writing SUID scripts with the sh, csh, or related interpreters.
Some modern Unix systems ignore the SUID or SGID bits on shell scripts for this reason. Unfortunately, many do not. Instead of writing SUID shell scripts, we suggest that you use the Perl programming language for these kinds of tasks. Using Perl’s “taint” option (perl -T) will force you to write SUID scripts that check their PATH environment variable and that do not use values supplied by users for parameters such as filenames unless they have been explicitly “untainted.” Perl has many other advantages for system administration work as well. We describe some of them in Chapter 16. You can also learn more about Perl from the excellent O’Reilly book, Programming Perl, now (as of 2003) in its third edition, by Larry Wall, Tom Christiansen, and Jon Orwant.
Sometimes, an interaction between a SUID program and a system program or library creates a security hole that’s unknown to the author of the program. For this reason, it can be extremely difficult to know if a SUID program contains a security hole or not.
One of the most famous examples of a security hole of this type existed for years in the program /usr/lib/preserve (which is now given names similar to /usr/lib/ex3.5preserve). This program, which is used by the vi and ex editors, automatically makes a backup of the file being edited if the user is unexpectedly disconnected from the system before writing out changes to the file. The preserve program writes the changes to a temporary file in a special directory, then uses the /bin/mail program to send the user a notification that the file has been saved.
Because people might be editing a file that was private or confidential, the directory used by the older version of the preserve program was not accessible by most users on the system. Therefore, to let the preserve program write into this directory, and let the recover program read from it, these programs were made SUID root.
Three details of the /usr/lib/preserve implementation worked together to allow knowledgeable system users to use the program to gain root privileges:
The problem was that the system( ) function uses sh to parse the string that it executes. There is a little-known shell variable named IFS, the internal field separator, which sh uses to figure out where the breaks are between words on each line that it parses. Normally, IFS is set to the whitespace characters: space, tab, and newline. But by setting IFS to the slash character (/), running vi, and then issuing the preserve command, it was possible to get /usr/lib/preserve to execute a program named bin in the current directory. This program was executed as root. (/bin/mail was parsed as bin with the argument mail.)[74]
If a user can convince the operating system to run a command as root, that user can become root. To see why this is so, imagine a simple shell script that might be called bin run through the hole described earlier:[75]
#
# Shell script to make a SUID-root shell
#
cd /homes/mydir/bin
cp /bin/sh ./sh
# Now do the damage!
chown root sh
chmod 4755 sh
This shell script would place a copy of the Bourne shell program into the user’s bin directory, and then make it SUID root. Indeed, this is the way that the problem with /usr/lib/preserve was exploited by system crackers.
The preserve program had more privilege than it needed—it violated a basic security principle called least privilege . The principle of least privilege states that a program should have only the privileges it needs to perform the particular function it is supposed to perform, and no others. Moreover, it should only have those privileges while it needs them, and no longer. In this case, instead of being SUID root, /usr/lib/preserve should have been SGID preserve, in which preserve would have been a specially created group for this purpose. Although this restriction would not have completely eliminated the security hole, it would have made its presence considerably less dangerous. Breaking into the preserve group would have let only the attacker view files that had been preserved.
Although the preserve security hole was a part of Unix since the addition of preserve to the vi editor, it wasn’t widely known until 1986. For a variety of reasons, it wasn’t fixed until a year after it was widely publicized. In practice, some systems were still vulnerable through the early 1990s.
Newer editions of Unix sh ignore IFS if the shell is running as root or if the effective user ID differs from the real user ID. One of the best things to come out of the world-wide effort to upgrade systems to Y2K conformance (and retire those systems that could not be upgraded) was that the vast majority of systems that were once vulnerable to this IFS attack have long since been upgraded or retired.
You should know the names of every SUID and SGID file on your system. If you discover new SUID or SGID files, somebody might have created a trap door that they can use at some future time to gain superuser access. You can list all of the SUID and SGID files on your system with the command:
# find / \( -perm -004000 -o -perm -002000 \) -type f -printThis find command starts in the root directory (/) and looks for all files that match mode 002000 (SGID) or mode 004000 (SUID).[76] The -type f option causes the search to be restricted to files. The -print option causes the name of every matching file to be printed. Instead of -print, you may wish to use -ls, if your version of find supports it, which produces a detailed listing.
Note
If you are using NFS, you may want to execute find commands only on your file servers. You can also restrict the find command so that it does not try to search networked disks. To restrict your find command, use the following:
# find / \( -local -o -prune \)\( -perm -004000 -o -perm -002000 \)-type f -print
Alternatively, if your find command has the -xdev option, you can use it to prevent find from crossing filesystem boundaries. To search the entire filesystem using this option means running the command multiple times, once for each mounted partition.
Be sure that you are the superuser when you run find, or you may miss SUID files hidden in protected directories.
As an example of what you might see when you run find, here’s a list of SUID-root files on one recent Linux system:
/bin/su
/bin/ping
/bin/eject
/bin/mount
/bin/ping6
/bin/umount
/opt/kde2/bin/kreatecd
/opt/kde2/bin/konsole_grantpty
/opt/kde3/bin/artswrapper
/opt/kde3/bin/konsole_grantpty
/usr/bin/lpq
/usr/bin/lpr
/usr/bin/rcp
/usr/bin/rsh
/usr/bin/chfn
/usr/bin/chsh
/usr/bin/lprm
/usr/bin/sudo
/usr/bin/crontab
/usr/bin/chage
/usr/bin/mandb
/usr/bin/vmware-ping
/usr/bin/expiry
/usr/bin/lpstat
/usr/bin/newgrp
/usr/bin/passwd
/usr/bin/gpasswd
/usr/bin/rlogin
/usr/bin/vmware
/usr/bin/cdda2cdr
/usr/lib/majordomo/wrapper
/usr/lib/pt_chown
/usr/sbin/lpc
/usr/sbin/traceroute
/usr/sbin/sendmail
/usr/sbin/suexec
/usr/X11R6/bin/Xwrapper
/usr/X11R6/bin/XFree86
/sbin/cardctl
These files fall into several broad categories. Some require root privileges because they are designed to run commands as other users (su, sudo, suexec, crontab) or groups (newgrp). Others need access to the system’s shadow password file (passwd, chage, chfn, chsh, expiry). Some need to modify system devices (mount, umount, eject, cardctl, kcreatecd, cdda2cdr). This printing system (lpr, lpstat, lpq, lprm, lpc) uses SUID programs, though not all do. You should similarly be able to account for each SUID-root program on your system and understand why it requires superuser privileges.
The ncheck command is an ancient Solaris Unix command that prints a list of each file on your system and its corresponding inode number. When used with the -s option, ncheck restricts itself to listing all of the “special” inodes on your system—such as the devices and SUID files.
The ncheck command runs on a filesystem-by-filesystem basis. For example:
# ncheck -s | cat -ve -
/dev/dsk/c0t3d0s0:
125     /dev/fd/0
513     /dev/fd/1
514     /dev/fd/2

                ...

533     /dev/fd/21
534     /dev/fd/22
535     /dev/fd/23
3849    /sbin/su
3850    /sbin/sulogin
(The cat -ve command is present in this example to print control characters so that they will be noticed, and to indicate the end of line for filenames that end in spaces.)
The ncheck command is very old and has largely been superseded by other commands, although it is present in Solaris and other SVR4-based systems. If you run it, you may discover that it is substantially faster than the find command, because ncheck reads the inodes directly, rather than searching through files in the filesystem.
Unlike find, ncheck will locate SUID files that are hidden beneath directories that are used as mount-points. In this respect, ncheck is superior to find because find can’t find such files because they do not have complete pathnames as long as the mounts are mounted.
If you mount remote network filesystems on your computer, or if you allow users to mount their own floppy disks or CD-ROMs, you usually do not want programs that are SUID on these filesystems to be SUID on your computer as well. In a network environment, honoring SUID files means that if an attacker manages to take over the remote computer that houses the filesystem, he can also take over your computer simply by creating a SUID program on the remote filesystem and running the program on your machine. Likewise, if you allow users to mount floppy disks containing SUID files on your computer, they can simply create a floppy disk with a SUID ksh on another computer, mount the floppy disk on your computer, and run the program—making themselves root.
You can turn off the SUID and SGID bits on mounted filesystems by specifying the nosuid option with the mount command. You should always specify this option when you mount a foreign filesystem unless there is an overriding reason to import SUID or SGID files from the filesystem you are mounting. Likewise, if you write a program to mount floppy disks for a user, that program should specify the nosuid option (because the user can easily take his floppy disk to another computer and create a SUID file).
For example, to mount the filesystem athena in the /usr/athena directory from the machine zeus with the nosuid option, type the command:
# /etc/mount -o nosuid zeus:/athena /usr/athenaSome systems also support a nodev option that causes the system to ignore device files that may be present on the mounted partition. If your system supports this option, you should use it, too. If your user creates a floppy with a mode 777 kmem, for instance, he can subvert the system with little difficulty if he is able to mount the floppy disk. This is because Unix treats the /dev/kmem on the floppy disk the same way that it treats the /dev/kmem on your main system disk—it is a device that maps to your system’s kernel memory.
[73] For this purpose of this section, a script is any program that is interpreted, rather than compiled. The SUID script problem applies specifically to shell scripts; the Perl programming language has special code to get around the SUID problem.
[74] Another contributing factor was the failure to properly set the PATH variable.
[75] There is actually a small bug in this shell script; can you find it?
[76] Note that you must have a space after the \( and before the \) in this find command.