Table of Contents for
The IDA Pro Book, 2nd Edition
 The IDA Pro Book, 2nd Edition
Published by
No Starch Press, 2011
The IDA Pro Book, 2nd Edition
Published by
No Starch Press, 2011
- Cover
- The IDA Pro Book
- PRAISE FOR THE FIRST EDITION OF THE IDA PRO BOOK
- Acknowledgments
- Introduction
- I. Introduction to IDA
- 1. Introduction to Disassembly
- The What of Disassembly
- The Why of Disassembly
- The How of Disassembly
- Summary
- 2. Reversing and Disassembly Tools
- Summary Tools
- Deep Inspection Tools
- Summary
- 3. IDA Pro Background
- Obtaining IDA Pro
- IDA Support Resources
- Your IDA Installation
- Thoughts on IDA’s User Interface
- Summary
- II. Basic IDA Usage
- 4. Getting Started with IDA
- IDA Database Files
- Introduction to the IDA Desktop
- Desktop Behavior During Initial Analysis
- IDA Desktop Tips and Tricks
- Reporting Bugs
- Summary
- 5. IDA Data Displays
- Secondary IDA Displays
- Tertiary IDA Displays
- Summary
- 6. Disassembly Navigation
- Stack Frames
- Searching the Database
- Summary
- 7. Disassembly Manipulation
- Commenting in IDA
- Basic Code Transformations
- Basic Data Transformations
- Summary
- 8. Datatypes and Data Structures
- Creating IDA Structures
- Using Structure Templates
- Importing New Structures
- Using Standard Structures
- IDA TIL Files
- C++ Reversing Primer
- Summary
- 9. Cross-References and Graphing
- IDA Graphing
- Summary
- 10. The Many Faces of IDA
- Using IDA’s Batch Mode
- Summary
- III. Advanced IDA Usage
- 11. Customizing IDA
- Additional IDA Configuration Options
- Summary
- 12. Library Recognition Using FLIRT Signatures
- Applying FLIRT Signatures
- Creating FLIRT Signature Files
- Summary
- 13. Extending IDA’s Knowledge
- Augmenting Predefined Comments with loadint
- Summary
- 14. Patching Binaries and Other IDA Limitations
- IDA Output Files and Patch Generation
- Summary
- IV. Extending IDA’s Capabilities
- 15. IDA Scripting
- The IDC Language
- Associating IDC Scripts with Hotkeys
- Useful IDC Functions
- IDC Scripting Examples
- IDAPython
- IDAPython Scripting Examples
- Summary
- 16. The IDA Software Development Kit
- The IDA Application Programming Interface
- Summary
- 17. The IDA Plug-in Architecture
- Building Your Plug-ins
- Installing Plug-ins
- Configuring Plug-ins
- Extending IDC
- Plug-in User Interface Options
- Scripted Plug-ins
- Summary
- 18. Binary Files and IDA Loader Modules
- Manually Loading a Windows PE File
- IDA Loader Modules
- Writing an IDA Loader Using the SDK
- Alternative Loader Strategies
- Writing a Scripted Loader
- Summary
- 19. IDA Processor Modules
- The Python Interpreter
- Writing a Processor Module Using the SDK
- Building Processor Modules
- Customizing Existing Processors
- Processor Module Architecture
- Scripting a Processor Module
- Summary
- V. Real-World Applications
- 20. Compiler Personalities
- RTTI Implementations
- Locating main
- Debug vs. Release Binaries
- Alternative Calling Conventions
- Summary
- 21. Obfuscated Code Analysis
- Anti–Dynamic Analysis Techniques
- Static De-obfuscation of Binaries Using IDA
- Virtual Machine-Based Obfuscation
- Summary
- 22. Vulnerability Analysis
- After-the-Fact Vulnerability Discovery with IDA
- IDA and the Exploit-Development Process
- Analyzing Shellcode
- Summary
- 23. Real-World IDA Plug-ins
- IDAPython
- collabREate
- ida-x86emu
- Class Informer
- MyNav
- IdaPdf
- Summary
- VI. The IDA Debugger
- 24. The IDA Debugger
- Basic Debugger Displays
- Process Control
- Automating Debugger Tasks
- Summary
- 25. Disassembler/Debugger Integration
- IDA Databases and the IDA Debugger
- Debugging Obfuscated Code
- IdaStealth
- Dealing with Exceptions
- Summary
- 26. Additional Debugger Features
- Debugging with Bochs
- Appcall
- Summary
- A. Using IDA Freeware 5.0
- Using IDA Freeware
- B. IDC/SDK Cross-Reference
- Index
- About the Author
It is important that we begin with an understanding of how the debugger treats your database when you initiate (and terminate) a debugging session. A debugger needs a process image to work with. Debuggers obtain process images either by attaching to existing processes or by creating new processes from executable files. An IDA database does not contain a valid process image, nor in most cases can a valid process image be reconstructed from a database (if one could, then File ▸ Produce File ▸ Create EXE File might be simple to implement). When you launch a debugger session from IDA, the disassembler side informs the debugger side of the name of the original input file, which the debugger uses to create and attach to a new process. Information provided to the debugger includes disassembly formatting, symbol names, data formatting, and any comments that you have entered into the database. An important point to understand is that any patches (changes in byte content) you have applied to your database will not be reflected in the process being debugged. In other words, it is not possible to patch changes into the database and expect to observe the effect of those changes when you launch the debugger.
The opposite holds true as well. When you have finished debugging a process and you return to disassembly mode, by default the only changes that will be reflected in the database are cosmetic in nature (such as renamed variables or functions). Any memory changes, such as self-modified code, are not pulled back into the database for you to analyze. If you wish to migrate any content, such as newly de-obfuscated code, from the debugger back to your disassembly database, IDA will allow you to do so via the Debugger ▸ Take Memory Snapshot command. The resulting confirmation dialog is shown in Figure 25-1.
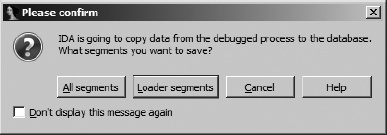
The default option is to copy loader segments from the running process to the database. Loader segments are those segments that were loaded into the database by the IDA loader module used to create the current database. In the case of an obfuscated program, one or more of these segments probably contain data that has been obfuscated and are therefore nearly impossible to analyze in the disassembler. These are precisely the segments that you will want to copy back from the running process image in order to take advantage of the de-obfuscation work performed by the process running under debugger control.
Selecting All segments causes all segments created by the debugger to be copied back to the database. These segments include the contents of all shared libraries loaded in support of the process as well as additional process-related segments, such as the stack and heap contents.
When the debugger is used to attach to an existing process with no associated database, none of the debugger segments will be flagged as loader segments because the file was not loaded by one of IDA’s loaders. In such cases, you may elect to capture all available segments into a new database. Alternatively, you may elect to edit segment attributes and designate one or more segments as loader segments. Segment attributes may be edited by first opening the Segments window (View ▸ Open Subviews ▸ Segments). Any segment marked as a loader segment will contain an L in the L column of the Program Segmentation window. Right-clicking a segment of interest and selecting Edit Segment opens the segment attributes dialog shown in Figure 25-2.
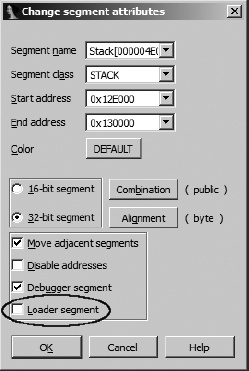
Selecting the Loader segment checkbox marks the segment as a loader segment and allows it to be copied into the database along with all other loader segments.
The segment attributes dialog is also useful when you have created a process from an open database and wish to add additional loader segments before taking a memory snapshot. For example, if an obfuscated process extracts the original code into a block of memory allocated in the heap (or a memory-mapped block), you will want to mark that memory block as a loader segment before you snapshot memory; otherwise, the de-obfuscated code will not be copied back into your database.