Table of Contents for
The IDA Pro Book, 2nd Edition
 The IDA Pro Book, 2nd Edition
Published by
No Starch Press, 2011
The IDA Pro Book, 2nd Edition
Published by
No Starch Press, 2011
- Cover
- The IDA Pro Book
- PRAISE FOR THE FIRST EDITION OF THE IDA PRO BOOK
- Acknowledgments
- Introduction
- I. Introduction to IDA
- 1. Introduction to Disassembly
- The What of Disassembly
- The Why of Disassembly
- The How of Disassembly
- Summary
- 2. Reversing and Disassembly Tools
- Summary Tools
- Deep Inspection Tools
- Summary
- 3. IDA Pro Background
- Obtaining IDA Pro
- IDA Support Resources
- Your IDA Installation
- Thoughts on IDA’s User Interface
- Summary
- II. Basic IDA Usage
- 4. Getting Started with IDA
- IDA Database Files
- Introduction to the IDA Desktop
- Desktop Behavior During Initial Analysis
- IDA Desktop Tips and Tricks
- Reporting Bugs
- Summary
- 5. IDA Data Displays
- Secondary IDA Displays
- Tertiary IDA Displays
- Summary
- 6. Disassembly Navigation
- Stack Frames
- Searching the Database
- Summary
- 7. Disassembly Manipulation
- Commenting in IDA
- Basic Code Transformations
- Basic Data Transformations
- Summary
- 8. Datatypes and Data Structures
- Creating IDA Structures
- Using Structure Templates
- Importing New Structures
- Using Standard Structures
- IDA TIL Files
- C++ Reversing Primer
- Summary
- 9. Cross-References and Graphing
- IDA Graphing
- Summary
- 10. The Many Faces of IDA
- Using IDA’s Batch Mode
- Summary
- III. Advanced IDA Usage
- 11. Customizing IDA
- Additional IDA Configuration Options
- Summary
- 12. Library Recognition Using FLIRT Signatures
- Applying FLIRT Signatures
- Creating FLIRT Signature Files
- Summary
- 13. Extending IDA’s Knowledge
- Augmenting Predefined Comments with loadint
- Summary
- 14. Patching Binaries and Other IDA Limitations
- IDA Output Files and Patch Generation
- Summary
- IV. Extending IDA’s Capabilities
- 15. IDA Scripting
- The IDC Language
- Associating IDC Scripts with Hotkeys
- Useful IDC Functions
- IDC Scripting Examples
- IDAPython
- IDAPython Scripting Examples
- Summary
- 16. The IDA Software Development Kit
- The IDA Application Programming Interface
- Summary
- 17. The IDA Plug-in Architecture
- Building Your Plug-ins
- Installing Plug-ins
- Configuring Plug-ins
- Extending IDC
- Plug-in User Interface Options
- Scripted Plug-ins
- Summary
- 18. Binary Files and IDA Loader Modules
- Manually Loading a Windows PE File
- IDA Loader Modules
- Writing an IDA Loader Using the SDK
- Alternative Loader Strategies
- Writing a Scripted Loader
- Summary
- 19. IDA Processor Modules
- The Python Interpreter
- Writing a Processor Module Using the SDK
- Building Processor Modules
- Customizing Existing Processors
- Processor Module Architecture
- Scripting a Processor Module
- Summary
- V. Real-World Applications
- 20. Compiler Personalities
- RTTI Implementations
- Locating main
- Debug vs. Release Binaries
- Alternative Calling Conventions
- Summary
- 21. Obfuscated Code Analysis
- Anti–Dynamic Analysis Techniques
- Static De-obfuscation of Binaries Using IDA
- Virtual Machine-Based Obfuscation
- Summary
- 22. Vulnerability Analysis
- After-the-Fact Vulnerability Discovery with IDA
- IDA and the Exploit-Development Process
- Analyzing Shellcode
- Summary
- 23. Real-World IDA Plug-ins
- IDAPython
- collabREate
- ida-x86emu
- Class Informer
- MyNav
- IdaPdf
- Summary
- VI. The IDA Debugger
- 24. The IDA Debugger
- Basic Debugger Displays
- Process Control
- Automating Debugger Tasks
- Summary
- 25. Disassembler/Debugger Integration
- IDA Databases and the IDA Debugger
- Debugging Obfuscated Code
- IdaStealth
- Dealing with Exceptions
- Summary
- 26. Additional Debugger Features
- Debugging with Bochs
- Appcall
- Summary
- A. Using IDA Freeware 5.0
- Using IDA Freeware
- B. IDC/SDK Cross-Reference
- Index
- About the Author
In this and the following chapter we cover the heart of what puts the Interactive in IDA Pro, which is, in a nutshell, ease of navigation and ease of manipulation. The focus of this chapter is navigation; specifically, we show how IDA facilitates moving around a disassembly in a logical manner. So far, we have shown that at a basic level IDA simply combines the features of many common reverse engineering tools into an integrated disassembly display. Navigating around the display is one of the essential skills required in order to master IDA. Static disassembly listings offer no inherent navigational capability other than scrolling up and down the listing. Even with the best text editors, such dead listings are very difficult to navigate, as the best they have to offer is generally nothing more than an integrated, grep-style search. As you shall see, IDA’s database underpinnings provide for exceptional navigational features.
In your initial experience with IDA, you may be happy to make use of nothing more than the navigational features that IDA has to offer. In addition to offering fairly standard search features that you are accustomed to from your use of text editors or word processors, IDA develops and displays a comprehensive list of cross-references that behave in a manner similar to hyperlinks on a web page. The end result is that, in most cases, navigating to locations of interest requires nothing more than a double-click.
When a program is disassembled, every location in the program is assigned a virtual address. As a result, we can navigate anywhere within a program by providing the virtual address of the location we are interested in visiting. Unfortunately for us, maintaining a catalog of addresses in our head is not a trivial task. This fact motivated early programmers to assign symbolic names to program locations that they wished to reference, making things a whole lot easier on themselves. The assignment of symbolic names to program addresses was not unlike the assignment of mnemonic instruction names to program opcodes; programs became easier to read and write by making them easier to remember.
As we discussed previously, IDA generates symbolic names during the analysis phase by examining a binary’s symbol table or by automatically generating a name based on how a location is referenced within the binary. In addition to its symbolic purpose, any name displayed in the disassembly window is a potential navigation target similar to a hyperlink on a web page. The two differences between these names and standard hyperlinks are (1) that the names are never highlighted in any way to indicate that they can be followed and (2) that IDA requires a double-click to follow rather than the single-click required by a hyperlink. We have already seen the use of names in various subwindows such as the Functions, Imports, and Exports windows. Recall that for each of these windows, double-clicking a name caused the disassembly view to jump to the referenced location. This is one example of the double-click navigation at work. In the following listing, each of the symbols labeled  represents a named navigational target. Double-clicking any of them will cause IDA to relocate the display to the selected location.
.text:0040132B loc_40132B: ; CODE XREF:sub_4012E4+B^j .text:0040132B cmp edx, 0CDh .text:00401331 jg short
For navigational purposes, IDA treats two additional display entities as navigational targets. First, cross-references (shown at here) are treated as navigational targets. Cross-references are generally formated as a name and a hex offset. The cross-reference at the right of loc_40134E in the previous listing refers to a location that is 4D16 or 7710 bytes beyond the start of sub_4012E4. Double-clicking the cross-reference text will jump the display to the referencing location (00401331 in this case). Cross-references are covered in more detail in Chapter 9.
The second type of display entity afforded special treatment in a navigational sense is one that uses hexadecimal values. If a displayed hexadecimal value represents a valid virtual address within the binary, then double-clicking the value will reposition the disassembly window to display the selected virtual address. In the listing that follows, double-clicking any of the values indicated by  will jump the display, because each is a valid virtual address within the given binary, while double-clicking any of the values indicated by
  will have no effect.
.data:00409013 db
A final note about double-click navigation concerns the IDA Output window, which is most often used to display informational messages. When a navigational target, as previously described, appears as the first item in a message, double-clicking the message will jump the display to the indicated target.
Propagating type information... Function argument information has been propagated The initial autoanalysis has been finished.40134e is an interesting location
Testing: 40134e
In the Output window excerpt just shown, the two messages indicated by can be used to navigate to the addresses indicated at the start of the respective messages. Double-clicking any of the other messages, including those at , will result in no action at all.
Occasionally, you will know exactly what address you would like to navigate to, yet no name will be handy in the disassembly window to offer simple double-click navigation. In such a case, you have a few options. The first, and most primitive, option is to use the disassembly window scroll bar to scroll the display up or down until the desired location comes into view. This is usually feasible only when the location you are navigating to is known by its virtual address, since the disassembly window is organized linearly by virtual address. If all you know is a named location such as a subroutine named foobar, then navigating via the scroll bar becomes something of a needle-in-a-haystack search. At that point, you might choose to sort the Functions window alphabetically, scroll to the desired name, and double-click the name. A third option is to use one of IDA’s search features available via the Search menu, which typically involves specifying some search criteria before asking IDA to perform a search. In the case of searching for a known location, this is usually overkill.
Ultimately, the easiest way to get to a known disassembly location is to make use of the Jump to Address dialog shown in Figure 6-1.
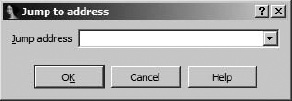
The Jump to Address dialog is accessed via Jump ▸ Jump to Address, or by using the G hotkey while the disassembly window is active. Thinking of this dialog as the Go dialog may help you remember the associated hotkey. Navigating to any location in the binary is as simple as specifying the address (a name or hex value will do) and clicking OK, which will immediately jump the display to the desired location. Values entered into the dialog are remembered and made available on subsequent use via a drop-down list. This history feature makes returning to previously requested locations somewhat easier.
If we compare IDA’s document-navigation functions to those of a web browser, we might equate names and addresses to hyperlinks, as each can be followed relatively easily to view a new location. Another feature IDA shares with traditional web browsers is the concept of forward and backward navigation based on the order in which you navigate the disassembly. Each time you navigate to a new location within a disassembly, your current location is appended to a history list. Two menu operations are available for traversing this list. First, Jump ▸ Jump to Previous Position repositions the disassembly to the most recent entry in the history list. The behavior is conceptually identical to a web browser’s back button. The associated hotkey is esc, and it is one of the most useful hotkeys that you can commit to memory. Be forewarned, however, that using esc when any window other than the disassembly window is active causes the active window to be closed. (You can always reopen windows that you closed accidentally via View ▸ Open Subviews.) Backward navigation is extremely handy when you have followed a chain of function calls several levels deep and you decide that you want to navigate back to your original position within the disassembly.
Jump ▸ Jump to Next Position is the counterpart operation that moves the disassembly window forward in the history list in a manner similar to a web browser’s forward button. For the sake of completeness, the associated hotkey for this operation is ctrl-enter, though it tends to be less useful than using esc for backward navigation.
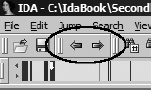
Finally, two of the more useful toolbar buttons, shown in Figure 6-2, provide the familiar browser-style forward and backward behavior. Each of the buttons is associated with a drop-down history list that offers you instant access to any location in the navigation history without having to trace your steps through the entire list.