Table of Contents for
The IDA Pro Book, 2nd Edition
 The IDA Pro Book, 2nd Edition
Published by
No Starch Press, 2011
The IDA Pro Book, 2nd Edition
Published by
No Starch Press, 2011
- Cover
- The IDA Pro Book
- PRAISE FOR THE FIRST EDITION OF THE IDA PRO BOOK
- Acknowledgments
- Introduction
- I. Introduction to IDA
- 1. Introduction to Disassembly
- The What of Disassembly
- The Why of Disassembly
- The How of Disassembly
- Summary
- 2. Reversing and Disassembly Tools
- Summary Tools
- Deep Inspection Tools
- Summary
- 3. IDA Pro Background
- Obtaining IDA Pro
- IDA Support Resources
- Your IDA Installation
- Thoughts on IDA’s User Interface
- Summary
- II. Basic IDA Usage
- 4. Getting Started with IDA
- IDA Database Files
- Introduction to the IDA Desktop
- Desktop Behavior During Initial Analysis
- IDA Desktop Tips and Tricks
- Reporting Bugs
- Summary
- 5. IDA Data Displays
- Secondary IDA Displays
- Tertiary IDA Displays
- Summary
- 6. Disassembly Navigation
- Stack Frames
- Searching the Database
- Summary
- 7. Disassembly Manipulation
- Commenting in IDA
- Basic Code Transformations
- Basic Data Transformations
- Summary
- 8. Datatypes and Data Structures
- Creating IDA Structures
- Using Structure Templates
- Importing New Structures
- Using Standard Structures
- IDA TIL Files
- C++ Reversing Primer
- Summary
- 9. Cross-References and Graphing
- IDA Graphing
- Summary
- 10. The Many Faces of IDA
- Using IDA’s Batch Mode
- Summary
- III. Advanced IDA Usage
- 11. Customizing IDA
- Additional IDA Configuration Options
- Summary
- 12. Library Recognition Using FLIRT Signatures
- Applying FLIRT Signatures
- Creating FLIRT Signature Files
- Summary
- 13. Extending IDA’s Knowledge
- Augmenting Predefined Comments with loadint
- Summary
- 14. Patching Binaries and Other IDA Limitations
- IDA Output Files and Patch Generation
- Summary
- IV. Extending IDA’s Capabilities
- 15. IDA Scripting
- The IDC Language
- Associating IDC Scripts with Hotkeys
- Useful IDC Functions
- IDC Scripting Examples
- IDAPython
- IDAPython Scripting Examples
- Summary
- 16. The IDA Software Development Kit
- The IDA Application Programming Interface
- Summary
- 17. The IDA Plug-in Architecture
- Building Your Plug-ins
- Installing Plug-ins
- Configuring Plug-ins
- Extending IDC
- Plug-in User Interface Options
- Scripted Plug-ins
- Summary
- 18. Binary Files and IDA Loader Modules
- Manually Loading a Windows PE File
- IDA Loader Modules
- Writing an IDA Loader Using the SDK
- Alternative Loader Strategies
- Writing a Scripted Loader
- Summary
- 19. IDA Processor Modules
- The Python Interpreter
- Writing a Processor Module Using the SDK
- Building Processor Modules
- Customizing Existing Processors
- Processor Module Architecture
- Scripting a Processor Module
- Summary
- V. Real-World Applications
- 20. Compiler Personalities
- RTTI Implementations
- Locating main
- Debug vs. Release Binaries
- Alternative Calling Conventions
- Summary
- 21. Obfuscated Code Analysis
- Anti–Dynamic Analysis Techniques
- Static De-obfuscation of Binaries Using IDA
- Virtual Machine-Based Obfuscation
- Summary
- 22. Vulnerability Analysis
- After-the-Fact Vulnerability Discovery with IDA
- IDA and the Exploit-Development Process
- Analyzing Shellcode
- Summary
- 23. Real-World IDA Plug-ins
- IDAPython
- collabREate
- ida-x86emu
- Class Informer
- MyNav
- IdaPdf
- Summary
- VI. The IDA Debugger
- 24. The IDA Debugger
- Basic Debugger Displays
- Process Control
- Automating Debugger Tasks
- Summary
- 25. Disassembler/Debugger Integration
- IDA Databases and the IDA Debugger
- Debugging Obfuscated Code
- IdaStealth
- Dealing with Exceptions
- Summary
- 26. Additional Debugger Features
- Debugging with Bochs
- Appcall
- Summary
- A. Using IDA Freeware 5.0
- Using IDA Freeware
- B. IDC/SDK Cross-Reference
- Index
- About the Author
When a binary is first opened, IDA attempts to apply special signature files, designated as startup signatures, to the entry point of the binary. It turns out that the entry point code generated by various compilers is sufficiently unique that matching entry point signatures is a useful technique for identifying the compiler that may have been used to generate a given binary.
If IDA identifies the compiler used to create a particular binary, then the signature file for the corresponding compiler libraries is loaded and applied to the remainder of the binary. The signatures that ship with IDA tend to be related to proprietary compilers such as Microsoft Visual C++ or Borland Delphi. The reason behind this is that a finite number of binary libraries ship with these compilers. For open source compilers, such as GNU gcc, the binary variations of the associated libraries are as numerous as the operating systems the compilers ship with. For example, each version of FreeBSD ships with a unique version of the C standard library. For optimal pattern matching, signature files would need to be generated for each version of the library. Consider the difficulty in collecting every variation of libc.a[78] that has shipped with every version of every Linux distribution. It simply is not practical. In part, these differences are due to changes in the library source code that result in different compiled code, but huge differences also result from the use of different compilation options, such as optimization settings and the use of different compiler versions to build the library. The net result is that IDA ships with very few signature files for open source compiler libraries. The good news, as you shall soon see, is that Hex-Rays makes tools available that allow you to generate your own signature files from static libraries.
So, under what circumstances might you be required to manually apply signatures to one of your databases? Occasionally IDA properly identifies the compiler used to build the binary but has no signatures for the related compiler libraries. In such cases, either you will need to live without signatures, or you will need to obtain copies of the static libraries used in the binary and generate your own signatures. Other times, IDA may simply fail to identify a compiler, making it impossible to determine which signatures should be applied to a database. This is common when analyzing obfuscated code in which the startup routines have been sufficiently mangled to preclude compiler identification. The first thing to do, then, would be to de-obfuscate the binary sufficiently before you could have any hope of matching library signatures. We will discuss techniques for dealing with obfuscated code in Chapter 21.
Regardless of the reason, if you wish to manually apply signatures to a database, you do so via File ▸ Load File ▸ FLIRT Signature File, which opens the signature selection dialog shown in Figure 12-1.
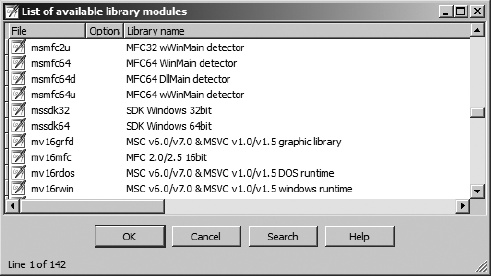
The File column reflects the name of each .sig file in IDA’s <IDADIR>/sig directory. Note that there is no means to specify an alternate location for .sig files. If you ever generate your own signatures, they need to be placed into <IDADIR>/sig along with every other .sig file. The Library name column displays the library name comment that is embedded within each file. Keep in mind that these comments are only as descriptive as the creator of the signatures (which could be you!) chooses to make them.
When a library module is selected, the signatures contained in the corresponding .sig file are loaded and compared against every function within the database. Only one set of signatures may be applied at a time, so you will need to repeat the process if you wish to apply several different signature files to a database. When a function is found to match a signature, the function is marked as a library function, and the function is automatically renamed according to the signature that has been matched.
Warning
Only functions named with an IDA dummy name can be automatically renamed. In other words, if you have renamed a function, and that function is later matched by a signature, then the function will not be renamed as a result of the match. Therefore, it is to your benefit to apply signatures as early in your analysis process as possible.
Recall that statically linked binaries blur the distinction between application code and library code. If you are fortunate enough to have a statically linked binary that has not had its symbols stripped, you will at least have useful function names (as useful as the trustworthy programmer has chosen to create) to help you sort your way through the code. However, if the binary has been stripped, you will have perhaps hundreds of functions, all with IDA-generated names that fail to indicate what the function does. In both cases, IDA will be able to identify library functions only if signatures are available (function names in an unstripped binary do not provide IDA with enough information to definitively identify a function as a library function). Figure 12-2 shows the Overview Navigator for a statically linked binary.

In this display, no functions have been identified as library functions, so you may find yourself analyzing far more code than you really need to. After application of an appropriate set of signatures, the Overview Navigator is transformed as shown in Figure 12-3.

As you can see, the Overview Navigator provides the best indication of the effectiveness of a particular set of signatures. With a large percentage of matched signatures, substantial portions of code will be marked as library code and renamed accordingly. In the example in Figure 12-3, it is highly likely that the actual application-specific code is concentrated in the far left portion of the navigator display.
There are two points worth remembering when applying signatures. First, signatures are useful even when working with a binary that has not been stripped, in which case you are using signatures more to help IDA identify library functions than to rename those functions. Second, statically linked binaries may be composed of several separate libraries, requiring the application of several sets of signatures in order to completely identify all library functions. With each additional signature application, additional portions of the Overview Navigator will be transformed to reflect the discovery of library code. Figure 12-4 shows one such example. In this figure, you see a binary that was statically linked with both the C standard library and the OpenSSL[79] cryptographic library.

Specifically, you see that following application of the appropriate signatures for the version of OpenSSL in use in this application, IDA has marked a small band (the lighter band toward the left edge of the address range) as library code. Statically linked binaries are often created by taking the application code first and then appending required libraries to create the resulting executable. Given this picture, we can conclude that the memory space to the right of the OpenSSL library is likely occupied by additional library code, while the application code is most likely in the very narrow band to the left of the OpenSSL library. If we continue to apply signatures to the binary shown in Figure 12-4, we eventually arrive at the display of Figure 12-5.

In this example, we have applied signatures for libc, libcrypto, libkrb5, libresolv, and others. In some cases we selected signatures based on strings located within the binary; in other cases we chose signatures based on their close relationship to other libraries already located within the binary. The resulting display continues to show a dark band in the middle of the navigation band and a smaller dark band at the extreme left edge of the navigation band. Further analysis is required to determine the nature of these remaining nonlibrary portions of the binary. In this case we would learn that the wider dark band in the middle is part of an unidentified library, while the dark band on the left is the application code.
[78] libc.a is the version of the C standard library used in statically linked binaries on Unix-style systems.
[79] See http://www.openssl.org/.