Table of Contents for
The IDA Pro Book, 2nd Edition
 The IDA Pro Book, 2nd Edition
Published by
No Starch Press, 2011
The IDA Pro Book, 2nd Edition
Published by
No Starch Press, 2011
- Cover
- The IDA Pro Book
- PRAISE FOR THE FIRST EDITION OF THE IDA PRO BOOK
- Acknowledgments
- Introduction
- I. Introduction to IDA
- 1. Introduction to Disassembly
- The What of Disassembly
- The Why of Disassembly
- The How of Disassembly
- Summary
- 2. Reversing and Disassembly Tools
- Summary Tools
- Deep Inspection Tools
- Summary
- 3. IDA Pro Background
- Obtaining IDA Pro
- IDA Support Resources
- Your IDA Installation
- Thoughts on IDA’s User Interface
- Summary
- II. Basic IDA Usage
- 4. Getting Started with IDA
- IDA Database Files
- Introduction to the IDA Desktop
- Desktop Behavior During Initial Analysis
- IDA Desktop Tips and Tricks
- Reporting Bugs
- Summary
- 5. IDA Data Displays
- Secondary IDA Displays
- Tertiary IDA Displays
- Summary
- 6. Disassembly Navigation
- Stack Frames
- Searching the Database
- Summary
- 7. Disassembly Manipulation
- Commenting in IDA
- Basic Code Transformations
- Basic Data Transformations
- Summary
- 8. Datatypes and Data Structures
- Creating IDA Structures
- Using Structure Templates
- Importing New Structures
- Using Standard Structures
- IDA TIL Files
- C++ Reversing Primer
- Summary
- 9. Cross-References and Graphing
- IDA Graphing
- Summary
- 10. The Many Faces of IDA
- Using IDA’s Batch Mode
- Summary
- III. Advanced IDA Usage
- 11. Customizing IDA
- Additional IDA Configuration Options
- Summary
- 12. Library Recognition Using FLIRT Signatures
- Applying FLIRT Signatures
- Creating FLIRT Signature Files
- Summary
- 13. Extending IDA’s Knowledge
- Augmenting Predefined Comments with loadint
- Summary
- 14. Patching Binaries and Other IDA Limitations
- IDA Output Files and Patch Generation
- Summary
- IV. Extending IDA’s Capabilities
- 15. IDA Scripting
- The IDC Language
- Associating IDC Scripts with Hotkeys
- Useful IDC Functions
- IDC Scripting Examples
- IDAPython
- IDAPython Scripting Examples
- Summary
- 16. The IDA Software Development Kit
- The IDA Application Programming Interface
- Summary
- 17. The IDA Plug-in Architecture
- Building Your Plug-ins
- Installing Plug-ins
- Configuring Plug-ins
- Extending IDC
- Plug-in User Interface Options
- Scripted Plug-ins
- Summary
- 18. Binary Files and IDA Loader Modules
- Manually Loading a Windows PE File
- IDA Loader Modules
- Writing an IDA Loader Using the SDK
- Alternative Loader Strategies
- Writing a Scripted Loader
- Summary
- 19. IDA Processor Modules
- The Python Interpreter
- Writing a Processor Module Using the SDK
- Building Processor Modules
- Customizing Existing Processors
- Processor Module Architecture
- Scripting a Processor Module
- Summary
- V. Real-World Applications
- 20. Compiler Personalities
- RTTI Implementations
- Locating main
- Debug vs. Release Binaries
- Alternative Calling Conventions
- Summary
- 21. Obfuscated Code Analysis
- Anti–Dynamic Analysis Techniques
- Static De-obfuscation of Binaries Using IDA
- Virtual Machine-Based Obfuscation
- Summary
- 22. Vulnerability Analysis
- After-the-Fact Vulnerability Discovery with IDA
- IDA and the Exploit-Development Process
- Analyzing Shellcode
- Summary
- 23. Real-World IDA Plug-ins
- IDAPython
- collabREate
- ida-x86emu
- Class Informer
- MyNav
- IdaPdf
- Summary
- VI. The IDA Debugger
- 24. The IDA Debugger
- Basic Debugger Displays
- Process Control
- Automating Debugger Tasks
- Summary
- 25. Disassembler/Debugger Integration
- IDA Databases and the IDA Debugger
- Debugging Obfuscated Code
- IdaStealth
- Dealing with Exceptions
- Summary
- 26. Additional Debugger Features
- Debugging with Bochs
- Appcall
- Summary
- A. Using IDA Freeware 5.0
- Using IDA Freeware
- B. IDC/SDK Cross-Reference
- Index
- About the Author

It’s about time we got down to actually using IDA. The remainder of this book is dedicated to various features of IDA and how you can leverage them to best suit your reverse engineering needs. In this chapter we begin by covering the options you are presented with when you launch IDA, and then we describe just what is happening when you open a binary file for analysis. Finally, we’ll present a quick overview of the user interface to lay the groundwork for the remaining chapters.
For the sake of standardization, examples in both this chapter and the remainder of the book will be presented with the Windows Qt GUI interface unless an example requires a specific, different version of IDA (such as an example of Linux debugging).
Any time you launch IDA, you will be greeted briefly by a splash screen that displays a summary of your license information. Once the splash screen clears, IDA displays another dialog offering three ways to proceed to its desktop environment, as shown in Figure 4-1.
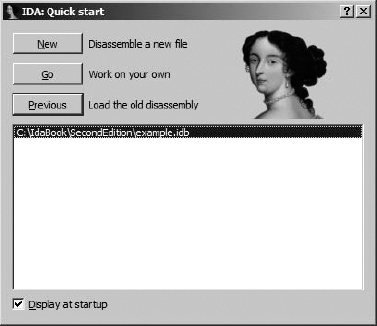
If you prefer not to see the welcome message, feel free to uncheck the Display at startup checkbox at the bottom of the dialog. If you check the box, future sessions will begin as if you had clicked the Go button, and you will be taken directly to an empty IDA workspace. If at some point you find yourself longing for the Welcome dialog (after all, it conveniently allows you to return to recently used files), you will need to edit IDA’s registry key to set the DisplayWelcome value back to 1. Alternatively, selecting Windows ▸ Reset hidden messages will restore all previously hidden messages.
Note
When installed on Windows, IDA creates the following registry key: HKEY_CURRENT_USER\Software\Hex-Rays\IDA.[29] Many options that can be configured within IDA itself (as opposed to editing one of the configuration files) are stored within this registry key. However, on other platforms, IDA stores such values in a binary data file ($HOME/.idapro/ida.reg) that is not easily edited.
Each of the three options shown in Figure 4-1 offers a slightly different method to proceed to the IDA desktop. These three launch options are reviewed here:
- New
Choosing New opens a standard File Open dialog to select the file to be analyzed. Following file selection, one or more additional dialogs are displayed that allow you to choose specific file-analysis options before the file is loaded, analyzed, and displayed.
- Go
The Go button terminates the load process and causes IDA to open with an empty workspace. At this point, if you want to open a file, you may drag and drop a binary file onto your IDA desktop, or you may use one of the options from the File menu to open a file. The File ▸ Open command results in a File Open dialog, as described previously. By default, IDA utilizes a known extensions filter to limit the view of the File dialog. Make sure that you modify or clear the filter (such as choosing All Files) so that the File dialog correctly displays the file you are interested in opening.[30] When you open a file this way, IDA attempts to automatically identify the selected file’s type; however, you should pay careful attention to the Loading dialog to see which loaders have been selected to process the file.
- Previous
You should utilize the Previous button when you wish to open one of the files in the list of recent files that is directly below the Previous button. The list of recently used files is populated with values from the
Historysubkey of IDA’s Windows registry key (or ida.reg on non-Windows platforms). The maximum length of the history list is initially set to 10, but this limit may be raised as high as 100 by editing the appropriate entry in idagui.cfg or idatui.cfg (see Chapter 11). Utilizing the history list is the most convenient option for resuming work on recently used database files.
When choosing to open a new file using the File ▸ Open command, you will be presented with the loading dialog shown in Figure 4-2. IDA generates a list of potential file types and displays that list at the top of the dialog. This list represents the IDA loaders that are best suited for dealing with the selected file. The list is created by executing each of the file loaders in IDA’s loaders directory in order to find any loaders[31] that recognize the new file. Note that in Figure 4-2, both the Windows PE loader (pe.ldw) and the MS-DOS EXE loader (dos.ldw) claim to recognize the selected file. Readers familiar with the PE file format will not be surprised by this, as the PE file format is an extended form of the MS-DOS EXE file format. The last entry in the list, Binary File, will always be present since it is IDA’s default for loading files that it does not recognize, and this provides the lowest-level method for loading any file. When offered the choice of several loaders, it is not a bad initial strategy to simply accept the default selection unless you possess specific information that contradicts IDA’s determination.
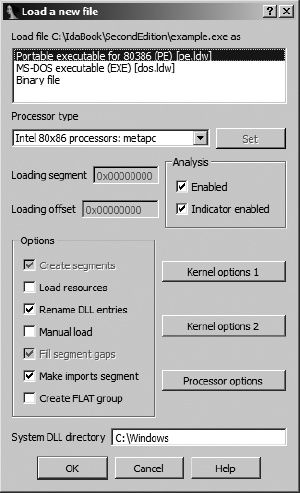
At times, Binary File will be the only entry that appears in the loader list. In such cases, the implied message is that none of the loaders recognize the chosen file. If you opt to continue the loading process, make sure that you select the processor type in accordance with your understanding of the file contents.
The Processor Type drop-down menu allows you to specify which processor module (from IDA’s procs directory) should be used during the disassembly process. In most cases, IDA will choose the proper processor based on information that it reads from the executable file’s headers. When IDA can’t properly determine the processor type associated with the file being opened, you will need to manually select a processor type before continuing with the file-loading operation.
The Loading Segment and Loading Offset fields are active only when the Binary File input format is chosen in conjunction with an x86 family processor. Since the binary loader is unable to extract any memory layout information, the segment and offset values entered here are combined to form the base address for the loaded file content. Should you forget to specify a base address during the initial loading process, the base address of the IDA image can be modified at any time using the Edit ▸ Segments ▸ Rebase Program command.
The Kernel Options buttons provide access to configure the specific disassembly analysis options that IDA will utilize to enhance the recursive-descent process. In the overwhelming majority of cases, the default options provide the best possible disassembly. The IDA help files provide additional information on available kernel options.
The Processor Options button provides access to configuration options that apply to the selected processor module. However, processor options are not necessarily available for every processor module. Limited help is available for processor options as these options are very highly dependent on the selected processor module and the programming proficiency of the module’s author.
The remaining Options checkboxes are used to gain finer control over the file-loading process. Each of the options is described further in IDA’s help file. The options are not applicable to all input file types, and in most cases, you can rely on the default selections. Specific cases when you may need to modify these options will be covered in Chapter 21.
When you opt to utilize the binary loader, you need to be prepared to do more than your usual share of the processing work. With no file header information to guide the analysis process, it is up to you to step in and perform tasks that more capable loaders often do automatically. Examples of situations that may call for the use of the binary loader include the analysis of ROM images and exploit payloads that may have been extracted from network packet captures or log files.
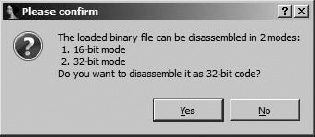
When the x86 processor module is paired with the binary loader, the dialog shown in Figure 4-3 will be displayed. With no recognizable file headers available to assist IDA, it is up to the user to specify whether code should be treated as 16-bit or 32-bit mode code. Other processors for which IDA can distinguish between 16- and 32-bit modes include ARM and MIPS.
Binary files contain no information concerning their memory layout (at least no information that IDA knows how to recognize). When an x86 processor type has been selected, base address information must be specified in the loader dialog’s Loading Segment and Loading Offset fields, as mentioned earlier. For all other processor types, IDA displays the memory layout dialog shown in Figure 4-4. As a convenience, you may create a RAM section, a ROM section, or both and designate the address range of each. The Input File options are used to specify which portion of the input file (the default is the entire file) should be loaded and to which address the file content should be mapped.
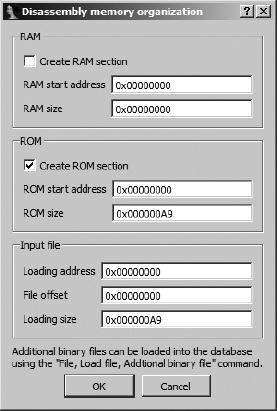
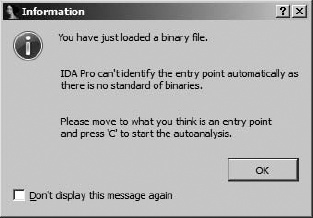
Figure 4-5 shows the last step of a binary load—a gentle reminder that you need to do some work. The message highlights the fact that IDA has no header information available to help it distinguish code bytes from data bytes in the binary file. At this point, you are reminded to designate one of the addresses in the file as an entry point by telling IDA to turn the byte(s) at that address into code (C is the hotkey used to force IDA to treat a byte as code). For binary files, IDA will not perform any initial disassembly until you take the time to identify at least one byte as code.
[29] Older versions of IDA used HKEY_CURRENT_USER\Software\Datarescue\IDA.
[30] On non-Windows systems, it is not uncommon for executable files to have no file extension at all.
[31] IDA loaders will be discussed further in Chapter 18.