Table of Contents for
The IDA Pro Book, 2nd Edition
 The IDA Pro Book, 2nd Edition
Published by
No Starch Press, 2011
The IDA Pro Book, 2nd Edition
Published by
No Starch Press, 2011
- Cover
- The IDA Pro Book
- PRAISE FOR THE FIRST EDITION OF THE IDA PRO BOOK
- Acknowledgments
- Introduction
- I. Introduction to IDA
- 1. Introduction to Disassembly
- The What of Disassembly
- The Why of Disassembly
- The How of Disassembly
- Summary
- 2. Reversing and Disassembly Tools
- Summary Tools
- Deep Inspection Tools
- Summary
- 3. IDA Pro Background
- Obtaining IDA Pro
- IDA Support Resources
- Your IDA Installation
- Thoughts on IDA’s User Interface
- Summary
- II. Basic IDA Usage
- 4. Getting Started with IDA
- IDA Database Files
- Introduction to the IDA Desktop
- Desktop Behavior During Initial Analysis
- IDA Desktop Tips and Tricks
- Reporting Bugs
- Summary
- 5. IDA Data Displays
- Secondary IDA Displays
- Tertiary IDA Displays
- Summary
- 6. Disassembly Navigation
- Stack Frames
- Searching the Database
- Summary
- 7. Disassembly Manipulation
- Commenting in IDA
- Basic Code Transformations
- Basic Data Transformations
- Summary
- 8. Datatypes and Data Structures
- Creating IDA Structures
- Using Structure Templates
- Importing New Structures
- Using Standard Structures
- IDA TIL Files
- C++ Reversing Primer
- Summary
- 9. Cross-References and Graphing
- IDA Graphing
- Summary
- 10. The Many Faces of IDA
- Using IDA’s Batch Mode
- Summary
- III. Advanced IDA Usage
- 11. Customizing IDA
- Additional IDA Configuration Options
- Summary
- 12. Library Recognition Using FLIRT Signatures
- Applying FLIRT Signatures
- Creating FLIRT Signature Files
- Summary
- 13. Extending IDA’s Knowledge
- Augmenting Predefined Comments with loadint
- Summary
- 14. Patching Binaries and Other IDA Limitations
- IDA Output Files and Patch Generation
- Summary
- IV. Extending IDA’s Capabilities
- 15. IDA Scripting
- The IDC Language
- Associating IDC Scripts with Hotkeys
- Useful IDC Functions
- IDC Scripting Examples
- IDAPython
- IDAPython Scripting Examples
- Summary
- 16. The IDA Software Development Kit
- The IDA Application Programming Interface
- Summary
- 17. The IDA Plug-in Architecture
- Building Your Plug-ins
- Installing Plug-ins
- Configuring Plug-ins
- Extending IDC
- Plug-in User Interface Options
- Scripted Plug-ins
- Summary
- 18. Binary Files and IDA Loader Modules
- Manually Loading a Windows PE File
- IDA Loader Modules
- Writing an IDA Loader Using the SDK
- Alternative Loader Strategies
- Writing a Scripted Loader
- Summary
- 19. IDA Processor Modules
- The Python Interpreter
- Writing a Processor Module Using the SDK
- Building Processor Modules
- Customizing Existing Processors
- Processor Module Architecture
- Scripting a Processor Module
- Summary
- V. Real-World Applications
- 20. Compiler Personalities
- RTTI Implementations
- Locating main
- Debug vs. Release Binaries
- Alternative Calling Conventions
- Summary
- 21. Obfuscated Code Analysis
- Anti–Dynamic Analysis Techniques
- Static De-obfuscation of Binaries Using IDA
- Virtual Machine-Based Obfuscation
- Summary
- 22. Vulnerability Analysis
- After-the-Fact Vulnerability Discovery with IDA
- IDA and the Exploit-Development Process
- Analyzing Shellcode
- Summary
- 23. Real-World IDA Plug-ins
- IDAPython
- collabREate
- ida-x86emu
- Class Informer
- MyNav
- IdaPdf
- Summary
- VI. The IDA Debugger
- 24. The IDA Debugger
- Basic Debugger Displays
- Process Control
- Automating Debugger Tasks
- Summary
- 25. Disassembler/Debugger Integration
- IDA Databases and the IDA Debugger
- Debugging Obfuscated Code
- IdaStealth
- Dealing with Exceptions
- Summary
- 26. Additional Debugger Features
- Debugging with Bochs
- Appcall
- Summary
- A. Using IDA Freeware 5.0
- Using IDA Freeware
- B. IDC/SDK Cross-Reference
- Index
- About the Author
On Windows, plug-ins are valid DLL files (that happen to use a .plw or .p64 extension), while on Linux and Mac, a plug-in is a valid shared object file (that uses a .plx/.plx64 or .pmc/.pmc64 extension, respectively). Building plug-ins can be a tricky matter, because you must get all of the build settings correct or the build process is almost certain to fail. The SDK contains a number of sample plug-ins, each containing its own makefile. The makefiles were all created with Borland’s build tools for Windows in mind. This poses some challenges when you wish to build with a different tool chain or on a different platform. The install_xxx.txt files included with the SDK discuss the use of <SDKDIR>/bin/idamake.pl to build plug-ins using GNU make and gcc. The purpose of idamake.pl is to generate a GNU make-style makefile from the Borland-style makefiles and then invoke GNU make to build the plug-in.
Our preference for building plug-ins is to use simplified makefiles with the GNU tools (via MinGW on Windows). The simplified makefile in Example 17-1 can easily be adapted to your own plug-in projects:
Example 17-1. A sample makefile for IDA plug-ins
#Set this variable to point to your SDK directory
IDA_SDK=../../

PLATFORM=$(shell uname | cut -f 1 -d _)

ifneq "$(PLATFORM)" "MINGW32"
IDA=$(HOME)/ida
endif

#Set this variable to the desired name of your compiled plugin
PROC=idabook_plugin

ifeq "$(PLATFORM)" "MINGW32"
PLATFORM_CFLAGS=-D__NT__ -D__IDP__ -DWIN32 -Os -fno-rtti
PLATFORM_LDFLAGS=-shared -s
LIBDIR=$(shell find ../../ -type d | grep -E "(lib|lib/)gcc.w32")
ifeq ($(strip $(LIBDIR)),)
LIBDIR=../../lib/x86_win_gcc_32
endif
IDALIB=$(LIBDIR)/ida.a
PLUGIN_EXT=.plw

else ifeq "$(PLATFORM)" "Linux"
PLATFORM_CFLAGS=-D__LINUX__
PLATFORM_LDFLAGS=-shared -s
IDALIB=-lida
IDADIR=-L$(IDA)
PLUGIN_EXT=.plx

else ifeq "$(PLATFORM)" "Darwin"
PLATFORM_CFLAGS=-D__MAC__
PLATFORM_LDFLAGS=-dynamiclib
IDALIB=-lida
IDADIR=-L$(IDA)/idaq.app/Contents/MacOs
PLUGIN_EXT=.pmc
endif

#Platform specific compiler flags
CFLAGS=-Wextra -Os $(PLATFORM_CFLAGS)

#Platform specific ld flags
LDFLAGS=$(PLATFORM_LDFLAGS)

#specify any additional libraries that you may need
EXTRALIBS=

# Destination directory for compiled plugins
OUTDIR=$(IDA_SDK)bin/plugins/

#list out the object files in your project here
OBJS=idabook_plugin.o

BINARY=$(OUTDIR)$(PROC)$(PLUGIN_EXT)

all: $(OUTDIR) $(BINARY)

clean:
    -@rm *.o
    -@rm $(BINARY)

$(OUTDIR):
    -@mkdir -p $(OUTDIR)

CC=g++
INC=-I$(IDA_SDK)include/

%.o: %.cpp
    $(CC) -c $(CFLAGS) $(INC) $< -o $@

LD=g++

$(BINARY): $(OBJS)
    $(LD) $(LDFLAGS) -o $@ $(OBJS) $(IDADIR) $(IDALIB) $(EXTRALIBS)

#change idabook_plugin below to the name of your plugin, make sure to add any
#additional files that your plugin is dependent on
idabook_plugin.o: idabook_plugin.cpp
The preceding makefile uses the uname command to determine the platform on which it is running and configures some build flags accordingly. Additional source files can be added to the plug-in project by appending the names of the associated object files to the $OBJS variable and to the end of the makefile. If your plug-in requires additional libraries, you should specify the library names in $EXTRALIBS. The $IDA_SDK variable is used to specify the location of the <SDKDIR>, and $IDA_SDK may be specified as an absolute or a relative path. In this example, $IDA_SDK is specified as a relative path, indicating that <SDKDIR> lies two directories above the plug-in’s directory. This is in keeping with locating plug-in projects within <SDKDIR>/plugins (<SDKDIR>/plugins/idabook_plugin in this case). If you choose to locate your plug-in’s project directory in some other location relative to <SDKDIR>, you must ensure that $IDA_SDK properly refers to <SDKDIR>. Finally, the preceding example is configured to store successfully compiled plug-ins in <SDKDIR>/bin/plugins. It is important to understand that successfully compiling a plug-in does not necessarily install the plug-in. We cover plug-in installation in the next section.
The use of Microsoft’s Visual C++ Express to build IDA modules is discussed in install_visual.txt. To create a project from scratch using Visual Studio 2008, perform the following steps:
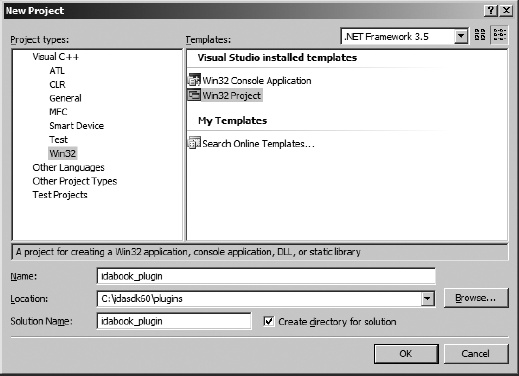
Select File ▸ New ▸ Project to open the New Project dialog shown in Figure 17-1.
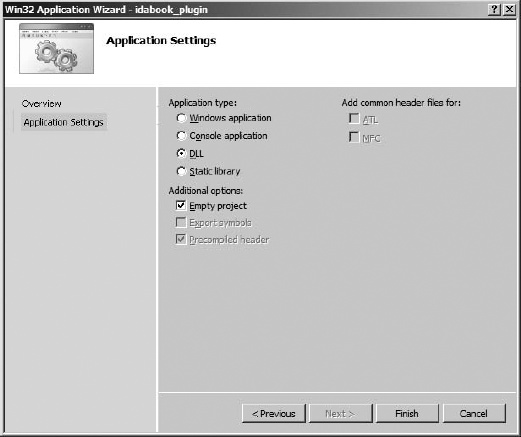
Specify the project type as Visual C++/Win32, choose the Win32 Project template, and provide the name and location for your project. We typically create new plug-in projects within the <SDKDIR>/plugins directory in order to keep all of our plug-ins grouped together. When you click OK, the Win32 Application Wizard appears. Click Next to get to the Application Settings step and then set the Application type to DLL and the Additional options to Empty project before clicking Finish, as shown in Figure 17-2.
Once the basic framework of the project has been created, you must configure a few additional settings. Project properties in Visual Studio 2008 are accessed via Project ▸ Properties, which brings up the dialog shown in Figure 17-3. C/C++ configuration options only become available once a source file has been added to the project, either by adding and editing a new file or adding an existing file.
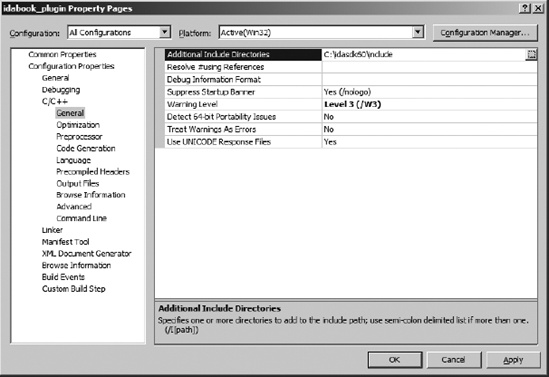
The settings that require modification are spread throughout the Configuration Properties section at the left side of the dialog. Figure 17-3 is representative of the manner in which properties are set throughout a project. For each property category selected in the left-hand portion of the dialog, a list of configurable properties is displayed in the right-hand portion of the dialog. Note that property categories are organized in a hierarchical fashion. Properties are edited using file-selection controls, single-line edit controls, multiline edit controls, or drop-down-list-selection controls. Table 17-1 details the properties that must be edited to create a plug-in project.
Note that Visual Studio allows you to specify separate configuration options for Debug and Release versions of the project (see top left of Figure 17-3). If you intend to build separate Debug and Release versions of your plug-in, make certain that you have modified the properties in both configurations. Alternatively, you may save some time by selecting All Configurations from the Configurations drop-down list (at the top left of the Properties dialog), in which case your property changes will be applied to all build configurations.
Table 17-1. Visual Studio Plug-in Configuration Values (32-bit)
Specific Property | Property Value | |
|---|---|---|
General | Output Directory | As desired, often <SDKDIR>\bin\plugins |
C/C++▸General | Additional Include Directories | Add <SDKDIR>\include |
C/C++▸Preprocessor | Preprocessor Definitions | Append “;__NT__;__IDP__” |
C/C++▸Code Generation | Runtime Library | Multithreaded (Release)[a] Multithreaded Debug (Debug) (Not the DLL versions)[b] |
Linker▸General | Output File | Change extension to .plw |
Linker▸General | Additional Library Directories | Add <SDKDIR>\lib\x86_win_vc_32[c] |
Linker▸Input | Additional Dependencies | Add ida.lib (from \lib\86_win_vc_32) |
Linker▸Command Line | Additional options | Add /EXPORT:PLUGIN |
[a] Multithreaded in this case refers to the C++ runtime library itself. IDA just happens to be a single-threaded application that makes use of this library. A single-threaded version of the C++ runtime library does not exist. [b] Choosing the DLL versions of the C++ library requires that MSVCR80.DLL be present on the system on which the plug-in will ultimately run. In order to remove this restriction, choose the non-DLL version of the C++ runtime libraries, which produces a statically linked plug-in that is more portable. [c] Prior to SDK version 6.1, add library directory <SDKDIR>\lib\vc.w32. | ||