Table of Contents for
The IDA Pro Book, 2nd Edition
 The IDA Pro Book, 2nd Edition
Published by
No Starch Press, 2011
The IDA Pro Book, 2nd Edition
Published by
No Starch Press, 2011
- Cover
- The IDA Pro Book
- PRAISE FOR THE FIRST EDITION OF THE IDA PRO BOOK
- Acknowledgments
- Introduction
- I. Introduction to IDA
- 1. Introduction to Disassembly
- The What of Disassembly
- The Why of Disassembly
- The How of Disassembly
- Summary
- 2. Reversing and Disassembly Tools
- Summary Tools
- Deep Inspection Tools
- Summary
- 3. IDA Pro Background
- Obtaining IDA Pro
- IDA Support Resources
- Your IDA Installation
- Thoughts on IDA’s User Interface
- Summary
- II. Basic IDA Usage
- 4. Getting Started with IDA
- IDA Database Files
- Introduction to the IDA Desktop
- Desktop Behavior During Initial Analysis
- IDA Desktop Tips and Tricks
- Reporting Bugs
- Summary
- 5. IDA Data Displays
- Secondary IDA Displays
- Tertiary IDA Displays
- Summary
- 6. Disassembly Navigation
- Stack Frames
- Searching the Database
- Summary
- 7. Disassembly Manipulation
- Commenting in IDA
- Basic Code Transformations
- Basic Data Transformations
- Summary
- 8. Datatypes and Data Structures
- Creating IDA Structures
- Using Structure Templates
- Importing New Structures
- Using Standard Structures
- IDA TIL Files
- C++ Reversing Primer
- Summary
- 9. Cross-References and Graphing
- IDA Graphing
- Summary
- 10. The Many Faces of IDA
- Using IDA’s Batch Mode
- Summary
- III. Advanced IDA Usage
- 11. Customizing IDA
- Additional IDA Configuration Options
- Summary
- 12. Library Recognition Using FLIRT Signatures
- Applying FLIRT Signatures
- Creating FLIRT Signature Files
- Summary
- 13. Extending IDA’s Knowledge
- Augmenting Predefined Comments with loadint
- Summary
- 14. Patching Binaries and Other IDA Limitations
- IDA Output Files and Patch Generation
- Summary
- IV. Extending IDA’s Capabilities
- 15. IDA Scripting
- The IDC Language
- Associating IDC Scripts with Hotkeys
- Useful IDC Functions
- IDC Scripting Examples
- IDAPython
- IDAPython Scripting Examples
- Summary
- 16. The IDA Software Development Kit
- The IDA Application Programming Interface
- Summary
- 17. The IDA Plug-in Architecture
- Building Your Plug-ins
- Installing Plug-ins
- Configuring Plug-ins
- Extending IDC
- Plug-in User Interface Options
- Scripted Plug-ins
- Summary
- 18. Binary Files and IDA Loader Modules
- Manually Loading a Windows PE File
- IDA Loader Modules
- Writing an IDA Loader Using the SDK
- Alternative Loader Strategies
- Writing a Scripted Loader
- Summary
- 19. IDA Processor Modules
- The Python Interpreter
- Writing a Processor Module Using the SDK
- Building Processor Modules
- Customizing Existing Processors
- Processor Module Architecture
- Scripting a Processor Module
- Summary
- V. Real-World Applications
- 20. Compiler Personalities
- RTTI Implementations
- Locating main
- Debug vs. Release Binaries
- Alternative Calling Conventions
- Summary
- 21. Obfuscated Code Analysis
- Anti–Dynamic Analysis Techniques
- Static De-obfuscation of Binaries Using IDA
- Virtual Machine-Based Obfuscation
- Summary
- 22. Vulnerability Analysis
- After-the-Fact Vulnerability Discovery with IDA
- IDA and the Exploit-Development Process
- Analyzing Shellcode
- Summary
- 23. Real-World IDA Plug-ins
- IDAPython
- collabREate
- ida-x86emu
- Class Informer
- MyNav
- IdaPdf
- Summary
- VI. The IDA Debugger
- 24. The IDA Debugger
- Basic Debugger Displays
- Process Control
- Automating Debugger Tasks
- Summary
- 25. Disassembler/Debugger Integration
- IDA Databases and the IDA Debugger
- Debugging Obfuscated Code
- IdaStealth
- Dealing with Exceptions
- Summary
- 26. Additional Debugger Features
- Debugging with Bochs
- Appcall
- Summary
- A. Using IDA Freeware 5.0
- Using IDA Freeware
- B. IDC/SDK Cross-Reference
- Index
- About the Author
This book makes no pretense at being a user interface development guide. However, there are many occasions in which a plug-in will need to interact with an IDA user to request or display information. In addition to the API’s askXXX functions mentioned in Chapter 16, a few more complex functions are available for user interaction via the IDA API. For more adventurous plug-in authors, it is worth remembering that plug-ins developed for GUI versions of IDA also have full access to the user interface functions that are available in various GUI libraries (Qt or Windows Native). Through the use of these functions it is possible to use virtually any type of graphical interface element within your plug-ins.
Beyond the SDK’s askXXX interface functions, things get a little more challenging when using the SDK to build user interface elements. One of the reasons for this is that the SDK attempts to provide a generic programming interface to accomplish the fairly complex task of displaying a GUI element to a user and accepting the user’s input.
The first two functions that we will discuss are called choose and choose2. Each of these functions, along with various constants used to control its behavior, is declared in kernwin.hpp. The purpose of each function is to display a list of data elements to the user and ask the user to select one or more items from the list. The choose functions are capable of displaying virtually any type of data by virtue of the fact that they require you to specify formatting functions that are called to generate each line of text displayed in the chooser window. The two functions differ in that choose displays a single-column list, while choose2 is capable of displaying a multicolumn list. In the following examples we demonstrate the simplest forms of these functions, which rely on many default parameters. If you want to explore the full range of capabilities of choose and choose2, please consult kernwin.hpp.
For displaying a single column of information to a user, the simplest form of the choose function boils down to the following, once default parameters are omitted:
ulong choose(void *obj,
int width,
ulong (idaapi *sizer)(void *obj),
char *(idaapi *getline)(void *obj, ulong n, char *buf),
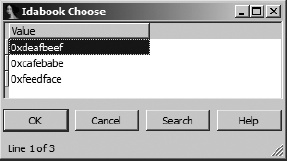
const char *title);Here, the obj parameter is a pointer to the block of data to be displayed, and width is the desired column width to be used in the chooser window. The sizer parameter is a pointer to a function that is capable of parsing the data pointed to by obj and returning the number of lines required to display that data. The getline parameter is a pointer to a function that can generate the character string representation of a single item selected from obj. Note that the obj pointer can point to any type of data as long as the sizer function can parse the data to determine the number of lines required to display the data and as long as the getline function can locate a specific data item using an integer index and generate a character string representation of that data item. The title parameter specifies the title string used in the generated chooser dialog. The choose function returns the index number (1..n) of the user-selected item or zero if the dialog was canceled by the user. The code in Example 17-2, while not terribly exciting, is extracted from a plug-in that demonstrates the use of the choose function.
Example 17-2. Example use of the choose function
#include <kernwin.hpp>

//The sample data to be displayed
int data[] = {0xdeafbeef, 0xcafebabe, 0xfeedface, 0};

//this example expects obj to point to a zero
//terminated array of non-zero integers.
ulong idaapi idabook_sizer(void *obj) {
   int *p = (int*)obj;
   int count = 0;
   while (*p++) count++;
   return count;
}

/*
 * obj In this example obj is expected to point to an array of integers
 * n indicates which line (1..n) of the display is being formatted.
 *   if n is zero, the header line is being requested.
 * buf is a pointer to the output buffer for the formatted data. IDA will
 *     call this with a buffer of size MAXSTR (1024).
 */
char * idaapi idabook_getline(void *obj, ulong n, char *buf) {
   int *p = (int*)obj;
   if (n == 0) { //This is the header case
      qstrncpy(buf, "Value", strlen("Value") + 1);
   }
   else { //This is the data case
      qsnprintf(buf, 32, "0x%08.8x", p[n - 1]);
   }
   return buf;
}

void idaapi run(int arg) {
   int choice = choose(data, 16, idabook_sizer, idabook_getline,
                      "Idabook Choose");
   msg("The user's choice was %d\n", choice);
}
Activating the plug-in from Example 17-2 results in the chooser dialog shown in Figure 17-4.
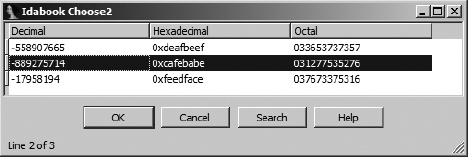
The choose2 function offers a multicolumn variation of the chooser dialog. Again, we look at the simplest version of the function, accepting all possible default arguments, which boils down to the following:
ulong choose2(void *obj,
              int ncol,
              const int *widths,
              ulong (idaapi *sizer)(void *obj),
              void (idaapi *getline)(void *obj, ulong n, char* const *cells),
              const char *title);
We can observe a few differences between choose2 and the choose function we saw earlier. First, the ncol parameter specifies the number of columns to be displayed, while the widths parameter is an array of integers that specify the width of each column. The format of the getline function changes somewhat in choose2. Since the choose2 dialog can contain several columns, the get-line function must provide data for each column within a single line. The example code in Example 17-3 shows the use of choose2 in a demonstration plug-in.
Example 17-3. Example use of the choose2 function
#include <kernwin.hpp>

//The sample data to be displayed
int data[] = {0xdeafbeef, 0xcafebabe, 0xfeedface, 0};
//The width of each column
int widths[] = {16, 16, 16};
//The headers for each column
char *headers[] = {"Decimal", "Hexadecimal", "Octal"};
//The format strings for each column
char *formats[] = {"%d", "0x%x", "0%o"};

//this function expects obj to point to a zero terminated array
//of non-zero integers.
ulong idaapi idabook_sizer(void *obj) {
   int *p = (int*)obj;
   int count = 0;
   while (*p++) count++;
   return count;
}

/*
 * obj In this function obj is expected to point to an array of integers
 * n indicates which line (1..n) of the display is being formatted.
 *   if n is zero, the header line is being requested.
 * cells is a pointer to an array of character pointers. This array
 *       contains one pointer for each column in the chooser.  The output
 *       for each column should not exceed MAXSTR (1024) characters.*/
void idaapi idabook_getline_2(void *obj, ulong n, char* const *cells) {
   int *p = (int*)obj;
   if (n == 0) {
      for (int i = 0; i < 3; i++) {
         qstrncpy(cells[i], headers[i], widths[i]);
      }
   }
   else {
      for (int i = 0; i < 3; i++) {
         qsnprintf(cells[i], widths[i], formats[i], p[n - 1]);
      }
   }
}

void run(int arg) {
   int choice = choose2(data, 3, widths, idabook_sizer, idabook_getline_2,
                        "Idabook Choose2");
   msg("The choice was %d\n", choice);
}
The multicolumn chooser dialog generated using the code from Example 17-3 is shown in Figure 17-5.
Far more complex uses of both the choose and the choose2 functions are possible. Each function is capable of creating either modal [118] or nonmodal dialogs, and each function can generate dialogs that allow for selection of multiple items. Also, each function accepts several additional parameters that allow you to be notified when various events take place within the dialog. When these functions are used to create nonmodal dialogs, the result is a new tabbed window displayed alongside the tabs of other IDA display windows, such as the Imports window. In fact, IDA’s Imports window is implemented using the choose2 interface. For more information on the capabilities of choose and choose2, please refer to kernwin.hpp.
For creating more complex user interface elements, the SDK provides the AskUsingForm_c function. The prototype for this function is shown here:
int AskUsingForm_c(const char *form,...);
The function seems simple enough, yet it is among the more complex user interface functions available in the SDK. This complexity is due to the nature of the form argument, which is used to specify the layout of various user interface elements within the custom dialog. AskUsingForm_c is similar to printf in that the form argument is essentially a format string that describes the layout of various input elements. Where printf format strings utilize output format specifiers that are replaced with formatted data, AskUsingForm_c format strings are composed of both output specifiers and form field specifiers that are replaced with instances of input elements when the form is displayed. AskUsingForm_c recognizes a completely different set of output field specifiers than printf. These specifiers are detailed in kernwin.hpp along with complete documentation on the use of AskUsingForm_c. The basic format of a form field specifier is shown here:
<#hint text#label:type:width:swidth:@hlp[]>
The individual components of a form field specifier are described in the following list:
#hint text# This element is optional. If present, the hint text, excluding the# characters, is displayed as a tool tip when the mouse hovers over the associated input field. |
label Static text displayed as a label to the left of the associated input field. In the case of button fields, this is the button text. |
type A single character indicates the type of form field being specified. Form field types are described following this list. |
width The maximum number of input characters accepted by the associated input field. In the case of button fields, this field specifies an integer button identification code used to distinguish one button from another. |
swidth The display width of the input field. |
@hlp[] This field is described in kernwin.hpp as “the number of help screen from the IDA.HLP file.” Since the content of this file is dictated by Hex-Rays, it seems unlikely that this field will be of use in the majority of cases. Substitute a colon for this field in order to ignore it. |
The characters used for the type field specify what type of input field will be generated when the dialog is realized at runtime. Each type of form field requires an associated parameter in the variable arguments portion of the AskUsingForm_c parameter list. Form field type specifiers and their associated parameter type are shown here (as taken from kernwin.hpp):
Input field types                       va_list parameter
  -----------------                       -----------------

  A - ascii string                        char* at least MAXSTR size
  S - segment                             sel_t*
  N - hex number, C notation              uval_t*
  n - signed hex number, C notation       sval_t*
  L - default base (usually hex) number,  ulonglong*
      C notation
  l - default base (usually hex) number,  longlong*
      signed C notation
  M - hex number, no "0x" prefix          uval_t*
  D - decimal number                      sval_t*
  O - octal number, C notation            sval_t*
  Y - binary number, "0b" prefix          sval_t*
  H - char value, C notation              sval_t*
  $ - address                             ea_t*
  I - ident                               char* at least MAXNAMELEN size
  B - button                              formcb_t button callback function
  K - color button                        bgcolor_t*
  C - checkbox                            ushort* bit mask of checked boxes
  R - radiobutton                         ushort* number of selected radiobutton
All numeric fields interpret the user-supplied input as an IDC expression that is parsed and evaluated when the user clicks the dialog’s OK button. All fields require a pointer argument that is used for both input and output. When the form is first generated, initial values for all form fields are taken by dereferencing the associated pointers. Upon return, the user-supplied form field values are written into the associated memory locations. The pointer argument associated with a button (B) field is the address of a function that will be called if the associated button is pressed. The formcb_t function is defined as follows.
// callback for buttons
typedef void (idaapi *formcb_t)(TView *fields[],int code);
The code argument to the button callback represents the code (width) value associated with the button that was clicked. By using a switch statement to test this code, you can use a single function to process many different buttons.
The syntax for specifying radio button and checkbox controls differs slightly from the format of other types of form fields. These fields utilize the following format:
<#item hint#label:type>
Radio buttons and checkboxes may be grouped by listing their specifiers in order and denoting the end of the list using the following special format (note the extra > at the end).
<#item hint#label:type>>
A radio button (or checkbox) group will be boxed to highlight the group. You can give the box a title by utilizing a special format when specifying the first element in the group, as shown here:
<#item hint#title#box hint#label:type>
If you want to have a box title but do not want to use any hints, the hints may be omitted, leaving the following format specifier:
<##title##label:type>
At this point let’s look at an example of a dialog constructed using AskUsingForm_c. Figure 17-6 shows a dialog that we will refer to throughout this discussion.
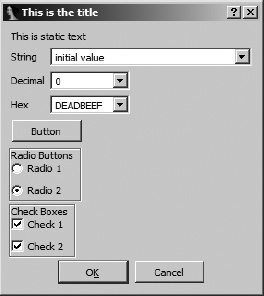
Format strings used to create AskUsingForm_c dialogs are made up of individual lines that specify each aspect of the desired dialog. In addition to form field specifiers, the format string may contain static text that is displayed, verbatim, in the resulting dialog. Finally, the format string may contain a dialog title (which must be followed by two carriage returns) and one or more behavior directives (such as STARTITEM, which specifies the index of the form field that is initially active when the dialog is first displayed). The format string used to create the dialog in Figure 17-6 is shown here:
char *dialog =
 "STARTITEM 0\n"          //The first item gets the input focus
 "This is the title\n\n"  //followed by 2 new lines
 "This is static text\n"
 "<String:A:32:32::>\n"   //An ASCII input field, need char[MAXSTR]
 "<Decimal:D:10:10::>\n"  //A decimal input field, sval_t*
 "<#No leading 0x#Hex:M:8:10::>\n"  //A Hex input field with hint, uval_t*
 "<Button:B::::>\n"                 //A button field with no code, formcb_t
 "<##Radio Buttons##Radio 1:R>\n"   //A radio button with box title
 "<Radio 2:R>>\n"                   //Last radio button in group
                                    //ushort* number of selected radio
 "<##Check Boxes##Check 1:C>\n"     //A checkbox field with a box title
 "<Check 2:C>>\n";                  //Last checkbox in group
                                    //ushort* bitmask of checks
By formatting the dialog specification as we have, one element per line, we are attempting to make it easier to map each field specifier to its corresponding field in Figure 17-6. You may notice that in Figure 17-6, all of the text and numeric input fields appear as drop-down list controls. In an effort to save you time, IDA populates each list with recently entered values whose type matches the type of the associated input field. The following plug-in code may be used to display the example dialog and process any results:
void idaapi button_func(TView *fields[], int code) {
   msg("The button was pressed!\n");
}

void idaapi run(int arg) {
   char input[MAXSTR];
   sval_t dec = 0;
   uval_t hex = 0xdeadbeef;
   ushort radio = 1;      //select button 1 initially
   ushort checkmask = 3;  //select both checkboxes initially
   qstrncpy(input, "initial value", sizeof(input));
   if (AskUsingForm_c(dialog, input, &dec, &hex,
                      button_func, &radio, &checkmask) == 1) {
      msg("The input string was: %s\n", input);
      msg("Decimal: %d, Hex %x\n", dec, hex);
      msg("Radio button %d is selected\n", radio);
      for (int n = 0; checkmask; n++) {
         if (checkmask & 1) {
            msg("Checkbox %d is checked\n", n);
         }
         checkmask >>= 1;
      }
   }
}
Note that when processing radio button and checkbox results, the first button in each group is considered button zero.
The AskUsingForm_c function provides a considerable amount of power for designing user interface elements for your plug-ins. The example here touches on many of the capabilities of this function, but many more are detailed in kernwin.hpp. Please refer to this file for more information on the AskUsingForm_c function and its capabilities.
Many developers have wrestled with the problem of creating user interfaces for their plug-ins. Plug-ins targeting the Windows-only GUI version of IDA (idag.exe) have the entire Windows graphical API at their disposal. The author of the mIDA[119] plug-in from Tenable Security developed an alternate approach for creating the MDI[120] client windows used in the mIDA plug-in. A lengthy thread[121] on the challenges faced by the mIDA developers can be found in the IDA support forums. The thread also contains example code that demonstrates their solution to the problem.
The ida-x86emu[122] plug-in takes a slightly different approach in its user interface. This plug-in relies on the fact that a handle to IDA’s main window can be obtained using the following SDK code:
HWND mainWindow = (HWND)callui(ui_get_hwnd).vptr;
Using the main IDA window as a parent, ida-x86emu currently makes no attempt to integrate into the IDA workspace. All of the plug-in’s dialog interfaces are generated using a Windows resource editor, and all user interactions are handled using direct calls to Windows API functions. The use of a graphical dialog editor in conjunction with direct calls to native Windows API functions provides the most powerful user interface–generation capability at the expense of added complexity and the additional knowledge required to process Windows messages and work with lower-level interface functions.
The Qt user interface introduced in IDA 6.0 offers plug-in developers the chance to create plug-ins with complex user interfaces capable of being used on all IDA platforms. Hex-Rays’ Daniel Pistelli[123] discusses some of the requirements for using Qt in your plug-ins in a blog post on the Hex-Rays blog. See [124] In this section we will reiterate some of the important points that Daniel makes as well as point out some additional useful information.
If you wish to make use of any Qt functionality in your plug-ins, you must begin by properly configuring a Qt development environment. IDA 6.1 ships with its own versions of the Qt 4.7.2 libraries.[125] When Hex-Rays builds its Qt libraries, it wraps the libraries in a C++ namespace named QT. To configure your development environment, obtain the appropriate Qt sources from Nokia. The Windows version of idaq is built with Visual Studio 2008,[126] and the Linux and OS X versions use g++. The appropriate sources for Windows may be found here:
ftp://ftp.qt.nokia.com/qt/source/qt-win-opensource-4.7.2-vs2008.exeSources for Linux and OS X can be found here:
ftp://ftp.qt.nokia.com/qt/source/qt-everywhere-opensource-src-4.7.2.tar.gzSee Daniel’s blog post for specific commands to configure your sources. The key to proper configuration is the following command-line parameter:
-qtnamespace QT
This parameter causes the Qt sources to be wrapped in the QT name-space. In order to build any Qt-related plug-ins on Windows, you will need link libraries (.lib files) for each Qt library that you utilize in your plug-in. While IDA ships with a number of dynamic link libraries for Qt (see <IDADIR> for a complete list), the SDK ships with a very limited number of Qt link libraries for Windows (notably QtCore4 and QtGui), which may be found in <SDKDIR>/lib/x86_win_qt. If you need additional link libraries, you will need to link against the libraries that you build yourself from the Qt sources. On Linux and OS X, you can link directly with the Qt libraries that ship with IDA. On Linux, these can be found in <IDADIR>; on OS X these can be found in <IDADIR>/idaq.app/Contents/Frameworks. Note that linking against Qt libraries that don’t ship with IDA will make your plug-in somewhat less portable, unless you also distribute those libraries along with your plug-in.
When configuring your Qt plug-in projects, make sure that your qmake project file contains the following configuration directive:
QT_NAMESPACE = QT
IDA defines a number of functions for safer string handling within the SDK. These include functions such as qstrlen and qsnprintf, which have long been part of the SDK. With the move to a Qt-based GUI, this leads to problems because Qt also defines several functions named the same as those provided by IDA. The IDA functions reside in the global namespace, while the Qt functions reside in the QT namespace. The IDA versions of such functions can be called by explicitly referencing the global namespace as shown here:
unsigned int len = ::qstrlen(myString);
Should you need a parent widget for any widgets that you are creating in your plug-in, the following statement will obtain a pointer to idaq’s top-level application window:
QWidget *mainWindow = QApplication::activeWindow();
This invokes a static method within Qt’s QApplication class that returns the widget pointer for the sole QApplication object in any Qt application.
For more information on configuring your plug-ins to use Qt, refer to Daniel’s blog post. Additionally, the qwindow plug-in sample that ships with IDA’s SDK provides an example of a plug-in that makes use of Qt. Specifically it contains example code that creates an empty widget (using create_tform), uses callbacks to receive notification that the form is being made visible, obtains a QWidget pointer to the newly created form, and finally populates the form with a Qt button object. The collabREate and ida-x86emu plug-ins to be discussed in Chapter 23 also make use of Qt GUI elements to allow these plug-ins to be used on all IDA capable platforms.
[118] A modal dialog must be closed before the user is allowed to continue interacting with the dialog’s parent application. File open and save dialogs are common examples of modal dialogs. Modal dialogs are typically used when an application requires information from a user before the application can continue execution. On the other hand, nonmodal or modeless dialogs allow the user to continue interacting with the parent application while the dialog remains open.
[120] The Windows Multiple Document Interface (MDI) allows multiple child (client) windows to be contained within a single container window.
[123] Daniel led the Hex-Rays effort to migrate IDA’s GUI to Qt.
[125] IDA 6.0 utilized Qt 4.6.3.
[126] As a consequence, if you are building a Qt-related plug-in on Windows, you must use Visual Studio to build your plug-in.