A common example of a GPGPU application is one which calculates the Fast Fourier Transform (FFT). This algorithm is commonly used for audio processing and similar, allowing you to transform, for example, from the time domain to the frequency domain for analysis purposes.
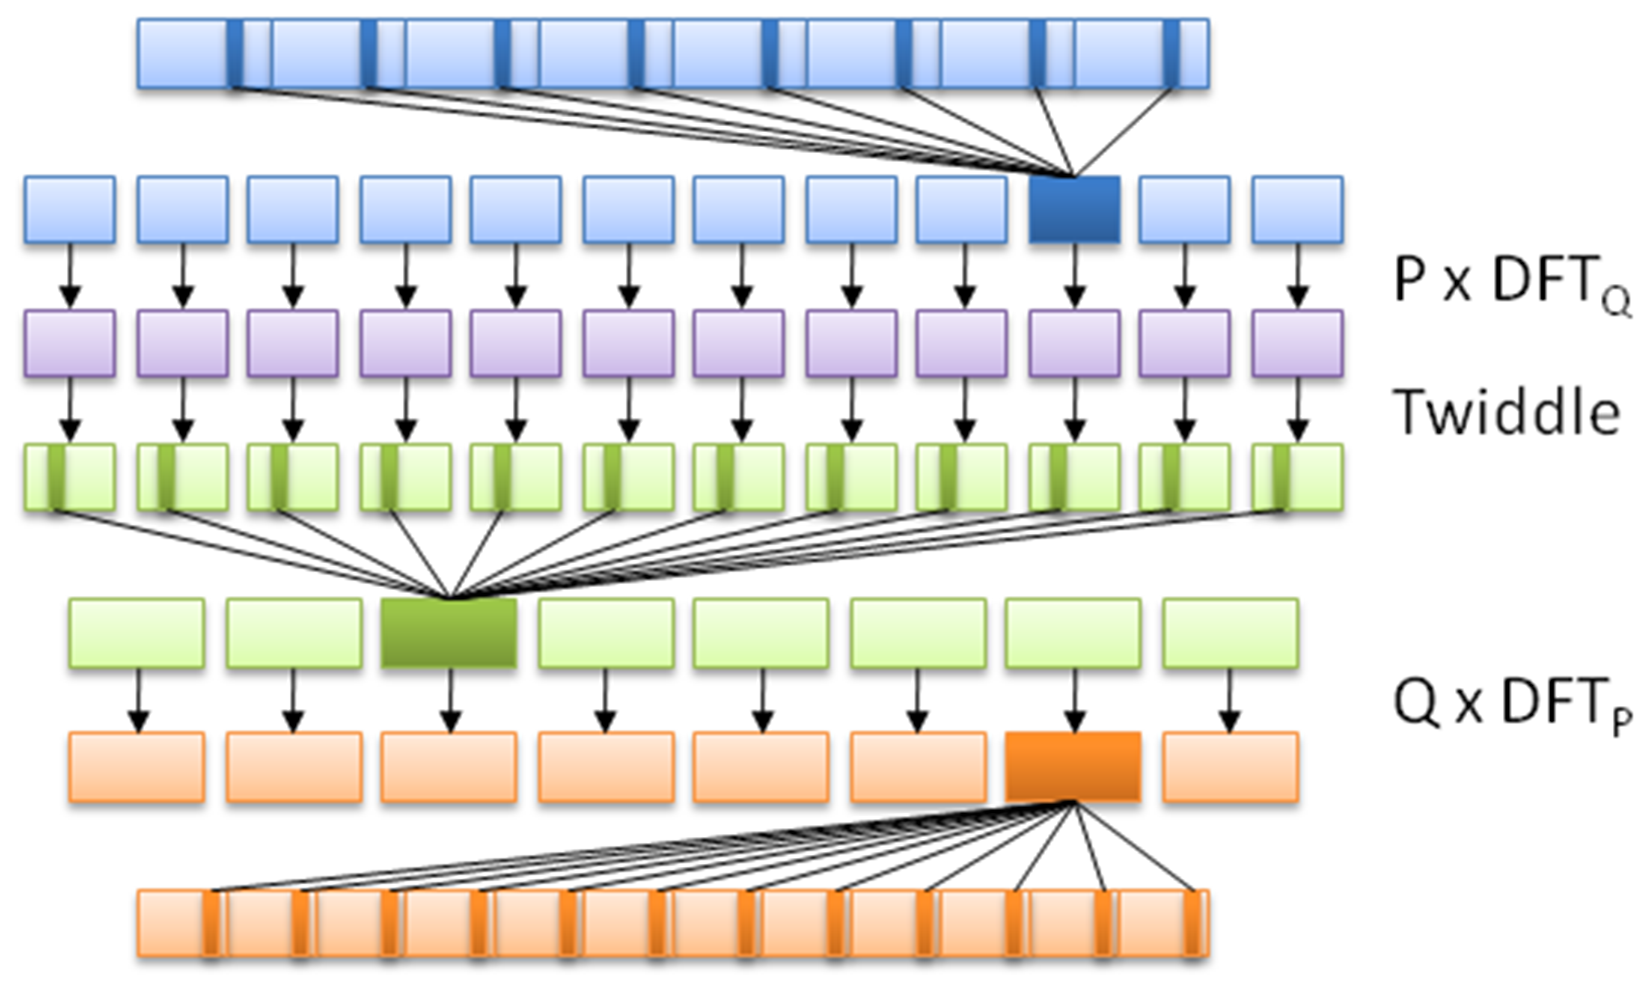
What it does is apply a divide and conquer approach to a dataset, in order to calculate the DFT (Discrete Fourier Transform). It does this by splitting the input sequence into a fixed, small number of smaller subsequences, computing their DFT, and assembling these outputs in order to compose the final sequence.
This is fairly advanced mathematics, but suffice it to say that what makes it so ideal for GPGPU is that it's a highly-parallel algorithm, employing the subdivision of data in order to speed up the calculating of the DFT, as visualized in this graphic:
Each OpenCL application consists of at least two parts: the C++ code that sets up and configures the OpenCL instance, and the actual OpenCL code, also known as a kernel, such as this one based on the FFT demonstration example from Wikipedia:
// This kernel computes FFT of length 1024.
// The 1024 length FFT is decomposed into calls to a radix 16 function,
// another radix 16 function and then a radix 4 function
 __kernel void fft1D_1024 (__global float2 *in,
                     __global float2 *out,
                     __local float *sMemx,
                     __local float *sMemy) {
          int tid = get_local_id(0);
          int blockIdx = get_group_id(0) * 1024 + tid;
          float2 data[16];

          // starting index of data to/from global memory
          in = in + blockIdx;  out = out + blockIdx;

          globalLoads(data, in, 64); // coalesced global reads
          fftRadix16Pass(data);      // in-place radix-16 pass
          twiddleFactorMul(data, tid, 1024, 0);

          // local shuffle using local memory
          localShuffle(data, sMemx, sMemy, tid, (((tid & 15) * 65) + (tid >> 4)));
          fftRadix16Pass(data);               // in-place radix-16 pass
          twiddleFactorMul(data, tid, 64, 4); // twiddle factor multiplication

          localShuffle(data, sMemx, sMemy, tid, (((tid >> 4) * 64) + (tid & 15)));

          // four radix-4 function calls
          fftRadix4Pass(data);      // radix-4 function number 1
          fftRadix4Pass(data + 4);  // radix-4 function number 2
          fftRadix4Pass(data + 8);  // radix-4 function number 3
          fftRadix4Pass(data + 12); // radix-4 function number 4

          // coalesced global writes
    globalStores(data, out, 64);
 }
This OpenCL kernel shows that, like the GLSL shader language, OpenCL's kernel language is essentially C with a number of extensions. Although one could use the OpenCL C++ kernel language, this one is only available since OpenCL 2.1 (2015), and as a result, support and examples for it are less common than the C kernel language.
Next is the C++ application, using which, we run the preceding OpenCL kernel:
#include <cstdio>
 #include <ctime>
 #include "CLopencl.h"

 #define NUM_ENTRIES 1024

 int main() { // (int argc, const char * argv[]) {
    const char* KernelSource = "fft1D_1024_kernel_src.cl";
As we can see here, there's only one header we have to include in order to gain access to the OpenCL functions. We also specify the name of the file that contains the source for our OpenCL kernel. Since each OpenCL device is likely a different architecture, the kernel is compiled for the target device when we load it:
          const cl_uint num = 1;
    clGetDeviceIDs(0, CL_DEVICE_TYPE_GPU, 0, 0, (cl_uint*) num);

   cl_device_id devices[1];
    clGetDeviceIDs(0, CL_DEVICE_TYPE_GPU, num, devices, 0);
Next, we have to obtain a list of OpenCL devices we can use, filtering it by GPUs:
    cl_context context = clCreateContextFromType(0, CL_DEVICE_TYPE_GPU,
                                                   0, 0, 0);
We then create an OpenCL context using the GPU devices we found. The context manages the resources on a range of devices:
    clGetDeviceIDs(0, CL_DEVICE_TYPE_DEFAULT, 1, devices, 0);
    cl_command_queue queue = clCreateCommandQueue(context, devices[0], 0, 0);
Finally, we will create the command queue that will contain the commands to be executed on the OpenCL devices:
    cl_mem memobjs[] = { clCreateBuffer(context, CL_MEM_READ_ONLY | CL_MEM_COPY_HOST_PTR, sizeof(float) * 2 * NUM_ENTRIES, 0, 0),
   clCreateBuffer(context, CL_MEM_READ_WRITE, sizeof(float) * 2 * NUM_ENTRIES, 0, 0) };
In order to communicate with devices, we need to allocate buffer objects that will contain the data we will copy to their memory. Here, we will allocate two buffers, one to read and one to write:
cl_program program = clCreateProgramWithSource(context, 1, (const char **)& KernelSource, 0, 0);
We have now got the data on the device, but still need to load the kernel on it. For this, we will create a kernel using the OpenCL kernel source we looked at earlier, using the filename we defined earlier:
clBuildProgram(program, 0, 0, 0, 0, 0);
Next, we will compile the source as follows:
cl_kernel kernel = clCreateKernel(program, "fft1D_1024", 0);
Finally, we will create the actual kernel from the binary we created:
    size_t local_work_size[1] = { 256 };

    clSetKernelArg(kernel, 0, sizeof(cl_mem), (void *) &memobjs[0]);
    clSetKernelArg(kernel, 1, sizeof(cl_mem), (void *) &memobjs[1]);
    clSetKernelArg(kernel, 2, sizeof(float) * (local_work_size[0] + 1) * 16, 0);
    clSetKernelArg(kernel, 3, sizeof(float) * (local_work_size[0] + 1) * 16, 0);
In order to pass arguments to our kernel, we have to set them here. Here, we will add pointers to our buffers and dimensions of the work size as follows:
    size_t global_work_size[1] = { 256 };
          global_work_size[0] = NUM_ENTRIES;
    local_work_size[0]  =  64;  // Nvidia: 192 or 256
    clEnqueueNDRangeKernel(queue, kernel, 1, 0, global_work_size, local_work_size, 0, 0, 0);
Now we can set the work item dimensions and execute the kernel. Here, we will use a kernel execution method that allows us to define the size of the work group:
          cl_mem C = clCreateBuffer(context, CL_MEM_WRITE_ONLY, (size), 0, &ret);
                      cl_int ret = clEnqueueReadBuffer(queue, memobjs[1], CL_TRUE, 0, sizeof(float) * 2 * NUM_ENTRIES, C, 0, 0, 0);
After executing the kernel, we wish to read back the resulting information. For this, we tell OpenCL to copy the assigned write buffer we passed as a kernel argument into a newly assigned buffer. We are now free to use the data in this buffer as we see fit.
However, in this example, we will not use the data:
    clReleaseMemObject(memobjs[0]);
    clReleaseMemObject(memobjs[1]);
   clReleaseCommandQueue(queue);
   clReleaseKernel(kernel);
   clReleaseProgram(program);
   clReleaseContext(context);
   free(C);
 }
Finally, we free the resources we allocated and exit.