Table of Contents for
PHP 7: Real World Application Development
 PHP 7: Real World Application Development
Published by
Packt Publishing, 2016
PHP 7: Real World Application Development
Published by
Packt Publishing, 2016
- Cover
- Table of Contents
- PHP 7: Real World Application Development
- PHP 7: Real World Application Development
- PHP 7: Real World Application Development
- Credits
- Preface
- What you need for this learning path
- Who this learning path is for
- Reader feedback
- Customer support
- 1. Module 1
- 1. Building a Foundation
- PHP 7 installation considerations
- Using the built-in PHP web server
- Defining a test MySQL database
- Installing PHPUnit
- Implementing class autoloading
- Hoovering a website
- Building a deep web scanner
- Creating a PHP 5 to PHP 7 code converter
- 2. Using PHP 7 High Performance Features
- Understanding the abstract syntax tree
- Understanding differences in parsing
- Understanding differences in foreach() handling
- Improving performance using PHP 7 enhancements
- Iterating through a massive file
- Uploading a spreadsheet into a database
- Recursive directory iterator
- 3. Working with PHP Functions
- Developing functions
- Hinting at data types
- Using return value data typing
- Using iterators
- Writing your own iterator using generators
- 4. Working with PHP Object-Oriented Programming
- Developing classes
- Extending classes
- Using static properties and methods
- Using namespaces
- Defining visibility
- Using interfaces
- Using traits
- Implementing anonymous classes
- 5. Interacting with a Database
- Using PDO to connect to a database
- Building an OOP SQL query builder
- Handling pagination
- Defining entities to match database tables
- Tying entity classes to RDBMS queries
- Embedding secondary lookups into query results
- Implementing jQuery DataTables PHP lookups
- 6. Building Scalable Websites
- Creating a generic form element generator
- Creating an HTML radio element generator
- Creating an HTML select element generator
- Implementing a form factory
- Chaining $_POST filters
- Chaining $_POST validators
- Tying validation to a form
- 7. Accessing Web Services
- Converting between PHP and XML
- Creating a simple REST client
- Creating a simple REST server
- Creating a simple SOAP client
- Creating a simple SOAP server
- 8. Working with Date/Time and International Aspects
- Using emoticons or emoji in a view script
- Converting complex characters
- Getting the locale from browser data
- Formatting numbers by locale
- Handling currency by locale
- Formatting date/time by locale
- Creating an HTML international calendar generator
- Building a recurring events generator
- Handling translation without gettext
- 9. Developing Middleware
- Authenticating with middleware
- Using middleware to implement access control
- Improving performance using the cache
- Implementing routing
- Making inter-framework system calls
- Using middleware to cross languages
- 10. Looking at Advanced Algorithms
- Using getters and setters
- Implementing a linked list
- Building a bubble sort
- Implementing a stack
- Building a binary search class
- Implementing a search engine
- Displaying a multi-dimensional array and accumulating totals
- 11. Implementing Software Design Patterns
- Creating an array to object hydrator
- Building an object to array hydrator
- Implementing a strategy pattern
- Defining a mapper
- Implementing object-relational mapping
- Implementing the Pub/Sub design pattern
- 12. Improving Web Security
- Filtering $_POST data
- Validating $_POST data
- Safeguarding the PHP session
- Securing forms with a token
- Building a secure password generator
- Safeguarding forms with a CAPTCHA
- Encrypting/decrypting without mcrypt
- 13. Best Practices, Testing, and Debugging
- Using Traits and Interfaces
- Universal exception handler
- Universal error handler
- Writing a simple test
- Writing a test suite
- Generating fake test data
- Customizing sessions using session_start parameters
- A. Defining PSR-7 Classes
- Implementing PSR-7 value object classes
- Developing a PSR-7 Request class
- Defining a PSR-7 Response class
- 2. Module 2
- 1. Setting Up the Environment
- Setting up Debian or Ubuntu
- Setting up CentOS
- Setting up Vagrant
- Summary
- 2. New Features in PHP 7
- New operators
- Uniform variable syntax
- Miscellaneous features and changes
- Summary
- 3. Improving PHP 7 Application Performance
- HTTP server optimization
- HTTP persistent connection
- Content Delivery Network (CDN)
- CSS and JavaScript optimization
- Full page caching
- Varnish
- The infrastructure
- Summary
- 4. Improving Database Performance
- Storage engines
- The Percona Server - a fork of MySQL
- MySQL performance monitoring tools
- Percona XtraDB Cluster (PXC)
- Redis – the key-value cache store
- Memcached key-value cache store
- Summary
- 5. Debugging and Profiling
- Profiling with Xdebug
- PHP DebugBar
- Summary
- 6. Stress/Load Testing PHP Applications
- ApacheBench (ab)
- Siege
- Load testing real-world applications
- Summary
- 7. Best Practices in PHP Programming
- Test-driven development (TDD)
- Design patterns
- Service-oriented architecture (SOA)
- Being object-oriented and reusable always
- PHP frameworks
- Version control system (VCS) and Git
- Deployment and Continuous Integration (CI)
- Summary
- A. Tools to Make Life Easy
- Git – A version control system
- Grunt watch
- Summary
- B. MVC and Frameworks
- Laravel
- Lumen
- Apigility
- Summary
- 3. Module 3
- 1. Ecosystem Overview
- Summary
- 2. GoF Design Patterns
- Structural patterns
- Behavioral patterns
- Summary
- 3. SOLID Design Principles
- Open/closed principle
- Liskov substitution principle
- Interface Segregation Principle
- Dependency inversion principle
- Summary
- 4. Requirement Specification for a Modular Web Shop App
- Wireframing
- Defining a technology stack
- Summary
- 5. Symfony at a Glance
- Creating a blank project
- Using Symfony console
- Controller
- Routing
- Templates
- Forms
- Configuring Symfony
- The bundle system
- Databases and Doctrine
- Testing
- Validation
- Summary
- 6. Building the Core Module
- Dependencies
- Implementation
- Unit testing
- Functional testing
- Summary
- 7. Building the Catalog Module
- Dependencies
- Implementation
- Unit testing
- Functional testing
- Summary
- 8. Building the Customer Module
- Dependencies
- Implementation
- Unit testing
- Functional testing
- Summary
- 9. Building the Payment Module
- Dependencies
- Implementation
- Unit testing
- Functional testing
- Summary
- 10. Building the Shipment Module
- Dependencies
- Implementation
- Unit testing
- Functional testing
- Summary
- 11. Building the Sales Module
- Dependencies
- Implementation
- Unit testing
- Functional testing
- Summary
- 12. Integrating and Distributing Modules
- Understanding GitHub
- Understanding Composer
- Understanding Packagist
- Summary
- Bibliography
- Index
With user stories laid out, let's shift our focus to actual wireframing. For reasons we will get into later on, our wireframing efforts will be focused around the customer perspective.
There are numerous wireframing tools out there, both free and commercial. Some commercial tools like https://ninjamock.com, which we will use for our examples, still provide a free plan. This can be very handy for personal projects, as it saves us a lot of time.
The starting point of every web application is its home page. The following wireframe illustrates our web shop app's homepage:
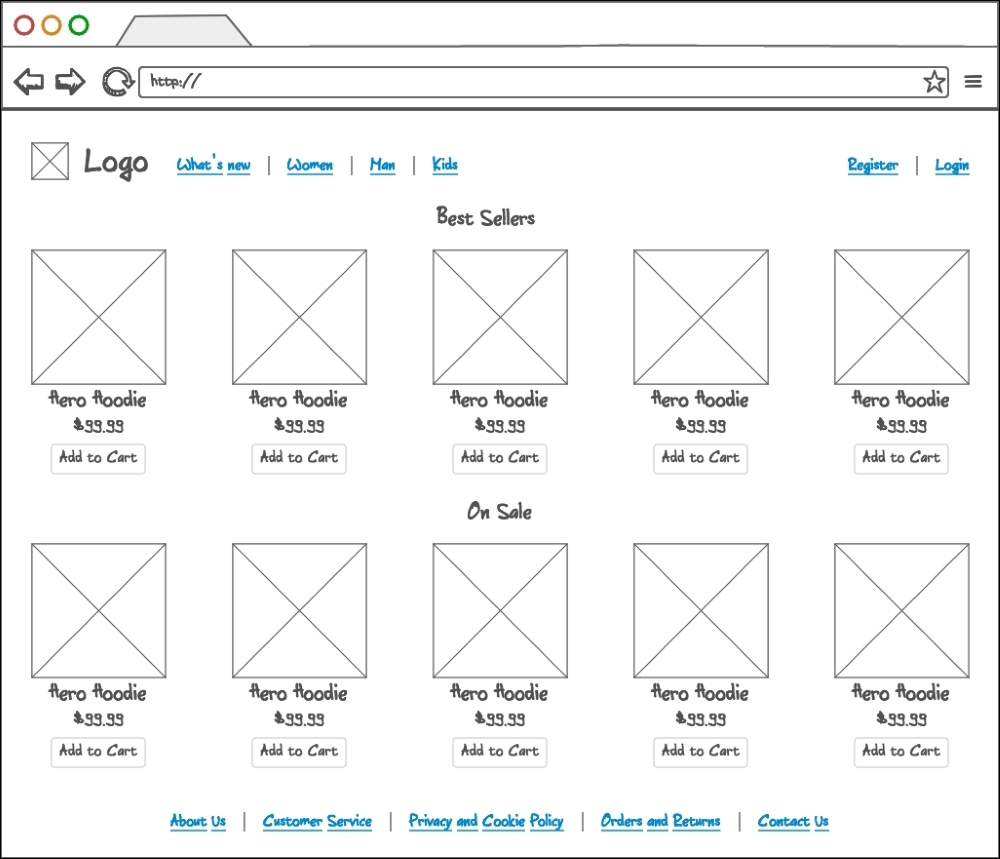
Here we can see a few sections determining the page structure. The header is comprised of a logo, category menu, and user menu. The requirements don't say anything about category structure, and we are building a simple web shop app, so we are going to stick to a flat category structure, without any sub-categories. The user menu will initially show Register and Login links, until the user is actually logged in, in which case the menu will change as shown in following wireframes. The content area is filled with best sellers and on sale items, each of which have an image, title, price, and Add to Cart button defined. The footer area contains links to mostly static content pages, and a Contact Us page.
The following wireframe illustrates our web shop app's category page:
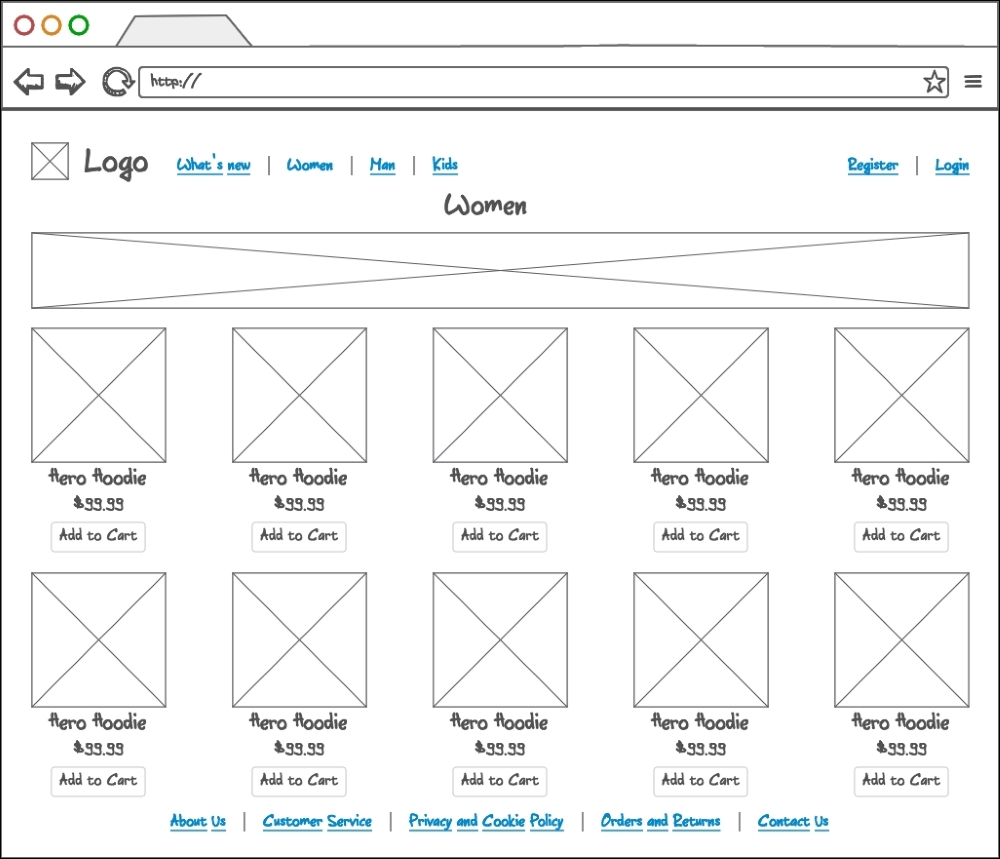
The header and footer areas remain conceptually the same across the entire site. The content area has now changed to list products within any given category. Individual product areas are rendered in the same manner as it is on the home page. Category names and images are rendered above the product list. The width of a category image gives some hints as to what type of images we should be preparing and uploading onto our categories.
The following wireframe illustrates our web shop app's product page:
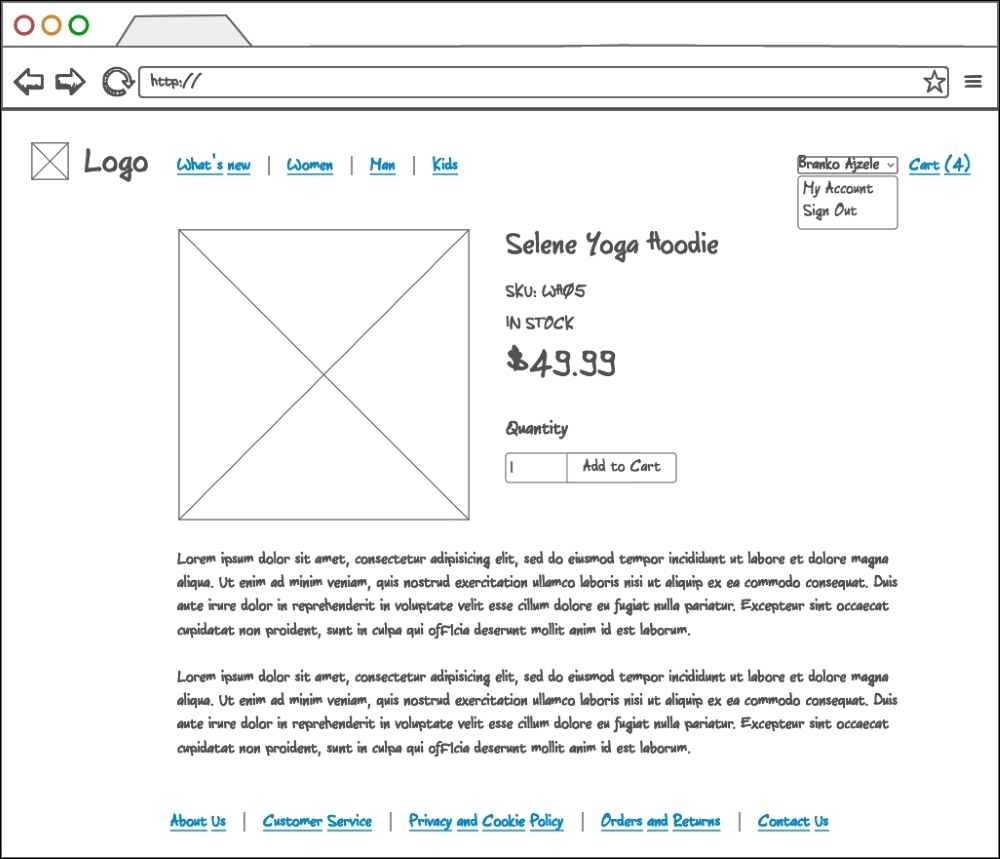
The content area here now changes to list individual product information. We can see a large image placeholder, title, sku, stock status, price, quantity field, Add to Cart button, and product description being rendered. The IN STOCK message is to be displayed when an item is available for purchase and OUT OF STOCK when an item is no longer available. This is to be related to the product quantity attribute. We also need to keep in mind the "See the product image with a big view (zoom)" requirement, where clicking on an image would zoom into it.
The following wireframe illustrates our web shop app's register page:
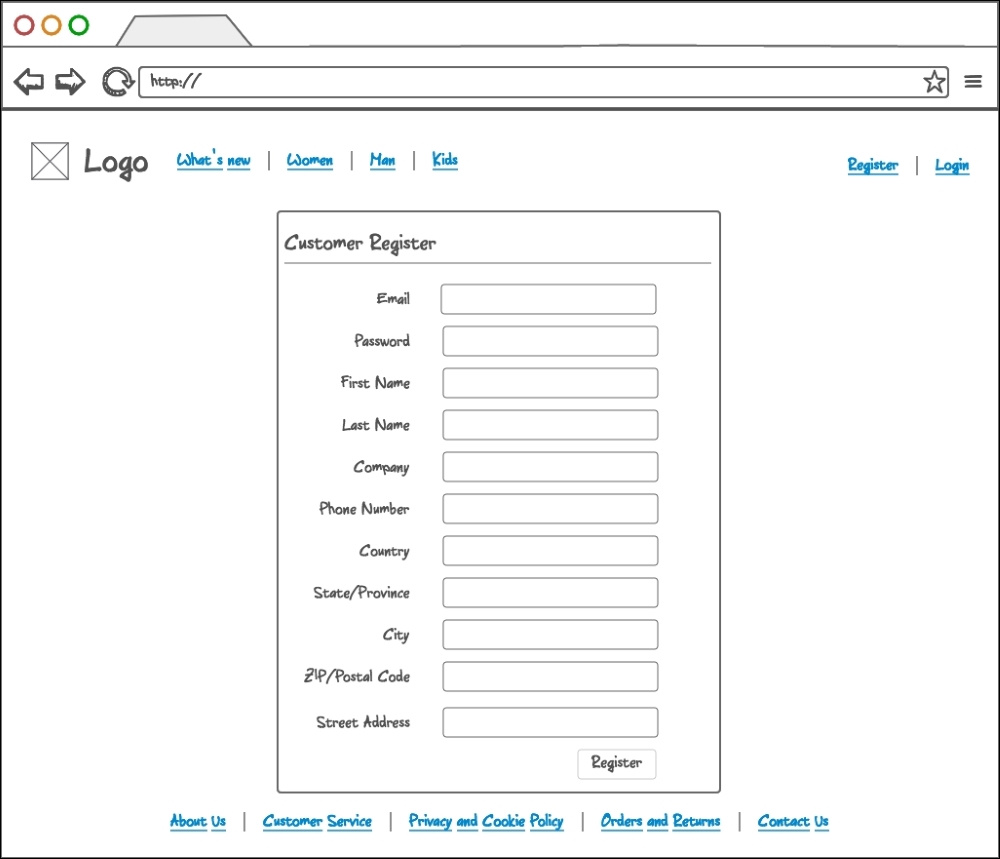
The content area here now changes to render a registration form. There are many ways that we can implement the registration system. More often than not, the minimal amount of information is asked on a registration screen, as we want to get the user in as quickly as possible. However, let's proceed as if we are trying to get more complete user information right here on the registration screen. We ask not just for an e-mail and password, but for entire address information as well.
The following wireframe illustrates our web shop app's login page:
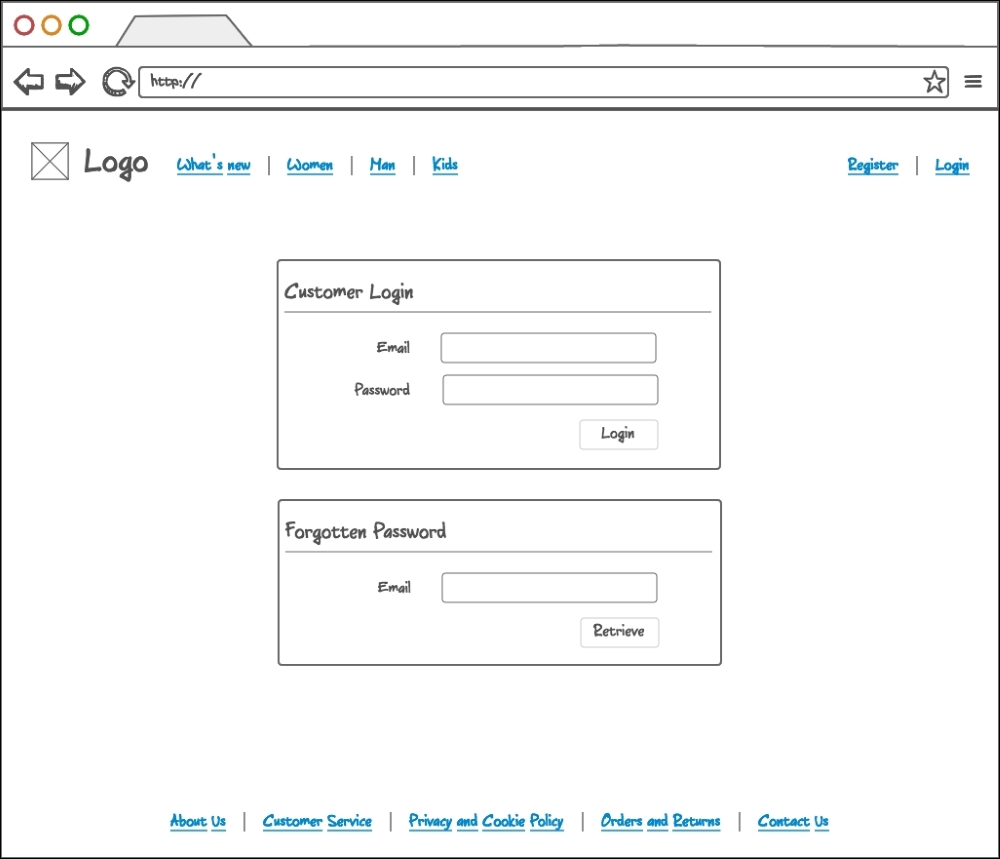
The content area here now changes to render a customer login and forgotten password form. We provide the user with Email and Password fields in case of login, or just an Email field in case of a password reset action.
The following wireframe illustrates our web shop app's customer account page:
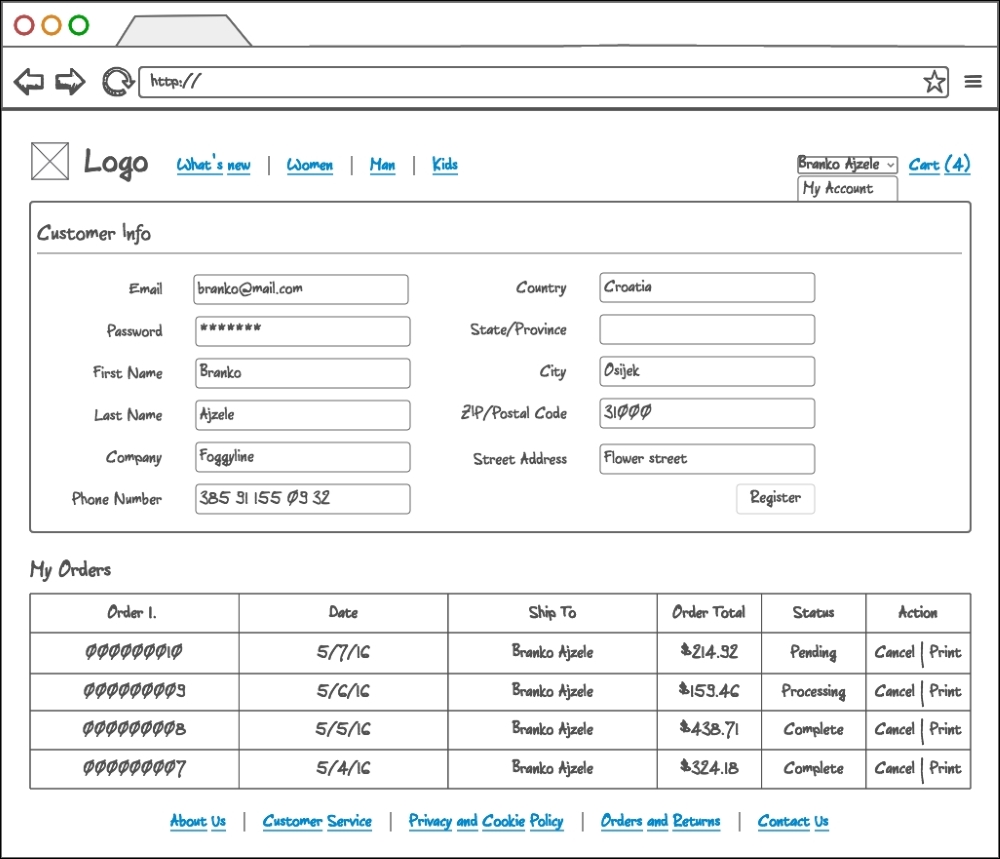
The content area here now changes to render the customer account area, visible only to logged in customers. Here we see a screen with two main pieces of information. The customer information being one, and order history being the other. The customer can change their e-mail, password, and other address information from this screen. Furthermore, the customer can view, cancel, and print all of their previous orders. The My Orders table lists orders top to bottom, from newest to oldest. Though not specified by the user stories, the order cancelation should work only on pending orders. This is something that we will touch upon in more detail later on.
This is also the first screen that shows the state of the user menu when the user is logged in. We can see a dropdown showing the user's full name, My Account, and Sign Out links. Right next to it, we have the Cart (%s) link, which is to list exact quantities in a cart.
The following wireframe illustrates our web shop app's checkout cart page:

The content area here now changes to render the cart in its current state. If the customer has added any products to the cart, they are to be listed here. Each item should list the product title, individual price, quantity added, and subtotal. The customer should be able to change quantities and press the Update Cart button to update the state of the cart. If 0 is provided as the quantity, clicking the Update Cart button will remove such an item from the cart. Cart quantities should at all time reflect the state of the header menu Cart (%s) link. The right-hand side of a screen shows a quick summary of current order total value, alongside a big, clear Go to Checkout button.
The following wireframe illustrates our web shop app's checkout cart shipping page:
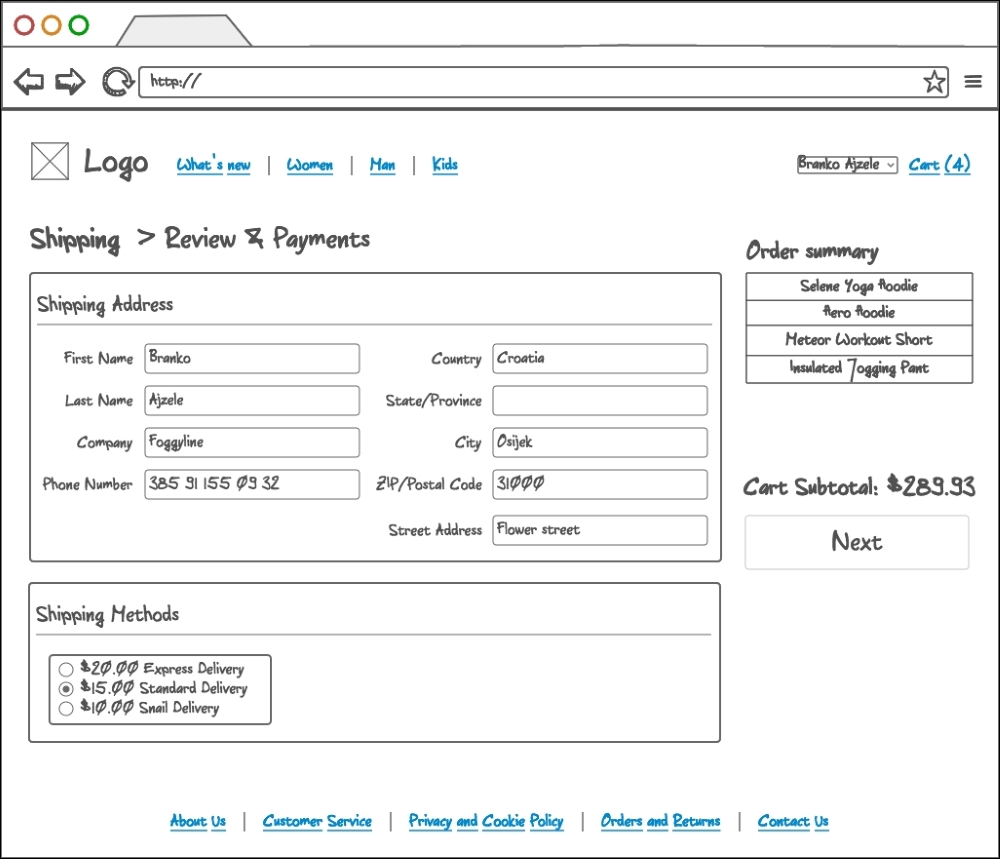
The content area here now changes to render the first step of a checkout process, the shipping information collection. This screen should not be accessible for non-logged in customers. The customer can provide us with their address details here, alongside a shipping method selection. The shipping method area lists several shipping methods. On the right hand side, the collapsible order summary section is shown, listing current items in the cart. Below it, we have the cart subtotal value and a big clear Next button. The Next button should trigger only when all of the required information is provided, in which case it should take us to payment information on the checkout cart payment page.
The following wireframe illustrates our web shop app's checkout cart payment page:
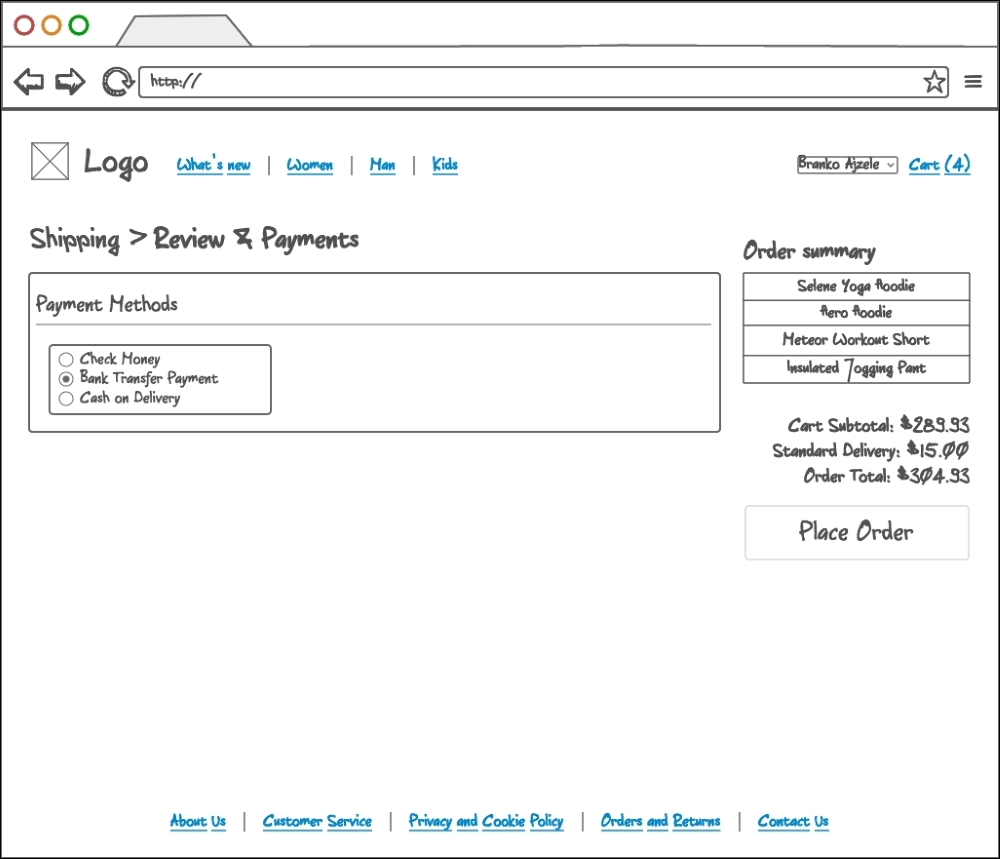
The content area here now changes to render the second step of a checkout process, the payment information collection. This screen should not be accessible for non-logged in customers. The customer is presented with a list of available payment methods. For the simplicity of the application, we will focus only on flat/fixed payments, nothing robust such as PayPal or Stripe. On the right-hand side of the screen, we can see a collapsible Order summary section, listing current items in the cart. Below it, we have the order totals section, individually listing Cart Subtotal, Standard Delivery, Order Total, and a big clear Place Order button. The Place Order button should trigger only when all of the required information is provided, in which case it should take us to the checkout success page.
The following wireframe illustrates our web shop app's checkout success page:
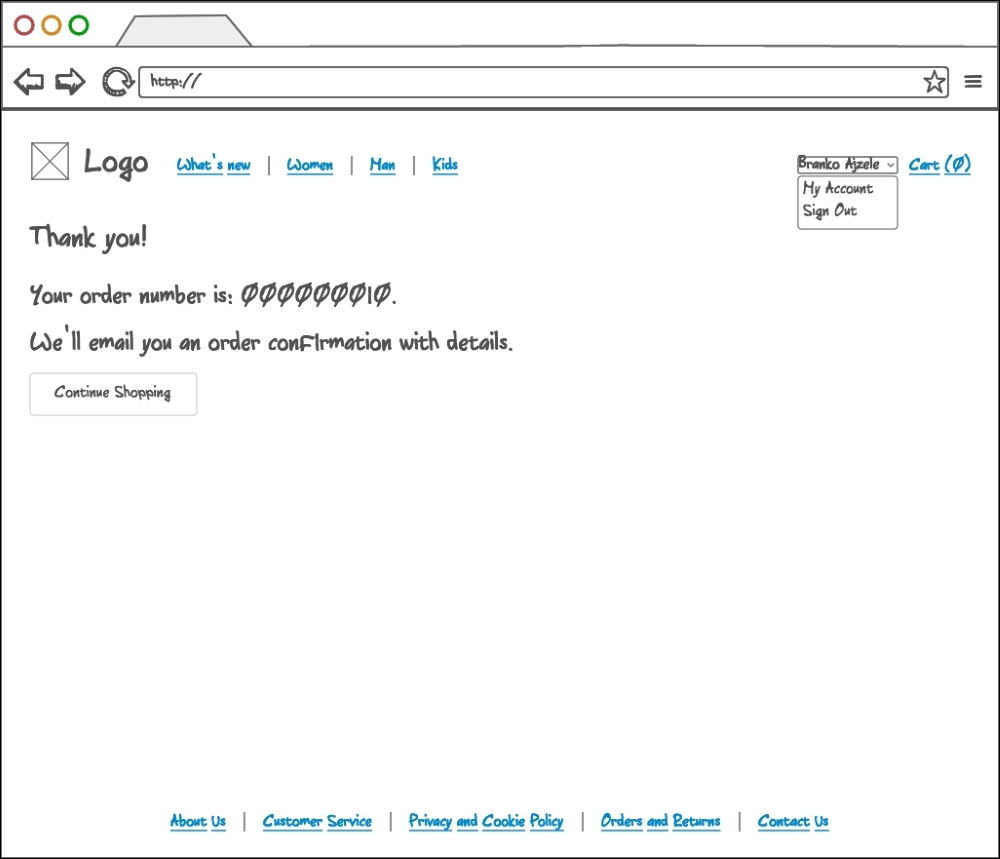
The content area here now changes to output the checkout successful message. Clearly this page is only visible to logged in customers that just finished the checkout process. The order number is clickable and links to the My Account area, focusing on the exact order. By reaching this screen, both the customer and store manager should receive a notification email, as per the Get email notification after order has been placed and Be notified if the new sales order has been created requirements.
With this, we conclude our customer facing wireframes.
In regards to store manager user story requirements, we will simply define a landing administration interface for now, as shown in the following screenshot:
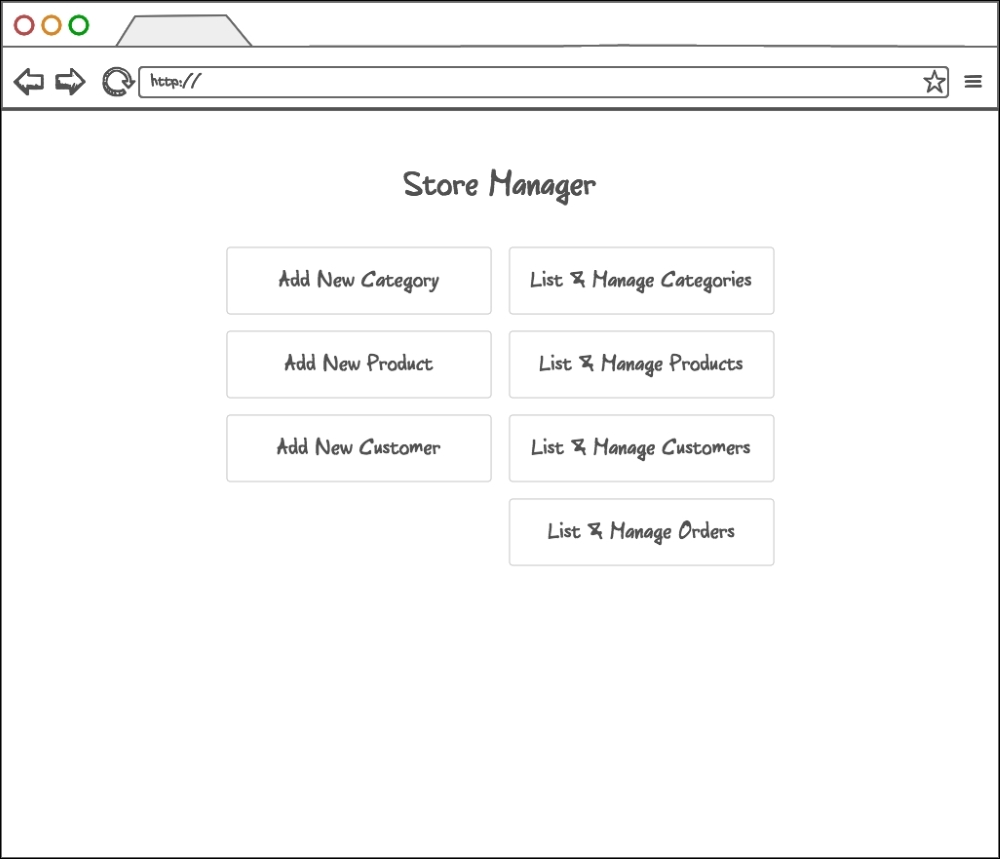
Using the framework later on, we will get a complete auto-generated CRUD interface for the multiple Add New and List & Manage links. The access to this interface and its links will be controlled by the framework's security component, since this user will not be a customer or any user in the database as such.
Furthermore, throughout the following chapters, we will split our application into several modules. In such a setup, each module will take ownership of individual functionalities, taking care of customer, catalog, checkout, and other requirements.