Table of Contents for
PHP 7: Real World Application Development
 PHP 7: Real World Application Development
Published by
Packt Publishing, 2016
PHP 7: Real World Application Development
Published by
Packt Publishing, 2016
- Cover
- Table of Contents
- PHP 7: Real World Application Development
- PHP 7: Real World Application Development
- PHP 7: Real World Application Development
- Credits
- Preface
- What you need for this learning path
- Who this learning path is for
- Reader feedback
- Customer support
- 1. Module 1
- 1. Building a Foundation
- PHP 7 installation considerations
- Using the built-in PHP web server
- Defining a test MySQL database
- Installing PHPUnit
- Implementing class autoloading
- Hoovering a website
- Building a deep web scanner
- Creating a PHP 5 to PHP 7 code converter
- 2. Using PHP 7 High Performance Features
- Understanding the abstract syntax tree
- Understanding differences in parsing
- Understanding differences in foreach() handling
- Improving performance using PHP 7 enhancements
- Iterating through a massive file
- Uploading a spreadsheet into a database
- Recursive directory iterator
- 3. Working with PHP Functions
- Developing functions
- Hinting at data types
- Using return value data typing
- Using iterators
- Writing your own iterator using generators
- 4. Working with PHP Object-Oriented Programming
- Developing classes
- Extending classes
- Using static properties and methods
- Using namespaces
- Defining visibility
- Using interfaces
- Using traits
- Implementing anonymous classes
- 5. Interacting with a Database
- Using PDO to connect to a database
- Building an OOP SQL query builder
- Handling pagination
- Defining entities to match database tables
- Tying entity classes to RDBMS queries
- Embedding secondary lookups into query results
- Implementing jQuery DataTables PHP lookups
- 6. Building Scalable Websites
- Creating a generic form element generator
- Creating an HTML radio element generator
- Creating an HTML select element generator
- Implementing a form factory
- Chaining $_POST filters
- Chaining $_POST validators
- Tying validation to a form
- 7. Accessing Web Services
- Converting between PHP and XML
- Creating a simple REST client
- Creating a simple REST server
- Creating a simple SOAP client
- Creating a simple SOAP server
- 8. Working with Date/Time and International Aspects
- Using emoticons or emoji in a view script
- Converting complex characters
- Getting the locale from browser data
- Formatting numbers by locale
- Handling currency by locale
- Formatting date/time by locale
- Creating an HTML international calendar generator
- Building a recurring events generator
- Handling translation without gettext
- 9. Developing Middleware
- Authenticating with middleware
- Using middleware to implement access control
- Improving performance using the cache
- Implementing routing
- Making inter-framework system calls
- Using middleware to cross languages
- 10. Looking at Advanced Algorithms
- Using getters and setters
- Implementing a linked list
- Building a bubble sort
- Implementing a stack
- Building a binary search class
- Implementing a search engine
- Displaying a multi-dimensional array and accumulating totals
- 11. Implementing Software Design Patterns
- Creating an array to object hydrator
- Building an object to array hydrator
- Implementing a strategy pattern
- Defining a mapper
- Implementing object-relational mapping
- Implementing the Pub/Sub design pattern
- 12. Improving Web Security
- Filtering $_POST data
- Validating $_POST data
- Safeguarding the PHP session
- Securing forms with a token
- Building a secure password generator
- Safeguarding forms with a CAPTCHA
- Encrypting/decrypting without mcrypt
- 13. Best Practices, Testing, and Debugging
- Using Traits and Interfaces
- Universal exception handler
- Universal error handler
- Writing a simple test
- Writing a test suite
- Generating fake test data
- Customizing sessions using session_start parameters
- A. Defining PSR-7 Classes
- Implementing PSR-7 value object classes
- Developing a PSR-7 Request class
- Defining a PSR-7 Response class
- 2. Module 2
- 1. Setting Up the Environment
- Setting up Debian or Ubuntu
- Setting up CentOS
- Setting up Vagrant
- Summary
- 2. New Features in PHP 7
- New operators
- Uniform variable syntax
- Miscellaneous features and changes
- Summary
- 3. Improving PHP 7 Application Performance
- HTTP server optimization
- HTTP persistent connection
- Content Delivery Network (CDN)
- CSS and JavaScript optimization
- Full page caching
- Varnish
- The infrastructure
- Summary
- 4. Improving Database Performance
- Storage engines
- The Percona Server - a fork of MySQL
- MySQL performance monitoring tools
- Percona XtraDB Cluster (PXC)
- Redis – the key-value cache store
- Memcached key-value cache store
- Summary
- 5. Debugging and Profiling
- Profiling with Xdebug
- PHP DebugBar
- Summary
- 6. Stress/Load Testing PHP Applications
- ApacheBench (ab)
- Siege
- Load testing real-world applications
- Summary
- 7. Best Practices in PHP Programming
- Test-driven development (TDD)
- Design patterns
- Service-oriented architecture (SOA)
- Being object-oriented and reusable always
- PHP frameworks
- Version control system (VCS) and Git
- Deployment and Continuous Integration (CI)
- Summary
- A. Tools to Make Life Easy
- Git – A version control system
- Grunt watch
- Summary
- B. MVC and Frameworks
- Laravel
- Lumen
- Apigility
- Summary
- 3. Module 3
- 1. Ecosystem Overview
- Summary
- 2. GoF Design Patterns
- Structural patterns
- Behavioral patterns
- Summary
- 3. SOLID Design Principles
- Open/closed principle
- Liskov substitution principle
- Interface Segregation Principle
- Dependency inversion principle
- Summary
- 4. Requirement Specification for a Modular Web Shop App
- Wireframing
- Defining a technology stack
- Summary
- 5. Symfony at a Glance
- Creating a blank project
- Using Symfony console
- Controller
- Routing
- Templates
- Forms
- Configuring Symfony
- The bundle system
- Databases and Doctrine
- Testing
- Validation
- Summary
- 6. Building the Core Module
- Dependencies
- Implementation
- Unit testing
- Functional testing
- Summary
- 7. Building the Catalog Module
- Dependencies
- Implementation
- Unit testing
- Functional testing
- Summary
- 8. Building the Customer Module
- Dependencies
- Implementation
- Unit testing
- Functional testing
- Summary
- 9. Building the Payment Module
- Dependencies
- Implementation
- Unit testing
- Functional testing
- Summary
- 10. Building the Shipment Module
- Dependencies
- Implementation
- Unit testing
- Functional testing
- Summary
- 11. Building the Sales Module
- Dependencies
- Implementation
- Unit testing
- Functional testing
- Summary
- 12. Integrating and Distributing Modules
- Understanding GitHub
- Understanding Composer
- Understanding Packagist
- Summary
- Bibliography
- Index
PDO is a highly performant and actively maintained database extension that has a unique advantage over vendor-specific extensions. It has a common Application Programming Interface (API) that is compatible with almost a dozen different Relational Database Management Systems (RDBMS). Learning how to use this extension will save you hours of time trying to master the command subsets of the equivalent individual vendor-specific database extensions.
PDO is subdivided into four main classes, as summarized in the following table:
|
Class |
Functionality |
|---|---|
|
|
Maintains the actual connection to the database, and also handles low-level functionality such as transaction support |
|
| |
|
| |
|
|
- Set up the database connection by creating a
PDOinstance. - You need to construct a Data Source Name (DSN). The information contained in the DSN varies according to the database driver used. As an example, here is a DSN used to connect to a MySQL database:
$params = [ 'host' => 'localhost', 'user' => 'test', 'pwd' => 'password', 'db' => 'php7cookbook' ]; try { $dsn = sprintf('mysql:host=%s;dbname=%s', $params['host'], $params['db']); $pdo = new PDO($dsn, $params['user'], $params['pwd']); } catch (PDOException $e) { echo $e->getMessage(); } catch (Throwable $e) { echo $e->getMessage(); } - On the other hand, SQlite, a simpler extension, only requires the following command:
$params = [ 'db' => __DIR__ . '/../data/db/php7cookbook.db.sqlite' ]; $dsn = sprintf('sqlite:' . $params['db']); - PostgreSQL, on the other hand, includes the username and password directly in the DSN:
$params = [ 'host' => 'localhost', 'user' => 'test', 'pwd' => 'password', 'db' => 'php7cookbook' ]; $dsn = sprintf('pgsql:host=%s;dbname=%s;user=%s;password=%s', $params['host'], $params['db'], $params['user'], $params['pwd']); - The DSN could also include server-specific directives, such as
unix_socket, as shown in the following example:$params = [ 'host' => 'localhost', 'user' => 'test', 'pwd' => 'password', 'db' => 'php7cookbook', 'sock' => '/var/run/mysqld/mysqld.sock' ]; try { $dsn = sprintf('mysql:host=%s;dbname=%s;unix_socket=%s', $params['host'], $params['db'], $params['sock']); $opts = [PDO::ATTR_ERRMODE => PDO::ERRMODE_EXCEPTION]; $pdo = new PDO($dsn, $params['user'], $params['pwd'], $opts); } catch (PDOException $e) { echo $e->getMessage(); } catch (Throwable $e) { echo $e->getMessage(); }Note
Best practice
Wrap the statement that creates the PDO instance in a
try {} catch {}block. Catch aPDOExceptionfor database-specific information in case of failure. CatchThrowablefor errors or any other exceptions. Set the PDO error mode toPDO::ERRMODE_EXCEPTIONfor best results. See step 8 for more details about error modes.In PHP 5, if the PDO object cannot be constructed (for example, when invalid parameters are used), the instance is assigned a value of
NULL. In PHP 7, anExceptionis thrown. If you wrap the construction of the PDO object in atry {} catch {}block, and thePDO::ATTR_ERRMODEis set toPDO::ERRMODE_EXCEPTION, you can catch and log such errors without having to test forNULL. - Send an SQL command using
PDO::query(). APDOStatementinstance is returned, against which you can fetch results. In this example, we are looking for the first 20 customers sorted by ID:$stmt = $pdo->query( 'SELECT * FROM customer ORDER BY id LIMIT 20');
- Iterate through the
PDOStatementinstance to process results. Set the fetch mode to eitherPDO::FETCH_NUMorPDO::FETCH_ASSOCto return results in the form of a numeric or associative array. In this example we use awhile()loop to process results. When the last result has been fetched, the result is a booleanFALSE, ending the loop:while ($row = $stmt->fetch(PDO::FETCH_ASSOC)) { printf('%4d | %20s | %5s' . PHP_EOL, $row['id'], $row['name'], $row['level']); }Note
PDO fetch operations involve a cursor that defines the direction (that is, forward or reverse) of the iteration. The second argument to
PDOStatement::fetch()can be any of thePDO::FETCH_ORI_*constants. Cursor orientations include prior, first, last, absolute, and relative. The default cursor orientation isPDO::FETCH_ORI_NEXT. - Set the fetch mode to
PDO::FETCH_OBJto return results as astdClassinstance. Here you will note that thewhile()loop takes advantage of the fetch mode,PDO::FETCH_OBJ. Notice that theprintf()statement refers to object properties, in contrast with the preceding example, which references array elements:while ($row = $stmt->fetch(PDO::FETCH_OBJ)) { printf('%4d | %20s | %5s' . PHP_EOL, $row->id, $row->name, $row->level); } - If you want to create an instance of a specific class while processing a query, set the fetch mode to
PDO::FETCH_CLASS. You must also have the class definition available, andPDO::query()should set the class name. As you can see in the following code snippet, we have defined a class calledCustomer, with public properties$id,$name, and$level. Properties need to bepublicfor the fetch injection to work properly:class Customer { public $id; public $name; public $level; } $stmt = $pdo->query($sql, PDO::FETCH_CLASS, 'Customer'); - When fetching objects, a simpler alternative to the technique shown in step 5 is to use
PDOStatement::fetchObject():while ($row = $stmt->fetchObject('Customer')) { printf('%4d | %20s | %5s' . PHP_EOL, $row->id, $row->name, $row->level); } - You could also use
PDO::FETCH_INTO, which is essentially the same asPDO::FETCH_CLASS, but you need an active object instance instead of a class reference. Each iteration through the loop re-populates the same object instance with the current information set. This example assumes the same classCustomeras in step 5, with the same database parameters and PDO connections as defined in step 1:$cust = new Customer(); while ($stmt->fetch(PDO::FETCH_INTO)) { printf('%4d | %20s | %5s' . PHP_EOL, $cust->id, $cust->name, $cust->level); }
- If you do not specify an error mode, the default PDO error mode is
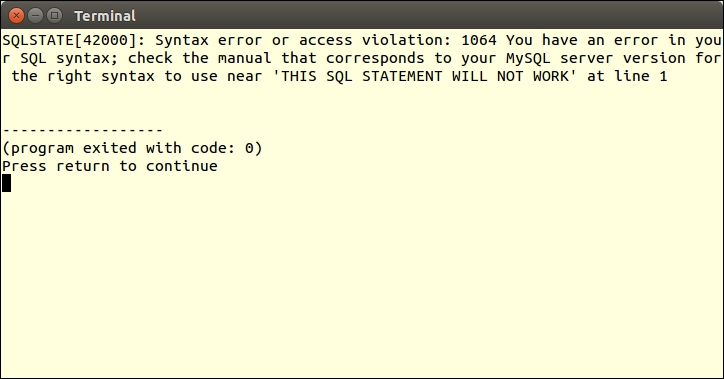
PDO::ERRMODE_SILENT. You can set the error mode using thePDO::ATTR_ERRMODEkey, and either thePDO::ERRMODE_WARNINGor thePDO::ERRMODE_EXCEPTIONvalue. The error mode can be specified as the fourth argument to the PDO constructor in the form of an associative array. Alternatively, you can usePDO::setAttribute()on an existing instance. - Let us assume you have the following DSN and SQL (before you start thinking that this is a new form of SQL, please be assured: this SQL statement will not work!):
$params = [ 'host' => 'localhost', 'user' => 'test', 'pwd' => 'password', 'db' => 'php7cookbook' ]; $dsn = sprintf('mysql:host=%s;dbname=%s', $params['host'], $params['db']); $sql = 'THIS SQL STATEMENT WILL NOT WORK'; - If you then formulate your PDO connection using the default error mode, the only clue that something is wrong is that instead of producing a
PDOStatementinstance, thePDO::query()will return a booleanFALSE:$pdo1 = new PDO($dsn, $params['user'], $params['pwd']); $stmt = $pdo1->query($sql); $row = ($stmt) ? $stmt->fetch(PDO::FETCH_ASSOC) : 'No Good';
- The next example shows setting the error mode to
WARNINGusing the constructor approach:$pdo2 = new PDO( $dsn, $params['user'], $params['pwd'], [PDO::ATTR_ERRMODE => PDO::ERRMODE_WARNING]);
- If you need full separation of the prepare and execute phases, use
PDO::prepare()andPDOStatement::execute()instead. The statement is then sent to the database server to be pre-compiled. You can then execute the statement as many times as is warranted, most likely in a loop. - The first argument to
PDO::prepare()can be an SQL statement with placeholders in place of actual values. An array of values can then be supplied toPDOStatement::execute(). PDO automatically provides database quoting, which helps safeguard against SQL Injection.Note
Best practice
Any application in which external input (that is, from a form posting) is combined with an SQL statement is subject to an SQL injection attack. All external input must first be properly filtered, validated, and otherwise sanitized. Do not put external input directly into the SQL statement. Instead, use placeholders, and provide the actual (sanitized) values during the execution phase.
- To iterate through the results in reverse, you can change the orientation of the scrollable cursor. Alternatively, and probably more easily, just reverse the
ORDER BYfromASCtoDESC. This line of code sets up aPDOStatementobject requesting a scrollable cursor:$dsn = sprintf('pgsql:charset=UTF8;host=%s;dbname=%s', $params['host'], $params['db']); $opts = [PDO::ATTR_ERRMODE => PDO::ERRMODE_EXCEPTION]; $pdo = new PDO($dsn, $params['user'], $params['pwd'], $opts); $sql = 'SELECT * FROM customer ' . 'WHERE balance > :min AND balance < :max ' . 'ORDER BY id LIMIT 20'; $stmt = $pdo->prepare($sql, [PDO::ATTR_CURSOR => PDO::CURSOR_SCROLL]); - You also need to specify cursor instructions during the fetch operation. This example gets the last row in the result set, and then scrolls backwards:
$stmt->execute(['min' => $min, 'max' => $max]); $row = $stmt->fetch(PDO::FETCH_ASSOC, PDO::FETCH_ORI_LAST); do { printf('%4d | %20s | %5s | %8.2f' . PHP_EOL, $row['id'], $row['name'], $row['level'], $row['balance']); } while ($row = $stmt->fetch(PDO::FETCH_ASSOC, PDO::FETCH_ORI_PRIOR));
- Neither MySQL nor SQLite support scrollable cursors! To achieve the same results, try the following modifications to the preceding code:
$dsn = sprintf('mysql:charset=UTF8;host=%s;dbname=%s', $params['host'], $params['db']); $opts = [PDO::ATTR_ERRMODE => PDO::ERRMODE_EXCEPTION]; $pdo = new PDO($dsn, $params['user'], $params['pwd'], $opts); $sql = 'SELECT * FROM customer ' . 'WHERE balance > :min AND balance < :max ' . 'ORDER BY id DESC . 'LIMIT 20'; $stmt = $pdo->prepare($sql); while ($row = $stmt->fetch(PDO::FETCH_ASSOC)); printf('%4d | %20s | %5s | %8.2f' . PHP_EOL, $row['id'], $row['name'], $row['level'], $row['balance']); } - PDO provides support for transactions. Borrowing the code from step 9, we can wrap the
INSERTseries of commands into a transactional block:try { $pdo->beginTransaction(); $sql = "INSERT INTO customer ('" . implode("','", $fields) . "') VALUES (?,?,?,?,?,?)"; $stmt = $pdo->prepare($sql); foreach ($data as $row) $stmt->execute($row); $pdo->commit(); } catch (PDOException $e) { error_log($e->getMessage()); $pdo->rollBack(); } - Finally, to keep everything modular and re-usable, we can wrap the PDO connection into a separate class
Application\Database\Connection. Here, we build a connection through the constructor. Alternatively, there is a staticfactory()method that lets us generate a series of PDO instances:namespace Application\Database; use Exception; use PDO; class Connection { const ERROR_UNABLE = 'ERROR: no database connection'; public $pdo; public function __construct(array $config) { if (!isset($config['driver'])) { $message = __METHOD__ . ' : ' . self::ERROR_UNABLE . PHP_EOL; throw new Exception($message); } $dsn = $this->makeDsn($config); try { $this->pdo = new PDO( $dsn, $config['user'], $config['password'], [PDO::ATTR_ERRMODE => $config['errmode']]); return TRUE; } catch (PDOException $e) { error_log($e->getMessage()); return FALSE; } } public static function factory( $driver, $dbname, $host, $user, $pwd, array $options = array()) { $dsn = $this->makeDsn($config); try { return new PDO($dsn, $user, $pwd, $options); } catch (PDOException $e) { error_log($e->getMessage); } } - An important component of this
Connectionclass is a generic method that can be used to construct a DSN. All we need for this to work is to establish thePDODriveras a prefix, followed by ":". After that, we simply append key/value pairs from our configuration array. Each key/value pair is separated by a semi-colon. We also need to strip off the trailing semi-colon, usingsubstr()with a negative limit for that purpose:public function makeDsn($config) { $dsn = $config['driver'] . ':'; unset($config['driver']); foreach ($config as $key => $value) { $dsn .= $key . '=' . $value . ';'; } return substr($dsn, 0, -1); } }
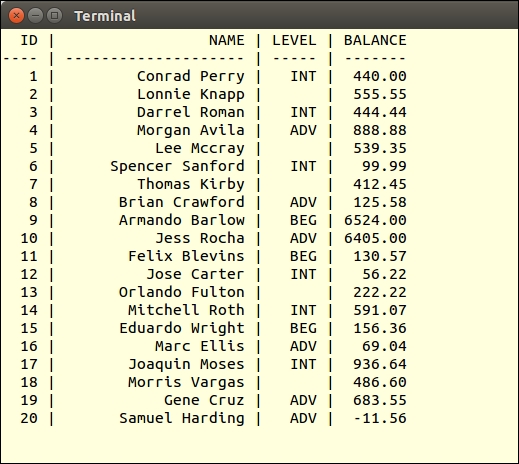
First of all, you can copy the initial connection code from step 1 into a chap_05_pdo_connect_mysql.php file. For the purposes of this illustration, we will assume you have created a MySQL database called php7cookbook, with a username of cook and a password of book. Next, we send a simple SQL statement to the database using the PDO::query() method. Finally, we use the resulting statement object to fetch results in the form of an associative array. Don't forget to wrap your code in a try {} catch {} block:
<?php
$params = [
'host' => 'localhost',
'user' => 'test',
'pwd' => 'password',
'db' => 'php7cookbook'
];
try {
$dsn = sprintf('mysql:charset=UTF8;host=%s;dbname=%s',
$params['host'], $params['db']);
$pdo = new PDO($dsn, $params['user'], $params['pwd']);
$stmt = $pdo->query(
'SELECT * FROM customer ORDER BY id LIMIT 20');
printf('%4s | %20s | %5s | %7s' . PHP_EOL,
'ID', 'NAME', 'LEVEL', 'BALANCE');
printf('%4s | %20s | %5s | %7s' . PHP_EOL,
'----', str_repeat('-', 20), '-----', '-------');
while ($row = $stmt->fetch(PDO::FETCH_ASSOC)) {
printf('%4d | %20s | %5s | %7.2f' . PHP_EOL,
$row['id'], $row['name'], $row['level'], $row['balance']);
}
} catch (PDOException $e) {
error_log($e->getMessage());
} catch (Throwable $e) {
error_log($e->getMessage());
}Here is the resulting output:
Add the option to the PDO constructor, which sets the error mode to EXCEPTION. Now alter the SQL statement and observe the resulting error message:
$opts = [PDO::ATTR_ERRMODE => PDO::ERRMODE_EXCEPTION];
$pdo  = new PDO($dsn, $params['user'], $params['pwd'], $opts);
$stmt = $pdo->query('THIS SQL STATEMENT WILL NOT WORK');
You will observe something like this:
Placeholders can be named or positional. Named placeholders are preceded by a colon (:) in the prepared SQL statement, and are references as keys in an associative array provided to
execute(). Positional placeholders are represented as question marks (?) in the prepared SQL statement.
In the following example, named placeholders are used to represent values in a WHERE clause:
try {
  $dsn  = sprintf('mysql:host=%s;dbname=%s',
                  $params['host'], $params['db']);
  $pdo  = new PDO($dsn,
                  $params['user'],
                  $params['pwd'],
                  [PDO::ATTR_ERRMODE => PDO::ERRMODE_EXCEPTION]);
  $sql  = 'SELECT * FROM customer '
      . 'WHERE balance < :val AND level = :level '
      . 'ORDER BY id LIMIT 20'; echo $sql . PHP_EOL;
  $stmt = $pdo->prepare($sql);
  $stmt->execute(['val' => 100, 'level' => 'BEG']);
  while ($row = $stmt->fetch(PDO::FETCH_ASSOC)) {
    printf('%4d | %20s | %5s | %5.2f' . PHP_EOL,
      	$row['id'], $row['name'], $row['level'], $row['balance']);
  }
} catch (PDOException $e) {
  echo $e->getMessage();
} catch (Throwable $e) {
  echo $e->getMessage();
}
This example shows using positional placeholders in an INSERT operation. Notice that the data to be inserted as the fourth customer includes a potential SQL injection attack. You will also notice that some awareness of the SQL syntax for the database being used is required. In this case, MySQL column names are quoted using back-ticks ('):
$fields = ['name', 'balance', 'email',
'password', 'status', 'level'];
$data = [
['Saleen',0,'saleen@test.com', 'password',0,'BEG'],
['Lada',55.55,'lada@test.com', 'password',0,'INT'],
['Tonsoi',999.99,'tongsoi@test.com','password',1,'ADV'],
['SQL Injection',0.00,'bad','bad',1,
'BEG\';DELETE FROM customer;--'],
];
try {
$dsn = sprintf('mysql:host=%s;dbname=%s',
$params['host'], $params['db']);
$pdo = new PDO($dsn,
$params['user'],
$params['pwd'],
[PDO::ATTR_ERRMODE => PDO::ERRMODE_EXCEPTION]);
$sql = "INSERT INTO customer ('"
. implode("','", $fields)
. "') VALUES (?,?,?,?,?,?)";
$stmt = $pdo->prepare($sql);
foreach ($data as $row) $stmt->execute($row);
} catch (PDOException $e) {
echo $e->getMessage();
} catch (Throwable $e) {
echo $e->getMessage();
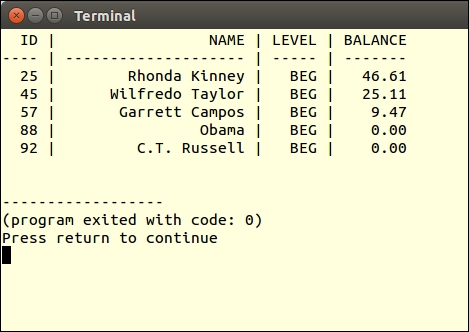
}To test the use of a prepared statement with named parameters, modify the SQL statement to add a WHERE clause that checks for customers with a balance less than a certain amount, and a level equal to either BEG, INT, or ADV (that is, beginning, intermediate, or advanced). Instead of using PDO::query(), use PDO::prepare(). Before fetching results, you must then perform PDOStatement::execute(), supplying the values for balance and level:
$sql  = 'SELECT * FROM customer '
     . 'WHERE balance < :val AND level = :level '
     . 'ORDER BY id LIMIT 20';
$stmt = $pdo->prepare($sql);
$stmt->execute(['val' => 100, 'level' => 'BEG']);
Here is the resulting output:
Instead of providing parameters when calling PDOStatement::execute(), you could alternatively bind parameters. This allows you to assign variables to placeholders. At the time of execution, the current value of the variable is used.
In this example, we bind the variables $min, $max, and $level to the prepared statement:
$min   = 0;
$max   = 0;
$level = '';

try {
  $dsn  = sprintf('mysql:host=%s;dbname=%s', $params['host'], $params['db']);
  $opts = [PDO::ATTR_ERRMODE => PDO::ERRMODE_EXCEPTION];
  $pdo  = new PDO($dsn, $params['user'], $params['pwd'], $opts);
  $sql  = 'SELECT * FROM customer '
      . 'WHERE balance > :min '
      . 'AND balance < :max AND level = :level '
      . 'ORDER BY id LIMIT 20';
  $stmt = $pdo->prepare($sql);
  $stmt->bindParam('min',   $min);
  $stmt->bindParam('max',   $max);
  $stmt->bindParam('level', $level);

  $min   =  5000;
  $max   = 10000;
  $level = 'ADV';
  $stmt->execute();
  showResults($stmt, $min, $max, $level);

  $min   = 0;
  $max   = 100;
  $level = 'BEG';
  $stmt->execute();
  showResults($stmt, $min, $max, $level);

} catch (PDOException $e) {
  echo $e->getMessage();
} catch (Throwable $e) {
  echo $e->getMessage();
}
When the values of these variables change, the next execution will reflect the modified criteria.