
As mentioned previously, PgRaster support in GeoServer is not there yet. This is good, because we can learn how to consume it ourselves!
Let's import some data first:
raster2pgsql -s 4326 -C -l 2,4,6,8,10,12,14 -I -F -t 256x256 NE2_HR_LC_SR_W_DR.tif webgis.ne_raster | psql -h localhost -p 5434 -U postgres -d mastering_postgis
In Chapter 5, Exporting Spatial Data, we used PostgreSQL's large object support to export the raster from the database. We will now build on what we achieved there, so we can come up with a simple raster extractor query for our WMS handler. The interesting bit is the query we used for assembling the tiles of the imported raster back into one raster:
select
   ST_Union(rast) as rast
from
   data_import.gray_50m_partial
where
   filename = 'gray_50m_partial_bl.tif'
Our slightly extended query looks like this:
select
   --3. union our empty canvas with the extracted raster
   ST_Union(rast) as rast
from (
   --1. empty raster based on the passed bounds and raster settings of
   the raster data is extracted from;
   --this is our 'canvas' we will paint the extracted raster on.
   --this lets us always output a raster that extends to the requested
   bounds
   select ST_AsRaster(ST_MakeEnvelope(14,85,24,95,4326), (select rast
   from data_import.gray_50m_partial limit 1)) as rast

   --2. extract the tiles of the raster that interset with bounds of out
   request and clip them to the requested bound
   union all select
      ST_Clip(
         ST_Union(rast),
         ST_MakeEnvelope(14,85,24,95,4326)
      )as rast
   from
      data_import.gray_50m_partial

   where
      ST_Intersects(rast, ST_MakeEnvelope(14,85,24,95,4326))

) as preselect
As a matter of fact, we do not do much more. Basically, what happens here is:
- Generation of an empty raster that has the extent of the requested bounds and the parameters of the source raster we read from
- Extraction of the source tiles that intersect with the requested bounds; tiles are further cropped with the very same bounds
- Data assembly - we paint the natural earth raster on top of the empty canvas
At this stage, we have a raster we can output. To do so, we'll need a simple HTTP handler that can deal with our WMS requests. This will be a simplistic handler that is supposed to present the idea rather than be bullet-proof, production-ready code. Our WMS handler will only support a GetMap request.
Let's start with disassembling the WMS request itself into separate parameters, so it is clear what we are about to deal with. You may remember an example of a WMS request presented a few pages back - basically its query string will be similar to the following: ?SERVICE=WMS&VERSION=1.1.1&REQUEST=GetMap&FORMAT=image%2Fjpeg&TRANSPARENT=true&STYLES&LAYERS=mastering_postgis%3Ane_coastline&&WIDTH=256&HEIGHT=256&SRS=EPSG%3A4326&BBOX=-11.25%2C33.75%2C0%2C45.
It will be a bit easier when we look at the parameters one by one:
- SERVICE=WMS: Service type
- VERSION=1.1.1: Version of the WMS service
- REQUEST=GetMap: Request type
- FORMAT=image/jpeg: Output format
- TRANSPARENT=true: Whether or not the background should be transparent; important when outputting vector data, but also when there are voids in the raster data
- STYLES: Styles to be applied to the requested data
- LAYERS=mastering_postgis:ne_coastline: Layers to be extracted
- WIDTH=256: Width of the image
- HEIGHT=256: Height of the image
- SRS=EPSG:4326: Coordinate system of the request
- BBOX=-11.25,33.75,0,45: Bounding box in the form of minx,miny,maxx,maxy
Now, as we fully understand the WMS request parameters, we can move on to coding a simple handler in Node.js. We will build upon a web Hello World example that we wrote in a previous chapter:
const http = require('http');
const url = require('url');

const server = http.createServer((req, res) => {

    console.warn('Processing WMS request...', req.url);

    var params = url.parse(req.url, true).query; // true to get query
    as object
    //fix param casing; url param names should not be case sensitive!...
    let pLowerCase = p.toLowerCase();
        if(p !== pLowerCase){
            params[pLowerCase] = params[p];
            delete params[p];
        }
    }

    //validate the request
    if(vaidateRequest(res, params)){
        processRequest(res, params);
    }
});

const port  = 8081; //another port so we can have it working with geoserver
server.listen(port,  () => {
    console.warn('WMS Server listening on http://localhost:%s', port);
});
As mentioned, our handler is going to be a simple one; therefore we will hardcode some logic that otherwise should be made dynamic, and thanks to that we'll keep the example clear.
Let's perform a simple checkup on the request parameter first so we can ensure that the submitted request is valid. According to the OGC specification, WMS should output exceptions in a specified form driven by the exception format parameter. In this case though, we will simply output 400, as handling exceptions the way that complies to the specs is not our task at this time. Our validation handler will therefore look like this:
/**
 * validates the WMS request; returns true if the request is valid and false otherwise. if request is nod valid response writes 400 and closes
 */
const validateRequest = (res, params) => {
    var valid = true;
    try {
        for(var validator of validationRules){
            validator(params);
        }
    }
    catch(e){
        valid = false;
        handleError(res, e);
    }
    return valid;
}

/**
 * handles exception response
 */
const handleError = (res, msg) => {
    res.statusCode = 400;
    res.end(msg);
};
We'll need some validation rules too:
const validationRules = [
    (params) => {validateParamPresence(params, 'service')},
    (params) => {if(params.service !== 'WMS'){throw 'This service only
    supports WMS'}},
    (params) => {validateParamPresence(params, 'version')},
    (params) => {if(params.version !== '1.1.1'){throw 'The only supported version
    is 1.1.1';}}, (...)
];
Once our request is validated, we should be able to render a map image safely (without errors). In order to do so, we have to talk to our database and for this, we need the pg module first:
npm install --pg save
Let's extract the params we need to process the request:
/**
 * generates wms output based on the params. params should be validated prior to calling this method
 */
const processRequest = (res, params) => {

    //prepare some params first
    let w = parseInt(params.width);
    let h = parseInt(params.height);
    let bb = params.bbox.split(',');
    let minX = parseFloat(bb[0]);
    let minY = parseFloat(bb[1]);
    let maxX = parseFloat(bb[2]);
    let maxY = parseFloat(bb[3]);
    let format = getGdalFormat(params.format);

    //get table name based on tile resolution expressed in map units
    let tableName = getTableName(Math.abs(maxX - minX) / w);
}
The database connection skeleton is not very complex and actually it is pretty much what we have seen before:
//init client with the appropriate conn details
const client = new pg.Client({
    host: 'localhost',
    port: 5434,
    user: 'postgres',
    password: 'postgres',
    database: 'mastering_postgis'
});

//connect to the database
client.connect(function(err){
    if(err){
        handleError(err);
        return;
    }

    let query = `TODO`;

    client.query(query, function(err, result){
       client.end();

       if(err){
           handleError(err);
           return;
       }

       //handle response
       res.statusCode = 200;
       res.setHeader('content-type', params.format);
       res.end(result.rows[0].rast);
    });
});
The last part we have left is the actual query. We have experimented with it a bit, so it is now time to make it dynamic:
let query = `
select
   --3. union our empty canvas with the extracted raster and resize it to the requested tile size
   ST_AsGDALRaster(
        ST_Resample(
            ST_Union(rast),
            $1::integer,
            $2::integer,
            NULL,NULL,0,0,'Cubic',0.125
        ),
        $3
   )as rast
from (
   --1. empty raster based on the passed bounds and raster settings of the raster data is extracted from;
   --this is our 'canvas' we will paint the extracted raster on.
   --this lets us always output a raster that extends to the requested bounds
   select ST_AsRaster(ST_MakeEnvelope($4,$5,$6,$7,4326), (select rast from webgis.${tableName} limit 1)) as rast

   --2. extract the tiles of the raster that interset with bounds of out request and clip them to the requested bound
   union all select
      ST_Clip(
         ST_Union(rast),
         ST_MakeEnvelope($4,$5,$6,$7,4326)
      )as rast
   from
      webgis.${tableName}
   where
      ST_Intersects(rast, ST_MakeEnvelope($4,$5,$6,$7,4326))
) as preselect
;
As you can see, the preceding query is almost the same as the one we saw already; the main difference is its parameterization. Also, I have added a ST_Resample call with the Cubic resampling algorithm, so the resized images look smooth, and an ST_AsGDALRaster call so we get the binary data that we can pipe straight into the response.
At this stage, our WMS handler should be ready, so let's launch it via the node index.js command and paste the following URL into the browser's address bar: http://localhost:8081/?SERVICE=WMS&VERSION=1.1.1&REQUEST=GetMap&FORMAT=image%2Fpng&TRANSPARENT=true&STYLES&LAYERS=ne_raster&&WIDTH=256&HEIGHT=256&SRS=EPSG%3A4326&BBOX=-11.25%2C33.75%2C0%2C45.
The expected output is the Iberian Peninsula cut out of an o_2_ne_raster table:
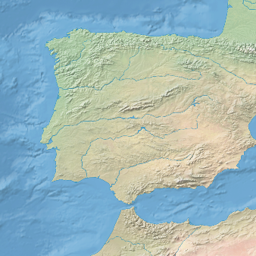
Congratulations! You have just created your very own Geo-Server capable of serving WMS GetMap requests. Obviously, our implementation is quite limited and should be considered a rather basic one--our point though was to consume PgRaster, not to create a full- blown service.