Table of Contents for
Linux Essentials for Cybersecurity, First Edition
 Linux Essentials for Cybersecurity, First Edition
Published by
Pearson IT Certification, 2018
Linux Essentials for Cybersecurity, First Edition
Published by
Pearson IT Certification, 2018
- Cover Page
- Title Page
- Copyright Page
- Contents at a Glance
- Table of Contents
- About the Author
- Dedication
- Acknowledgments
- About the Technical Reviewers
- We Want to Hear from You!
- Reader Services
- Introduction
- Part I: Introducing Linux
- Chapter 1: Distributions and Key Components
- Chapter 2: Working on the Command Line
- Chapter 3: Getting Help
- Chapter 4: Editing Files
- Chapter 5: When Things Go Wrong
- Part II: User and Group Accounts
- Chapter 6: Managing Group Accounts
- Chapter 7: Managing User Accounts
- Chapter 8: Develop an Account Security Policy
- Part III: File and Data Storage
- Chapter 9: File Permissions
- Chapter 10: Manage Local Storage: Essentials
- Chapter 11: Manage Local Storage: Advanced Features
- Chapter 12: Manage Network Storage
- Chapter 13: Develop a Storage Security Policy
- Part IV: Automation
- Chapter 14: Crontab and At
- Chapter 15: Scripting
- Chapter 16: Common Automation Tasks
- Chapter 17: Develop an Automation Security Policy
- Part V: Networking
- Chapter 18: Networking Basics
- Chapter 19: Network Configuration
- Chapter 20: Network Service Configuration: Essential Services
- Chapter 21: Network Service Configuration: Web Services
- Chapter 22: Connecting to Remote Systems
- Chapter 23: Develop a Network Security Policy
- Part VI: Process and Log Administration
- Chapter 24: Process Control
- Chapter 25: System Logging
- Part VII: Software Management
- Chapter 26: Red Hat–Based Software Management
- Chapter 27: Debian-Based Software Management
- Chapter 28: System Booting
- Chapter 29: Develop a Software Management Security Policy
- Part VIII: Security Tasks
- Chapter 30: Footprinting
- Chapter 31: Firewalls
- Chapter 32: Intrusion Detection
- Chapter 33: Additional Security Tasks
- Appendix A: Answers to Review Questions
- Appendix B: Resource Guide
- Glossary
Chapter 33 Additional Security Tasks
As you have likely learned by now, security on Linux is a huge topic. There is really so much more you can learn and so much more we could have included in this book.
Consider this final chapter a collection of different security features that we, the authors, wanted to cover but that just did not fit logically anywhere else in the book. In this chapter, you learn how to use the fail2ban service to temporarily block access to a system. You also learn how to set up a basic VPN (virtual private network) and secure files using the gpg utility. Lastly, you learn about security sites that provide useful alerts.
After reading this chapter and completing the exercises, you will be able to do the following:
Configure the fail2ban service.
Set up a virtual private network.
Encrypt files using gpg.
Use security sites to become informed about security issues.
The fail2ban Service
The fail2ban daemon scans specific log files, searching for IP addresses of systems that attempt to breach a system via repeated connection attempts. This service is not typically installed by default on most distributions, so you will need to install it with either the yum or apt-get command.
After installing the utility, you will have a new configuration directory: /etc/fail2ban. The primary configuration file is /etc/fail2ban/jail.conf. However, if you look at this file, you will likely see the message displayed in Example 33-1.
Example 33-1 The fail2ban Configuration File Warning
# HOW TO ACTIVATE JAILS:
#
# YOU SHOULD NOT MODIFY THIS FILE.
#
# It will probably be overwritten or improved in a distribution update.
#
# Provide customizations in a jail.local file or a jail.d/customisation.local.
# For example to change the default bantime for all jails and to enable the
# ssh-iptables jail the following (uncommented) would appear in the .local file.
# See man 5 jail.conf for details.
The problem that you run into in modifying this file directly is that updates to the fail2ban software package could result in overriding this file. As the warning in this file recommends, you can create .local files with customizations.
The file is called jail.conf because remote hosts are placed in a “jail” due to suspicious activity. As with a real jail, the intent is to let the hosts out of jail after a specific period of time.
Some key settings in this file are described in Table 33-1.
Table 33-1 Key fail2ban Configuration Settings
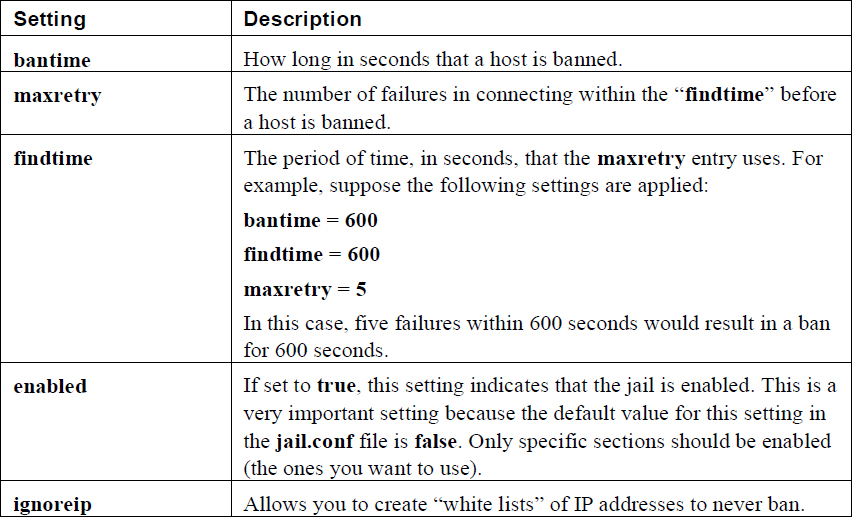
In addition to the global settings described in Table 33-1, there are sections for different “jails.” For example, you can have a section related to SSH connections, like the following:
[sshd]
enabled = true
maxretry = 3
This is a very simple example, and there are many other possible features you can use in the section. For example, you could create a custom action rule, including sending someone an email in the event the rule is used to block an IP address:
[sshd]
enabled = true
maxretry = 3
action   = iptables[name=SSH, port=ssh, protocol=tcp]
           sendmail-whois[name=SSH, dest=root, sender=fail2ban@example.com]
The action setting tells the fail2ban daemon what actions to take. The actions are normally defined in the /etc/fail2ban/action.d/iptables.conf file, which you can review to determine more about what these actions are designed to do.
OpenVPN
Consider an organization that is geographically located in a single building in San Diego, California. This organization provides its employees access to sensitive data from a locally administered database. By keeping all of the data transfer of this sensitive data within the company’s physical network (on the local area network, or LAN), the company enjoys a higher level of security than if the data were transmitted over the Internet (a wide area network, or WAN).
However, as the company grows, this method of providing access to the data becomes a hindrance. Employees who need to travel to meet clients cannot access this important data. The company is also considering expanding by acquiring a company based in New York City, but there are concerns as to how the data would be shared.
You are the system administrator for the company and it is your responsibility to develop a viable (and secure) solution. Fortunately for you, there is virtual private network (VPN). With this VPN, you can securely transfer data between a VPN server and a VPN client. This feature is much like how Secure Shell (SSH) provides secure data transfer; it makes use of public and private keys to encrypt and decrypt the data. All of the routers between the VPN server and VPN client only see encrypted data.
Several different VPN-based software packages are available for Linux; one of the most common VPN solutions is called OpenVPN. This is an open source variation of VPN software.
Most likely your distribution does not include OpenVPN by default. You will likely need to install openvpn and perhaps some additional software. For example, on an Ubuntu system, you should install the following:
root@onecoursesource:~# apt-get install openvpn easy-rsa
In order to configure OpenVPN, you must perform five primary steps:
• Configure a Certificate Authority (CA).
• Generate the VPN Server certificate.
• Generate the VPN Client certificate.
• Configure the VPN server.
• Configure the VPN client.
Configuring the Certificate Authority
The first step in setting up the CA is to create a directory and copy some files from the /usr/share/easy-rsa directory:
root@onecoursesource:~# mkdir /etc/openvpn/easy-rsa
root@onecoursesource:~# cp -r /usr/share/easy-rsa/* /etc/openvpn/easy-rsa
The /usr/share/easy-rsa directory contains configuration files and scripts that are used to generate the CA. Before you execute the scripts, you should edit the following settings in the /etc/openvpn/easy-rsa/vars file:
export KEY_COUNTRY="US"
export KEY_PROVINCE="CA"
export KEY_CITY="SanDiego"
export KEY_ORG="One-Course-Source"
export KEY_EMAIL="bo@onecoursesource.com"
export KEY_OU="MyOrg"
export KEY_ALTNAMES="OCS"
Of course, use the values that make the most sense for your organization. The next step is to change the directory to /etc/openvpn/easy-rsa (using the cd command) and execute the following three commands:
source vars
./clean-all
./build-ca
These steps are demonstrated in Example 33-2. Note that you will be asked questions that have default values that you provided in the /etc/openvpn/easy-rsa/vars file. Just press the Enter key to accept these defaults.
root@onecoursesource:~# cd /etc/openvpn/easy-rsa
root@onecoursesource:/etc/openvpn/easy-rsa# source vars
NOTE: If you run ./clean-all, I will be doing a rm -rf on /etc/openvpn/easy-rsa/keys
root@onecoursesource:/etc/openvpn/easy-rsa# ./clean-all
root@onecoursesource:/etc/openvpn/easy-rsa# ./build-ca
Generating a 2048 bit RSA private key
..................+++
.....+++
writing new private key to 'ca.key'
-----
You are about to be asked to enter information that will be incorporated
into your certificate request.
What you are about to enter is what is called a Distinguished Name or a DN.
There are quite a few fields but you can leave some blank
For some fields there will be a default value,
If you enter '.', the field will be left blank.
-----
Country Name (2 letter code) [US]:
State or Province Name (full name) [CA]:
Locality Name (eg, city) [SanDiego]:
Organization Name (eg, company) [One-Course-Source]:
Organizational Unit Name (eg, section) [MyVPN]:
Common Name (eg, your name or your server's hostname) [MyVPN]:
Name [MyVPN]:
Email Address [bo@onecoursesource.com]:
root@onecoursesource:/etc/openvpn/easy-rsa#
Note
The source command is just the shell source command that will read the variable settings from the vars file and create these variables in the current shell. This is needed because the ./build-ca script does not read the variables from the vars file, but rather from the current shell variables.
Generating the VPN Server Certificate
The next step in this process is to create the certificates for the specific client and the server. To create the server certificate, execute the ./build-key-server script followed by the name you want to give your server, as demonstrated in Example 33-3. You will be asked several questions, and you can just accept the default for most of them by pressing the Enter key. However, you must answer y for two questions:
Sign the certificate? [y/n]:
and
1 out of 1 certificate requests certified, commit? [y/n]
Example 33-3 Creating the Server Certificate
root@onecoursesource:/etc/openvpn/easy-rsa# ./build-key-server ocs-server
Generating a 2048 bit RSA private key
.......................................+++
.................................+++
writing new private key to 'ocs-server.key'
-----
You are about to be asked to enter information that will be incorporated
into your certificate request.
What you are about to enter is what is called a Distinguished Name or a DN.
There are quite a few fields but you can leave some blank
For some fields there will be a default value,
If you enter '.', the field will be left blank.
-----
Country Name (2 letter code) [US]:
State or Province Name (full name) [CA]:
Locality Name (eg, city) [SanDiego]:
Organization Name (eg, company) [One-Course-Source]:
Organizational Unit Name (eg, section) [MyVPN]:
Common Name (eg, your name or your server's hostname) [ocs-server]:
Name [MyVPN]:
Email Address [bo@onecoursesource.com]:

Please enter the following 'extra' attributes
to be sent with your certificate request
A challenge password []:
An optional company name []:
Using configuration from /etc/openvpn/easy-rsa/openssl-1.0.0.cnf
Check that the request matches the signature
Signature ok
The Subject's Distinguished Name is as follows
countryName           :PRINTABLE:'US'
stateOrProvinceName   :PRINTABLE:'CA'
localityName          :PRINTABLE:'SanDiego'
organizationName      :PRINTABLE:'One-Course-Source'
organizationalUnitName:PRINTABLE:'MyVPN'
commonName            :PRINTABLE:'ocs-server'
name                  :PRINTABLE:'MyVPN'
emailAddress          :IA5STRING:'bo@onecoursesource.com'
Certificate is to be certified until Jan 16 23:39:58 2026 GMT (3650 days)
Sign the certificate? [y/n]:y


1 out of 1 certificate requests certified, commit? [y/n]y
Write out database with 1 new entries
Data Base Updated
Next, you need to execute the following script to generate the dh (Diffie-Hellman key exchange method) parameters:
root@onecoursesource:/etc/openvpn/easy-rsa# ./build-dh
Generating DH parameters, 2048 bit long safe prime, generator 2
This is going to take a long time
............................................+.............................
As you can see from the output of the previous command, it takes a while to execute, and you will see a lot more dots and plus signs that we have included in the previous output.
The result now should be a set of keys in the /etc/openvpn/easy-rsa/keys directory:
root@onecoursesource:/etc/openvpn/easy-rsa# ls keys
01.pem  ca.key      index.txt       index.txt.old   ocs-server.csr  serial
ca.crt  dh2048.pem  index.txt.attr  ocs-server.crt  ocs-server.key  serial.old
The new key should be placed in the /etc/openvpn directory, assuming that the current machine is the VPN server:
root@onecoursesource:/etc/openvpn/easy-rsa# cd keys root@onecoursesource:/etc/openvpn/easy-rsa/keys# cp ocs-server.crtocs-server.key ca.crt dh2048.pem /etc/openvpn
Generating the VPN Client Certificate
The process for creating a VPN client certificate is similar to creating a server certificate. Each client system needs a certificate, so you may perform these steps several times.
Return to the /etc/openvpn/easy-rsa directory and execute the ./build-key script, providing the name of the client as an argument. See Example 33-4 for a demonstration.
Example 33-4 Creating the Client Certificate
root@onecoursesource:/etc/openvpn/easy-rsa/keys# cd /etc/openvpn/easy-rsa
root@onecoursesource:/etc/openvpn/easy-rsa# ./build-key vpnclient1
Generating a 2048 bit RSA private key
........................+++
.....+++
writing new private key to 'vpnclient1.key'
-----
You are about to be asked to enter information that will be incorporated
into your certificate request.
What you are about to enter is what is called a Distinguished Name or a DN.
There are quite a few fields but you can leave some blank
For some fields there will be a default value,
If you enter '.', the field will be left blank.
-----
Country Name (2 letter code) [US]:
State or Province Name (full name) [CA]:
Locality Name (eg, city) [SanDiego]:
Organization Name (eg, company) [One-Course-Source]:
Organizational Unit Name (eg, section) [MyVPN]:
Common Name (eg, your name or your server's hostname) [vpnclient1]:
Name [MyVPN]:
Email Address [bo@onecoursesource.com]:

Please enter the following 'extra' attributes
to be sent with your certificate request
A challenge password []:
An optional company name []:
Using configuration from /etc/openvpn/easy-rsa/openssl-1.0.0.cnf
Check that the request matches the signature
Signature ok
The Subject's Distinguished Name is as follows
countryName           :PRINTABLE:'US'
stateOrProvinceName   :PRINTABLE:'CA'
localityName          :PRINTABLE:'SanDiego'
organizationName      :PRINTABLE:'One-Course-Source'
organizationalUnitName:PRINTABLE:'MyVPN'
commonName            :PRINTABLE:'vpnclient1'
name                  :PRINTABLE:'MyVPN'
emailAddress          :IA5STRING:'bo@onecoursesource.com'
Certificate is to be certified until Jan 17 00:01:30 2027 GMT (3650 days)
Sign the certificate? [y/n]:y


1 out of 1 certificate requests certified, commit? [y/n]y
Write out database with 1 new entries
Data Base Updated
There will be new keys in the /etc/openvpn/easy-rsa/keys directory:
root@onecoursesource:/etc/openvpn/easy-rsa# ls keys
01.pem  dh2048.pem          index.txt.old   serial          vpnclient1.key
02.pem  index.txt           ocs-server.crt  serial.old
ca.crt  index.txt.attr      ocs-server.csr  vpnclient1.crt
ca.key  index.txt.attr.old  ocs-server.key  vpnclient1.csr
These keys need to be copied to the VPN client: the ca.crt, vpnclient1.crt, and vpnclient1.key files.
Setting Up the Basic Server
The OpenVPN software package comes with some sample configuration files. On a typical Ubuntu system, these files are located in the following directory:
root@onecoursesource:~# ls /usr/share/doc/openvpn/examples/sample-config-files
client.conf      loopback-server      README              tls-home.conf
firewall.sh      office.up            server.conf.gz      tls-office.conf
home.up          openvpn-shutdown.sh  static-home.conf    xinetd-client-config
loopback-client  openvpn-startup.sh   static-office.conf  xinetd-server-config
Copy the server.conf.gz file to the /etc/openvpn directory and extract the contents with the gunzip command:
root@onecoursesource:~# cp /usr/share/doc/openvpn/examples/sample-
Change the following settings to match the files on your system:
# OpenVPN can also use a PKCS #12 formatted key file
# (see "pkcs12" directive in man page).
ca ca.crt
cert server.crt
key server.key  # This file should be kept secret

# Diffie hellman parameters.
# Generate your own with:
#   openssl dhparam -out dh1024.pem 1024
# Substitute 2048 for 1024 if you are using
# 2048 bit keys.
dh dh1024.pem
For example, these settings might be as follows:
ca ca.crt
cert ocs-server.crt
key ocs-server.key  # This file should be kept secret
dh dh2048.pem
Now, start the openvpm service and test the configuration by viewing the new network interface, tun0:
root@onecoursesource:~# ifconfig tun0
tun0      Link encap:UNSPEC  HWaddr 00-00-00-00-00-00-00-00-00-00-00-00-00-00-00-00
          inet addr:10.8.0.1  P-t-P:10.8.0.2  Mask:255.255.255.255
          UP POINTOPOINT RUNNING NOARP MULTICAST  MTU:1500  Metric:1
          RX packets:0 errors:0 dropped:0 overruns:0 frame:0
          TX packets:0 errors:0 dropped:0 overruns:0 carrier:0
          collisions:0 txqueuelen:100
          RX bytes:0 (0.0 B)  TX bytes:0 (0.0 B)
Setting Up the Basic Client
For the client setup, first make sure the openvpn software is installed. Then copy the client configuration file to the /etc/openvpn directory:
root@onecoursesource:~# cp /usr/share/doc/openvpn/
Also make sure you copy over the following files from the VPN server system and put these in the /etc/openvpn directory (remember the client filenames may differ, but be sure to copy over the .crt and .key files only):
• ca.crt
• vpnclient1.crt
• vpnclient1.key
Edit the /etc/openvpn/client.conf file and make sure the following settings are correct:
ca ca.crt
cert vpnclient1.crt
key vpnclient1.key
In the /etc/openvpn/client.conf file, you’ll see a setting similar to the following:
remote my-server-1 1194
Here, my-server-1 must be changed to the hostname of the VPN server. The value 1194 is the port number; 1194 is the standard VPN port. Also, you must include the client setting. Here’s an example:
client
remote vpnserver.onecoursesource.com 1194
Next, start the openvpm service and test the configuration by viewing the new network interface, tun0:
root@onecoursesource:~# ifconfig tun0
tun0      Link encap:UNSPEC  HWaddr 00-00-00-00-00-00-00-00-00-00-00-00-00-00-00-00
          inet addr:10.8.0.6  P-t-P:10.8.0.5  Mask:255.255.255.255
          UP POINTOPOINT RUNNING NOARP MULTICAST  MTU:1500  Metric:1
          RX packets:0 errors:0 dropped:0 overruns:0 frame:0
          TX packets:0 errors:0 dropped:0 overruns:0 carrier:0
          collisions:0 txqueuelen:100
          RX bytes:0 (0.0 B)  TX bytes:0 (0.0 B)
Now, how can you tell that this really works? Notice that the tun0 interface is in a completely different network than your local network:
root@ubuntu:/etc/openvpn# ifconfig eth0
eth0      Link encap:Ethernet  HWaddr 08:00:27:ca:89:f1
          inet addr:192.168.1.25  Bcast:192.168.1.255  Mask:255.255.255.0
          inet6 addr: fe80::a00:27ff:feca:89f1/64 Scope:Link
          UP BROADCAST RUNNING MULTICAST  MTU:1500  Metric:1
          RX packets:785 errors:0 dropped:0 overruns:0 frame:0
          TX packets:307 errors:0 dropped:0 overruns:0 carrier:0
          collisions:0 txqueuelen:1000
          RX bytes:88796 (88.7 KB)  TX bytes:39865 (39.8 KB)
In fact, your new tun0 interface is not directly routable outside of the current network. However, if you did everything right, the following should work:
root@onecoursesource:~# ping -c 4 10.8.0.1
PING 10.8.0.1 (10.8.0.1) 56(84) bytes of data.
64 bytes from 10.8.0.1: icmp_seq=1 ttl=64 time=0.732 ms
64 bytes from 10.8.0.1: icmp_seq=2 ttl=64 time=1.68 ms
64 bytes from 10.8.0.1: icmp_seq=3 ttl=64 time=1.76 ms
64 bytes from 10.8.0.1: icmp_seq=4 ttl=64 time=0.826 ms

--- 10.8.0.1 ping statistics ---
4 packets transmitted, 4 received, 0% packet loss, time 3003ms
rtt min/avg/max/mdev = 0.732/1.253/1.768/0.477 ms
That IP address that you just “pinged” is the VPN server IP address (note that it may be different from this example; double-check the tun0 interface on the server when you test this).
How does this work? Any attempt to connect to 10.8.0.1 will result in the local OpenVPN capturing the network packet, encrypting it, and then sending it to the correct “real IP” address of the server.
But, how does it “capture” the packet? It essentially sets itself up as a router for the network associated with the tun0 interface. You can see this by executing the route command:
root@onecoursesource:~# route
Kernel IP routing table
Destination     Gateway         Genmask         Flags Metric Ref    Use Iface
default         192.168.1.1     0.0.0.0         UG    0      0        0 eth0
10.8.0.1        10.8.0.5        255.255.255.255 UGH   0      0        0 tun0
10.8.0.5        *               255.255.255.255 UH    0      0        0 tun0
192.168.1.0     *               255.255.255.0   U     0      0        0 eth0
192.168.122.0   *               255.255.255.0   U     0      0        0 virbr0
One last note: there are a lot of “moving parts” when it comes to a VPN. If you follow all the steps carefully, it should work for you. However, if you make a mistake, first look at the VPN log. For example, suppose you forgot to copy the client files to the /etc/openvpn directory, causing the VPN client service to fail to start. A quick look at the log file (and an obligatory slap on the forehead) is all you should need to determine where the problem resides (see Example 33-5).
Example 33-5 Viewing the VPN Log File
root@onecoursesource:~# grep -i vpn /var/log/syslog
Jan 19 16:47:18 ubuntu NetworkManager[1148]: <info> VPN: loaded org.freedesktop.NetworkManager.pptp
Jan 19 17:09:02 ubuntu NetworkManager[1304]: <info> VPN: loaded org.freedesktop.NetworkManager.pptp
Jan 19 17:09:03 ubuntu ovpn-client[1407]: Options error: --ca fails with 'ca.crt': No such file or directory
Jan 19 17:09:03 ubuntu ovpn-client[1407]: Options error: --cert fails with 'client.crt': No such file or directory
Jan 19 17:09:03 ubuntu ovpn-client[1407]: Options error: --key fails with 'client.key': No such file or directory
Jan 19 17:09:03 ubuntu ovpn-client[1407]: Options error: Please correct these errors.
Jan 19 17:09:03 ubuntu ovpn-client[1407]: Use --help for more information.
Jan 19 17:45:15 ubuntu ovpn-client[3389]: Options error: --ca fails with 'ca.crt': No such file or directory
Jan 19 17:45:15 ubuntu ovpn-client[3389]: Options error: --cert fails with 'vpnclient1.crt': No such file or directory
Jan 19 17:45:15 ubuntu ovpn-client[3389]: Options error: --key fails with 'vpnclient1.key': No such file or directory
Jan 19 17:45:15 ubuntu ovpn-client[3389]: Options error: Please correct these errors.
Jan 19 17:45:15 ubuntu ovpn-client[3389]: Use --help for more information.
gpg
The GNU Privacy Guard utility, gpg, can be used to create public and private encryption keys. These keys can be used for several features, including encrypting a file so the data in the file is more secure when transported to another system.
The first step is to create the encryption keys by using the gpg --gen-key command. The result of this command will be a collection of files in the ~/.gnupg directory that can be used to encrypt data or digitally sign messages. See Example 33-6 for an example.
Example 33-6 The gpg --gen-key Command
root@onecoursesource:~# gpg --gen-key
gpg (GnuPG) 1.4.16; Copyright (C) 2013 Free Software Foundation, Inc.
This is free software: you are free to change and redistribute it.
There is NO WARRANTY, to the extent permitted by law.

Please select what kind of key you want:
   (1) RSA and RSA (default)
   (2) DSA and Elgamal
   (3) DSA (sign only)
   (4) RSA (sign only)
Your selection? 1
RSA keys may be between 1024 and 4096 bits long.
What keysize do you want? (2048)
Requested keysize is 2048 bits
Please specify how long the key should be valid.
         0 = key does not expire
<n>  = key expires in n days
<n>w = key expires in n weeks
<n>m = key expires in n months
<n>y = key expires in n years
Key is valid for? (0)
Key does not expire at all
Is this correct? (y/N) y
You need a user ID to identify your key; the software constructs the user ID
from the Real Name, Comment and Email Address in this form:
    "Heinrich Heine (Der Dichter) <heinrichh@duesseldorf.de>"


Real name: June Jones
Email address: june@jones.com
Comment: Test
You selected this USER-ID:
    "June Jones (Test) <june@jones.com>"

Change (N)ame, (C)omment, (E)mail or (O)kay/(Q)uit?O
You need a Passphrase to protect your secret key.

We need to generate a lot of random bytes. It is a good idea to perform
some other action (type on the keyboard, move the mouse, utilize the
disks) during the prime generation; this gives the random number
generator a better chance to gain enough entropy.
gpg: key 1946B1F2 marked as ultimately trusted
public and secret key created and signed.

gpg: checking the trustdb
gpg: 3 marginal(s) needed, 1 complete(s) needed, PGP trust model
gpg: depth: 0  valid:   1  signed:   0  trust: 0-, 0q, 0n, 0m, 0f, 1u
pub   2048R/1946B1F2 2017-06-05
      Key fingerprint = 1D6A D774 A540 F98C EBF0  2E93 49D5 711C 1946 B1F2
uid                  June Jones (Test) <june@jones.com>
sub   2048R/FED22A14 2019-06-05
What Could Go Wrong?
If you get the message “Not enough random bytes available. Please do some other work to give the OS a chance to collect more entropy!”, then continue working on your system, and it will eventually generate enough random bytes. This error occurs because the system generates the encryption key from random items in the system’s random access memory (RAM), which fills based on system operations. If you are impatient, try running a system-intensive command, such as sudo find / -type f | xargs grep blahblahblah > /dev/null.
In order for a user to encrypt data to send to you, they need your public key. To send this public key to a user, first execute the following command to create a public key file:
gpg --output pub_key_file --export 'June Jones'
The --output option is used to specify the name of the public key file. The --export option is used to specify the key that you want to send.
After sending the public key, the receiving user imports the key into their GPG database by executing the following command (pub_key_file is the file they received from you):
gpg --import pub_key_file
Then the user can encrypt a file using the following command:
gpg --encrypt --recipient june@jones.com data.txt
After the file has been encrypted, the only way it can be decrypted is with the private key on your system using the gpg --decrypt command.
Security Alert Services
Security alert services provide timely information about current security issues, vulnerabilities, and exploits. Several services are available that are designed to provide you with important security alerts. Here are a few of these services:
• BugTraq: This service is an email-based program that is sponsored by Security Focus (www.securityfocus.com). Per the website, “BugTraq is a full disclosure moderated mailing list for the *detailed* discussion and announcement of computer security vulnerabilities: what they are, how to exploit them, and how to fix them.” To subscribe to the list, visit the following link: http://www.securityfocus.com/archive/1/description#0.3.1.
• CERT: Generically, the term CERT stands for Computer Emergency Response Teams. In this case, however, there is a specific CERT that this refers to: The CERT Coordination Center (CERT-CC) at Carnegie Mellon University (CMU). This organization is a component of a larger organization at CMU called the Software Engineering Institute (SEI). CERT provides a variety of features, including vulnerability analysis tools, a knowledgebase of vulnerability notes, and coordination with private and governmental organizations regarding security issues. Visit www.cert.org to learn more about this organization.
• US-CERT: The United States CERT (www.us-cert.gov). The National Cybersecurity and Communications Center (NCCIC) is found at this site. Per the website, US-CERT is “the Nation’s flagship cyber defense, incident response, and operational integration center,” and its mission is “to reduce the Nation’s risk of systematic cybersecurity and communications challenges.”
Summary
When it comes to security, you will find that there is always more to learn. This chapter covered some additional security topics that did not fit logically in other chapters of this book. You discovered how you can secure files for transport by encrypting them with the gpg utility. You also learned how to configure fail2ban and OpenVPN. Lastly, you learned about security websites that can provide you with important information regarding security issues.
Key Terms
Review Questions
1. The primary configuration file for the fail2ban utility is the /etc/fail2ban/_____ file.
2. Which of the following settings of the fail2ban configuration file will allow you to “white list” IP addresses?
a. white-list
b. ignoreip
c. allowip
d. white-ip-list
3. Which of following is the correct way to specify a section called “sshd” in a fail2ban configuration file?
a. “sshd”
b. <sshd>
c. [sshd]
d. {sshd}
4. Before you create an OpenVPN CA, you should execute the following command: _____ vars.
5. Which of the following scripts will create an OpenVPN CA when executed in the /etc/openvpn/easy-rsa directory?
a. ./create-ca
b. ./set-ca
c. ./generate-ca
d. ./build-ca
6. To generate the Diffie-Hellman parameters, execute the build-dh script in the /etc/openvpn/_____ directory.