Table of Contents for
Linux Essentials for Cybersecurity, First Edition
 Linux Essentials for Cybersecurity, First Edition
Published by
Pearson IT Certification, 2018
Linux Essentials for Cybersecurity, First Edition
Published by
Pearson IT Certification, 2018
- Cover Page
- Title Page
- Copyright Page
- Contents at a Glance
- Table of Contents
- About the Author
- Dedication
- Acknowledgments
- About the Technical Reviewers
- We Want to Hear from You!
- Reader Services
- Introduction
- Part I: Introducing Linux
- Chapter 1: Distributions and Key Components
- Chapter 2: Working on the Command Line
- Chapter 3: Getting Help
- Chapter 4: Editing Files
- Chapter 5: When Things Go Wrong
- Part II: User and Group Accounts
- Chapter 6: Managing Group Accounts
- Chapter 7: Managing User Accounts
- Chapter 8: Develop an Account Security Policy
- Part III: File and Data Storage
- Chapter 9: File Permissions
- Chapter 10: Manage Local Storage: Essentials
- Chapter 11: Manage Local Storage: Advanced Features
- Chapter 12: Manage Network Storage
- Chapter 13: Develop a Storage Security Policy
- Part IV: Automation
- Chapter 14: Crontab and At
- Chapter 15: Scripting
- Chapter 16: Common Automation Tasks
- Chapter 17: Develop an Automation Security Policy
- Part V: Networking
- Chapter 18: Networking Basics
- Chapter 19: Network Configuration
- Chapter 20: Network Service Configuration: Essential Services
- Chapter 21: Network Service Configuration: Web Services
- Chapter 22: Connecting to Remote Systems
- Chapter 23: Develop a Network Security Policy
- Part VI: Process and Log Administration
- Chapter 24: Process Control
- Chapter 25: System Logging
- Part VII: Software Management
- Chapter 26: Red Hat–Based Software Management
- Chapter 27: Debian-Based Software Management
- Chapter 28: System Booting
- Chapter 29: Develop a Software Management Security Policy
- Part VIII: Security Tasks
- Chapter 30: Footprinting
- Chapter 31: Firewalls
- Chapter 32: Intrusion Detection
- Chapter 33: Additional Security Tasks
- Appendix A: Answers to Review Questions
- Appendix B: Resource Guide
- Glossary
Chapter 7 Managing User Accounts
Because Linux is a multiuser operating system, security is often based on accounts. Each person is provided a user account that allows the user access to the system.
As an administrator, it is important to know the basics of creating and managing user accounts. In regard to security, you should consider user accounts as one of the biggest potential risks to the system. As a result, properly securing user accounts is a critical system administration task.
In this chapter, you learn more about the concepts of user accounts. You also explore how to create, modify, secure, and delete user accounts.
After reading this chapter and completing the exercises, you will be able to do the following:
Understand the concept of Linux user accounts.
Manage users, including creating, modifying, and deleting user accounts.
Understand network-based user accounts.
Use su and sudo to gain privileged system access.
Restrict user accounts using PAM.
The Importance of User Accounts
User accounts play a critical role on Linux operating systems, including the following:
• Granting system access: User accounts provide a means for users to log in and gain controlled access to the system.
• Securing files and directories: Each file (and directory) is owned by a user account. The user account owner of the file can access the file based on the file permissions.
• Security processes: Each process (program) that is running is owned by a user account. This user account has the right to stop or modify the running process, while other users do not have this access.
• Additional privileges: System administrators can provide special privileges to a user account. This can include the ability to run specific processes or perform specific system operations that other users don’t have the ability to perform.
• Additional authentication: Some software programs verify user accounts for authentication. This means that to run the software programs, the user account and user password (or some other authentication method) is used.
User Account Information
Account data for local users is stored in several different files:
• /etc/passwd: Primary account data.
• /etc/shadow: User passwords and password-related data.
• /etc/group: Group account data, which includes information related to user accounts. Details regarding this file are found in Chapter 6, “Managing Group Accounts.”
• /etc/gshadow: Group account data, which includes information related to user accounts. Details regarding this file are found in Chapter 6.
Note that these files are only used to store local user account information. User accounts can also be provided by network servers, allowing a user to log in to several different systems using the same username and password.
Network-based user accounts are covered in more detail later in this chapter.
The /etc/passwd File
The /etc/passwd file contains basic user account information. However, despite its name, this file doesn’t contain any information related to the users’ passwords.
Example 7-1 demonstrates part of a typical /etc/passwd file.
Example 7-1 The /etc/passwd File
student@onecoursesource:~$ head /etc/passwd
root:x:0:0:root:/root:/bin/bash
daemon:x:1:1:daemon:/usr/sbin:/usr/sbin/nologin
bin:x:2:2:bin:/bin:/usr/sbin/nologin
sys:x:3:3:sys:/dev:/usr/sbin/nologin
sync:x:4:65534:sync:/bin:/bin/sync
games:x:5:60:games:/usr/games:/usr/sbin/nologin
man:x:6:12:man:/var/cache/man:/usr/sbin/nologin
lp:x:7:7:lp:/var/spool/lpd:/usr/sbin/nologin
mail:x:8:8:mail:/var/mail:/usr/sbin/nologin
news:x:9:9:news:/var/spool/news:/usr/sbin/nologin
Security Highlight
As demonstrated in Example 7-1, regular (non-administrator) users can view the /etc/passwd file. This highlights the need to prevent unauthorized access to the system because even a regular user can gain valuable information about the system by viewing the /etc/passwd file. Keep in mind, this is not uncommon for operating systems—regular users can see basic user account information on other operating systems, including Unix, macOS, and Microsoft Windows.
Note that administrators should not change file permissions for the /etc/passwd file because this will cause some programs to not work correctly.
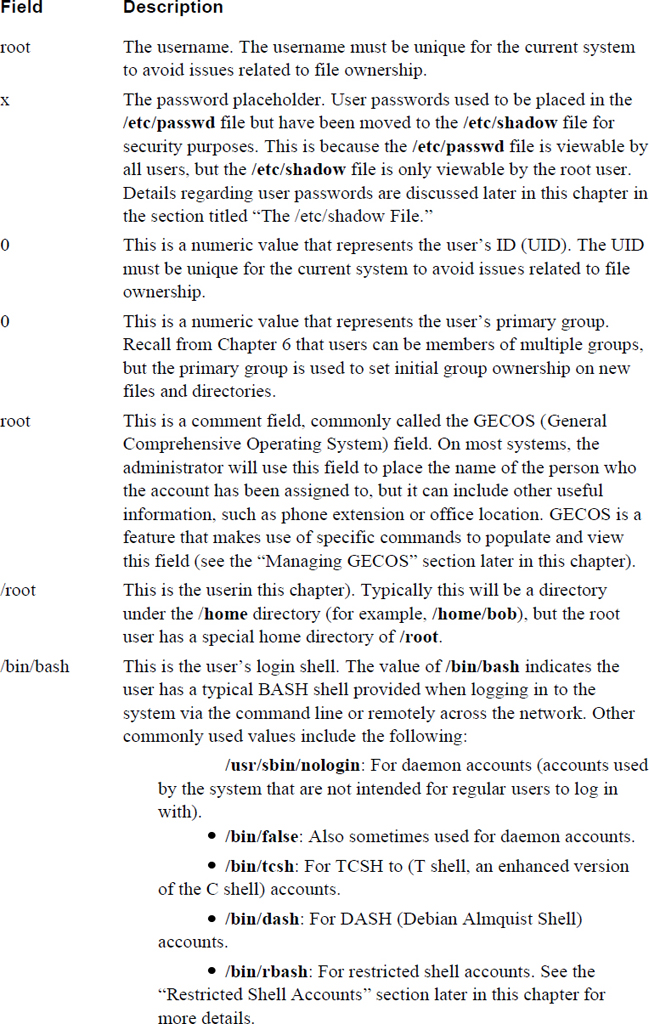
Each line in the /etc/passwd file describes one group. Each line is separated into fields of data, with the colon (:) character as the field separator. Table 7-1 describes these fields using the root:x:0:0:root:/root:/bin/bash line as an example.
Table 7-1 Fields of the /etc/passwd File
Security Highlight
Normally the /etc/passwd file isn’t manually modified. Administrators use commands like useradd, userdel, and usermod to change the contents of the /etc/passwd file. However, administrators can choose to modify the /etc/passwd file manually; as a result, errors in the file can occur. To see if there are any errors in the /etc/passwd file, execute the pwck command while logged in as the root user.
Special Users
A typical Linux system will have many default user accounts. These default user accounts typically have UID values under 1000, making it easy for an administrator to recognize these as special accounts.
Some of these default accounts are often referred to as “daemon accounts” because they are used by daemon-based software. Daemons are programs that run in the background, performing specific system tasks.
Other default accounts may exist to provide features for the operating system. For example, the nobody account is used to apply permissions for files that are shared via NFS (Network File System).
Additionally, if you add new software to the system, more users might be added because software vendors make use of both user and group accounts to provide controlled access to files that are part of the software.
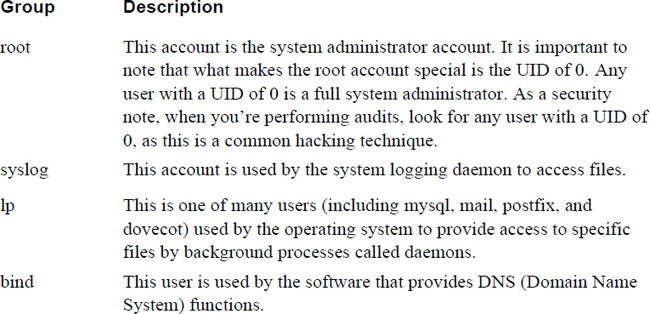
Administrators who are focused on security should be aware of these default user accounts because these accounts can provide either security features or pose security threats. Table 7-2 highlights the more important special group accounts (it is beyond the scope of this book to cover every default user).
Table 7-2 Default User Accounts
Security Highlight
As an administrator, you should be aware of what each user account is designed to do. Take the time to explore all the users listed in your /etc/passwd file and carefully consider the impact of each account. Also, after adding software to the system, review the contents of the /etc/passwd file to determine if new user accounts were added. If new accounts were added, explore the purpose of these new accounts.
The /etc/shadow File
The /etc/passwd file contains some of the user account information, but none of the password information. Ironically, this password data is stored in the /etc/shadow file. This file is only viewable by the root user, which is why more sensitive data regarding passwords is stored in the /etc/shadow file.
Example 7-2 demonstrates part of a typical /etc/shadow file.
Example 7-2 The /etc/shadow File
root@onecoursesource:~# head /etc/shadow root:$6$5rU9Z/H5$sZM3MRyHS24SR/ySv80ViqIrzfhh.p1EWfOic7NzA2zvSjquFKiPgIVJy8/ba.X/mEQ9DUwtQQb2zdSPsEwb8.:17320:0:99999:7::: daemon:*:16484:0:99999:7::: bin:*:16484:0:99999:7::: sys:*:16484:0:99999:7::: sync:*:16484:0:99999:7::: games:*:16484:0:99999:7::: man:*:16484:0:99999:7::: lp:*:16484:0:99999:7::: mail:*:16484:0:99999:7::: news:*:16484:0:99999:7:::
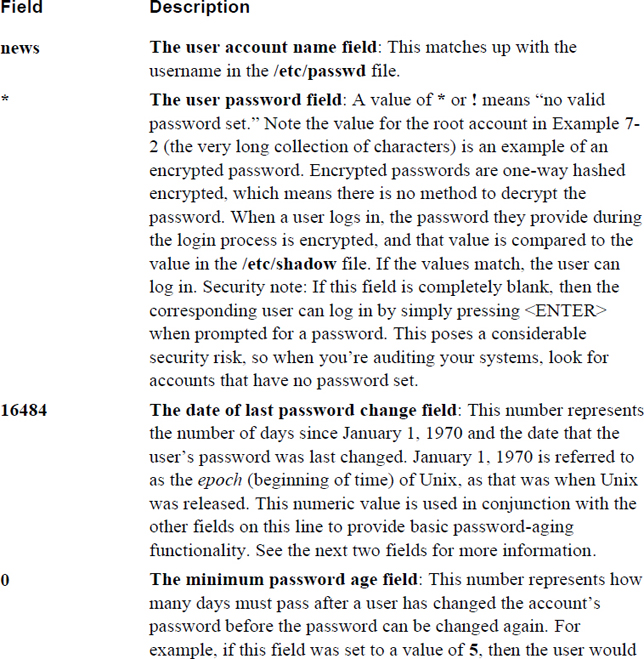
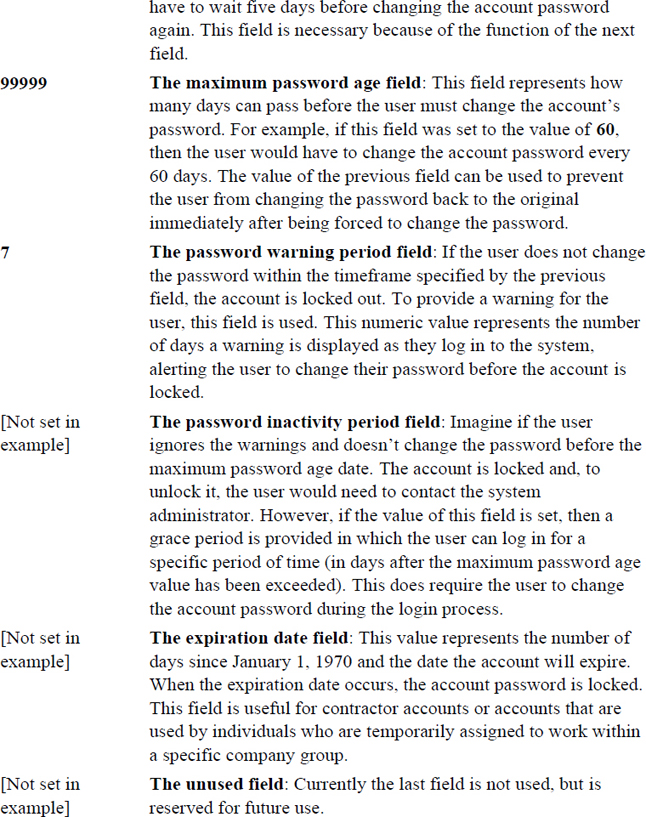
Each line in the /etc/shadow file describes one user account’s password information. Each line is separated into fields of data, with the colon (:) character as the field separator. Table 7-3 describes these fields using the news:*:16484:0:99999:7::: line as an example.
Table 7-3 Fields of the /etc/shadow File
The /etc/shadow file, with password-aging features of minimum password aging, maximum password aging, password inactivity, and other features, tends to cause confusion for beginning Linux users. It is essential for system administrators to understand this account because it provides important user account security features. The example displayed in Figure 7-1 is designed to provide a better understanding of the fields of the /etc/shadow file.
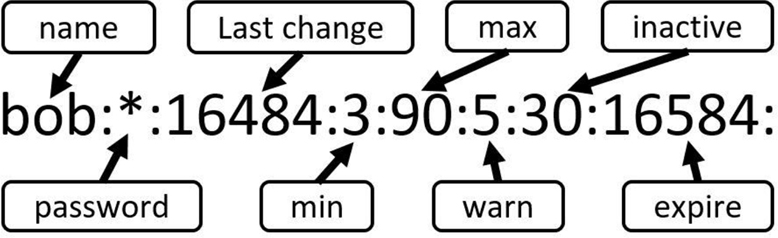
Figure 7-1 The Fields of the /etc/shadow File
Using the values of the sample record displayed in Figure 7-1, we can determine the following about the bob user account:
• It currently has a locked password (* = locked).
• It has been 16,484 days since January 1, 1970 and the last time the account password was changed (or locked in this case). Note that there are tools that we will cover in this chapter to convert standard dates into epoch dates.
• The user must change the account password every 90 days and must keep that new password for at least three days.
• The user is warned during the login process if the account password must be changed within five days.
• If the user exceeds the maximum password-aging value of 90 days, there is a grace period of 30 days. Within the next 30 days, the user can change the account password during the login process.
• The account will expire (be locked) 16,584 days from January 1, 1970.
Conversational Learning™ — Understanding Password Aging
Gary: Hi, Julia. I’m stuck on something related to user passwords.
Julia: What’s the problem, Gary?
Gary: I have a user trying to change his password, but he keeps getting a weird error message.
Julia: Is he using the passwd command to change his password?
Gary: Yep.
Julia: What error message does he get?
Gary: “You must wait longer to change your password.”
Julia: Ah, I assume that he probably has recently changed his password and is now trying to change it again to something else?
Gary: Right. Yesterday the command worked, but today it gives him that error message.
Julia: OK, look at the /etc/shadow file, specifically the line that contains this person’s account data. Look at the fourth field of the line. What value is there?
Gary: 10.
Julia: That means the user must wait ten days after he changes his password before he can change it again. This prevents people from reverting to their previous password right after the system forces them to change to a new password.
Gary: But what if he really needs to have this changed?
Julia: No problem. An administrator can make the change for the user.
Gary: OK, great. Thanks for the info!
Julia: You are welcome!
Managing Users
The process of managing users includes creating new users, modifying existing users, and deleting users. These operations require the privilege provided by the root account.
Creating Users
Create a new group by using the useradd command:
root@onecoursesource:~# useradd timmy
root@onecoursesource:~# tail -1 /etc/passwd
timmy:x:1003:1003::/home/timmy:
root@onecoursesource:~# tail -1 /etc/shadow
timmy:!:17456:0:99999:7:::
Some important notes regarding the useradd command:
• The -u option can be used to assign a UID to the user. If the -u option is omitted, then the next available UID above 1000 is used (on some systems, the next available UID above 500 may be used).
• Notice that although the user’s home directory in the /etc/passwd file was set to /home/timmy, this directory was not created by default. To create this directory, you must use the -m option when issuing the useradd command. Creating the home directory can also be set as the default; see the “Using Defaults” section later in this chapter for more details.
• The new user’s account is locked by default (hence the ! in the second field of the /etc/shadow file). Use the passwd command to set the account password after it has been created.
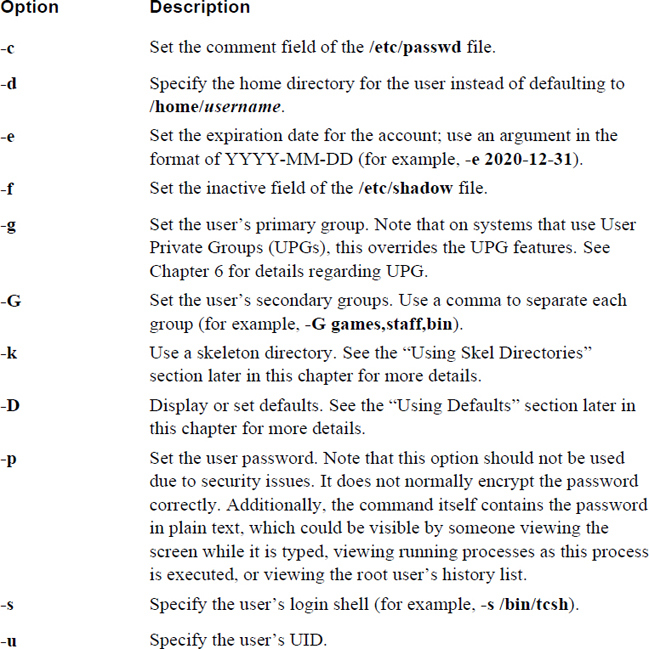
Table 7-4 describes additional useful options for the useradd command.
Table 7-4 Useful useradd Options
What Could Go Wrong
When creating a user, you must use a UID and name that is not currently used; otherwise, you will get errors, as shown next:
root@onecoursesource:~# useradd -u 1002 bob
useradd: UID 1002 is not unique
root@onecoursesource:~# useradd nick
useradd: user 'nick' already exists
Setting the Account Password
After creating the user account, you need to set a password for the user. This is accomplished by using the passwd command:
root@onecoursesource:~# tail -1 /etc/shadow timmy:!:17456:0:99999:7::: root@onecoursesource:~# passwd timmy Enter new UNIX password: Retype new UNIX password: passwd: password updated successfully root@onecoursesource:~# tail -1 /etc/shadow timmy:$6$29m4A.mk$WK/qVgQeJPrUn8qvVqnrbS2m9OCa2A0fx0N3keWM1BsZ9Ft
Using Defaults
You can use options to change how a user is created, but if you don’t use these options, then default values are normally used. Some of these default values can be viewed by using the -D option to the useradd command:
root@onecoursesource:~# useradd -D
GROUP=100
HOME=/home
INACTIVE=-1
EXPIRE=
SHELL=/bin/sh
SKEL=/etc/skel
CREATE_MAIL_SPOOL=no
Some of these values are not exactly accurate. For example, the value GROUP=100 is supposed to mean “place users in the group with the GID of 100 by default”; however, most modern Linux distributions use User Private Groups, so this value is not really used. However, some of these values, like the EXPIRE value, which indicates the default account-expiration date, are used.
These settings can be changed by editing the values found in the /etc/default/useradd file. Several additional default settings can be viewed and modified in the /etc/logins.def file. For example, Example 7-3 shows settings related to default password-aging policies.
Example 7-3 Default Password-Aging Policies
root@onecoursesource:~# grep PASS /etc/login.defs
#    PASS_MAX_DAYS    Maximum number of days a password may be used.
#    PASS_MIN_DAYS    Minimum number of days allowed between password
changes.
#    PASS_WARN_AGE    Number of days warning given before a password
expires.
PASS_MAX_DAYS    99999
PASS_MIN_DAYS    0
PASS_WARN_AGE    7
#PASS_CHANGE_TRIES
#PASS_ALWAYS_WARN
#PASS_MIN_LEN
#PASS_MAX_LEN
# NO_PASSWORD_CONSOLE
Using Skel Directories
Creating a user account is only part of the process. In many cases it would benefit the user to have specific default files placed in the user’s home directory. This can be accomplished by using skeleton directories.
When a skeleton directory is used, the entire contents of the specified directory are copied to the new user’s home directory. The files that are copies are also automatically owned by the new user, as Example 7-4 demonstrates.
Example 7-4 Files Are Owned by the New User
root@onecoursesource:~# ls -lA /etc/skel
total 12
-rw-r--r--   1 root root   220 Apr  8  2014 .bash_logout
-rw-r--r--   1 root root  3637 Apr  8  2014 .bashrc
-rw-r--r--   1 root root   675 Apr  8  2014 .profile
root@onecoursesource:~# useradd -m -k /etc/skel steve
root@onecoursesource:~# ls -lA /home/steve
total 12
-rw-r--r-- 1 steve steve  220 Apr  8  2014 .bash_logout
-rw-r--r-- 1 steve steve 3637 Apr  8  2014 .bashrc
-rw-r--r-- 1 steve steve  675 Apr  8  2014 .profile
Different directories can be used for different types of users. For example, you could create a directory structure named /etc/skel_eng that has a .bashrc file containing aliases designed to be used by software engineers. Then you could create another directory named /etc/skel_sales that has a .bashrc file containing aliases designed to be used by sales engineers. Use the -k /etc/skel_eng option when creating an account for software engineers and the -k /etc/skel_sales option when creating an account for sales engineers.
Note
If you don’t use the -k option, the useradd command will automatically copy the contents of the /etc/skel directory into the new user account.
Modifying Users
As an administrator, you can modify user accounts using the usermod command and the same type of options used by the useradd command. For example, if you want to change a user’s name, use the usermod command with the -c option:
root@onecoursesource:~# grep timmy /etc/passwd
timmy:x:1003:1003::/home/timmy:
root@onecoursesource:~# usermod -c "Timmy Smith" timmy
root@onecoursesource:~# grep timmy /etc/passwd
timmy:x:1003:1003:Timmy Smith:/home/timmy:
Whereas the usermod command can be used to change the expiration date and inactive fields of the /etc/shadow file, the chage command can change additional fields with the options shown:

Managing GECOS
Recall from earlier in the chapter the comment field in the /etc/passwd file that is commonly called the GECOS (General Comprehensive Operating System) field. Although not used very often on modern Linux systems, there is a feature that allows regular users to modify the comment field of the /etc/passwd file, at least for their own account. By default, users can make these changes by using the chfn command, as shown in Example 7-5.
student@onecoursesource:~$ chfn
Password:
Changing the user information for student
Enter the new value, or press ENTER for the default
    Full Name:
    Room Number []: 101
    Work Phone []: 999
    Home Phone []: 1-555-555-5555
student@onecoursesource:~$ grep student /etc/passwd
student:x:1002:1002:,101,999,1-555-555-5555:/home/student:
Some regular users like this feature because this data can be easily displayed using the finger command:
student@onecoursesource:~$ finger student
Login: student                    Name:
Directory: /home/student                Shell: /bin/sh
Office: 101, 999            Home Phone: 1-555-555-5555
Never logged in.
No mail.
No Plan.
However, this feature can result in a security risk because it provides regular users with the ability to modify the /etc/passwd file. Granted, it should only modify the comment field, but it is always possible that a security hole in the chfn program could result in an exploit, so you might consider turning off this feature. An easy way to remove this feature is to change the permission of the chfn program:
root@onecoursesource:~# ls -l /usr/bin/chfn
-rwsr-xr-x 1 root root 46424 Feb 16  2014 /usr/bin/chfn
root@onecoursesource:~# chmod u-s /usr/bin/chfn
root@onecoursesource:~# ls -l /usr/bin/chfn
-rwxr-xr-x 1 root root 46424 Feb 16  2014 /usr/bin/chfn
This results in the following error:
student@onecoursesource:~$ chfn
Password:
Changing the user information for student
Enter the new value, or press ENTER for the default
    Full Name:
    Room Number [101]: 222
    Work Phone [999]: 222
    Home Phone [1-555-555-5555]: 222
Cannot change ID to root.
Note
Permissions and the chmod command are covered in detail in Chapter 8, “Develop an Account Security Policy.”
Deleting Users
Deleting a user account is accomplished by executing the userdel command. However, before you delete a user, you need to make a decision: Do you want to delete just the account from the /etc/passwd and /etc/shadow files or do you also want to delete the user’s home directory and mail spool?
In some cases, keeping the user’s home directory can be useful for the person who is replacing the user. The mail spool, which contains inbound mail messages, may be necessary for audits or liability reasons.
To remove a user and keep the user’s home directory and mail spool, use the userdel command without any additions arguments:
root@onecoursesource:~# userdel steve
To remove a user and their home directory and mail spool, include the -r option to the userdel command.
Restricted Shell Accounts
In certain cases you will want to provide very limited access to a system for specific users. For example, suppose you have a guest user who only needs very limited access to a system (for example, for assisting in a hardware repair that requires testing on the network). Or perhaps you have created a kiosk-based system and you only want users to perform very specific tasks, such as booking a car rental or viewing their student schedule.
In these cases, you should consider creating a restricted shell account. This sort of account makes use of the BASH shell, but has many important restrictions, including the following:
• The user cannot change directories using the cd command.
• The user cannot change the values of the following variables: SHELL, PATH, ENV, and BASH_ENV.
• The user cannot run any commands that have a pathname that starts with the / character (such as /bin/bash).
• The user cannot redirect output to a file.
There are additional restrictions that can be viewed in the man page for rbash. However, the point is that a restricted shell account is very limited and will only have access to built-in commands and commands that are available via the PATH variable.
To create a restricted shell account, use the -s option to the useradd command and provide an argument of /bin/rbash:
root@onecoursesource:~# useradd -m -s /bin/rbash limited
Next, modify the account so the user has limited access to commands. For example, if you only want the user to run commands from the /bin directory, add the following to the end of the user’s .bashrc file:
PATH=/bin
This could also be set to a directory where you have copied specific commands, rather than the entire /bin directory. Once the user logs in, they are limited in the commands they can execute. For example, the ls command is in the /bin directory, so that is allowed. However, the vi command is in the /usr/bin directory, not the /bin directory, so it will fail:
limited@onecoursesource:~$ ls limited@onecoursesource:~$ vi -rbash: /usr/lib/command-not-found: restricted: cannot specify
Security Highlight
It takes practice and some experience to fine-tune the restricted account to provide just the right access. As a recommendation, start with a limited amount of commands and add more as needed.
Network-Based User Accounts
At this point in the book, a full discussion regarding network-based accounts is a bit premature. The topics of networking in general and services that provide network-based accounts haven’t been covered yet. As a result, the discussion in this chapter is more theory based. Several later chapters—most notably Chapter 19, “Network Configuration”—cover these topics in more detail.
Using network-based accounts to log users in to different systems requires setting up a client-server relationship between the system you want the user to log in to and a server that provides login information. Linux platforms have several different login servers, including the following:
• LDAP (Lightweight Directory Access Protocol): An LDAP server can provide both user and group account data, as well as other data defined by the LDAP administrator. It is a commonly used server for network-based accounts on Linux distributions.
• NIS (Network Information Service): Although not as flexible as LDAP, NIS provides the advantage of being an easy service to set up and administer. However, administrators who are concerned about security will often avoid NIS due to its security issues.
• Active Directory and Samba: Active Directory is a Microsoft product and Samba is a Linux-based service that can make use of Active Directory to allow users to log in to Linux systems using the Active Directory server. This can be a complex configuration due to changes made to Active Directory that do not take the Linux system structure into consideration.
When a system can use a server for network-based accounts, local accounts are still available. However, given that there could be conflicts, there is a method to indicate which location account information is accessed first. This is accomplished by settings in the /etc/nsswitch.conf file, which is the configuration file for a local service called NSS (Name Service Switch). For example, the following settings in the /etc/nsswitch.conf file would have the local database files (/etc/passwd, /etc/shadow, and /etc/group) referenced first when a user attempts to log in:
passwd:         files ldap
group:          files ldap
shadow:         files ldap
If the user’s account information is not found in the local files, the LDAP server would be used. More details on network-based user accounts can be found in Chapter 19 where network services are discussed.
Using su and sudo
As an administrator, you often will want to test user accounts by logging in as a specific user. Unfortunately, even the administrator does not know the password for regular user accounts. However, the root user can “switch user” (su) to another user account, as demonstrated here:
root@onecoursesource:~# id uid=0(root) gid=0(root) groups=0(root) root@onecoursesource:~# su - student student@onecoursesource:~$ id uid=1002(student) gid=1002(student)
The su command opens a new shell in which the identity has been switched to a new user (in this case, the student user). To return to the original account, use the exit command to close the shell, as demonstrated next:
student@onecoursesource:~$ id uid=1002(student) gid=1002(student)
The - option used with the su command has a special purpose. It allows you to switch to the other user account as if you were logging in to it directly. This results in all of that user’s initialization files being executed before the new shell is provided. Typically this is the most desired behavior, but if you have a reason to not run all the initialization files, omit the - option to the su command.
The root user is not the only one who can use the su command, but it is the only account that does not require knowledge of the password for the account being switched to. For example, suppose you are logged in as a regular user and you want to execute commands as the root user. You can use the su command to gain access to the root account, but you will be prompted for the root password, as shown here:
student@onecoursesource:~$ su - root
Password:
root@onecoursesource:~#
Security Highlight
It is a bad habit to log in as the root user to perform tasks. The more often you do this, the more likely your system can be compromised. For example, suppose you log in as the root user every day, and then one day you take a coffee break, leaving your terminal exposed. As you might imagine, it is much better to log in as a regular user and then use the su command to execute specific administrative commands. Also, you should immediately exit from the privileged shell once the task is complete.
In some cases you may want to provide some users with the ability to execute specific tasks as the administrator. This is the purpose of the sudo command. With the sudo command, authorized users can execute specific commands as the administrator, as demonstrated in Example 7-6.
Example 7-6 Using the sudo Command
student@onecoursesource:~$ apt-get install joe E: Could not open lock file /var/lib/dpkg/lock - open (13:
Note that in Example 7-6, the student user could not run the apt-get command initially. This command, which is used to install software on the system, requires administrative privileges. The sudo command was used to temporarily elevate the student user’s privileges to allow execution of the apt-get command as the root user.
Also note the area in gray in Example 7-6 where the student user is asked for a password. This is the password for the student account, not the root account. The student user does not need to know the root password if the sudo access has been set up prior to executing this command.
This access is configured in a file called the /etc/sudoers file. To provide access to the student account, the following entry was made in this file:
root@onecoursesource:~# grep student /etc/sudoers
student ALL=/usr/bin/apt-get
The format for this line is account_name SYSTEM=command. Both account_name and command are self-explanatory, but the SYSTEM value requires a bit of explanation. This could be the host name of the system where this configuration line is valid. In this case, it could have been set to “onecoursesource” because that is the current system’s host name. However, if this /etc/sudoers file were copied to another system, the file would have to be updated. Using ALL as a value here means “no matter what system this file is on, this line applies.”
Note that the /etc/sudoers file should not be modified directly, but rather with the visudo command. This command performs basic syntax checking and issues an error message if there is a problem:
>>> /etc/sudoers: syntax error near line 22 <<<
What now?
Options are: ?
  (e)dit sudoers file again
  e(x)it without saving changes to sudoers file
  (Q)uit and save changes to sudoers file (DANGER!)

What now? x
root@onecoursesource:~#
Also note that only the root user can edit the /etc/sudoers file.
Security Highlight
A complete discussion of sudo is beyond the scope of this book. It is a powerful tool with many configurable options and features. Consider investigating this topic on your own by exploring the documentation (man and info pages) for the sudo and visudo commands as well as the sudoers file.
Most importantly, only provide sudo access when necessary. Too much access can result in a serious security risk.
Restricting User Accounts
Several methods can be used to limit user accounts, including file permissions and SELinux. These topics are discussed in later chapters, but it makes sense to cover one method now: Pluggable Authentication Modules (PAM).
PAM is a powerful tool that allows an administrator to provide many restrictions to user accounts. For example:
• PAM can be used to limit access to a system by time or date.
• PAM can limit system resource utilization after the user logs in, including limiting how many processes a user can run or how much RAM the user’s processes can use.
• PAM can be applied to specific login commands. This allows for different rules for when a user logs in locally versus when they log in remotely.
• PAM can be used to create additional log entries for specific login events.
The preceding list details just a few features that PAM can provide. PAM is a set of libraries that is called by authentication-based software such as local command-line login, SSH (Secure Shell), and FTP (File Transfer Protocol). Essentially, every time a user account needs to be authenticated, PAM libraries are used to verify and validate the user.
PAM has a primary configuration file (/etc/pam.conf), but it is rarely used. Instead, each authentication-based software program has a separate configuration file under the /etc/pam.d directory, as shown in Example 7-7.
Example 7-7 The /etc/pam.d Directory
root@onecoursesource:~# ls /etc/pam.d
accountsservice                cups-daemon             login
atd                            dovecot                 newusers
chfn                           gdm                     other
chpasswd                       gdm-autologin           passwd
chsh                           gdm-launch-environment  polkit-1
common-account                 gdm-password            pop3
common-auth                    gnome-screensaver       ppp
common-password                imap                    samba
common-session                 lightdm                 sshd
common-session-noninteractive  lightdm-autologin       su
cron                           lightdm-greeter         sudo
The files you see in this directory will depend on what software is installed. For example, the ls command was executed prior to installing an FTP server. Example 7-8 highlights a new file that appears after the vsftpd software is installed.
Example 7-8 New File After vsftpd Installation
root@onecoursesource:~# ls /etc/pam.d
accountsservice                dovecot                 other
atd                            gdm                     passwd
chfn                           gdm-autologin           polkit-1
chpasswd                       gdm-launch-environment  pop3
chsh                           gdm-password            ppp
common-account                 gnome-screensaver       samba
common-auth                    imap                    sshd
common-password                lightdm                 su
common-session                 lightdm-autologin       sudo
common-session-noninteractive  lightdm-greeter         vsftpd
cron                           login
cups-daemon                    newusers
To understand how PAM works, we will focus on a single service: Secure Shell. An example of a PAM configuration file (without comment lines and blank lines) for Secure Shell is shown in Example 7-9.
Example 7-9 Sample PAM Configuration File for SSH
root@onecoursesource:~# grep -v "^#" /etc/pam.d/sshd | grep -v "^$" @include common-auth account required pam_nologin.so @include common-account session [success=ok ignore=ignore module_unknown=ignore default=bad]
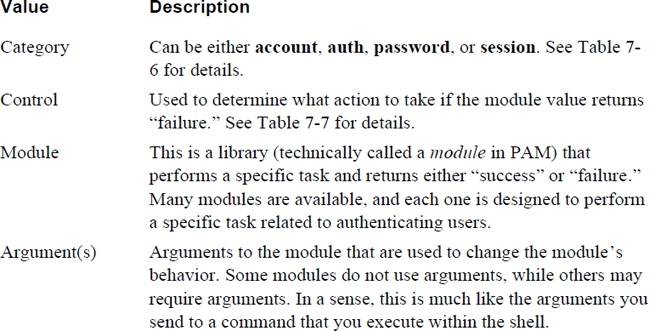
Each line represents a PAM rule. There are two types of lines: standard lines that have three or four values (like account required pam_nologin.so) and @include lines that are used to pull in more rules from another file.
For standard lines, the three possible values are described in the Table 7-5.
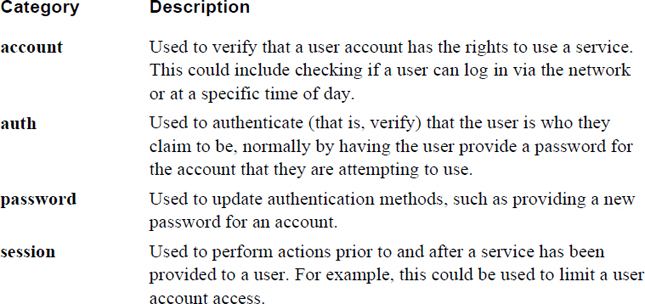
PAM Categories
A category is essentially one of the four primary operations that PAM can perform. These are described in more detail in Table 7-6.
It is important to note that when an authentication request is made by an authentication program, the program will ask for the modules of a specific category to be executed. For example, if the user is logging in via SSH, then the SSH utility will attempt to validate the user account name first. This is accomplished by asking PAM to run the modules in the account category. If all of these modules run successfully, then the SSH utility will attempt to authenticate the user, perhaps by verifying that the user provided the correct password for the account (there are other methods available for SSH). This is accomplished by asking PAM to run the modules in the auth category.
Assuming these modules return “success,” the SSH utility may run the session modules to set up the user’s session. The term “may” is used because it is up to the developers who wrote the SSH utility as to which of these PAM categories it calls and when the call is made. It is up to you as the administrator to fine-tune which modules are called to customize how users are granted access to the system.
Figure 7-2 provides a visual demonstration of how this process works. The “S” arrows in this figure indicate the action that is taken if PAM returns “success” when the modules are run. The “F” arrows in this figure indicate the action that is taken if PAM returns “failure” when the modules are run.
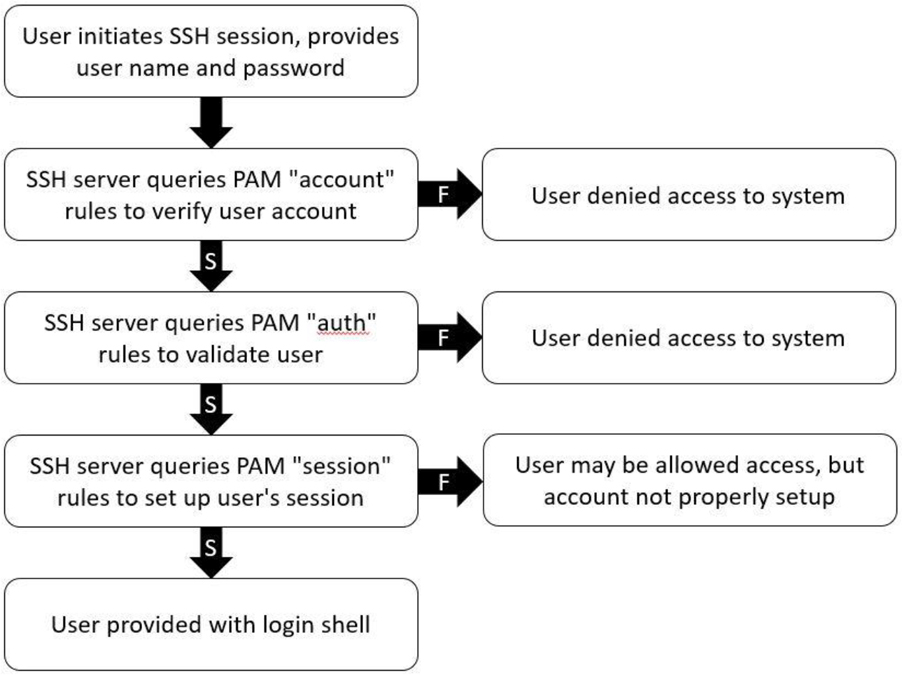
Figure 7-2 SSH Using PAM Categories
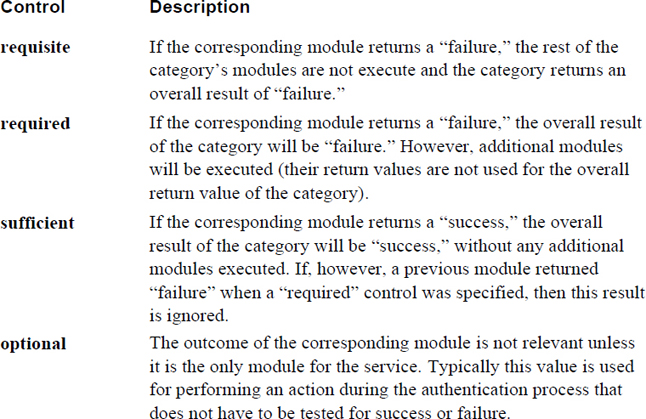
PAM Control Values
What determines whether or not a category is successful is largely dependent on the control values. These values are described in more detail in Table 7-7.
Note that you will likely encounter a more complex control type, which you can see an example of in the following output:
root@onecoursesource:~# grep ^auth /etc/pam.d/common-auth
auth    [success=1 default=ignore]    pam_unix.so nullok_secure
auth    requisite            pam_deny.so
auth    required            pam_permit.so
auth    optional            pam_cap.so
The [success=1 default=ignore] control type allows an administrator to further fine-tune the behavior of the PAM, but this is very complex and largely outside the scope of this book. If you review the man page for pam.conf, you will find there are dozens of these complex control values. For this book, we focus on the four primary control types.
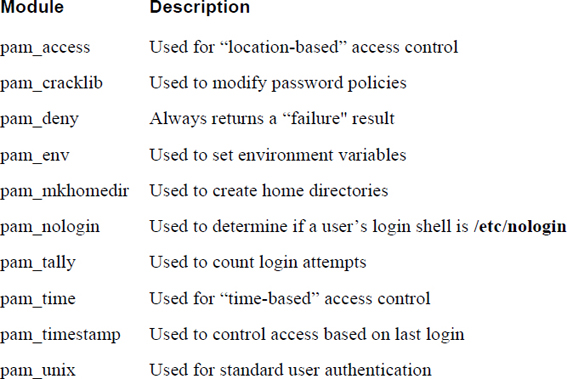
PAM Modules
The PAM modules are the actual code that is executed. Each module performs a specific task and should return a value of success or failure. Some of the more useful PAM modules are described in Table 7-8.
Security Highlight
The PAM configuration files already contain several PAM modules that are used by authentication software. You will likely be tempted to learn what these modules do, and you are encouraged to explore them. However, do not make changes or remove these modules from the configuration files unless you understand the modules and realize the impact such changes will have on authentication software.
This book focuses on how to make specific changes to some of these PAM modules and on adding key PAM modules to the configuration files. Not every PAM module will be explored in detail.
Using PAM to Alter the Password Policy
A common use of PAM is to modify the default password policy. As Table 7-9 illustrates, you can provide arguments to the pam_cracklib module to modify many password settings.
Table 7-9 Password Settings for pam_cracklib

The minlen argument works in conjunction with four additional arguments: dcredit (digit credit), lcredit (lowercase credit), ocredit (other character credit) and ucredit (uppercase credit). Each of these items may be assigned a value that “goes toward” fulfilling the number of minimum characters in the password.
For example, the following requires a minimum password length of 12 characters, but using an uppercase character counts for three of the 12 character minimum (using more than one uppercase character does not provide any additional credits):
password required pam_cracklib.so minlen=12 ucredit=3
Note
Not all Linux distributions have the cracklib module installed by default. When using Debian-based systems, execute the following command as the root user to install this module (if needed): apt-get install libpam-cracklib. On Red Hat–based systems, run this command: yum install libpam-cracklib.
What Could Go Wrong
Be very careful when changing PAM configuration files. You can easily lock the root account. As a suggestion, after changing a PAM configuration file, you should stay logged in to the system and attempt a separate login as the root user to confirm you can still gain access to the system. Also, be sure to always back up a configuration file before making any changes to make it easier to change the file back to its original values.
In addition to the pam_cracklib library, you can use the pam_unix library to modify password policies. For example, you can use the remember=N argument to have PAM remember N number of passwords (so users cannot just reuse the same passwords). The old passwords are stored in /etc/security/opasswd in encrypted format.
Here’s an example of password settings in the /etc/pam.d/common-password file:
Password    required    pam_cracklib.so minlenght=12 ucredit=3
type=Linux
password    [success=1 default=ignore]    pam_unix.so obscure
use_authtok try_first_pass sha512 remember=7
Summary
The Linux operating system uses user accounts to control access to key components, including files and directories. In this chapter, you learned how to manage these user accounts. This included how to create, modify, secure, and delete user accounts, as well as how to use special group account features, including restricted user accounts.
Key Terms
Review Questions
1. User passwords and password-aging data are stored in the /etc/_____ file.
2. Which UID makes the root account the administrator on the system?
a. 0
b. 1
c. 10
d. 125
3. What does the value 7 represent in the following line from the /etc/shadow file?
sync:*:16484:0:99999:7:::
a. The date of last password change field
b. The minimum password age field
c. The maximum password age field
d. The password warning period field
4. The /etc/default/_____ file contains default values used by the useradd command.
5. PAM configuration files are stored in the /etc/_____ directory.