Table of Contents for
Linux Essentials for Cybersecurity, First Edition
 Linux Essentials for Cybersecurity, First Edition
Published by
Pearson IT Certification, 2018
Linux Essentials for Cybersecurity, First Edition
Published by
Pearson IT Certification, 2018
- Cover Page
- Title Page
- Copyright Page
- Contents at a Glance
- Table of Contents
- About the Author
- Dedication
- Acknowledgments
- About the Technical Reviewers
- We Want to Hear from You!
- Reader Services
- Introduction
- Part I: Introducing Linux
- Chapter 1: Distributions and Key Components
- Chapter 2: Working on the Command Line
- Chapter 3: Getting Help
- Chapter 4: Editing Files
- Chapter 5: When Things Go Wrong
- Part II: User and Group Accounts
- Chapter 6: Managing Group Accounts
- Chapter 7: Managing User Accounts
- Chapter 8: Develop an Account Security Policy
- Part III: File and Data Storage
- Chapter 9: File Permissions
- Chapter 10: Manage Local Storage: Essentials
- Chapter 11: Manage Local Storage: Advanced Features
- Chapter 12: Manage Network Storage
- Chapter 13: Develop a Storage Security Policy
- Part IV: Automation
- Chapter 14: Crontab and At
- Chapter 15: Scripting
- Chapter 16: Common Automation Tasks
- Chapter 17: Develop an Automation Security Policy
- Part V: Networking
- Chapter 18: Networking Basics
- Chapter 19: Network Configuration
- Chapter 20: Network Service Configuration: Essential Services
- Chapter 21: Network Service Configuration: Web Services
- Chapter 22: Connecting to Remote Systems
- Chapter 23: Develop a Network Security Policy
- Part VI: Process and Log Administration
- Chapter 24: Process Control
- Chapter 25: System Logging
- Part VII: Software Management
- Chapter 26: Red Hat–Based Software Management
- Chapter 27: Debian-Based Software Management
- Chapter 28: System Booting
- Chapter 29: Develop a Software Management Security Policy
- Part VIII: Security Tasks
- Chapter 30: Footprinting
- Chapter 31: Firewalls
- Chapter 32: Intrusion Detection
- Chapter 33: Additional Security Tasks
- Appendix A: Answers to Review Questions
- Appendix B: Resource Guide
- Glossary
Chapter 29 Develop a Software Management Security Policy
In Chapter 26, “Red Hat–Based Software Management,” and Chapter 27, “Debian-Based Software Management,” you learned how to install software on Red Hat and Debian systems, respectively. Installing software comes with a responsibility: to ensure that the software placed on your systems does not pose a security risk. In this chapter, you learn how to discover possible security risks that software poses.
You also learned in Chapter 28, “System Booting,” how to configure a system to boot, including controlling what services and processes were started during the system boot. Each service has a separate configuration for security, much of which you have learned throughout this book. In this chapter, you explore another method of configuring and securing legacy services using a procedure known as xinetd.
After reading this chapter and completing the exercises, you will be able to do the following:
Read Common Vulnerabilities and Exposures (CVE) to discover possible security vulnerabilities.
Utilize distribution resources to better secure your systems.
Configure and secure legacy services.
Ensuring Software Security
Because of how easy it is to install software, security experts might overlook the importance of creating a security policy for software. This section focuses on key elements of creating a security policy that should be followed when managing software on a Linux distribution.
Keep Packages Up to Date
In some ways, keeping all software packages up to date can be a double-edged sword. Many software updates include fixes to bugs or security holes, so installing these updates is critical. On the other hand, software updates that provide more features or functions may introduce a security hole that did not exist in previous versions.
It is a good practice to install any software update that fixes a bug or security venerability. Normally, installing software that provides new features is also a good idea, but you should consider exploring the update before installing it. You might not be able to determine if the update introduces a new security hole, but you should be able to determine if the update is really necessary.
It is also important to keep a log of software updates. This may seem like a lot of extra “paperwork,” but any time you opt to not install an update, the reason should be clearly stated in a log entry. Otherwise, another administrator might decide to install the update without knowing the reason why the update was omitted.
It is also fairly common to perform updates automatically via a crontab job on workstation systems. However, this is normally not a good idea for mission-critical servers because an update could cause problems, especially an update to core operating system software or the kernel. For mission-critical servers, it is normally better to have a lab system that is identical (or as identical as possible) to the mission-critical server and perform updates on the lab system. After the lab system is tested to ensure no problems arise, the software updates should be safe to install on the mission-critical system.
You should also be prepared to undo (back out of) updates in the event that the new updates cause a problem. This isn’t something that is always immediately noticeable, so systems with updates should be monitored routinely for faulty software.
Lastly, realize that you do not need to reboot the system after installing a software package (with the exception of the kernel); however, you may need to restart a server program. This is not always the case because many developers include this restart process in the software package’s post-installation tasks.
Consider Removing Unnecessary Packages
This may be a challenge at first, but it is very important that you only have necessary software installed on the system. The challenge of determining which packages are necessary is that a typical default Linux installation includes thousands of software packages. For example, a default installation of Kali Linux has almost 3000 packages, as shown here:
root@kali:~# dpkg -l | wc -l
2801
You might be asking, “do I really need to decide which packages should be installed on each system by reviewing each package one at a time?” The answer is that you should explore what each package in a distribution provides and then create rules for different kinds of systems. For example, what belongs on a typical user workstation and what belongs on a web server?
In fact, you should create three categories:
• The software that should be installed by default.
• Software considered optional (okay to install, but not installed by default).
• Potentially risky or problematic software that should never be installed on any system.
You go through the process of determining if a package should be installed by exploring the package. For example, you might first look at the package to determine what is does, as shown on a Fedora system in Listing 29-1.
Listing 29-1 Viewing Package Information
[root@onecoursesource ~]#rpm -qi zsh
Name        : zsh
Version     : 5.0.7
Release     : 8.fc20
Architecture: x86_64
Install Date: Mon 10 Mar 2019 03:24:10 PM PDT
Group       : System Environment/Shells
Size        : 6188121
License     : MIT
Signature   : RSA/SHA256, Fri 22 May 2015 11:23:12 AM PDT, Key ID 2eb161fa246110c1
Source RPM  : zsh-5.0.7-8.fc20.src.rpm
Build Date  : Fri 22 May 2015 06:27:34 AM PDT
Build Host  : buildhw-12.phx2.fedoraproject.org
Relocations : (not relocatable)
Packager    : Fedora Project
Vendor      : Fedora Project
URL         : http://zsh.sourceforge.net/
Summary     : Powerful interactive shell
Description :
The zsh shell is a command interpreter usable as an interactive login
shell and as a shell script command processor.  Zsh resembles the ksh
shell (the Korn shell), but includes many enhancements.  Zsh supports
command line editing, built-in spelling correction, programmable
command completion, shell functions (with autoloading), a history
mechanism, and more.
Based on the information provided by the command in Listing 29-1, you may be able to determine this package should not be installed on the system. Perhaps it is because you do not want to support another shell and only want to support BASH on this system. Or you may consider this package unnecessary since a good shell already exists. If you are considering the installation, which requires an additional shell, be sure to investigate the implications and ramifications of running a second shell on the system prior to installation.
If you decide this might be a good package, then before approving it, you should also look at the files it provides, particularly the executable programs (which are typically located in a /bin directory, such as /usr/bin and /bin, but could also be located under /sbin or /usr/sbin):
[root@onecoursesource ~]# rpm -ql zsh | grep /bin/
/usr/bin/zsh
[root@onecoursesource ~]# ls -l /usr/bin/zsh
-rwxr-xr-x 1 root root 726032 May 22  2015 /usr/bin/zsh
Look at the documentation (man pages) for these executable programs and look closely at the permissions and ownership of the files. Ask yourself questions like, “does this program provide elevated privileges because of a SUID or SGID permission?”
Lastly, note that the commands demonstrated in this section were performed on a system that already had the software installed. You should be vetting software packages on a test system where you can safely install packages without any concern of impacting a critical system. This system should not even be attached to the network. This allows you to run the commands and test each one before deciding if the software is safe to install on “real” systems in your organization.
Ensure You Install from Trusted Sources
Many administrators rely on the yum, dnf, and apt-get commands to download and install software programs. As long as these tools are configured to download from trusted sources, this is not a bad practice. However, your security policy should include a process in which the source location of packages is confirmed before installing packages in this manner.
This means you should include a review of the configuration files that point the yum, dnf, and apt-get commands to repository servers:
• For yum and dnf: The /etc/yum.conf file and files in the /etc/yum.repos.d directory
• For apt-get: The /etc/apt/sources.list file or files located in the /etc/apt/sources.list.d directory
Also, you should take great care when getting software directly from another source, such as downloading a software package from a website or receiving one via email. Very carefully consider whether such a package should be installed and review it very closely if you choose to move forward with the installation.
CVE
The Common Vulnerabilities and Exposures (CVE) is a system designed to provide a single location where you can learn about security-related software issues. The system is maintained by the MITRE Corporation and accessible via http://cve.mitre.org, as shown in Figure 29-1.
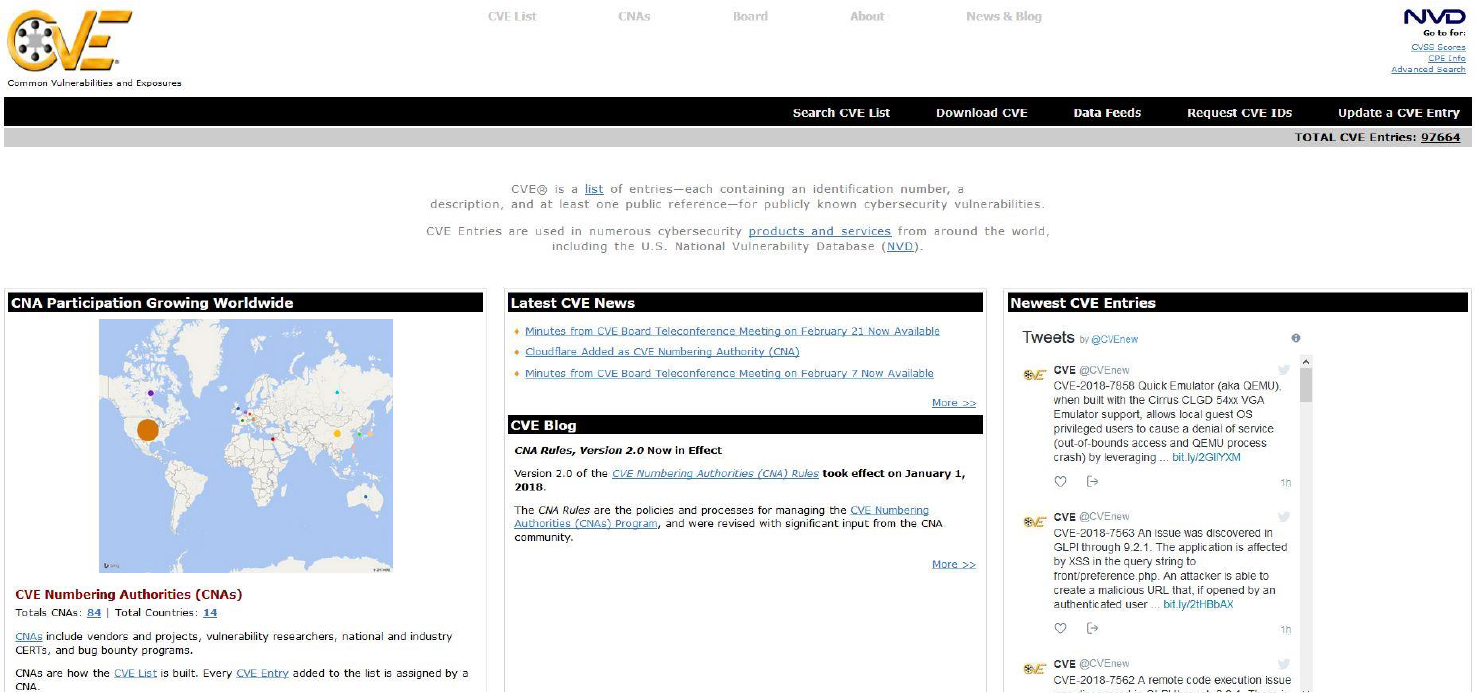
When a vulnerability is discovered and reported to MITRE, it is assigned a unique ID, regardless of the distribution where the vulnerability was discovered. As a result, each vulnerability can be referred to using this unique ID, making it easier to keep track of it when working in an environment that supports many different distributions.
The CVE data is free to anyone. This is great for administrators because they are provided with details to vulnerabilities, but it also means that hackers can use this information against your system if you do not keep your system updated.
Your security policy should include a practice of reviewing relevant CVEs on a regular basis to determine possible security holes. You can download all of the CVEs and use the grep command to find the ones that are related to the software installed on your system. You can also make use of the search tool on the CVE website. Figure 29-2 demonstrates the search results for zsh (the Z shell).
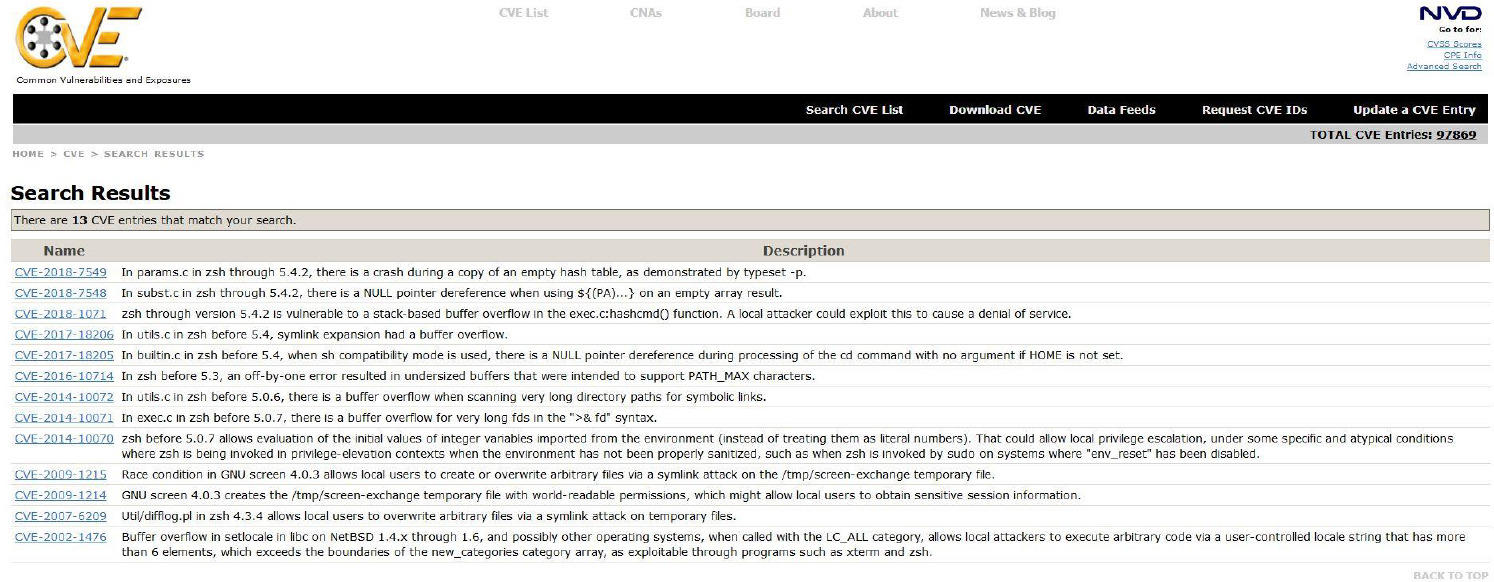
Figure 29-2 CVE Search Results
You should consider making use of the “Data Feeds,” a feature on the website that lets you learn about CVEs via Twitter or email. If you do choose email, keep in mind that this could result in many emails, so consider using a specific email address such as a general department or admin-only address just for these security alerts, especially if multiple administrators will review the information and make decisions, such as if a different admin is responsible for each shift.
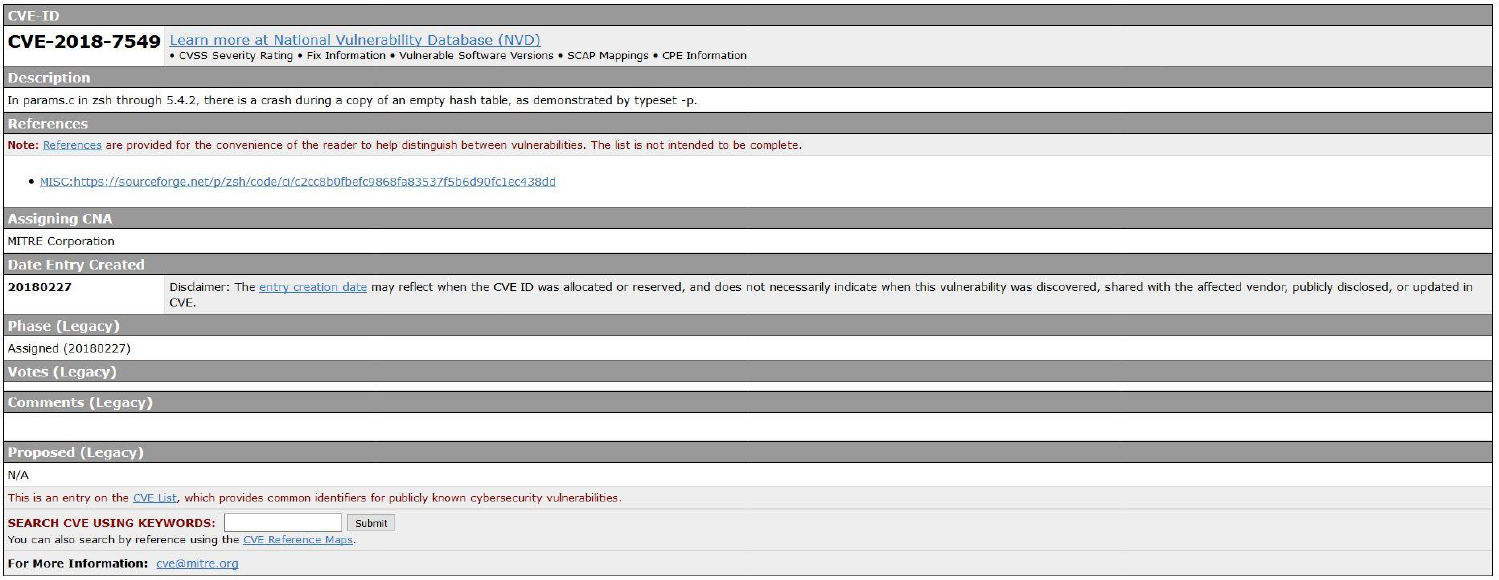
The information provided in a CVE is very well defined and includes the following:
• A unique CVE ID.
• A brief description of the issue.
• References to additional information.
• Organization that assigned the CVE a unique ID.
• The date the CVE was created. This is a very important field because older CVEs are likely not an issue on modern versions of software. Software vendors typically release patches that close any hole that has been reported as a CVE.
See Figure 29-3 for an example of a CVE.
Distribution-Specific Security Alerts
Each distribution will normally have its own security alerts. This is because part of building a distro is the customization of the software provided by other open source projects. For example, the Z shell may be modified to provide additional features for the distribution that you have installed on your systems.
This is also one of the reasons why many organizations only install and support one or two distributions. More distributions in an environment means more work to properly secure each system. Your security plan should include a regular review of CVEs as well as a review of the distribution’s security alerts.
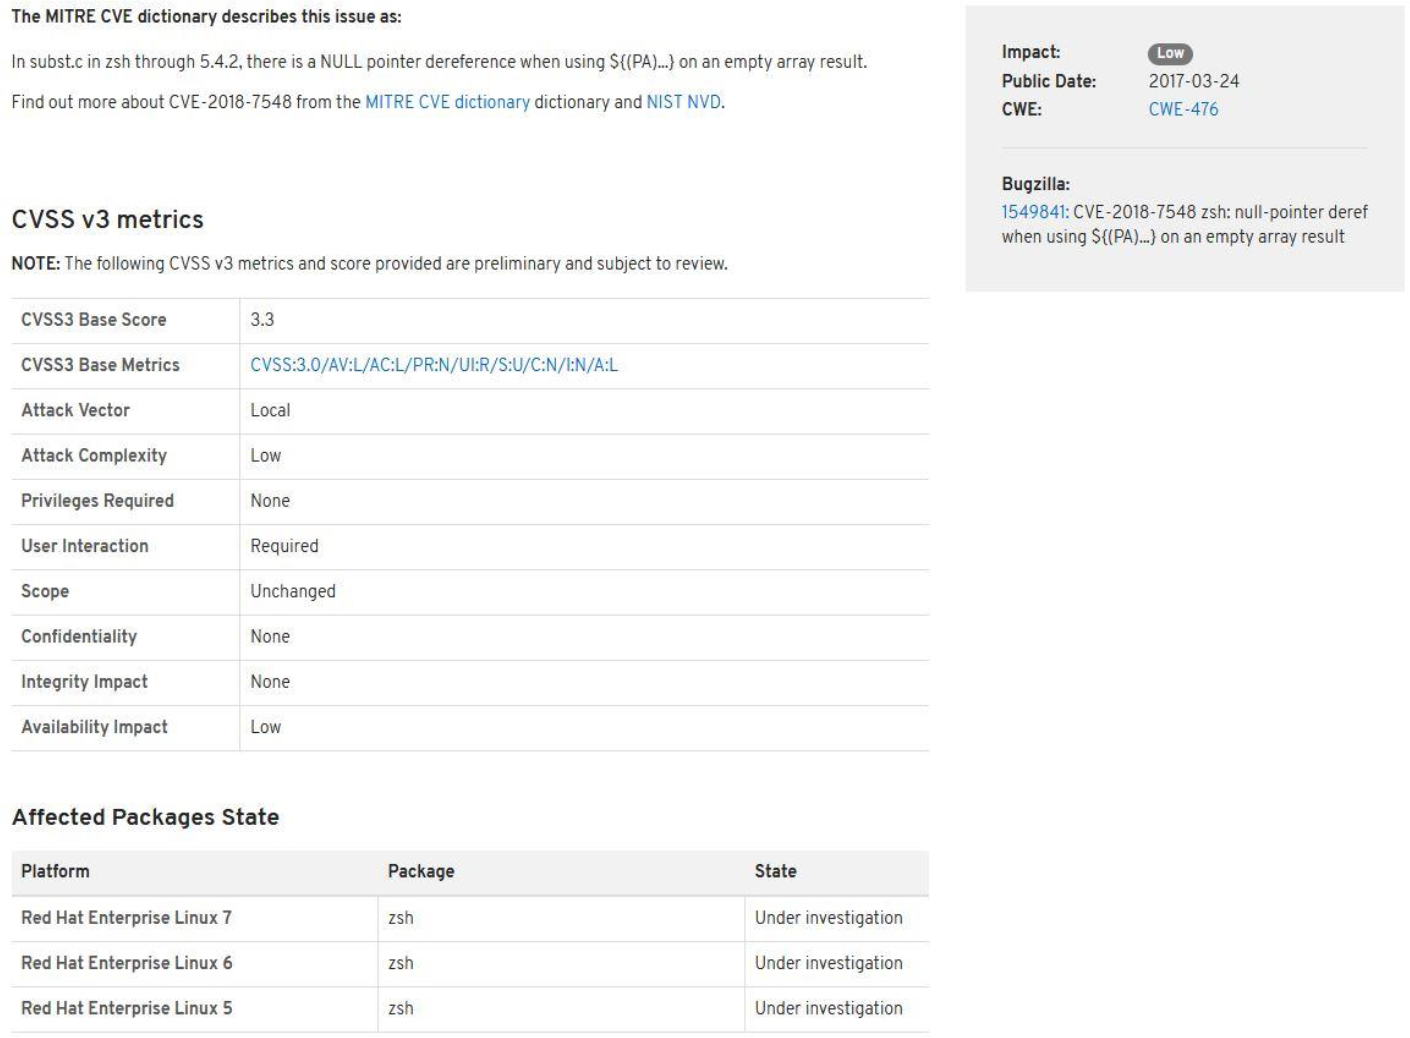
As an example, consider Red Hat Enterprise Linux (RHEL). Red Hat uses Red Hat Security Advisories (RHSAs) to inform security personal of any potential vulnerabilities. Red Hat also makes references to CVEs when appropriate so you are aware that this is a problem on all distributions, not just RHEL.
RHSAs clearly indicate which versions of the distribution may be affected. This is important because you do not want to investigate a vulnerability that does not affect your current distributions. See Figure 29-4 for an example of an RHSA.
xinetd
xinetd is a collection of older services, normally referred to as “legacy services,” that your organization may need to use. For example, in Chapter 22, “Connecting to Remote Systems,” the Secure Shell server was introduced as a service that allows a user to remotely log in to a system. The Secure Shell was designed to replace an older service called telnet. The telnet service has security issues; for example, when someone logs in to a system using the telnet service, all data (including username and password) is sent across the network in plain-text format. This means anyone who is able to “sniff” (watch network traffic) the network will see all user and password data.
In most cases, the telnet service should be avoided, but that is not always possible. There are situations where you need to provide access to a system via telnet, which is why the software is still available on Linux (although not normally installed or configured by default).
The xinetd daemon is referred to as the “super daemon” because it will start other daemons (services) as needed and stop each one when it is no longer needed. The primary configuration file for the xinetd daemon is the /etc/xinetd.conf file.
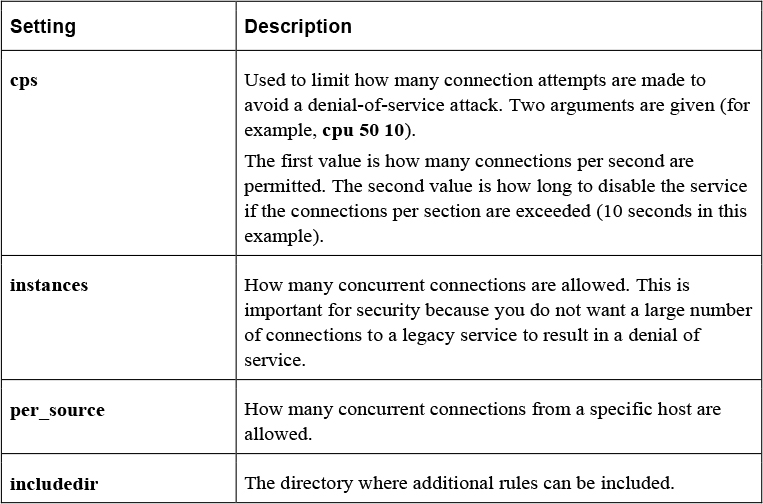
Table 29-1 describes common settings in the /etc/xinetd.conf file.
Table 29-1 Common Settings in the /etc/xinetd.conf File
The files in the /etc/xinetd.d directory are used to override and supplement settings from the /etc/xinetd.conf file. The one shown in Example 29-2 is for the telnet service.
Listing 29-2 Sample xinetd Configuration File
[root@onecoursesource ~]# cat /etc/xinetd.d/telnet
# default: on
# description: The telnet server serves telnet sessions; it uses \
#       unencrypted username/password pairs for authentication.
service telnet
{
        flags           = REUSE
        socket_type     = stream
        wait            = no
        user            = root
        server          = /usr/sbin/in.telnetd
        log_on_failure  += USERID
        disable         = yes
}
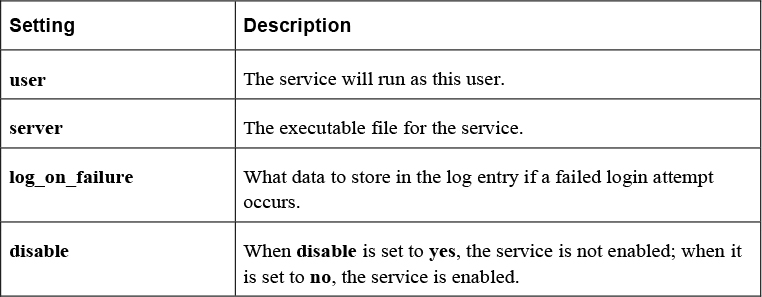
Table 29-2 describes common settings of files in the /etc/xinetd.d directory.
Table 29-2 Common Setting in the /etc/xinetd.d Directory
Summary
In this chapter, you explored some of the key components of making a software management security policy. You learned about where you can find possible vulnerabilities that software packages may pose. You also discovered how to implement legacy services, like the telnet service.
Key Terms
Review Questions
1. The _____ option to the dpkg command can be used to list all packages on a Debian-based system.
2. Which locations are used to determine which repositories are used with the apt-get command? (Choose two.)
a. /etc/apt/list
b. /etc/apt/sources.list
c. /etc/apt/list.d/*
d. /etc/apt/sources.list.d/*
3. _____ is a system designed to provide an single location where you can learn about security-related software issues.
4. The _____ option in the /etc/xinetd.conf file limits how many connections are permitted from a specific host.
a. per_host
b. per_system
c. per_source
d. per_ip
5. The _____ daemon is referred to as the “super daemon” because it will start other daemons (services) as needed and stop them when they are no longer needed.