Table of Contents for
Linux Essentials for Cybersecurity, First Edition
 Linux Essentials for Cybersecurity, First Edition
Published by
Pearson IT Certification, 2018
Linux Essentials for Cybersecurity, First Edition
Published by
Pearson IT Certification, 2018
- Cover Page
- Title Page
- Copyright Page
- Contents at a Glance
- Table of Contents
- About the Author
- Dedication
- Acknowledgments
- About the Technical Reviewers
- We Want to Hear from You!
- Reader Services
- Introduction
- Part I: Introducing Linux
- Chapter 1: Distributions and Key Components
- Chapter 2: Working on the Command Line
- Chapter 3: Getting Help
- Chapter 4: Editing Files
- Chapter 5: When Things Go Wrong
- Part II: User and Group Accounts
- Chapter 6: Managing Group Accounts
- Chapter 7: Managing User Accounts
- Chapter 8: Develop an Account Security Policy
- Part III: File and Data Storage
- Chapter 9: File Permissions
- Chapter 10: Manage Local Storage: Essentials
- Chapter 11: Manage Local Storage: Advanced Features
- Chapter 12: Manage Network Storage
- Chapter 13: Develop a Storage Security Policy
- Part IV: Automation
- Chapter 14: Crontab and At
- Chapter 15: Scripting
- Chapter 16: Common Automation Tasks
- Chapter 17: Develop an Automation Security Policy
- Part V: Networking
- Chapter 18: Networking Basics
- Chapter 19: Network Configuration
- Chapter 20: Network Service Configuration: Essential Services
- Chapter 21: Network Service Configuration: Web Services
- Chapter 22: Connecting to Remote Systems
- Chapter 23: Develop a Network Security Policy
- Part VI: Process and Log Administration
- Chapter 24: Process Control
- Chapter 25: System Logging
- Part VII: Software Management
- Chapter 26: Red Hat–Based Software Management
- Chapter 27: Debian-Based Software Management
- Chapter 28: System Booting
- Chapter 29: Develop a Software Management Security Policy
- Part VIII: Security Tasks
- Chapter 30: Footprinting
- Chapter 31: Firewalls
- Chapter 32: Intrusion Detection
- Chapter 33: Additional Security Tasks
- Appendix A: Answers to Review Questions
- Appendix B: Resource Guide
- Glossary
Chapter 26 Red Hat–Based Software Management
Most distributions offer a variety of tools to help you manage software. For Red Hat–based distributions, there are three commonly used tools. The rpm command allows you to view various information regarding installed packages. The command also allows you to install and remove packages.
The yum and dnf commands also provide the ability to view, install, and remove packages. However, these tools provide a higher level of functionality, as the commands are able to connect to software repositories and handle issues related to software dependencies.
These software management tools, along with additional theory about software packages, will be covered in this chapter.
After reading this chapter and completing the exercises, you will be able to do the following:
View package information with the rpm and yum commands.
Install software packages using the rpm and yum commands.
Use the rpm and yum commands to delete software packages.
Perform advanced package management operations, including creating software repositories.
Red Hat Packages
A software package is a file that contains a software program and additional required components. For example, consider a web server software program. The program serves up web pages to web clients, but it needs additional data, such as configuration file data, in order to perform its job.
In a sense, a software package is like the tar files discussed in Chapter 2, “Working on the Command Line.” It contains a collection of files that make up the complete software program. However, it also contains additional information, such as metadata (information about the software; who created it, when it was released, and so on) and dependencies. Dependency is the term for when one software program relies on another program.
The Red Hat package naming convention (for example, ntpdate-4.7.6p5-22.fc27.x86_64.rpm) is described in Figure 26-1.
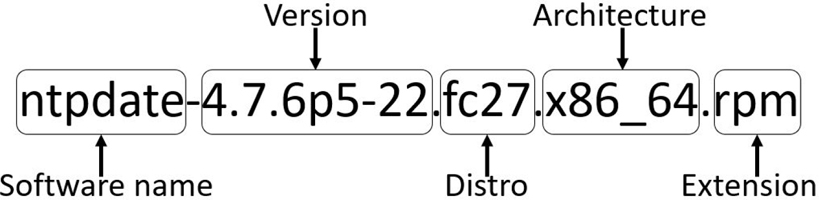
Figure 26-1 Components of a Red Hat package name
The package name provides basic information about the package itself. The package may be named after the primary command provided by the package, or it may be named after the entire software project.
Package versions can be a bit confusing, as there are no rules regarding versions. Typically the first number of the version (“4” for ntpdate-4.7.6p5-22.fc27.x86_64.rpm) is a major release version, and the second number (“7” for ntpdate-4.7.6p5-22.fc27.x86_64.rpm) is a minor release version. Beyond that, it is really up to the software vendor. Some vendors use up to six numbers in their version, and some use alpha characters (for example, “6p5”).
The developers who maintain the Linux distributions often add a “distro” number to the package name. For example, the “fc27” in Figure 26-1 means “Fedora, release 27.” This indicates that some changes may have been made to the software specifically for that distribution before it was repackaged.
The architecture is normally either for a 32-bit platform (“x86”) or a 64-bit platform (“x86_64”), but distributions that support non-Intel platforms will have different values for the architecture. You may also see “noarch,” which means the software in the package is not dependent on any specific architecture.
How to Obtain Packages
If you are using a command like yum or dnf, these tools can download software packages automatically for you. However, if you are using the rpm command to install software packages, you need to find and download packages manually (or use an option to the rpm command to tell it where to get the packages).
There are several sources for packages, including the following:
• The distribution site: Each distribution has its own servers.
• www.rpmfind.net: A website that has RPM packages.
• rpm.pbone.net: A website that has RPM packages.
• Independent project sites: Any software vendor that creates software designed to run on Red Hat–based distributions will likely have a website where the software can be downloaded directly.
• GitHub.com: Many software vendors also share code via this website.
Security Highlight
Be very careful when you download software. Because software must be installed by the root user, it provides an easy way for hackers to compromise your system. These hackers will repackage valid software with some additional tools designed to compromise your system.
The /var/lib/rpm Directory
Although you rarely need to perform any task directly on the /var/lib/rpm directory, you should be aware that this is the location where all package metadata is stored. Package metadata is information about packages, such as the date a package was built and the vendor who built the package. Whenever you install new software (or remove software), changes are made to the database in the /var/lib/rpm directory:
[root@onecoursesource ~]#ls /var/lib/rpm
Basenames     __db.002  Group       Obsoletename  Requirename  Triggername
Conflictname  __db.003  Installtid  Packages      Sha1header
__db.001      Dirnames  Name        Providename   Sigmd5
Although you should realize that this directory exists and that its purpose is to store information about packages, you shouldn’t modify any of these files directly. Occasionally you may need to rebuild the databases in these files, but this should be accomplished by executing the rpm --rebuilddb command.
Using the rpm Command
RPM originally was an acronym for Red Hat Package Manager. As more distributions started using the RPM system to manage software packages, RPM was repackaged to mean RPM Package Manager (a recursive acronym—technically a “backronym,” since the acronym already existed and a definition was provided). Many distributions use RPM, including RHEL (Red Hat Enterprise Linux), Fedora, CentOS, and SUSE.
The yum and dnf commands are “front-end” applications that eventually run rpm commands. Although you may find the yum or dnf command to be easier to use, you will encounter situations in which it is better to use the rpm command. Read the Conversational Learning™ box for reasons why the rpm command can be useful to execute directly.
Conversational Learning™ — Why Use the rpm Command?
Gary: Hi, Julia. I’m wondering if you can explain something about the rpm command for me?
Julia: I’ll do my best.
Gary: OK, it seems like yum and dnf are easier to use and provide more functionality, like the ability to download and automatically install dependency packages. So, why should I ever use the rpm command?
Julia: There are several reasons. For example, suppose you have a package file that has no dependencies. You can easily install that with the rpm command.
Gary: OK, are there other situations?
Julia: Yes, you will find that the rpm command is very good at performing database queries. While many of these queries can be performed by the yum and dnf commands, the rpm command has more features.
Gary: Ah, good point. Any other examples?
Julia: Suppose someone sends you an rpm file and you want to see information about it. The rpm command works well for that scenario.
Gary: Good point. I don’t want to install that package without taking a look at it first!
Julia: Exactly. Also, you can manually extract files from a package without installing them by using an rpm-based command called rpm2cpio.
Gary: OK, OK, you have me convinced! I should study the rpm command and its features in more detail. Thanks, Julia.
Listing rpm Information
To display all installed packages, execute the rpm -qa command. The -q option stands for “query” and the -a option stands for “all” (note that the head command was used to limit the output because there are usually hundreds of packages on a typical system), as shown in Example 26-1.
Example 26-1 The rpm -qa Command
[root@onecoursesource ~]# rpm -qa | head
pciutils-libs-3.3.0-1.fc20.x86_64
iptables-services-1.4.19.1-1.fc20.x86_64
bouncycastle-pg-1.46-10.fc20.noarch
perl-HTTP-Negotiate-6.01-7.fc20.noarch
php-pdo-5.5.26-1.fc20.x86_64
vim-filesystem-7.4.475-2.fc20.x86_64
sisu-inject-0.0.0-0.4.M4.fc20.noarch
perl-DBD-Pg-2.19.3-6.fc20.x86_64
php-bcmath-5.5.26-1.fc20.x86_64
zlib-1.2.8-3.fc20.x86_64
To view basic package information, execute the following command: rpm -qi pkgname. Replace pkgname with the name of the package you want to display. See Example 26-2 for an example.
Example 26-2 Viewing Package Information
[root@onecoursesource ~]# rpm -qi zlib
Name        : zlib
Version     : 1.2.11
Release     : 3.fc28
Architecture: x86_64
Install Date: Tue 6 Feb 2019 09:09:01 AM PST
Group       : System Environment/Libraries
Size        : 188163
License     : zlib and Boost
Signature   : RSA/SHA256, Tue 28 Aug 2017 02:04:04 AM PDT, Key ID 2eb161fa246110c1
Source RPM  : zlib-1.2.8-3.fc20.src.rpm
Build Date  : Sat 26 Aug 2017 06:42:20 AM PDT
Build Host  : buildvm-05.phx2.fedoraproject.org
Relocations : (not relocatable)
Packager    : Fedora Project
Vendor      : Fedora Project
URL         : http://www.zlib.net/
Summary     : The compression and decompression library
Description :
Zlib is a general-purpose, patent-free, lossless data compression
library which is used by many different programs.
Note that important information from the output of the rpm -qi command includes the version, release, and install date. The description can also be helpful to determine what the software package is designed to do.
To list files installed with the package, execute the following command: rpm -ql pkgname. This is a useful command to run right after installing a software package so you are aware of which new files have been added to the system. Here’s an example:
[root@onecoursesource ~]# rpm -ql zlib
/usr/lib64/libz.so.1
/usr/lib64/libz.so.1.2.8
/usr/share/doc/zlib
/usr/share/doc/zlib/ChangeLog
/usr/share/doc/zlib/FAQ
/usr/share/doc/zlib/README
If the package provides some sort of service, then the service will likely have configuration files. To list the configuration files of a package, execute the following command: rpm -qc pkgname. For example:
[root@onecoursesource ~]# rpm -qc vsftpd
/etc/logrotate.d/vsftpd
/etc/pam.d/vsftpd
/etc/vsftpd/ftpusers
/etc/vsftpd/user_list
/etc/vsftpd/vsftpd.conf
Note that the zlib package was not used in the previous example because it has no configuration files:
[root@onecoursesource ~]# rpm -qc zlib
[root@onecoursesource ~]#
It can also be useful to view the documentation files provided by the package. This allows you to view details about how to use the software that came with the package. To list documentation files, execute the following command: rpm -qd pkgname. For example:
[root@onecoursesource ~]# rpm -qd zlib
/usr/share/doc/zlib/ChangeLog
/usr/share/doc/zlib/FAQ
/usr/share/doc/zlib/README
What if you found a file that is already on the system and you want to know if anything else was installed as part of the package? This can be really useful when the file has been altered because you can retrieve the original file directly from the package. To view what package a file originated from, use the rpm -qf filename command:
[root@onecoursesource ~]# rpm -qf /usr/lib64/libz.so.1
zlib-1.2.8-3.fc20.x86_64
If one file from a package has been modified or removed, then other files from that same package may also have been modified or removed. To get a list of the state of all files of a package, use the rpm -V pkgname command:
[root@onecoursesource ~]# rpm -V clamd
.....UG..    /var/clamav
missing     /var/run/clamav
The output of the rpm -V command can be a bit difficult to get used to. If a file that was installed with the package is no longer on the system, then the output will mark the file as “missing.” If a file has been modified, then the command provides a list of characters (and “dots,” or periods) that indicate what changes have been made. These characters are defined in the man page for the rpm command, as shown in Example 26-3.
Example 26-3 Man Page Description of the Output of the rpm -V Command
[root@onecoursesource ~]#man rpm
…
       S file Size differs
       M Mode differs (includes permissions and file type)
       5 digest (formerly MD5 sum) differs
       D Device major/minor number mismatch
       L readLink(2) path mismatch
       U User ownership differs
       G Group ownership differs
       T mTime differs
P caPabilities differ
…
Security Highlight
Finding changes to a package’s files does not automatically indicate a problem. For example, if a configuration file’s size has changed, that likely means that an administrator edited the file to customize how the software runs.
Consider carefully which files should and should not change. For instance, files in the /bin and /usr/bin directories are typically binary (not text) files and should not change in size. Files in the /etc directory are typically configuration files, and you would expect these files to change in size.
Viewing Package Dependencies
Packages often need features from other packages. These features are called dependencies. To list the dependencies of a package, execute the following command: rpm -qR pkgname. See Example 26-4 for an example.
Example 26-4 The rpm -qR Command
[root@onecoursesource ~]#rpm -qR vsftpd
/bin/bash
/bin/sh
/bin/sh
/bin/sh
config(vsftpd) = 3.0.2-6.fc20
libc.so.6()(64bit)
libc.so.6(GLIBC_2.14)(64bit)
libc.so.6(GLIBC_2.15)(64bit)
libc.so.6(GLIBC_2.2.5)(64bit)
libc.so.6(GLIBC_2.3)(64bit)
libc.so.6(GLIBC_2.3.4)(64bit)
libc.so.6(GLIBC_2.4)(64bit)
libc.so.6(GLIBC_2.7)(64bit)
libcap.so.2()(64bit)
libcrypto.so.10()(64bit)
libcrypto.so.10(libcrypto.so.10)(64bit)
libdl.so.2()(64bit)
libnsl.so.1()(64bit)
libpam.so.0()(64bit)
libpam.so.0(LIBPAM_1.0)(64bit)
libssl.so.10()(64bit)
libssl.so.10(libssl.so.10)(64bit)
libwrap.so.0()(64bit)
logrotate
rpmlib(CompressedFileNames) <= 3.0.4-1
rpmlib(FileDigests) <= 4.6.0-1
rpmlib(PayloadFilesHavePrefix) <= 4.0-1
rtld(GNU_HASH)
rpmlib(PayloadIsXz) <= 5.2-1
Note that the dependencies are not just package names but also features that are provided by a package. For example, in the output of Example 26-4, “logrotate” indicates a dependency on the logrotate package, but “/bin/bash” indicates a dependence on the /bin/bash command. Most of the other lines indicate libraries (small programs that are shared by other programs to provide functions).
To list what package provides a dependency, execute the following command: rpm -q --whatprovides capability. Example 26-5 provides some examples.
Example 26-5 The rpm -q --whatprovides Command
[root@onecoursesource ~]#rpm -q --whatprovides /bin/bash
bash-4.2.53-2.fc28.x86_64
[root@onecoursesource ~]#rpm -q --whatprovides "libc.so.6()(64bit)"
glibc-2.18-19.fc28.x86_64
[root@onecoursesource ~]#rpm -q --whatprovides /sbin/ldconfig
glibc-2.18-19.fc28.x86_64
[root@onecoursesource ~]#rpm -q --whatprovides "libwrap.so.0()(64bit)"
tcp_wrappers-libs-7.6-76.fc28.x86_64
You also may be wondering “if this one package needs this dependency, what other packages also need this dependency?” To list what else requires a dependency, execute the following command: rpm -q --whatrequires capability. For example, see the output of Example 26-6.
Example 26-6 Output of rpm -q --whatrequires
[root@onecoursesource ~]# rpm -q --whatrequires "libwrap.so.0()(64bit)"
net-snmp-agent-libs-5.7.2-18.fc28.x86_64
net-snmp-5.7.2-18.fc28.x86_64
quota-4.01-11.fc28.x86_64
sendmail-8.14.8-2.fc28.x86_64
audit-2.4.1-1.fc28.x86_64
vsftpd-3.0.2-6.fc28.x86_64
pulseaudio-libs-5.0-25.fc28.x86_64
openssh-server-6.4p1-8.fc28.x86_64
systemd-208-31.fc28.x86_64
proftpd-1.3.4e-3.fc28.x86_64
The preceding output can be very useful. For example, we can tell that if we remove the package that provided the "libwrap.so.0()(64bit)" library, then the packages listed by the aforementioned rpm -q --whatrequires command will no longer work correctly.
Once you determine what package provides a specific dependency, you may also want to view what other dependencies that package provides. To list these other dependencies, execute the following command: rpm -q--provides pkgname. For example:
[root@onecoursesource ~]# rpm -q --provides tcp_wrappers-libs-7.6-76.fc28.x86_64
libwrap.so.0()(64bit)
tcp_wrappers-libs = 7.6-76.fc28
tcp_wrappers-libs(x86-64) = 7.6-76.fc28
Package Listing Tricks
The rpm command is well known for having powerful features to list software package information. For example, suppose you suspect a new package is causing problems on the system, but you do not recall which packages have been installed lately (or you suspect a hacker has installed some new packages). Consider running the rpm -qa --last command, which will display installed packages in order from the installation date:
[root@onecoursesource ~]# rpm -qa --last | head -n 5
perl-Pod-Checker-1.60-292.fc28.noarch      Fri 10 Feb 2019 11:09:09 AM PST
perl-Pod-Parser-1.61-3.fc28.noarch         Fri 10 Feb 2019 11:09:08 AM PST
perl-Readonly-1.03-24.fc28.noarch          Fri 10 Feb 2019 10:10:25 AM PST
perl-Readonly-XS-1.05-16.fc28.x86_64       Fri 10 Feb 2019 10:10:24 AM PST
libX11-devel-1.6.1-1.fc28.x86_64           Thu 26 Jan 2019 10:26:50 AM PST
Recall that the rpm -qi command provides information about an installed package. To see the sort of information on a package that has not been installed yet, execute the command rpm -qip pkgname.rpm. Note that the -p option means “this is a package file, not an installed package.” See Example 26-7 for an example.
Example 26-7 The rpm -qip Command
[root@onecoursesource ~]#rpm -qip fedora/packages/tcl-8.5.14-1.fc28.x86_64.rpm
Name        : tcl
Epoch       : 1
Version     : 8.5.14
Release     : 1.fc28
Architecture: x86_64
Install Date: (not installed)
Group       : Development/Languages
Size        : 4592249
License     : TCL
Signature   : RSA/SHA256, Thu 15 Aug 2017 10:36:45 AM PDT, Key ID 2eb161fa246110c1
Source RPM  : tcl-8.5.14-1.fc28.src.rpm
Build Date  : Thu 15 Aug 2017 02:04:19 AM PDT
Build Host  : buildvm-13.phx2.fedoraproject.org
Relocations : (not relocatable)
Packager    : Fedora Project
Vendor      : Fedora Project
URL         : http://tcl.sourceforge.net/
Summary     : Tool Command Language, pronounced tickle
Description :
The Tcl (Tool Command Language) provides a powerful platform for
creating integration applications that tie together diverse
applications, protocols, devices, and frameworks. When paired with the
Tk toolkit, Tcl provides a fastest and powerful way to create
cross-platform GUI applications.  Tcl can also be used for a variety
of web-related tasks and for creating powerful command languages for
applications.
Which packages take up the most hard drive space? To list packages by size, execute the following command: rpm -qa --queryformat '%{name} %{size}\n' | sort -n -k 2 -r. For example:
[root@onecoursesource ~]# rpm -qa --queryformat '%{name} %{size}\n' |
sort -n -k 2 -r | head -n 5
kernel 151587581
kernel 147584558
kernel 146572885
firefox 126169406
moodle 122344384
sort -n -k 2 -r | head -n 5
kernel 151587581
kernel 147584558
kernel 146572885
firefox 126169406
moodle 122344384
Note that in the preceding command line, the head command is used to reduce the amount of output to the top five largest files. The sort command performs a reverse numeric (higher numbers displayed first) sort on the second field of each line (the size of the package in bytes). Although the size is in bytes, this can easily be converted into megabytes or gigabytes using one of many online calculators (for example, http://whatsabyte.com/P1/byteconverter.htm).
In some cases you may want to list all packages that came from a specific vendor. This can be accomplished by executing the following command: rpm -qa --qf '%{name} %{vendor}\n' | grep vendor-name. Replace vendor-name with the name of the vendor, like so:
[root@onecoursesource ~]# rpm -qa --qf '%{name} %{vendor}\n' | grep  "Virtualmin, Inc."
virtualmin-base Virtualmin, Inc.
Note
The previous command might not work on your system if you do not have any software from "Virtualmin, Inc." So, how did we pick this particular vendor? We first ran the rpm -qa --qf '%{name} %{vendor}\n' command, which yielded hundreds of lines of output. Most of these lines displayed a vendor name of "Fedora Project," because the distribution we were working on is Fedora. Next, we ran the rpm -qa --qf '%{name} %{vendor}\n' | grep -v "Fedora Project" command to display all the packages that were not provided by the "Fedora Project" (recall that the -v option to the grep command means “match all lines that don’t contain this pattern”). Then we just picked one of the results at random for the demonstration. The point of this description is to demonstrate that knowing powerful command-line tools like grep can make your life a lot easier!
Security Highlight
To add or remove software requires you to be logged in as the root user. However, any user can view software package information. This highlights the importance of securing regular user accounts, because knowing what software is installed on a system can provide a hacker with the means to determine a hacking technique that could further compromise the system. As a result, if a hacker can gain access to the system as a regular user, valuable information is then available to the hacker.
Installing Packages with rpm
Three different options can be used to install software packages with the rpm command. Table 26-1 describes these three options.
Table 26-1 Installation Methods for the rpm Command
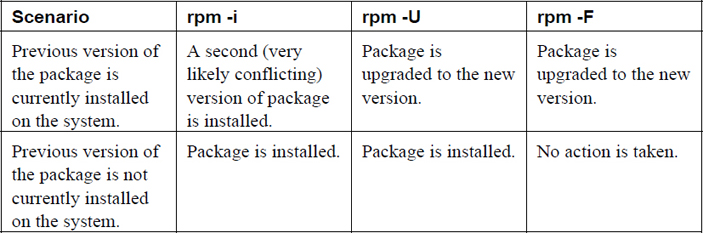
You only want to use the -i option if you are certain that a previous version of the package is not already installed. The exception to this is the kernel package. No two kernel packages have conflicting files, and having an older version of the kernel package is useful if the newer version of the package fails to boot the system.
In most cases, you should use the -U option to install or upgrade a package. However, the -F option is useful in certain situations. For example, suppose your administrator copies all updated packages for the distribution into a network shared directory. This share has thousands of packages—far more than you currently have installed on your system. If you execute the rpm -U * command in the directory where these packages are shared, you would end up not just upgrading existing packages but also installing a lot of new packages. If you execute the rpm -F * command, only existing packages would be upgraded, and all “new” packages would not be installed at all.
Note
Some packages may take a long time to install. Because there is normally no output to the rpm command until after the package is completely installed, this can lead to you thinking the command is not “doing anything.” Consider using the -h option, which will display “hash marks” across the screen as the package is installed:
[root@onecoursesource ~]# rpm -ih /var/cache/yum/x86_64/20/
Before You Install That Package…
Consider a situation in which you obtain a software package either from the Internet or via email. How can you tell that the package was really from the correct source versus a package that has been compromised by a hacker? You should never install a software package from an untrusted source, especially on a critical system.
You should also look at the content of the package before installing it. It would be a good idea to use a virus- or worm-scanning tool as well.
Even if you get the package from what you consider a trusted source, you should consider verifying the package. You can do this in a similar way that you could verify that a letter was written by a specific person. If you know what that person’s signature looks like, you could look at the signature on the letter to verify it really came from that specific person.
The organization that created the software package should provide a digital signature, which is a unique “key” that only that organization can place on the package. There is a tool you can use to verify this digital signature, but first you need to get a signature file from a trusted location (directly from the organization itself).
Next import the signature into the RPM database by using the following command: rpm --import /location/key-file
Once you have the signature in the RPM database, you can verify a RPM file signature on a RPM file before you install the package, as demonstrated below:
[root@onecoursesource ~]# rpm -K /var/cache/yum/x86_64/20/fedora/packages/joe-3.7-13.fc28.x86_64.rpm /var/cache/yum/x86_64/20/fedora/packages/joe-3.7-13.fc28.x86_64.rpm: rsa
What you primarily are looking for is the “OK” at the end of the output. Do not trust any packages that do not provide this message.
To list all signatures that are currently in the RPM databases, use the following command: rpm -qa gpg-pubkey*. For example:
[root@onecoursesource rpm -qa gpg-pubkey*
gpg-pubkey-11f63c51-3c7dc11d
gpg-pubkey-5ebd2744-418ffac9
gpg-pubkey-4520afa9-50ab914c
gpg-pubkey-246110c1-51954fca
gpg-pubkey-a0bdbcf9-42d1d837
Use rpm -qi for details of specific signature, as shown in Example 26-8.
Example 26-8 Displaying Signature Details
[root@onecoursesource ~]#rpm -qi gpg-pubkey-a0bdbcf9-42d1d837
Name        : gpg-pubkey
Version     : a0bdbcf9
Release     : 42d1d837
Architecture: (none)
Install Date: Thu 15 Jan 2015 09:02:46 AM PST
Group       : Public Keys
Size        : 0
License     : pubkey
Signature   : (none)
Source RPM  : (none)
Build Date  : Sun 10 Jul 2005 07:23:51 PM PDT
Build Host  : localhost
Relocations : (not relocatable)
Packager    : Virtualmin, Inc. <security@virtualmin.com>
Summary     : gpg(Virtualmin, Inc. <security@virtualmin.com>)
Description :
-----BEGIN PGP PUBLIC KEY BLOCK-----
Version: rpm-4.11.1 (NSS-3)
Note
Do not be thrown off by the build date in the output of Example 26-8. Digital signatures are often used for many years. As long as digital signatures are not compromised, the organization who builds the packages typically does not change these signatures. Some digital signatures have been used for decades.
Removing Packages with rpm
To remove a package with the rpm command, use the -e option, like so: rpm -e joe.
Note
This command uses the “no news is good news” policy. If the command is successful, then no output is provided. To see a verification that the package was removed, use the -v option.
What if you want to see what would happen if a package was removed, but not actually remove the package? Run the following command to view the removal steps without actually removing the package: rpm -e --test -vvpkgname.
What Could Go Wrong?
If you attempt to remove a package that contains dependencies that are required for other installed packages, you will get an error message like the following:
error: Failed dependencies:
        libwrap.so.0()(64bit) is needed by (installed) net-snmp-agent-libs-1:5.7.2-18.fc28.x86_64
While you can force the removal of this package by including the --nodeps option, keep in mind that you will be breaking other packages. Instead, consider removing the packages that present dependency issues.
rpm2cpio
Imagine a situation in which a file from a package has been removed or the contents have been altered. In a situation like this, you may want to recover the original file or contents.
The rpm2cpio command converts RPM files into CPIO data streams (CPIO stands for copy input/output). These streams can then be piped into the cpio command, which can extrapolate the files and directories. Here’s an example:
[root@localhost package]# ls
libgcc-4.8.5-4.el7.x86_64.rpm
[root@localhost package]# rpm2cpio libgcc-4.8.5-4.el7.x86_64.rpm | cpio-idum
353 blocks
[root@localhost package]# ls
lib64  libgcc-4.8.5-4.el7.x86_64.rpm  usr
[root@localhost package]# ls usr/share/doc/libgcc-4.8.5
COPYING  COPYING3  COPYING3.LIB  COPYING.LIB  COPYING.RUNTIME
This process is useful to extract specific files from an RPM file without having to reinstall the entire RPM. The resulting files are exactly the files that are installed; however, they are placed in the current directory.
Note that a complete discussion of the cpio command is beyond the scope of this book. The -idum options essentially mean “extract all files and directories in the CPIO stream into the current directory.”
The yum Command
You may be wondering why there is another command that can be used to view, add, and remove software packages on Red Hat–based systems. The reason is that the yum command is designed to overcome some drawbacks to the rpm command, such as the following:
• The rpm command requires that you download RPM files or manually point to a network-accessible RPM file when you install a new RPM package. With the yum command, remote repositories are automatically used to download the package during the installation process.
• When you install a RPM package that has a dependency and that dependency package is not already installed, the rpm command will fail. With the yum command, dependencies are handled automatically as the command will download and install all dependency packages.
• The yum utility is a rewrite of an older package management tool called Yellowdog Updater (YUP). In fact, YUM stands for Yellowdog Updater, Modified. Yellowdog is the name of an outdated Linux distribution.
What Could Go Wrong?
You may come across the term “dependency hell.” This is when you try to install an RPM package with the rpm command, only to find that the package has dependencies. You find these dependency packages and try to install those, only to find these also have dependencies. As you can imagine, this can result in an ugly situation where you are trying to find all the dependencies required to install the initial package. The yum command is designed to resolve most of these dependency issues.
Repositories
A repository (also called a repo) is a location, typically network accessible, that contains RPM packages and a small database that describes the relationship between these packages. The yum command connects to the repositories to determine which packages are available. During the installation of packages, the yum command will also download the packages from the repo.
Repos can either be shared across the network using FTP, HTTP, or HTTPS or be local to the system in a directory (hard drive or removable media). When a repo is shared via the network, part of the setup of the repo is configuring the FTP server or web server. See Chapter 20, “Network Service Configuration: Essential Services,” and Chapter 21, “Network Service Configuration: Web Services,” for details on how to configure those servers.
Accessing a Repo
To access a repo, you need to know how to configure the yum command. This is done by a combination of the /etc/yum.conf file and files in the /etc/yum.repos.d directory.
The /etc/yum.conf file is the primary configuration file for yum commands. For example, see Example 26-9.
Example 26-9 The /etc/yum.conf File
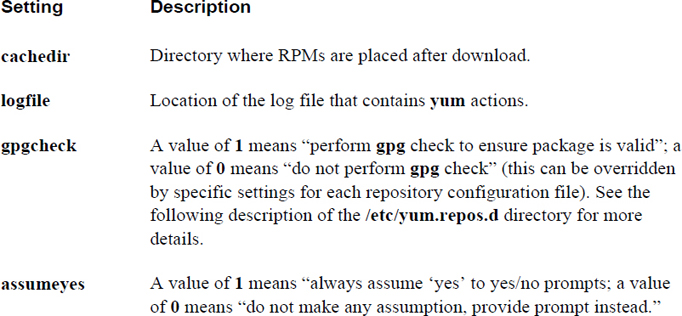
[main] cachedir=/var/cache/yum/$basearch/$releasever keepcache=0 debuglevel=2 logfile=/var/log/yum.log exactarch=1 obsoletes=1 gpgcheck=1 plugins=1 installonly_limit=5 bugtracker_url=http://bugs.centos.org/set_project.php?project_id=23&ref=
Key settings of the /etc/yum.conf file are shown in Table 26-2.
Table 26-2 Settings of the /etc/yum.conf File
The /etc/yum.repos.d directory contains files that end in .repo. These files are used to specify the location of yum repositories. Each file defines one or more repositories, as described in Figure 26-2.
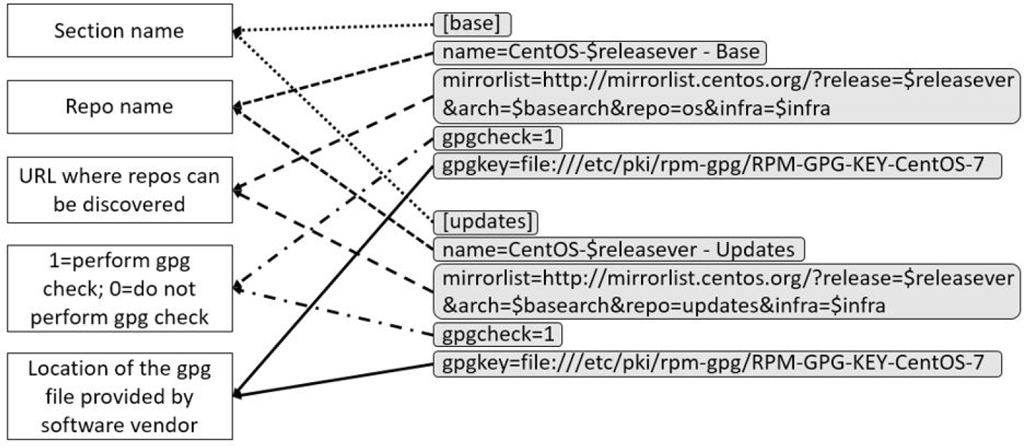
Figure 26-2 The format of files in the /etc/yum.repos.d directory
Creating a Repo
Creating a repository involves the following steps:
1. Create a directory where the packages will be stored.
2. Copy all packages into this directory.
3. Run the command createrepo /directory (replace /directory with the directory that you created in Step 1). Note that the createrepo command is not typically included on the system by default. You should install the createrepo package to get access to this command.
Using the yum Command
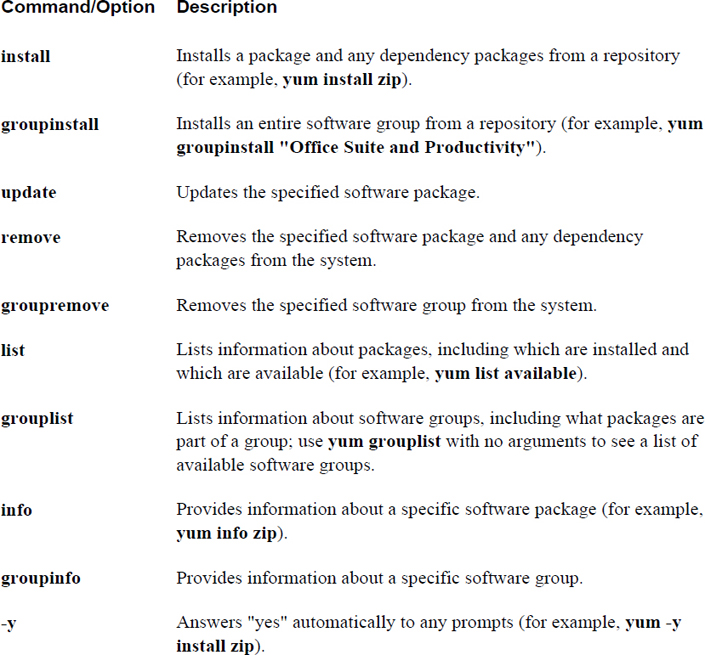
The yum command is used to install software from repositories. It can also be used to remove software and display information regarding software. Table 26-3 highlights the primary yum commands and options.
Table 26-3 Primary yum Commands and Options
Displaying Package Information with yum
To display software packages with the yum command, use the following: yum list item. Replace item with one of the following:
• installed: This displays all the packages already installed on the system.
• available: This displays packages that are available on repos, but not currently installed.
• all: This lists all packages, installed or not.
You can also use globs (wildcard characters) to limit the output. For example, the Example 26-10 only displays packages that contain “zip” in the package name.
Example 26-10 Packages Containing “zip”
[root@onecoursesource ~]# yum list installed "*zip*"
Loaded plugins: fastestmirror, langpacks
 * base: mirror.supremebytes.com
 * epel: mirror.chpc.utah.edu
 * extras: mirrors.cat.pdx.edu
 * updates: centos.sonn.com
Installed Packages
bzip2.x86_64                    1.0.6-13.el7               @base
bzip2-libs.x86_64               1.0.6-13.el7               @base
gzip.x86_64                     1.5-8.el7                  @base
perl-Compress-Raw-Bzip2.x86_64  2.061-3.el7                @anaconda
unzip.x86_64                    6.0-15.el7                 @base
zip.x86_64                      3.0-10.el7                 @anaconda
What Could Go Wrong?
For the yum command to work correctly, you need to have access to the Internet. If the command fails, test your network connections.
The yum command also supports a search feature that will match a glob pattern in package names and summaries. It attempts to match the glob in the package descriptions and URLs (website links). For example, all packages that contain “joe” in the package names, summaries, and descriptions are displayed in the command in Example 26-11 (the search term is highlighted in the output).
Example 26-11 Searching for Packages with the yum Command
[root@onecoursesource ~]#yum search joe
Loaded plugins: fastestmirror, verify
Loading mirror speeds from cached hostfile
 * atomic: www6.atomicorp.com
 * fedora: mirrors.rit.edu
 * updates: mirrors.rit.edu
=============================== N/S matched: joe ===============================
libjoedog-devel.i686 : Development files for libjoedog
libjoedog-devel.x86_64 : Development files for libjoedog
joe.x86_64 : An easy to use, modeless text editor
jupp.x86_64 : Compact and feature-rich WordStar-compatible editor
jwm.x86_64 : Joe's Window Manager
libjoedog.i686 : Repack of the common code base of fido and siege
libjoedog.x86_64 : Repack of the common code base of fido and siege
texlive-jknapltx.noarch : Miscellaneous packages by Joerg Knappen
You may wonder why the jupp.x86_64 package was matched in the command from Example 26-11. If you run the yum info jupp.x86_64 command, you will see that part of the output of that command includes what’s shown in Example 26-12.
Example 26-12 Displaying yum Info
Description : Jupp is a compact and feature-rich WordStar-compatible editor and
            : also the MirOS fork of the JOE 3.x editor which provides easy
            : conversion for former PC users as well as powerfulness for
            : programmers, while not doing annoying things like word wrap
            : "automagically". It can double as a hex editor and comes with a
            : character map plus Unicode support. Additionally it contains an
            : extension to visibly display tabs and spaces, has a cleaned up,
            : extended and beautified options menu, more CUA style key-bindings,
            : an improved math functionality and a bracketed paste mode
            : automatically used with Xterm.
Software Groups
One of the benefits of the yum command over the rpm command is the ability to create software groups on the repo. By grouping packages together, it makes it easier to install a suite or collection of packages.
To display some of the software groups available on existing repositories, use the command yum group list, as shown in Example 26-13.
Example 26-13 The yum group list Command
[root@onecoursesource ~]#yum group list
Loaded plugins: fastestmirror, verify
Loading mirror speeds from cached hostfile
 * atomic: www6.atomicorp.comyu
 * fedora: mirrors.rit.edu
 * updates: mirrors.rit.edu
Installed environment groups:
   Minimal Install
Available environment groups:
   GNOME Desktop
   KDE Plasma Workspaces
   Xfce Desktop
   LXDE Desktop
   Cinnamon Desktop
   MATE Desktop
   Sugar Desktop Environment
   Development and Creative Workstation
   Web Server
   Infrastructure Server
   Basic Desktop
Installed groups:
   Development Tools
Available Groups:
   3D Printing
   Administration Tools
   Audio Production
   Authoring and Publishing
   Books and Guides
   C Development Tools and Libraries
   Cloud Infrastructure
   D Development Tools and Libraries
   Design Suite
   Editors
   Educational Software
   Electronic Lab
   Engineering and Scientific
   Fedora Eclipse
   FreeIPA Server
   Games and Entertainment
   LibreOffice
   Medical Applications
   Milkymist
   Network Servers
   Office/Productivity
   RPM Development Tools
   Robotics
   Security Lab
   Sound and Video
   System Tools
   Text-based Internet
   Window Managers
Done
The yum group list command does not display all of the software groups. Some are hidden by default and can be viewed by executing the yum group list hidden command. The output of this command is too large for displaying in this book. To demonstrate how using the hidden option will display many more software groups, look at the following output:
 [root@onecoursesource ~]#yum group list | wc -l
51
[root@onecoursesource ~]#yum group list hidden | wc -l
142
Note that wc -l will display the number of lines from the output of the previous command. Each line represents a software group (besides a few lines that do not contain group names), so 142 lines versus 51 lines means there are about 90 additional software groups that are not displayed if you do not use the hidden option.
You can display information about a software group by using the yum group info command, as shown in Example 26-14.
Example 26-14 The yum group info Command
[root@onecoursesource ~]#yum group info "LibreOffice"
Loaded plugins: fastestmirror, verify
Loading mirror speeds from cached hostfile
 * atomic: www6.atomicorp.com
 * fedora: mirrors.rit.edu
 * updates: mirrors.rit.edu

Group: LibreOffice
 Group-Id: libreoffice
 Description: LibreOffice Productivity Suite
 Mandatory Packages:
   +libreoffice-calc
   +libreoffice-draw
   +libreoffice-emailmerge
   +libreoffice-graphicfilter
   +libreoffice-impress
   +libreoffice-math
   +libreoffice-writer
 Optional Packages:
   libreoffice-base
   libreoffice-pyuno
In the next section, you learn how to install packages using the package group.
Installing Software with yum
When you install a package with the yum command, you can either specify the package name, a glob, or a filename within the package. For example, Example 26-15 demonstrates installing the joe package by name.
Example 26-15 Installing a Package with yum
[root@onecoursesource ~]#yum install joe
Loaded plugins: fastestmirror, verify
Loading mirror speeds from cached hostfile
 * atomic: www6.atomicorp.com
 * fedora: mirrors.rit.edu
 * updates: mirrors.rit.edu
Resolving Dependencies
--> Running transaction check
---> Package joe.x86_64 0:3.7-13.fc28 will be installed
--> Finished Dependency Resolution

Dependencies Resolved

===================================================================
 Package    Arch         Version              Repository     Size
===================================================================
Installing:
 joe        x86_64       3.7-13.fc28          fedora         382 k

Transaction Summary
===================================================================
Install  1 Package

Total size: 382 k
Installed size: 1.2 M
Is this ok [y/d/N]: y
Downloading packages:
Running transaction check
Running transaction test
Transaction test succeeded
Running transaction (shutdown inhibited)
  Installing : joe-3.7-13.fc28.x86_64                                       1/1
  Verifying  : joe-3.7-13.fc28.x86_64                                       1/1

Installed:
  joe.x86_64 0:3.7-13.fc28

Complete!
In the next example, a glob is used to match package names: yum install joe*.
If you know a file that belongs to the package, you can specify a filename: yum install /bin/joe.
By default, the yum command will prompt you before downloading or installing the packages. To avoid that prompt and answer “yes” automatically, use the -y option to the yum command.
If you only want to download a package and not install any packages, use the --downloadonly option. This places the package in a subdirectory under the /var/ cache/yum directory (for example, /var/cache/yum/x86_64/28 for version 28 of the Fedora distribution). This can be useful when creating your own repo because it provides an easy way to download packages without actually installing them.
To install packages from a group, use the yum group install grpname command (for example, yum group install "LibreOffice").
Removing Software with yum
Use the yum remove command to remove software packages. You can either specify a package name, a glob, or a filename as an argument to the yum remove command:
• yum remove joe
• yum remove *ruby*
• yum remove /usr/bin/ruby
By default, you will be asked to verify that you want to remove the package. Use the -y option to automatically respond with “yes.”
What Could Go Wrong?
Be very careful when combining the -y option and package arguments that include wildcard characters. You can end up deleting a lot more packages than you intended.
To remove a software group, use the following syntax: yum group remove grpname.
Using yum Plug-Ins
Plug-ins are used to provide yum with more features and functions. Some examples of commonly used yum plug-ins:
• fastmirror: Finds the fastest mirror from the mirror list; a mirror is a repo feature that allows the repository to spread the client requests across different systems.
• snapshot: Automatically snapshots the filesystem during updates; a snapshot of a filesystem allows the recovery of files in the event that yum actions create problems.
• versionlock: Enables a feature to “lock” a package; when a package is locked, no updates will be performed on the package.
You can display currently installed plug-ins by executing the following command: yum info yum. This command will produce a large amount of output, so the example in Example 26-16 is designed to just display one installed plug-in.
Example 26-16 Displaying yum Plug-Ins
[root@onecoursesource ~]#yum info yum | head -n 25
Loaded plugins: fastestmirror, verify
Loading mirror speeds from cached hostfile
 * atomic: www6.atomicorp.com
 * fedora: mirrors.rit.edu
 * updates: mirrors.rit.edu
Installed Packages
Name        : yum
Arch        : noarch
Version     : 3.4.3
Release     : 152.fc20
Size        : 5.6 M
Repo        : installed
From repo   : updates
Summary     : RPM package installer/updater/manager
URL         : http://yum.baseurl.org/
License     : GPLv2+
Description : Yum is a utility that can check for and automatically
            : download and install updated RPM packages.
            : Dependencies are obtained and downloaded
            : automatically, prompting the user for permission as
            : necessary.
You can enable and disable plug-ins in multiple ways:
• Each plug-in can be enabled or disabled by a setting in its specific configuration file called “enabled”. These configuration files are located in the /etc/yum/pluginconf.d directory. For example, to enable the fastestmirror plug-in for all yum commands, set enabled=1 in the /etc/yum/pluginconf.d/fastestmirror.conf file. To disable this plug-in for all yum commands, set enabled=1 in the /etc/yum/pluginconf.d/fastestmirror.conf file.
• To disable a plug-in for a specific yum command, use the --disableplugin option. For example: yum --disableplugin=fastestmirror.
• To enable plug-ins, edit the /etc/yum.conf file and change the value of the plugins setting to 1 (plugins=1). This does not enable all plug-ins, just the ones that are specifically enabled in the aforementioned configuration files. To disable all plug-ins for all yum commands, edit the /etc/yum.conf file and change the value of the plugins setting to 0 (plugins=0).
• To disable all plug-ins for a specific yum command, use the --noplugins option.
Additional plug-ins are available that are not currently installed on your system. You can display available plug-ins by executing the following command:
yum provides "/usr/lib/yum-plugins/*"
This yum command produces a large amount of output; Example 26-17 uses the head command to limit the output.
Example 26-17 Using the head Command to Limit Output
[root@onecoursesource ~]# yum provides "/usr/lib/yum-plugins/*" | head
Loaded plugins: fastestmirror, verify
Loading mirror speeds from cached hostfile
 * atomic: www6.atomicorp.com
 * fedora: mirrors.rit.edu
 * updates: mirrors.rit.edu
PackageKit-yum-plugin-0.8.13-1.fc22.x86_64 : Tell PackageKit to
                                           : check for updates
                                           : when yum exits
Repo        : fedora
Matched from:
Filename    : /usr/lib/yum-plugins/refresh-packagekit.py
To install a plug-in, use the following command: yum install plugin_name (for example, yum install PackageKit-yum-plugin).
Additional Tools
On distributions that use RPM, you will find that there are additional tools related to software management:
• SUSE: This distribution has a command-line tool called zypper that works very much like the yum command. It is a front-end utility to the rpm command that handles software dependencies.
• Red Hat/CentOS/Fedora: These distributions have a GUI-based utility called PackageKit that can be accessed via the menu bar. It provides similar functionality to the yum command, but in a GUI-based format.
• Fedora: On more modern versions of Fedora, a newer tool that is designed to replace yum is available: DNF (Dandified yum). It provides better performance, better dependency resolution, and additional improvements over the yum command. It is also compatible with the yum command and uses most of the same options (a few have been removed and some have been added). As an example of a dnf new feature, if you type a command that does not already exist, dnf suggests a command to install the correct package to provide the missing command. Note that just about every yum feature described in this chapter can also be executed as a dnf command on newer Fedora versions.
What Could Go Wrong?
On newer Fedora systems, the yum command still technically exists, but it really executes dnf commands. So, any feature that only works with the yum command (and not the dnf command) will fail on newer Fedora systems, even if you execute yum instead of dnf.
Summary
In this chapter, you learned several different methods of managing packages on Red Hat–based distributions. You learned about the rpm command, which is primarily used to view package information, but it can also be used for simple package installations. You also learned about the advanced package management tools that the yum command provides, including downloading software packages from repositories and handling package dependencies.
Key Terms
Review Questions
1. The RPM databases that contain metadata about software packages are stored in the /var/lib/_____ directory.
2. Which command will list all packages that are currently installed?
a. rpm -ql
b. rpm -qp
c. rpm -qa
d. None of these is correct.
3. The _____ command will make a repository in the specified directory.
4. The _____ option to the rpm command will only upgrade packages that currently have older versions already installed on the system.
a. -i
b. -F
c. -g
d. -U
5. The _____ feature of the yum command will match a glob pattern in package names and summaries.