Table of Contents for
Linux Essentials for Cybersecurity, First Edition
 Linux Essentials for Cybersecurity, First Edition
Published by
Pearson IT Certification, 2018
Linux Essentials for Cybersecurity, First Edition
Published by
Pearson IT Certification, 2018
- Cover Page
- Title Page
- Copyright Page
- Contents at a Glance
- Table of Contents
- About the Author
- Dedication
- Acknowledgments
- About the Technical Reviewers
- We Want to Hear from You!
- Reader Services
- Introduction
- Part I: Introducing Linux
- Chapter 1: Distributions and Key Components
- Chapter 2: Working on the Command Line
- Chapter 3: Getting Help
- Chapter 4: Editing Files
- Chapter 5: When Things Go Wrong
- Part II: User and Group Accounts
- Chapter 6: Managing Group Accounts
- Chapter 7: Managing User Accounts
- Chapter 8: Develop an Account Security Policy
- Part III: File and Data Storage
- Chapter 9: File Permissions
- Chapter 10: Manage Local Storage: Essentials
- Chapter 11: Manage Local Storage: Advanced Features
- Chapter 12: Manage Network Storage
- Chapter 13: Develop a Storage Security Policy
- Part IV: Automation
- Chapter 14: Crontab and At
- Chapter 15: Scripting
- Chapter 16: Common Automation Tasks
- Chapter 17: Develop an Automation Security Policy
- Part V: Networking
- Chapter 18: Networking Basics
- Chapter 19: Network Configuration
- Chapter 20: Network Service Configuration: Essential Services
- Chapter 21: Network Service Configuration: Web Services
- Chapter 22: Connecting to Remote Systems
- Chapter 23: Develop a Network Security Policy
- Part VI: Process and Log Administration
- Chapter 24: Process Control
- Chapter 25: System Logging
- Part VII: Software Management
- Chapter 26: Red Hat–Based Software Management
- Chapter 27: Debian-Based Software Management
- Chapter 28: System Booting
- Chapter 29: Develop a Software Management Security Policy
- Part VIII: Security Tasks
- Chapter 30: Footprinting
- Chapter 31: Firewalls
- Chapter 32: Intrusion Detection
- Chapter 33: Additional Security Tasks
- Appendix A: Answers to Review Questions
- Appendix B: Resource Guide
- Glossary
Chapter 20 Network Service Configuration: Essential Services
As an administrator, you should know how to correctly set up and secure key network servers. In this chapter, you explore some of these servers, including DNS, DHCP, and mail servers.
You will start by learning key component of the Doman Name Service (DNS) and how to configure a BIND DNS server. Then you learn how to set up a Dynamic Host Configuration Protocol (DHCP) server and discover how this server can interact with a DNS server.
This chapter concludes with an in-depth discussion on email services, including setting up and configuring Postfix, procmail, and Dovecot.
After reading this chapter and completing the exercises, you will be able to do the following:
Configure and secure a BIND DNS server
Set up a DHCP server
Explain key email features
Configure a Postfix server
Configure email delivery software, including procmail and Dovecot
DNS Servers
DNS (Domain Name Service) is a protocol designed to provide name-to-IP-address resolution. It is part of the standard TCP/IP protocol suite and one of several protocols that can provide this functionality; others include the Network Information Service (NIS) and LDAP.
What distinguishes DNS from other similar protocols is that its sole focus is name resolution; NIS and LDAP provide other resolution operations, such as network user and group accounts. DNS is also the de facto standard name resolution solution for the majority of systems connected to the Internet.
DNS client configuration is simple—just specify the DNS server in the local system’s /etc/resolv.conf file:
[root@onesourcesource ~]#cat /etc/resolv.conf
nameserver 192.168.1.1
DNS server configuration can be much more complex. In order to properly configure a DNS server, you should understand some of the concepts behind DNS.
Essential Terms
The following are some important terms associated with DNS:
• Host: Typically a host is a computer (desktop, laptop, tablet, or mobile phone) that is attached to a network. Another way of looking at the term is that a host is a device that can communicate on a network.
• Domain name: Hosts on the Internet address each other by using IP address numbers. These numbers are difficult for humans to remember, so a unique name is often assigned to a host. When this name is registered on an authorized DNS server, the name is considered a “domain name.”
• Top-level domain: Domain names are structurally organized in a tree-like fashion, much like files are organized in a virtual filesystem structure. The very top level of the DNS structure is simply referred to as “dot” and symbolized by the “.” character. The domains directly beneath “.” are the top-level domains. The original top-level domains were .com, .org, .net, .int, .edu, .gov, and .mil. Many others have been added in recent years.
• FQDN: An FQDN, or fully qualified domain name, is the domain name of a host starting from the top of the DNS structure. For example, the name “www.onecoursesource.com.” would be an FQDN. Notice the dot (.) character at the very end of the FQDN. It is the domain above the top level. This character is often omitted when regular users provide a domain name, as the dot is assumed to be the last character of an FQDN in most cases. However, you should get used to including the dot character if you are going to administer DNS servers because it will be required in some of the DNS server configuration files.
• Subdomain: A subdomain is any domain that is a component of a larger domain. For example, suppose you wanted to have three domains in your organization to functionally organize the hosts. You might call these domains “sales,” “eng,” and “support.” If your company’s domain is “onecoursesource.com.”, these three subdomains would be called “sales.onecoursesource.com.”, “eng.onecoursesource.com.”, and “support.onecoursesource.com.”, respectively.
• Name server: A name server is a system that responds to DNS client requests. Name servers provide the translation from IP address to domain names (and, sometimes, provide the opposite: domain-name-to-IP-address translation). Note that a name server either has a copy of this information stored locally (called a zone file) or stores information obtained by other name servers temporarily in memory or passes on the query to another server (or servers) that has the information.
• Authoritative name server: An authoritative name server is one that returns results based on information stored locally on the system (the original master records).
• Zone file: The name of the file that is used to store IP-address-to-domain-name translation information (aka, the DNS records). This file also contains information that is used to define the domain itself.
• Record: Within the zone file, a record is an entry that defines a single chunk of information for the zone, such as the data that would translate an IP address to domain name.
• Caching name server: A caching name server is one that returns results based on information obtained from another name server, such as an authoritative name server. The primary advantage of a caching name server is that it can speed up the IP-address-to-domain-name resolution because it will cache results and be able to respond to future requests using the information in this cache.
• TTL: The data stored in a caching name server is typically not stored permanently. The name server that provides the data also provides the caching name server with a TTL, or a time to live. The caching name server will store the information in memory until this TTL period ends. Typically this period of time is 24 hours, but this can vary depending on how often the records in the authoritative name server are updated.
• DNS forwarder: A DNS server designed to take DNS queries from an internal network and send them to an external DNS server.
• Forward lookup: The process of translating an IP address into a domain name. Most DNS servers provide this functionality.
• Reverse lookup: The process of translating a domain name into an IP address. While many DNS servers provide this functionality, it is less common than a forward lookup.
• BIND: Berkeley Internet Name Domain; the DNS software that is most widely used on the Internet. Originally the software was developed at the University of California Berkeley. The current release of BIND is referred to as BIND 9.
How Name Resolution Works
The following example is purposefully simplistic to provide you with the idea of how name resolution works. Many factors can alter the exact nature of how this process works, including specifics about how each DNS server described in the example has been configured.
For this example, consider a situation in which you are using your web browser to surf to the www.onecoursesource.com domain. In order to determine the IP address of this domain name, your system first needs to determine which DNS servers it can query. The /etc/resolv.conf file is consulted for this information:
[root@onesourcesource ~]#cat /etc/resolv.conf
nameserver 192.168.1.1
In most cases, it is best to have at least two name server settings. If the first name server is unavailable, the second one can answer queries. However, you will find that some smaller companies only provide one name server for their systems. Additionally, if you are using a virtual machine (VM), then typically the VM manager serves as the only name server for the VM. So, do not be surprised if you end up with only one name server setting in the /etc/resolv.conf file.
The query is sent to the name server with the IP address of 192.168.1.1, which is the DNS server within the organization. You can determine this because the IP address is a “private” IP (not routable on the Internet). Although this DNS server may have cached the results of a previous query for www.onecoursesource.com, we will assume that the local DNS server does not have this information. In this case, the DNS server needs to pass off the request to another DNS server.
Although it is possible to configure a DNS server to pass off requests to other specific DNS servers, in most cases the query is passed off the DNS servers at the top of the DNS domain structure. These are called the “root servers,” and there are 13 of them; Example 20-1 displays these servers as they are described in the BIND zone files.
;; ANSWER SECTION:
.                      518400  IN      NS      a.root-servers.net.
.                      518400  IN      NS      b.root-servers.net.
.                      518400  IN      NS      c.root-servers.net.
.                      518400  IN      NS      d.root-servers.net.
.                      518400  IN      NS      e.root-servers.net.
.                      518400  IN      NS      f.root-servers.net.
.                      518400  IN      NS      g.root-servers.net.
.                      518400  IN      NS      h.root-servers.net.
.                      518400  IN      NS      i.root-servers.net.
.                      518400  IN      NS      j.root-servers.net.
.                      518400  IN      NS      k.root-servers.net.
.                      518400  IN      NS      l.root-servers.net.
.                      518400  IN      NS      m.root-servers.net.
;; ADDITIONAL SECTION:
a.root-servers.net.    3600000 IN      A       198.41.0.4
a.root-servers.net.    3600000 IN      AAAA    2001:503:ba3e::2:30
b.root-servers.net.    3600000 IN      A       192.228.79.201
c.root-servers.net.    3600000 IN      A       192.33.4.12
d.root-servers.net.    3600000 IN      A       199.7.91.13
d.root-servers.net.    3600000 IN      AAAA    2001:500:2d::d
e.root-servers.net.    3600000 IN      A       192.203.230.10
f.root-servers.net.    3600000 IN      A       192.5.5.241
f.root-servers.net.    3600000 IN      AAAA    2001:500:2f::f
g.root-servers.net.    3600000 IN      A       192.112.36.4
h.root-servers.net.    3600000 IN      A       128.63.2.53
h.root-servers.net.    3600000 IN      AAAA    2001:500:1::803f:235
i.root-servers.net.    3600000 IN      A       192.36.148.17
i.root-servers.net.    3600000 IN      AAAA    2001:7fe::53
j.root-servers.net.    3600000 IN      A       192.58.128.30
j.root-servers.net.    3600000 IN      AAAA    2001:503:c27::2:30
k.root-servers.net.    3600000 IN      A       193.0.14.129
k.root-servers.net.    3600000 IN      AAAA    2001:7fd::1
l.root-servers.net.    3600000 IN      A       199.7.83.42
l.root-servers.net.    3600000 IN      AAAA    2001:500:3::42
m.root-servers.net.    3600000 IN      A       202.12.27.33
m.root-servers.net.    3600000 IN      AAAA    2001:dc3::35
See Figure 20-1 for a demonstration of the queries described so far.
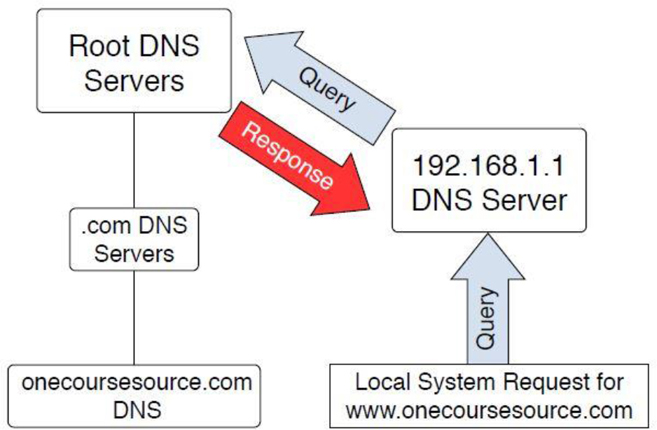
Figure 20-1 Querying the root DNS servers
These root servers are aware of the DNS servers for the top-level domains (.com, .edu, and so on). Although they do not know about the www.onecoursesource.com domain, they are able to direct the query to the DNS servers responsible for the “.com” domain, as shown in Figure 20-2.
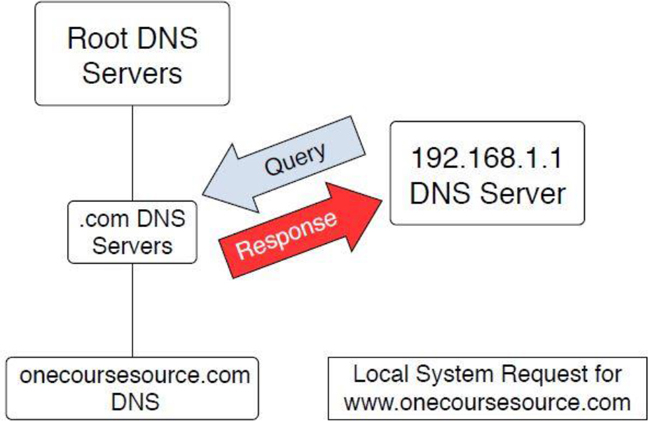
Figure 20-2 Querying the “.com” DNS servers
The “.com” DNS servers are also unaware of the www.onecoursesource.com domain, but they do know which DNS servers are responsible for the onecoursesource.com domain. The query is passed on to the DNS server that is responsible for the onecoursesource.com domain, which returns the IP address for the www.onecoursesource.com domain (see Figure 20-3).
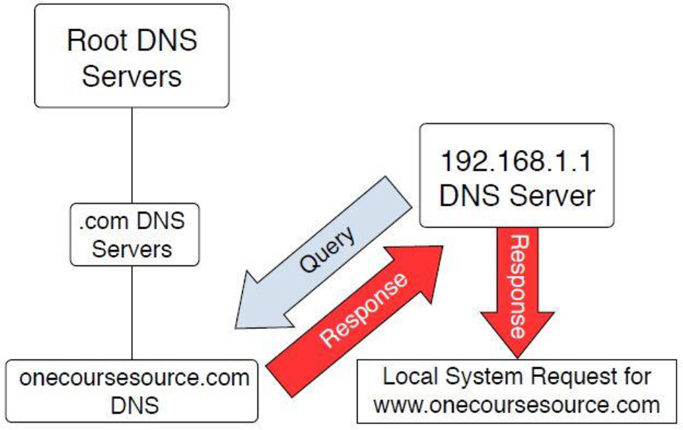
Figure 20-3 Querying the “onecoursesrouce.com” DNS servers
Basic BIND Configuration
Configuring BIND involves many components. Which of these components you will configure depends on several factors, such as the type of BIND server (caching, forwarder, or authoritative) and what features you want the BIND server to have (security features, for example).
The focus of this chapter is the basic configuration files.
The /etc/named.conf File
The primary configuration file for the BIND server is the /etc/named.conf file. This file is read by the BIND server (called named) when it is started. See Example 20-2 for a sample /etc/named.conf file.
Example 20-2 Sample /etc/named.conf File
//
// named.conf
//
// Provided by Red Hat bind package to configure the ISC BIND named(8) DNS
// server as a caching only nameserver (as a localhost DNS resolver only).
//
// See /usr/share/doc/bind*/sample/ for example named configuration files.
//

options {
        listen-on port 53 { 127.0.0.1; };
        listen-on-v6 port 53 { ::1; };
        directory       "/var/named";
        dump-file       "/var/named/data/cache_dump.db";
        statistics-file "/var/named/data/named_stats.txt";
        memstatistics-file "/var/named/data/named_mem_stats.txt";
        allow-query     { localhost; };

        /*
         - If you are building an AUTHORITATIVE DNS server, do NOT enable recursion.
         - If you are building a RECURSIVE (caching) DNS server, you need to enable
           recursion.
         - If your recursive DNS server has a public IP address, you MUST enable
           access control to limit queries to your legitimate users. Failing to do so
           will cause your server to become part of large scale DNS amplification
           attacks. Implementing BCP38 within your network would greatly
           reduce such attack surface
        */
        recursion yes;

        dnssec-enable yes;
        dnssec-validation yes;
        dnssec-lookaside auto;

        /* Path to ISC DLV key */
        bindkeys-file "/etc/named.iscdlv.key";

        managed-keys-directory "/var/named/dynamic";

        pid-file "/run/named/named.pid";
        session-keyfile "/run/named/session.key";
};

logging {
        channel default_debug {
                file "data/named.run";
                severity dynamic;
        };
};

zone "." IN {
        type hint;
        file "named.ca";
};

include "/etc/named.rfc1912.zones";
include "/etc/named.root.key";
You should not be intimidated by all these settings! Most of them are really straightforward once you understand how the DNS server works.
It is important to understand that the configuration file provided in Example 20-2 is for a caching name server (recall that this term was defined earlier in this chapter). When you install the BIND package, the default configuration file provided is for a caching name server. This is actually very handy because it makes it really easy to configure a caching name server; just install the BIND server package and start the BIND server.
Here are some syntax notes:
• There are three ways to make comments in the /etc/named.conf file. A single-line comment starts with // (called “C++ style”) or # (Unix style). A multiline comment starts with a line that contains /* and ends on a line that contains */ (called “C style”).
• Values in the /etc/named.conf file are separated by the semicolon (;) character. This is extremely important; many administrators have lost a lot of hair (from pulling it out) because of the headaches created by a missing semicolon.
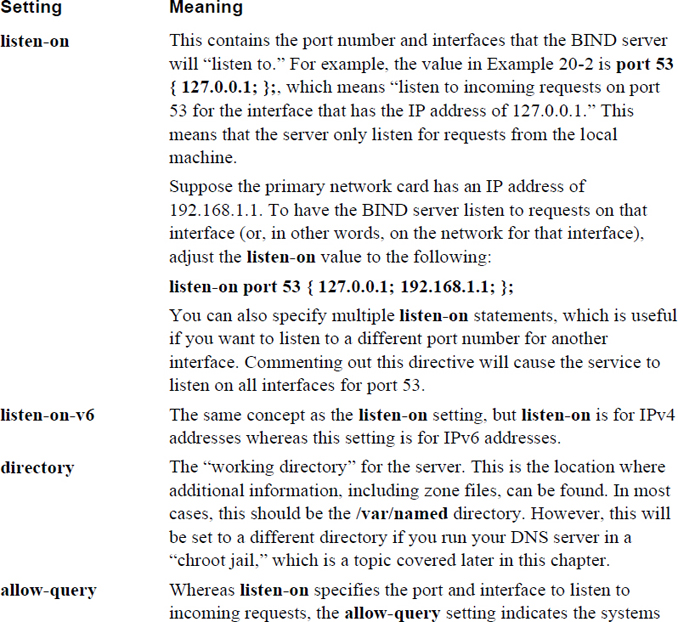
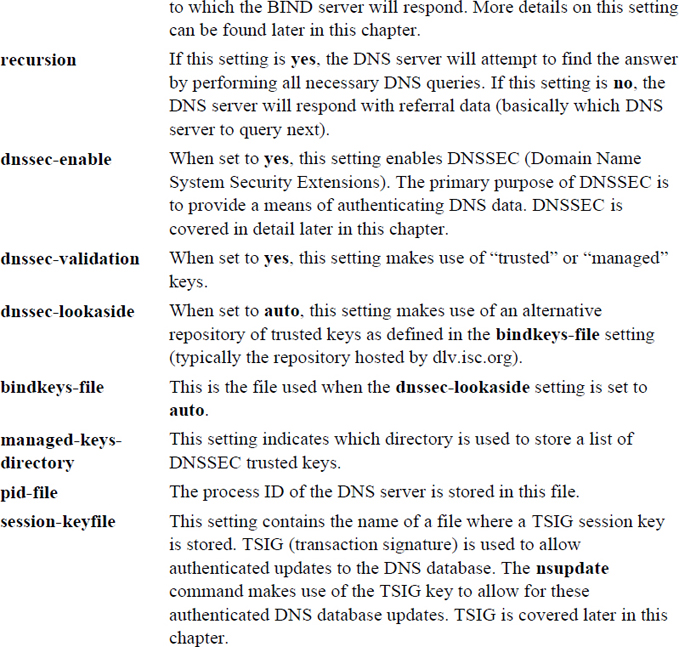
Review Table 20-1 to learn about the different settings in the options section of the file displayed in Example 20-1. The options section is used to provide general settings for the DNS server.
Table 20-1 Settings in the default /etc/named.conf File
The allow-query Setting
In some cases, you will want to limit which systems can query your DNS server. One way of doing this is to use the allow-query setting in the /etc/named.conf file. The allow-query setting accepts an argument in the form of { address_match_list; address_match_list; …};, where address_match_list can be one of the following:
• An IPv4 or IPv6 address.
• A network in the format 192.168.100/24 or 2001:cdba:9abc:5678::/64.
• An ACL, which is a nickname assigned to multiple IP addresses or networks.
• A predefined address. Four options are available: none matches no IP addresses, any matches all IP addresses, localhost matches the IP address of the DNS server itself, and localnets matches all the IP addresses of the network that the DNS server is on.
You can also use a ! character to negate one of the aforementioned values. For example, !192.168.100.1 means not 192.168.100.1. This is useful when you want to exclude an IP address from a network. For example, the following would allow transfers from every machine in the 192.168.100/24 network except the machine with the IP address of 192.168.100.1:
allow-query { localhost; !192.168.100.1; 192.168.100/24};
The acl address match mentioned previously can be very useful if you find yourself using the same address sets for different settings in the /etc/resolv.conf file. For example, consider the following:
acl "permit"     { localhost; !192.168.100.1; 192.168.100/24};
        allow-query     { "permit"};
Not only can the permit ACL be used with the allow-query setting, but it can be used with other settings that support address_match_list arguments. The address_match_list format is used with several other DNS configuration settings, such as listen-on and listen-on-v6.
Security Highlight
Generally speaking, you want to disallow DNS queries for internal hosts from external systems. In other words, only systems within your organization can perform DNS queries for hosts that should not be accessed by systems outside of your network.
Additional /etc/named.conf Settings
You should be aware of three additional settings in the /etc/named.conf file:
• logging: This setting allows you to specify several logging features, such as where log entries are stored (defined in the file setting) and the severity level of log messages that are recorded (the severity setting). The channel setting can be used to define a set of rules. This allows you to have different rules (such as different log files) for different log messages (such as different severity levels). Note that the severity levels are much like the syslog severity levels.
Security Highlight
Logging is a key element to determine if inappropriate DNS queries are performed, so be sure to set logging to a value that provides you with the necessary information to discover a breach. See Chapter 25, “System Logging,” for more details about system logs.
• zone: This is where you specify the type of zone files and the location of the zone file. This is covered in more detail later in this chapter.
• include: This allows you to place additional DNS settings in a separate file. Typically the include setting appears at the end of the /etc/named.conf file, but wherever it is placed is where the rules from the other file are inserted. The advantages of using an include file is that you can enable or disable a large set of rules by either uncommenting or commenting a single include setting from the /etc/named.conf file.
Note that if you explore the name.conf man page, you will quickly realize that we have just scratched the surface of potential settings. For now, keep in mind that we are focusing on the basics, and you should not be overwhelmed by all the other settings. However, if you are going to be a DNS administrator for your organization, you should explore additional settings because they can be extremely useful.
Zone Files
Previously in this chapter you learned about the basic configuration of BIND by modifying the /etc/named.conf file. One of the settings in that file, the directory setting, was used to indicate the location of additional configuration files, like so:
[root@onesourcesource ~]#grep "directory" /etc/named.conf
        directory       "/var/named";
On a standard BIND setup, the zone files are stored in the /var/named directory. These zone files are used to define the hostname-to-IP-address translation as well as additional information about DNS domains.
In this section, you learn how to configure these zone files for an authoritative DNS server for one or more domains. You learn the syntax of these zone files as well as how to create and administer resource records within the zone files.
Zone File Basics
By default, you should see two zone files in the /var/named directory:
• /var/named/named.ca: This file contains a list of the root servers. In most cases you should never modify this file directly. If more root servers are added (a rare event), a future update of the BIND software should update the /var/named/named.ca file.
• /var/named/named.localhost: This file defines the local host. It also is rarely modified because it is only used to define a single host. Example 20-3 shows a typical /var/named/named.localhost file.
Example 20-3 Sample /var/named/named.localhost File
[root@onesourcesource ~]#more /var/named/named.localhost
$TTL 1D
@       IN SOA  ns.onecoursesource.com. root.onecoursesource.com. (
                                        0       ; serial
                                        1D      ; refresh
                                        1H      ; retry
                                        1W      ; expire
                                        3H )    ; minimum
        NS      ns.onecoursesource.com
        A       127.0.0.1
        AAAA    ::1
Each of the settings you see in Example 20-3 is covered in greater detail later in this chapter.
Zone File Entries in the /etc/named.conf File
To use zone files, you need to make entries in the /etc/named.conf file first. If the changes to the zone are created on the local machine, you would make an entry like the following:
zone "onecoursesource.com" {
type master;
file "named.onecoursesource.com";
};
This defines a forward zone file that could be used to translate domain names into IP addresses. The type of master identifies this as the machine on which changes to the zone file are made. The file setting specifies the location of the file that contains the zone information, relative to the directory setting (/var/named) previously described.
Typically, you set up another DNS server that contains a copy of the zone file obtained from the master via a process classed as a zone transfer. To set up this secondary DNS server (a DNS slave server), place the following entry in the /etc/named.conf file on the other secondary machine:
zone "onecoursesource.com" {
type slave;
file "named.onecoursesource.com";
masters { 38.89.136.109; }
};
One advantage of having both master and slave servers is that you can spread the query load between different machines. Another advantage is that if one server becomes unavailable, another server is available to respond to queries.
The terms master name server, slave name server, and authoritative name server may be a bit confusing:
• A master name server is the system where you make changes directly to the zone files.
• A slave name server is a system that holds a copy of the master name server zone files.
• An authoritative name server is a name server that has the authority to respond to DNS queries. This includes both the master name server and the slave name servers.
Although not required, you may want to define reverse lookup zones. With a reverse lookup zone, the query provides an IP address, and the DNS server returns the domain name. To create a reverse lookup zone, you first need an entry like the following in the /etc/named.conf file:
zone    "136.89.38.in-addr.arpa" {
type   master;
file   "db.38.89.136";
};
Security Highlight
Although you are not required to provide reverse lookups, you should be aware that not creating reverse lookups may break some network services. Some of these services verify hostnames and IP addresses by performing a forward lookup and then a reverse lookup to ensure that the values are the same “both ways.” So, without a reverse lookup zone file, these network services would return a failure when performing this security check.
Note the format of the zone definition: 136.89.38.in-addr.arpa. This is the network address (octets) in reverse, with in-addr.arpa added to the end. As with forward lookup zone files, you should define one master DNS server and optionally additional slave DNS servers.
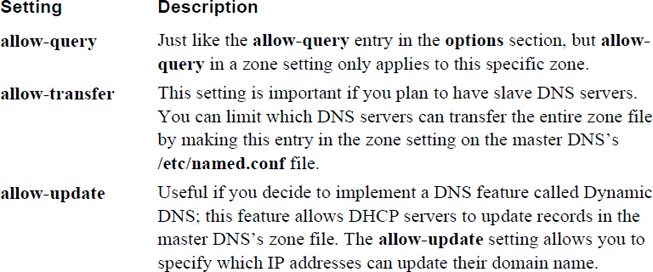
The /etc/named.conf zone entries previously described are the minimum settings that you need to have. Table 20-2 describes additional settings that you should consider when setting up zone file entries.
Table 20-2 Zone Settings in the /etc/named.conf File
Zone File Syntax
The syntax of the zone file (the files that you place in the /var/named directory) must be correct; otherwise, the DNS server will not load the zone file properly. In most cases it is probably best to copy an existing zone file and modify it to suit your needs. A simple Internet search results in many sample zone files.
Here are a few things to consider when creating a zone file:
• Comment lines begin with a semicolon (;) character and continue to the end of the line.
• Each line defines a record, and in most cases the end of the line is the end of the record. In some cases, the record can be spread across multiple lines (see the SOA example later in this chapter for an example).
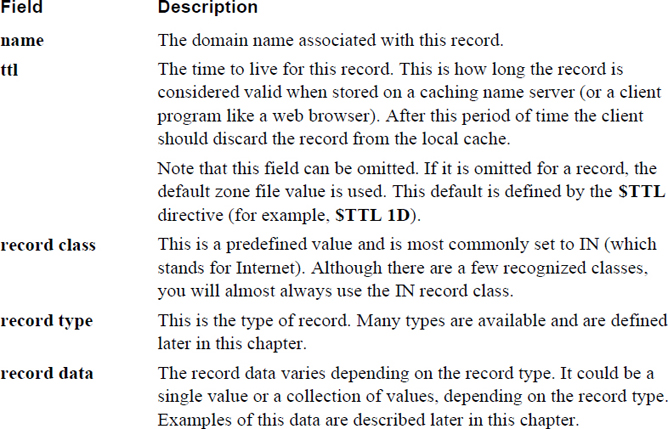
• Each record consists of fields of data separated by either spaces or tabs (whitespace). The fields are defined as name, ttl, record class, record type, and record data. Each of these fields is described in greater detail in Table 20-3.
• The @ character has a special meaning within the zone file. It means “the current origin,” which refers to the current domain. So, in a forward zone file for the onecoursesource.com domain, the @ character means onecoursesource.com. (Note the trailing dot character, which is required in zone files.) You can change the meaning of the @ character by using the $ORIGIN setting (for example, $ORIGIN example.com.).
• Each zone file should start with a $TTL setting, which is used to set the default time to live (TTL). The TTL is how long caching DNS servers should store information from this DNS server. This default TTL can be overridden by individual records; see the ttl field in Table 20-3 for further details.
• When times are given in the zone file, the default time value is seconds. For example, an entry of $TTL 86400 sets the default time to live to 86,400 seconds (which equates to one day). You can specify time values in minutes (30m, for example) hours (3h), days (2d), or weeks (1w). This option is not case sensitive (later examples use capital letters, which is what we normally use), and you can even combine values (2h30m, for example).
Table 20-3 Zone File Record Fields
Note
It is important that you include the trailing dot character (the period at the end of onecoursesource.com.) whenever using an FQDN in the zone file. Relative domain names do not require a trailing dot character because they are prepended to the value of $ORIGIN.
Zone Record Types
Although dozens of possible zone record types are available, you do not need to be aware of each one. In this section, you learn about the zone record types most commonly used in zone files.
The SOA Record Type
The SOA (Start of Authority) record type is used to define the authoritative information about the zone (think of it as the operating instructions for the zone). A typical SOA record type looks like the following:
@       IN SOA  ns.onecoursesource.com. root.onecoursesource.com. (
                                        0       ; serial
                                        1D      ; refresh
                                        1H      ; retry
                                        1W      ; expire
                                        3H )    ; minimum
The parentheses allow you to spread the data across multiple lines and provide comments for each data value. Although this for easier reading, it isn’t required. You may sometimes see the record in a single-line format:
@ IN SOA ns.onecoursesource.com. root.onecoursesource.com. 0 1D 1H 1W 3H
In the name field, the name for the entire domain should be provided. Recall that the shortcut value @ represents the current domain name, which is determined by the zone entry in the /etc/named.conf file.
Typically, the ttl field is set to the default value by the field being omitted. The IN class is almost always used, and the record type is set to SOA.
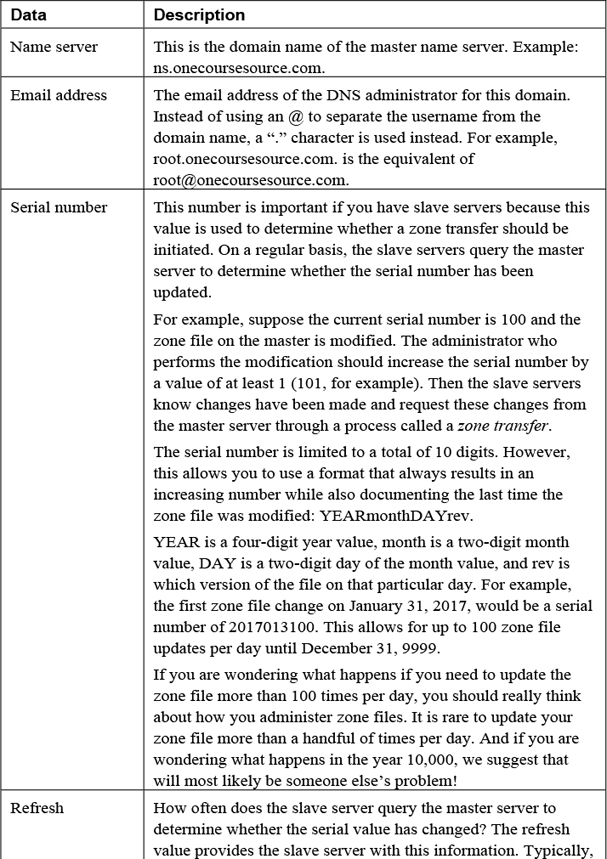
The record data field includes seven values, as described in Table 20-4.
The Address Record Type
An address record is used to define a domain-name-to-IP-address translation. A typical example would look like the following:
www IN A 38.89.136.109
The first field is the domain name (for example, www). In this case, the domain is given relative to the default domain defined by $ORIGIN, but it can also be provided as a fully qualified name:
www.onecoursesource.com. INA38.89.136.109
The value of A indicates that this line represents an address record type, and the value of 38.89.136.109 is the IP address associated with the www.onecoursesource.com. domain.
Note that address records are only placed in forward lookup zone files.
The Canonical Name Type
In some cases, you may have a host in your domain that provides more than one role and, as a result, should be accessible with more than one domain name. For example, the web server for onecoursesource.com may also act as the FTP server, so it would make sense to have this single system be accessible either via www.onecoursesource.com or ftp.onecoursesource.com.
However, you should only have one address record per IP address. So, to allow for more than one domain name to be translated to a single IP address, use canonical records. A canonical record (also called a cname) is like a nickname and typically looks like the second record shown in the following snippet:
www.onecoursesource.com.         IN     A     38.89.136.109
ftp                                                    IN     CNAME     www
With an entry like this, the domain name ftp.onecoursesource.com would be translated to the domain name www.onecoursesource.com, which is further translated into the IP address of 38.89.136.109.
The Name Server Record Type
As mentioned previously, each domain can have one or more name servers; these can be defined by NS records. The primary (or master) name server is specified in the SOA record, but also needs to have an NS record. Additional (secondary or slave) name servers also need to be defined with NS records. You can define name servers by creating records like the following:
@     INNSns.sample.com.
@     IN     NSns2.sample.com.
All of your name servers should have an NS entry, even the master server. Additionally, the NS entry data specifies a domain name, not an IP address, so it is important to also have an address record for each name server.
Note that the @ character in the NS example could have been removed completely. If the first field of data is omitted, it is assumed to be the value of $ORIGIN.
The Mail eXchange Record Type
Suppose an email is sent to info@onecoursesource.com. The MTA (mail transfer agent) from the sending domain needs to be able to determine which machine handles inbound email for the onecoursesource.com domain. The MTA accomplishes this by querying the domain name servers for the Mail eXchange (MX) records.
The MX records for a domain typically look like the following:
@INMX10mail1.onecoursesource.com
@INMX20mail2.onecoursesource.com
Most of the MX record should be straightforward now that you understand record types. The values of 10 and 20 are different from what you have seen so far. These numbers provide a priority value, where the lower the number, the higher its priority.
The priority value is often confused by administrators. If one mail server has a priority of 10 and another has a priority of 20, the MTA from the sending domain initially attempts to send mail to the server with the priority of 10. If the server does not respond, the mail server with the priority of 20 is then contacted. It is likely that the second mail server will never be used because most mail servers are available 24/7.
It is more common to have the same priority value for each mail server to allow for load balancing. In this case, the mail servers are roughly equally utilized (“roughly” because caching DNS servers can unbalance the load a bit).
It is not uncommon to have just one MX record because many small-to-midsize companies do not need multiple mail servers to handle incoming email.
The Pointer Record Type
The address record type described previously is used in forward lookup zone files to translate domain names into IP addresses. The Pointer (PTR) record type is used in reverse lookup zone files to translate IP addresses into domain names. Here’s an example of a typical Pointer record:
109.136.89.38.in-addr.arpa. IN PTR www.onecoursesource.com.
It is critical to understand that the IP address for a Pointer record type is given in reverse of the actual IP address, followed by in-addr.arpa. For example, the value 109.136.89.38.in-addr.arpa. is for the IP address of 38.89.136.109.
In most cases, you will not need to specify this fully qualified IP address name because $ORIGIN should be set to the current reverse lookup network domain (for example, .136.89.38.in-addr.arpa.) If that is the case, you could just provide the host IP portion of the IP address:
109 IN PTR www.onecoursesource.com.
Putting It All Together
Creating a DNS server from scratch is often a daunting task for the novice DNS administrator. When you create your first DNS server, use the KISS principal (Keep It Simple, Silly). If you try to implement a lot of fancy DNS settings, it will be hard to determine what went wrong.
It is also important to look at the log files when things do not work correctly. We are often blind to our own errors (especially simple typos), making log files very useful in determining what went wrong.
Sometimes it helps to see the big picture after focusing on specifics. With that in mind, let’s look at a simple DNS configuration. In this example, we create the necessary files for the sample.com domain. As this is just a test domain, we use private IP addresses.
First, see Example 20-4 for the /etc/named.conf file. Note that the comments have been removed from this file for brevity.
Example 20-4 New /etc/named.conf File
options {
        listen-on port 53 { 127.0.0.1; };
        listen-on-v6 port 53 { ::1; };
        directory       "/var/named";
        dump-file       "/var/named/data/cache_dump.db";
        statistics-file "/var/named/data/named_stats.txt";
        memstatistics-file "/var/named/data/named_mem_stats.txt";
        allow-query     { localhost; };
        recursion yes;
        dnssec-enable yes;
        dnssec-validation yes;
        dnssec-lookaside auto;
        bindkeys-file "/etc/named.iscdlv.key";
        pid-file "/run/named/named.pid";
        session-keyfile "/run/named/session.key";
};

logging {
        channel default_debug {
                file "data/named.run";
                severity dynamic;
        };
};

zone "." IN {
        type hint;
        file "named.ca";
};

include "/etc/named.rfc1912.zones";
include "/etc/named.root.key";

zone "sample.com" {
          type master;
          file "named.sample.com";
};

zone    "1.168.192.in-addr.arpa" {
        type   master;
        file   "db.192.168.1";
};
Based on the entries in Example 20-4, you should be able to tell that both a forward and reverse lookup zone were defined. Additionally, you should be able to determine that this system serves as the master name server for the sample.com domain, which means all changes to the zone files should be made on this machine.
If this was a slave server, you would not create zone files because these are automatically created during the first zone transfer from the master server. However, because this is the master server, you need to create a forward zone file, as shown in Example 20-5.
Example 20-5 The /var/named/named.sample.com File
$TTL 1D
@       IN SOA  ns.sample.com. root.sample.com. (
                                        0       ; serial
                                        1D      ; refresh
                                        1H      ; retry
                                        1W      ; expire
                                        3H )    ; minimum
; Nameservers:
@    INNSns1.sample.com.
@    INNSns2.sample.com.
; Address records:
wwwINA    192.168.1.100
ns1            INA    192.168.1.1
ns2            INA    192.168.1.2
mail1          INA    192.168.1.200
mail2          IN    A    192.168.1.201
test           INA    192.168.1.45

; Aliases:
ftpINCNAMEwww
; MX records
@        IN    MX    10    mail1.onecoursesource.com.
@        INMX20mail2.onecoursesource.com.
What Could Go Wrong
A lot could go wrong when editing the zone file. After you have made these changes, restart your BIND server and perform some simple tests (which can be done with the dig command, as shown later in this discussion).
You should create a reverse zone file, which is simpler because you only need an SOA record, NS records, and Pointer records (see Example 20-6).
Example 20-6 The /var/named/db.192.168.1 File
$TTL 1D
@       IN SOA  ns.sample.com. root.sample.com. (
                                        0       ; serial
                                        1D      ; refresh
                                        1H      ; retry
                                        1W      ; expire
                                        3H )    ; minimum
; Nameservers:
@    IN    NSns1.sample.com.
@    IN    NSns2.sample.com.
;
; Address records:
100            IN    PTR        www
1              IN    PTR        ns1
2              IN    PTR        ns1
200            IN    PTR        mail1
201            IN    PTR        mail2
45INPTR     text
You might be thinking, what about ftp.sample.com? Why is that not in the reverse lookup zone file? The IP address can only return one hostname, so you need to pick which one you want to have returned: either www.sample.com or ftp.sample.com.
Slave BIND Servers
The example provided in this section describes how to set up a master DNS server. Setting up a slave server requires several additional steps, including the following:
• Setting up the /etc/named.conf file on the slave server.
• Adding the slave server as an NS record on the master server’s zone file. This should also require creating an A record and PTR record for the slave server, assuming it is a new machine for the network.
• Modifying the /etc/named.conf file on the master server to allow the slave server to perform a zone transfer (using the allow-transfer statement).
Keep in mind that these are general steps. Knowing the specifics of setting up a slave server are beyond the scope of this book.
Testing the DNS Server
After you have set up all your DNS configuration files, you can restart the named server. However, it might be a good idea to first verify that the syntax of the configuration files is correct. This can be accomplished by using the named-checkconf and named-checkzone commands.
The named-checkconf command is used to verify the syntax of the /etc/named.conf file. If there are no problems with the file, no output is produced. However, if there is a syntax error, you receive an error message like the following:
[root@onesourcesource ~]#named-checkconf
/etc/named.conf:12: missing ';' before 'listen-on-v6'
The error message from the previous example includes the filename, the line number (12), and the syntax error.
Perhaps the best part of the named-checkconf command is that it is aware of which settings are valid and which are not, as you can see from the output of the following command:
[root@onesourcesource ~]#named-checkconf
/etc/named.conf:12: unknown option 'listen-onv6'
The named-checkzone command checks the syntax of a specific zone file. In addition to specifying the zone file as an argument, you specify the name of the zone:
[root@onesourcesource ~]# named-checkzone sample.com/var/named/named.sample.com zone sample.com/IN: loaded serial 0 OK [root@onesourcesource ~]# named-checkzone 1.168.192.in-addr.arpa
The error messages are not perfect, but they do help you find problems. For example, consider the output of the following commands:
[root@onesourcesource ~]# named-checkzone sample.com
The problem with the file is a missing dot character at the end of ns1.sample.com. (It should be “ns1.sample.com.” instead.)
The dig Command
After you restart the named server, you can perform a test lookup by executing the dig command, as shown in Example 20-7.
Example 20-7 Testing with the dig Command
[root@onesourcesource ~]#dig www.sample.com @localhost
; <<>> DiG 9.9.4-RedHat-9.9.4-18.el7_1.5 <<>> www.sample.com @localhost
;; global options: +cmd
;; Got answer:
;; ->>HEADER<<- opcode: QUERY, status: NOERROR, id: 28530
;; flags: qr aa rd ra; QUERY: 1, ANSWER: 1, AUTHORITY: 2, ADDITIONAL: 3

;; OPT PSEUDOSECTION:
; EDNS: version: 0, flags:; udp: 4096
;; QUESTION SECTION:
;www.sample.com.                       IN      A

;; ANSWER SECTION:
www.sample.com.        86400   IN      A       192.168.1.100

;; AUTHORITY SECTION:
sample.com.            86400   IN      NS      ns1.sample.com.
sample.com.            86400   IN      NS      ns2.sample.com.

;; ADDITIONAL SECTION:
ns1.sample.com.        86400   IN      A       192.168.1.1
ns2.sample.com.        86400   IN      A       192.168.1.2

;; Query time: 0 msec
;; SERVER: ::1#53(::1)
;; WHEN: Mon Nov 30 07:38:52 PST 2018
;; MSG SIZE  rcvd: 127
The dig command produces a lot of output, and it is difficult to read if you are not familiar with DNS zone file syntax. However, now that you are familiar with this syntax, you can see that the responses are in the same format as the zone file records. For example, consider the output below ANSWER SECTION:
www.sample.com. 86400 IN A 192.168.1.100
This output includes the fully qualified hostname (including the trailing “.” character), the TTL (86400 seconds, which is one day) for this record, the class for the record (IN), the record time (A for address), and the IP address. Keep in mind, this is the information that the DNS server is providing, not exactly what you have in your zone file. For example, you might not have included the TTL value, but that was included by the server when it responded to the dig request.
Securing BIND
BIND servers are often directly accessible to the Internet. Any time you have a system that can be directly accessed via the Internet, security becomes a big concern. Concerns include someone compromising the data on the server (sometimes called “poisoning” the data) and hackers seizing control of the exposed server process, allowing the hijacked server to have unauthorized access to other system files.
This section covers some of the more common methods for securing the BIND server.
Sending BIND to Jail
Before we dive into putting the named server in a “jail,” there are two things you should understand: what a jail is and why you would lock up the BIND server.
Traditionally, the named process ran as the root user, but this is rare on modern Linux distributions where the named process normally runs as the “named” user. This type of user is also known as a service account:
[root@onecoursesource ~]# ps -fe | grep named
root      9608  9563  0 17:35 pts/3    00:00:00 grep --color=auto named
named    19926     1  0 Nov30 ?        00:00:07 /usr/sbin/named -u named
Running as a non-root user is much better than running as the root user because the capability of the named process to make critical changes to the operating system is limited. However, there are still some security concerns when the named process runs as a non-root user.
To begin with, think about the fact that the named process is going to be interacting with network-based connections when it handles incoming DNS queries. Any time a process is network accessible, there is the potential that this process may be vulnerable to a hijack attack. In this type of attack, a user on a remote system takes control of the local process. Once this user has control, they can access the local system, including viewing or modifying files.
The danger is limited when a hijacked process runs as a non-root user. However, consider critical system files like the /etc/passwd file:
[root@onecoursesource ~]# ls -l /etc/passwd
-rw-r--r--. 1 root root 2786 Sep  7 07:46 /etc/passwd
Every user on the system, including the named user account, can view the contents of the /etc/passwd file because everyone has read permission on this file. Now ask yourself this question: Do you want some unknown hacker to be able to compromise your named server and view the contents of your /etc/passwd file (or any system file for that matter)?
The purpose of a chroot jail is to limit access to system files. The named process is placed into a jail, where it can only see files that pertain to BIND. This is accomplished by placing BIND configuration files into a specific subdirectory and starting the named process so that it appears that the root of the filesystem is the aforementioned subdirectory (chroot stands for change root, as in “change the root of the filesystem for this process”).
Security Highlight
Although it is not covered in this chapter, you should be aware of another method to protect system files from processes: SELinux. With SELinux, you can limit which files and directories a process can access, regardless of the user running the process.
Creating the chroot Directory and Files
To start the process of creating a chroot jail, you first need to create directories where all the files are placed:
[root@onecoursesource ~]# mkdir -p /chroot/named
[root@onecoursesource ~]# mkdir -p /chroot/named/dev
[root@onecoursesource ~]# mkdir -p /chroot/named/etc
[root@onecoursesource ~]# mkdir -p /chroot/named/var/named
[root@onecoursesource ~]# mkdir -p /chroot/named/var/run
You may be wondering what all these directories are used for. The following list describes the purpose of each of these directories:
• /chroot/named/dev: The location of the device files needed by the named process.
• /chroot/named/etc: The location of the named.conf file. Depending on your current configuration, you may also need to create additional files and subdirectories under the /chroot/named/etc directory, such as the /chroot/named/etc/named directory. Look at the current contents of the /etc directory on your system to see what else might need to be created.
• /chroot/named/var/named: The location where the zone files are placed.
• /chroot/named/var/run: The location where the named process stores data, such as the PID of the process.
In the next step, you copy the files from your current configuration into the new locations:
[root@onecoursesource ~]# cp -p /etc/named.conf /chroot/named/etc
[root@onecoursesource ~]# cp -a /var/named/* /chroot/named/var/named
[root@onecoursesource ~]# cp /etc/localtime /chroot/named/etc
The preceding commands assume a fairly standard DNS configuration. You may need to copy additional files, depending on customization to the DNS server.
Next, make sure all the new files are owned by the named user and group accounts (although if you use the -p and -a options with all the aforementioned cp commands, the following chown command won’t be necessary):
[root@onecoursesource ~]# chown -R named:named /chroot/named
Finally, you need to create a couple of device files:
[root@onecoursesource ~]# mknod /chroot/named/dev/null c 1 3
[root@onecoursesource ~]# mknod /chroot/named/dev/random c 1 8
[root@onecoursesource ~]# chmod 666 /chroot/named/dev/*
Configuring named to Start in the Jail
After creating and copying all the appropriate files and directories, you need to configure the named process to start in a chrooted jail. How you do this may depend on your distribution. The following example should work on most Red Hat–based systems:
[root@onecoursesource ~]# more /etc/sysconfig/named
# BIND named process options
-t /chroot/named
The –t option to the named command places the named service in a chrooted jail. After making this change to the /etc/sysconfig/named file, restart your named service.
Note
If you want to practice creating a chroot jail, use an older distribution, such as CentOS 5.x. Modern distributions provide a package named bind-chroot that automatically configures a chroot jail for BIND.
If that package is available, it is considered the recommended (and much easier) way to create a chrooted jail for BIND. However, if this package is not available, then you should know how to create a chroot jail manually. Additionally, the techniques used by the bind-chroot package are similar to the manual method, so by understanding the manual method, you will have a better understanding of the bind-chroot package.
Split BIND Configuration
To understand a split DNS server configuration, you first should understand why you would want to configure this sort of setup in the first place. Consider the situation in which you have three “public facing” servers:
In this situation, you want any machine on the Internet to be able to query your DNS server for domain-name-to-IP-address resolution for these three machines. But, suppose you had other hosts within your company not intended for external access. This could include systems with domain names such as sales.onecoursesource.com, test.onecoursesource.com, and eng.onecoursesource.com.
These systems may be behind a firewall that prevents access from outside your private network. Or, they may have private IP addresses and can only access the Internet via NAT (Network Address Translation). In other words, while you want users within your organization to be able to perform DNS queries for these internal domain names (as well as the external facing systems), there is no reason for these internal systems to be accessible outside your private network. The solution: a split DNS.
You can actually use a couple of different techniques to create this split DNS environment:
• Use DNS views: With the view statement (placed in the /etc/named.conf file), you can have your DNS server respond to DNS queries based on where the query originates. For example, you can have one view for the internal network that uses a zone file containing all the DNS records and another view for the external network that uses a zone file that contains only a few of the DNS records (the external facing systems). Views are an easy way to create a split DNS.
• Use two DNS servers: This method is more secure because you create two DNS master servers: a private one with a complete zone file and a public one with a partial zone file. It is more secure because if the named process of the external DNS server is compromised (hijacked), those private domain names and IP addresses are not exposed. With views, that data would be available because the named process could view any zone file because it is readable for the named process.
The configuration of a split DNS using two servers is not complicated. The concept will likely be more challenging, so an example is provided with more detail. To begin with, Figure 20-4 shows an internal network (the grey box) and an external network (the white box). The systems mentioned earlier are also shown in the network they belong in (www = www.onecoursesource.com, for example).
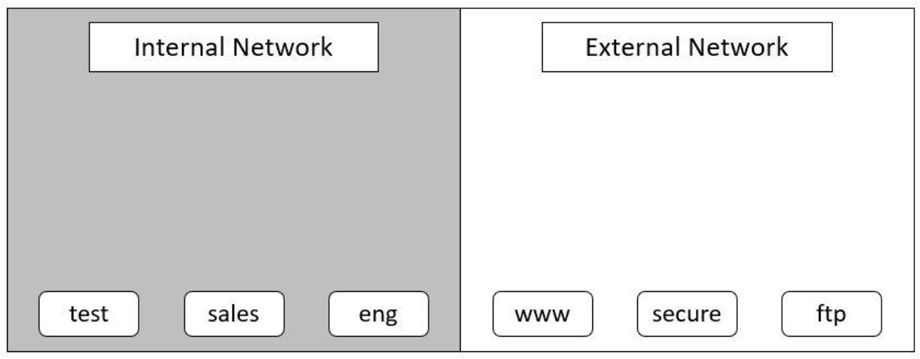
Figure 20-4 Internal and external networks
Next, we introduce two DNS servers: in-ns.onecoursesource.com and ex-ns.onecoursesource.com. The in-ns name server zone file contains both the private and public domain names, and the ex-ns name server zone file contains only the public domain names. Of course, the private network needs to communicate with the outside world, so the router (which could also act as a firewall or NAT system) is also added to the diagram. See Figure 20-5 for a visual example.
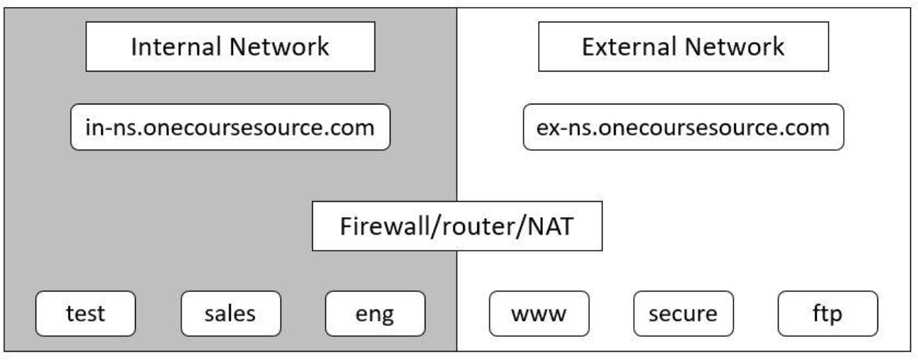
Figure 20-5 Internal and external name servers
You could also take one additional step. It is common in a scenario like this to have the internal DNS server use the external DNS server as the forwarder. Recall that the forwarder is placed in the /etc/named.conf file and is used in cases where the DNS server doesn’t have the answer to the query in its zone files.
For example, suppose someone in the internal lookup performs a query for www.sample.com. This domain name is not in the zone files for the in-ns.onecoursesource.com DNS server. It needs to be forwarded to either the top-level (root) servers or to another DNS server.
Why forward this to the external server? Keep in mind you are trying to hide the internal IP address and domain names from the external network. Even a forward query from the internal DNS server can provide a potential security leak, as external DNS servers will be made aware of your internal DNS server. By funneling the request through your external DNS server, you make your internal DNS server a bit more secure.
Security Highlight
We did not provide a full example of configuring a split DNS because once you understand the concept, it is easy to set up. Just use the information that you learned from the previous sections in this chapter to create your internal DNS server. Copy these files to your external DNS server and remove the private address and pointer records from the zone files. After both DNS servers are working, add a forwarder statement in the options statement of the /etc/named.conf file on your internal server, and have it point to the external server.
Have your internal systems point to the internal DNS server (by using the nameserver setting in the /etc/resolv.conf file) and share the external DNS server with the world.
Transaction Signatures
Previously in this chapter, the concepts of DNS master and slave servers were discussed. Recall that both types of DNS servers can respond to DNS queries, but the master server is the system where you make direct changes to the zone files. The slave servers copy this information into their zone files through a process called a zone transfer.
Limiting what machines can initiate a zone transfer was also covered briefly. The allow-transfer setting can be applied either to a specific zone (by placing allow-transfer in the zone setting of the /etc/named.conf file) or to the entire master server (by placing allow-transfer in the options setting of the /etc/named.conf file). By limiting which systems can perform a zone transfer, you are creating a more secure environment. If any system could perform a zone transfer, it would be easy for a potential hacker to gather a list of all the domain names and IP addresses within your domain. This would make it easier for the hacker to find machines to probe.
Another potential security risk can exist in the DNS system. It may be possible for a fake DNS server to provide incorrect data when a query is performed. This is known as DNS cache poisoning or DNS spoofing. The concern here is that the domain-name-to-IP-address translation of a sensitive system (like a bank’s website) could point to a rogue server designed to capture usernames and passwords.
Security Highlight
One example of DNS cache poisoning is the Great Firewall of China (also called the Golden Shield Project). This project was designed and implemented by the Ministry of Public Security of the government of China. One of the goals of this project is to prevent Chinese citizens from accessing websites deemed “inappropriate.” This is accomplished by DNS cache poisoning; DNS servers within China do not provide the correct IP addresses for domain names associated with what the Chinese government deems as inappropriate websites.
The Great Firewall cache poisoning is not always limited to people in China. In 2010, these invalid DNS responses “escaped” from China and were found on many DNS caching servers in the United States.
There is a way to limit the likelihood of DNS cache poisoning: use transaction signatures (TSIG). With TSIG, private and public digital signatures are used to ensure that DNS data is coming from the correct source. This technology can be used to verify zone transfers as well as DNS queries. The most common way to implement TSIG for DNS is to use Domain Name System Security Extensions (DNSSEC).
The dnssec-keygen Command
To use DNSSEC, you first need to create a private key and a public key. This is accomplished by first switching to the directory that contains the zone files (/var/named, for example) and then executing the dnssec-keygen command. Here’s an example:
[root@onecoursesource ~]# cd /var/named [root@onecoursesource named]# dnssec-keygen -a RSASHA1 -b 768
Note that the dnssec-keygen command may appear to hang (freeze), especially on a system that has been recently booted, is not very active, or is virtualized. This is because the command makes use of data from the /dev/random file, a file that contains random data derived from system activity, such as mouse movement, disk movement, or keyboard strokes.
You can speed up the process by performing these sorts of operations, but that may require significant mouse movements or banging on the keyboard. A quick way to populate the /dev/random file is by using the following rngd command:
rngd -r /dev/urandom -o /dev/random -b
After you execute the dnssec-keygen command, there are two new files in the current directory:
[root@onecoursesource named]# ls K*
Ksample.com.+005+05451.key  Ksample.com.+005+05451.private
The Ksample.com.+005+05451.key file contains the public key. This file should be provided to other DNS servers, such as the DNS slave servers. There isn’t a method within DNS that allows you to transfer this file to other systems, so you should use another technology, such as Secure Shell.
The Ksample.com.+005+05451.private file contains the private key. It is used to generate a digitally signed zone file.
The dnssec-signzone Command
The zone file used when DNSSEC is implemented is not the standard zone file. Instead, a digitally signed zone file is used. This digitally signed zone file is created using the private key generated by the dnssec-keygen command, and the digital signature can only be verified by the public key generated by the dnssec-keygen command.
To create this encrypted zone file, create a plain-text zone file first and then use the dnssec-signzone command to generate the encrypted file (note that on your distribution, you may need to use the -S option for smart signing):
[root@onecoursesource named]# dnssec-signzone -o sample.com
The result is a new file named named.sample.com.signed, which you should now use as the zone file for the domain.
Security Highlight
There is more to this process than described in this book. For example, you should make sure you have some additional settings in the /etc/named.conf file (such as the dnssec-enable setting). The focus of this section is the concepts behind the dnssec-keygen and dnssec-signzone commands.
DHCP Server
DHCP (Dynamic Host Configuration Protocol) gives you the ability to dynamically assign network-related information to client systems. This information can include providing a system with an IP address, subnet mask, and DNS server information.
DHCP is especially important in any network where hosts are mobile (for example, laptops, tablets, and cell phones). These devices are often moved from one network to another, and the owners of these devices want an easy way to connect their devices to the network. Part of that process is assigning IP network information to the devices.
The default installation of most distributions does not include the DHCP server package. (However, the DHCP client package is almost always installed by default.) The package name can vary between distributions. Common DHCP server package names include dhcp, dhcp-server, isc-dhcp-server, dhcp3-server, and dhcp4-server.
Note that in most cases, we suggest using virtual machines to practice setting up configurations. However, that poses a bit of a problem with DHCP because typically your Virtual Machine Manager acts as a DHCP server. There are ways around this, but in this case it may be easier to actually use two different physical machines connected to a physical network (not wireless) to practice setting up a DHCP server and client.
What Could Go Wrong
Do not connect your DHCP server to a network that needs to be used by other systems. Otherwise, your DHCP server might provide incorrect information to those systems. Creating a “rogue” DHCP server can prevent an entire network from functioning correctly.
DHCP Configuration Basics
After installing the correct DHCP server package, you can configure the server by editing the /etc/dhcpd.conf file (on some distributions the configuration file may be the /etc/dhcp/dhcpd.conf file). Typically, this file is entirely empty or contains only comments, as shown in the following output:
[root@onecoursesource ~]# more /etc/dhcpd.conf
#
# DHCP Server Configuration file.
#   see /usr/share/doc/dhcp*/dhcpd.conf.sample
#
The sample file that is mentioned within the /etc/dhcpd.conf file is useful in putting together an initial /etc/dhcpd.conf file. See Example 20-8 for the contents of the sample file.
Example 20-8 Sample dhcpd.conf File
[root@onecoursesource ~]# more /usr/share/doc/dhcp*/dhcpd.conf.sample
ddns-update-style interim;
ignore client-updates;

subnet 192.168.0.0 netmask 255.255.255.0 {

# --- default gateway
        option routers                  192.168.0.1;
        option subnet-mask              255.255.255.0;

        option nis-domain               "domain.org";
        option domain-name              "domain.org";
        option domain-name-servers      192.168.1.1;

        option time-offset              -18000; # Eastern Standard Time
#       option ntp-servers              192.168.1.1;
#       option netbios-name-servers     192.168.1.1;
# --- Selects point-to-point node (default is hybrid). Don't change this unless
# -- you understand Netbios very well
#       option netbios-node-type 2;

        range dynamic-bootp 192.168.0.128 192.168.0.254;
        default-lease-time 21600;
        max-lease-time 43200;

        # we want the nameserver to appear at a fixed address
        host ns {
                next-server marvin.redhat.com;
                hardware ethernet 12:34:56:78:AB:CD;
                fixed-address 207.175.42.254;
        }
}
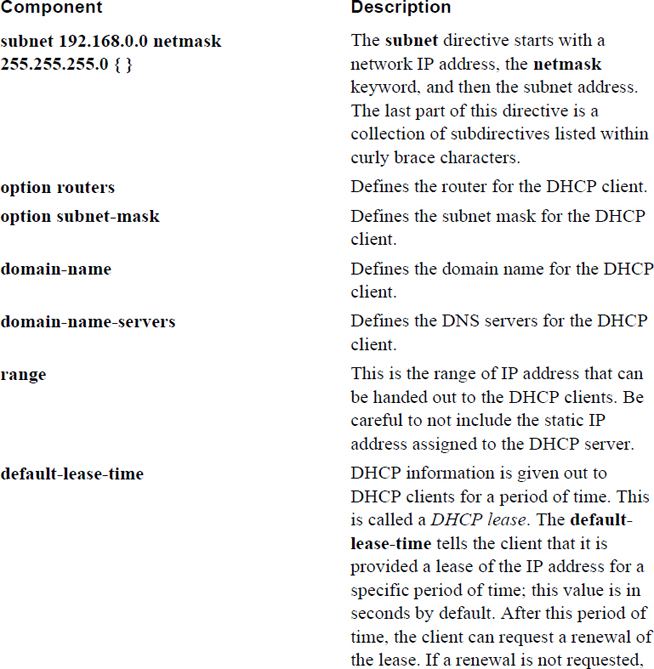
The file displayed in Example 20-8 has three primary directives, including the subnet directive. Within the subnet directive are additional option directives, some of which could also be provided as primary directives (sometimes you see these outside the subnet directive, as each can be global network directives).
Some of the directives in the default file shown in Example 20-8 are beyond the scope of this book. The rest of this section focuses on the critical directives.
The ddns-update-style and ignore client-updates Directives
The concept of Dynamic DNS (DDNS) was briefly introduced earlier in this chapter. In the /etc/named.conf file (the configuration file for the DNS server), the allow-update setting is described as follows: “Useful if you decide to implement a DNS feature called Dynamic DNS; this feature allows DHCP servers to update records in the master DNS’s zone file.”
How this feature is implemented is defined in the /etc/dhcpd.conf file by the ddns-update-style directive. Four possible values can be set for the ddns-update-style directive:
• none: Does not attempt to update DNS servers.
• ad-hoc: Based on a script language, this is an older method that was retired in DHCP 4.3.0.
• interim: Written in C and considered a better solution than ad-hoc. Called “interim” because it served as a temporary solution to the shortcomings of ad-hoc. It was released as the new Dynamic DNS standards were being written.
• standard: The newest technique was released in DHCP 4.3.0. It was designed to incorporate the new standards for DDNS.
DHCP clients can also perform DDNS updates. The ignore client-updates directive tells the DHCP server to suggest to the client that it perform the update itself. The deny client-updates directive tells the DHCP server to inform the client that it is not permitted to perform its own update.
The subnet Directive
The subnet directive is used to define a network for which the DHCP server provides IP information. There are many possible subdirectives for this directive. The best way of understanding the subnet directive is to see an example that shows the typical minimum subdirectives:
subnet 192.168.0.0 netmask 255.255.255.0 {
        option routers                  192.168.0.1;
        option subnet-mask              255.255.255.0;
        option domain-name              "domain.org";
        option domain-name-servers      192.168.1.1;
        range 192.168.0.128 192.168.0.254;
        default-lease-time 21600;
        max-lease-time 43200;
}
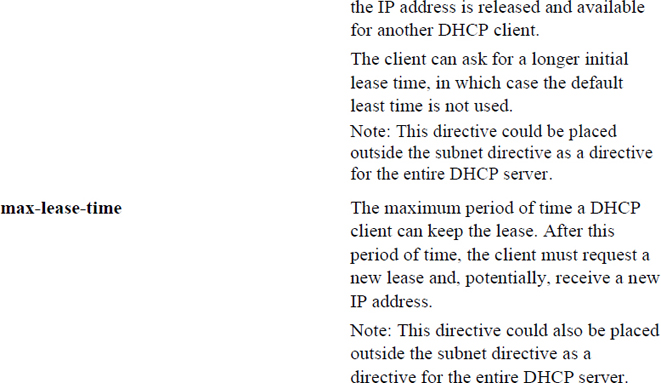
Each of these directives is described in Table 20-5.
Table 20-5 Components of the subnet Directive
Configuring Static Hosts
Suppose you have a user who brings the same laptop to the same network each day. It makes sense to ensure that this laptop gets the same IP address each day. To accomplish this, you define a static host (also known as a reservation) within the subnet directive of the /etc/dhcpd.conf file:
        host julia {
                hardware ethernet 12:34:56:78:AB:CD;
                fixed-address 192.168.0.101;
                option host-name "julia";
        }
The host directive has a value of the hostname for the system ("julia" in the previous example). This hostname could be defined on the client or assigned with the option host-name directive. The key to this working is the hardware ethernet directive. You must determine the Ethernet (or MAC) address of the client to create this static assignment.
There are a couple of ways to determine this. One is to execute the ifconfig command on the client system. The other is to look at the dhcpd.leases file on the server (typically located under the /var directory structure; the exact location varies). It contains details about DHCP leases that have already been given out. A typical entry in this file looks like the following (which could vary slightly depending on your version of DHCP):
lease 192.168.0.101{
    starts 6 2018/12/27 00:40:00;
    ends 6 2018/12/27 12:40:00;
    hardware ethernet 12:34:56:78:AB:CD;
    uid 01:00:50:04:53:D5:57;
    client-hostname "julia";
}
Using the dhcpd.leases file to determine the Ethernet address requires the remote machine to first secure a DHCP lease from the server. Another technique is to view the information provided by the arp command:
[root@onecoursesource ~]# arp
Address           HWtype  HWaddress           Flags Mask    Iface
192.168.1.1       ether   C0:3F:0E:A1:84:A6   C             eth0
192.168.1.101     ether   12:34:56:78:AB:CD   C             eth0
DHCP Log Files
In addition to the dhcpd.leases file previously mentioned, you should be aware that the DHCP server may store log information either in the /var/log/messages file (Red Hat–based systems) or the /var/log/daemon.log file (Debian-based systems). Example 20-9 demonstrates a potential DHCP server message. We purposely made a mistake in the configuration file, and when the DHCP server was started, it provided a useful message (see the bold line).
Example 20-9 /var/log/messages Entry
Jan  6 20:26:16 localhost dhcpd: Internet Systems Consortium DHCP Server V3.0.5-RedHat
Jan  6 20:26:16 localhost dhcpd: Copyright 2004-2006 Internet Systems Consortium.
Jan  6 20:26:16 localhost dhcpd: All rights reserved.
Jan  6 20:26:16 localhost dhcpd: For info, please visit http://www.isc.org/sw/dhcp/
Jan  6 20:26:16 localhost dhcpd: Address range 192.168.1.128 to 192.168.1.254 not on net 192.168.0.0/255.255.255.0!
Jan  6 20:26:16 localhost dhcpd:
Jan  6 20:26:16 localhost dhcpd: If you did not get this software from ftp.isc.org, please
Jan  6 20:26:16 localhost dhcpd: get the latest from ftp.isc.org and install that before
Jan  6 20:26:16 localhost dhcpd: requesting help.
Jan  6 20:26:16 localhost dhcpd:
Jan  6 20:26:16 localhost dhcpd: If you did get this software from ftp.isc.org and have not
Jan  6 20:26:16 localhost dhcpd: yet read the README, please read it before requesting help.
Jan  6 20:26:16 localhost dhcpd: If you intend to request help from the dhcp-server@isc.org
Jan  6 20:26:16 localhost dhcpd: mailing list, please read the section on the README about
Jan  6 20:26:16 localhost dhcpd: submitting bug reports and requests for help.
Jan  6 20:26:16 localhost dhcpd:
Jan  6 20:26:16 localhost dhcpd: Please do not under any circumstances send requests for
Jan  6 20:26:16 localhost dhcpd: help directly to the authors of this software - please
Jan  6 20:26:16 localhost dhcpd: send them to the appropriate mailing list as described in
Jan  6 20:26:16 localhost dhcpd: the README file.
Jan  6 20:26:16 localhost dhcpd:
Jan  6 20:26:16 localhost dhcpd: exiting.
Email Servers
In this section, you learn techniques to manage email servers—specifically Postfix. Postfix has become the most widely used email server on Linux, with many distributions providing it as the default email server. You will learn features such as configuring email addresses, implementing email quotas, and managing virtual email domains.
Early in the career of one of the authors of this book, he asked a senior administrator to explain SMTP (Simple Mail Transfer Protocol) and sendmail (which at the time was the predominant email server). This senior administrator said, “Just go read RFC 821 and once you understand all of that, I will explain sendmail to you.” If you take a look at RFC 821 (actually, you should look at 2821, which defines the more modern ESMTP, Extended SMTP), you will realize that the joke was on the author. This document definitely defines SMTP, but it is not for the faint of heart, nor is it an enjoyable read for a novice administrator.
Fortunately, you do not need to read RFC 821 or 2821 to understand the essentials of SMTP. However, you should realize that basic knowledge of the SMTP protocol is key to understanding how email servers function.
SMTP Basics
As a protocol, SMTP defines how email is transmitted and stored. It is part of the application layer of the TCP/IP protocol, and it provides the set of rules that all email-based programs agree to follow. Simply put: Without SMTP, there would be no email.
To understand SMTP, it is helpful to understand some of the major components to email: the mail user agent (MUA), the mail submission agent (MSA), the mail transfer agent (MTA), and the mail delivery agent (MDA).
• MUA: The mail user agent is the client program that the user uses to create email messages. A variety of MUAs are available on Linux, including command-line-based utilities (like mutt), GUI-based programs (like Thunderbird), and web-based interfaces (like SquirrelMail).
• MSA: A mail submission agent accepts an email message from the MUA and communicates with an MTA to begin the process of transferring the message to the intended recipient. In most cases, the software program that functions as the MSA also functions as the MTA.
• MTA: The mail transfer agent is responsible for accepting the email message from the MUA and sending it to the correct receiving mail server (another MTA). The communication might not be direct because the message may need to pass through a series of MTAs before reaching its final destination. Examples of MTA servers in Linux include Postfix, sendmail, and exim.
• MDA: The mail delivery agent takes the message from the MTA and sends it to the local mail spool (typically a file on the hard drive). Typically, MTA servers can also act as MDAs; however, there are programs specifically designed to act as MDAs, such as procmail and maildrop. The advantage of the MDA is that it can be configured to perform operations on the message before sending it to the spool. For example, the MDA can be used as a filter, perhaps to block junk mail.
• Post Office Protocol (POP) and Internet Message Access Protocol (IMAP): These protocols are used by MUAs to retrieve email.
Figure 20-6 presents a visual example of the process of transporting an email message. In this figure, user1 wants to send an email to user2. Working on an MUA, user1 composes and sends the message. The message is sent to the company MSA and then to the company MTA (although these could be the same system). The gray box represents multiple possible MTAs between the domain for user1’s MTA and the MTA for user2.
Eventually the message arrives at the MTA for user2’s domain. From there it could be sent directly to the mail spool (typically a file in /var/spool on the mail server), but it may be first sent to the MDA for filtering—hopefully for user1’s sake, it makes it past the junk filter! When user2 wants read new emails, his MUA connects to the POP or IMAP server to download the message.
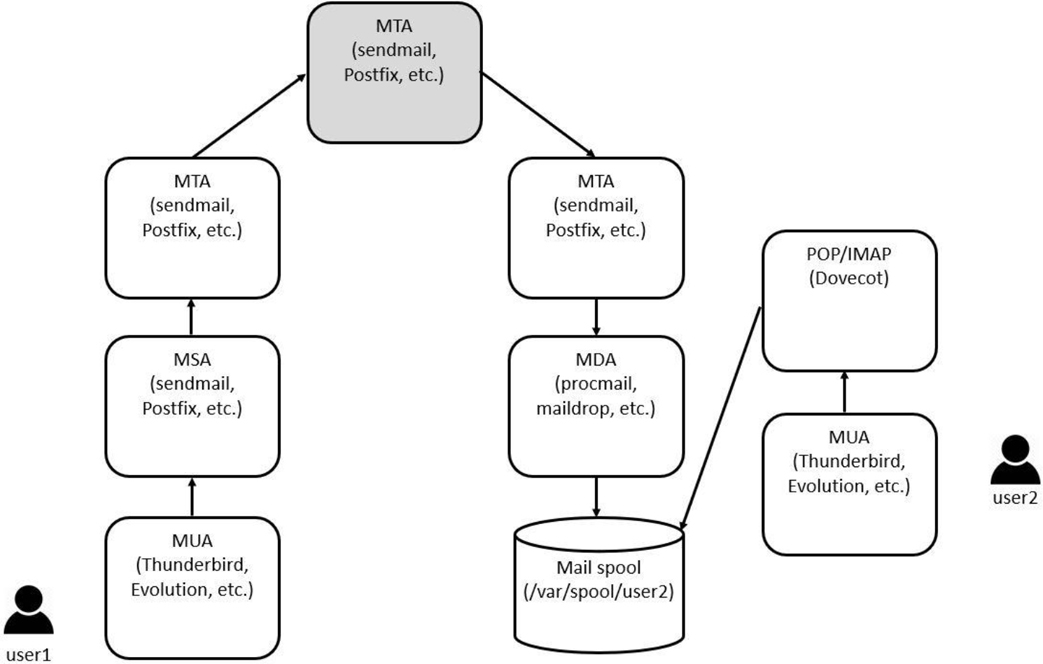
Figure 20-6 Transporting an email message
What Could Go Wrong
Keep in mind that there is another important part of the process of sending an email message. The sending MTA must be able to determine which MTA is responsible for receiving the email message. This is handled by the MX records provided by the DNS servers, a topic that was covered earlier in this chapter.
Configuring Postfix
For many years the sendmail server was the standard SMTP server in both UNIX and Linux. Many argue that the standard is now Postfix, with sendmail relegated to older systems or esoteric distributions.
Note
Although most of the changes you make to Postfix will be within files in the /etc directory, you should be aware that Postfix stores information, such as incoming email messages, in the /var/spool/postfix directory. Email messages are initially stored in subdirectories until a filtering process (such as the qmgr utility) processes the messages and stores each in the user’s spool (a file named after the user’s name: /var/spool/mail/username).
Postfix Configuration File
The primary configuration file for postfix is the /etc/postfix/main.cf file. The format of the settings in this file is like setting a shell variable:
setting = value
You can either modify this file by hand or use the postconf command to make changes. The postconf command has the advantage of providing some basic syntax checking, making it less likely that you will make errors. It also can be used to easily display the current configuration of Postfix. Normally all settings are displayed by default (the first command here is just to show you how many settings there can be):
[root@onecoursesource ~]# postconf |wc -l
816
[root@onecoursesource ~]# postconf | head -5
2bounce_notice_recipient = postmaster
access_map_defer_code = 450
access_map_reject_code = 554
address_verify_cache_cleanup_interval = 12h
address_verify_default_transport = $default_transport
As you can see, the postconf command displays all configuration settings by default. This includes all the default settings, not just the ones specified in the configuration file. If you only want to see the custom settings defined in the configuration file, use the -n option to the postconf command, as shown in Example 20-10.
Example 20-10 The postconf -n Command
[root@onecoursesource ~]# postconf -n alias_database = hash:/etc/aliases alias_maps = hash:/etc/aliases command_directory = /usr/sbin config_directory = /etc/postfix daemon_directory = /usr/libexec/postfix data_directory = /var/lib/postfix debug_peer_level = 2 debugger_command = PATH=/bin:/usr/bin:/usr/local/bin:/usr/X11R6/bin ddd
You can also view a specific setting by providing the setting name as a parameter:
[root@onecoursesource ~]# postconf inet_interfaces
inet_interfaces = localhost
To make a changes, use the -e option and the following syntax:
[root@onecoursesource ~]# postconf -e inet_interfaces=all
[root@onecoursesource ~]# postconf inet_interfaces
inet_interfaces = all
Although it is not perfect, the postconf command does include some error checking. For example, it is aware of what legal settings are allowed in the main.cf file:
[root@onecoursesource ~]# postconf ine_interfaces
postconf: warning: ine_interfaces: unknown parameter
Important Postfix Settings
As you can see by running the postconf command, the Postfix server has hundreds of possible settings:
[root@onecoursesource ~]# postconf |wc -l
816
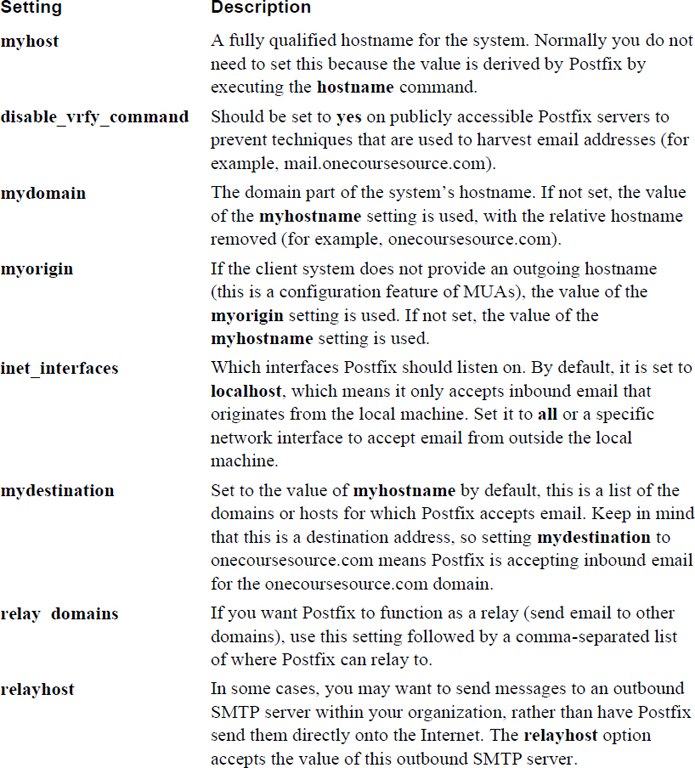
If you are going to administer a companywide Postfix server, you certainly want to explore a lot of these settings. However, for basic Postfix configuration, the settings described in Table 20-6 should be sufficient.
Table 20-6 Essential Postfix Settings
Note
After you make changes to the Postfix configuration file, make sure you restart Postfix to have the settings take effect.
Aliases
You may want to configure some email aliases for your Postfix server. For example, the user account on your system may be bob, but you want to have a more descriptive email address, such as bob.smith@onecoursesource.com. You can set up an alias so email that arrives for bob.smith is sent to the bob account by creating an entry in the /etc/aliases file similar to the one in Example 20-11.
Example 20-11 The /etc/aliases File
[root@onecoursesource ~]# head -20 /etc/aliases
#
#  Aliases in this file will NOT be expanded in the header from
#  Mail, but WILL be visible over networks or from /bin/mail.
#
#       >>>>>>>>>>      The program "newaliases" must be run after
#       >> NOTE >>      this file is updated for any changes to
#       >>>>>>>>>>      show through to sendmail.
#

# Basic system aliases -- these MUST be present.
mailer-daemon:  postmaster
postmaster:     root

# General redirections for pseudo accounts.
bin:            root
daemon:         root
adm:            root
lp:             root
sync:           root
shutdown:       root
Each line in this file follows this format:
alias: local_acount
So, to send incoming email for bob.smith to the local account bob, add the following to the /etc/aliases file:
bob.smithbob
Note that in some cases, the /etc/mail/aliases file is used. This is more likely on some older distributions using sendmail.
You can also send email to multiple accounts. For example, to have the email for webmaster go to the bob, sue, and nick local accounts, add the following line to the /etc/aliases file:
webmaster: bob, sue, nick
After changing the /etc/aliases file, you must run the newaliases command. This converts the text-based file into a binary file (the /etc/aliases.db file) used by Postfix:
[root@onecoursesource ~]# newaliases
[root@onecoursesource ~]# ls /etc/aliases*
/etc/aliases  /etc/aliases.db
Postfix Virtual Domains
The /etc/aliases file is useful to redirect email to local user accounts. The /etc/postfix/virtual file is designed to perform a similar task, but instead of redirecting email just to local accounts, it can be configured to also redirect email to virtual and remote destinations. This can be useful in situations where you have multiple domains or when you want to hide the destination location.
The format of the /etc/postfix/virtual file is as follows:
inbound_addressrelay.to_address
For example, suppose the Postfix server handles inbound email for two domains: example.com and sample.com. The following /etc/postfix/virtual file settings may be used:
bob@example.combobsmith
bob@sample.combobjones
You could also use the following line to forward inbound email for one account to a different account:
bob@example.combob@sample.com
After making changes to the /etc/postfix/virtual file, you must take a few steps for this to work. The first step is to modify the /etc/postfix/main.cf file to include the following line:
virtual_alias_maps = hash:/etc/postfix/virtual
Next, you must convert the text-based /etc/postfix/virtual file into a binary file (hence the hash in the previous line) by executing the following command:
postmap /etc/postfix/virtual
Finally, you need to either restart the Postfix service or reload its configuration files.
Managing Local Email Delivery
This section focuses on the procmail tool. The procmail program is designed to perform filtering of email messages. This can be useful to perform actions like blocking SPAM, redirecting mail to other user accounts, and making copies of the email message and sending them to other accounts.
Although a technique presented previously allows you to redirect mail to other user accounts using aliases, the technique is limited to redirection based on the inbound user’s name. With procmail, you can create complex rules that use regular expressions to match data from any part of the email message. As a result, the procmail program provides a much more robust method of filtering inbound email.
Some systems (such as Postfix) do not use procmail but rather have the MTA store the incoming email messages directly in the mail spool. This might lead you to wonder why you should use procmail.
The advantage that procmail has over MTAs is the capability to use rules to perform actions on messages before they are sent to the mail spool. These rules can be anything from simple (redirecting messages from one account to another) to complex (regular expressions pattern matching of the contents of the message).
procmail Basics
It is important to note that procmail is not a typical service started at bootup. Instead, it is a program called by the MTA when needed. The procmail package is installed by default on most distributions and is often enabled for Postfix and sendmail.
One way to determine whether procmail is automatically used by the MTA is to create a simple rule in a user’s procmail configuration file, the $HOME/.procmailrc file:
:0c:
$HOME/mail.backup
The previous rule should make a backup of all inbound messages to the mail.backup directory in that user’s home directory (more details about how this rule works in the next section). As that user (the student user in the following example), create the following backup directory:
[student@localhost ~]# mkdir $HOME/mail.backup
Now as the root user, send a message to that user account:
[root@onecoursesource ~]# mail student
Subject: test
test
EOT
The result should be something like the following:
[root@onecoursesource ~]# ls /home/student/mail.backup
msg.e1mmB  msg.f1mmB
You may wonder how you can read these messages if they are in a different directory. Most mail clients have a means to specify a different directory for the mail spool. For example, using the command-line mail program, you would do the following:
[student@localhost ~]$ mail -f mail.backup/msg.e1mmB

Heirloom Mail version 12.5 7/5/10. Type ? for help.

"mail.backup/msg.e1mmB": 1 message 1 unread

>U  1 root                  Sat Jan 16 14:47  19/622   "test"

&
So, what if it doesn’t work? That just means your MTA is not configured to automatically use procmail. You could configure it to automatically use MTA, but a better solution could be to have users who want to use procmail add the following file to their home directories. (Note: Check the location of procmail on your system, as it may differ from the path specified here.)
[student@localhost ~]$ more .forward
| /bin/procmail
Why is this better than reconfiguring the MTA? There are a couple of things to take into consideration:
• While you can make a global procmail configuration (the /etc/procmailrc file), this is typically only done if you are using procmail as a SPAM filter. Because specific SPAM filter programs are more robust than procmail, procmail is not commonly used for this feature (except on an individual user basis). If there is no valid procmail configuration file, only individual configuration files are used.
• Not all users want to use procmail. Most novice users find the process of creating the rules to be challenging. If the MTA is configured to use procmail and only a handful of users are creating rules, the procmail is called repeatedly for no valid reason.
Security Highlight
As a system administrator, you can place procmail rules in the /etc/procmailrc file. However, you should avoid placing any rules that execute external commands. The commands are run as the root user, and that could be used to cause security issues on your system.
So, unless the majority of users are using procmail rules or you are using a global configuration file, it makes sense for users to call procmail via their own .forward file. You also provide the users with an easy way to temporarily disable procmail by commenting out that one line from their own .forward file.
procmail Rules
The syntax of a procmail rule is as follows:
:0 [flags] [:[lockfile]]
* [conditions]
Action
The :0 tells procmail that this is the start of a new rule. The [flags] are used to modify how the rule matching works. Table 20-7 describes these flags.
Some additional filters can be viewed by executing the procmail -h command, as shown in Example 20-12.
Example 20-12 The procmail-h Command
[student@localhost ~]$ procmail -h 2>&1 | tail -12
Recipe flag quick reference:
        H  egrep header (default)       B  egrep body
        D  distinguish case
        A  also execute this recipe if the common condition matched
        a  same as 'A', but only if the previous recipe was successful
        E  else execute this recipe, if the preceding condition didn't match
        e  on error execute this recipe, if the previous recipe failed
        h  deliver header (default)     b  deliver body (default)
        f  filter                       i  ignore write errors
        c  carbon copy or clone message
        w  wait for a program           r  raw mode, mail as is
        W  same as 'w', but suppress 'Program failure' messages
The [:[lockfile]] is a filename (or a : character) that tells the procmail utility which file to use to inform other processes that it is working with a file. This prevents duplicate actions from taking place on the same message. In most cases, it is just easy to specify : for the lockfile, allowing the procmail utility to pick its own filename.
The [conditions] line is used to perform the pattern matching itself. The [condition] line must start with an * character to be valid.
The procmail utility uses the egrep command to perform pattern matching. You should be aware of the egrep command from previous experience; Table 20-8 serves as a reminder of some of the more important pattern matching characters that the egrep utility supports.
Table 20-8 The egrep Pattern-Matching Characters
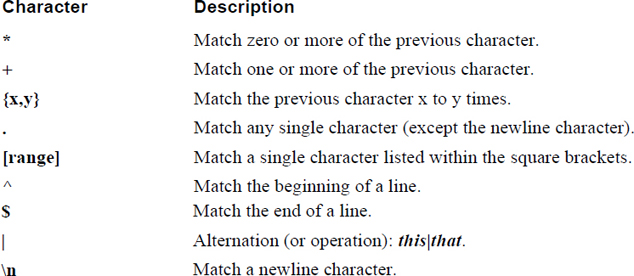
To see additional regular expression characters that the egrep command supports, view the man page for the egrep command.
The last part of the rule is the action. This can be different sorts of actions, including those described in Table 20-9.
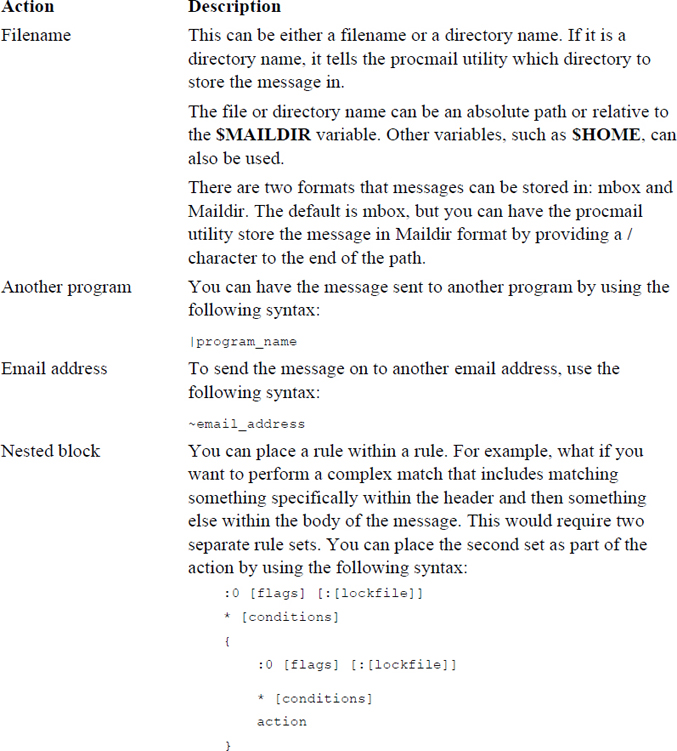
procmail Examples
To understand procmail rules, it helps to see some examples. The following example sorts all mail messages sent to bob and places those in the bobfile directory:
:0:
* ^TObob
bobfile
The next rule is more complex. The rule in Example 20-13 matches any message from support that contains “reboot” in the subject line. If the match occurs, a copy of the message is sent to bo@onecoursesource.com and the message is stored in the $MAILDIR/support-reboot directory.
Example 20-13 Complex procmail Rule
:0:
* ^From.*support.*
* ^Subject:.*reboot.*
{
   :0 c
   ! bo@onecoursesource.com

   :0
   support-reboot
}
Note
Putting together good rules requires knowing regular expressions really well. It also requires a lot of testing and a decent amount of patience!
mbox and Maildir Formats
Two different formats are used to store mail messages: mbox and Maildir. The mbox format has been the standard format used by MTAs for quite some time. In this format, all the mail for the user is stored in a single file, typically located in the /var/spool/mail directory. Each user has a file named after their username. Thus, the user bob would have a single mail file named /var/spool/mail/bob.
When a new massage is sent to the MTA to the user bob, the MTA locks the /var/spool/mail file and appends the message to the end. The file is unlocked when the process is complete.
The nice thing about the single file format is that a user can search all of their messages using a utility like the grep command. I have done this myself to find a particular message that seemed to have mysteriously disappeared when I downloaded it to my email client.
The problem with this single file format is that the locking process sometimes causes issues. There is also the potential for the file to become corrupted, resulting in the loss of all the email messages.
By default, Postfix writes to mbox format, although it can be configured to write to Maildir format. With the Maildir format, a directory is created for each user who receives email. This directory contains three subdirectories: new, cur, and temp.
The Maildir format is considered faster, and if you know the grep command well you can still search for messages in the directory structure.
You should know that the procmail utility understands both formats, as does the Dovecot program (an MDA), which is discussed in the next section.
Remote Email Delivery
Recall the way that an email message travels from the originating system to the destination by reviewing Figure 20-6 earlier in this chapter. Servers like Postfix act as MTAs (mail transmission agents), and the primary focus of these servers is to transmit an email message from one domain to another. MTAs are referred to as push servers because the sending MTA actively “pushes” the message from the origin to the destination.
Once the message has arrived and gone through the filter process (recall the procmail program), the message is placed on the mail spool. It sits in the mail spool until the user’s MUA (mail user agent) requests the message be sent. This request is sent to the server’s MDA (mail delivery agent) either using the POP or IMAP protocol. Because the request originates from the client, the MDA is referred to as a pull server.
IMAP and POP Essentials
To administer an MDA server, you want to have a basic understanding of the POP and IMAP protocols. The knowledge level is similar to what you should know about SMTP when administering an MTA server: You do not necessarily need to be an expert, but you should understand the essentials.
In some ways, understanding IMAP and POP is more important than understanding SMTP because you have the option to have the MDA server use one or the other (or both). Both are designed to allow an MUA to request access to email messages, but there are differences that could make one protocol better in certain situations than the other protocol.
Table 20-10 provides a summary of the major differences between the two protocols.
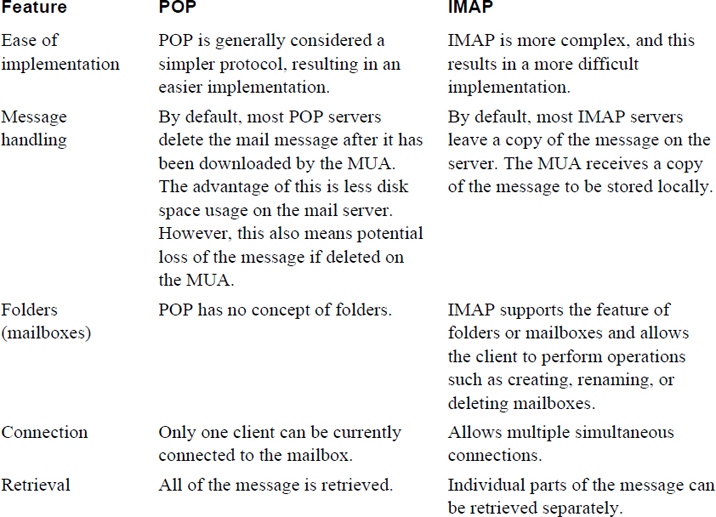
The Dovecot Server
Dovecot supports both the IMAP and POP protocols. Dovecot also supports both types of mailboxes: mbox and Maildir.
More than likely, you should have the Dovecot server installed on your distribution because this package is the standard MDA for most distributions. The Dovecot server is configured by modifying the primary configuration file, the /etc/dovecot/dovecot.conf file.
One of the nice features of Dovecot is the capability to see a clean configuration by executing the dovecot -n command, as shown in Example 20-14. Instead of reading through the configuration file, you can see the current settings by executing this command. This is useful because much of the /etc/dovecot/dovecot.conf file consists of commands. Also, the configuration files in the /etc/dovecot/conf.d directory are also included, making it difficult to see the full picture that the dovecot -n command provides.
Example 20-14 The dovecot -n Command
[root@onecoursesource ~]# dovecot -n
# 2.2.10: /etc/dovecot/dovecot.conf
# OS: Linux 3.10.0-229.14.1.el7.x86_64 x86_64 CentOS Linux release 7.1.1503 (Core)
mbox_write_locks = fcntl
namespace inbox {
  inbox = yes
  location =
  mailbox Drafts {
    special_use = \Drafts
  }
  mailbox Junk {
    special_use = \Junk
  }
  mailbox Sent {
    special_use = \Sent
  }
  mailbox "Sent Messages" {
    special_use = \Sent
  }
  mailbox Trash {
    special_use = \Trash
  }
  prefix =
}
passdb {
  driver = pam
}
ssl = required
ssl_cert = </etc/pki/dovecot/certs/dovecot.pem
ssl_key = </etc/pki/dovecot/private/dovecot.pem
userdb {
  driver = passwd
}
Most of the default Dovecot configuration file consists of comments that explain the more important settings. The format for these settings is the standard setting=value; however, there is a twist because the value can actually be multiple values and there can be subsettings that override default settings for specific values when a value is followed by a set of curly braces ({}). If you look at Example 20-14 again, you can see this by looking at the namespace setting.
There are many possible settings for the Dovecot server. Table 20-11 describes some of the most important settings.
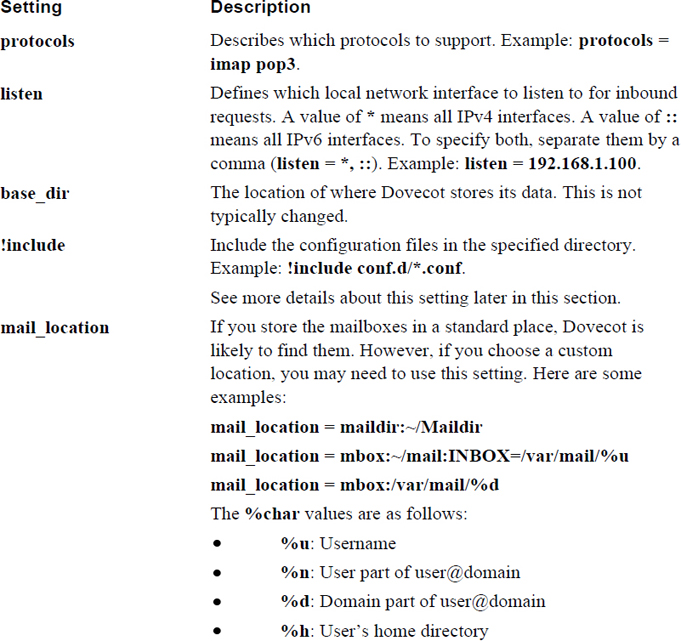
It is important to understand how the !include setting works. First, do not be thrown off by that ! character, which makes it seem like the setting should mean “do not include.” The ! character is supposed to be there, and it does mean include.
Second, having this include directory provides a good way of breaking the settings into categories. The following is an example of the files that you may see in the include directory:
[root@onecoursesource ~]$ ls /etc/dovecot/conf.d
10-auth.conf       20-imap.conf                 auth-dict.conf.ext
10-director.conf   20-lmtp.conf                 auth-ldap.conf.ext
10-logging.conf    20-pop3.conf                 auth-master.conf.ext
10-mail.conf       90-acl.conf                  auth-passwdfile.conf.ext
10-master.conf     90-plugin.conf               auth-sql.conf.ext
10-ssl.conf        90-quota.conf                auth-static.conf.ext
15-lda.conf        auth-checkpassword.conf.ext  auth-system.conf.ext
15-mailboxes.conf  auth-deny.conf.ext           auth-vpopmail.conf.ext
The concept is that if you want to make a configuration setting concerning how IMAP works, you would modify the /etc/dovecot/conf.d/20-imap.conf file. This can be a great system, but it can also lead to problems. For example, if you make a change to the /etc/dovecot/dovecot.conf file that affects IMAP, it would take precedence over a setting in the 20-imap.conf file if it appears after the !include setting in the /etc/dovecot/dovecot.conf file. But, if it appears before the !include setting, the value provided by the 20-imap.conf file would be applied.
Also, the numbers in front of the files in the /etc/dovecot/conf.d directory provide an order. This can cause confusion and misconfigurations if you are not careful.
If you want to have a single configuration file, but changes have already been made to the settings in the configuration files in the /etc/dovecot/conf.d directory, the easy way to handle this is to execute the following commands:
[root@onecoursesource ~]$ cp /etc/dovecot/dovecot.conf
The result of the previous commands is to make a backup of the original configuration file and then override the dovecot.conf file with the current configuration settings.
Note that you can use the telnet command for basic testing of a POP server, as shown in Example 20-15.
Example 20-15 Testing with telnet
[root@onecoursesource ~]# telnet localhost 110
Trying 127.0.0.1...
Connected to localhost.localdomain (127.0.0.1).
Escape character is '^]'.
+OK Dovecot ready.
user student
+OK
pass student
+OK Logged in.
retr 1
+OK 537 octets
Return-Path: <root@localhost.example.com>
X-Original-To: student@localhost
Delivered-To: student@localhost.example.com
Received: from example.com (localhost.localdomain [127.0.0.1])
        by ldap.example.com (Postfix) with SMTP id 6575F11802F
        for <student@localhost>; Sun, 31 Jan 2019 15:36:34 -0800 (PST)
Subject: Sending a message without a MUA
Message-Id: <20160131233644.6575F11802F@ldap.example.com>
Date: Sun, 31 Jan 2019 15:36:34 -0800 (PST)
From: root@localhost.example.com
To: undisclosed-recipients:;

Body of message
Summary
In this chapter you explored how to configure several important network services. You learned how to correctly set up and secure BIND DNS servers and how to configure DHCP servers. You also learned how to configure a variety of email servers, including Postfix, procmail, and Dovecot.
Key Terms
fully qualified domain name (FQDN)
Berkeley Internet Name Domain (BIND)
Review Questions
1. Which of the following would you find in a zone file?
a. The directory setting
b. The A record
c. The dump-file setting
d. The recursion setting
2. Which type of name server returns results based on original records stored locally on the system?
a. Caching name server
b. Forwarder name server
c. Authoritative name server
d. Local name server
3. A _____ file is used to store IP-address-to-domain-name translation information (also called “records”).
4. Fill in the blank to create a master DNS server entry in the /etc/named.conf file:
zone "onecoursesource.com" {
type master;
_____ "named.onecoursesource.com";
};
5. Which of the following zone files should you see in the /var/named directory by default? (Choose two.)
a. /var/named/named.ca
b. /var/named/sample.com
c. /var/named/named.localhost
d. /var/named/localhost.ca
6. Which of the following settings allows for a zone transfer when placed in the appropriate place within the /etc/named.conf file?
a. allow-query
b. allow-zone
c. allow-zone-transfer
d. allow-transfer
7. Which of the following directives tells the DHCP server to suggest to the client that it perform the update itself?
a. allow client-updates
b. permit client-updates
c. ignore client-updates
d. avoid client-updates
8. The _____ directive is used to define a network that the DHCP server provides IP information for.
9. Which of the following is an example of an MDA?
a. mailget
b. mailserv
c. Dovecot
d. procmail
10. Which part of the following procmail rule is used to specify the lockfile name?
:0:
* ^TObob
bobfile
a. The first : character
b. The second : character
c. bobfile
d. None of the above