Table of Contents for
Linux Essentials for Cybersecurity, First Edition
 Linux Essentials for Cybersecurity, First Edition
Published by
Pearson IT Certification, 2018
Linux Essentials for Cybersecurity, First Edition
Published by
Pearson IT Certification, 2018
- Cover Page
- Title Page
- Copyright Page
- Contents at a Glance
- Table of Contents
- About the Author
- Dedication
- Acknowledgments
- About the Technical Reviewers
- We Want to Hear from You!
- Reader Services
- Introduction
- Part I: Introducing Linux
- Chapter 1: Distributions and Key Components
- Chapter 2: Working on the Command Line
- Chapter 3: Getting Help
- Chapter 4: Editing Files
- Chapter 5: When Things Go Wrong
- Part II: User and Group Accounts
- Chapter 6: Managing Group Accounts
- Chapter 7: Managing User Accounts
- Chapter 8: Develop an Account Security Policy
- Part III: File and Data Storage
- Chapter 9: File Permissions
- Chapter 10: Manage Local Storage: Essentials
- Chapter 11: Manage Local Storage: Advanced Features
- Chapter 12: Manage Network Storage
- Chapter 13: Develop a Storage Security Policy
- Part IV: Automation
- Chapter 14: Crontab and At
- Chapter 15: Scripting
- Chapter 16: Common Automation Tasks
- Chapter 17: Develop an Automation Security Policy
- Part V: Networking
- Chapter 18: Networking Basics
- Chapter 19: Network Configuration
- Chapter 20: Network Service Configuration: Essential Services
- Chapter 21: Network Service Configuration: Web Services
- Chapter 22: Connecting to Remote Systems
- Chapter 23: Develop a Network Security Policy
- Part VI: Process and Log Administration
- Chapter 24: Process Control
- Chapter 25: System Logging
- Part VII: Software Management
- Chapter 26: Red Hat–Based Software Management
- Chapter 27: Debian-Based Software Management
- Chapter 28: System Booting
- Chapter 29: Develop a Software Management Security Policy
- Part VIII: Security Tasks
- Chapter 30: Footprinting
- Chapter 31: Firewalls
- Chapter 32: Intrusion Detection
- Chapter 33: Additional Security Tasks
- Appendix A: Answers to Review Questions
- Appendix B: Resource Guide
- Glossary
Chapter 23 Develop a Network Security Policy
For each network service, a variety of methods can be used to secure the service. For example, part of securing the BIND DNS service includes placing BIND in a chroot jail, implementing a split BIND configuration, and using Transaction Signature (all of which were covered in Chapter 20, “Network Service Configuration: Essential Services”), but many additional security settings can be used to make a more secure BIND server.
Your security policy should include specific steps to properly secure each network-based service. This can be a daunting task because there are so many different services, including many that are not covered in this book.
The previous three chapters covered several network-based services. The essential security features of each service were covered, so these will not be covered again in this chapter. Realize, however, that these security features are important when you’re creating a security policy. Also important are the additional security features that these network-based services provide (something you will need to explore more if you end up implementing these services in a live environment).
Additionally, some network-based security features will be covered in more detail later in this book. For example, a firewall (covered in detail in Chapter 31, “Firewalls”) can be used to block incoming connections to a system. Although firewalls will be a major part of any network security policy, they are not discussed in this chapter. Instead, this chapter focuses on the three key components of a network security policy: kernel parameters, TCP Wrappers, and the Network Time Protocol.
After reading this chapter and completing the exercises, you will be able to do the following:
Modify kernel parameters to provide better network security
Implement TCP Wrappers
Configure the system time manually
Configure the system to use a Network Time Protocol server
Kernel Parameters
Chapter 28, “System Booting,” introduces you to a topic that is related to kernel parameters. You can use kernel parameters to modify the behavior of the kernel by adjusting key features. They can be used to change how the kernel manages devices, optimize memory usage, and enhance the security of the system.
Because a complete discussion of kernel parameters is provided in Chapter 28, this chapter focuses on the essentials of kernel parameters as well as some of the more important kernel parameters for network security.
The /etc/sysctl.conf File
Kernel parameters can be modified by making changes in the /etc/sysctl.conf file; see Example 23-1 for an example of this file.
Example 23-1 The /etc/sysctl.conf File
[root@onecoursesource ~]#head /etc/sysctl.conf
# Kernel sysctl configuration file for Red Hat Linux
#
# For binary values, 0 is disabled, 1 is enabled. See sysctl(8) and
# sysctl.conf(5) for more details.

# Controls IP packet forwarding
net.ipv4-ip_forward = 0

# Controls source route verification
net.ipv4.conf.default.rp_filter = 1
To modify a kernel parameter, you set the value of the parameter (net.ipv4-ip_forward, for example) to a new value in this file. For example, the net.ipv4-ip_forward kernel parameter determines if this system will act as a router. A router will forward network packets between networks. If you set net.ipv4-ip_forward to a value of 1 (0=false or no, 1=true or yes), then this machine can act as a router. A full router would also need two network connections (one for each network), but the point of this discussion is to point out how to change a kernel parameter, not how to set up a router.
Note that any changes you make to the /etc/sysctl.conf file will not have an immediate effect because the contents of this file are only read during system boot. Either reboot the system or run the systemctl --system command to have changes take place immediately.
It is important to note that there are thousands of kernel parameters, and many of them are designed to make the system more secure. This chapter only covers some of the more common security-based kernel parameters.
Ignoring ping Requests
The ping command is often used to determine if a remote host is accessible through the network. It does this by sending an Internet Control Message Protocol (ICMP) echo request packet to the remote host, expecting a response packet if the remote system is reachable. This poses two security challenges:
• A hacker can use ping to probe for active systems, trying to find systems that they can break into. Although this is not the only way to probe for active systems (see Chapter 30, “Footprinting,” for other methods), it is a very common one. As a result, it is best to ignore ping requests for mission-critical systems.
• Responding to ping requests can leave a system venerable to denial of service (DoS) attacks. A DoS attack is when a large number of network packets are sent to a system, making it difficult for the system to handle all the data and rendering the system nonresponsive. This can also be accomplished via a distributed denial of service (DDoS) attack when packets are sent from multiple systems to overwhelm a host. Because of this venerability, it is best to ignore ping requests for mission-critical systems.
To ignore ping requests, use the following setting in the /etc/sysctl.conf file:
net.ipv4.icmp_echo_ignore_all = 1
What Could Go Wrong?
If you set all of your systems to ignore ping requests, that means you cannot use the ping command to determine if a machine is responding via the network. Keep this in mind while trying to troubleshoot network issues.
Ignoring Broadcast Requests
Broadcast requests can be used for DoS and DDoS attacks, using a technique similar to that of ping requests. To ignore broadcast requests, use the following setting in the /etc/sysctl.conf file:
net.ipv4.icmp_echo_ignore_broadcasts = 1
Enabling TCP SYN Protection
A SYN flood attack is another DoS attack where SYN requests are used to make a system unresponsive. To ignore SYS requests, use the following setting in the /etc/sysctl.conf file:
net.ipv4.tcp_syncookies = 1
Disabling IP Source Routing
IP source routing is a feature that enables the sender of a packet to specify the network route that should be taken. This feature bypasses routing tables and makes your system vulnerable because hackers can employ man-in-the-middle attacks (interjecting a system between client-to-server communications) or they can use this feature to map your network or bypass your firewalls.
Each network interface has a separate IP source routing kernel parameter. So, to disable this feature from a specific network device, use a setting like the following:
net.ipv4.conf.eth0.accept_source_route = 0
TCP Wrappers
TCP wrappers are used when server programs that have been compiled with the libwrap library call that library when a system tries to access the service. For example, the Secure Shell server (sshd) calls the libwrap library when someone tries to connect to the Secure Shell service. The libwrap library uses configuration files to determine whether the SSH connection should be allowed, based on what machine is initiating the connection. The files used are the /etc/hosts.allow and /etc/hosts.deny files.
Before exploring the configuration files, you first need to be able to determine which services use the libwrap library. An easy way to do that is to use the ldd command:
[root@onecoursesource ~]# ldd /usr/sbin/sshd | grep libwrap
libwrap.so.0 => /lib64/libwrap.so.0 (0x00007efeb9df7000)
If the ldd command returns libwrap.so.0, then the program uses TCP wrappers. One way to find these “libwrapped” services is by executing a command like the one shown in Example 23-2.
Example 23-2 Displaying “libwrapped” Programs
[root@onecoursesource ~]# for i in /usr/sbin/*
>do
>ldd $i | grep libwrap && echo $i
>done
libwrap.so.0 => /lib64/libwrap.so.0 (0x00007facd0b05000)
/usr/sbin/exportfs
libwrap.so.0 => /lib64/libwrap.so.0 (0x00007fd295593000)
/usr/sbin/rpcinfo
libwrap.so.0 => /lib64/libwrap.so.0 (0x00007fd87537c000)
/usr/sbin/rpc.mountd
libwrap.so.0 => /lib64/libwrap.so.0 (0x00007f5251e30000)
/usr/sbin/rpc.rquotad
libwrap.so.0 => /lib64/libwrap.so.0 (0x00007f96e8b39000)
/usr/sbin/sshd
libwrap.so.0 => /lib64/libwrap.so.0 (0x00007f5a93020000)
/usr/sbin/xinetd
Note
There may be services located in the /usr/bin and /sbin directories that use the libwrap library, so you should also search those directories.
To understand how the /etc/hosts.allow and /etc/hosts.deny files work, you first need to understand the order in which these two files are evaluated. When the libwrap library is asked by a service (sshd, for example) to authorize a connection, it first looks in the /etc/hosts.allow file to determine whether there is any rule that matches. The rules will be described in more detail, but essentially a rule includes a service (sshd) and a machine specification (IP address, hostname, and so on). If a rule matches in the /etc/hosts.allow file, the library utility tells the service to permit this access.
If no rule in the /etc/hosts.allow file matches, then the libwrap library looks at the rules in the /etc/hosts.deny file. If a rule matches in that file, then the libwrap library tells the service not to permit this access.
If no rules in either file match, then the libwrap library tells the service to permit this access. That means the default policy is to permit access, and you would need a rule in the /etc/hosts.deny to block access. See Figure 23-1 for a visual representation of this process.
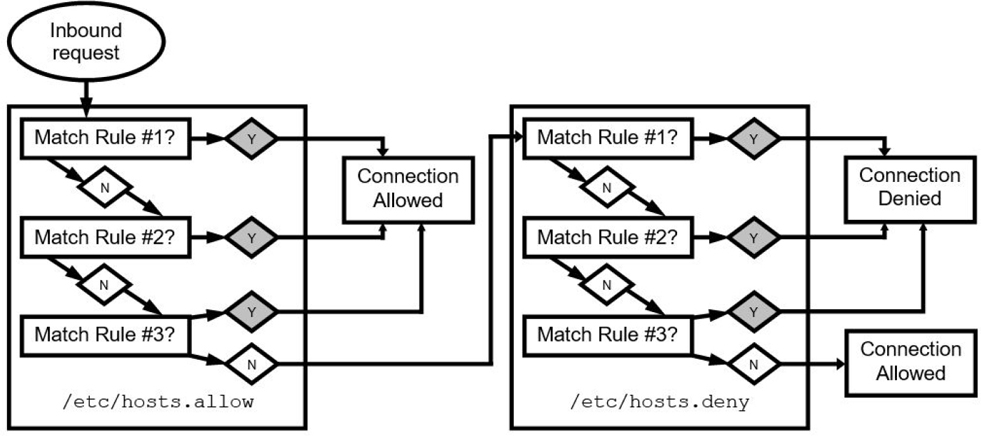
Figure 23-1 TCP Wrappers
The syntax of the rules in the /etc/hosts.allow and /etc/hosts.deny files is
service_list: client_list [options]
The service is the name of the binary executable service program (for example, sshd or xinetd). The client list is what system(s) this rule should apply to. Consider the following simple example:
[root@onecoursesource ~]# more /etc/hosts.allow
[root@onecoursesource ~]# more /etc/hosts.deny
sshd: test.onecoursesource.com
In the previous example, all clients are permitted to access the local system to connect to any service, except that clients from the test.onecoursesource.com system cannot connect via the sshd service.
The service list can consist of multiple services:
[root@onecoursesource ~]# more /etc/hosts.allow
[root@onecoursesource ~]# more /etc/hosts.deny
xinetd,sshd: test.onecoursesource.com
The previous example would deny access to users from the test.onecoursesource.com system who attempt to connect to the sshd or xinetd service on the local machine.
The keyword ALL could also be used to specify all services:
[root@onecoursesource ~]# more /etc/hosts.allow
[root@onecoursesource ~]# more /etc/hosts.deny
ALL: test.onecoursesource.com
The client_list is also flexible. The following list details the different values you can provide:
• IP address: Example: 192.168.0.100.
• Network: Example: 192.168.0.0/255.255.255.0 or 192.168.0.
• Entire domain: Example: .example.com.
• ALL: Matches every possible client.
• LOCAL: Matches clients without a dot in their hostname. Example: test1.
• UNKNOWN: Matches clients that can’t be resolved via the hostname resolver (DNS, local hosts file, and so on).
• KNOWN: Matches clients that can be resolved via the hostname resolver (DNS, local hosts file, and so on).
Consider the following example:
[root@onecoursesource ~]# more /etc/hosts.allow
ALL: test.onecoursesource.com
[root@onecoursesource ~]# more /etc/hosts.deny
ALL: .onecoursesource.com
This would deny access to all systems within the onecoursesource.com domain except the test.onecoursesource.com machine.
Network Time Protocol
Maintaining an accurate system clock is critical for network security because many network services have time-based security features. For example, a network service may allow a login to be considered valid for a specific period of time. Or a network service might use PAM (Pluggable Authentication Modules, discussed in Chapter 7, “Managing User Accounts,” and Chapter 8, “Develop an Account Security Policy”) to allow access to services on specific dates or times.
The system clock can be set manually or configured from a Network Time Protocol (NTP) server. In this section, we first cover how to set the system clock manually. Although using an NTP server is more ideal, you should at least understand how to set a system clock manually in the event a reliable NTP server is not available.
Setting the System Clock Manually
You can use the date command to display the system clock:
 [root@onecoursesource ~]#date
Tue Feb 28 22:15:33 PST 2019
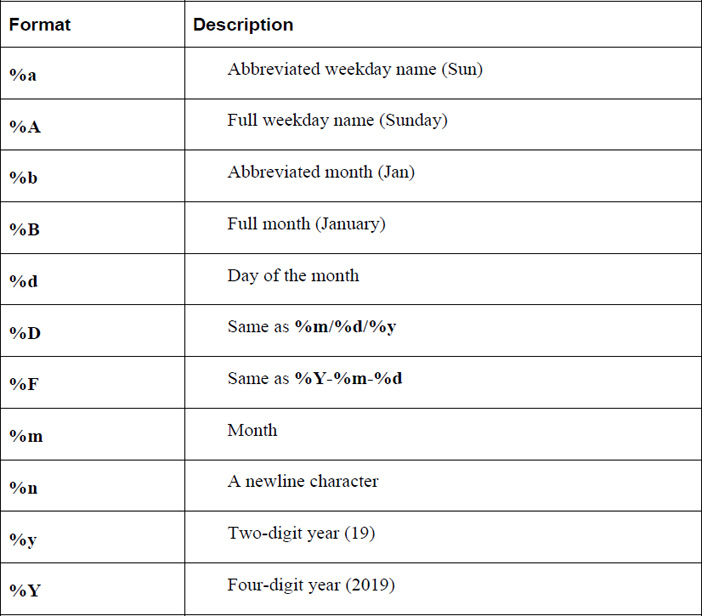
The output of the date command is commonly used to generate unique filenames because the command has a very flexible output format. Here’s an example:
[root@onecoursesource ~]#date "+%F"
2019-02-28
[root@onecoursesource ~]#touch data-$(date "+%F")
[root@onecoursesource ~]#ls data*
data-2019-02-28
Table 23-1 details some of the more commonly used date formats.
As the root user, you can use the date command to set the system clock using the following syntax:
[root@onecoursesource ~]#date Tue Feb 28 22:15:33 PST 2019
On some systems, the timedatectl command is used to display or set the system clock, as shown in Example 23-3.
Example 23-3 The timedatectl Command
[root@onecoursesource ~]#timedatectl
      Local time: Tue 2019-02-28 22:07:39 PST
  Universal time: Wed 2019-03-01 06:07:39 UTC
        RTC time: Sun 2018-06-12 17:50:56
        Timezone: America/Los_Angeles (PST, -0800)
     NTP enabled: yes
NTP synchronized: no
 RTC in local TZ: no
      DST active: no
 Last DST change: DST ended at
                  Sun 2018-11-06 01:59:59 PDT
                  Sun 2018-11-06 01:00:00 PST
 Next DST change: DST begins (the clock jumps one hour forward) at
                  Sun 2019-03-12 01:59:59 PST
                  Sun 2019-03-12 03:00:00 PDT
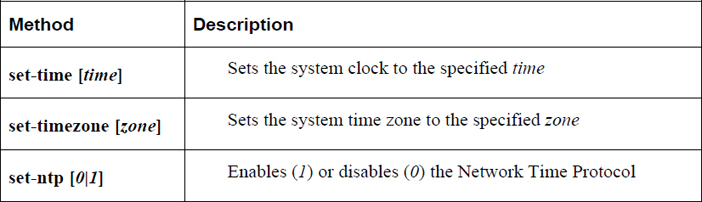
As the root user, you can use this command to set the system clock. Table 23-2 demonstrates the more commonly used methods of changing the system clock.
Table 23-2 Changing the System Clock
Setting the System Time Zone Manually
The tzselect utility is a menu-driven, CLI-based tool that allows a user to select a time zone. An example is provided in Example 23-4.
Example 23-4 Executing the tzselect Command
[root@onecoursesource~]#tzselect
Please identify a location so that time zone rules can be set correctly.
Please select a continent, ocean, "coord", or "TZ".
 1) Africa
 2) Americas
 3) Antarctica
 4) Arctic Ocean
 5) Asia
 6) Atlantic Ocean
 7) Australia
 8) Europe
 9) Indian Ocean
10) Pacific Ocean
11) coord - I want to use geographical coordinates.
12) TZ - I want to specify the time zone using the Posix TZ format.
#? 2
Please select a country whose clocks agree with yours.
 1) Anguilla             28) Haiti
 2) Antigua & Barbuda         29) Honduras
 3) Argentina             30) Jamaica
 4) Aruba             31) Martinique
 5) Bahamas             32) Mexico
 6) Barbados             33) Montserrat
 7) Belize             34) Nicaragua
 8) Bolivia             35) Panama
 9) Brazil             36) Paraguay
10) Canada             37) Peru
11) Caribbean Netherlands    38) Puerto Rico
12) Cayman Islands         39) St Barthelemy
13) Chile             40) St Kitts & Nevis
14) Colombia             41) St Lucia
15) Costa Rica             42) St Maarten (Dutch part)
16) Cuba             43) St Martin (French part)
17) Curacao             44) St Pierre & Miquelon
18) Dominica             45) St Vincent
19) Dominican Republic         46) Suriname
20) Ecuador             47) Trinidad & Tobago
21) El Salvador             48) Turks & Caicos Is
22) French Guiana         49) United States
23) Greenland             50) Uruguay
24) Grenada             51) Venezuela
25) Guadeloupe             52) Virgin Islands (UK)
26) Guatemala             53) Virgin Islands (US)
27) Guyana
#? 49
Please select one of the following time zone regions.
 1) Eastern Time
 2) Eastern Time - Michigan - most locations
 3) Eastern Time - Kentucky - Louisville area
 4) Eastern Time - Kentucky - Wayne County
 5) Eastern Time - Indiana - most locations
 6) Eastern Time - Indiana - Daviess, Dubois, Knox & Martin Counties
 7) Eastern Time - Indiana - Pulaski County
 8) Eastern Time - Indiana - Crawford County
 9) Eastern Time - Indiana - Pike County
10) Eastern Time - Indiana - Switzerland County
11) Central Time
12) Central Time - Indiana - Perry County
13) Central Time - Indiana - Starke County
14) Central Time - Michigan - Dickinson, Gogebic, Iron & Menominee Counties
15) Central Time - North Dakota - Oliver County
16) Central Time - North Dakota - Morton County (except Mandan area)
17) Central Time - North Dakota - Mercer County
18) Mountain Time
19) Mountain Time - south Idaho & east Oregon
20) Mountain Standard Time - Arizona (except Navajo)
21) Pacific Time
22) Pacific Standard Time - Annette Island, Alaska
23) Alaska Time
24) Alaska Time - Alaska panhandle
25) Alaska Time - southeast Alaska panhandle
26) Alaska Time - Alaska panhandle neck
27) Alaska Time - west Alaska
28) Aleutian Islands
29) Hawaii
#? 23

The following information has been given:

     United States
     Alaska Time

Therefore TZ='America/Anchorage' will be used.
Local time is now:        Tue Feb 28 21:03:15 AKST 2019.
Universal Time is now:    Wed Mar  1 06:03:15 UTC 2019.
Is the above information OK?
1) Yes
2) No
#? 1

You can make this change permanent for yourself by appending the line
     TZ='America/Anchorage'; export TZ
to the file '.profile' in your home directory; then log out and log in again.

Here is that TZ value again, this time on standard output so that you
can use the /usr/bin/tzselect command in shell scripts:
America/Anchorage
The output of the tzselect command is displayed on the screen, and it includes the value (for example, America/Anchorage) used on Debian-based systems to set the time zone for the system.
The location of the system time zone on Debian-based systems is located in the following file:
[root@onecoursesource ~]#more /etc/timezone
America/Anchorage
This file can be modified manually by using the output of the tzselect command.
On Red Hat–based distributions, the system time zone is set by the /etc/localtime file. This file is a symbolic link to a binary time zone file:
[root@onecoursesource ~]#ls -l /etc/localtime
lrwxrwxrwx 1 root root 41 Feb 18  2019 /etc/localtime ->
../usr/share/zoneinfo/America/Los_Angeles
[root@onecoursesource ~]#file /usr/share/zoneinfo/America/Los_Angeles
/usr/share/zoneinfo/America/Los_Angeles: timezone data, version 2,
4 gmt time flags, 4 std time flags, no leap seconds, 185 transition times,
4 abbreviation chars
To change the time zone on a system that uses the /etc/localtime file, create a new symbolic link:
[root@onecoursesource ~]# rm /etc/localtime [root@onecoursesource ~]# ln -s /usr/share/zoneinfo/America/Goose_Bay/etc/localtime [root@onecoursesource~]#ls -l /etc/localtime lrwxrwxrwx 1 root root 36 Feb 28 2019 /etc/localtime -> ../usr/share/zoneinfo/America/Goose_Bay
Note that the tzselect output is still useful when setting a time zone on a Red Hat–based distribution because the output (for example, America/Anchorage) can be added to /usr/share/zoneinfo to create a full path to the time zone file: /usr/share/zoneinfo/America/Anchorage.
Setting the System Date Using NTP
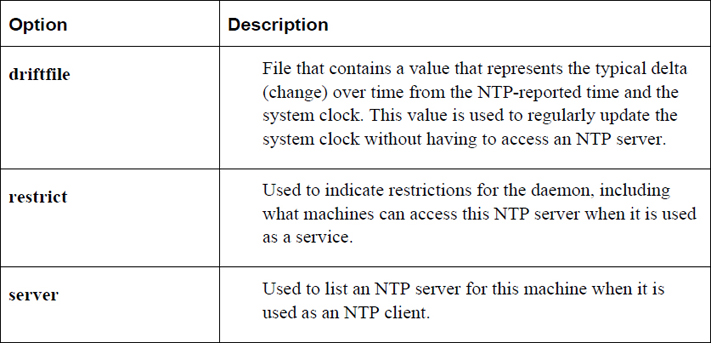
The Network Time Protocol daemon (ntpd) is a process that ensures the system clock is in sync with the time provided by remote NTP servers. Most of the configuration for this process is handled via the /etc/ntp.conf file. Table 23-3 shows the important settings of the /etc/ntp.conf file.
Table 23-3 Settings for the /etc/ntp/conf File
See Example 23-5 for an example of a typical /etc/ntp.conf file.
Example 23-5 Typical /etc/ntp.conf File
# For more information about this file, see the man pages
# ntp.conf(5), ntp_acc(5), ntp_auth(5), ntp_clock(5), ntp_misc(5), ntp_mon(5).

driftfile /var/lib/ntp/drift

# Permit time synchronization with our time source, but do not
# permit the source to query or modify the service on this system.
restrict default kod nomodify notrap nopeer noquery

# Permit all access over the loopback interface.  This could
# be tightened as well, but to do so would effect some of
# the administrative functions.
restrict 127.0.0.1
restrict ::1

# Hosts on local network are less restricted.
#restrict 192.168.1.0 mask 255.255.255.0 nomodify notrap

# Use public servers from the pool.ntp.org project.
# Please consider joining the pool (http://www.pool.ntp.org/join.html).
server 0.fedora.pool.ntp.org iburst
server 1.fedora.pool.ntp.org iburst
server 2.fedora.pool.ntp.org iburst
server 3.fedora.pool.ntp.org iburst

# Enable public key cryptography.
#crypto

includefile /etc/ntp/crypto/pw

# Key file containing the keys and key identifiers used when operating
# with symmetric key cryptography.
keys /etc/ntp/keys
The pool.ntp.org address is a link to a cluster of NTP servers that are geographically spread throughout the world. These servers can be freely used within the /etc/ntp.conf file. For example, the following servers are provided by the Fedora project (note that these are often mirrors, pointing to other systems, so the resulting hostnames for these servers will be different once you have connected to them):
0.fedora.pool.ntp.org
1.fedora.pool.ntp.org
2.fedora.pool.ntp.org
3.fedora.pool.ntp.org
The ntpq command allows you to perform queries on NTP servers. For example, the ntpq command shown in Example 23-6 displays a summary of the status of NTP servers.
[root@onecoursesource ~]# ntpq -p
     remote           refid      st t when poll reach   delay   offset  jitter
============================================================
*propjet.latt.ne 68.110.9.223     2 u  120 1024  377   98.580    7.067   4.413
-services.quadra 208.75.88.4      3 u  272 1024  377   72.504  -10.689   1.612
+mirror          216.93.242.12    3 u  287 1024  377   20.406   -2.555   0.822
+108.61.194.85.v 200.23.51.102    2 u  741 1024  377   69.403   -3.670   1.610
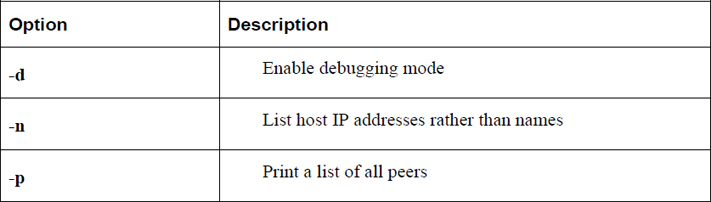
Table 23-4 lists some important options to the ntpq command.
Table 23-4 Options for the ntpq Command
Note: Using Kali Linux
Some excellent tools are provided in Kali Linux that let you probe the network security of a system. However, given that we have not yet fully covered all the network security topics introduced in this book, further discussion of these tools is deferred until later chapters.
Summary
In this chapter, you studied several key elements of putting together a network security policy, including kernel parameters and how to implement TCP wrappers. You also learned how to configure the system clock, both manually and via NTP.
Key Terms
Review Questions
1. The primary configuration file for kernel parameters is the /etc/_____ file.
2. Which of the following parameters can be used to prevent a DoS attack? (Choose two.)
a. net.ipv4.icmp_echo_ignore_all
b. net.ipv4.dos.trap
c. net.ipv4.conf.eth0.accept_source_route
d. net.ipv4.tcp_syncookies
3. The _____ library is used to implement TCP wrappers.
4. Which of the following files are used with TCP wrappers? (Choose two.)
a. /etc/hosts.reject
b. /etc/hosts.accept
c. /etc/hosts.allow
d. /etc/hosts.deny
5. The _____ command allows you to perform queries on NTP servers.